DIY Coffee Bar Cabinet – Kitchen Renovation
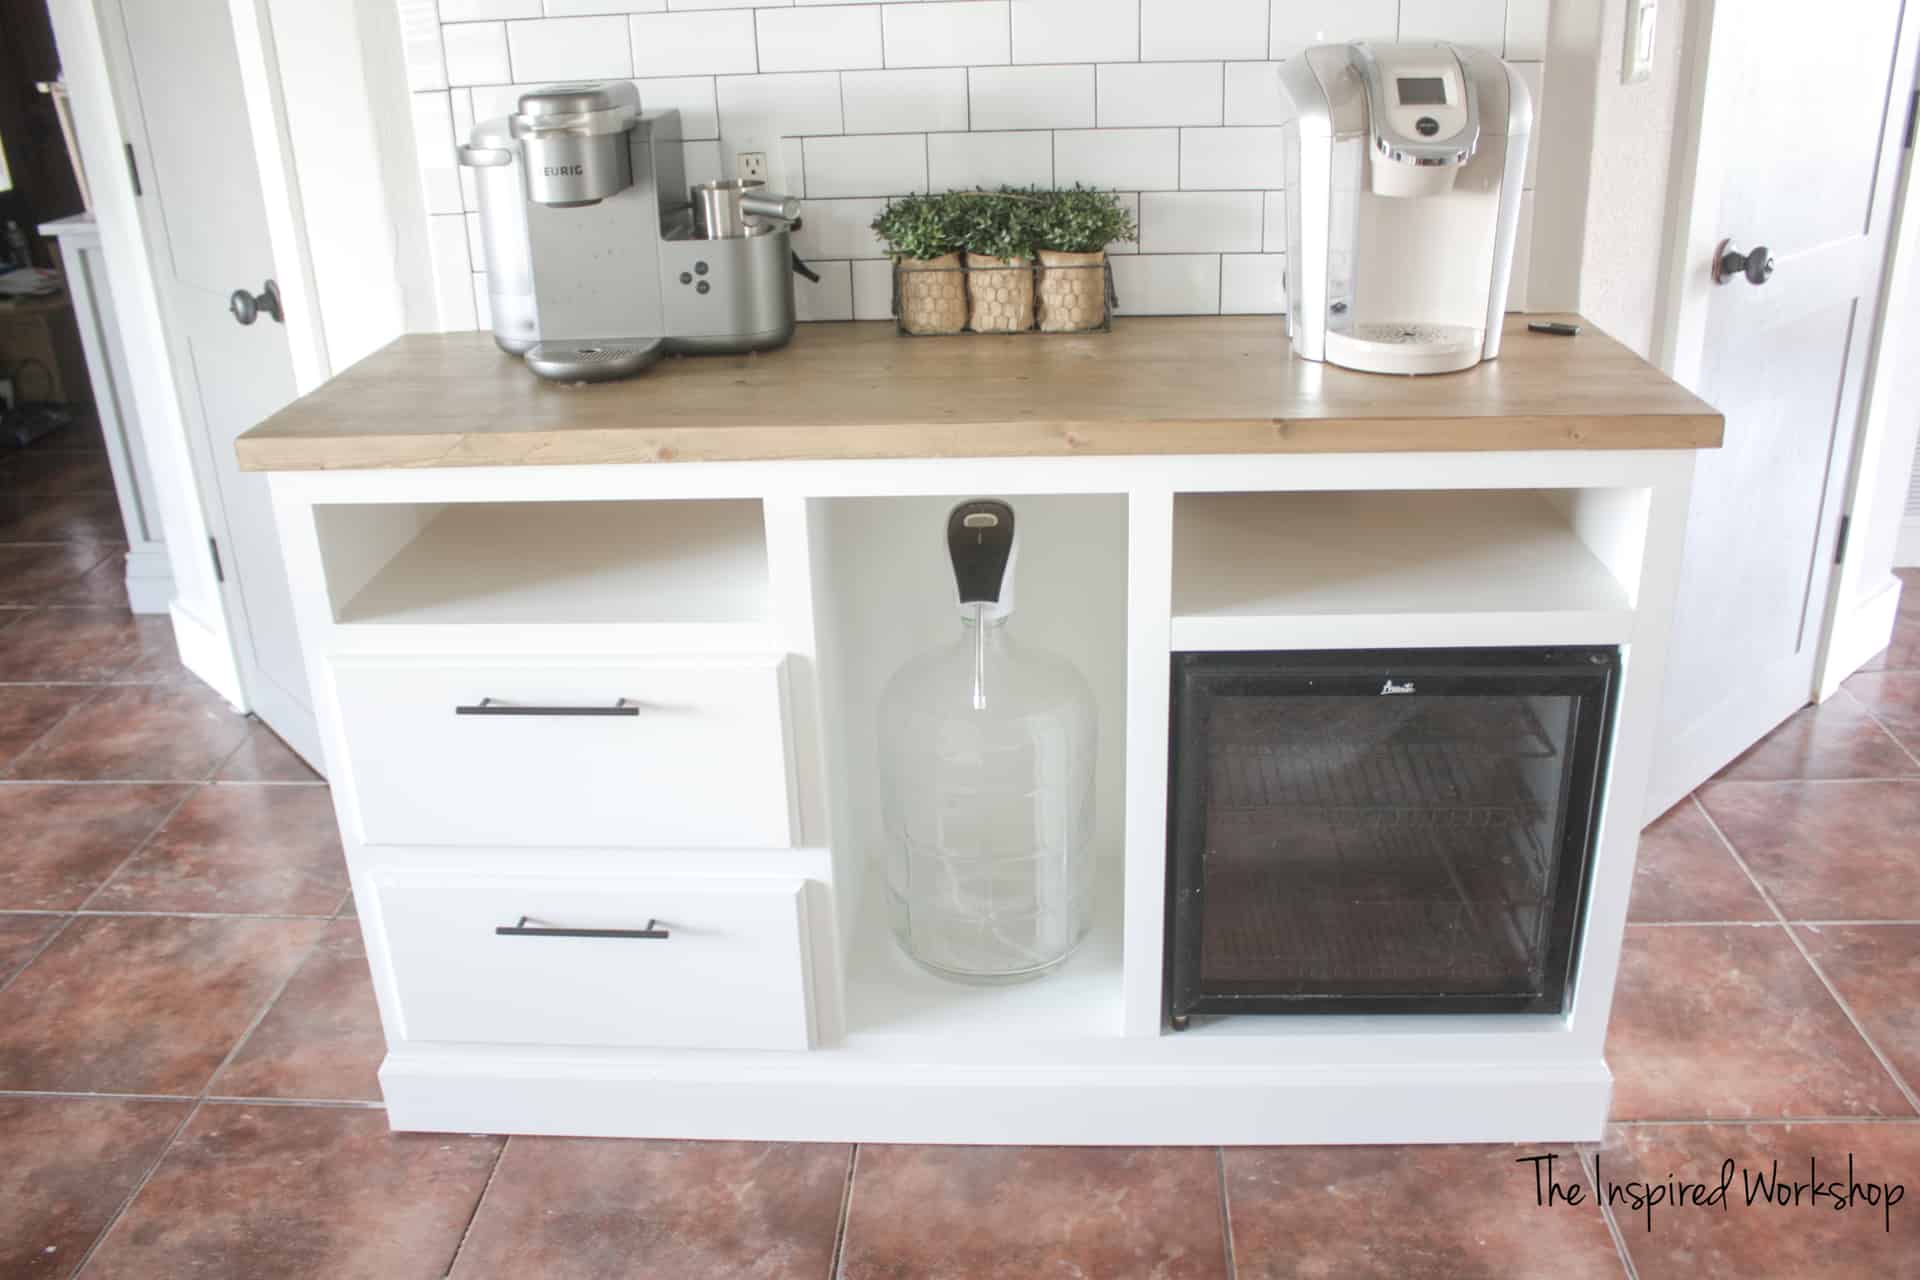
This coffee bar cabinet is the perfect way to house all your coffee or drink needs! The cabinet was designed to hold a small beverage cooler, five gallon water jug, and drawers to conceal all the coffee pods, filters, sugar, mugs, and anything else you can think of to make your coffee quickly and easily! Modify this coffee bar to meet your needs, or make it your adult beverage station!
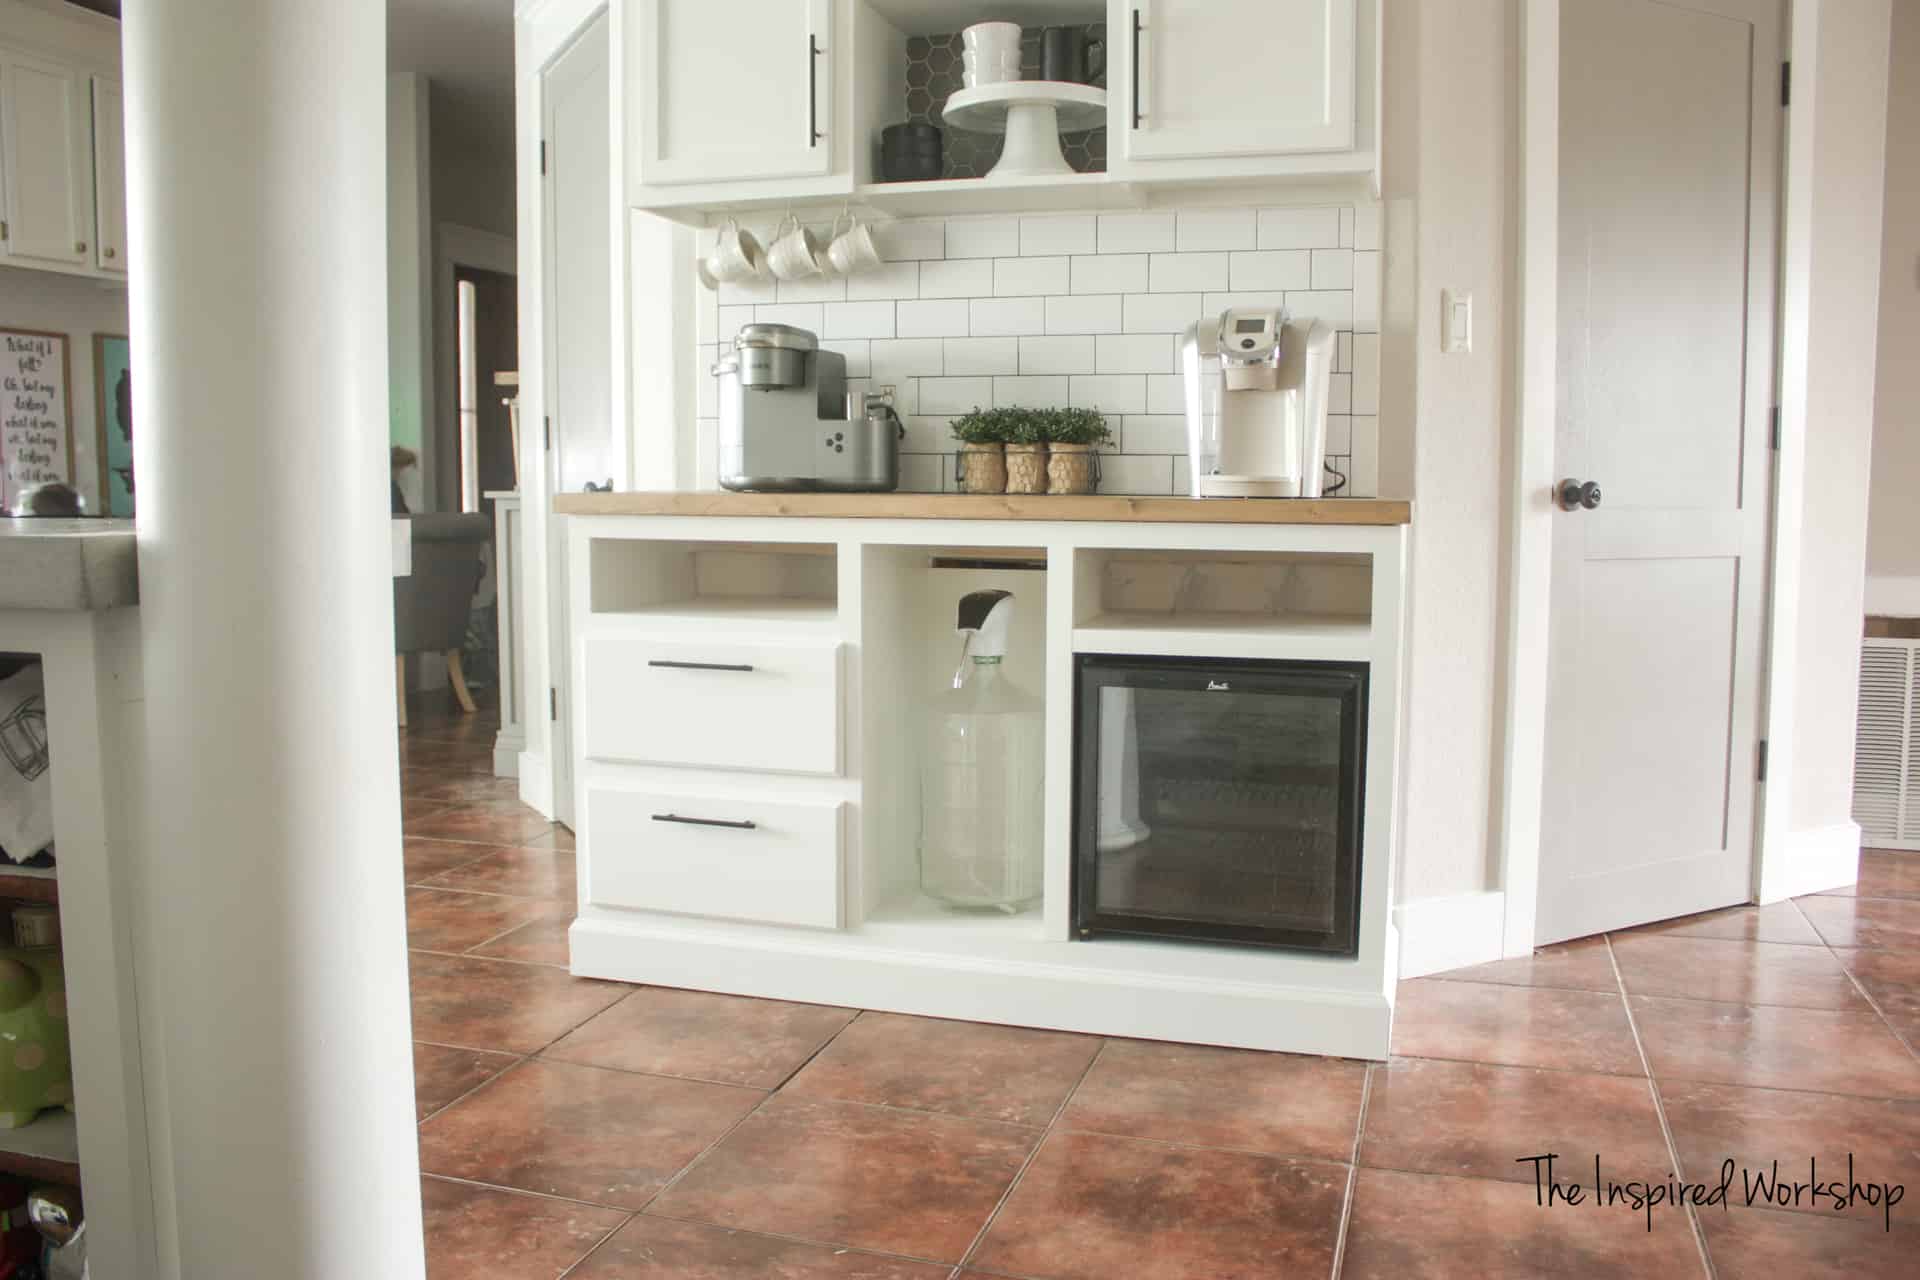
This is my FAVORITE project in my kitchen renovation, my DIY coffee bar cabinet! I mean, let’s face it, this is the place where the magic happens! Lol! Coffee is life for me! 😂
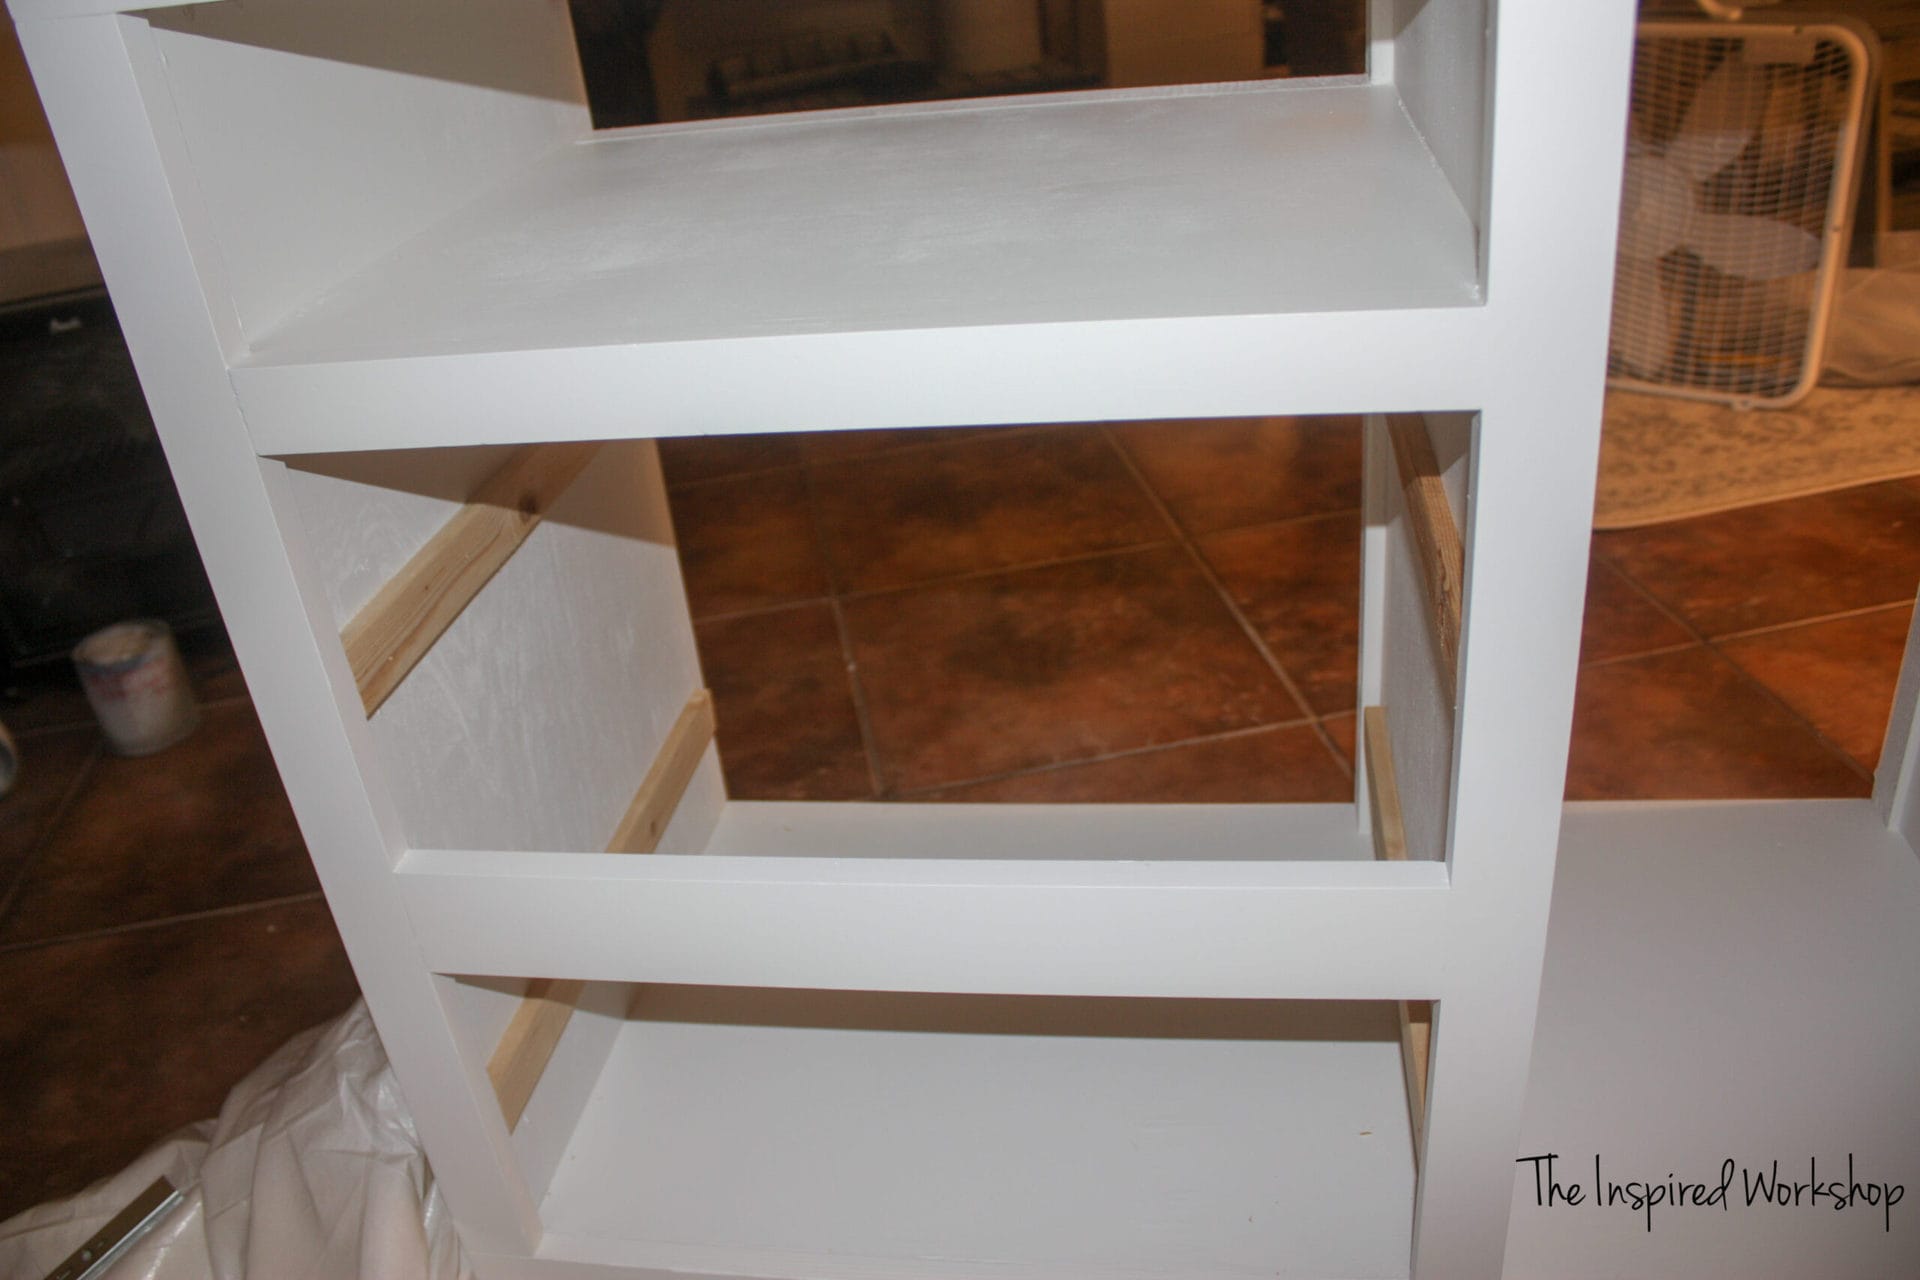
(Don’t mind where my hubby taped and floated behind those little cubbies and I didn’t texture and paint!😂🙈)
I built this to my needs and you can always alter the plans to fit your custom needs, I say it all the time, and I will say it again…that is why I DIY! I love building exactly what I want to serve my purpose best! And you can too!

So I built it to match all the other cabinetry in the kitchen! It has the same MDF on the sides, the same baseboards I placed on the island and peninsula, and I routed the drawer edges to match the other drawers in the kitchen! I think it turned out great and serves my needs perfectly!
Want to see all the other DIY posts we did on the kitchen renovation?
I love the warmth that the wood countertop adds to pull the shelves together on the opposite wall! And the hexagon tiles above, match the Gauntlet Gray of the island and vent hood perfectly! It could not have worked out better if I tried! Lol, don’t let me fool you, I did try…it took me forever to get the plan finalized and find everything that I wanted, for a price I was willing to pay!😆
Anyway, enough about me and this beautiful DIY coffee bar cabinet, let me show you how to build one!
Don’t have time to build this coffee bar cabinet now? PIN IT for later!
Gathering Supplies for Coffee Bar Cabinet
In an effort to keep my plans FREE, I have recently started asking for your email in exchange for the printable plans! I will never share your information and I will never send you spam…plus you can unsubscribe at any time!
Materials: DIY Coffee Bar Cabinet
- 1 – 4×8 sheet of 3/4″ plywood
- 1 – 2×4 sheet of 3/4″ plywood
- 1 – 4×8 sheet of 1/4″ plywood (drawer bottoms and back of the cabinet)
- 1 – 4×4 sheet of 1/2″ plywood (drawer boxes)
- 1 – 2×4 piece of 1/2″ MDF (side molding)
- 2 – 1x2x8 (front face frame)
- 1 – 1x2x10 (front face frame)
- 1 – 1x4x8 (front face frame)
- 1 – 1x10x8 (drawer fronts)
- 1 – 8 ft stick of baseboard of your choice
- 2 – 2x2x8 (I used furring strips to keep costs down, and they are in the back where they will not be seen)
- 1 – 2x4x10 (extra support in the back)
- 4 – 2x6x8 (top)
- 2 sets of 16″ drawer slides
- 2 drawer pulls
- miter saw
- wood glue
- Kreg jig
- pocket hole screws 1″, 1 1/4″, and 2 1/2″
- right angle drill attachment
Cut List for Coffee Bar Cabinet
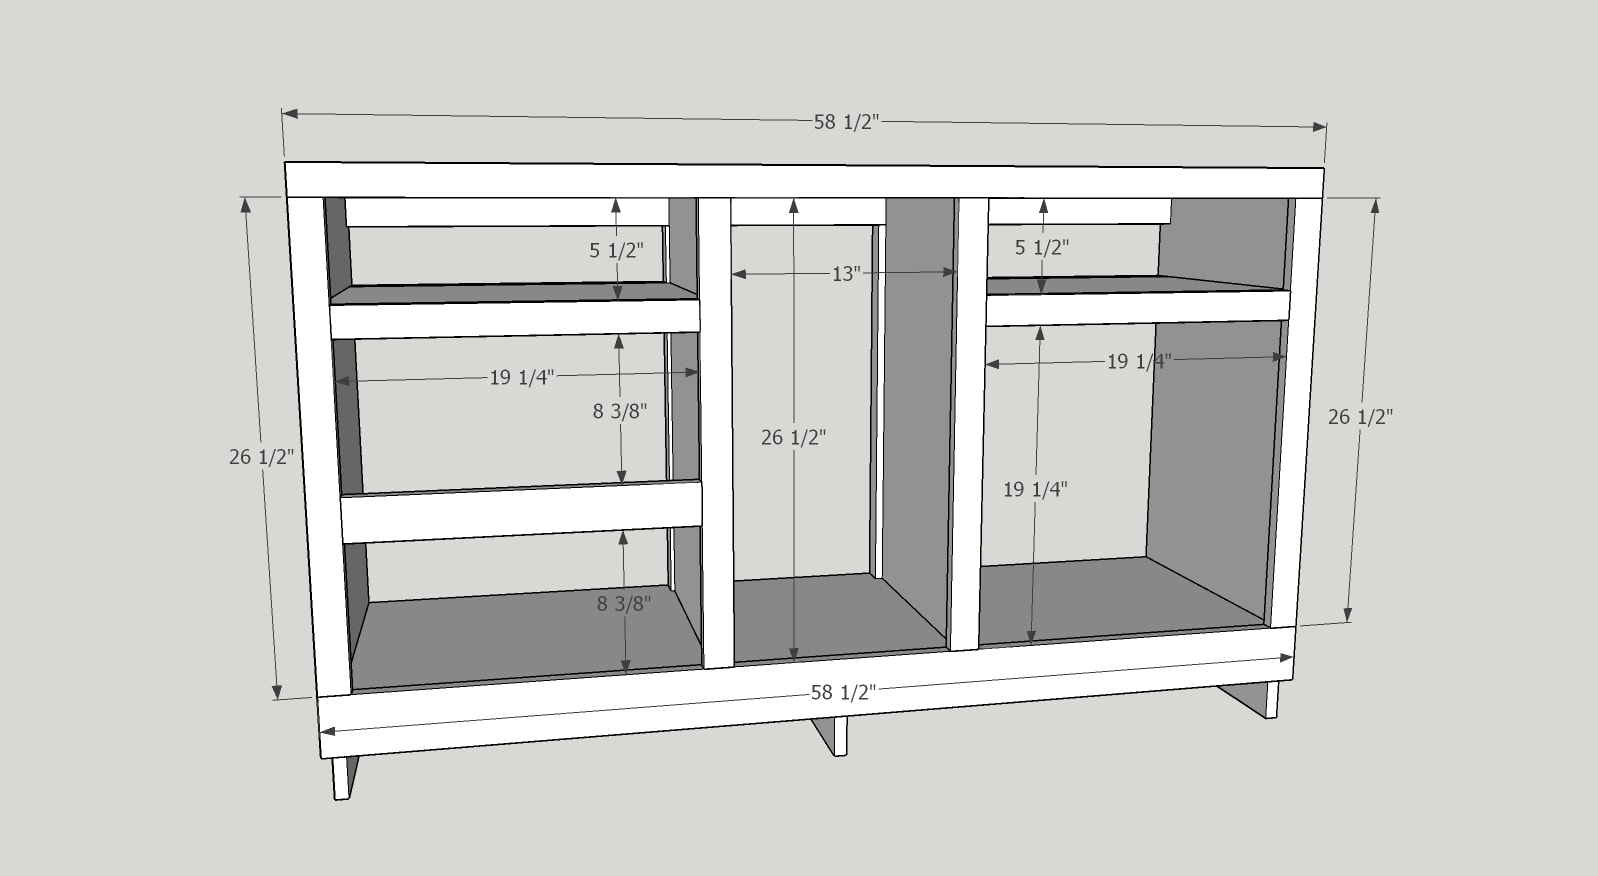
- 2 – 3/4″ plywood pieces cut @ 17 1/4″ x 34 1/2″ (sides)
- 1 – 3/4″ plywood piece cut @ 17 1/4″ x 56″ (bottom)
- 2 – 3/4″ plywood pieces cut @ 15 3/4″ x 28 1/4″ (dividers)
- 2 – 3/4″ plywood pieces cut @ 15 3/4″ x 20 1/4″ (shelves)
- 2 – 2×4 @ 56″
- 1 – 1×2 @ 56″
- 2 – 2×2 @ 15″
- 2 – 2×2 @ 24 3/4″
- 2 – 2×2 @ 20″
- 2 – 1/2″ MDF @ 3 1/2″ x 17 1/4″ (side molding)
- 1 – 1/2″ MDF @ 2 1/4″ x 24 3/4″ (side molding)
- 1 – 1/2″ MDF @ 3″ x 24 3/4″ (side molding)
- 1 – 1×2 @ 58 1/2″ (face frame top)
- 4 – 1×2 @ 26 1/2″ (face frame vertical)
- 2 – 1×2 @ 19 1/4″ (face frame shelves)
- 1 – 1×3 @ 19 1/4″ (face frame drawer divider)
- 1 – 1×4 @ 58 1/2″ (face frame bottom)
- 2 – scrap 1/2″ MDF pieces (can be any width that will fit below the side molding) @ 17 1/4″
- 1 – 1×2 @ 58 1/2″ (bottom support to attach baseboard to)
- 4 – 2×6 @ 60″ (top)
**Make sure and measure your cabinet for your baseboards as they will probably be slightly different from the measurements below.
- 2 – 2 baseboards cut @ 18 5/8″ beveled on one end at 45 degrees off square (sides)
- 1 – baseboard cut @ 59 49/64″ beveled on both ends at 45 degrees off square (front)
- 4 – 1/2″ plywood pieces cut @ 17″ (drawer boxes sides)
- 4 – 1/2″ plywood pieces cut @ 17 3/8″ (drawer boxes front and back)
- 2 – 1/4″ plywood pieces cut @ 17″ x 18 3/8″ (drawer bottoms)
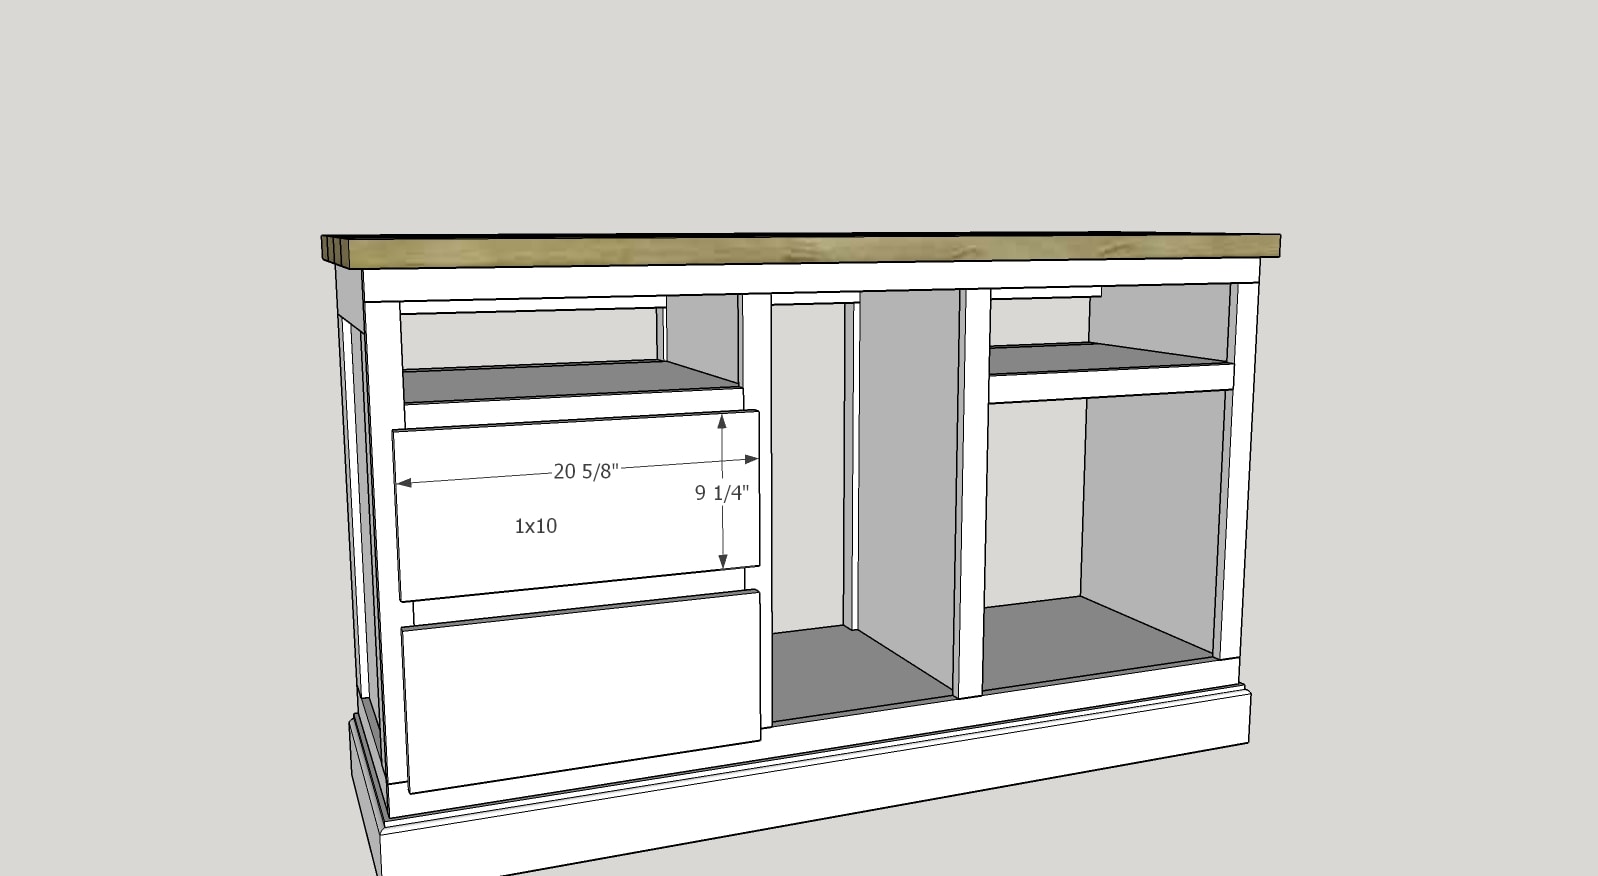
- 2 – 1×10 @ 20 5/8″(drawer fronts)
- 1 – 1/4″ plywood piece @ 56 1/2″ x 25 1/2″ (back)
Building the DIY Coffee Bar Cabinet
Okay, I did a horrible job of taking pictures of this coffee bar cabinet as I built it, so I will improvise with Sketchup pics where I don’t have actual pics to show you a step! You can still download the full printable plans above!
NOTE: All joints on this project will need to be GLUED as well as pocket holed! Just know, I will not state it in EVERY step but you will need to GLUE in every step unless I state otherwise!
Building the Main Frame of the Coffee Bar Cabinet
Step 1
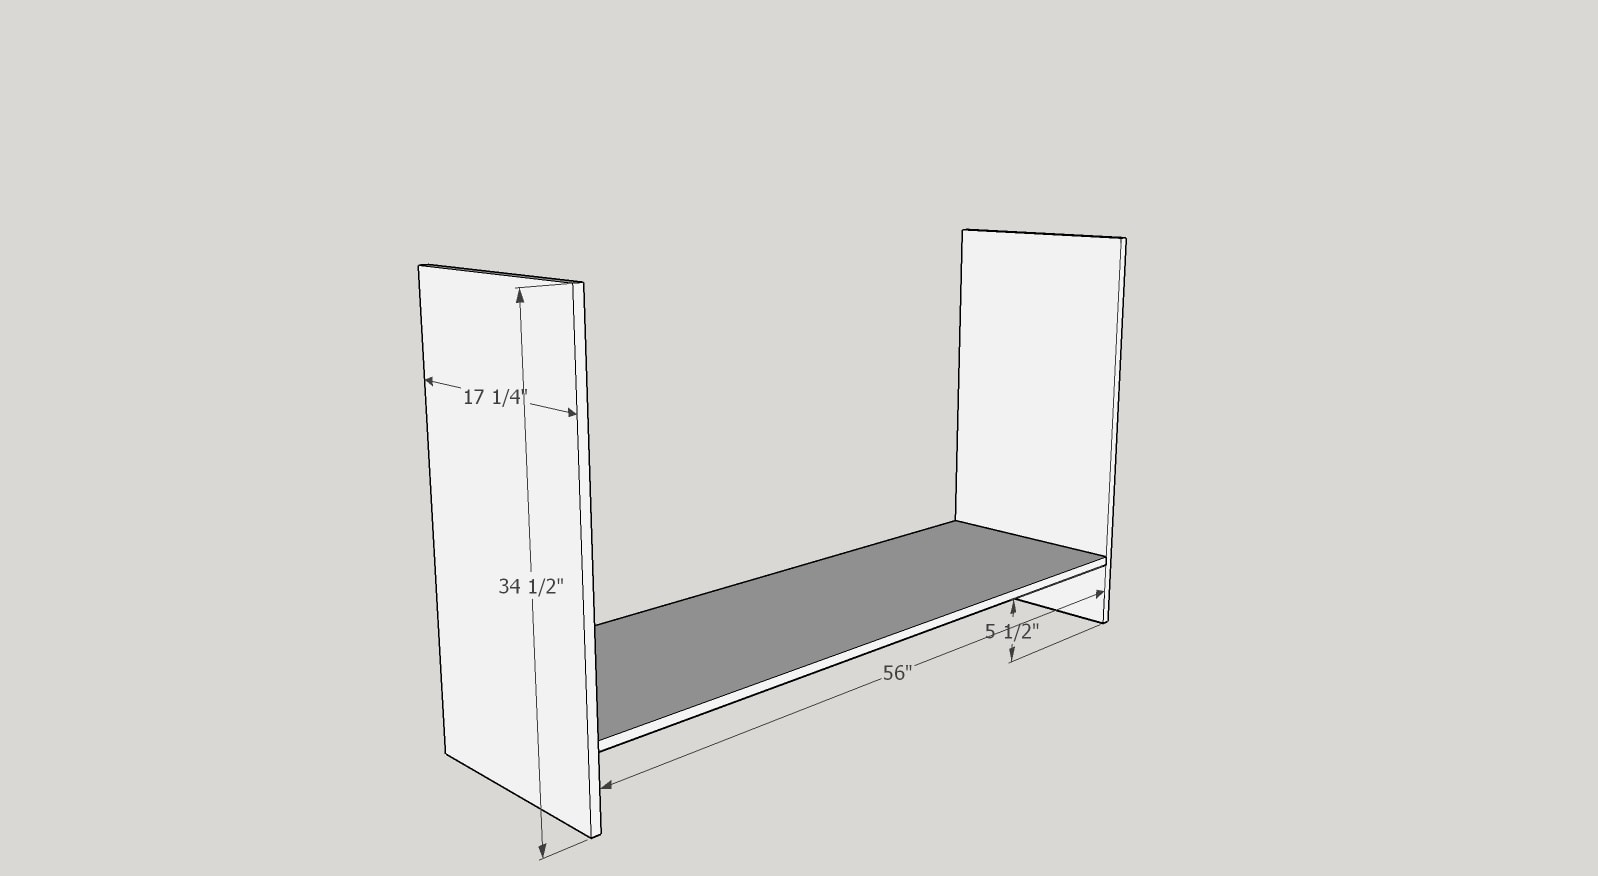
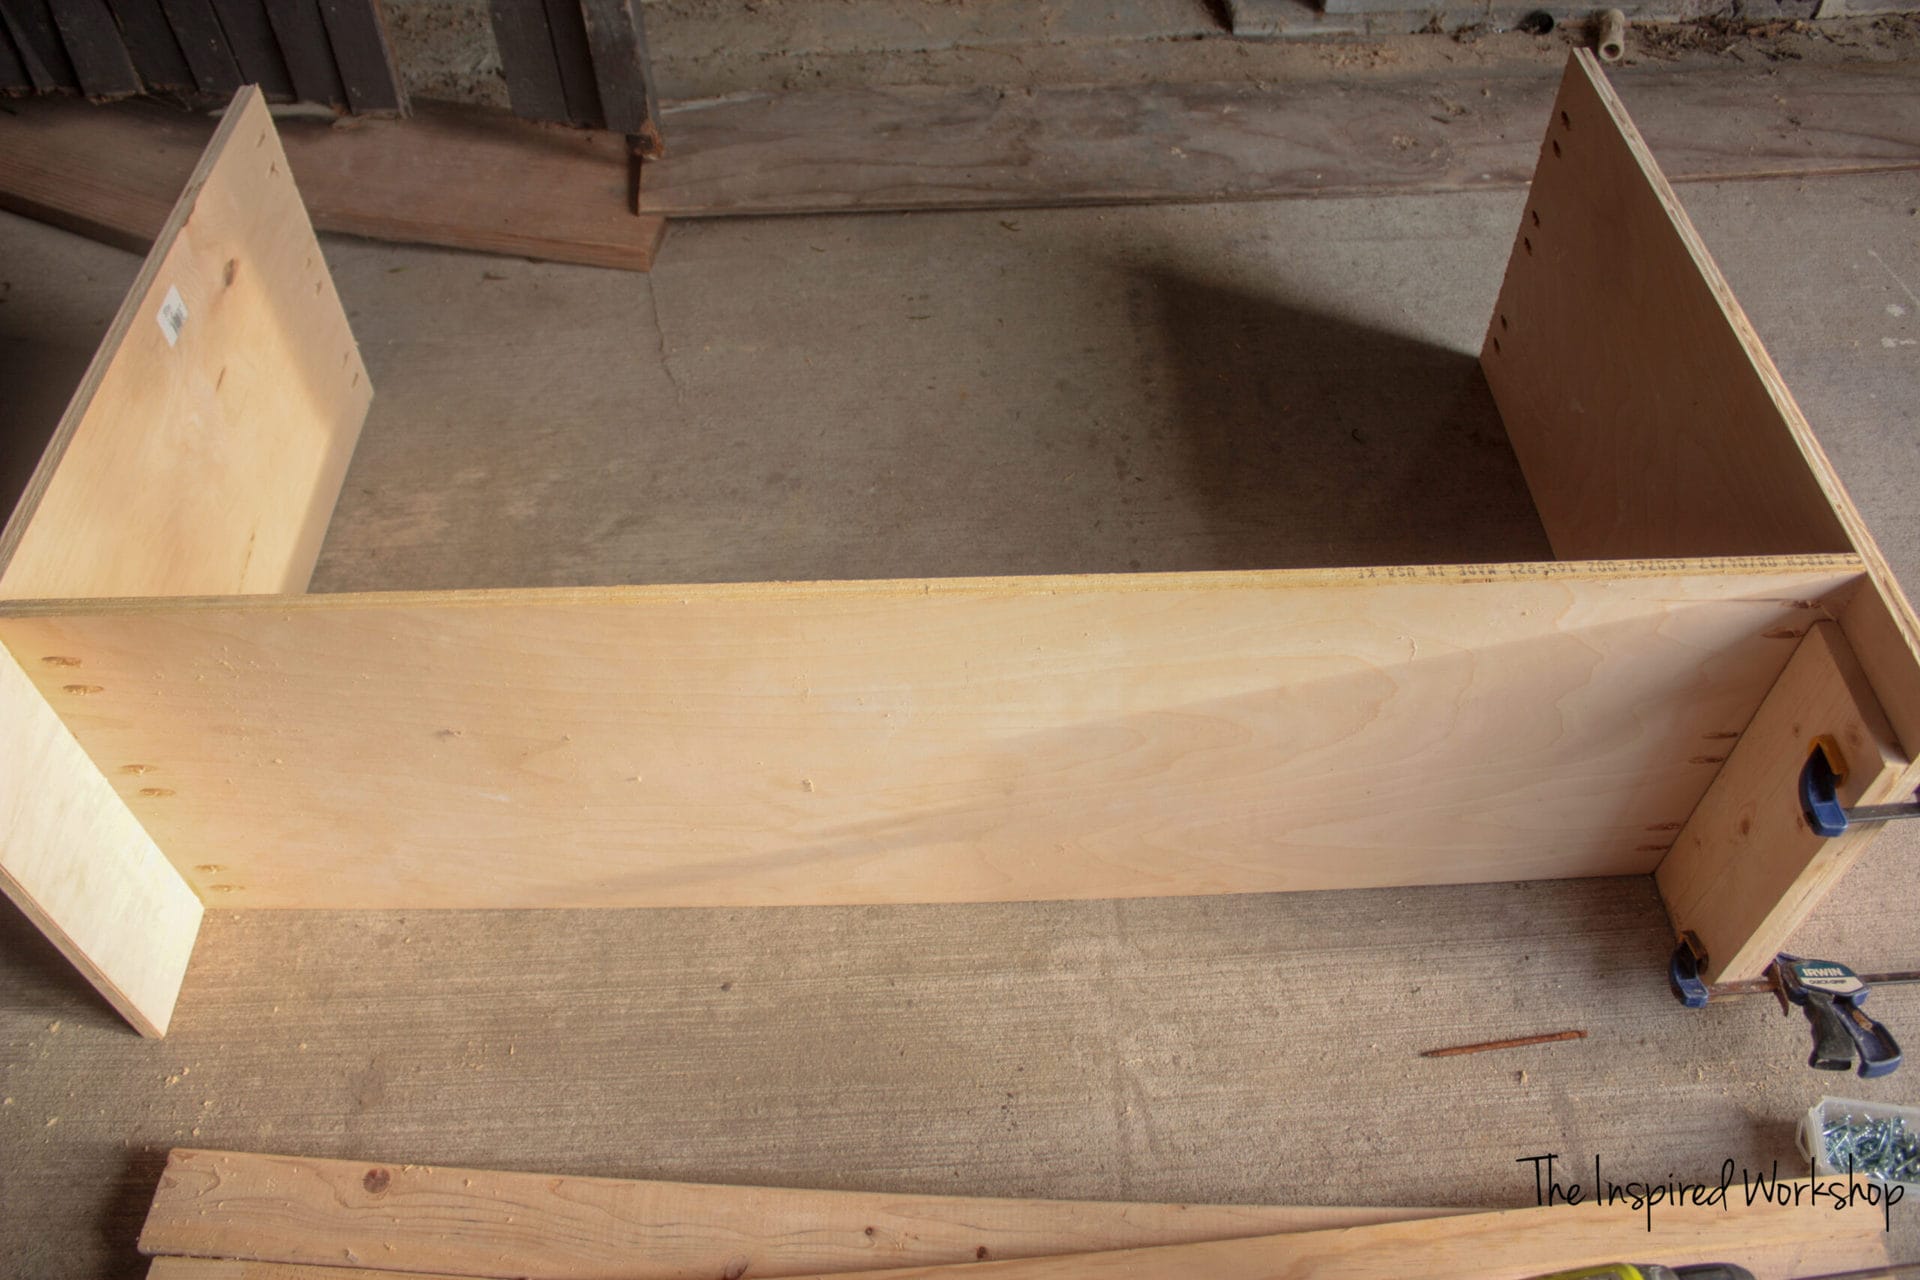
Cut your side plywood pieces (3/4″ x 17 1/4 x 34 1/2″). Attach the bottom board inside the two side boards, up 5 1/2″ from the ground. Drill pocket holes at 3/4″ deep (since the plywood is 3/4″) and then attach with wood glue and 1 1/4″ pocket hole screws. I like to use a scrap piece of wood cut to the height I am attaching the bottom board, to make sure it is attached at the same height on both sides. This board gives me a brace to press the board against to make sure it is at the exact level it should be!

Make sure and drill pocket holes along the top of the side boards as well to use later to attach the top of the coffee bar cabinet, although you may want to just use Liquid Nail to hold it in place because it will be hard to get your drill in there after you add the top shelves!
Step 2
Add the 2×4 brace to the top back and the 1×2 to the top front. You could also you a 2×2 here if you would rather, I felt a 1×2 was sufficient since I was gluing another 1×2 to this one as a face frame board.
The back 2×4 will have pocket holes drilled at 1 1/2″ (since a 2×4 board is actually 1 1/2″ thick) and you will use 2 1/2″ pocket hole screws to attach, making sure to use adequate wood glue as well. The 1×2 will have pocket holes drilled at 3/4″ deep (since a 1×2 is actually 3/4″ thick) and you will use 1 1/4″ pocket holes screws to attach!
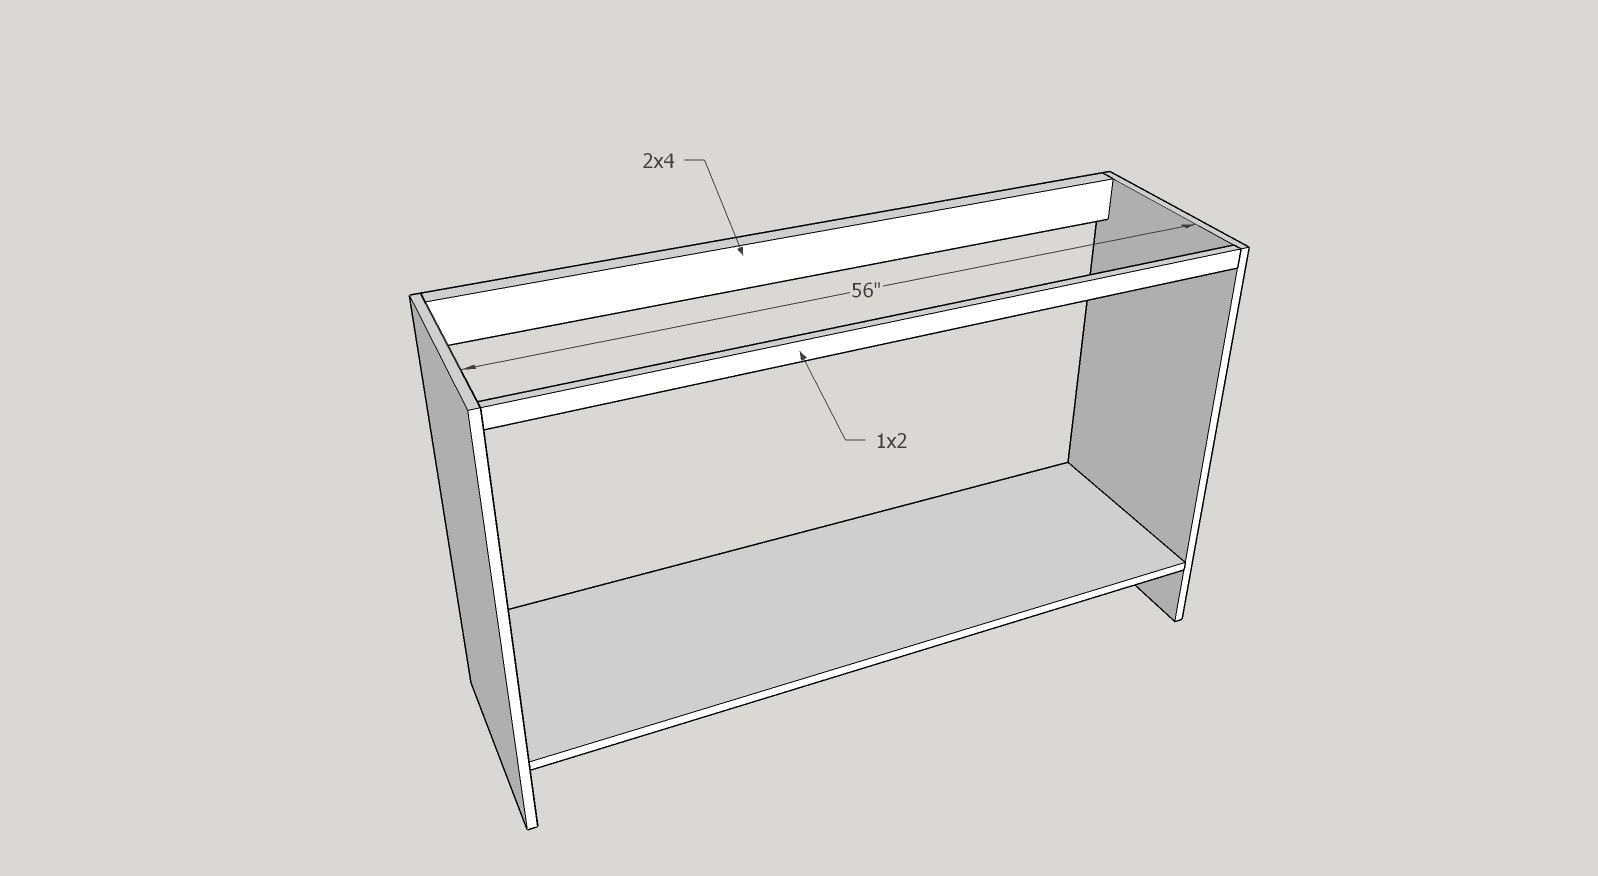

(this was the only picture I took of this step😆 but it helps to show the pocket holes so I shared it)
NOTE: If your 1×2 is actual width 1 3/4″ (one store I buy them at they are 1 1/2″ and at Home Depot they are 1 3/4″ so measure yours) you will have to notch out your plywood, so I would rip it down to 1 1/2″ before attaching it! I didn’t pay attention to this when I was building mine and had to notch out my plywood which isn’t that big of a deal, but I feel it is important to mention!
Step 3
Add an additional 2×4 below the bottom shelf of the coffee bar cabinet. Added support, it may be overkill but I’d much rather that than have it fall apart later! Lol! Again since it is a 2×4 drill the pocket holes at 1 1/2″ deep and use 2 1/2″ screws to attach.

Step 4
Add a brace in the middle to keep the bottom shelf from sagging! Attach using pocket holes drilled at 3/4″ deep and 1 1/4″ screws!

Step 5
Add 2×2 supports along the top! Drill pocket holes at 1 1/2″ deep and use 2 1/2″ screws to attach. You may also want to drill 2-3 pocket holes along one long side of each 2×2 to use later to attach your top. Drilling them along the side that faces the 13″ opening will help you not need to use a right angle drill, although you will still need one for the far sides.

Step 6
Add 2x2s to the back of the frame of the coffee bar cabinet! Your plywood shelves and dividers will be able to be pocket holed into these 2x2s to make them sturdy! Drill the pocket holes at 1 1/2″ deep and use 2 1/2″ screws to attach!

Step 7
Add your plywood dividers! The pocket holes will be drilled at 3/4″ and 1 1/4″ screws will be used to attach.

Step 8
Add the shelves. Again, the pocket holes will be drilled along the back and sides at 3/4″ and 1 1/4″ screws will be used to attach.

Step 9
Add the side MDF molding! This came from a sheet of MDF, so I was able to rip boards to the small sizes I needed. I was able to adjust the size when needed, such as I ripped the board to 2 1/4″ where it was meeting up with the face frame board, so it would look like it was the same size as the back board that I cut at 3″. Hope that makes sense.
This is what really ties the coffee bar cabinet into my other cabinets so you can always change this out to match the molding or design of your other kitchen cabinets!
Also, the picture doesn’t show, but the top board is also ripped at 3 1/2″.

Step 10
Add the face frame. This can be built as one solid piece (pocket holing it all together) and then brad nailed on, or you can individually brad nail the boards on. I just brad nailed those babies up there! Make sure and use glue either way!

Step 11
Add the scrap boards to the bottom! They do not have to be any specific width, just as long as the side ones are 1/2″ MDF cut at 17 1/4″ and the front one is a 1x board cut at 58 1/2″ (in the materials list, there is a 1×2 for this) but you can use any scrap boards you have that will fit there, just to give you something to brad nail your baseboard to!

Step 12
The next step, add the baseboards to the coffee bar cabinet. The side baseboards will be beveled on one end at 45 degrees off square and the front baseboard will be beveled on both ends at 45 degrees off square! The measurements below are if your cabinet is built exactly as this one was, ALWAYS measure your cabinet so that the baseboards will fit well!

Building the top of the DIY coffee bar cabinet.
I cut the rounded edges of 2x6s off with my table saw and that cut them down to 4 3/4″. I then planked them together with pocket holes (drilled at 1 1/2″ deep and 2 1/2″ screws). The pocket holes will be drilled along the long edge of the boards to plank them.
If you are worried about wood movement and using pocket holes, you can just use wood glue and clamps to glue it up!
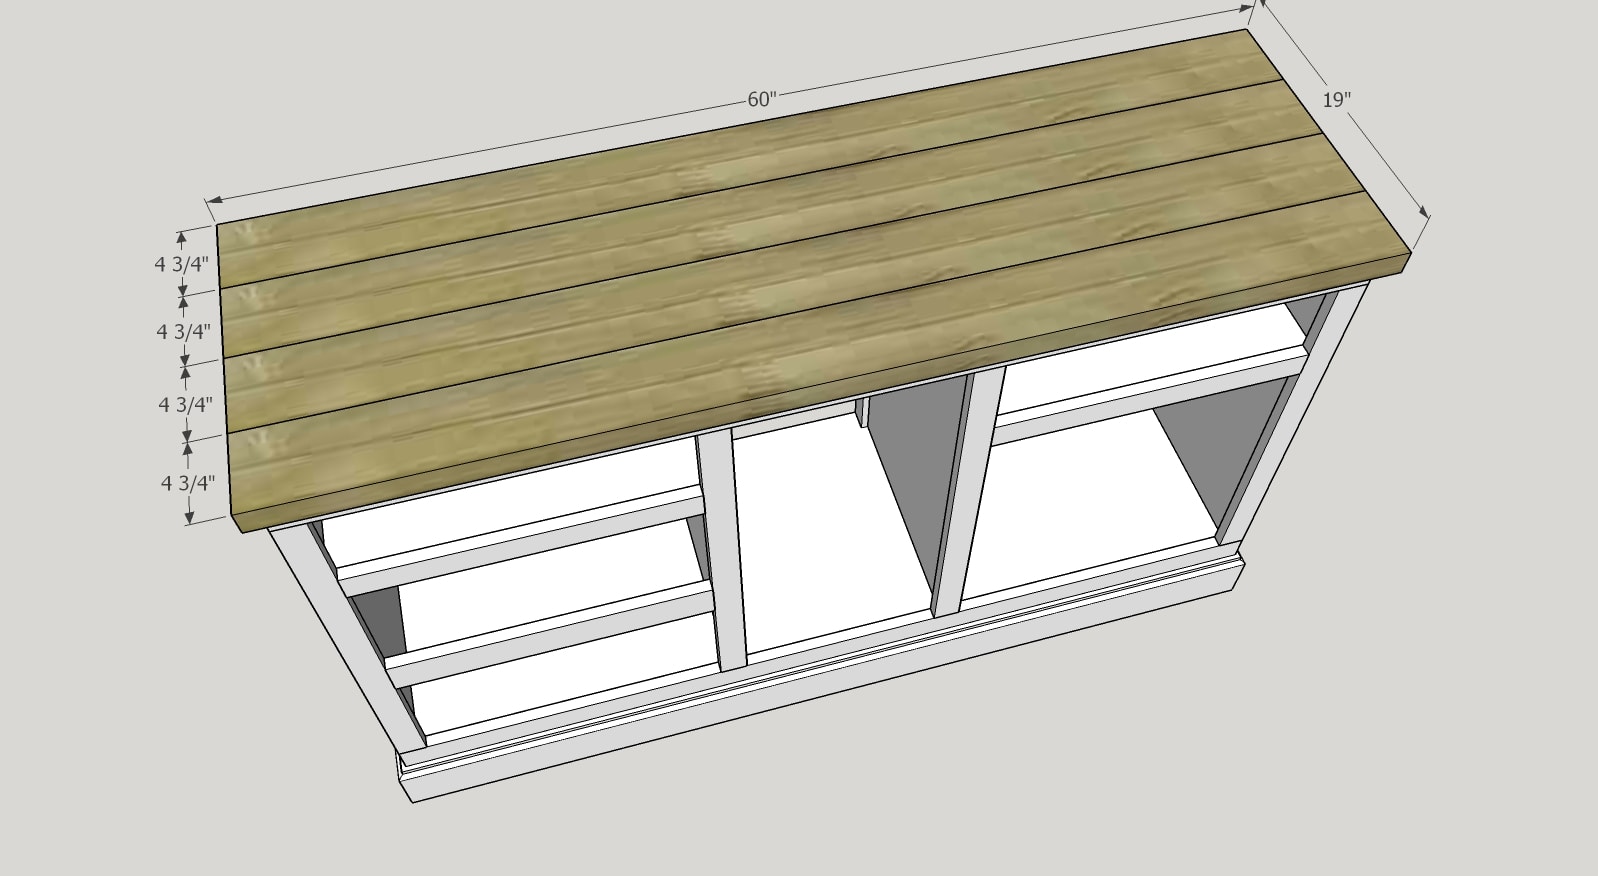
Sand and stain the countertop to the color of your choice! I used Old Barn Milk Paint Stain in Weathered for mine! It is my FAVORITE stain right now, I cannot get enough of it! Lol! It is natural and non-toxic… with a built-in sealer! What more could you ask for? I did still add a couple of coats of water-based poly though just to be safe…I spill a lot of coffee!🙃
Using the pocket holes you drilled earlier into your plywood and 2x2s, you will connect the top to the cabinet. You will need a right-angle attachment for your drill, and the short square bit to have enough room. If you cannot get a drill in there, you can also just liquid nail it if you would like.
Building the drawers for the DIY coffee bar cabinet
Using the 1/2″ plywood, build drawer boxes for the coffee bar cabinet! You will use holes drilled with your Kreg Jig at 1/2″ and you will use 1″ screws along with glue to attach!
**Your drawer boxes may be a different size than mine based on your cabinet and your drawer slides! Make sure and measure before building the drawer boxes so you know they will fit!

Using 1/4″ plywood, cut it to the same size as your box, and attach the bottom with wood glue and brad nails!

You could also route out the bottom of the drawer box so that the 1/4″ plywood would be flush with the 1/2″ plywood, but I wanted to keep it easy! Lol!
Add your drawer fronts.

The overhang shown in the photo above is on the sides.
Add scrap pieces of wood to bring a level surface from the face frame to the rest of the cabinet. This will allow the drawer slides to pull out. Otherwise, your drawer slide would hit the face frame! This can be any wood you want to use, but you will need to measure your space to see what exact width you will need to cut them at!

The drawer front size is shown in the photo below! You can wait until after you have installed the drawer boxes and drawer slides if you would like, to attach the fronts. That is my favorite method, just in case my drawer slides are not completely level or something.
Attach the drawer slides and slide them drawers in!

Last but not least, add the 1/4″ plywood to the back of the coffee bar cabinet. Make sure and cut a small hole in the plywood if you plan on plugging in a refrigerator. If your fridge is a back vent fridge, you will need to leave that whole side backless and you may want to supply ventilation through the wall. Ours has a hole in the sheetrock into a closet that is behind it. They do make front vent fridges though.

Boom shocka-locka! It’s finito! And it looks so good!
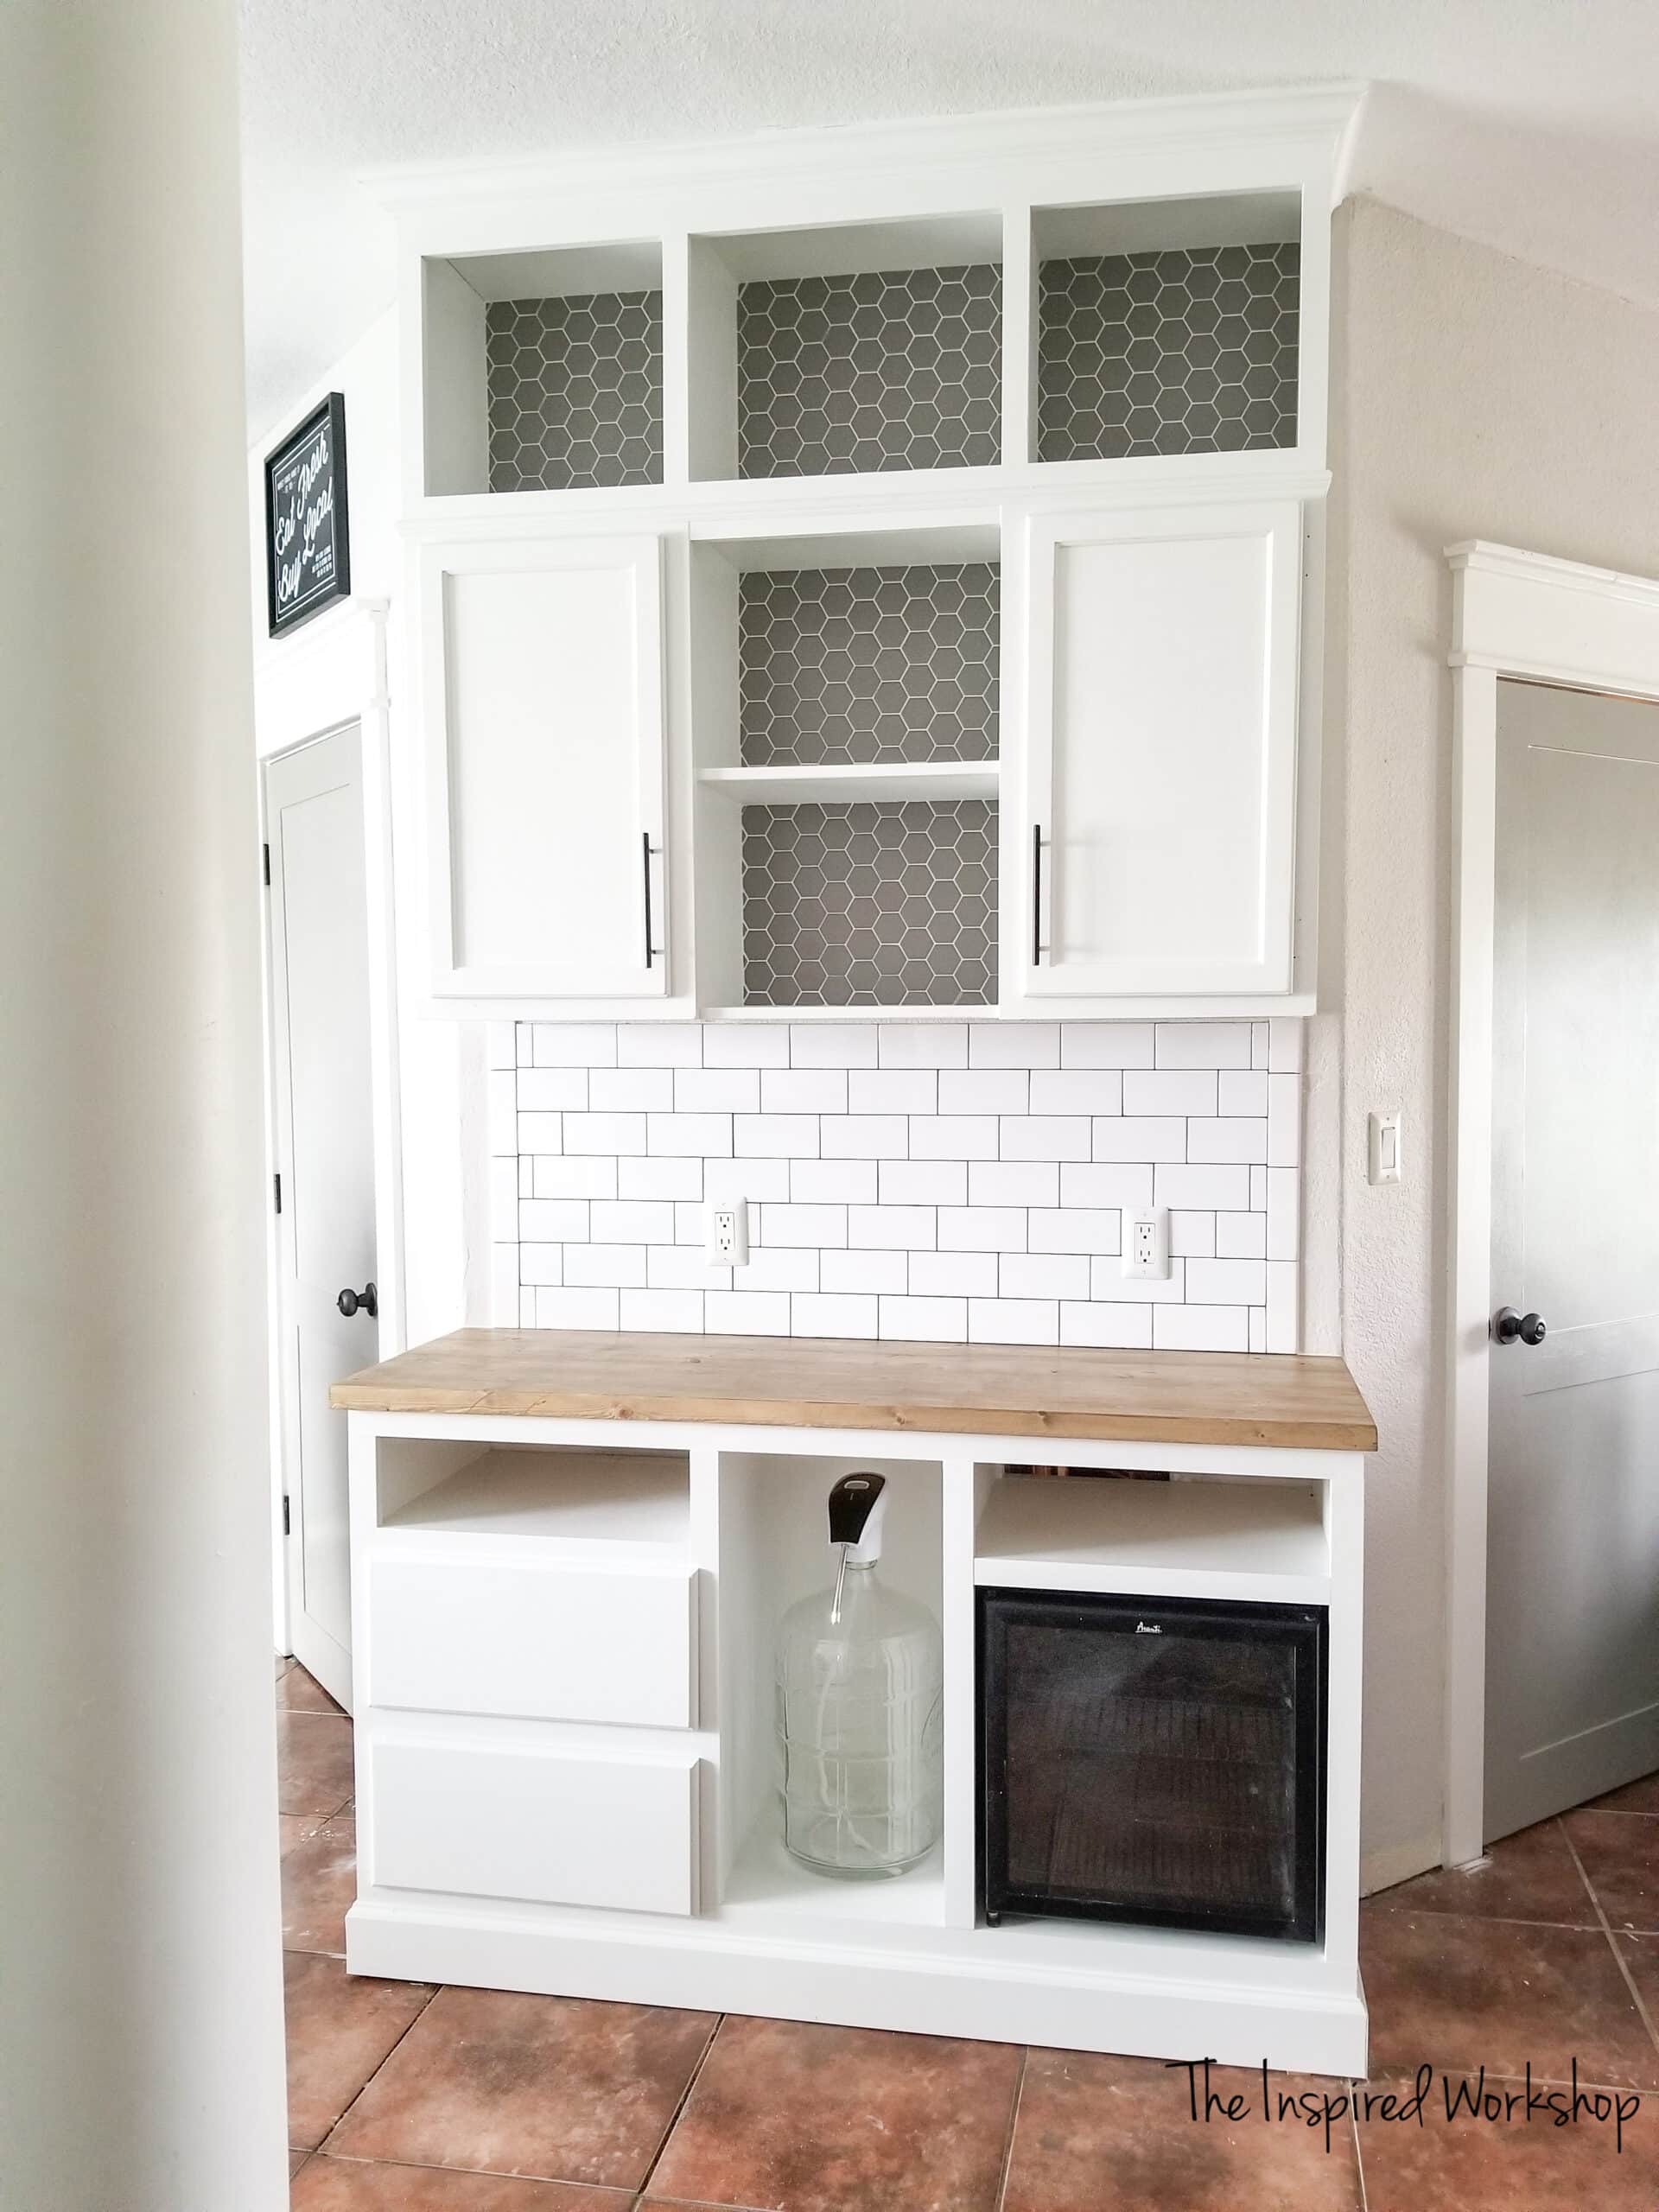
Isn’t she lovely?🎶 Isn’t she beautiful?🎶 I don’t even know if that’s the words to the song, but it works for me because I think this coffee bar cabinet is pretty dang beautiful!😀
Want to make her even more beautiful? Add some hardware to those drawers! I used this particular hardware from EBAY, y’all Jenna Sue told me about these drawer pulls (okay, okay she posted them and I feel like she told me! LOL!) and I could not have been more ecstatic when I got them in, for the price I was SHOCKED at the quality! I will never buy from anywhere else again! Lol, okay I may have to buy from other places from time to time, but I will always check them out first!
Well, I think that pretty much sums it all up! Lol! If you have any questions or comments, feel free to leave them below! 😊
Know someone else who may want to build a coffee bar cabinet? SHARE IT!
[social_warfare]
Happy Building!

Want to save this Coffee Bar Cabinet for later?! Pin It!


Which keurig is this?
Hey Caitlyn!
If you are referring to the silver Keurig, it is the K-cafe Special Edition in Nickel! Here is a link to it on Amazon (affiliate link) Keurig K-Cafe! I love it, it makes it so easy to make something pretty close to a latte vs having to mess with an espresso machine! Lol!
Thanks for stopping by! Have a good one!
Cara
Could you tell me more about the spout on top of the water jug? And make/ model/size of the beverage fridge? Love this idea! Beautiful job!
Hey Ginger!
Thank you so much for your kind words! The water dispenser spout is a battery operated spout with a silicone straw that goes down into the jug of water! I love this thing! It makes using 5 gallon jugs so easy and without needing a stand alone dispenser, I only need enough room for the jug and a little extra for the spout, it has lasted this whole time too! Here’s the link to the exact one I have from Walmart but you can also search Amazon for Water dispenser spout and they have a lot of variations of it as well!
As far as the small fridge, this one is an older model, the brand is Avanti but they have made a couple new versions of it! The dimensions of my fridge are 18 1/2″W x 17″D x 19″H. Mine has actually been acting up so I have been looking for a replacement! Home Depot has a new version by Avanti (affiliate link) and Amazon has a different one that is newer by Avanti as well but it is slightly taller at 20 1/2″ it won’t fit the space even though it is the same 1.6 cu ft. It is so hard though to know for sure if they are going to fit too because the dimensions are slightly different in the specs vs the description on some! I was looking at a slightly cheaper one at Amazon (affiliate link) that would fit and one at Walmart!
Hope that helps! Thank you so much for stopping by! Have a good one!
Cara