DIY Kitchen Remodel – Extending the Kitchen Cabinets and Building a Peninsula
Hey everyone! Do you ever look through pictures of homes and just love the look of the kitchen cabinets that touch the ceiling, and then walk into your kitchen and think, “Blah, my cabinets are boring and lame!” Well, today is your lucky day as I’m sharing how I extended the kitchen cabinets to the ceiling during our DIY kitchen remodel. As a small bonus, I am showing you how I fixed the back of the sink area by building a kitchen peninsula so that it now looks like it was always meant to be this way as well!
You would never know that the cabinets were short, or that the peninsula was just a sheet of painted plywood covering a drainpipe! Yep, it was a lot different, to say the least! After this tutorial, you will be able to update your cabinets and make your kitchen look great, no matter what you may be dealing with! Lol!
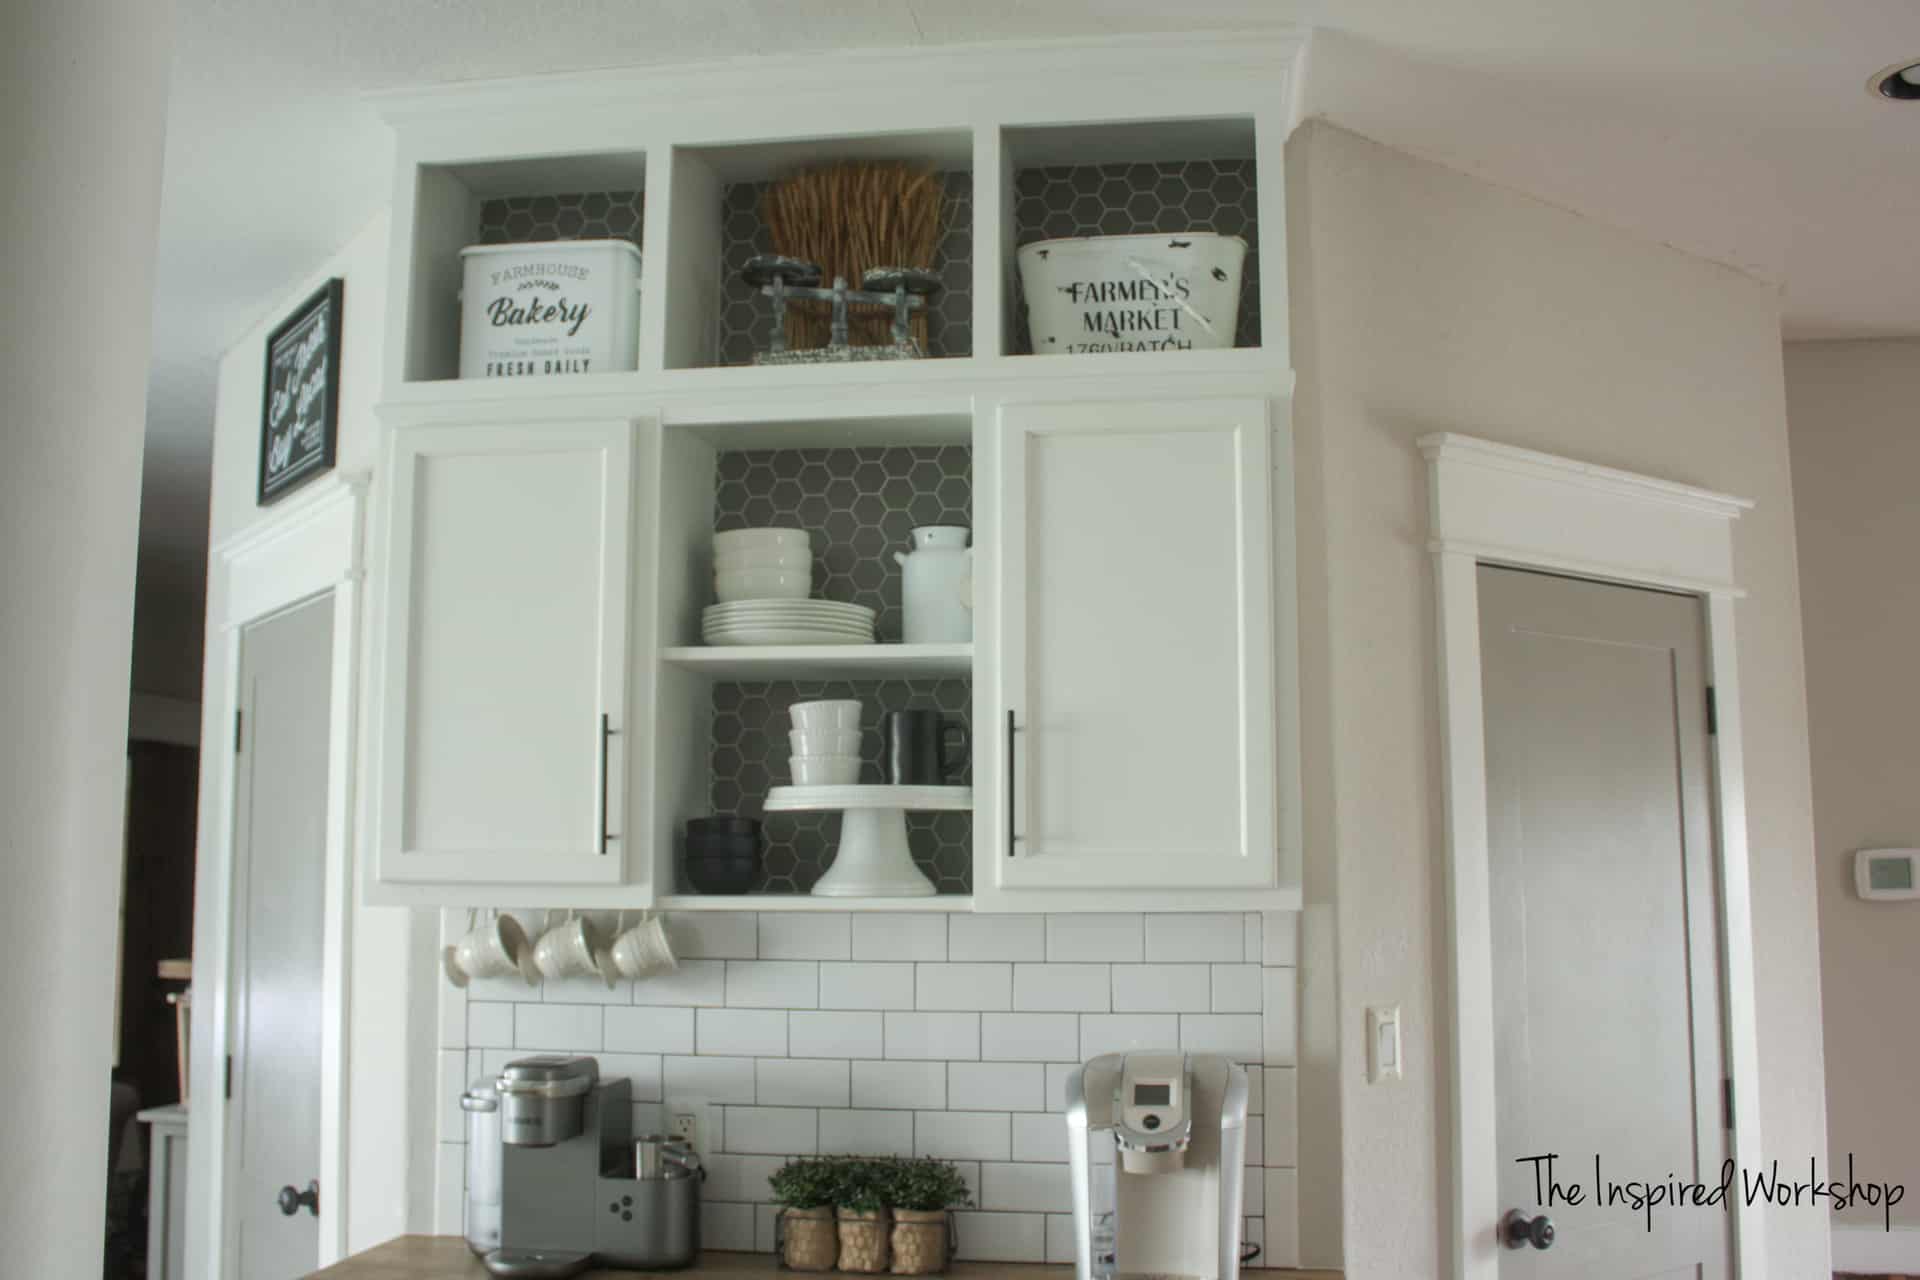
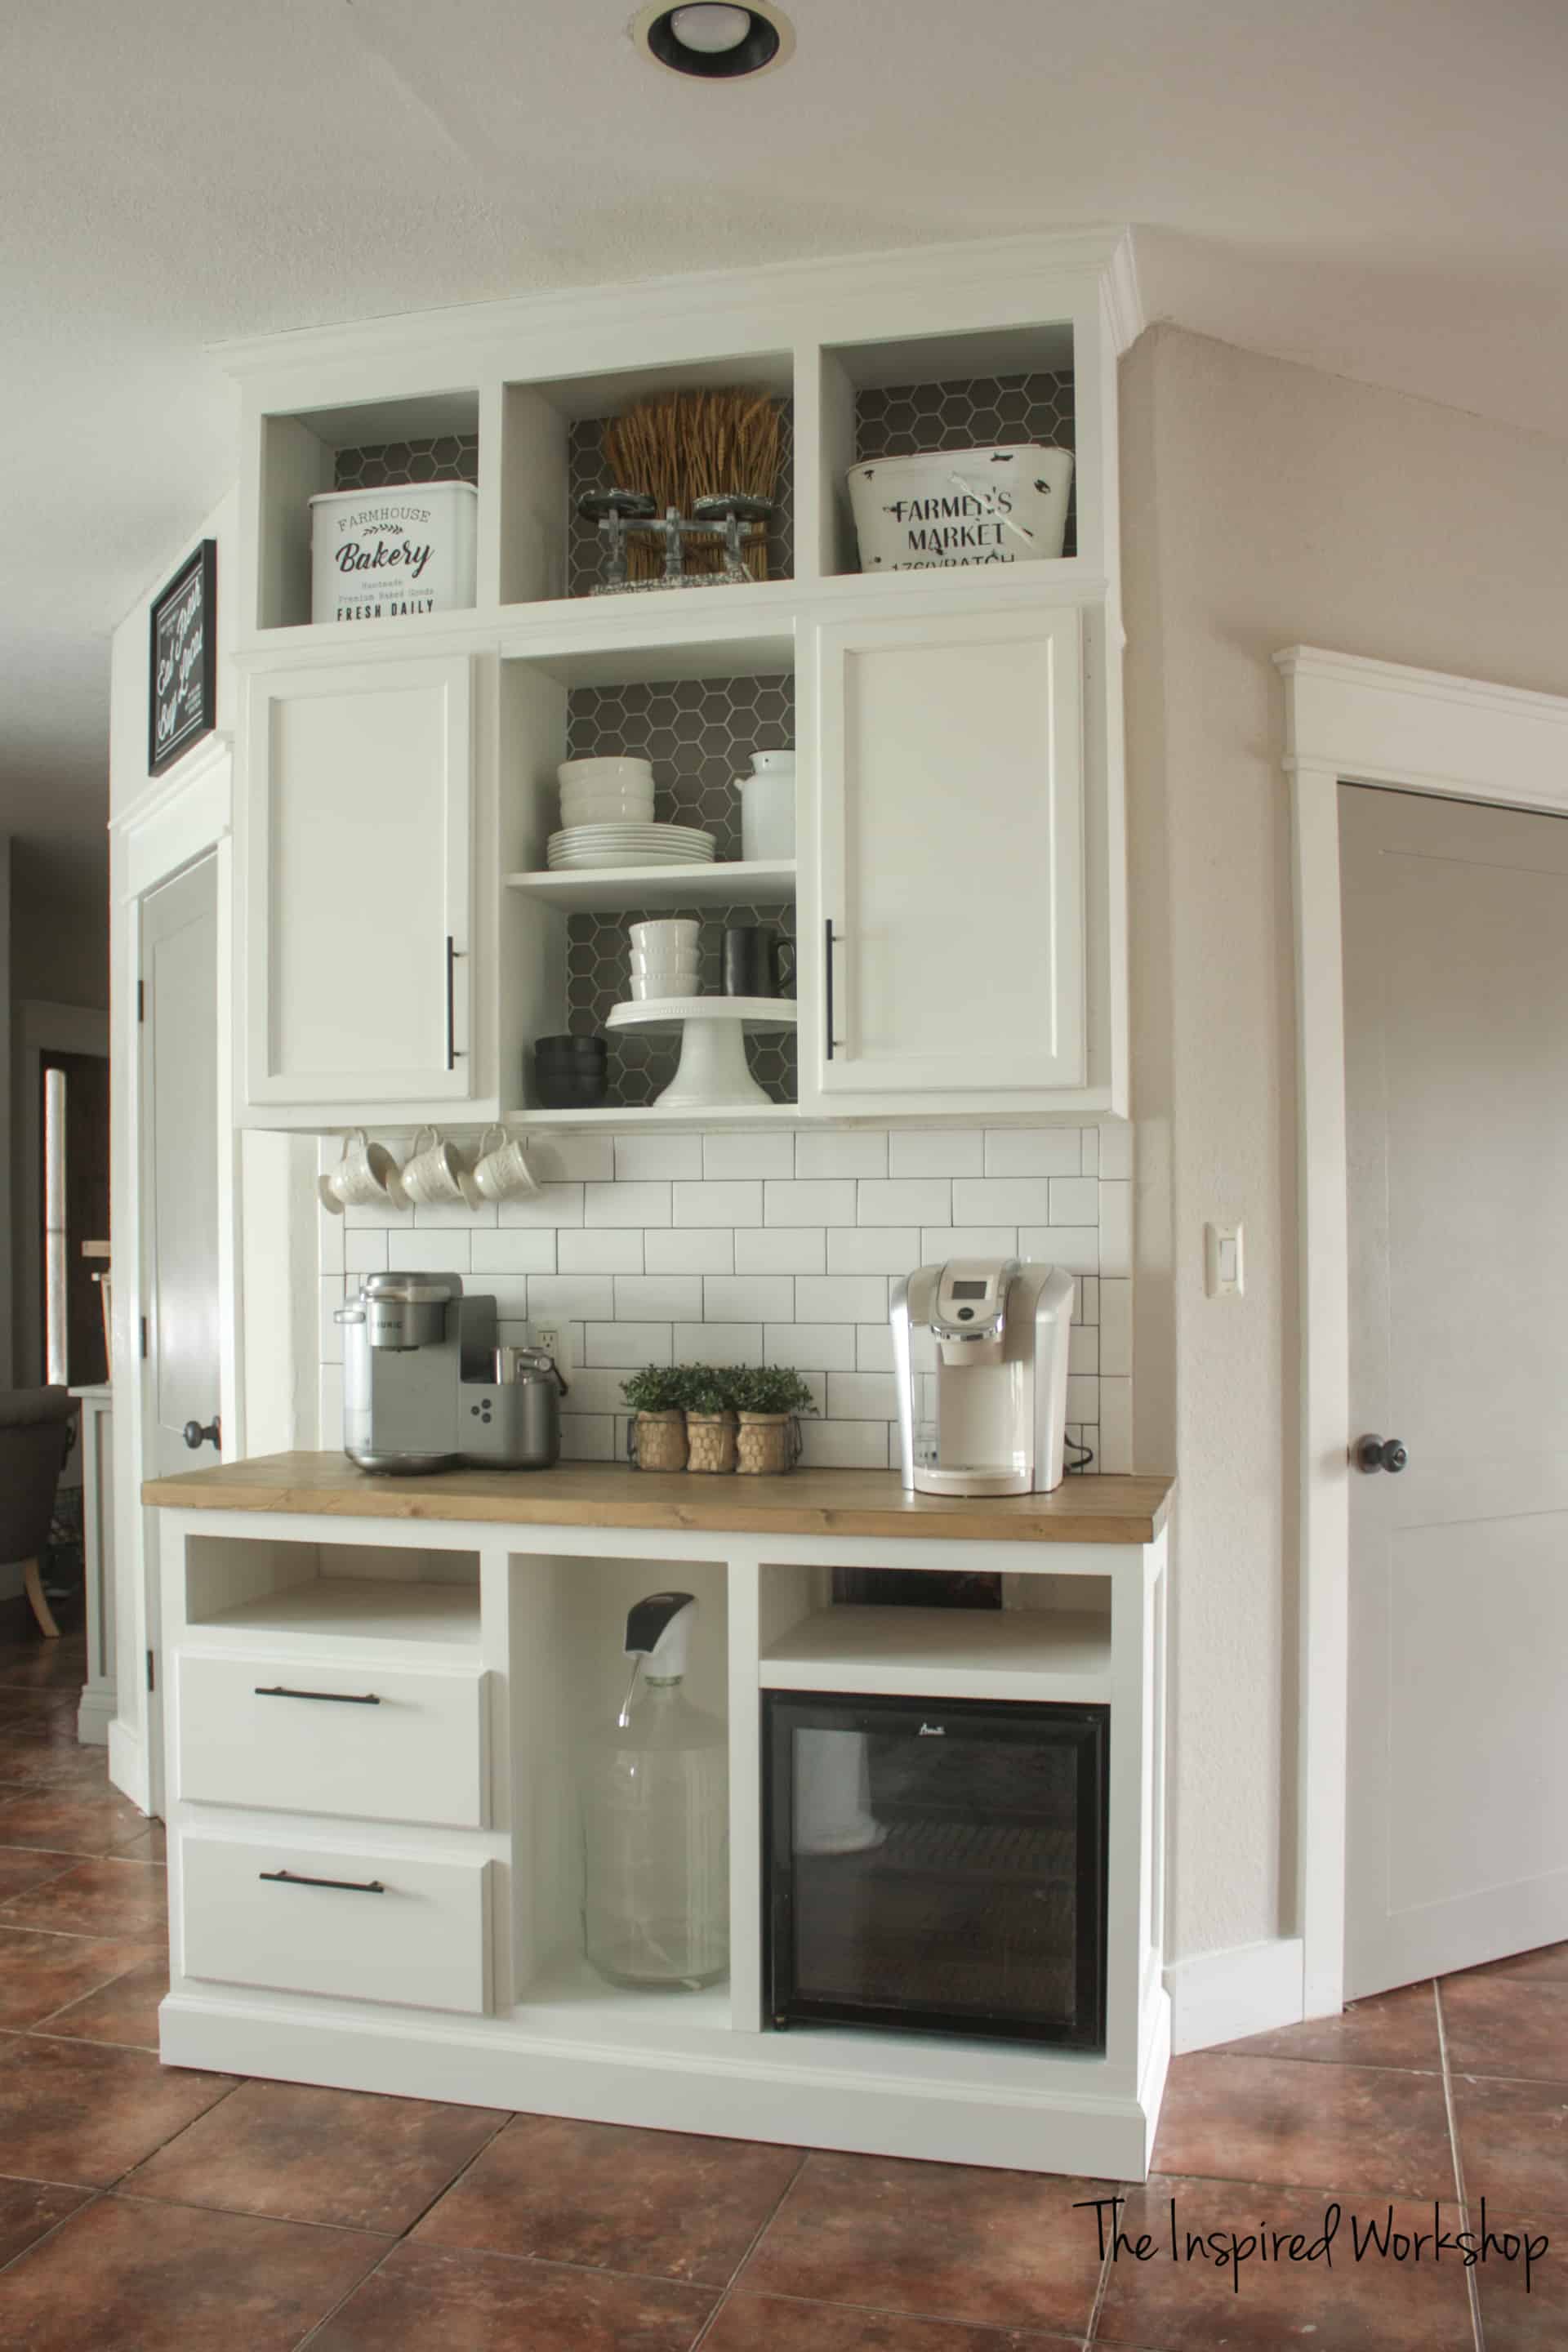
Here’s the beautiful shot of the cabinets extended to the ceiling!
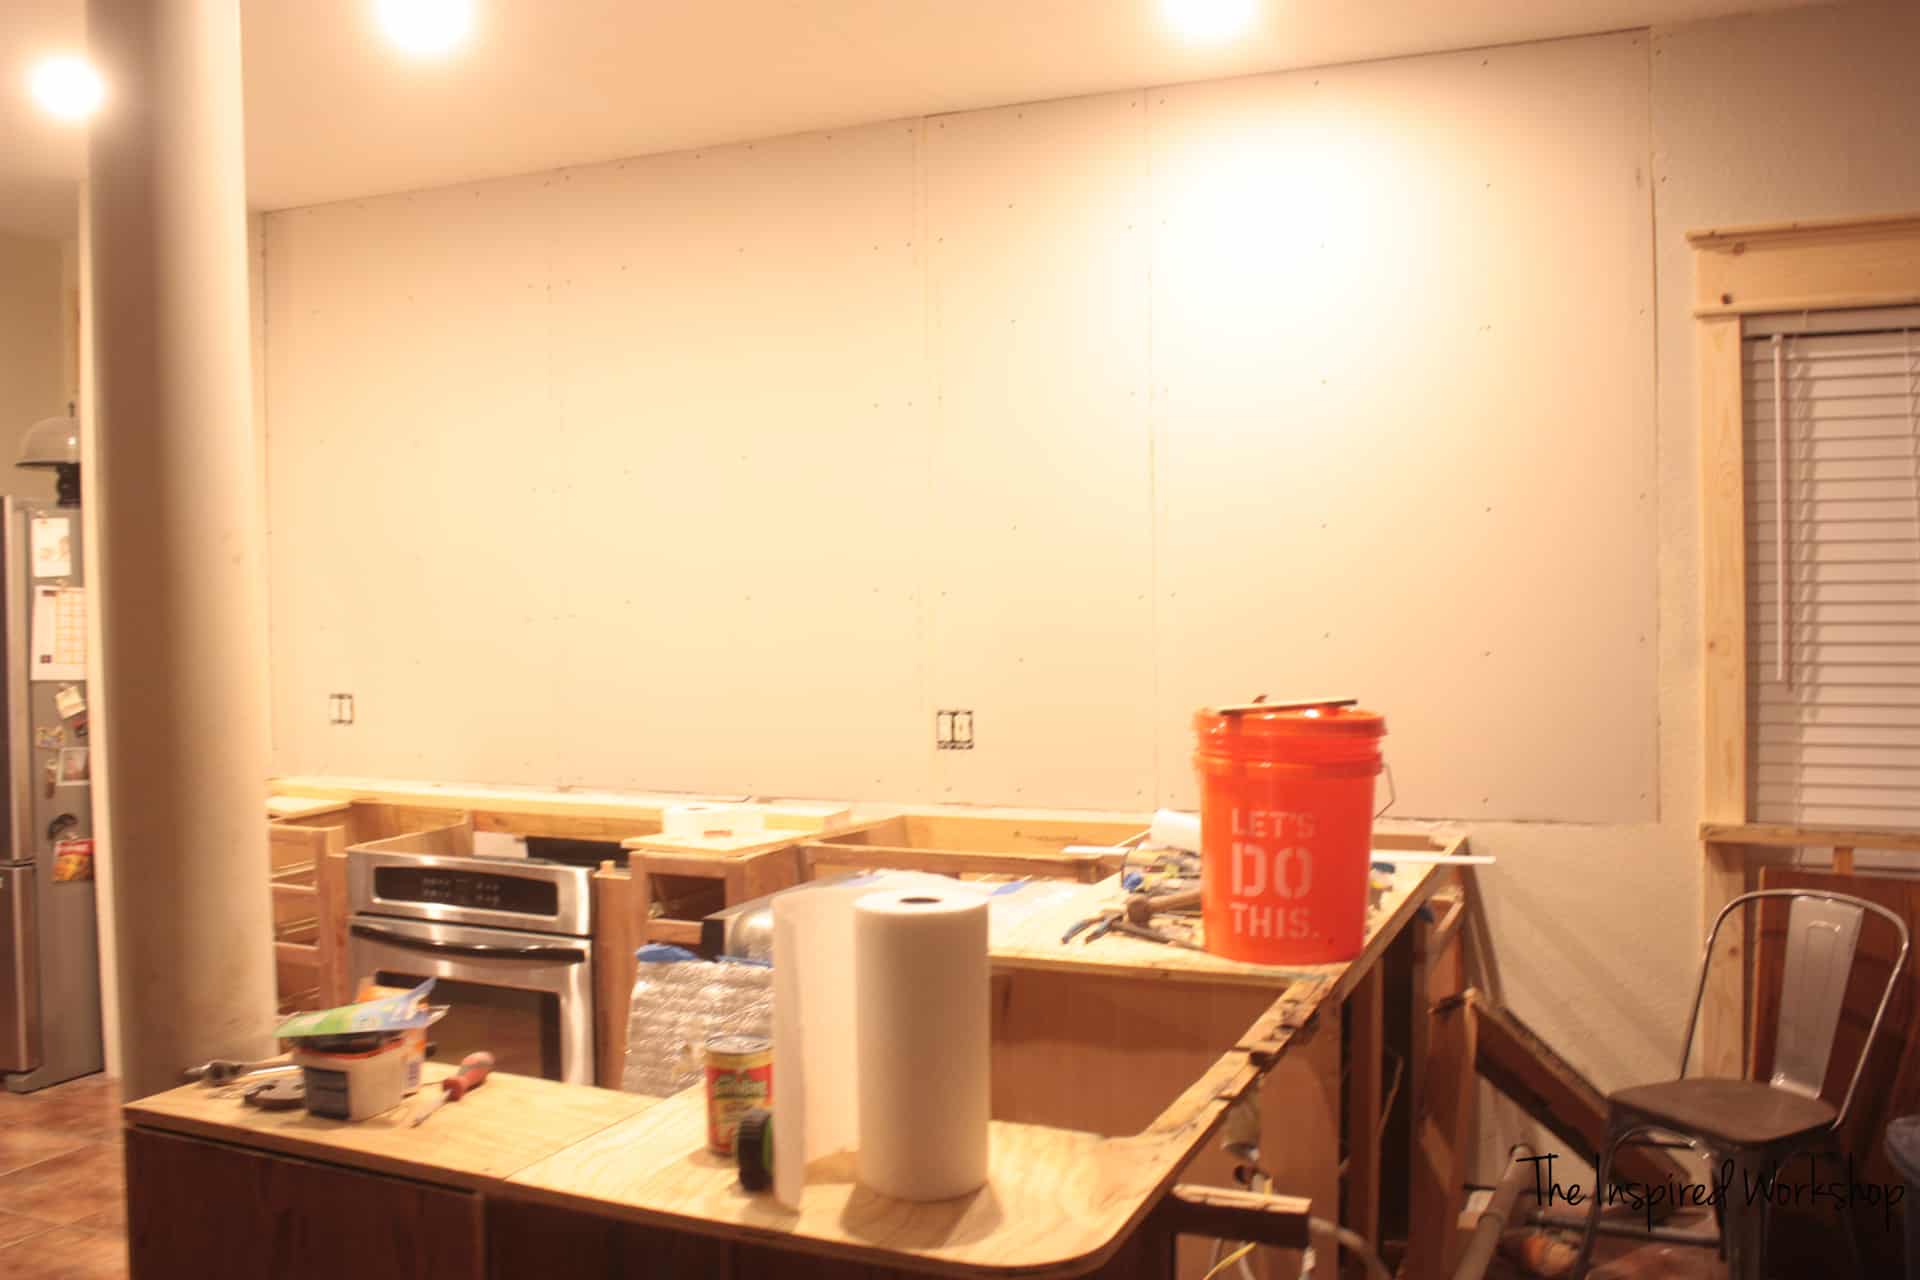
Check out the before!
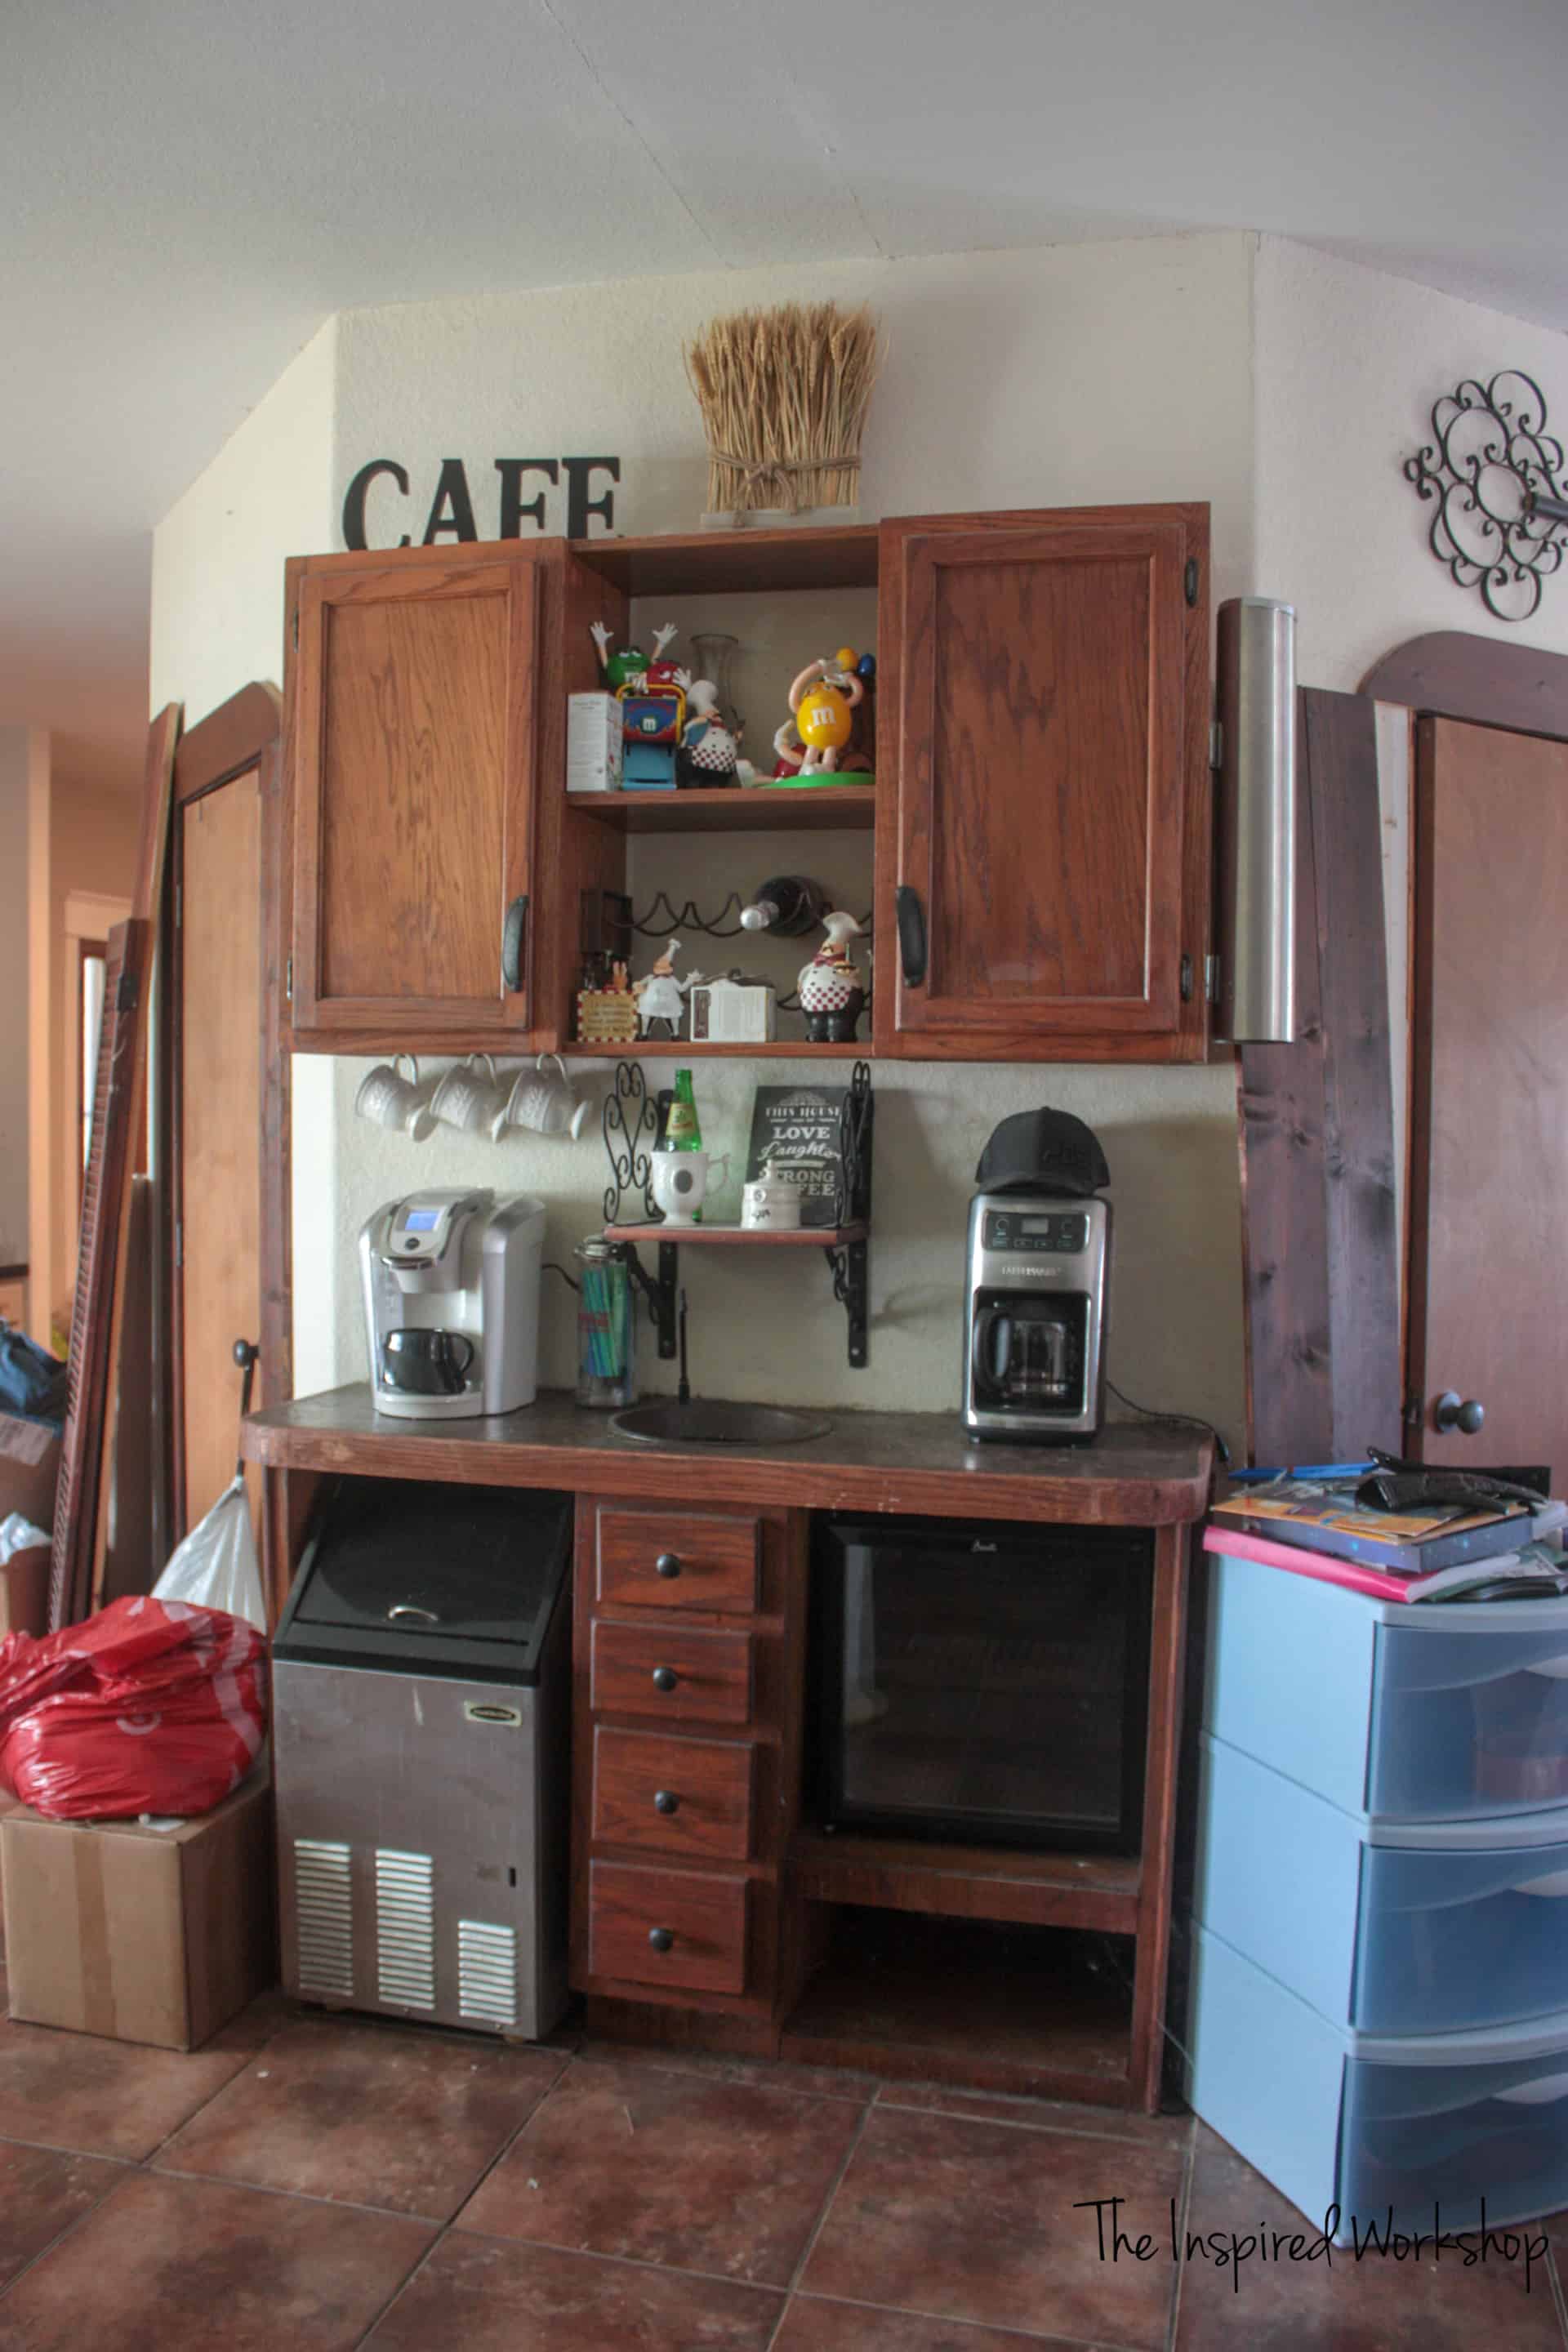
Woah, the mess! 😳 It looks so much better now, but it may just be because I cleaned up the mess! 😂 Oh, and I can’t wait to show you the mold that was growing just beneath that counter! 😬
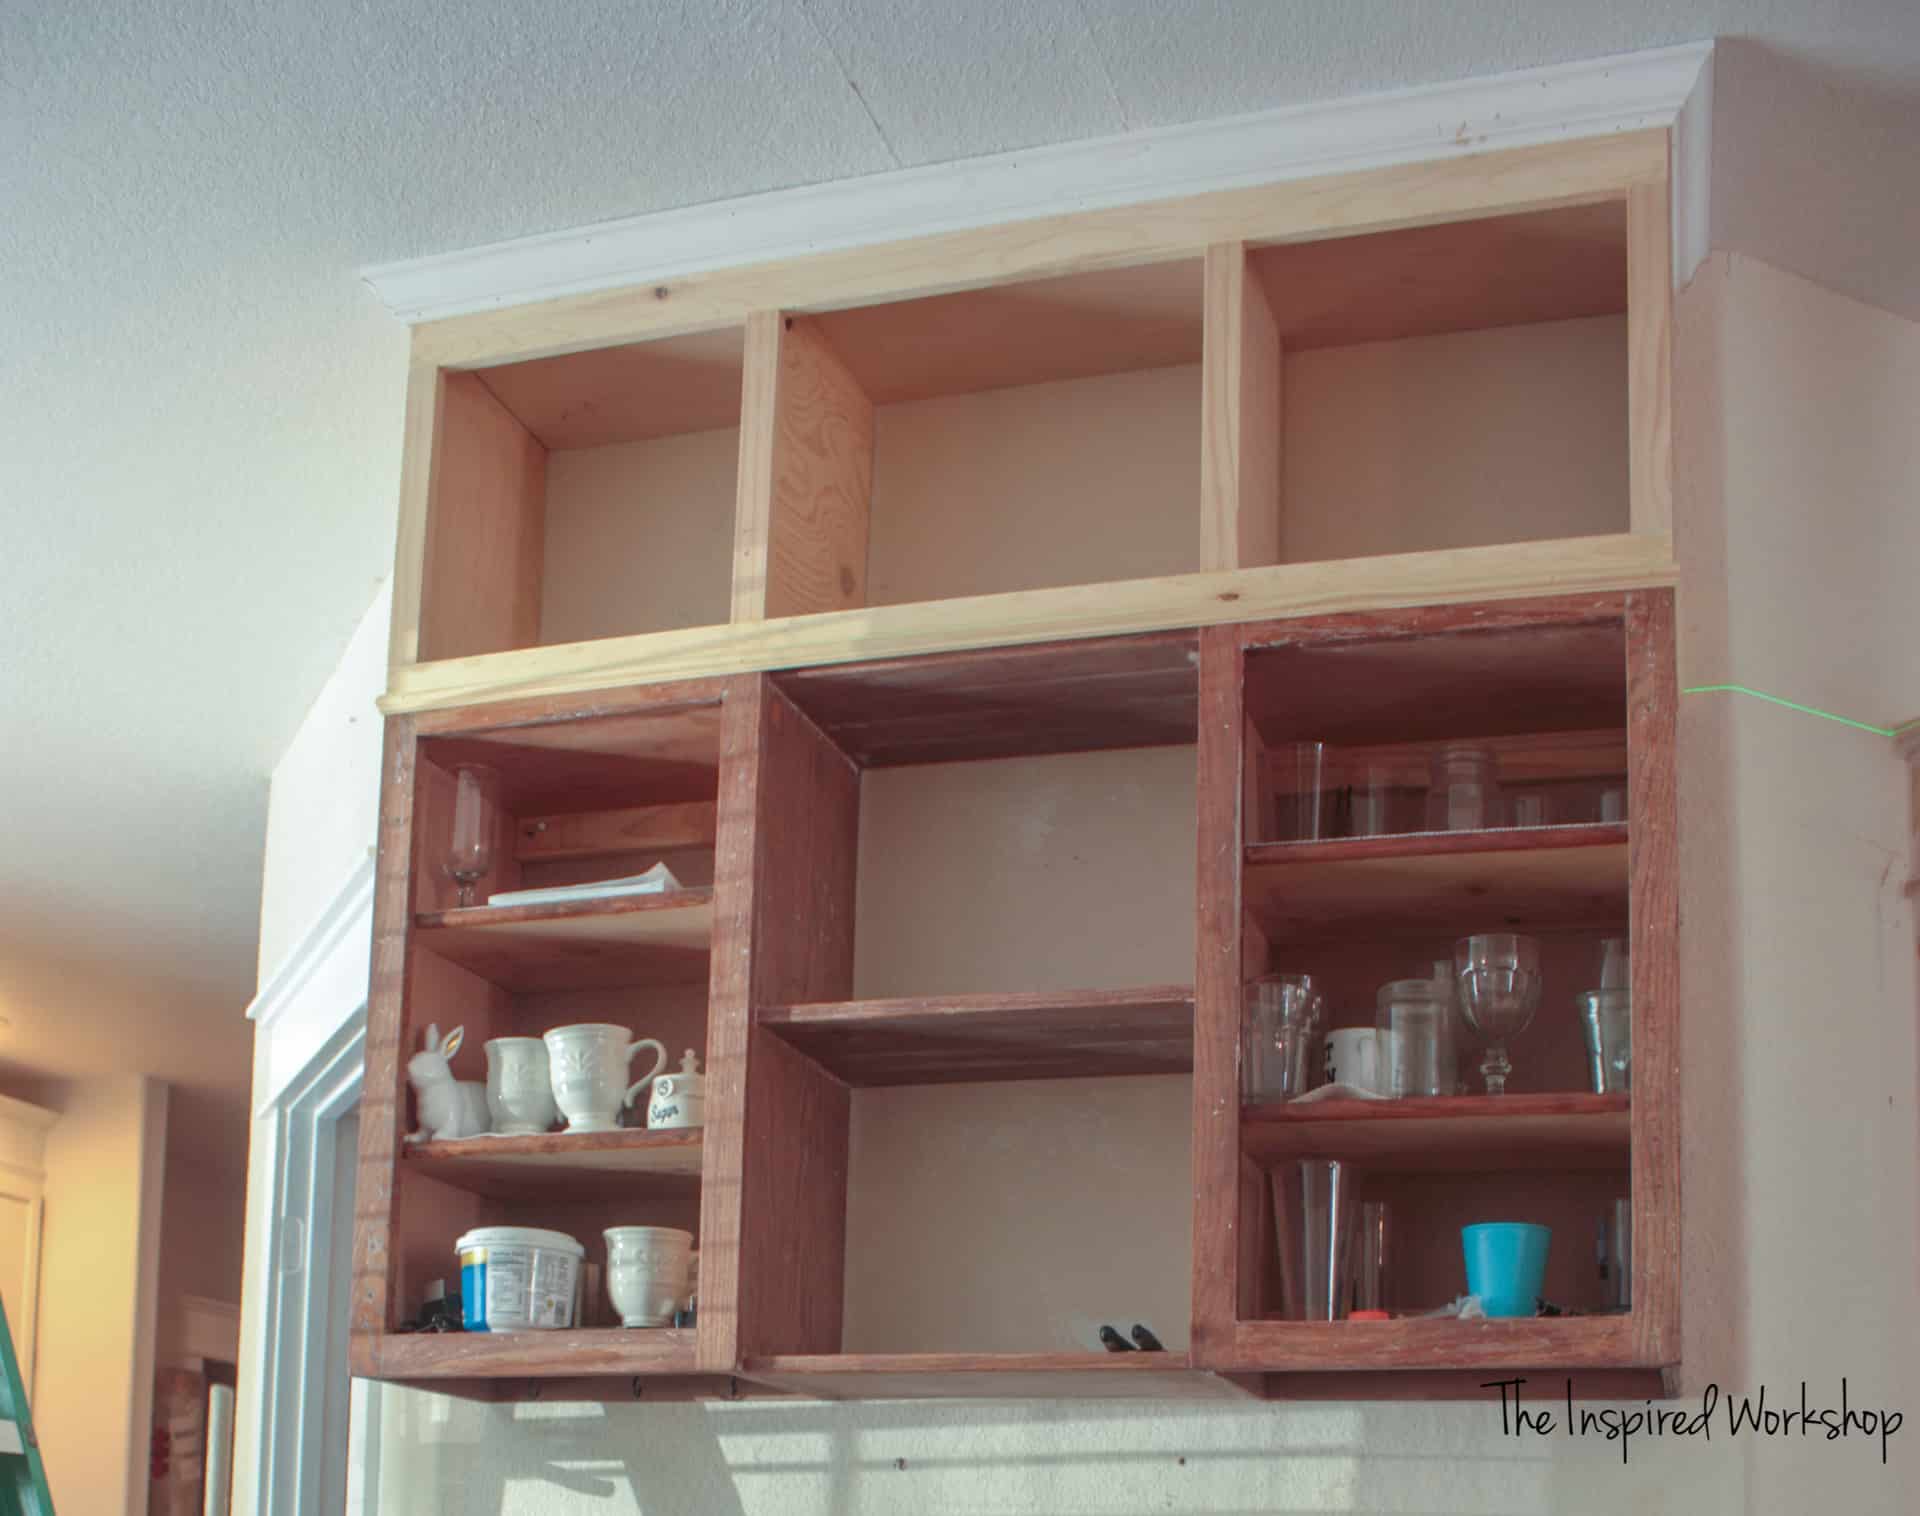
Here’s the part of the cabinets I was talking about needing to be built out, there was a piece of plywood screwed back here when we started and now it looks like this!😍
And of course, I will show you the plywood back it had before!
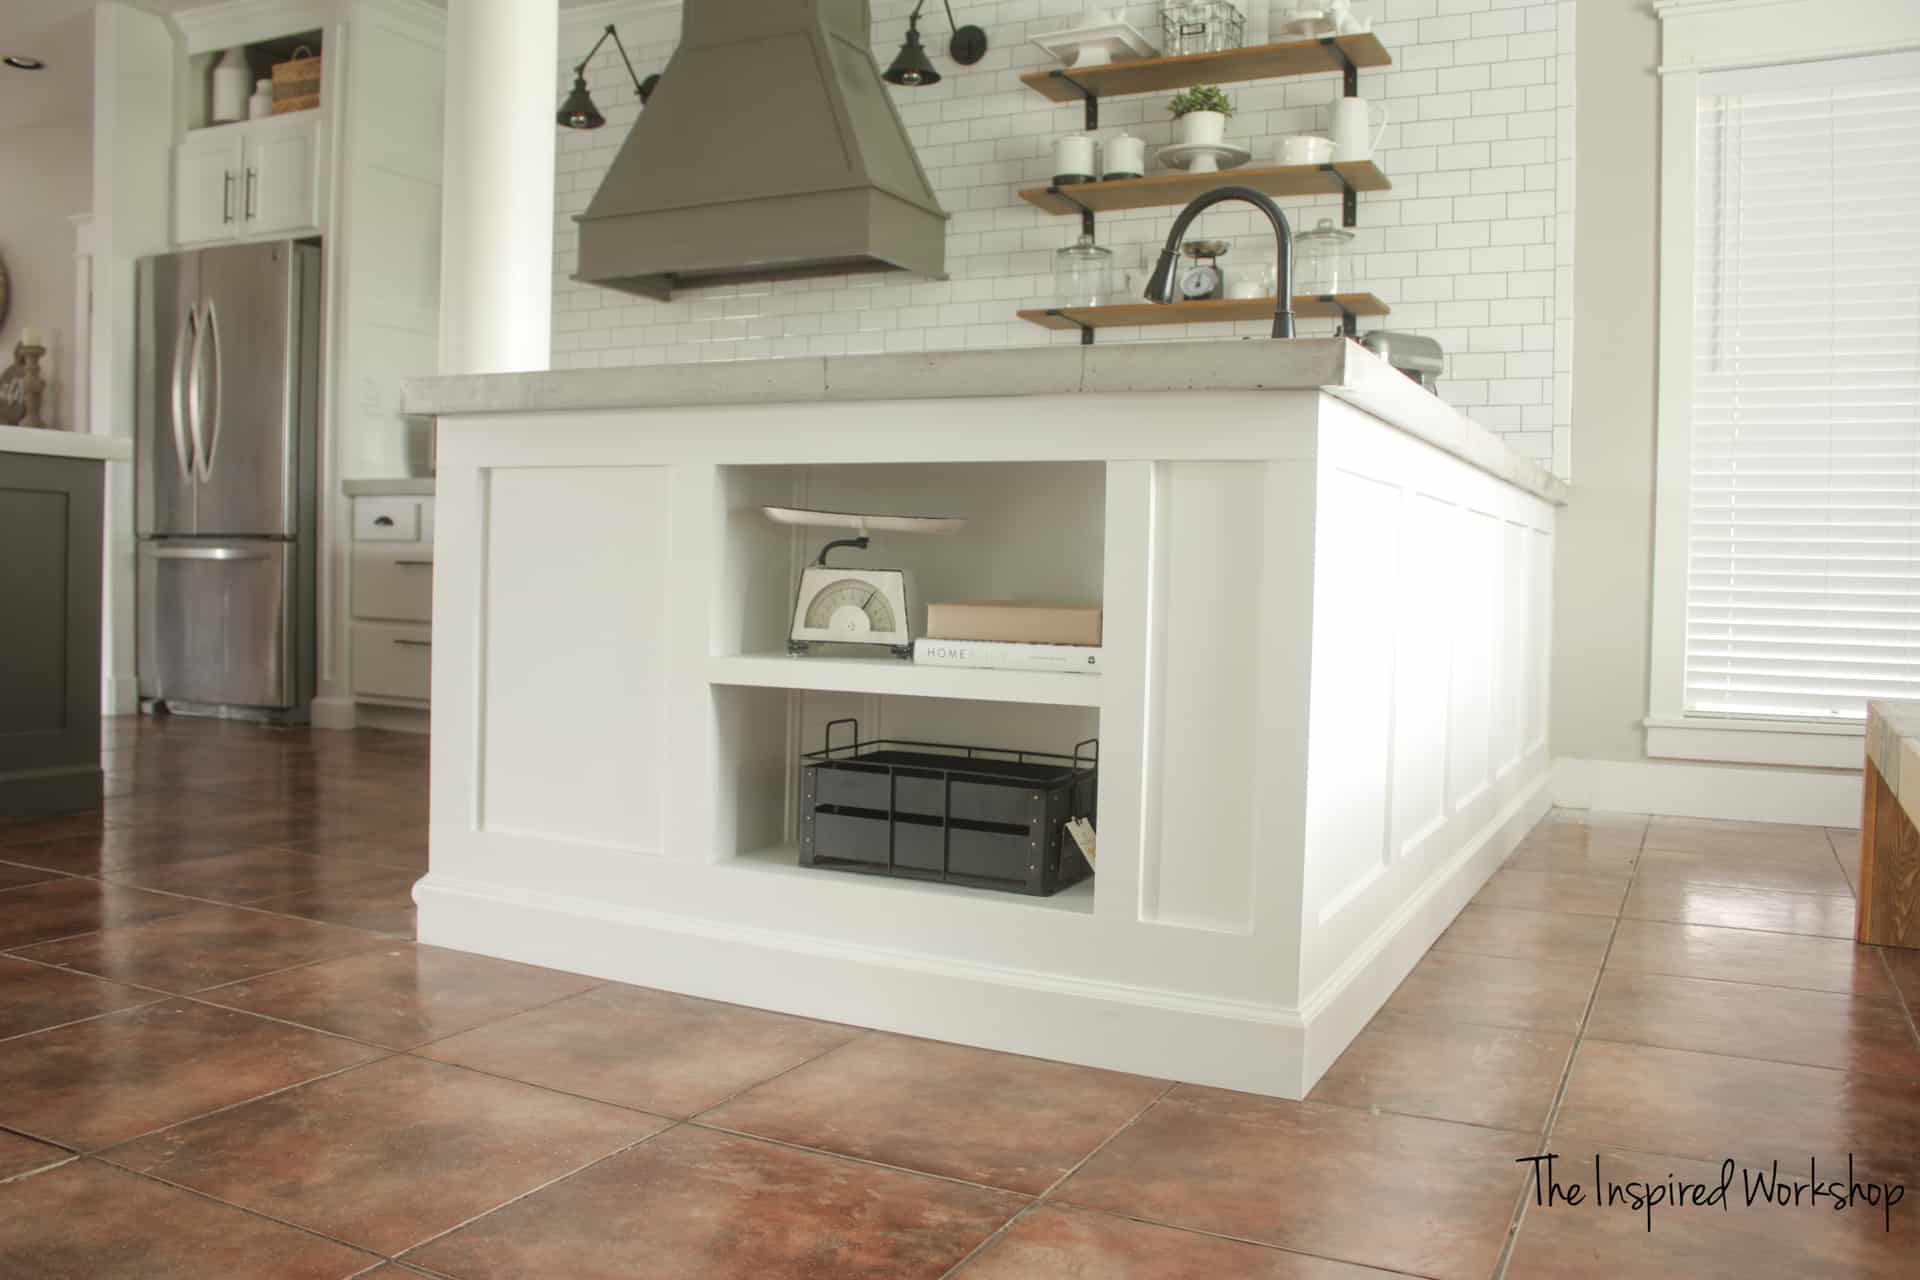
I closed in the awkward area that was almost like a spot for a stool, but if you sat there it seemed strange and there was already an island with seating and two dining areas, so I figured we could manage without that area! I closed it up and created shelves here! I love it so much more now!
Now in advance, I must tell you that I was an emotional mess because this was done only days before my grandma passed away and so in my absentmindedness, I did not take nearly the pics I should have to show you exactly what I was doing, but with my Sketchup pics and words hopefully, you will understand! Lol!
DIY Kitchen Remodel
I’ll start first by extending the cabinets to the ceiling! This is the simplest build you can really do, but yet it packs such a big punch! It takes ordinary to extraordinary! 😉 If you can build a box, you can do this to all your cabinets. It doesn’t even have to be perfect because you are going to use molding to cover where it meets your existing cabinets and then crown molding where it meets the ceiling! No one will ever know if you have a gap, or something isn’t totally square! I will tell you from experience, there is NOTHING in this house that is square and I had to do a TON of tricking the eye and laser leveling what I could!
NOTE: This post may contain affiliate links! If you click any link below and make a purchase, I may make a small percentage at no extra cost to you! I also may not make any money because I provide links regardless of whether or not I have an affiliate with that company! But just in case you click and make a purchase, and I am an affiliate, I would like to thank you in advance!😁
Extending Your Kitchen Cabinets
Note* This is a generalized list to build a box about the same size as mine, make sure you buy enough supplies based on your measurements!
-1 4×8 sheet of 3/4″ plywood (you could also use 1/2″ plywood)
-3 1x2x8
-1 – 1x4x8
– 1 – 8 ft stick of crown molding
-1 – 8 ft stick of small molding to cover where the new box meets the cabinet top
If there is ONE tool you will need in this kitchen renovation besides the obvious saw and brad nailer, it would be a laser level! This Bosch laser level was a Godsend and thankfully my Dad let me borrow his, so I didn’t have to spend the money! They make lower-end ones that from others that have used it, they say it works well too! I just haven’t personally used the more affordable ones! I would have purchased a lower-end model though if I would not have been able to borrow his! This red beam laser level is more affordable and has great reviews, although it still isn’t cheap! But definitely worth the splurge!
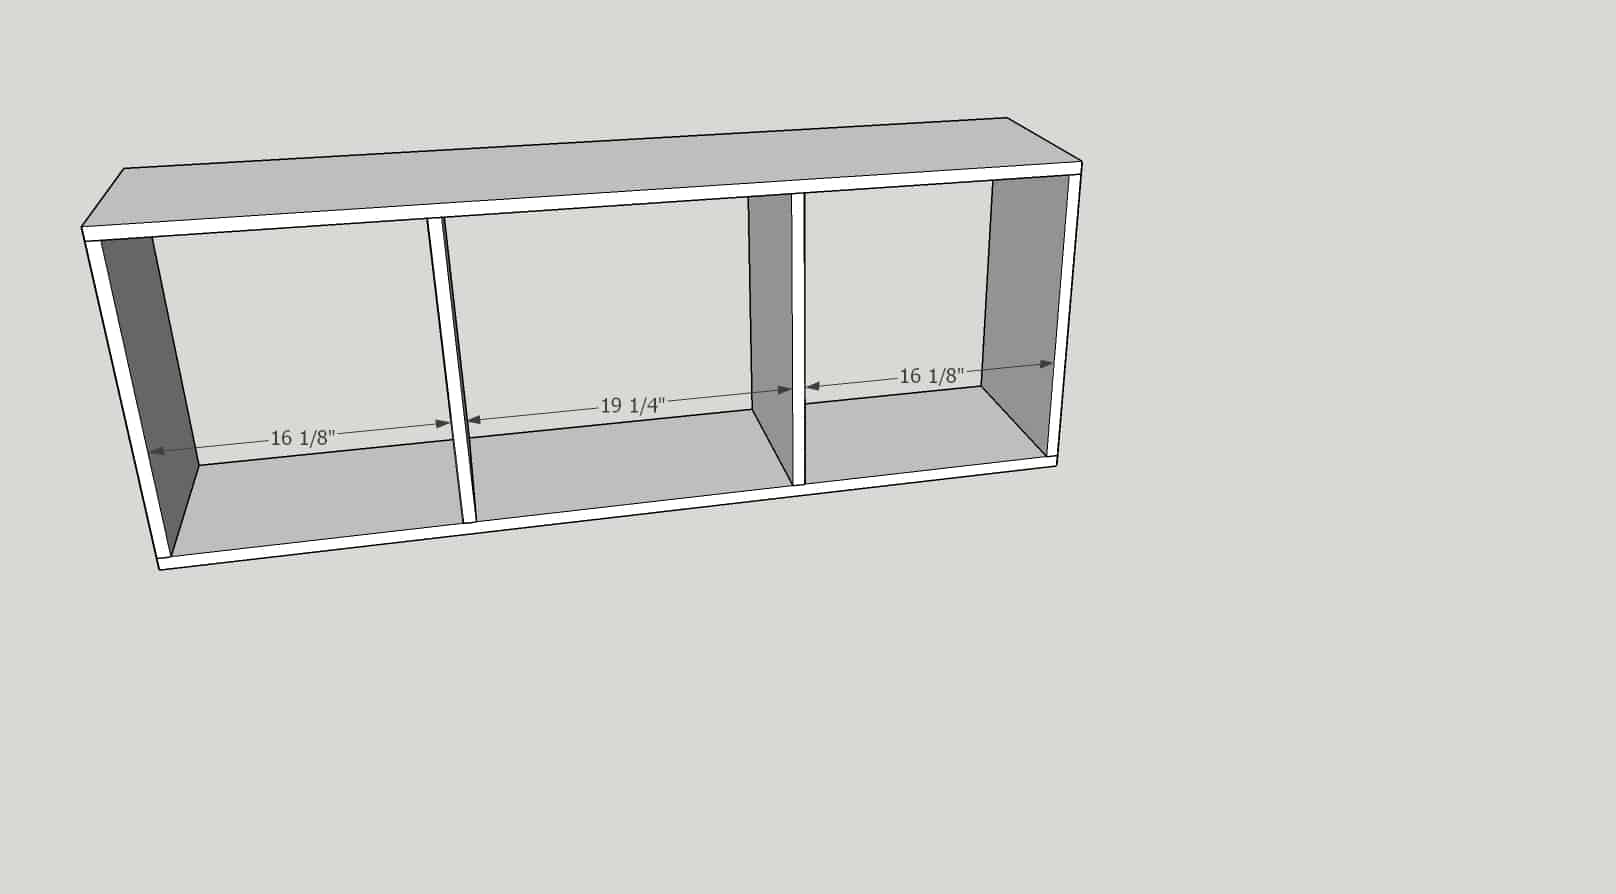
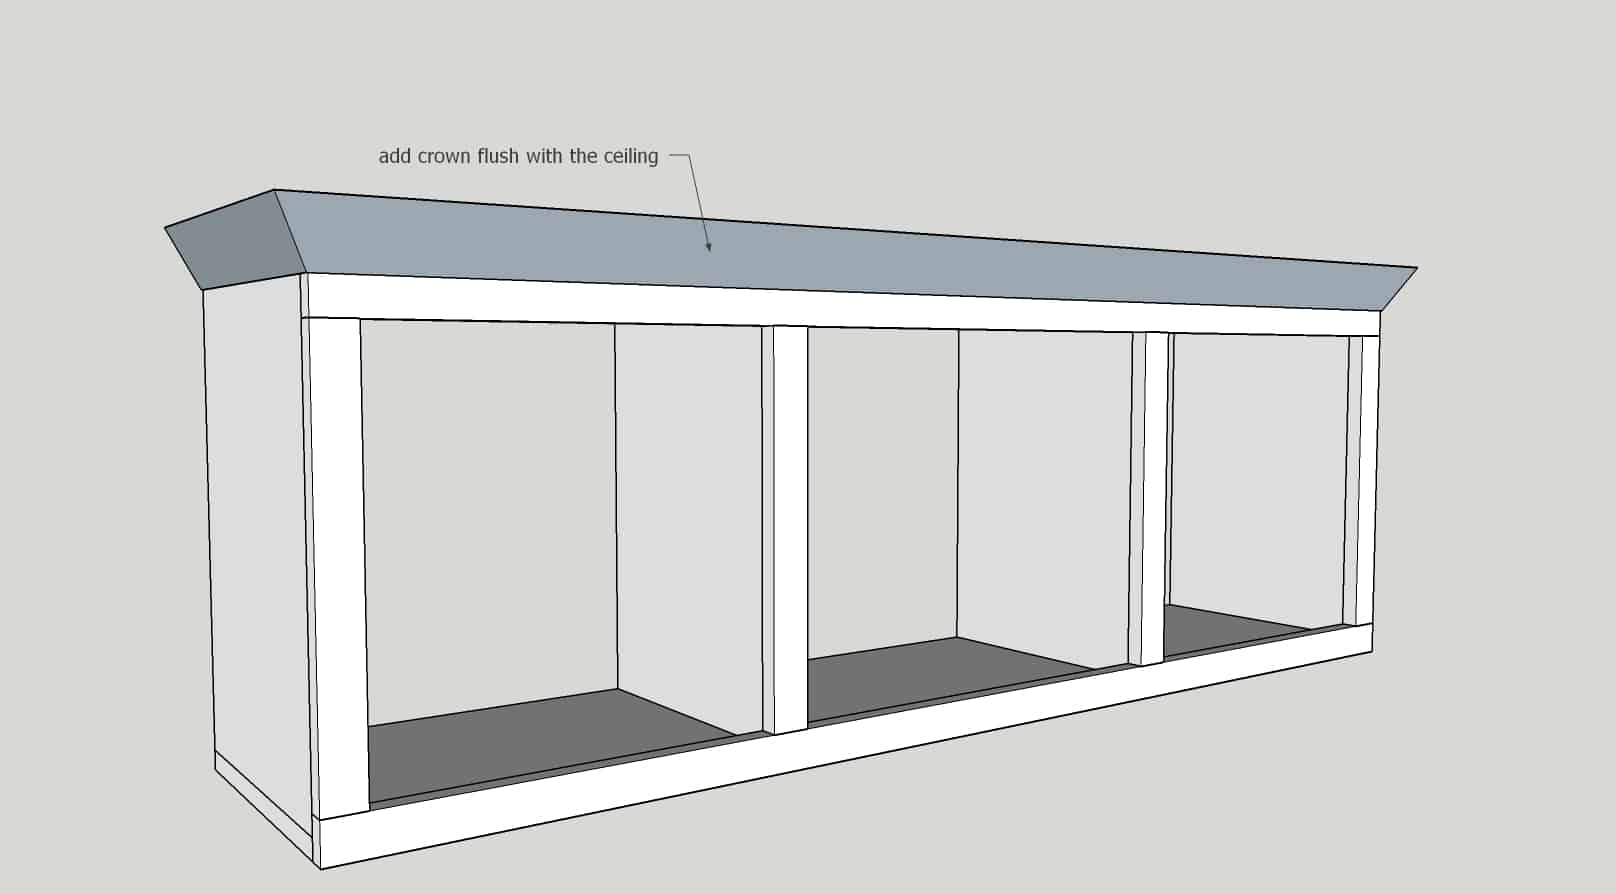
Alright, for starters, you will need to measure your cabinets, how wide/long and deep are the tops of your cabinets. Then check the space from the top of your cabinets to the ceiling. This will be the size of your box! For instance, my cabinets were 54 1/2″w x 12″d, with a space of 20″ to remaining to the ceiling. Using 3/4″ plywood, the box was built at 54 1/2″ long x 12″ deep and 20″ tall. Pretty simple right?! Here’s a diagram of the box.

Cut list here is 2 pieces at 54 1/2″ x 12″ and 2 pieces at 18 1/2″ x 12″. The sides were cut down by 1 1/2″ to accommodate the 3/4″ plywood on top and bottom!
I opted for dividers as well so that they looked as if they were built this way even though I added this later! My cabinets were each 18″ wide and the shelf in between was 18 1/2″, so I had to place my dividers accordingly!
The measurements in between each divider is taking into consideration that our face frame will be made of 1x2s and centered along each divider. In a couple more pictures you will be able to see it with the face frame and it will make sense!
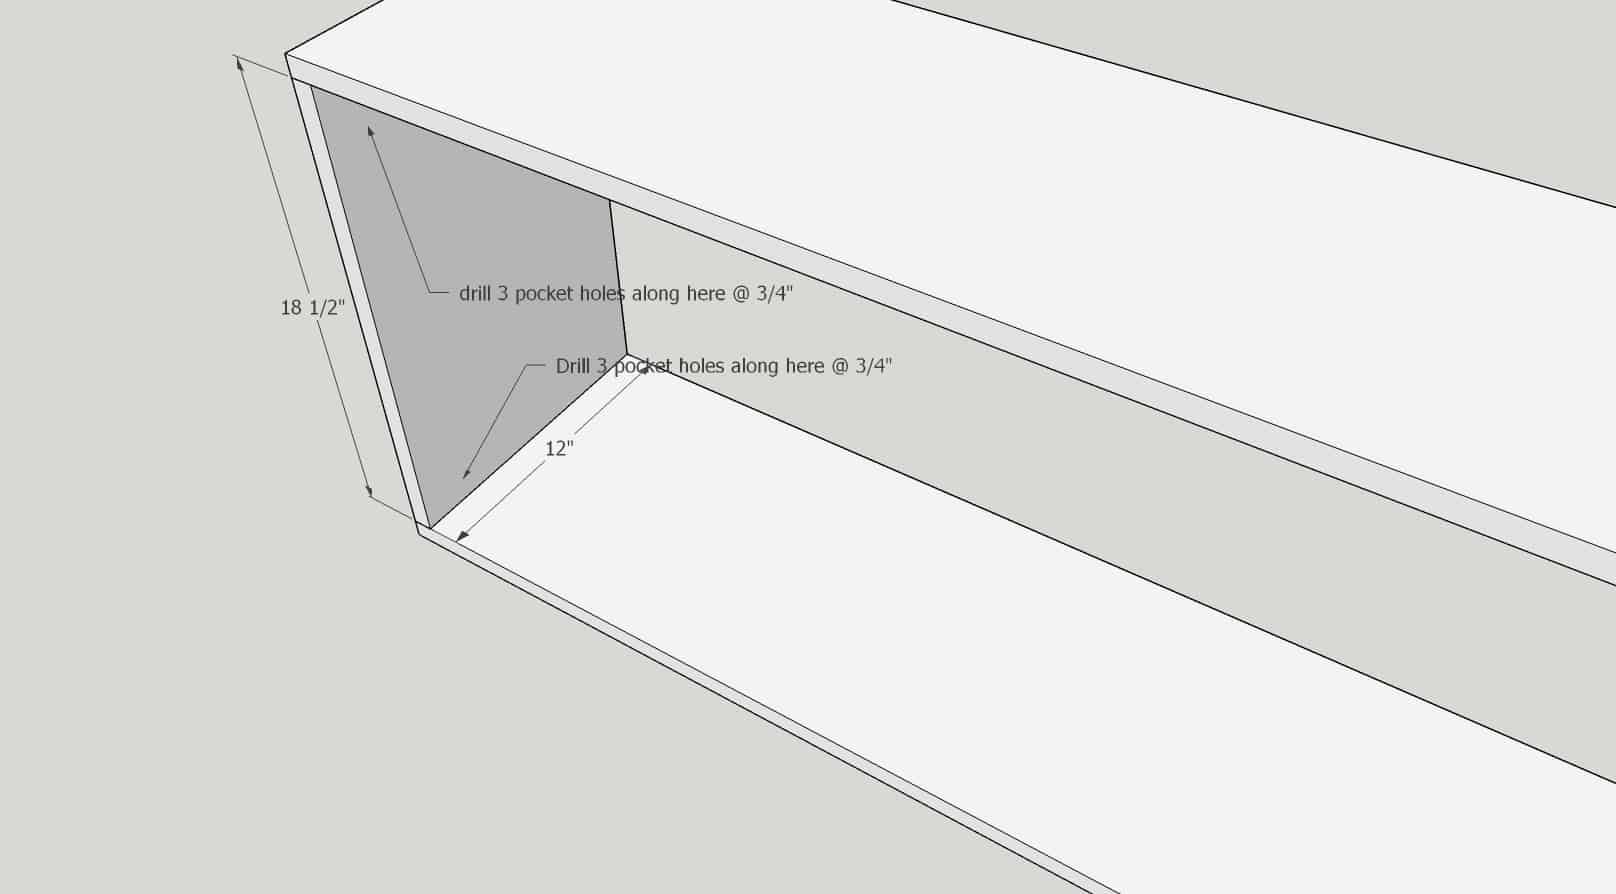
I used my Kreg Jig to attach the box together! Using wood glue and 1 1/4″ screws make for the easiest joinery. But if you do not have a Kreg Jig, you need to get one, but you can screw straight down into your sides from the top and bottom.
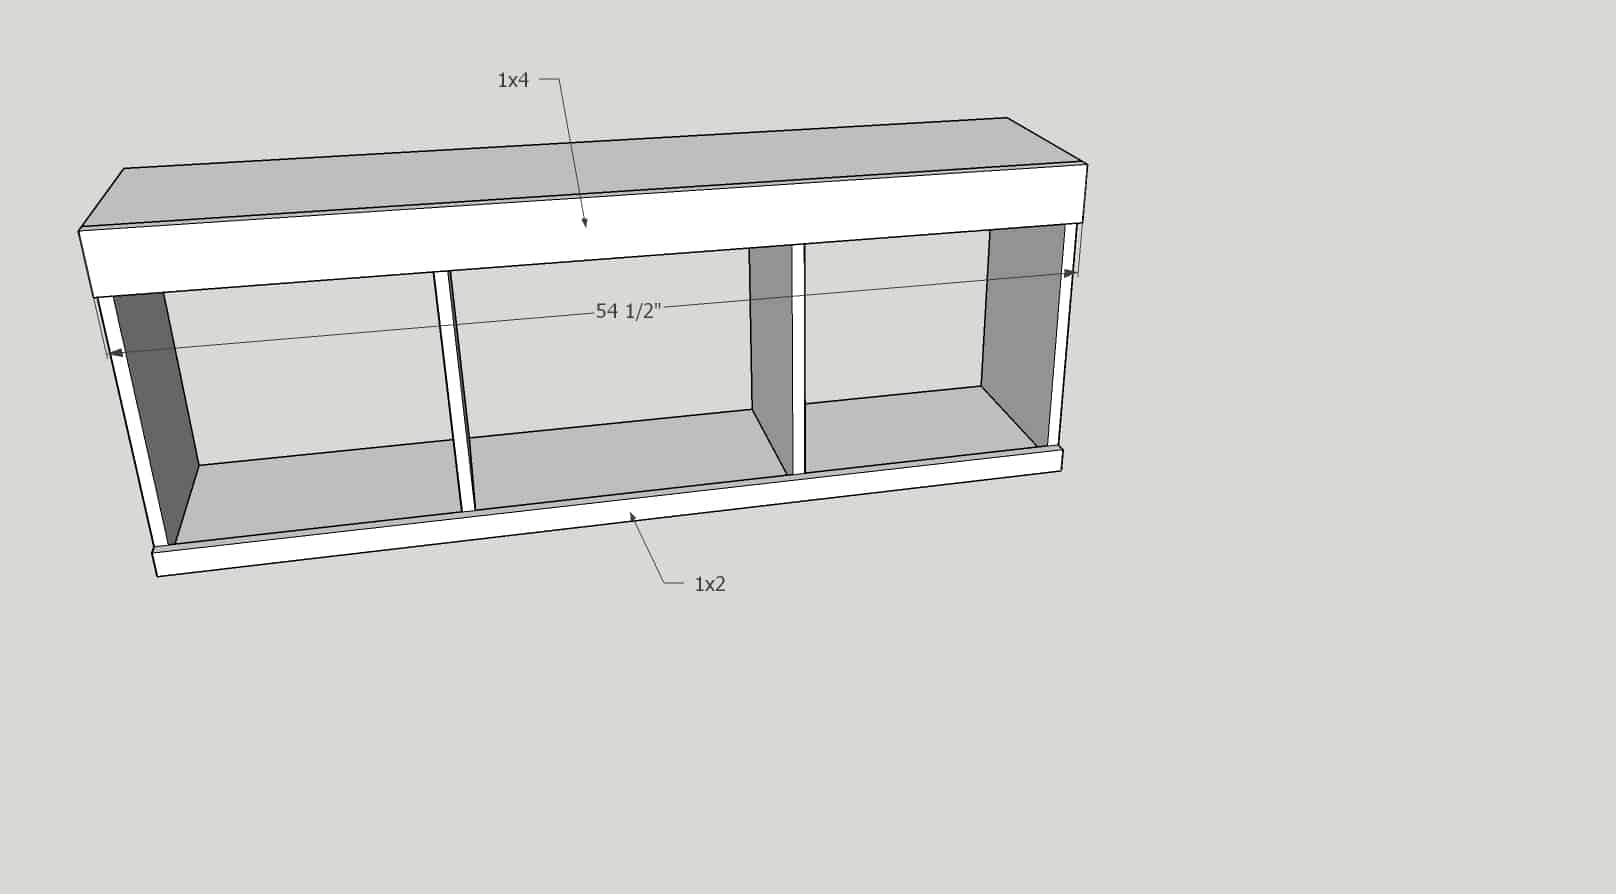
Once your box is built, add your face-framing boards to the front and brad nail into place with wood glue and 1 1/4″ brad nails. I used the 1×4 at the top so even after the crown molding was added there was still a decent amount of board seen.
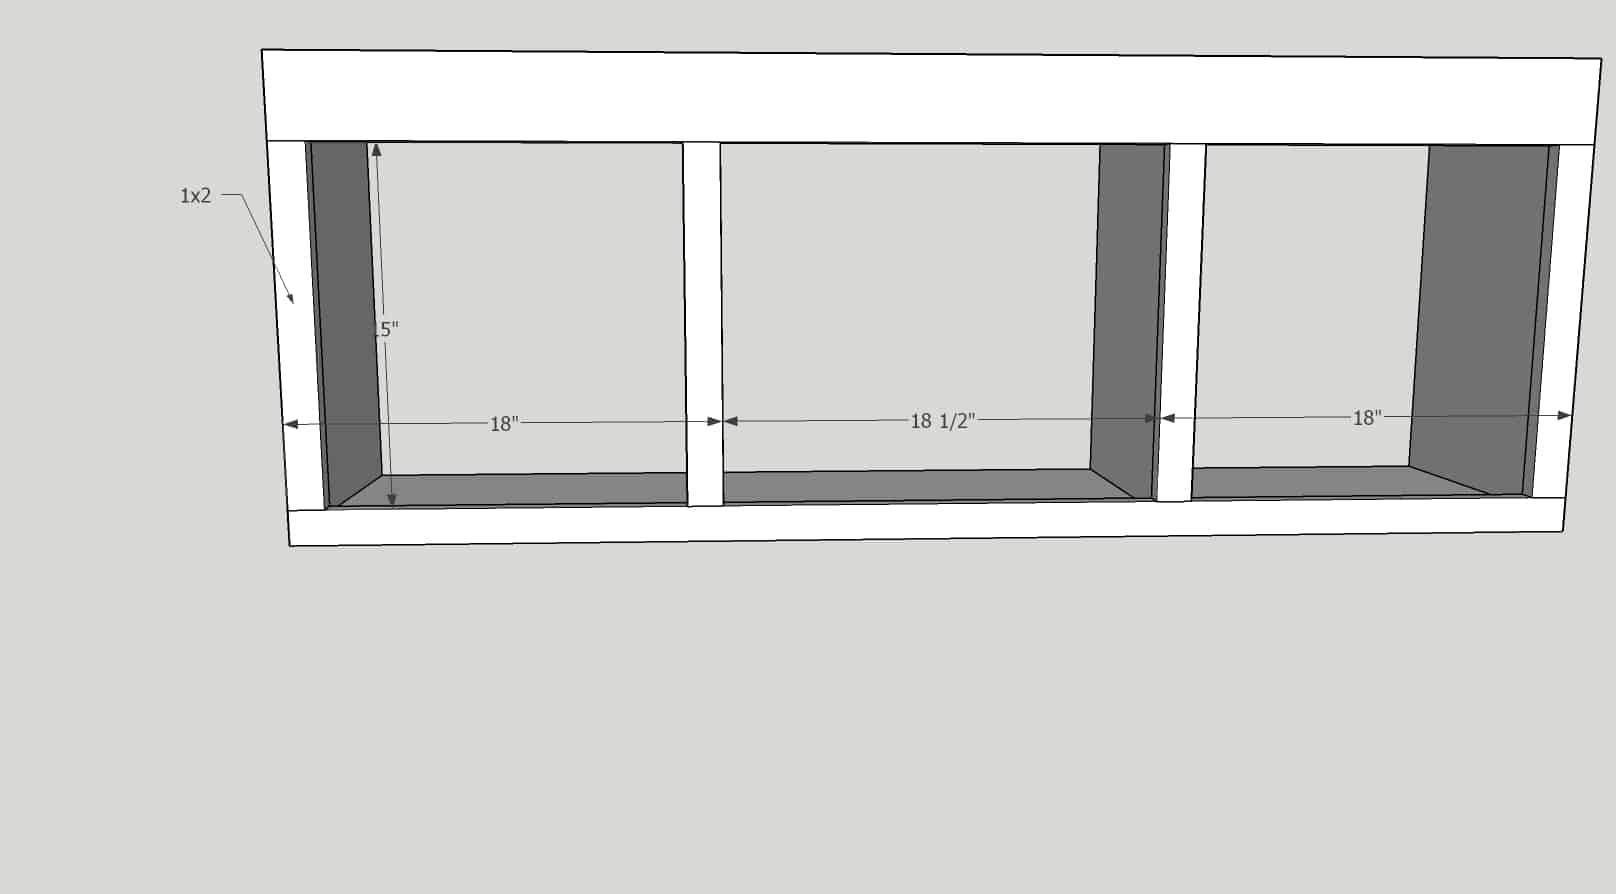
See how the dividers are perfectly placed to look like they are part of the existing cabinets!
I did not add a back onto the box simply because I knew that I would be tiling the back wall and so there wasn’t a need for a back, and even if you don’t want to tile, there is nothing wrong with seeing a wall through the open cabinets!
After the face frame boards were attached, I placed the box on top of my cabinets and then added the crown molding and small molding as it is to hide any imperfections and nonlevel lines of the ceiling or existing cabinets. I just used brad nails so they could easily be removed if I ever wanted to take this down. You can use glue if you prefer, but they aren’t going anywhere!
I didn’t show you how to add the molding to the bottom, but I am assured you can do that all on your own! LoL! Bevel the corners of your bottom molding at 45 degrees off square to give it seamless corners!
Once it’s done and your cabinets will look like a million bucks!
Building out the peninsula
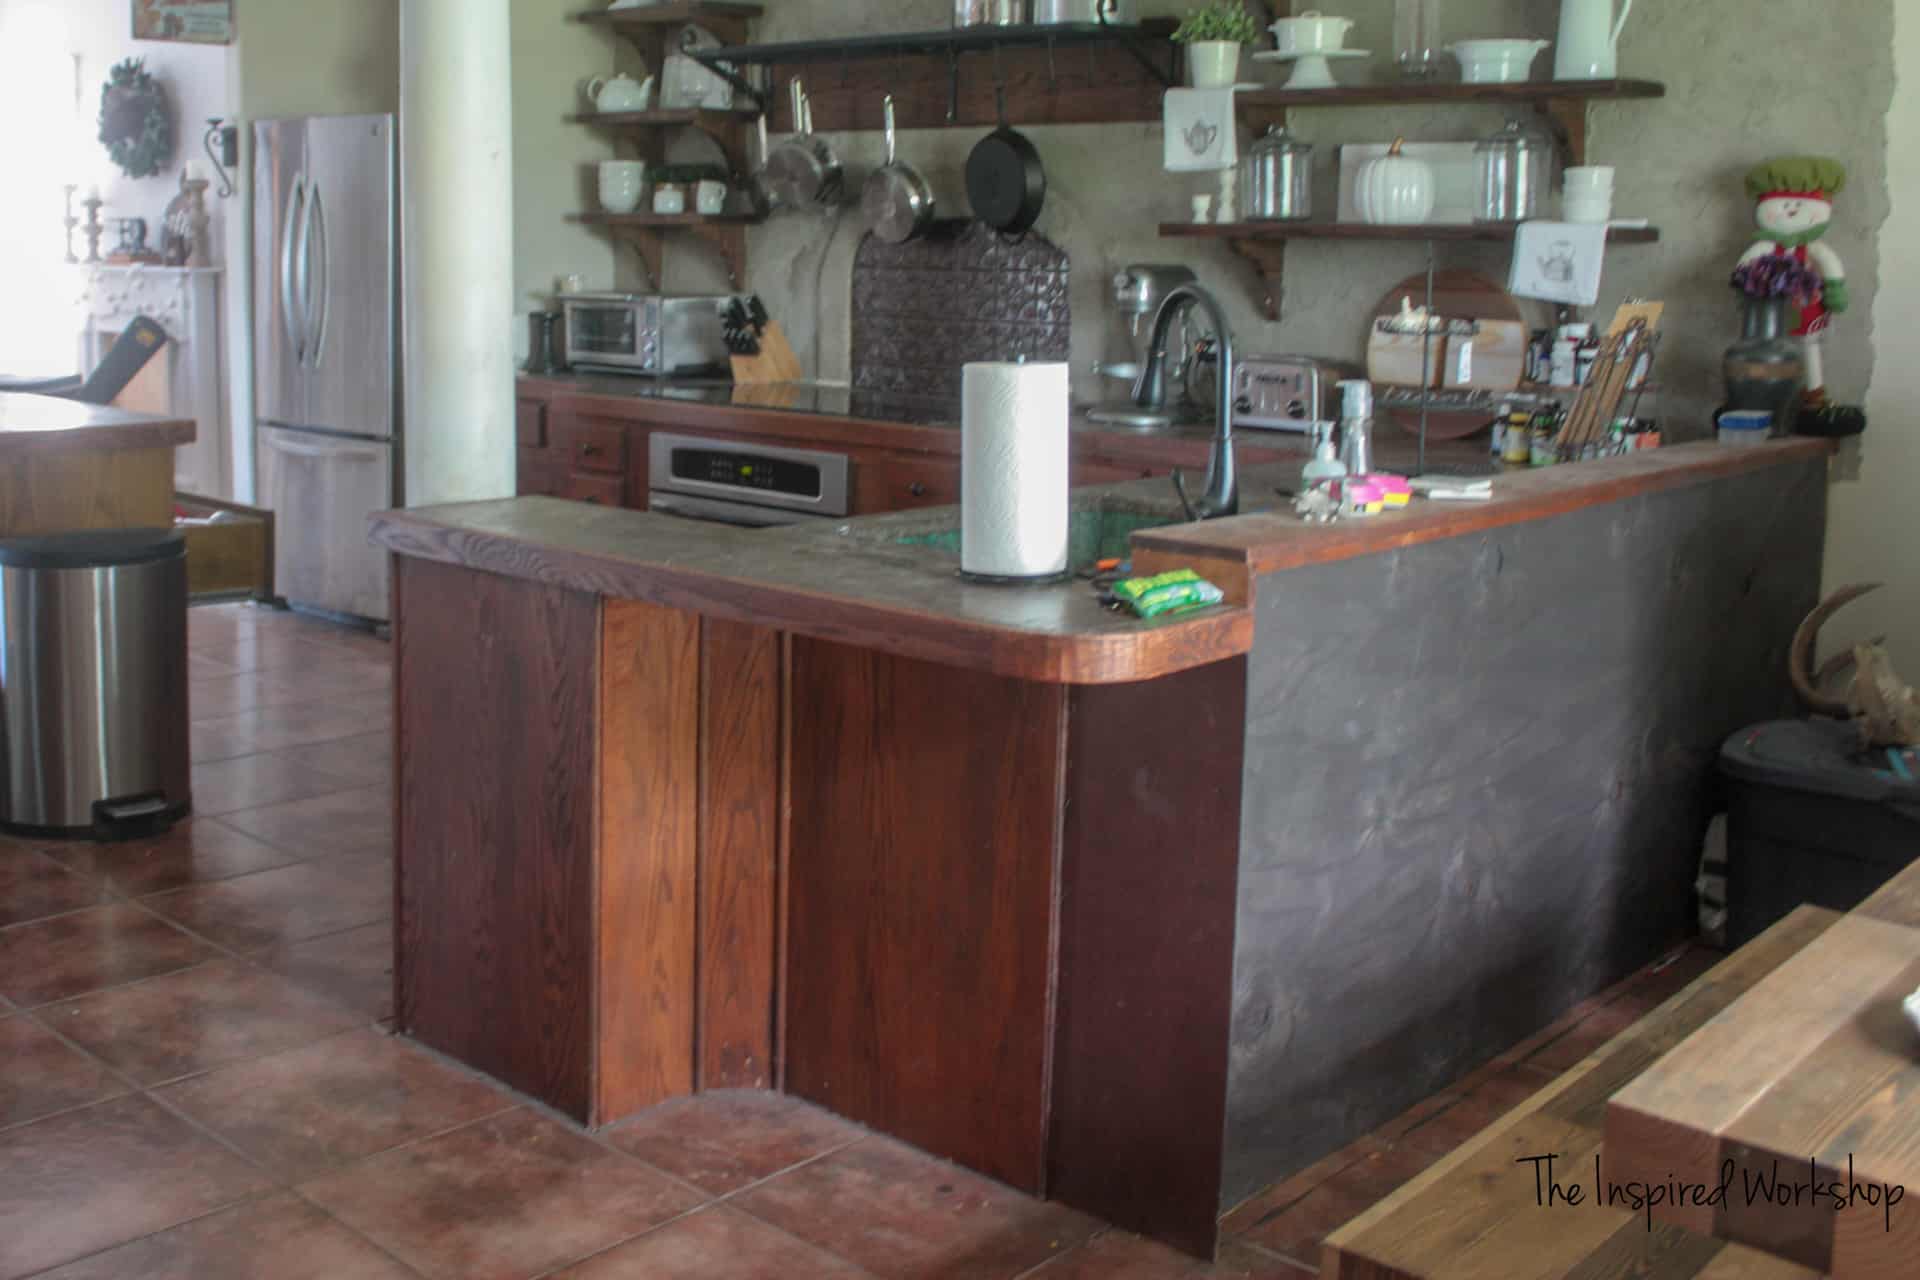
Now moving on to the building out of the peninsula, this was a little trickier for me than it should be for most. Most people aren’t trying to build out around a drain pipe that had to be moved outside the existing cabinetry because the drain wouldn’t drain…and they just took the pipe straight out of the wall! I didn’t get the greatest pictures but here was one I found that kinda shows the crazy going on back there! Lol!
You can see the pipe just randomly exiting the wall! But it really isn’t tricky, I built two ladders essentially and put one inside the pipe on its side and one outside the pipe on its side, and attached them with small boards! It gave me the perfect surface to attach the concrete board to for the countertops and the plywood to close it all in! You may have to think a little outside the box if you have something that most people don’t but I promise you, you can make it beautiful…and look totally normal!😅
I will have to use Sketchup pics to help show you this! I WISH I would have taken pictures for you! It really was an easy fix!
Materials Needed:
2 – 2x4x10
3 – 2x4x8
2 – sheets of 1/4″ plywood
1 – 4×8 sheet of melamine ripped down to 3 1/2″ strips and 5 1/2″ strips (1 sheet did the entire kitchen – the back of the peninsula, the island, the wall by the fridge and drink station)
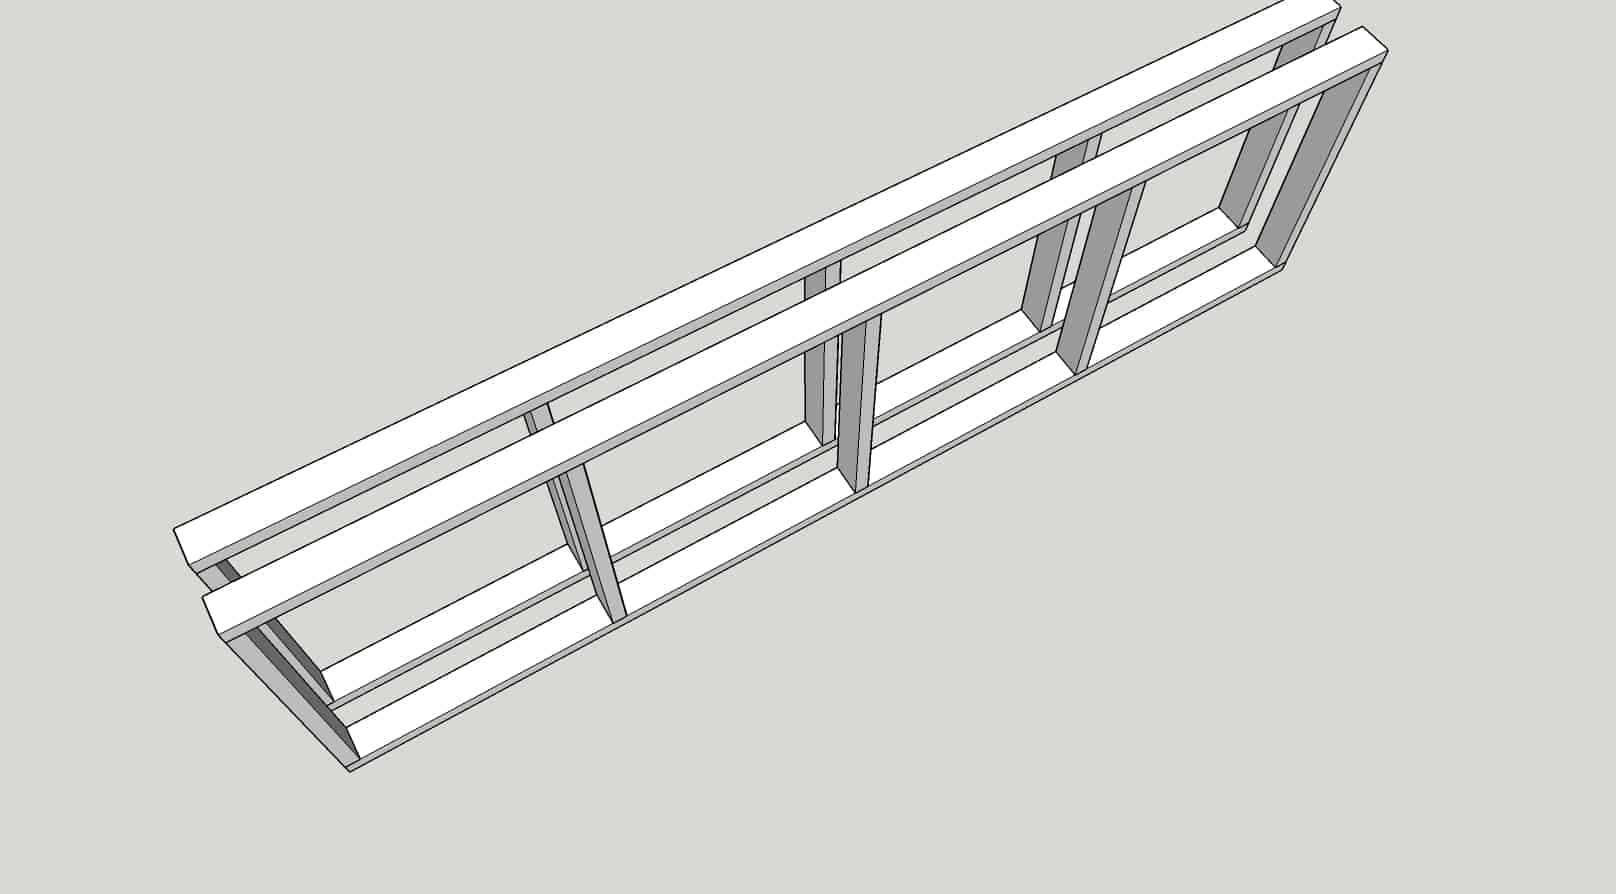
I built the two ‘ladders’ as I will call them as long as from the wall to the end of the cabinet back that you can see in the picture, that’s how I closed in the space for the shelves. It ended up being 113″ long and 34″ high since that’s how high the rest of the cabinets were without a countertop! I used 2x4s to make sure it was able to support the weight of the concrete counters.
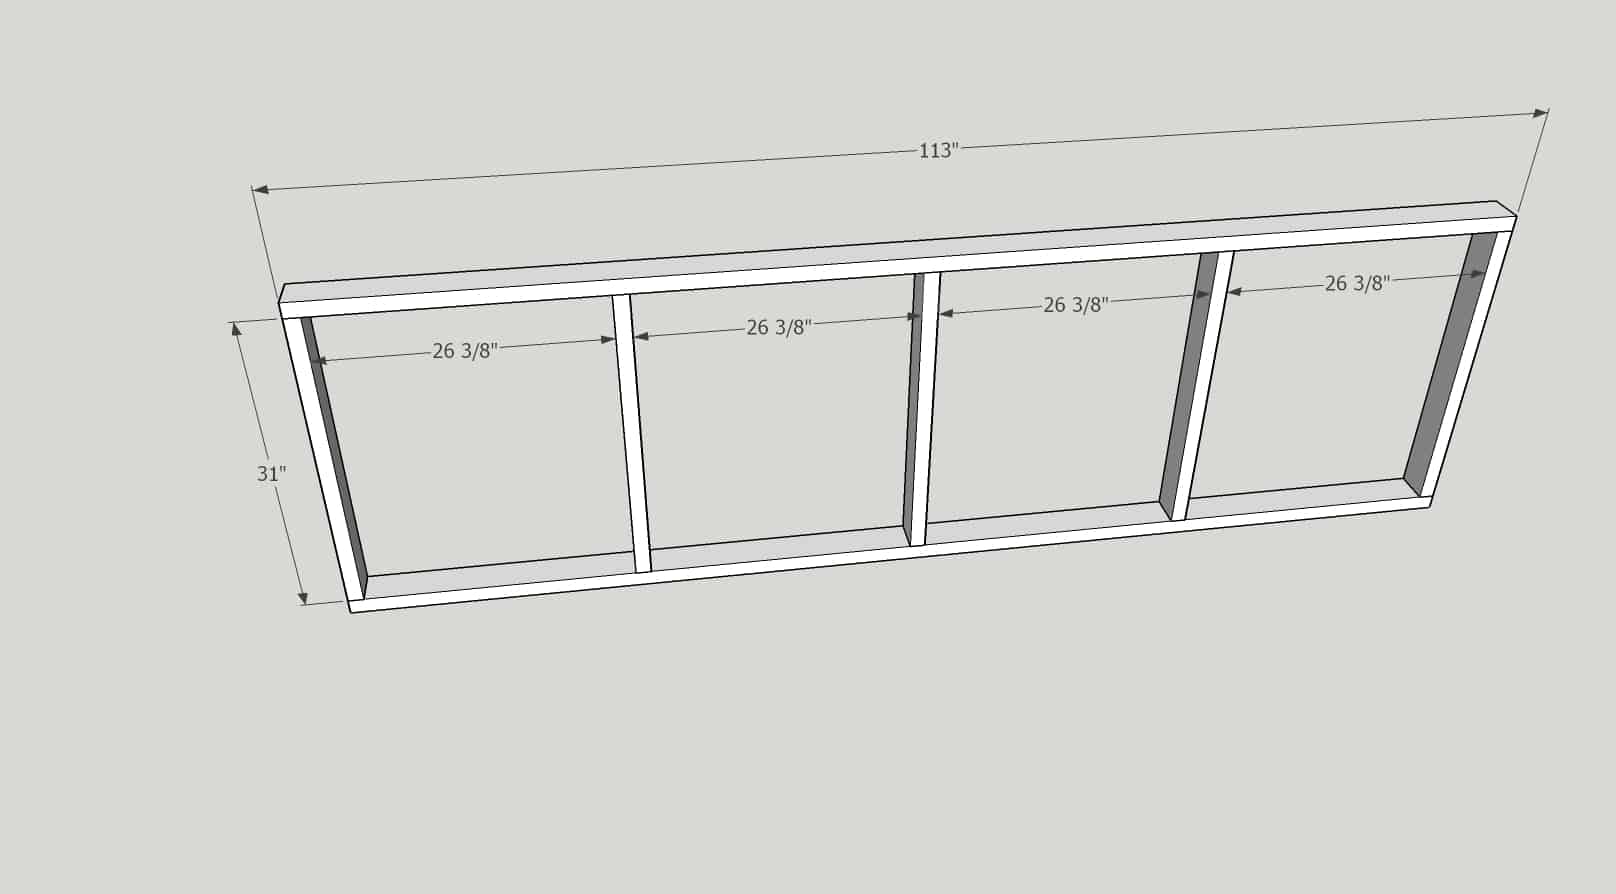
Once I had the ‘ladders’ built, I attached them to each other with small pieces of 2×4.
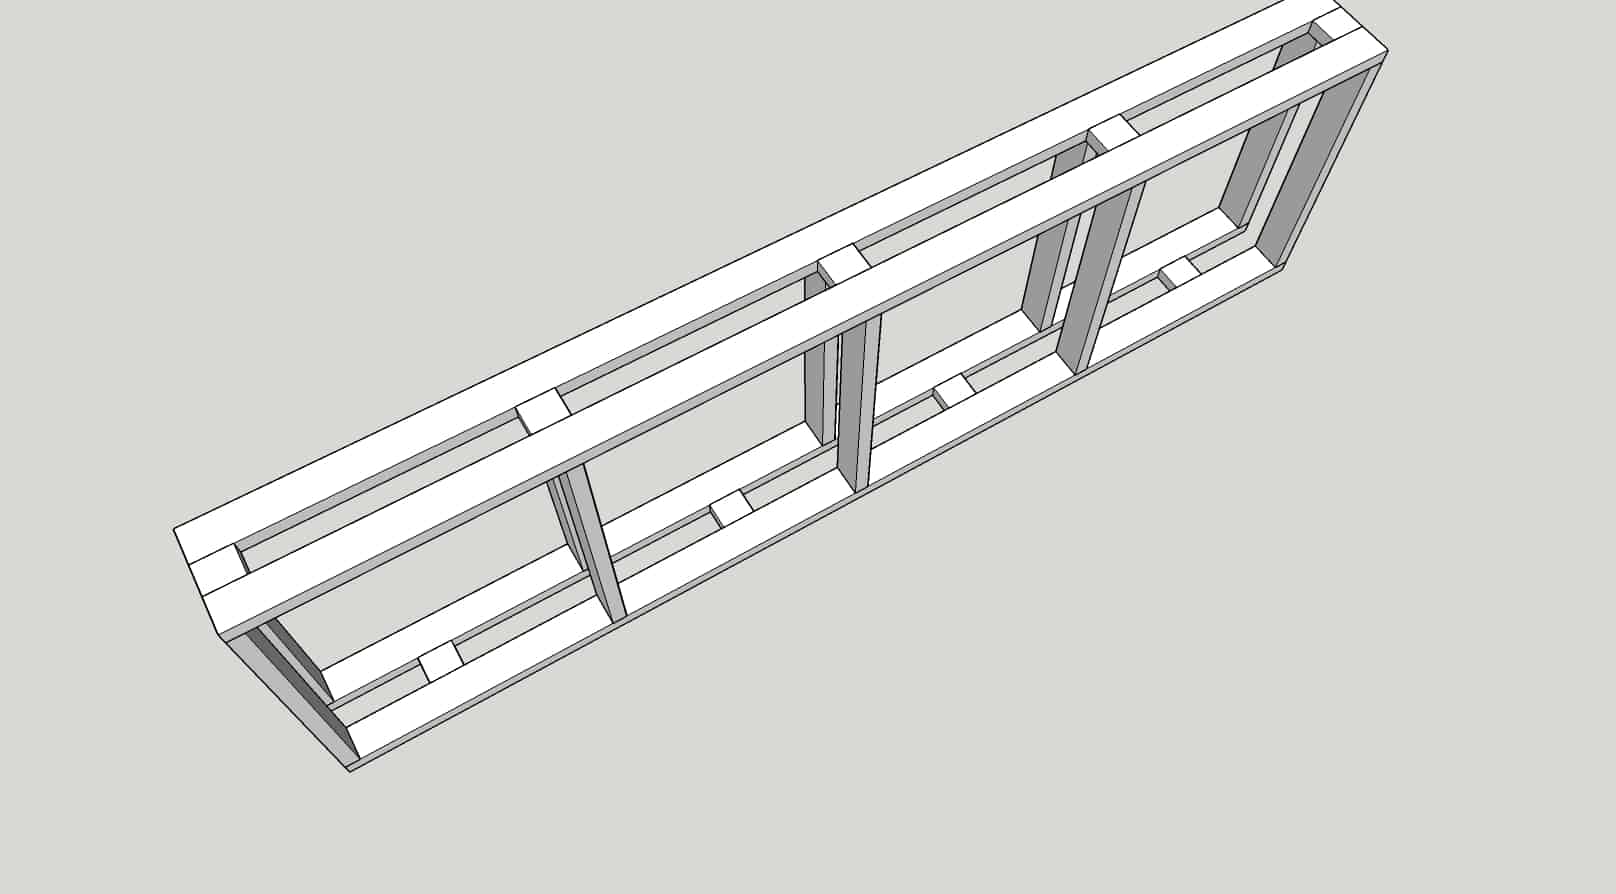
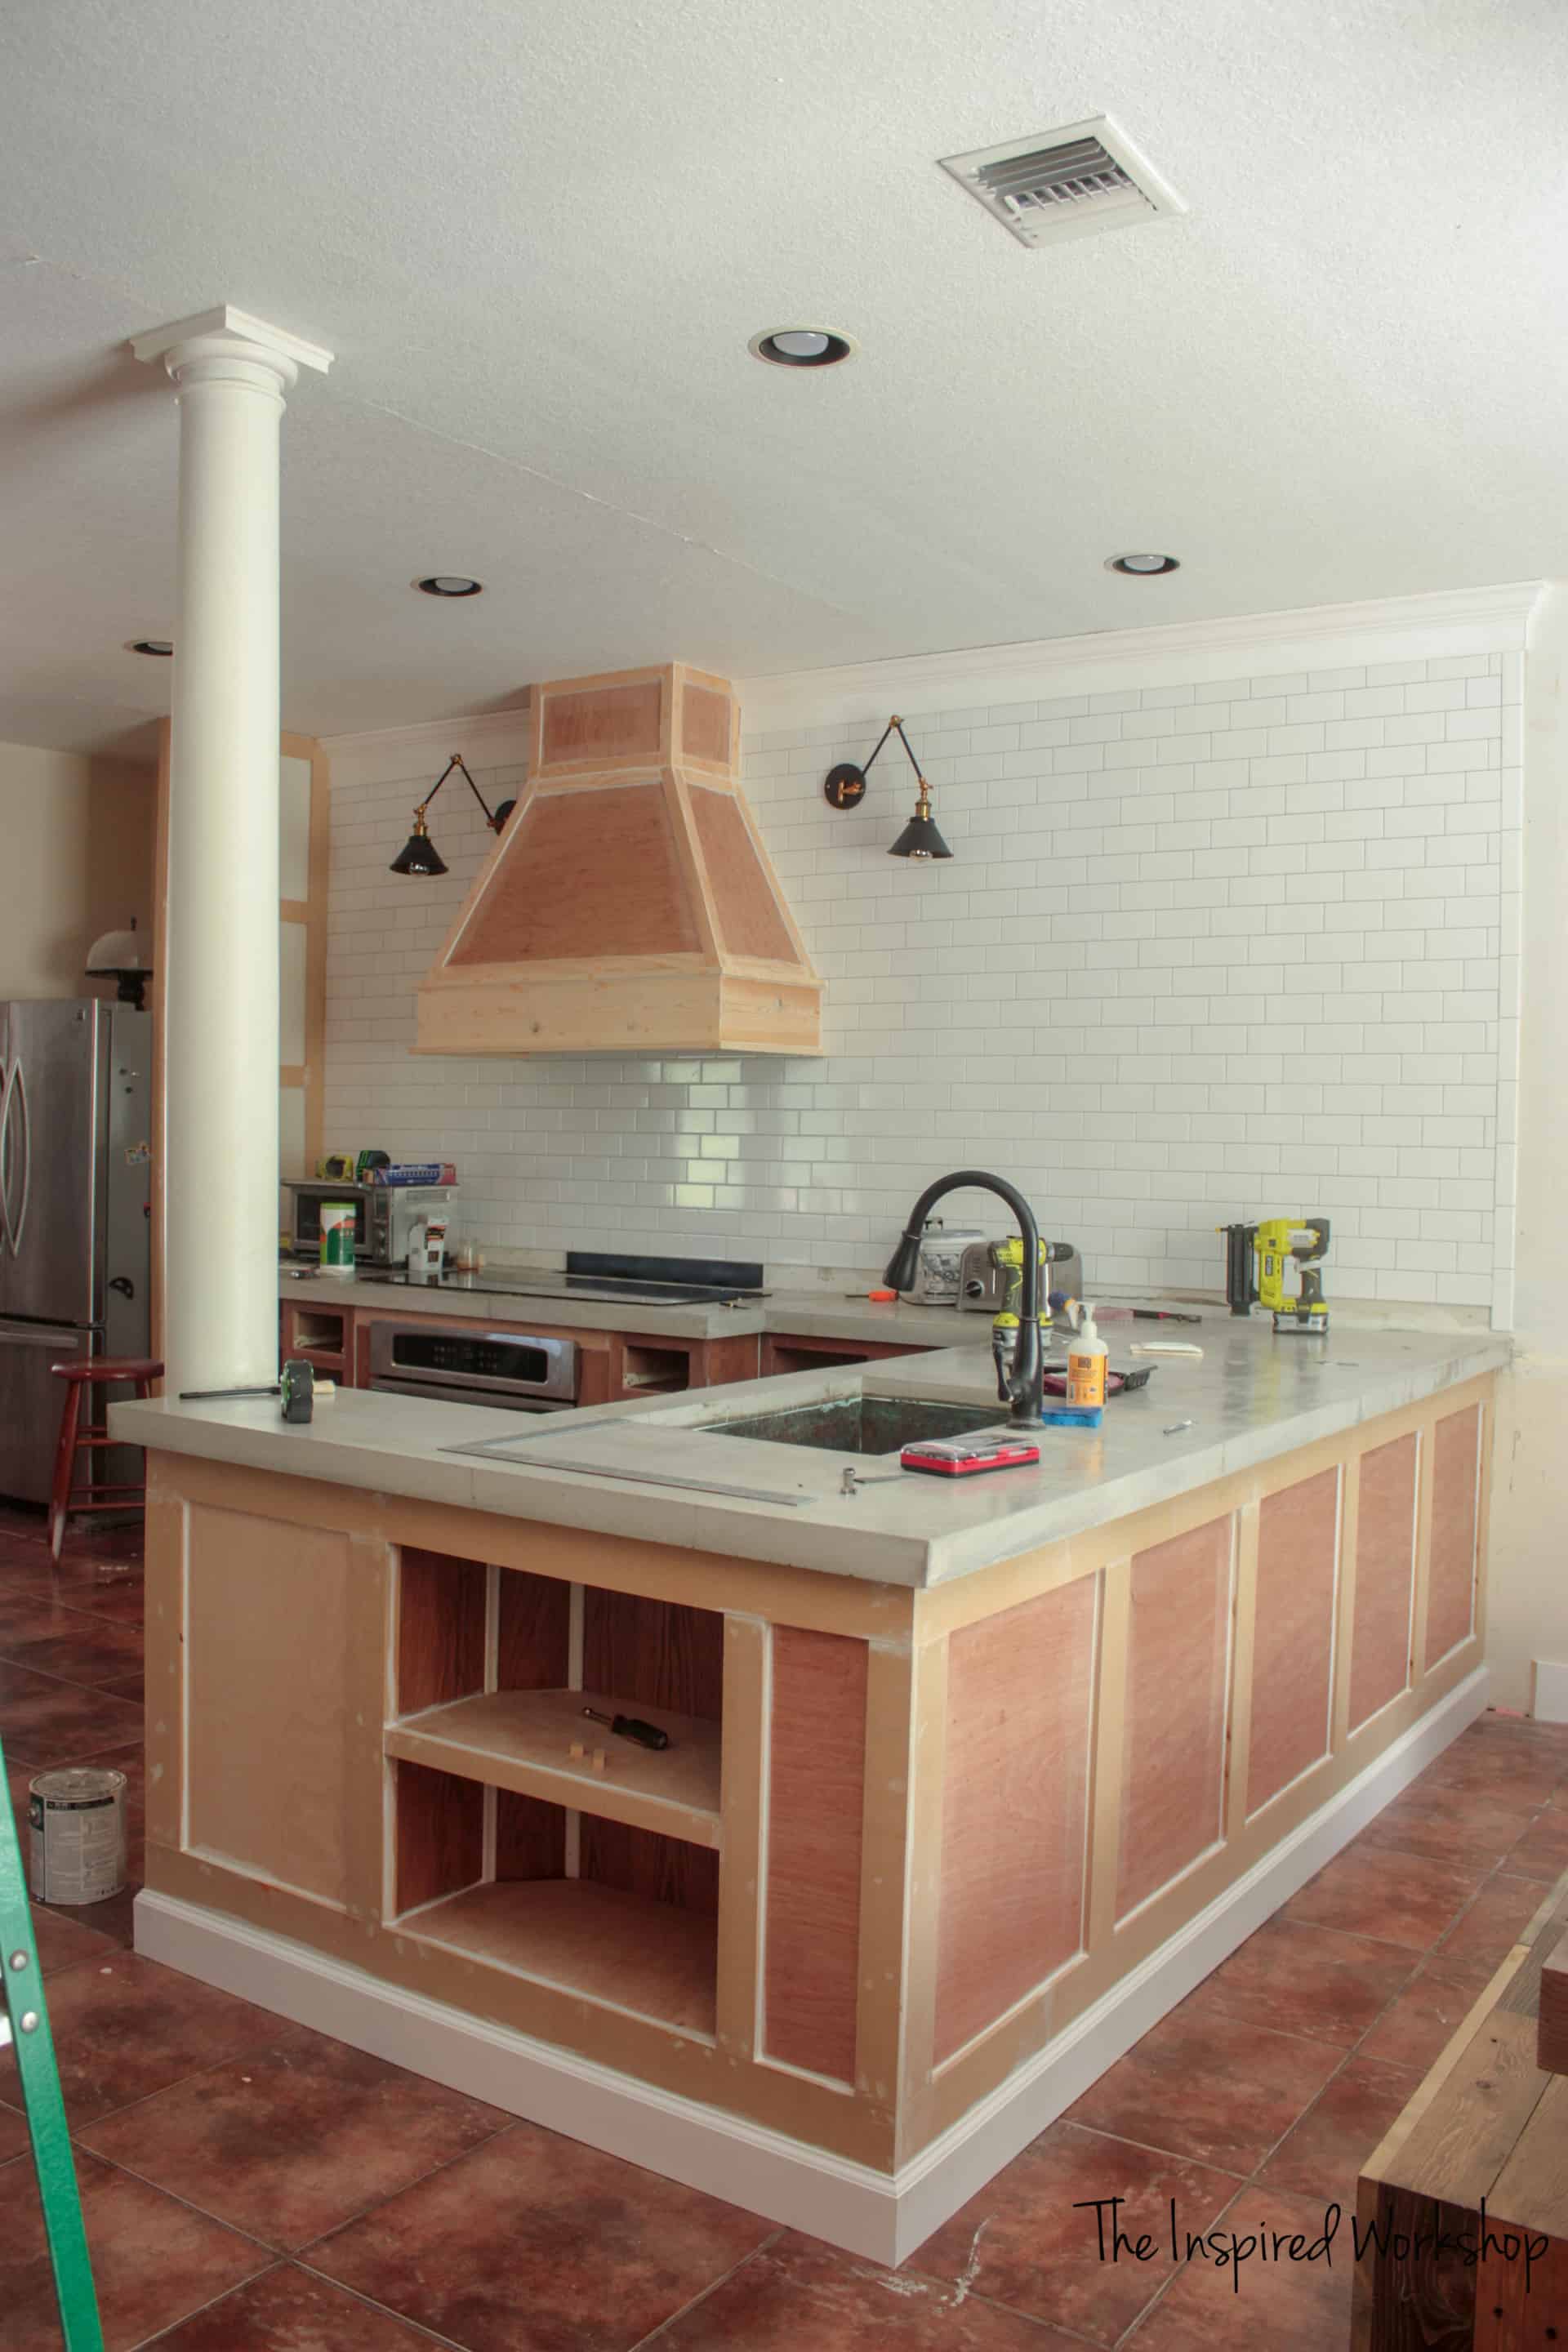
I covered them in 1/4″ plywood just like I did the island in this POST. Then added MDF strips just the same as well! Throw on some baseboards and BOOM! Just like that the whole kitchen seemed brand new! That was the moment I knew the kitchen would turn out alright! Lol!
I had to really work some magic where the shelves were. That was a little harder simply because of the angles and the plywood that was already there was not straight at all, it leaned way back as you got to the top of it. So the bottom shelf is a wee bit small on that side than the other…luckily if I didn’t just tell you that, you would never have known! That is the beauty in all of this! It does not have to be absolutely perfect…as a matter of fact, I have looked really closely at every kitchen and bathroom I have encountered since starting to work on this house and I have yet to find one that doesn’t have something that I end up finding that I would have never noticed if it weren’t for REALLY paying attention and looking for mistakes! LOL!!
The only way to DIY your kitchen renovation is to be able to see through all the caulk and ugly to visualize the pretty! If you can do that, you can make your kitchen anything you want!
Want to see more of the kitchen renovation? Here are the other posts I have that go along with it!
Mood board and plan for the kitchen reno
Thanks for checking out this post! If you liked it, or it helped you in your DIY journey, I would LOVE for you to Pin it or share it!
