DIY Velvet Ornaments
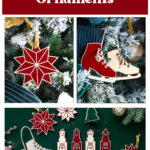
Velvet is classy, elegant, and when paired with gold it takes everything up a notch! This is exactly why these DIY velvet ornaments are just what you need to make your Christmas tree absolutely perfect this year without breaking the bank! You can make yourself a tree full and send some to family and friends for a fraction of what you would pay for fancy velvet Christmas ornaments in the store!

***NOTE: All links in this article are affiliate links! Affiliate links pay me a small commission (at no extra cost to you) should you make a purchase after clicking one! I always appreciate you shopping at my links as that helps me keep creating content for you all!***

I mean how elegant, but yet adorable are those ornaments?! Ahh!! I get so excited still when I see them! I would NEVER be able to create these masterpieces without my xTool M1 laser cutter though! That is the real MVP this Christmas because I have made so many gifts, ornaments, and decor pieces with it that are perfection!

Check out the Chinese Checkers board, the Taylor Swift ornaments, the block printing shirts tutorials, and the personalized Christmas ornaments that I have made this holiday season! There are even more if you search laser projects!
These velvet ornaments are so easy to make because the laser does all the hard work, and the file creating has already been done for you by me, so all you need to be able to do is spray paint and use super glue! Lol! Let’s get to it, Christmas is right around the corner!

If you don’t have a laser cutter but you LOVE these ornaments, I am selling a couple of sets! Head to my SHOP page and place your order! Make sure and order before December 15th to ensure Christmas delivery!

Gathering Supplies for DIY Velvet Ornaments
Grab your SVG files here! They are free for a limited time this holiday season, so make sure and download them!
Materials for velvet ornaments:
- Velvet flocking – deep red, dark green
- gold spray paint
- 3mm basswood sheets
- 1.5mm basswood sheets – I linked some at Amazon but if you have a Micheal’s near you they sell the 1/16″ (or 1.5mm) small 5×5 sheets in a 16 pack for 5 bucks AND you can use a coupon on them! They are up by the register and I love paying 2.50 for them and I use them for so many ornaments that I cut! They are also cheap enough I don’t feel bad testing on them!
- ribbon of your choice
- gold rope
- super glue – if you get super glue on the gold spray paint, it turns it slightly black, so find the smallest nozzle super glue you can! I didn’t use a tiny nozzle and there are a couple of places I messed them up, it isn’t super obvious but it is there! Lol!
- M1 laser or other laser cutter/engraver
Cutting the designs for the DIY Velvet Ornaments
Alright once you have your files downloaded, you will want to prepare your basswood! This velvet flock is so cool because it is self adhesive so you just peel and stick and the laser does the rest! There is a lot of it too, for the twenty dollars that it cost, you could make so many of these ornaments!
Making the Star Velvet Ornaments

I started by cutting a piece just big enough to fit the star on it since I wasn’t sure how many I was going to be making originally and it is as easy as sticking it onto the wood just like a sticker! I used the 3mm wood for the one sided stars, and used the 1.5 mm for the double sided stars! As I break down each design later I will make sure and let you know which wood I used but it won’t hurt to use either one!


Ignore my hands, they are always pretty rough but I have been doing a lot of tiling so they are real rough right now! Lol!
Set the wood sheet inside the machine, it is best to make sure the velvet is under the red dot even though I did not do that and it does work without but if you end up having problems with it cutting all the way through make sure and place the velvet under the red dot for auto measure!

Now go to your computer and open the XCS software! Click image and find the star svg file you downloaded from my site and click it! Make sure and fit the star with pieces on the velvet and the solid star on the plain wood! ***Then you will also cut the whole file on plain wood after cutting one on velvet, that is how you get them to cross coordinate!
Click off of the star, anywhere on the screen and you will see the right side panel options, make sure laser flat is selected, material is set to 3mm basswood, you can use the auto measure by clicking the small ruler to the right of the thickness box. You will want to use your triangle risers or honeycomb panel is best if you have one! So select triangular prism on the height raised box, and processing path should be set to auto planning!

Click and drag across the stars to the processing settings to pop up! You will want to make sure output is checked, if you choose ignore, it will ignore whatever is highlighted!
You will set both layers (blue and black) to cut with the preset 3mm basswood settings except I slowed the speed down to 4 instead of 5 which then makes it considered manual settings! Click the process button!

Once you click process, a new screen pops up to show you what will be processed! And you have to click start in the upper right hand corner to actually send this to the machine!

Once you have clicked start the side screen will change to say machine is ready!

Now you will need to press the white button on the front of the xTool M1 to start the cutting! Make sure and use air assist when cutting the velvet for sure or else it burns the edges pretty bad!
The machine works its laser magic to make this beautiful star!

Now this is why you really want a honey comb panel, the prisms allow the pieces to fall and the laser can run back over them ruining them!

I started moving a couple of the prisms closer together underneath the spot where there a bunch of smaller cuts so that they couldn’t fall through! And it is easy to select these couple of pieces and re-cut only these pieces!
I then cut another set on the plain 3mm basswood so that I could swap the pieces and make the two stars without wasting any! Apparently I don’t have pics of me cutting the plain wood ones but I used the same settings!
Once all the pieces are cut, you will need to spray paint the plain wood pieces gold! I also placed the velvet star outline face down on painter’s tape so I could spray the edges gold as well! Make sure and spray lightly so you don’t saturate the velvet, it may take a couple of coats!


Now is the fun part to assemble the star ornaments! Gather all the pieces and some super glue! Just glue the outline to the star backer! Then add the pieces to the inside of the star outline!


Keep adding pieces until viola, it is completed!


Apparently I don’t have a gold one completed until I was taking final pics! Lol!
Making the Nutcracker Velvet Ornaments
The nutcracker ornaments were very time consuming to make since I created the file myself! Lol! There are always a lot of mistakes made but luckily I have worked them all out for you and your ornament making should be smooth sailing!

Once you have downloaded the nutcracker file, you will want to prepare your wood just as we did with the star ornaments, you will need some velvet cuts and some plain wood cuts! Place the velvet on your wood and place it inside the machine!
**You will cut TWO full sets of the file, one will have the main nutcracker and all the small pieces cut out of velvet but the backers will still be cut out of plain wood! Then you will cut the entire file on plain wood! That is how you get all the pieces to cross coordinate!
Then open XCS and click image and find the nutcracker SVG file you downloaded from me and it will come into XCS just as shown below!

Now, if your name is not Troell, you do not need the names and you can click and delete them! Lol! I tried to delete them in the original file and it told me something about boundaries and it wouldn’t let me use the file anymore! So I left it alone because I was not about to redraw these dang nutcrackers, you have no idea the hours I spent even though they look so simple! LOL!

Once you have deleted the names, you will see this panel to the right, you will want it to be laser flat, 3mm basswood plywood, thickness (you can auto measure this), height raised – triangular prism, and processing path is auto planning! **If you do not see this same panel, you have something selected, just click anywhere on the screen that doesn’t have part of the cut file!**

Note on Cutting the Nutcrackers
***I originally cut everything in 3mm and went back and cut the small pieces that fit inside the engravings in 1.5mm because I did not like how far they stood out! You will just click the small pieces to select them and click IGNORE on the right panel once you have cut the large part of the nutcrackers, you will delete them or IGNORE them while you cut the small pieces on 1.5mm!***
Once you have those settings set, you will want to click the black layer down on the bottom left, it is called layer 2! That will highlight all the black layers in the photo so you can set the settings for that layer! Black will be a cut layer!

I used the preset settings for 3mm basswood so the only thing you need to change here is the CUT, by default XCS is set to score, you have to manually select CUT!

Next, select Layer 1 (the blue layer).

The blue layer is the ENGRAVE layer! You will change the default score to ENGRAVE on this layer!

Alright, click Process so the machine can so it’s thing!

If you clicked ignore on the small pieces they should NOT show up on this screen! It should only be the nutcracker men and their outline! They are on my screen because I cut them out of 3mm before I realized that was too thick!
Make sure and press start on this screen and go outside and press the start button on the machine to start engraving and cutting! ALSO make sure and use AIR ASSIST on the velvet for sure or else it burns it!

You can see how I arranged the nutcrackers trying to get the most out of my sheet and also how I made mistakes! Lol!
The engraving on the red velvet almost looks gold, it was so neat!

Okay after all the cutting, you should have all these pieces…ignore all the star pieces, I was gluing them all at the same time! Make sure to do all your spray painting! Use the upside down paint trick for the velvet pieces (I didn’t take pictures of painting these but you can see the star or the skates to see the painting!)
They are ready to assemble! Grab your super glue!

I just realized there are not any backers in this photo, but you should have 4!

I found it easiest to glue the outline in place first, let it dry a little and then glue the center part in place!


Continue this until all the pieces are in place and you have your nutcracker velvet ornaments!
Making the Ice Skate Velvet Ornaments
Here we go again! Let’s make some ice skate velvet ornaments! I am not going to go through the whole process simply because it is the same as the others, I will just give you the settings to cut 1.5mm basswood at since it is not a pre-programmed wood!

Oh my…you can’t even read the settings in my photo! LOL! They are CUT, Power – 100, Speed – 7, Passes – 1. These are the settings I used on both the velvet and the plain wood! Make sure and use your AIR ASSIST! The ice skate file has all the ice skates to only cut once! You can move the pieces around and ignore the ones while you cut the others!
Everything is set to CUT on the ice skate file!
Once everything is cut you will want to spray paint the skates gold, and make sure and use painter’s tape on top of the velvet ones and then turn them upside down to spray paint the sides!


Once they are painted and ready to go you can assemble!

I found it easiest to glue the shoe lace grommets first and then add the velvet, the great thing is there is a little extra wiggle room if you don’t glue them perfectly!


Flip the skate over and glue the other side the same way!
Now make the gold skate!


Flip the skate over and glue it the same way!
Now you will need to add the beautiful shoe laces! I used this rope trim from Hobby Lobby but if you don’t have one nearby I found this one on Amazon, same size and color!! The trick to this stuff is wrap tape anywhere you want to cut to keep it from unraveling!
Wrap the laces like so…

Pull it through long enough at the top to tie a knot and you like the length, then wrap tape around the rope where you are going to cut on the lower end!

Now place some super glue on the taped area to glue it up under the first row of shoe laces!


I ruined two skates trying to figure out how to do the shoe laces, this was the cleanest way I found!
To connect them, I just glued a separate piece of the gold rope to the inside of the shoe laces at the top!

Boom, those beauties are DONE!

Gosh I sure do love these little beauties!!
Making the 3D Tree Velvet Ornaments
Last but not least, maybe my favorite one of all, the 3D velvet tree ornament! Y’all I just got the green velvet in from Amazon which is why there is only one green ornament, but I cannot wait until I finish all my green velvet ideas!

Okay, this one doesn’t have it’s gold partner yet because I have to make a smaller width on the plain wood one than the velvet one since they fit together! I don’t know it that makes sense but when you cut it, it will! Lol! Hopefully I will have the file updated soon!
First things first with this ornament…***You must add green velvet to BOTH sides of your 3mm basswood! I cannot tell you how many I cut working out the kinks with the file and then didn’t place the velvet on both sides! Ugh! Wasting all my expensive basswood! Lol!
So add your velvet to BOTH sides of your basswood and then place it in the machine! I used the preset settings for basswood I am almost certain, but if for some reason it doesn’t cut all the way through adjust the speed down to 4! I like to go as fast as possible though because I don’t like to burn the velvet!
Once you cut two trees out of velvet, you will cut the same tree out of plain wood, nothing special needs to be done to this!
Once the plain wood is cut, spray paint the pieces gold!
Now you can assemble!

All you have to do is glue the gold ‘frame’ to the tree cutouts! And vise versa if I had my wood ones cut!


Now slide them together, you can try to glue them but I had a rough time and it is a tight fit when you slide them together so you don’t have to glue, but you can if you want!

So freaking cute!!! So tiny and so elegant!

Well that sums up the velvet ornaments I have made so far, but OMGeeee I have so many others to share! I can’t type fast enough to get all the posts done!
Have you ever made any laser cut ornaments? Or handmade ornaments? I realized I have made every ornament on my tree! Lol! Some make me proud and some make me wonder what I was thinking! 🤣
I better get back to decorating! Thanks for stopping by! Have a good one!

Want to save this DIY Velvet Ornaments post for later? Pin it!


