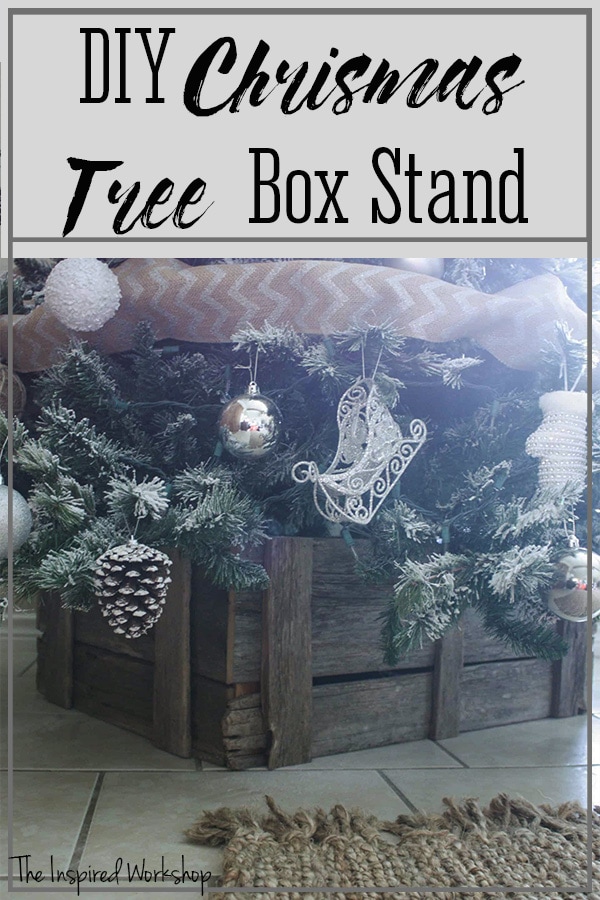
• Skip to secondary menu
  • Skip to main content
  • Skip to primary sidebar
  • Skip to footer
  • About
  • Blog
  • Contact Me

The Inspired Workshop

Inspiring you to Do-It-Yourself

  • Home
  • Furniture Plans
  • Remodeling
  • How To
  • Holiday
  • Crafts
  • Tools
  • Videos
You are here: Home / Crafts / DIY Christmas Tree Crate Stand

DIY Christmas Tree Crate Stand

December 14, 2015 by Cara Leave a Comment

143 Shares
Pin140
Tweet
Share3

Oh Christmas Tree, Oh Christmas Tree…I am so excited about this simple post on my DIY Christmas Tree Crate Stand!! I know it’s a little late considering it is already the 14th of December, but… yes, I did JUST get my tree up last week!! Lol!! And even if your tree is already up, and you are using some other skirt of sorts, you can easily change it out… or pin this idea for next year! My tree was already up and decorated when I decided I wanted a crate instead of a skirt this year, and so I just built it around the base of my tree!!

DIY Christmas Tree Crate Stand

This only took me a few minutes of building because I wanted it as IMperfect as I could get!! Lol!! I wanted it OLD looking, and well used…and I think it turned out perfectly imperfect!!!

DIY Christmas Tree Crate Stand

I was recently driving through town and there was a bunch of old fence wood laying out by the road…I, of course, swung around the block and ran up to the door of the home nearest the heap, and asked if they would mind me taking some of their trash wood!! Of course they were all, “Have at it you crazy lady!!” Haha!! Ok, they waited until I was gone to say the crazy lady part but you know they did once I had left!! Lol!!

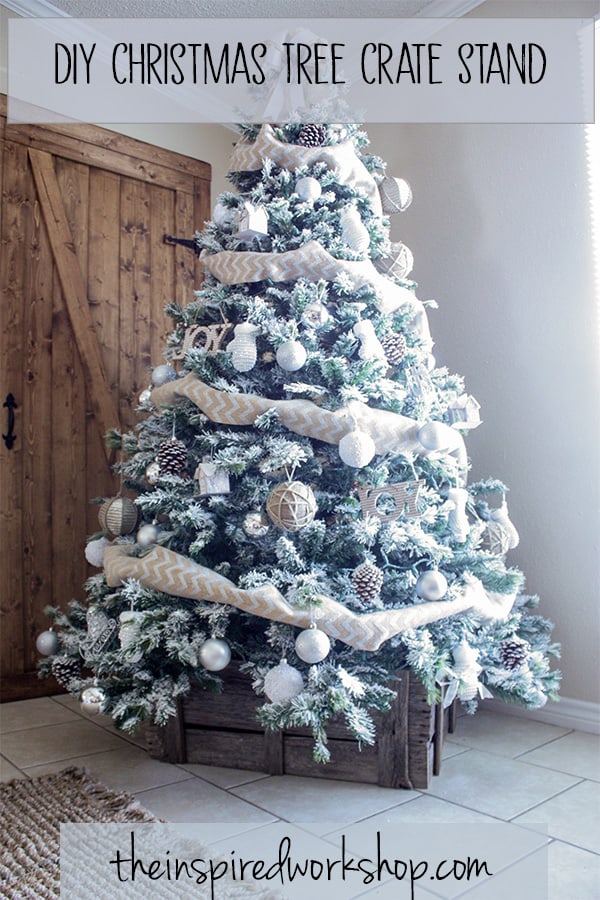
So once I got my tree out of the garage and flocked it…because I decided this year I was LOVING all the flocked trees I was seeing on Instagram…but I couldn’t justify spending all the money on a new tree when yeah, my tree isn’t the BEST tree, but it sure wasn’t worth retiring just yet either!! You can read about my flocking fun HERE if you would like…I flocked my tree and some wreaths (which aren’t pictured here) and I had such a good time!! It only cost me $20 and my tree looks like a whole new tree!!

After all that flocking, I started decorating, all the while not being sure of what I wanted for my skirt!! Then as I was scrolling through my Intagram feed, I came across an adorable picture by @rusted_design and knew exactly what I would do with that fence wood I had picked up the other day!! She actually used an old wagon top but since I didn’t have one of those just laying around, I could easily make one close enough that it would be just right!!

So, now that I have caught you up on all that I have done since November…Lol… we can build this!! Just a note: make sure and measure your tree stand because this just fits around the existing stand it won’t actually hold the tree up and they are all sizes…mine was a triangular shape that measured 22″ each way! The measurements of my crate are 30″ L x ~24″ W x 11 1/4″ H

Materials:

Broken up old fencing…or 4 new cedar fence pickets and some scrap wood pieces for the outside or if you don’t have scrap wood, go ahead and pick up 5 cedar fence pickets

brad nailer and 1″ brad nails

wood glue

scrap wood of 2x any size


Cut List:

4 – fence pickets cut @ 30″

4 – fence pickets cut @ 23″

10 scrap pieces cut @ 11 1/4″

4 other scrap pieces cut of 2x @ 11″

Now I am not going to be super detailed here because the pictures are pretty self explanatory, and it’s your basic crate, nothing fancy!

One thing worth mentioning, when you look at my pictures you will see two different size boards, the top being larger than the bottom, the fence boards I used were larger than standard cedar pickets, they were more like a 1×8 and then a ton of them were broken into almost a 1×4…if you like this look you can always buy the wood accordingly, just be aware that 1x8s in cedar are pretty expensive compared to fence pickets…and free off the side of the road is even better!! Lol!!

If you are using old wood, you will definitely want to scrub it down first to make sure you don’t bring any type of creepy crawlers into your house!! Here are my boards sitting out to dry after being washed!

DIY Christmas Tree Crate Stand

Isn’t it beautiful!! All old and worn…used and torn up!! Makes my heart go pitter patter!

I cut 2 pieces to 30″ leaving the really worn end on the board.

DIY Christmas Tree Crate Stand

I used broken pieces that were smaller in size to attach the two pieces together! I just used wood glue and brad nails…I used 1 1/4″ brad nails but most of them went all the way through so I put 1″ brad nails on the materials list!

DIY Christmas Tree Crate Skirt

It’s looking so cute already!!

Then repeat this step to make a second side that is 30″! And you pretty much just repeat this two more times, but cut your pieces to 23″ instead of 30″ to make your two smaller sides!

Here is where we use the 4 extra scrap pieces of wood…mine is scrap 2×3 in pine and maybe 2×2 in cedar…I am not even sure of the size to be honest…and it doesn’t really matter!! Just cut them and glue them to the inside this time…

DIY Christmas Tree Crate Skirt

DIY Christmas Tree Crate SkirtI flipped this over and stapled them from the front so I wouldn’t have to change brad nails!

I took all the pieces inside to staple them around the bottom of my tree and I was so excited I didn’t take pictures of this step, but just line up the 30″ sides to cover up your scrap pieces on the inside and glue and staple!! Before you know it, you have a beautiful crate around the bottom of your tree!! Woohoo!!

DIY Christmas Tree Crate Skirt

DIY Christmas Tree Crate Skirt

DIY Christmas Tree Crate Stand

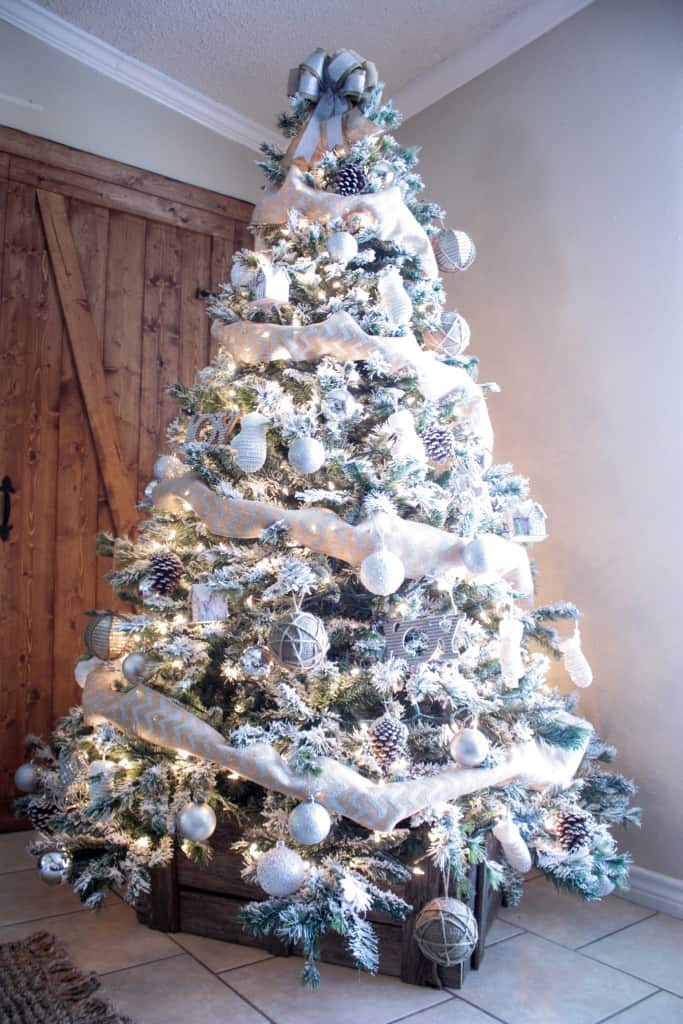
All lit up and ready to host some present!! I better get wrapping!!

If you have any questions or comments about building your own DIY Christmas Tree Crate Stand, feel free to spout off down below!! I would love to see your versions if you make one!!

Hope your Holidays are Merry and Bright!!

Lots of Love,

Cara

Are you following me on Instagram and Pinterest to keep up with my latest projects?

Want to save this post for later? Pin it now so you’ll easily be able to find it when you need it!

DIY Christmas Tree Crate Stand - Adorn the bottom of your Christmas Tree with this beautiful crate made of barnwood instead of a tree skirt! Looks so great and hides the ugly metal stand perfectly! Use it elsewhere in the home as decor when not in use under the tree! Paint or stain it to match your Christmas decor!
DIY Christmas Tree Crate Stand - Adorn the bottom of your Christmas Tree with this beautiful crate made of barnwood instead of a tree skirt! Looks so great and hides the ugly metal stand perfectly! Use it elsewhere in the home as decor when not in use under the tree! Paint or stain it to match your Christmas decor! Get the step by step instructions on theinspiredworkshop.com

No need for a tree skirt when you build this beautiful Christmas Tree stand out of barnwood or pallet wood you can get for free! This can be used after the holidays for many other purposes as well! #barnwood #diychristmastreestand #diytreeskirt

Related Posts

  • DIY Winter Christmas WreathDIY Winter Christmas Wreath
  • DIY Tree Card Holder Made of TasselsDIY Tree Card Holder Made of Tassels
  • DIY Faux FireplaceDIY Faux Fireplace
  • Home Depot’s DIY Workshop Virtual Party: DIY Wooden Door MatHome Depot’s DIY Workshop Virtual Party: DIY Wooden Door Mat
  • Home Depot’s Workshop Virtual PartyHome Depot’s Workshop Virtual Party
  • Small DIY BenchSmall DIY Bench

Filed Under: Crafts, Furniture Tagged With: Christmas Decor, Christmas Tree Crate, Christmas Tree Crate Stand, Christmas Tree Stand, diy

Affiliate Links

Note: some posts may contain affiliate links! An affiliate link means that when you click a link from my site and make a purchase, I may receive a small compensation from that purchase! It's a real win-win for the two of us since it doesn't cost you any extra and helps me bring you and everyone else more free plans!! Thank you in advance for any affiliate purchases that may be made!!

Reader Interactions

Leave a Reply Cancel reply

Your email address will not be published. Required fields are marked *

Primary Sidebar

Connect with me!

  • Email
  • Facebook
  • Instagram
  • Pinterest
  • Twitter
  • YouTube

Search

Welcome

Hey there! Welcome to the place I share all my diy adventures in hopes of inspiring you to pick up a hammer or drill and get to work building, crafting or renovating your dreams! I will show you step by step instructions on every project to help you see how easy it can be! I’m so glad to have you here! Look around, hopefully you will enjoy what you see!

New Posts Sent Straight to Your Inbox!

Sign up to receive new posts directly in your inbox! Don't miss a single post or FREE plans!

Please wait...

Thank you for signing up! Can't wait to keep in touch!

Recent Posts

  • DIY Gold Hexagon Napkin Rings
  • DIY Marble Epoxy Pumpkin Chargers
  • DIY Hinges Made From Dowel and Pipe
  • DIY TV Stand / Media Console
  • DIY Neutral Fall Wreath

Latest Pins

  • Pour in Place Concrete Countertops - Diy tutorial shows you how to pour  your own white or gray concrete countertops! Filled with helpful video snippets of what to expect when working with concrete for countertops! #diykitchenrenovation #diyconcretecountertops #concretecountertops
  • Pour in Place Concrete Countertops are a budget friendly DIY option for countertops! Come see the reveal of our kitchen renovation and read the in depth tutorial for the concrete countertops! We poured white concrete countertops and gray and boy do I have a ton of information to share!
  • This beautiful DIY kitchen renovation includes pour in place concrete countertops that span a large island and peninsula. The tutorial shows you how to pour your own concrete countertops in place! The post covers the does, don'ts and so much more!
  • Pour in Place Concrete Countertops are a budget friendly DIY option for countertops! Come see the reveal of our kitchen renovation and read the in depth tutorial for the concrete countertops! We poured white concrete countertops and gray and boy do I have a ton of information to share!
Follow Me on Pinterest

I have been featured at

Archives

Copyright

It makes me happy when we all share… but please keep in mind that all images & text on this site are property of The Inspired Workshop. I love seeing my photos on other websites, just as long as there are no more than two per post, and they are linked back to my site! Please do not remove any watermarks, crop or edit any photos, or copy text off of this site without obtaining written permission from me first! Pinning is always welcome and appreciated! Thanks!

SiteLock

Popular Posts

DIY Scrap Wood Outdoor PlanterDIY Scrap Wood Outdoor Planter
DIY Ring Toss GameDIY Ring Toss Game
DIY Plans for Chicken CoopDIY Plans for Chicken Coop
DIY Concrete Countertops – Pour in PlaceDIY Concrete Countertops – Pour in Place
DIY Dog Bed – Pottery Barn KnockoffDIY Dog Bed – Pottery Barn Knockoff

Footer

Privacy Policy

Rest assured that The Inspired Workshop will never sell or distribute your name or email address! Please be aware though that we do offer advertisements and in order to place relevant ads for your viewing, tracking cookies are used. Tracking cookies are small text files that are stored on your computer, which are only used to analyze your viewing preferences while on this site! You do not have to allow tracking cookies to enjoy this site and you may disable them in your web browser! Thanks!

Disclosure

Although I am sometimes given free product to review or am paid to help promote certain products/websites, all opinions on this website are 100% my OWN!! I only work with brands that I truly use and LOVE, and I have no problem turning down offers from brands that I do not feel are great quality, or would not use!! I promote many brands without incentive as well, I just enjoy sharing anything and everything I have found in hopes of make building/crafting simple enough everyone can do it!! You can be certain that if I am promoting it, I truly LOVE it!!

Tags

barn door bathroom bench chevron Christmas Decor concrete console table countertops dining bench dining table distressed finish diy fall decor farmhouse bench fireplace gift ideas holiday decor Home Depot industrial kitchen reno kitchen renovation knockoff makeover mantle media cabinet one room challenge outdoor furniture painting cabinets pallet wood playroom pottery barn Restoration Hardware review rope storage table table settings vanity wall art wall decor wall hanging wardrobe west elm winter decor wreath

Copyright © 2021 · Lifestyle Pro on Genesis Framework · WordPress · Log in

We use cookies to ensure that we give you the best experience on our website. If you continue to use this site we will assume that you are happy with it.OkNo