DIY Bookcase with Barn Door

This post is sponsored by Kreg Tool!
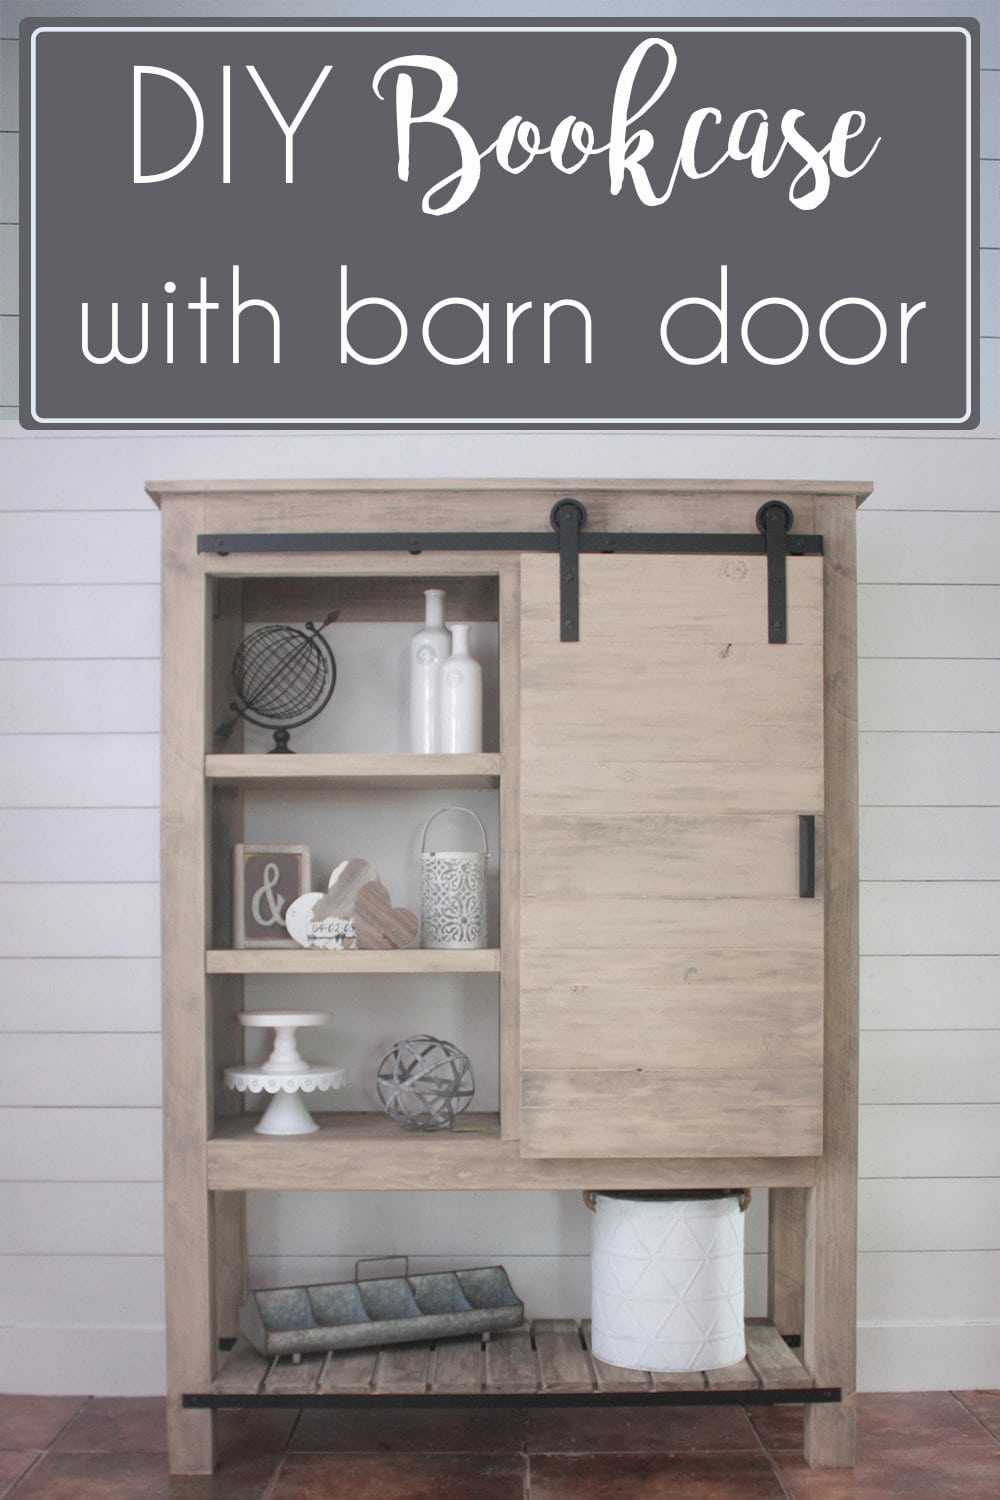
I’m so happy to share this DIY bookcase with barn door with you all!! My mom actually sent me a pic of this bookcase when she and my Dad were in Arhaus one day, and I, of course, added it to my To-Build List immediately!! LoL!!
But, unfortunately, like so many things on my list, I had forgotten all about it, until the other day on IG (by the way, do you follow me on Instagram? If not you better get over there and follow me!! Ha! @theinspiredworkshop) @McNellyfarmhouselove posted it…and it stopped me in my tracks, and in that instant, I knew it was my next project!!
What do you think? I think I’m in love with this bookcase with barn door, and I just so happen to think it’s the barn door that made me fall in love!! I have also realized that this happens to me with pretty much every project!! 😍 Well, actually I think I’m just in love with the fact that I got this completed! No, not really, I’m sure it’s true love!!
So, if you are still unsure of what to get your Valentine…problem solved!! Build them this here bookcase and they will love you forever! You’re welcome because, yes, I do have free plans for you to build this over on BuildSomething.com!!
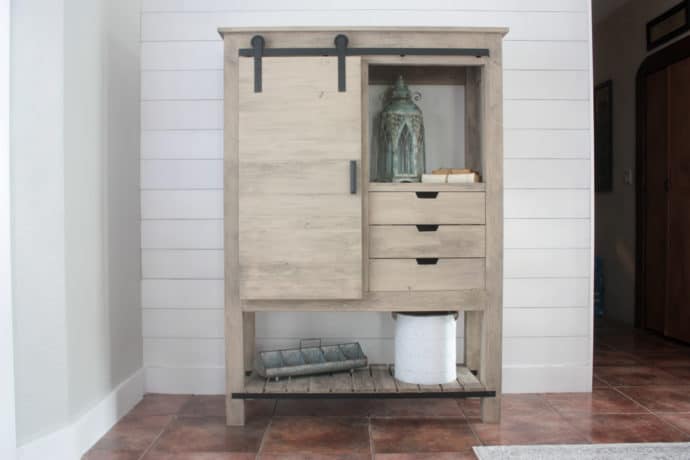
She’s a real beauty, you know I almost couldn’t even put the barn door on it because I thought it was so gorgeous without it! It is unique and I can’t get enough of this bookcase with barn door! Enough about me though, let’s see some more of her!! Here she is without her barn door!

Gathering Supplies to Build a Bookcase with Barn Door
What are you waiting for? Go on!! Get the free plans from KregTool.com!! Have you checked out their site yet? I have done several awesome projects with them and so have MANY other seriously talented bloggers!! You must check it out!! Kreg Tool is Kreg’s DIY website where you can get free plans for all sorts of projects, vanities, media cabinets, beds, tables, you name they probably have it…and all the plans include the easy-to-use Kreg Jig (affiliate link)!!
Barn Door Hardware for the Bookcase
While you’re over there checking out all the UH-Mazing plans, I’ll be over here trying to type up the post for the super easy and inexpensive barn door hardware!! UPDATE: Here is the VIDEO and the step-by-step tutorial for the cheap and easy DIY Barn Door Hardware! I can’t believe I put off making anything with a barn door because I thought it would be hard…Psshhtt, it was nothing like I figured it would be!!
With the barn door hardware tutorial, you can literally put a barn door on anything and everything you want!
The total cost of building this DIY bookcase is a little over 200 bucks! That is amazing considering Arhaus wanted 2400 dollars for theirs! UPDATE: With current lumber prices in 2022, this beauty will cost quite a bit more coming in at 450 with the barndoor hardware! Ouch, these lumber prices are killing me!😅
Materials for DIY bookcase
- 4 – 4x4x8
- 2 – 2x6x8
- 2 – 2x4x8
- 1 – 2x2x8
- 2 – 1x6x8
- 3 – 1x4x8
- 2 – 1x4x10
- 2 – 1x3x8
- 1 – 1x2x8
- 1 – piece of 1x1x8 molding
- 1 – 3/4″x 4×8 sheet of plywood
- 1 – 3/4″ x 2×4 quarter sheet of plywood
- 1 – 1/2″ x 4×4 half sheet of plywood
- 1 – 1/4″ x 4×4 half sheet of plywood
Cut List for Bookcase
- 4 – 4×4 @ 68″ ripped down to make them 3x3s
- 2 – 2×6 @ 42″ front and back top rails
- 2 – 2×4 @ 42″ front and back middle rails
- 2 – 2×6 @ 12″ top, side rails
- 2 – 2×4 @ 12″ bottom, side rails
- 2 – 1×3 @ 42″ front and back bottom rails
- 2 – 3/4″ plywood pieces @ 12″ x 39″ side panels
- 2 – 2×2 @ 39″ front and back, middle stiles
- 1 – 3/4″ plywood piece @ 15″ x 45″ bottom plywood
- 1 – 3/4″ plywood piece @ 15″ x 44 1/2″ middle divider
- 1 – 3/4″ plywood piece @ 15 1/2″ x 43″ top plywood
- 2 – 1×4 @ 19″ sides of top plywood frame – one end mitered at 45 degrees off square
- 2 – 1×4 @ 50″ front of top plywood frame – ends mitered @ 45 degrees off square, ends not parallel
- 11 – 1×4 @ 18 1/8″ bottom slats
- 3 – 1×2 @ 20 1/4″ shelf face frames
- 2 – 3/4″ plywood pieces cut @ 17″ x 22 1/2″ left shelves with corner cutouts
- 6 – 1/2″ plywood pieces @ 4 1/2″ x 16 1/4″ drawer box sides
- 6 – 1/2″ plywood pieces @ 4 1/2″ x 18 3/4″ drawer box front and back
- 3 – 1/4″ plywood pieces @ 16 1/4″ x 19 3/4″ drawer bottoms
- 3 – 1×6 @ 20″ drawer fronts
- 6 – 1×1 @ 16 1/4″ homemade drawer slides
- 2 – 1×4 @ 15″ left drawer slide supports
- 2 – 1×4 @ 12″ right drawer slide supports
- 1 – 3/4″ plywood piece @ 17″ x 23 1/4″ right shelf with cutouts
- 4 – 1×4 @ 20 1/2″ barn door boards
- 4 – 1×3 @ 20 1/2″ barn door boards
- 3 – 1×6 @ 20 1/2″ barn door boards
Building the DIY Bookcase with Barn Door
I wish I would have taken photos of the step-by-step building of this DIY bookshelf but I was on one heck of a time crunch with getting it built! Luckily, the Sketchup plans available on Kreg Tool are even better than my messy photos! Go grab your plans for the DIY Bookcase with Barn Door.
What Finish Did I Use on the Bookcase?
I have had a couple of people ask what stain I used on the bookcase! Well, would you believe me if I said it is painted with a glaze? The color is Valspar Moose Mousse flat paint, followed by Valspar Antiquing Glaze! I thought the back of the bookshelf was too dark when I painted it the same color as the rest, so I used a little alabaster to lighten it up, and it changed the whole look of the bookcase!
Want to check out other great furniture builds like this one? Here are a few of my favorites!
Hope you have a wonderful week and Happy Valentine’s Day to you all!! Hope you get to spend time with someone you love and maybe get to even build something!!! Lol!
Happy Building!!

Want to save this DIY bookcase with barn door for your to-do list?! PIN IT!

Related Posts



Love it! What color of stain did you use?
Hey Sandy!!! Thank you so much!! It is actually painted not stained!! I love lighter color stains but they just don’t work on the 4x4s when they are a reddish pink like mine were, so I tried painting it and glazing it to look almost stained!! I used valspar paint in moose mousse and valspar antiquing glaze!!! Hope this helps!! Thanks for stopping by!!
I am super late to the party but I had a question! Did you have to do anything after the wax?? Or is that the last step?
Can’t wait for the hardware plans!! Very cool. Thanks.
Hey Sandy!!
I still can’t wait to get the hardware plans out…life went a little crazy and I didn’t get them posted when I wanted to and I am sooo sorry for that!! Be on the lookout though because they will be coming up in the next two weeks, complete with video!! Thanks so much for stopping by!! Have a great one!!!
Yes, I am sooo in love with this!! You are amazing! I love it without the door too! So beautiful!
Ahh!! I don’t know how I missed your comment!!! Thanks so much Mindi, I appreciate your sweet words girl!! Thanks for stopping by!!