DIY Armoire with Mudroom Bench

Do you love the idea of a mudroom to control and organize the mess of coming and going in your home? If you do but you also know that even a space that is to help with organization can become untidy, this DIY armoire that looks like a mudroom inside is the perfect solution to be able to close the doors if you don’t have time to organize the mess!

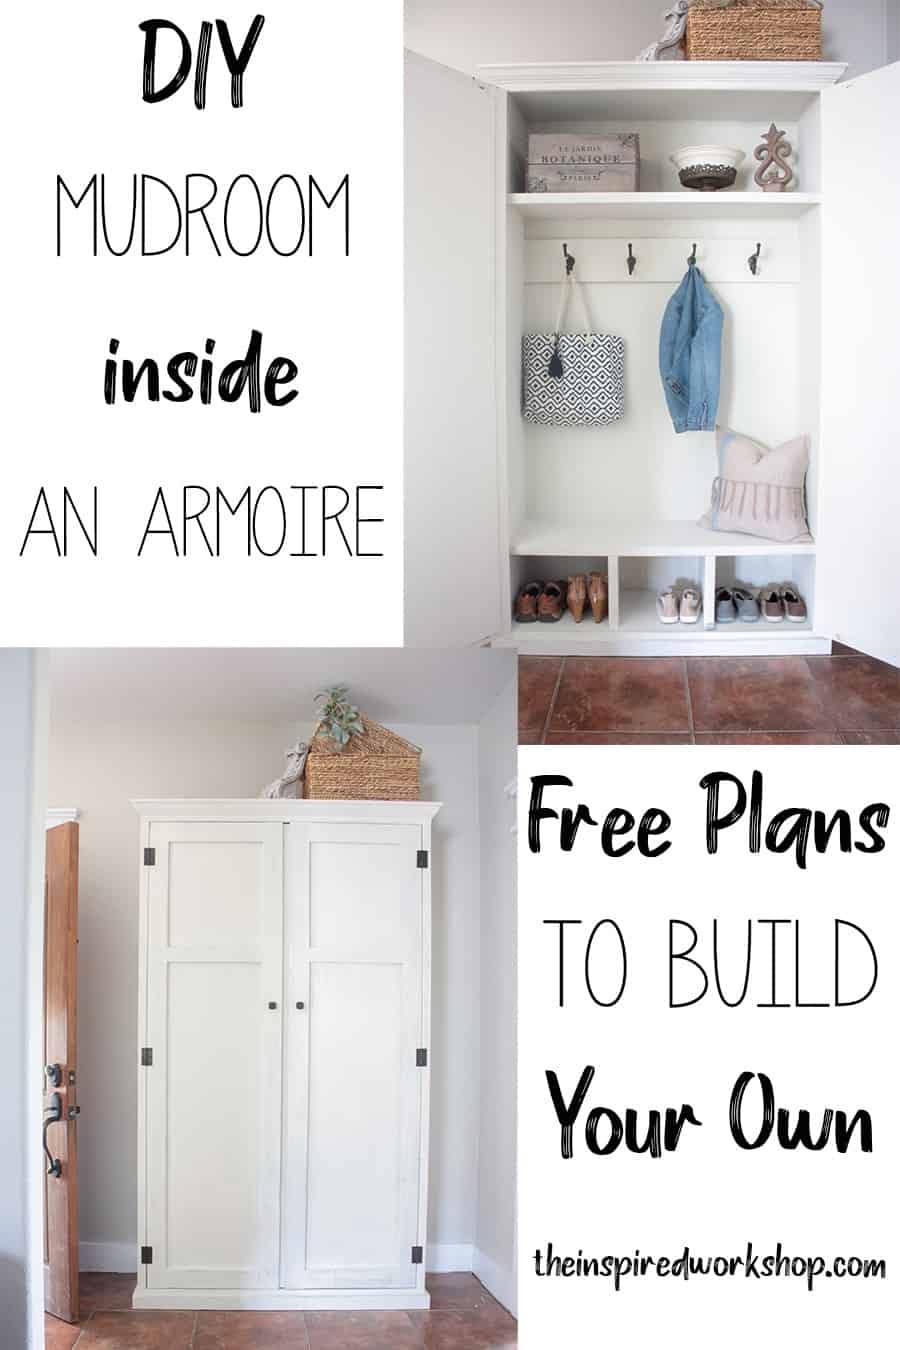
I wanted a mudroom in my house, but I really don’t have the room by any other door than my front door, or it would be in my dining room!! LOL!! But after seeing Liz Marie from @lizmariegalvan on Instagram or her blog Liz Marie Blog (go follow her now for some major farmhouse inspo but be prepared to fall in love with everything she and Jose do), if you already follow her, then you probably remember, a year or so ago, she bought a gorgeous armoire a lot like this and put it by her door!
Her piece was antique, but it was absolutely beautiful!! I don’t have many places around me to find antiques, and when I do, they act like King Edward III owned it back in 1736…totally made that name and date up but you get the idea!! They are way overpriced!! So of course, I thought, that looks simple enough to build and I could add a bench inside so the kids could still sit and put on their shoes!! It came alive right then…the DIY mudroom in an armoire!
Plus I can easily move it to our next house if I want to!!

I will also say that I started building this a year ago, right after she bought hers, and accidentally painted one of the doors the wrong color…that’s why you shouldn’t grab your paint in a dark garage and paint it on a semi-lit porch!! I painted it the same color as my porch swing and it was obvious that they were not the same white! Lol! It seriously took me until just this last month though to finally go sand it down and paint it the correct color so I could put the hinges on and finish it!
Anyway, that said in the year since I started this build, I have fallen in love with the locker style mudroom benches with individual doors on each locker which will also hide your crap, so I may take a go at replacing this with a locker/bench system, or adding a locker bench system somewhere else in my house if I can concoct an area to put one!! But for now, I am just going to enjoy and love this DIY armoire!


Moving on because I could talk your ear off all day, the armoire stands tall and proud coming in at 7′ tall and 4′ wide but only 16 3/4″ deep!! I didn’t want to go too wide since my entryway space is limited, and it saved plywood expense to stay at 4′ but you could ultimately make it as wide as you wanted!
Gathering Supplies for the DIY Armoire
Printable Plans HERE! DIY Armoire with Mudroom Bench!
Full tutorial down below!
**Some links within this post may be affiliate links! Affiliate links allow me to make a small commission off of any purchases you may make after you click a link on my site, at no extra cost to you!! I appreciate it and it helps keep all the plans on this site free!!
Material List:
- 1 – full sheet 3/4″ plywood
- 1 – half sheet 3/4″ plywood
- 2 – full sheet 1/4″ plywood
- 1 – 1x8x8
- 11 – 1x4x8 (I used furring strips to get the old worn look…but it takes a lot of digging to come by straight ones)
- 2 – 1x3x8 (I used furring strips)
- 4 – 1x2x8 (I used furring strips)
- 1 – stick of crown molding
- Kreg Jig
- Miter Saw
- Kreg Rip Cut – this is perfect if you don’t have a table saw!
- brad nailer
- 1 1/4″ pocket hole screws
- 1 1/4″ brad nails
- wood glue
- 3″ butt hinges
- 2 knobs
- 4 hooks
- magnetic latch
CUT LIST:
Make sure that you measure if you don’t use furring strips as it will slightly adjust some lengths of boards!! Your plywood should not be affected though!
- 2 – pieces of 3/4″ plywood ripped down to 16″ x 84″
- 1 – 3/4″ piece of plywood ripped down to 16″ x 48″
- 1 – 3/4″ piece of plywood ripped down to 16″x 46 1/2″
- 2 – 3/4″ pieces of plywood ripped down to 14″ x 46 1/2″
- 2 – 3/4″ pieces of plywood ripped down to 14″ x 12″
- 1 – 1/4″ piece of plywood ripped down to 84″ x 48″
- 2 – 1/4″ pieces of plywood ripped down to 18 3/4″ x 74 1/4″
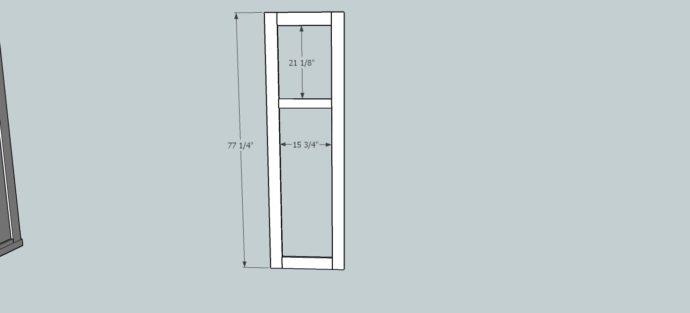
- 4 – 1×4 @ 84 3/4″
- 4 – 1×4 @ 8 3/4″
- 4 – 1×4 @ 77 1/4″
- 4 – 1×4 @ 15 3/4″
- 1 – 1×4 @ 76 3/4″
- 2 – 1×4 @ 46 1/2″
- 1 – 1×3 @ 50 1/2″
- 2 – 1×3 @ 16 5/8″
- 2 – 1×3 @ 15 3/4″
- 2 – 1×3 @ 8 3/4″
- 1 – 1×8 @ 46 1/2″
- 2 – 1×2 @ 84 3/4″
- 2 – 1×2 @ 12″
- 2 – 1×2 @ 46 1/2″
Measure for your crown molding!
You see, since I started this DIY armoire a year ago, I have since lost my memory card that has the build pictures on it so I am going to use the Sketchup pics to show you what I did as I went, and the free printable plans are still available above but they are simply the sketchup pics, if you need the actual instruction you will need to use the tutorial below!
Building the DIY Armoire
Getting started on this DIY armoire, I had Home Depot rip the full 3/4″ plywood sheet down into 16″ x 96″ strips, the first two swipes will create 16″ boards and the last swipe will be a slightly smaller board which is great because we want our shelf and bench sat back a little inside the armoire, and we need to put framing boards on it as well!
The half sheet of 3/4″ plywood needs to be ripped down to 16″ pieces as well, you only need 2 from this one, but it is best to get it cut at the same time while the saw is set so they will all be the exact same width!! Does that make sense?
Let’s start building this beautiful beast!! I started with attaching the sides to the top! The top is on top of the sides, using 3/4″ pocket holes drilled into the sides, attach the sides and top with wood glue and 1 1/4″ pocket hole screws!

Next, add the bottom! Pocket holes drilled on the underside at 3/4″ will be drilled into the bottom shelf and will be attached to the sides with wood glue and 1 1/4″ screws! The top of the bottom…that’s kinda an oxymoron isn’t it…Lol…will be at 3 5/8″ if you are using a furring strip. If you are using a regular 1×4, it will be 3 3/4″ high, so make sure and measure what you are working with!

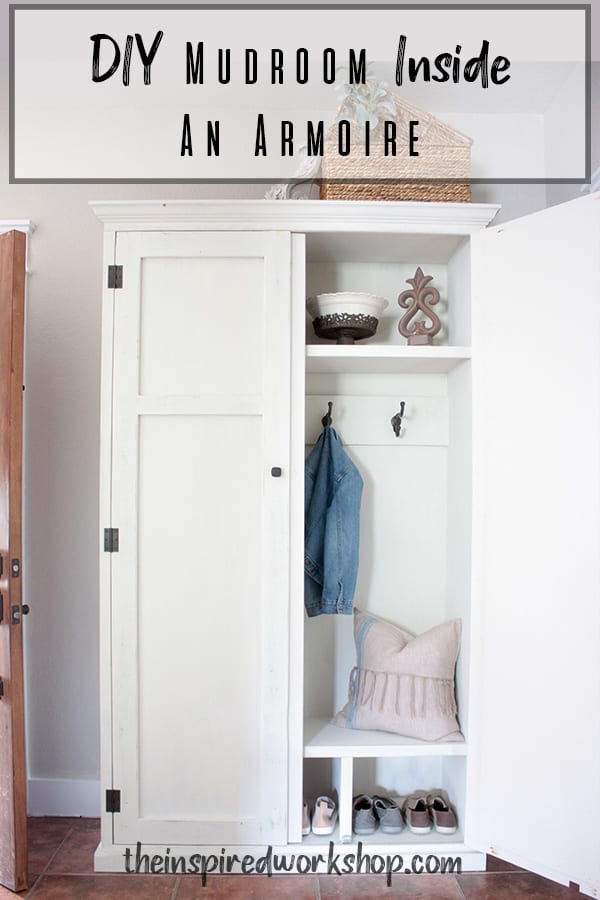
Now you can add the bench seat up 12″ from the bottom! Use 3/4″ pocket holes drilled into the bench seat on the underside and attach with wood glue and 1 1/4″ screws! Make sure it is flush to the back!

Simply add the shoe dividers in place! Pocket holes will be drilled into the tops and bottoms of the dividers! The spacing can be changed up if you would like!

Add the top shelf 16″ down from the top! I placed the pocket holes on this shelf on the top of the shelf but still used 3/4″ holes and 1 1/4″ screws with wood glue!

At this point, you may be thinking this is feeling kinda flimsy!! But just give it the next step and it will stiffen up and you will be able to relax!! Add the 1×8 @ 46 1/2″ to the back! Again using 3/4″ pocket holes and 1 1/4″ screws and wood glue!! I placed it 3 1/2″ down from the bottom of the shelf!

Now comes all the trim of the DIY armoire which is my favorite part because it all starts coming together and looking like a piece of furniture!! Yay!! I started with the easy ones first and just framed out my shelves and shoe dividers! They are just glued and brad nailed into place with 1 1/4″ brad nails! Make sure and glue as brad nails are not going to hold these on long without it!! (Don’t mind that small piece of molding on the bottom…it’s not supposed to be there)!!

Next, I added framing on the sides! The picture below holds a lot of info! Lol!! Take a moment to take it all in! The 1x4s and the middle 1×3 are 8 3/4″ long, you couldn’t read it when I put the dimensions in!! Again these are just brad nailed and glued into place!

Now that the sides are done we can add the front face frames!

Oh, how the DIY armoire is coming right along! All we have left are the doors, crown molding and base molding (which is just a 1×3 furring strip)! Here goes the base molding and crown! You will notice, I didn’t miter my corners on the base molding…I just brought the front out to cover the ends of the side and since it’s painted you would never know that they aren’t mitered!! So make sure and do your sides first!

The crown, on the other hand, will have to be mitered at 45 degrees off square, and you will want to do the front first!! I didn’t give lengths here either because you have to measure even the smallest hair of being off will create a problem!! Make sure and measure yours…the bottom part of your crown should be the length of the armoire, the top of the crown should be longer than (since it’s mitered). The sides are easy because only one end needs to be mitered as I left it a straight cut in the back!

You can staple the back on at this time!! I just used glue and brad nails!

Last but not least, let’s build some doors!
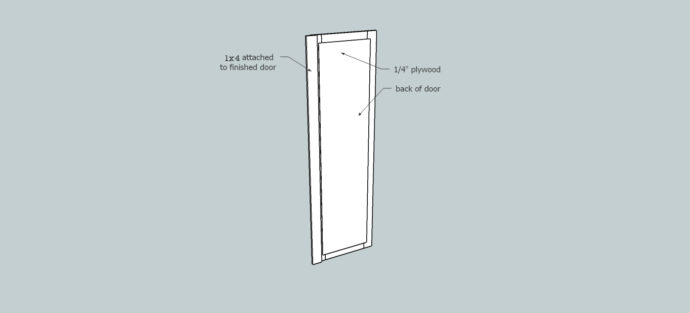
I chose the easy route which was just using 1/4″ plywood stapled on the backs of the doors! But you can get fancy and route a groove for it to fit inside! If I were to build it again I would probably do that but it really doesn’t bother me to have it done this way!! LoL!! Plywood pieces are 18 3/4″ x 74 1/4″!
The 1×4 board shown here is screwed to the back of the door and has a 2″ over hang to create a stop for the two doors so that it can fully open without a brace down the middle! It is a 1/2″ shorter than the actual door size! I just used glue and 1″ screws since I was using furring strips, you will need longer screws if you are using regular 1x4s!
Finishing Touches on the DIY Armoire
I just used regular 2 1/2″ utility hinges placed flat on the outsides of the doors to hang them! I spray painted them with Rust-oleum oil rubbed bronze to make them match my knobs! (affiliate link) I did the same with the hooks that I picked up at Hobby Lobby, I couldn’t find the hooks online but Amazon has a ton of great options!
I added magnetic clasps at the bottom to stop the doors from being able to swing back into the armoire too far! (affiliate link)
After sanding everything down, the finish I used was created by first staining everything in classic gray by minwax, I gave it a real sloppy coat not caring if I missed a few spots here and there!

I then painted over the gray with only one coat of Behr Old White flat paint! Lightly sand to revel the gray in some areas!! Bada-bing! Bada-boom! You are finished!!
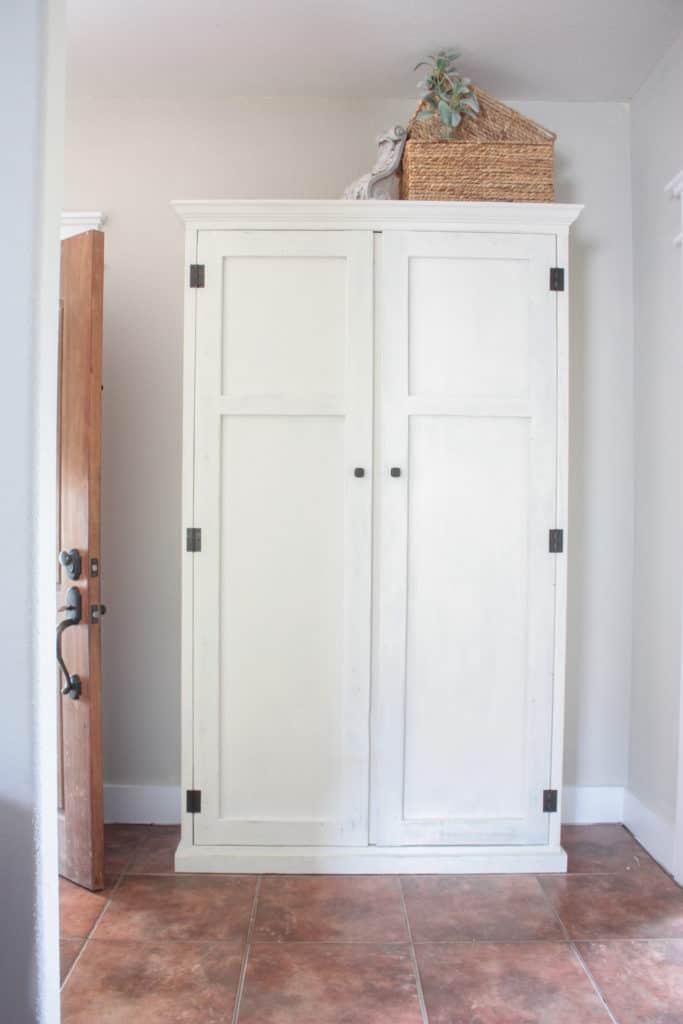
The knobs I usedon the DIY armoire are the Liberty Mandara Knobs (affiliate link) in cocoa bronze!
I think that pretty much sums it all up!! Any questions, ask away below!! Thanks for stopping by!!
Happy Building!

Want to save this DIY armoire for later? I LOVE when you pin or share my posts!
Do you have an appx price for the project? I’m thinking to change the demensions a bit to make three separate ones and connect them like built ins for my kids sports equiptment
Hey Laura!
So back when I built this, I think I only paid 120 bucks for the whole thing which is a steal compared to today’s prices! Lol! I would imagine it would probably run 300-400 dollars now simply because plywood is so much more expensive! Plywood in my area is double or triple the cost it was 3 years ago, but depending on your area it could be cheaper! If you pull up Home Depot or Lowe’s online you can search each item on the materials list to get a good idea of cost since you will see the prices for your area! I think that would be a great idea to make separate ones too! I would love to see it if you do!
Hope that helps! Thanks so much for stopping by! Have a good one!
Cara
This is EXACTLY what i have been looking for and NEED in my house! Thank you! Now I just have to find someone to build it for me!
Hey Tracy! That’s GREAT to hear! I think you could build it for yourself if you have a couple of tools laying around! I promise it is easier than you think! If you have any questions, email me! cara.theinspiredworkshop(at)gmail.com! Have a good one!