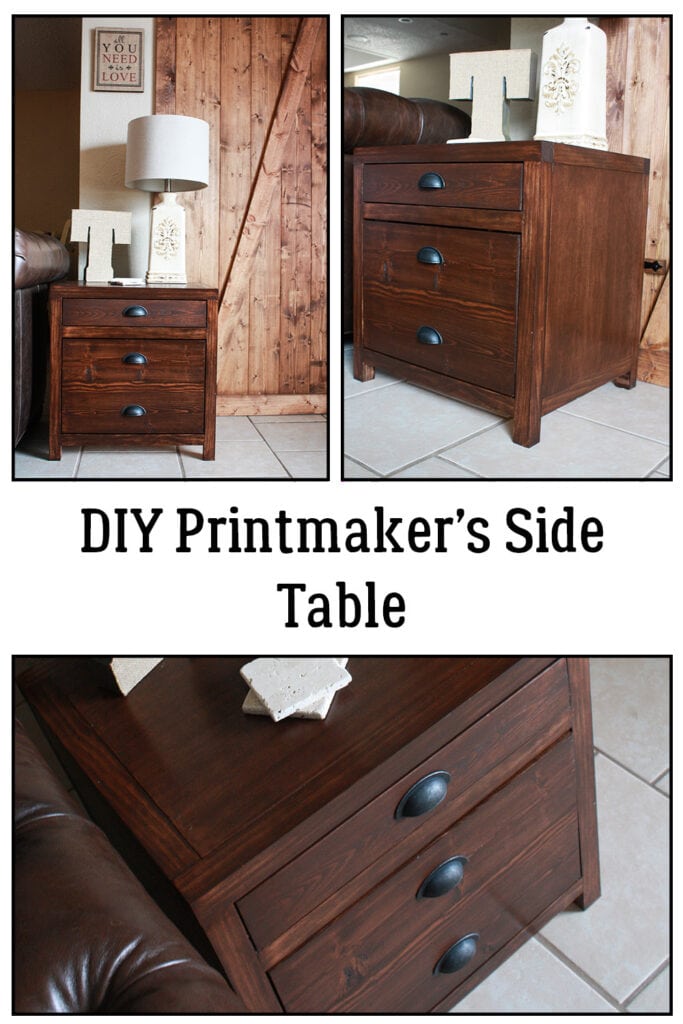
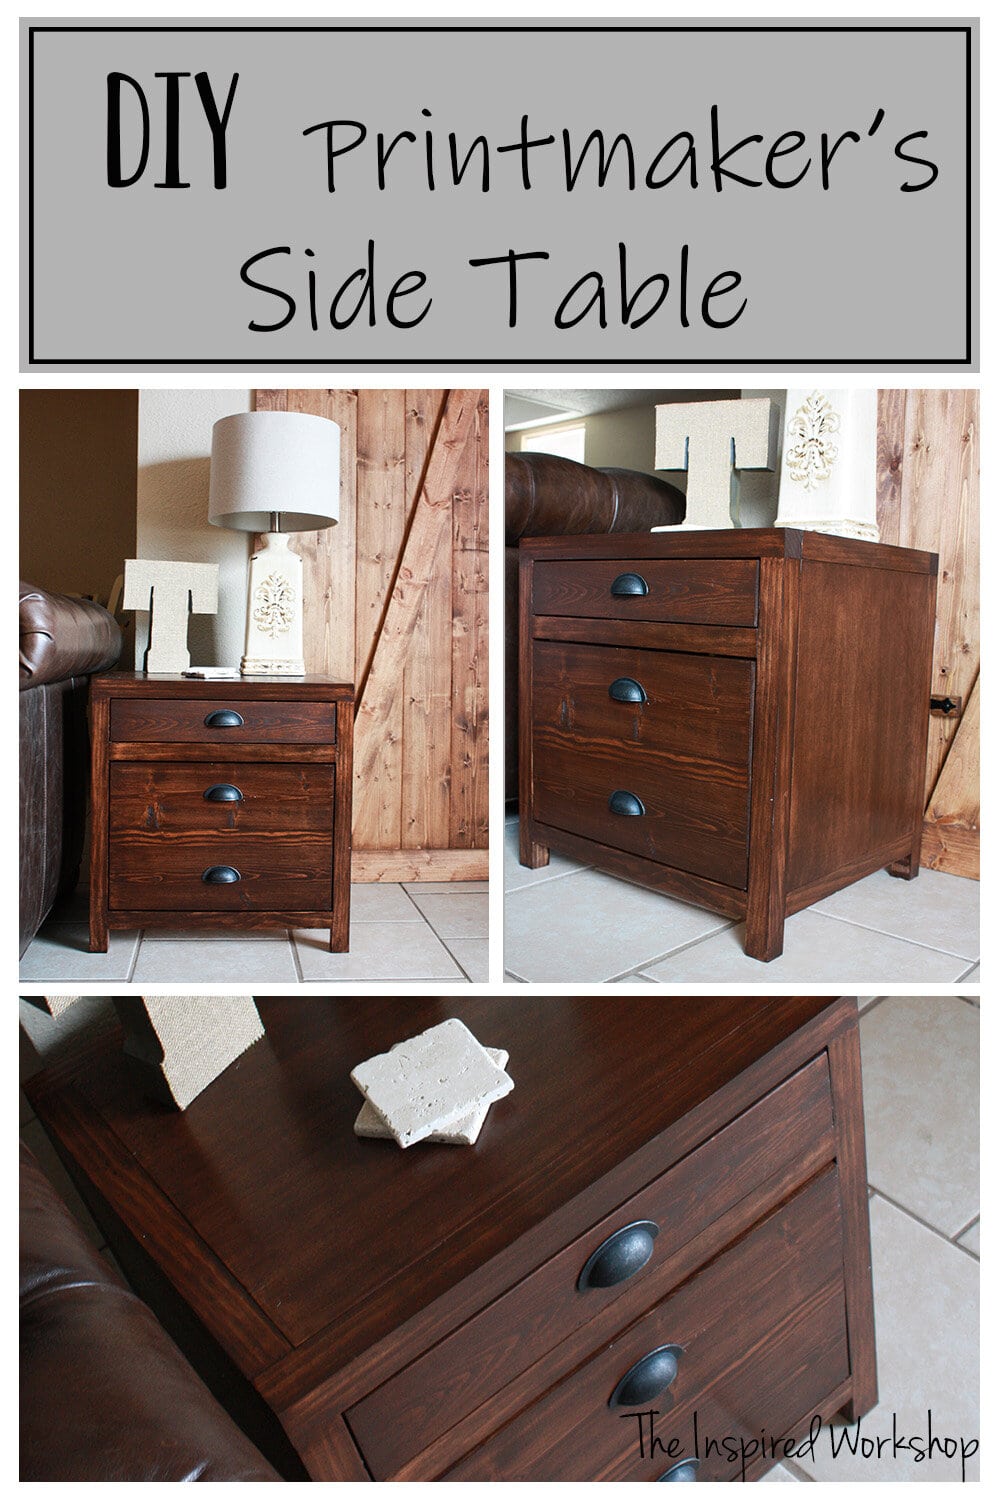
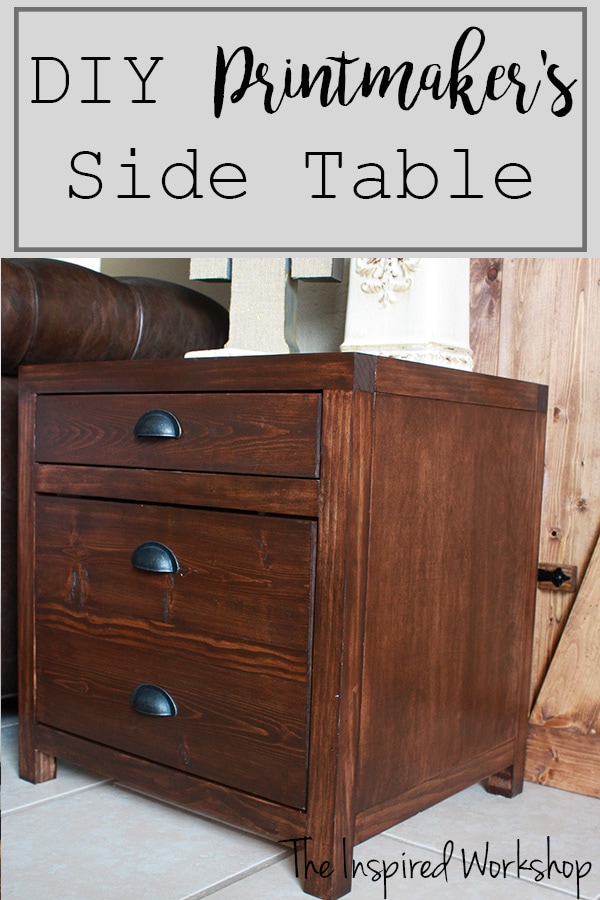
DIY Printmaker’s Side Table
Side tables can be costly when going to a furniture store or shopping online! If they are solid wood you will pay big bucks, but you can build a DIY side table for cheap! Free plans for this DIY printmaker’s side table will show you how easy and inexpensive it can be!

As always, poking around Restoration Hardware’s website I found a side table that I really liked. It is part of the Printmaker’s collection that I have loved ever since Jen Woodhouse and Ana White made plans for the big brother to this piece, the Printmaker’s sideboard! You must take a look at it just in case you ever need a sideboard… she designed it to be a bar cabinet & it is BEAUTIFUL!!
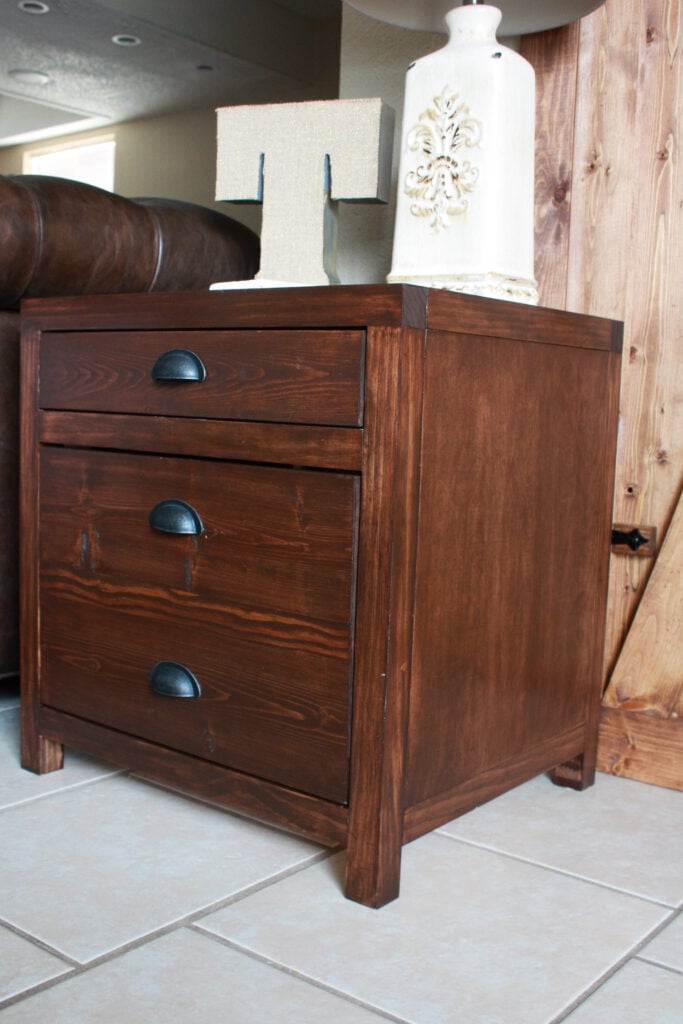
After drooling over Jen’s sideboard/bar cabinet for many moons, I was certain I needed to build this Printmaker’s Side Table when I came across it!! Another plus was the side table had really straight lines that I could easily recreate without too much skill, yet it was still a challenge because I have never built anything with a drawer or a door! I love the drawer and door because they can house anything I need out of sight…like toys, games, movies…anything I don’t want to look at! Ha!
This is a GREAT beginner drawer and door project! I am so glad I didn’t build a piece with three or four drawers or doors as my first piece…the dump probably would have had a new pile of wood!! 😅 I made quite a few mistakes so I would have absolutely gone crazy if I had to make more than one of each…well, I may already be crazy…LOL! I learned so much about what NOT to do! Hopefully, my next project will be easier with all the wisdom I gained from this project!
Interested in plans for other side tables? How about this industrial nightstand, small oak side table, or this epoxy marble top side table?!
So, you think it’s good that I have the instructions for this DIY side table…Oh but wait…it gets BETTER! I have easy-to-follow Sketchup plans as well as detailed instructions and pictures! Woohoo! Thanks to Ana White and her awesome tutorials…did you know the girl even has a tutorial on how to use Google Sketchup? Well, she does and I read it and tried to do what she said and read it again and tried again…and after much trial and error…something happened…I was able to design a piece of furniture!!!
WOOHOO! I was soooo excited you have NO idea!
Gathering Supplies to Build a DIY Side Table
Anyway, to get rolling on the project at hand, the material list and cut list are below. The total cost on this project is a little over 100 bucks, that’s if you have to buy a sheet of plywood. You will only need 1/3 of a sheet, I was able to use scraps around the garage so I only spent 58.00! Cha-ching! That is the sound of a bargain! LOL! It also beats the 500 bucks Restoration Hardware wants for theirs!
If you don’t have scraps laying around, buying the whole sheet will totally be worth it… just imagine the possibilities of what you could do with the remaining 2/3 of the sheet! You’re welcome! 😉
Material List for DIY Side Table:
**NOTE: Amazon links below are affiliate links! Affiliate links are links that earn me a small commission (at no extra cost to you) if you make a purchase after clicking a link! I always appreciate you shopping my links as it helps me keep bringing you free plans!
- 3 – 2x2x8 (can be furring strips to save $20)
- 1 sheet of 3/4″ plywood (I suggest PureBond Plywood)
- 1- 1x4x6
- 1- 1x6x6
- 1- 1x2x8
- 1- 1x3x8 (can be a furring strip to save $4)
- 3 – drawer pulls (handles)
- 2 – inset cabinet hinges
- 1 – set of 16 in. drawer slides (euro bottom corner mount)
- 1/4″ piece of plywood for the bottom of your drawer & for the back if you’d like!
- 2 1/2″ pocket hole screws
- 1 1/4″ pocket hole screws – this is the large box it saves money to buy the large boxes if you plan to make more furniture than just this piece, but if not then grab the small box
- 1 1/4″ wood screws
- wood glue
- saw
- sander, sanding discs & staining supplies
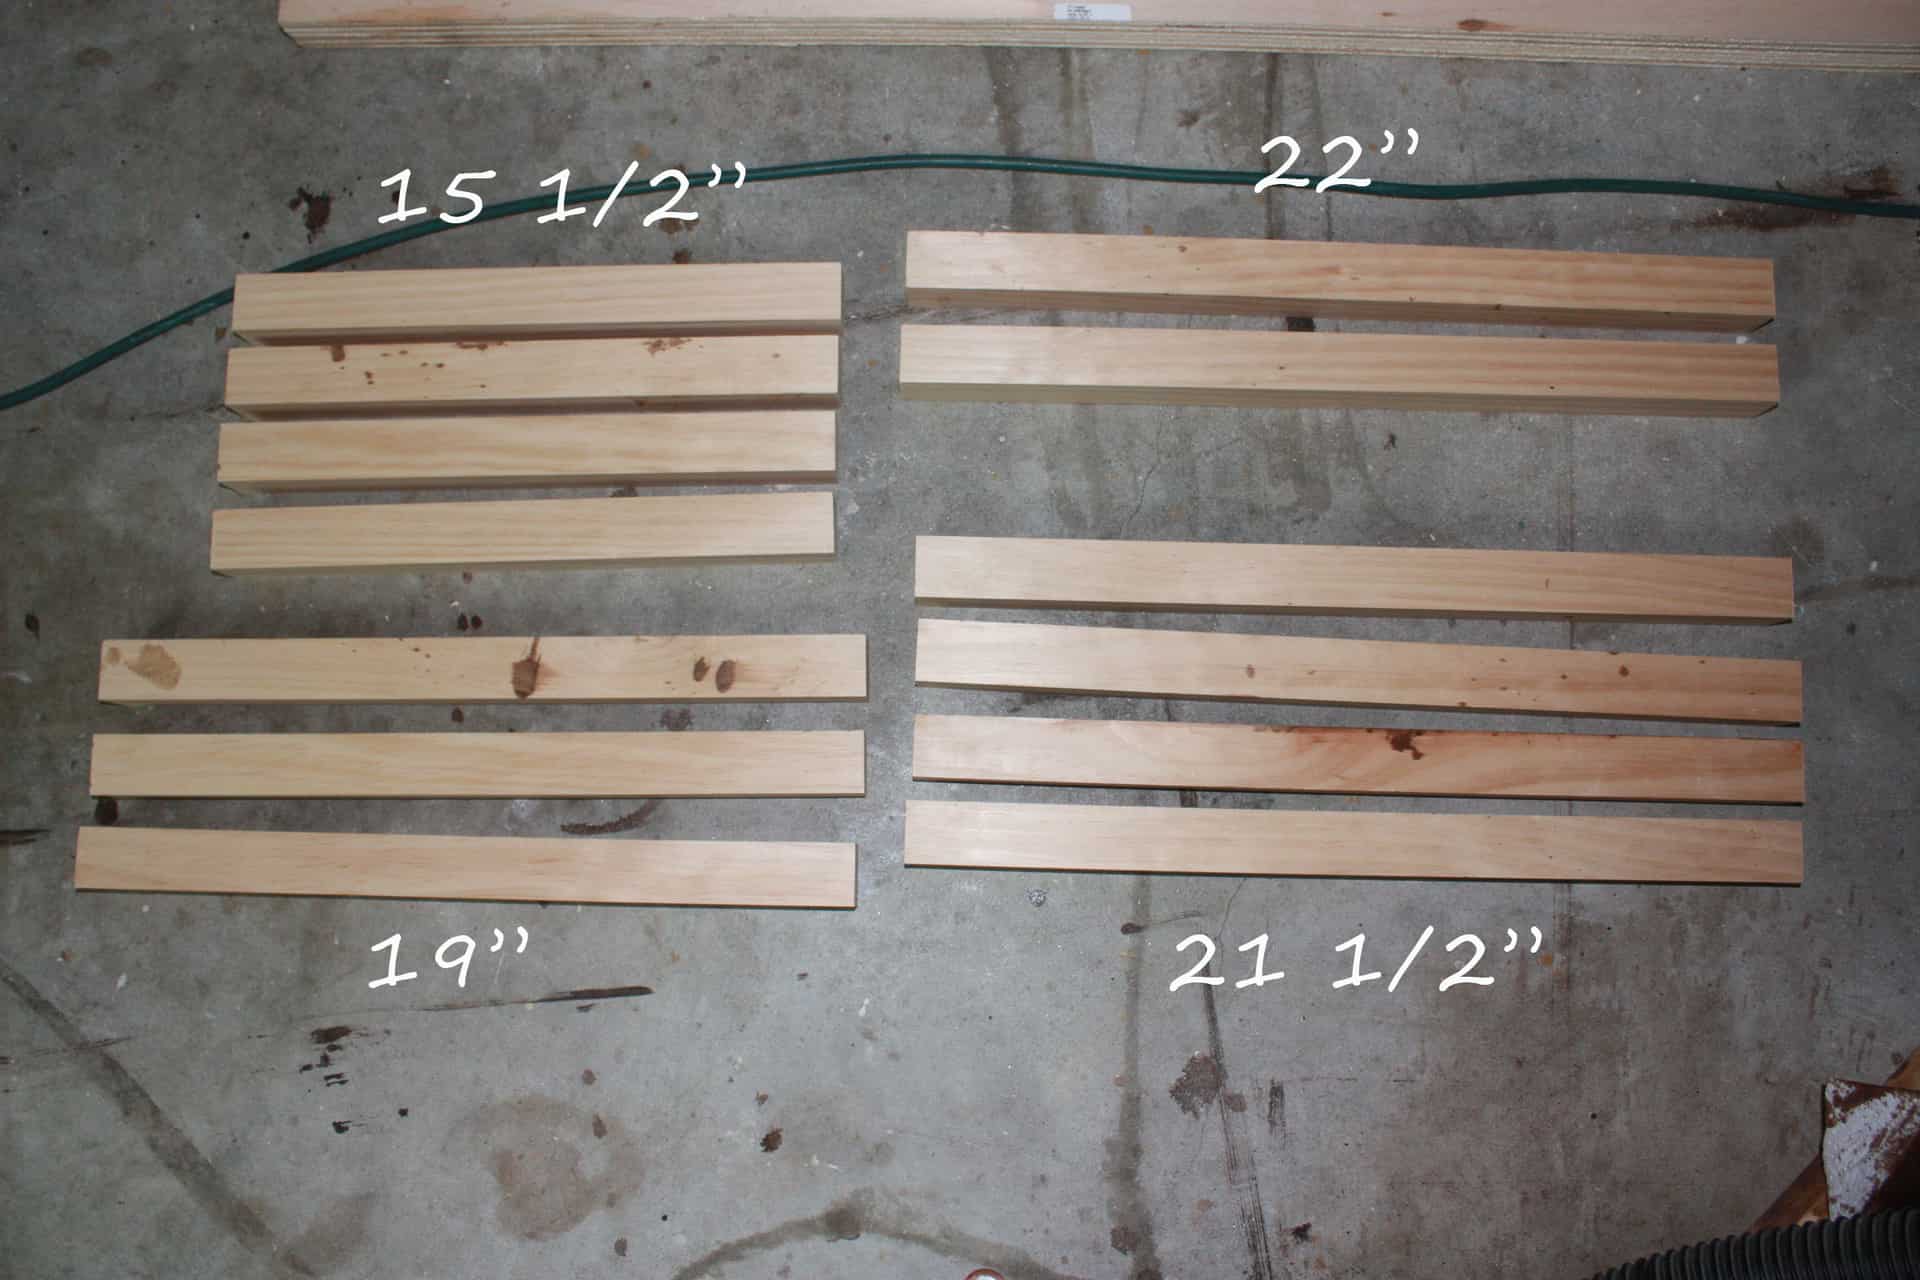
Cut List for the DIY Side Table:
- 2- 2×2 @22″
- 4- 2×2 @ 21.5″
- 3- 2×2 @ 19″
- 4- 2×2 @ 15.5″
- 1- 1×4@ 19″
- 2- 1×6 @ 19″
- 1- 1×2 @ 19″
- 2- 1×2 @ 15.5″
- 2- 1×2 @ 10.5″
- 4 – 1×3 (measure in between drawer glides to get precise measurement)
Plywood cuts given are what your measurements should be…in a perfect world…Lol! Make sure you measure each frame section before you cut the plywood for it! Several times, my cuts had to be a hair off of what they should have been, I think only two sides were completely true to what they should have been! It is normal!
Also, you may want to add a 1/4″ plywood piece to the back of the table which would be cut a little larger than the opening so it can be stapled to the back – I cut mine to 21″ x 20″.
The 1/4″ plywood for the bottom of the drawer should be measured based on your drawer, I just traced my drawer onto my plywood as you will see in the pictures below!
Building the DIY Printmaker’s Side Table
There are both Sketchup plans and a tutorial for this DIY side table, scroll past the plans if you want the tutorial photos which are where I show the build in real life as I did it! Between the two you should be able to figure out how to build the side table but if you have any questions feel free to ask below in the comments or email me cara.theinspiredworkshop(at)gmail.com!
Plans for DIY Side Table
Alright, let’s build this DIY side table! *Note: click pictures to enlarge!

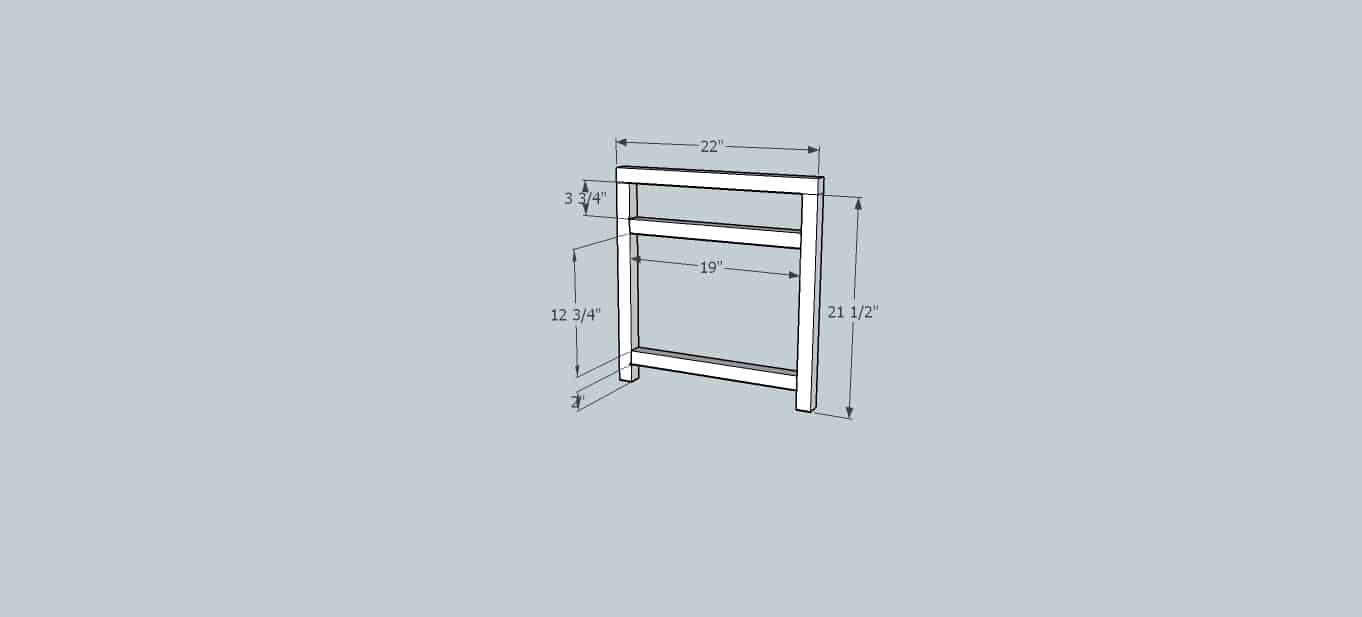
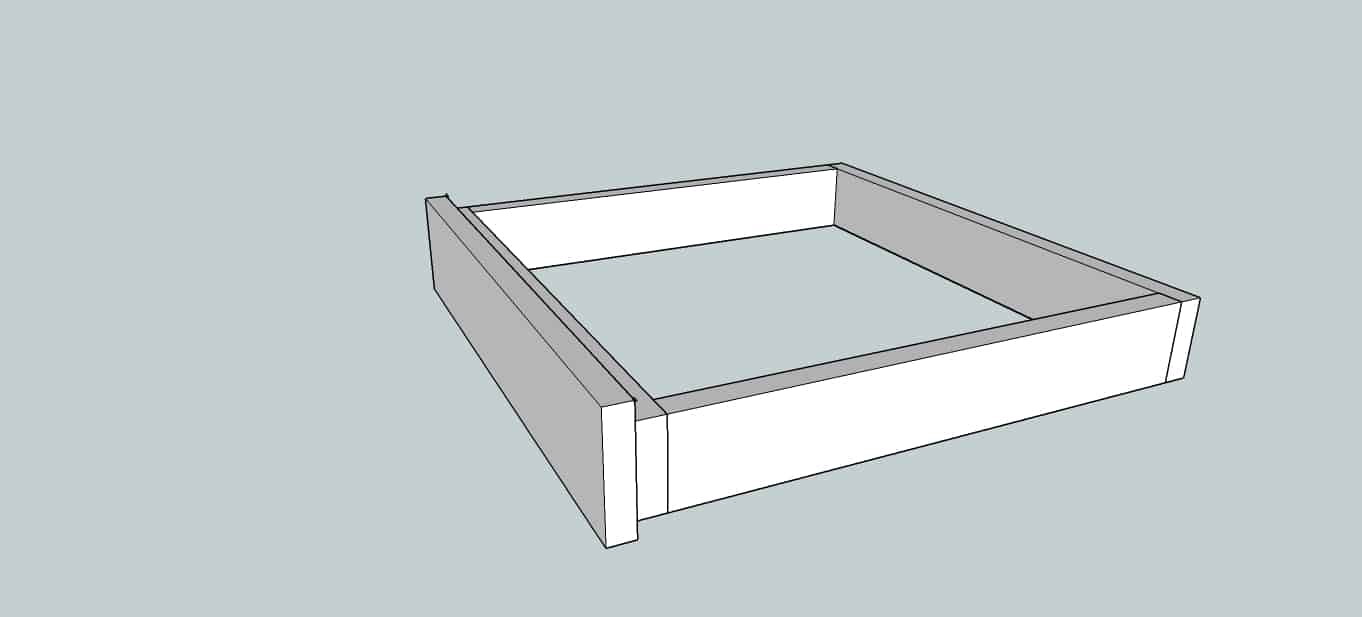
To get started you build the face frame, pocket holes are used to join all pieces unless otherwise stated, placement of pocket holes and a more detailed description of what to do are further down in my own pictures! I was able to build a plan in Sketchup but I am not a master builder in Sketchup yet! Ha!
Then your back frame.
Add side pieces to both sides to join the two frames.
Now the frame is built and it’s time to cut plywood to fit inside of all the frames of the DIY side table, except the front and back!
Next, we have to create the door, kind of upside-down looking…lol! Lay your 2 – 1×6’s and your 1×2 together and then screw perpendicular 1×2’s onto the back of the door to hold it all together…don’t forget the glue!
Now build the drawer and attach the front drawer face.
Now you attach 1/4″ plywood to the bottom of the drawer, attach drawer slides and screw in your hinges to the door and put all drawer pulls on!
What’s UP? Yep, the DIY side table is built! That fast and easy! Okay, that Sketchup plan made it seem like a piece of cake! My plans are more realistic of the time involved in building this piece! LOL!
Tutorial for the DIY Side Table
Okay, so you start by cutting your wood for the frames of the side table, all 2x2s.
Now, I drilled all my pocket holes at this time so that I could bust it out quickly once I started building…it’s a mental thing with me, if I “feel” like I am building fast, I will get so much more accomplished then if I “feel” like I am building slow! I know it’s silly!
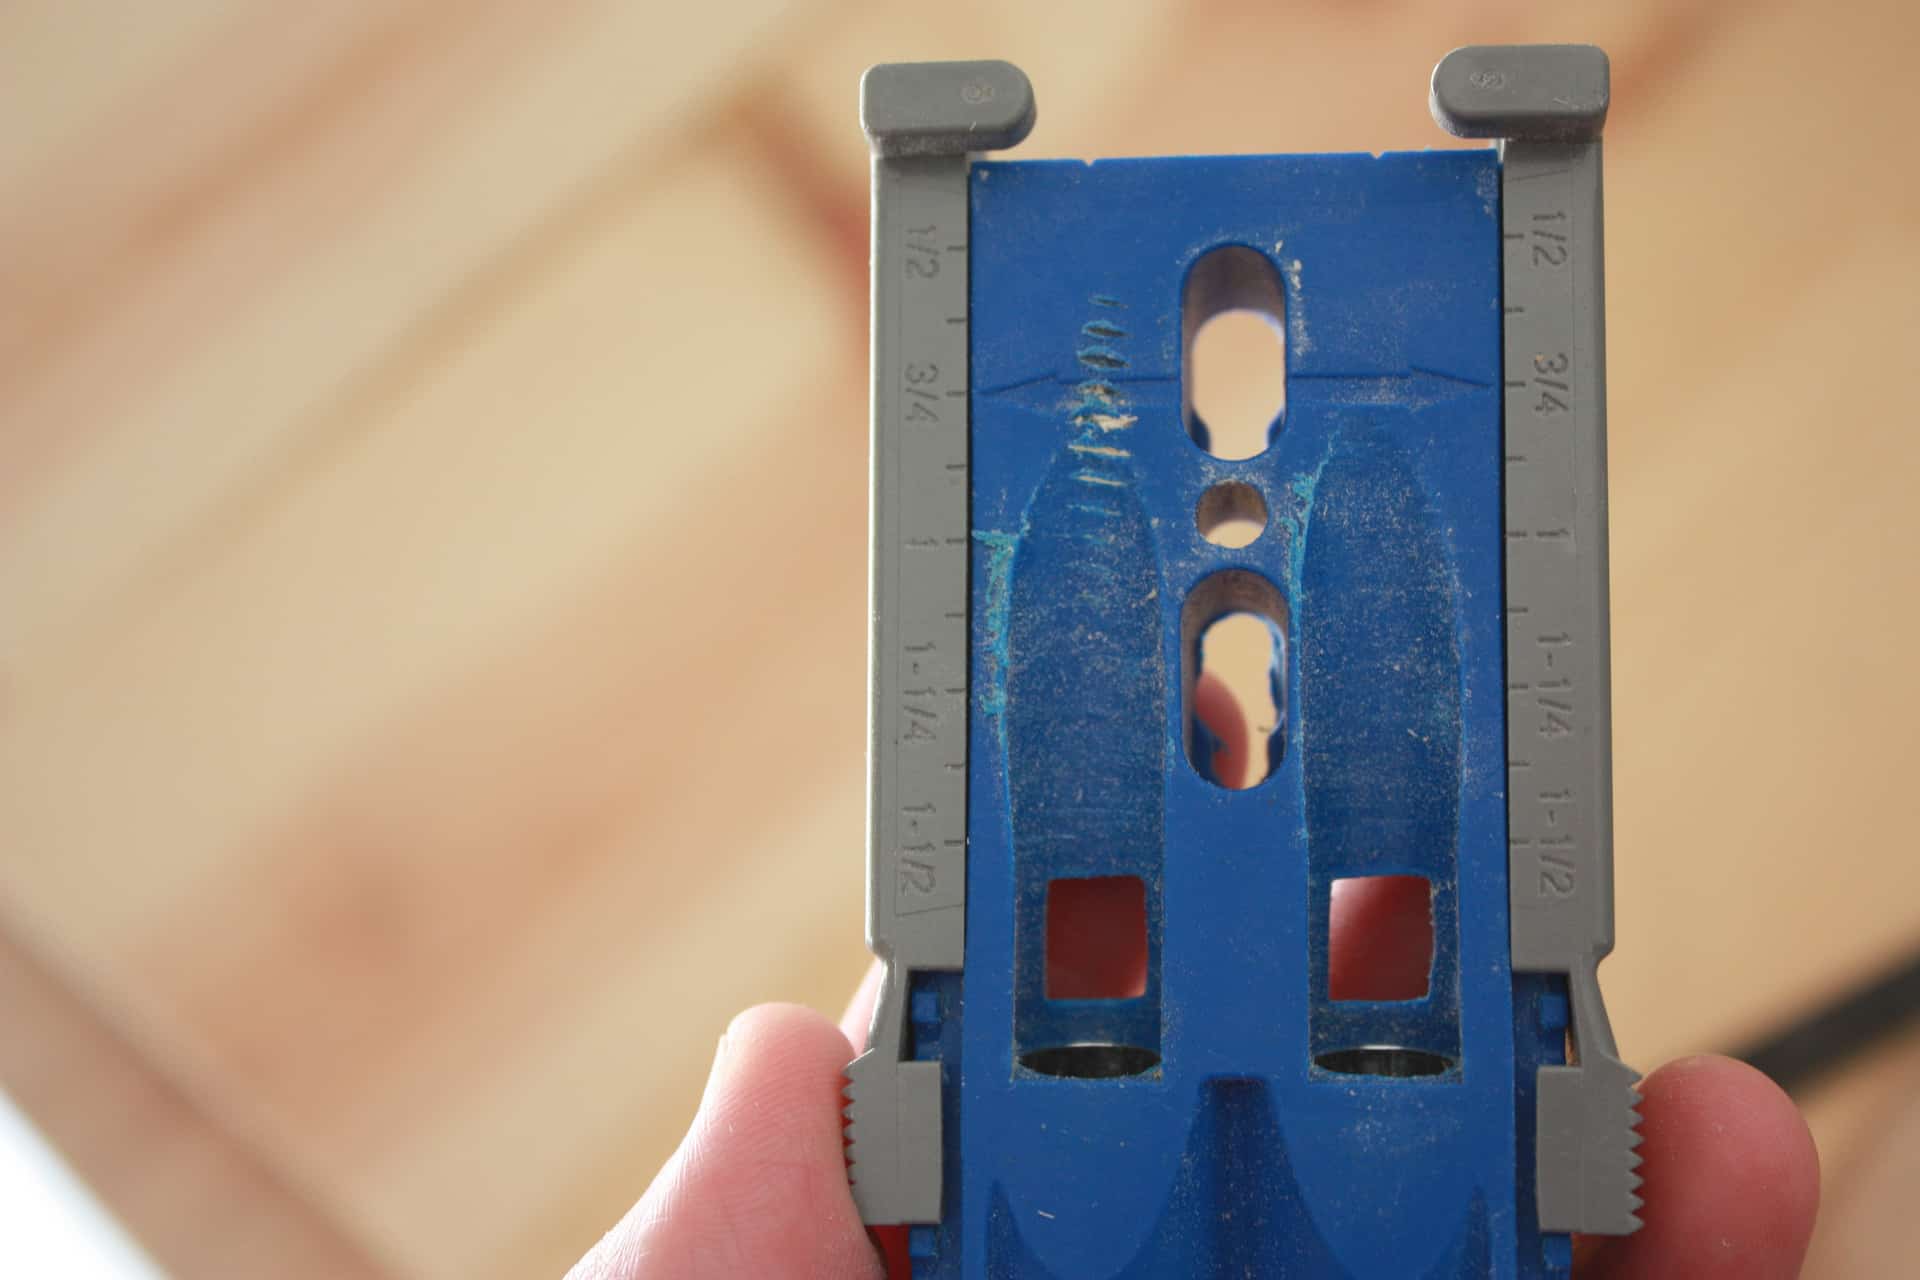
In case you haven’t read any of my other posts on pocket holes I will give a quick rundown on how to use a Kreg Jig! I have the Kreg R3 model and as much as I want to upgrade to a larger model, I just haven’t been able to make it myself because it does everything I need! LOL! You can get any model at Amazon (affiliate link), Home Depot, Lowe’s, or Woodcraft.
So the Kreg Jig is basically a drill bit and guide that keeps you from being able to mess up a pocket hole! The jig itself is the guide and looks like this
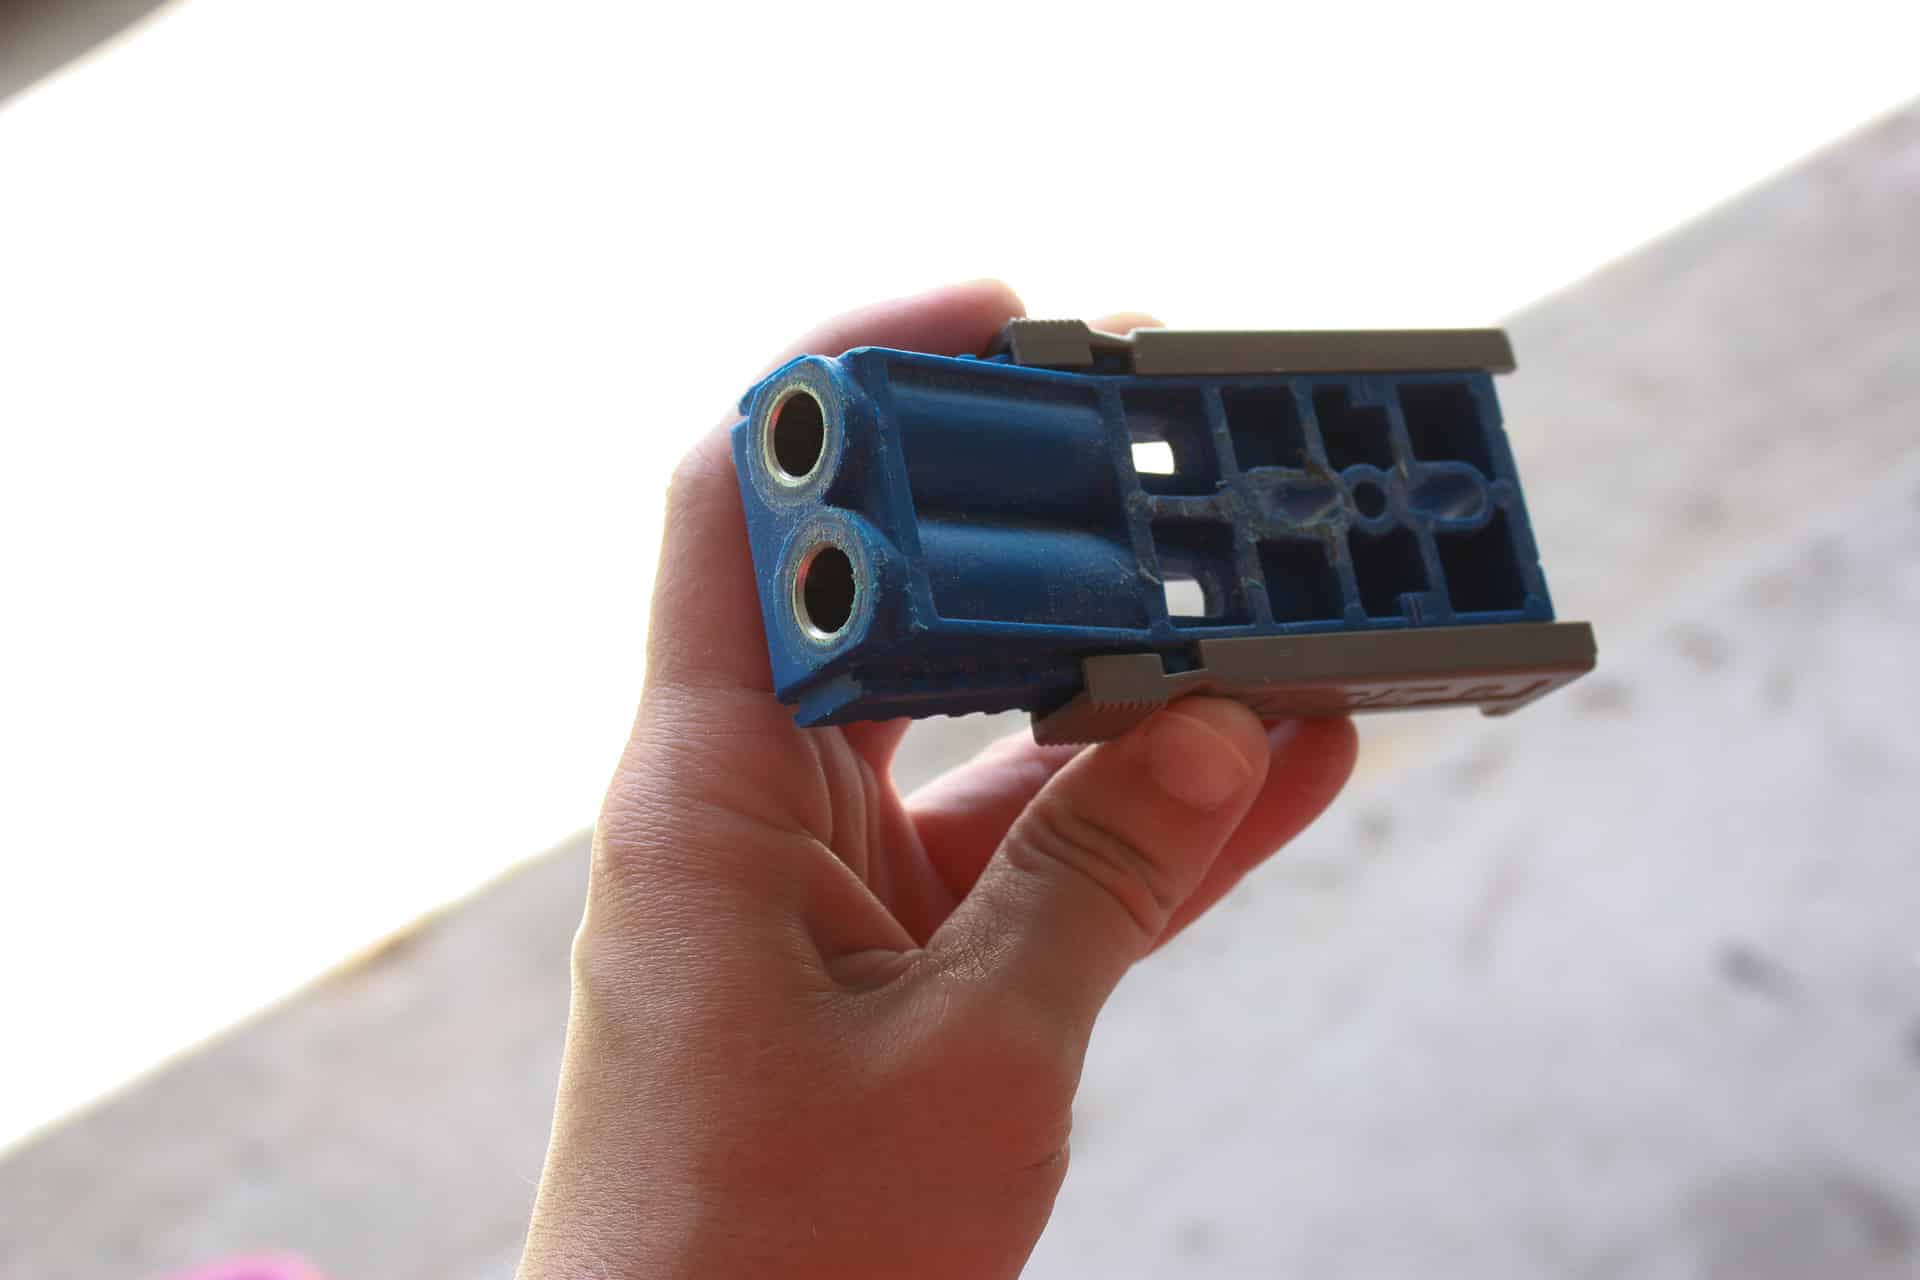
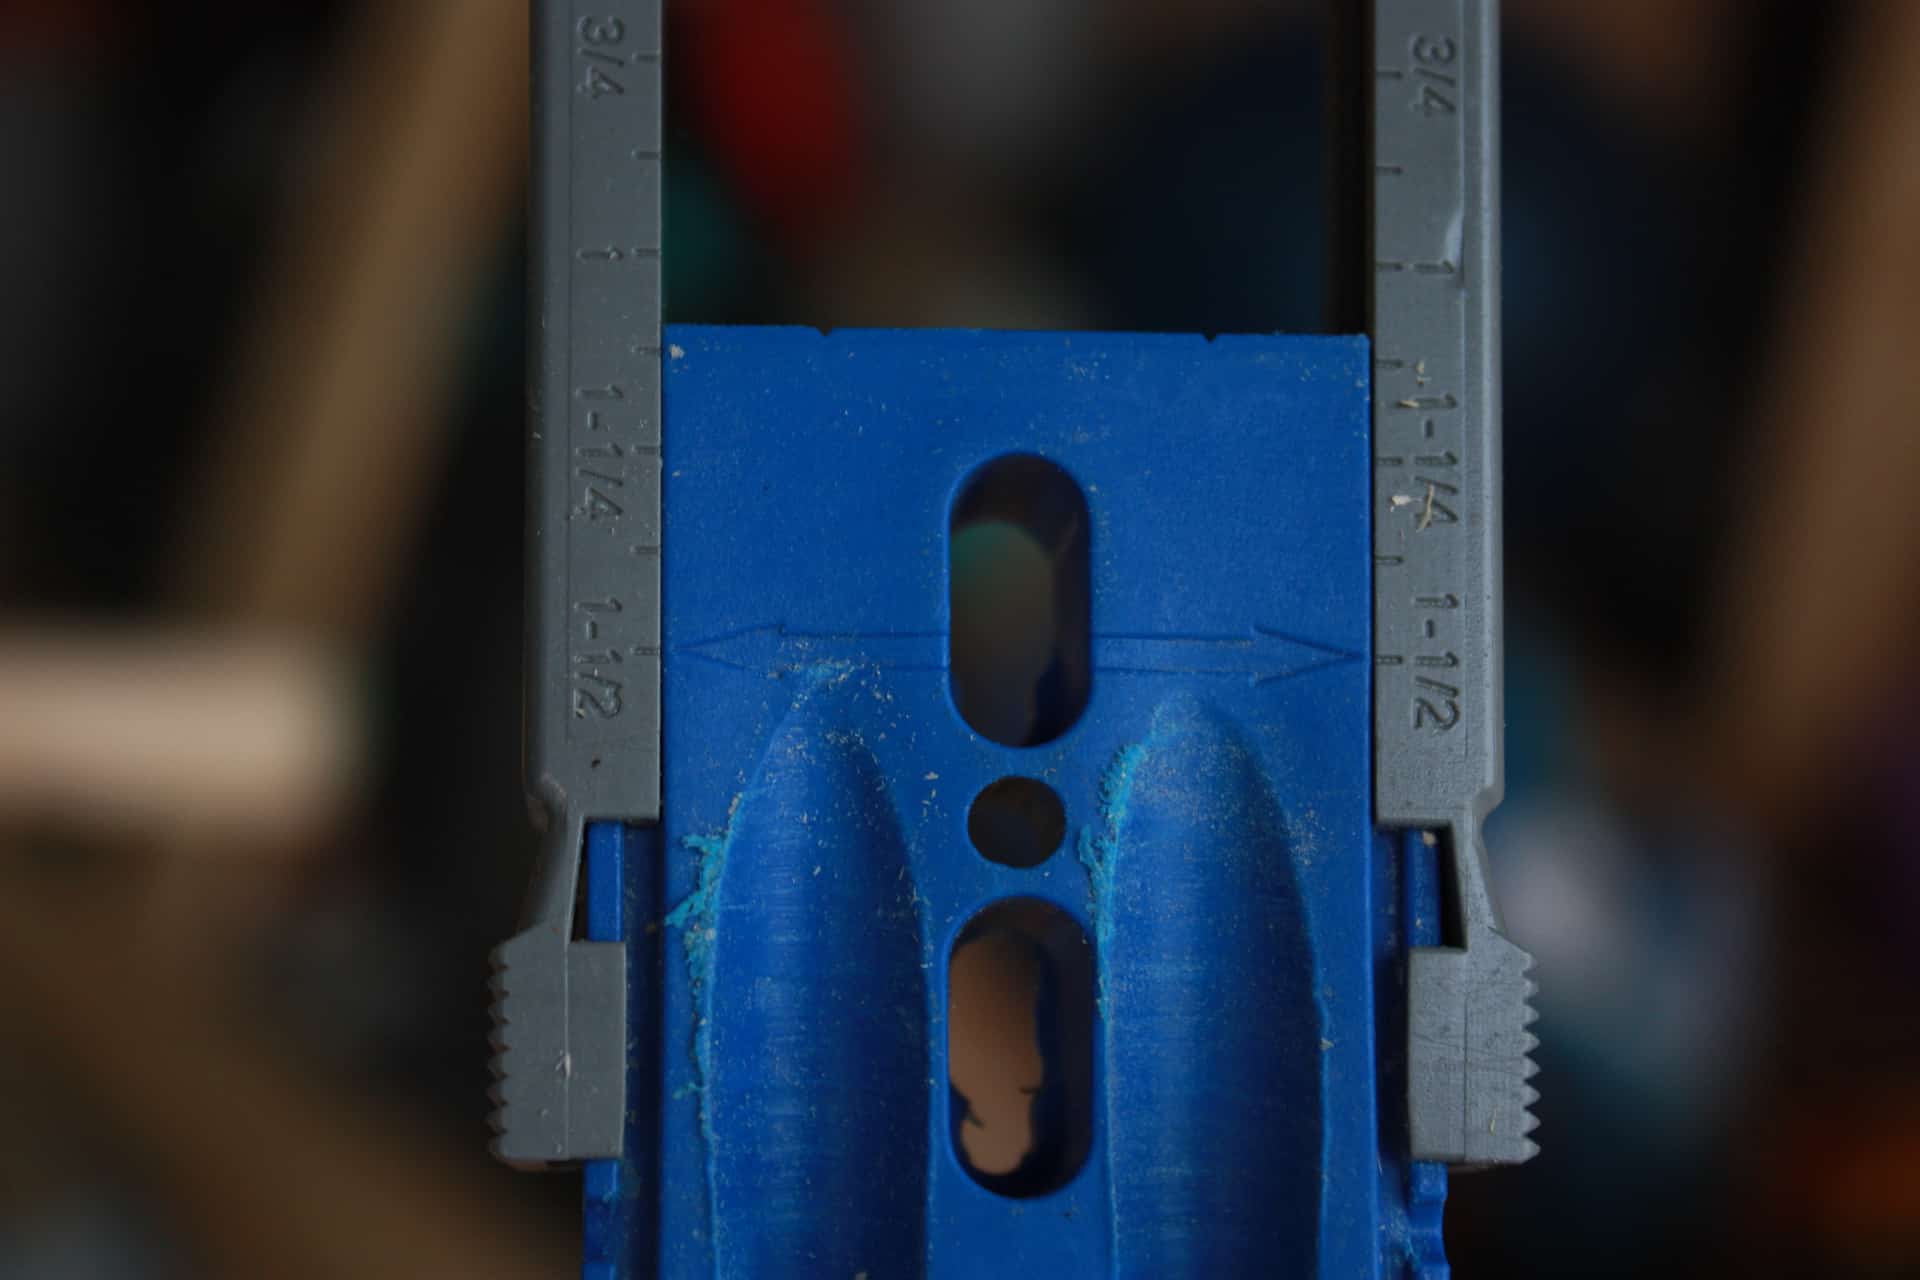
Mine has been well used as you can see! You set the jig at the thickness of the wood you are drilling into, since we are drilling into 2×2’s their actual measurements are 1 1/2″ x 1 1/2″ so we set our Kreg Jig to 1 1/2″
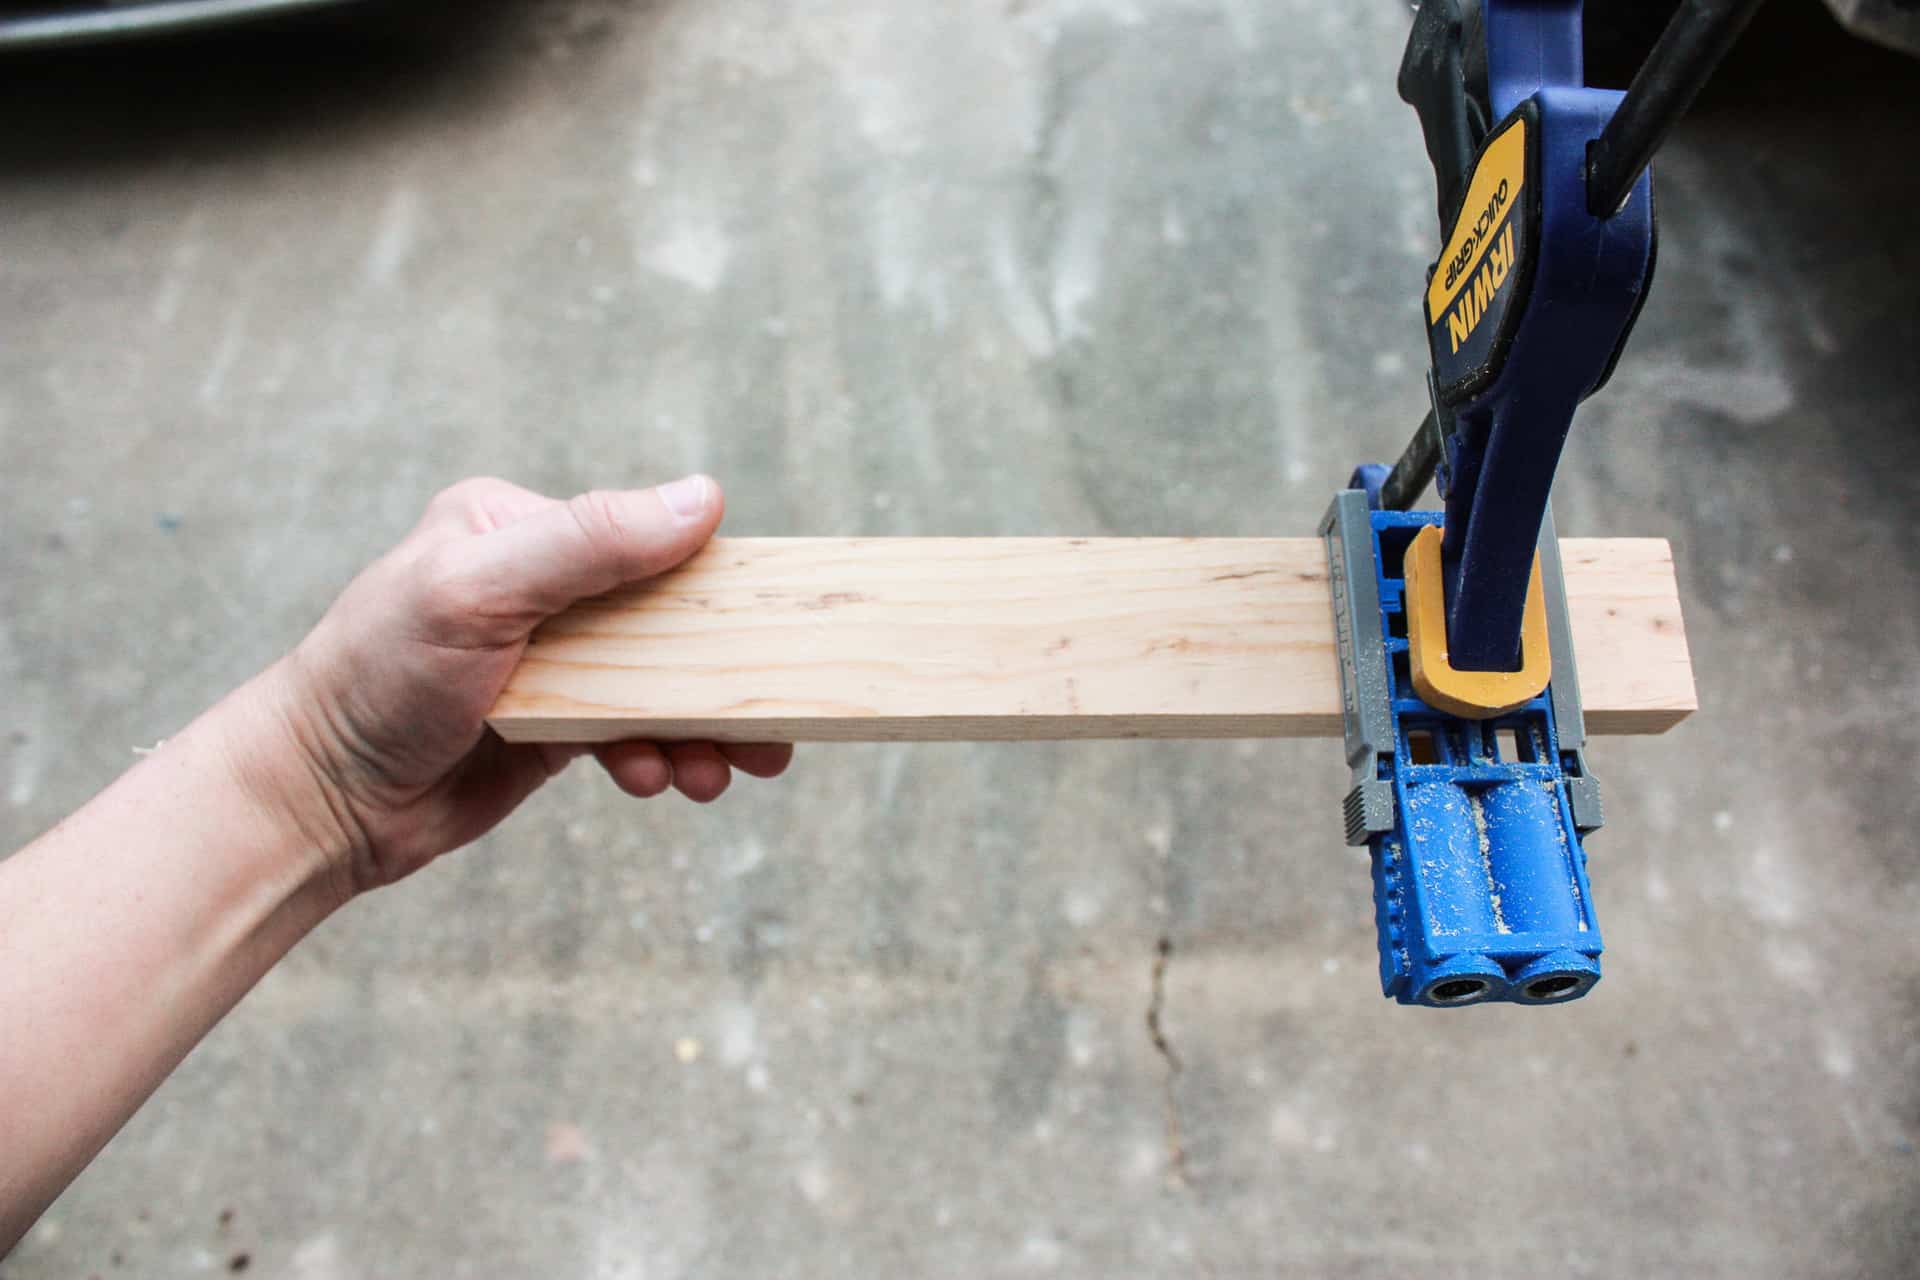
Now you take the jig and clamp it to your wood!
*note: this picture is just an example – you will not be using a board this size

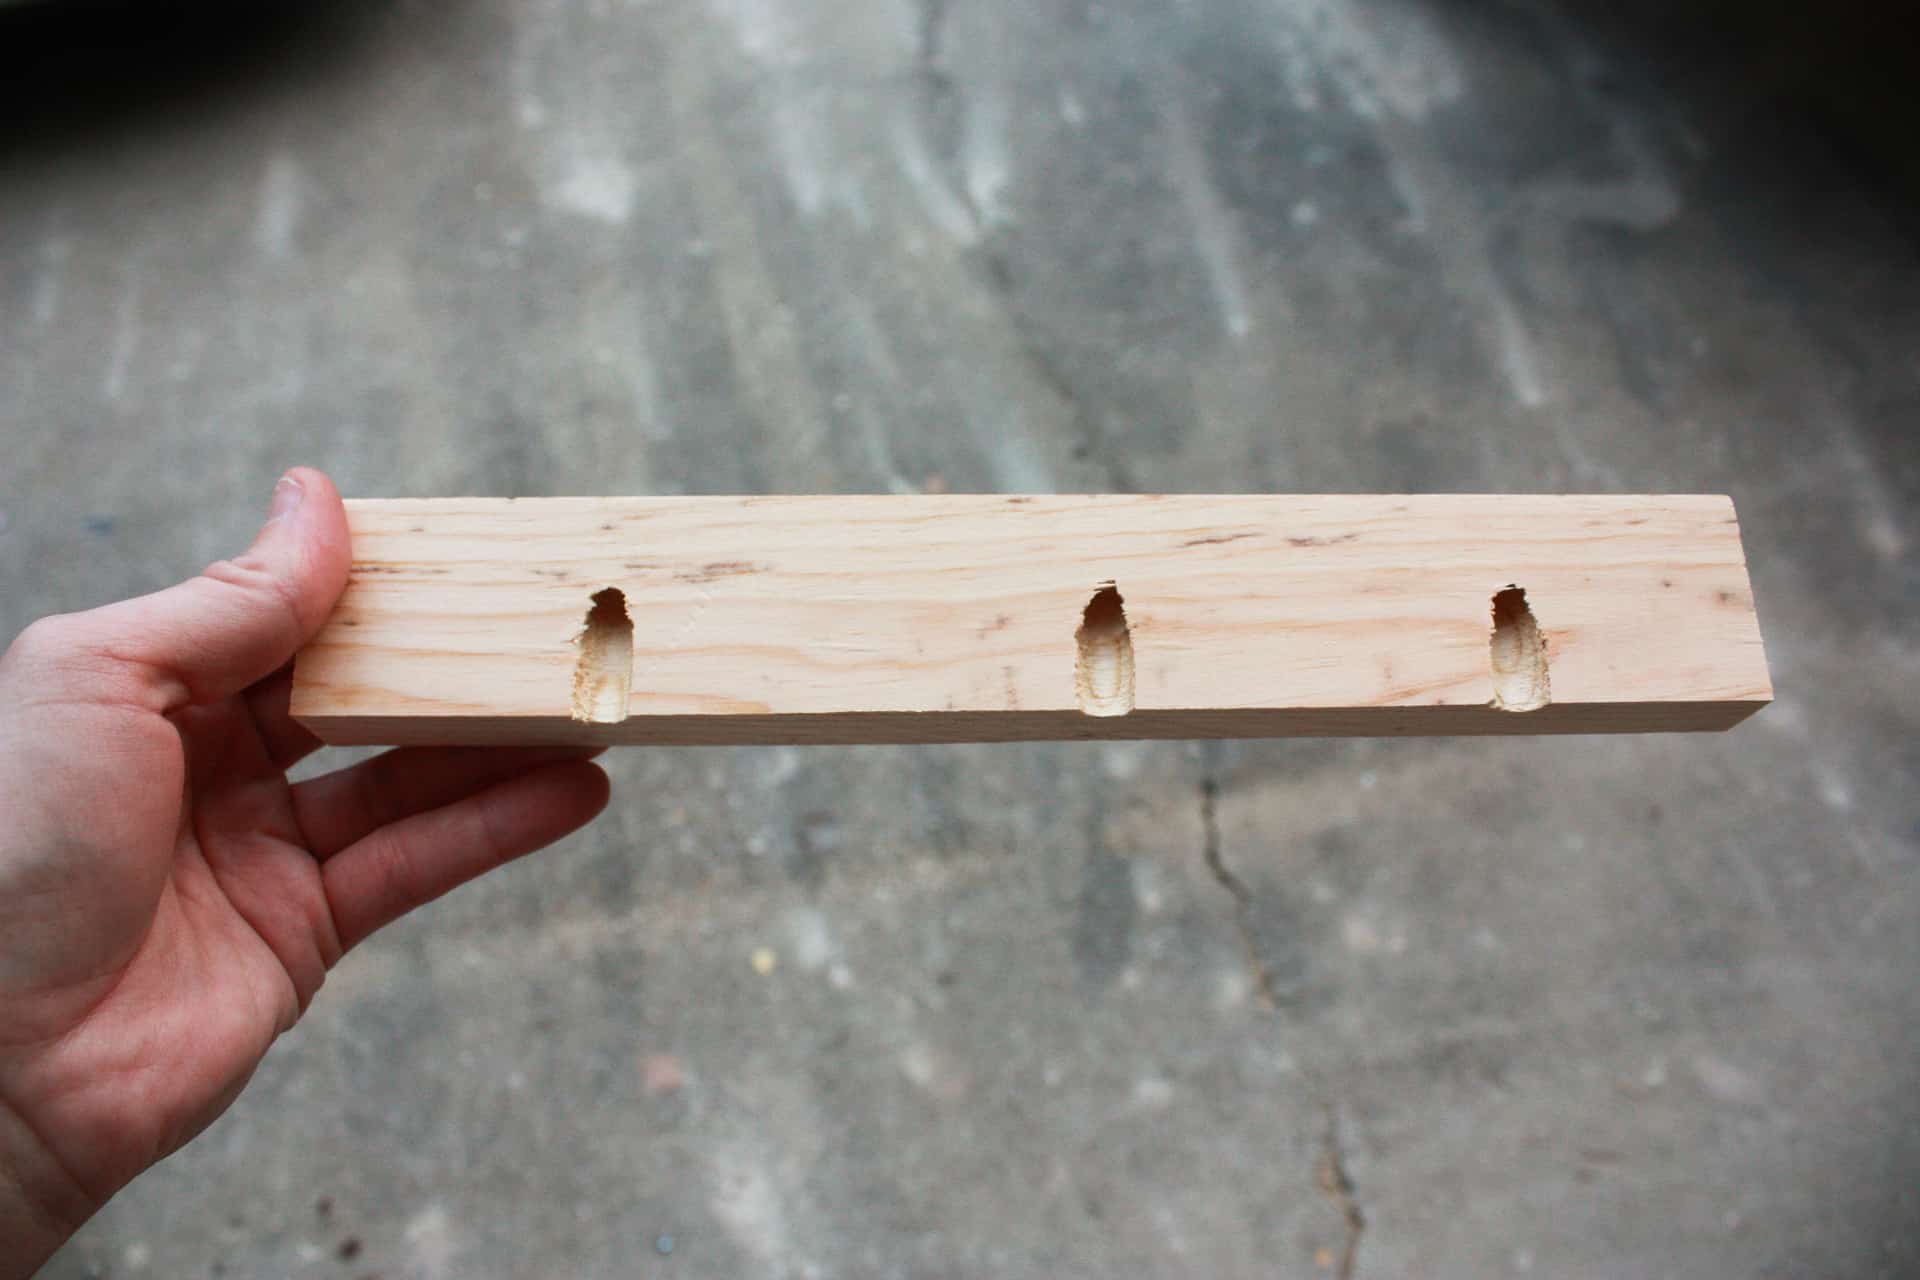
Now with your Kreg Jig R3, you get a drill bit and it has a round ring that you set at the depth of the wood you are drilling into as well.
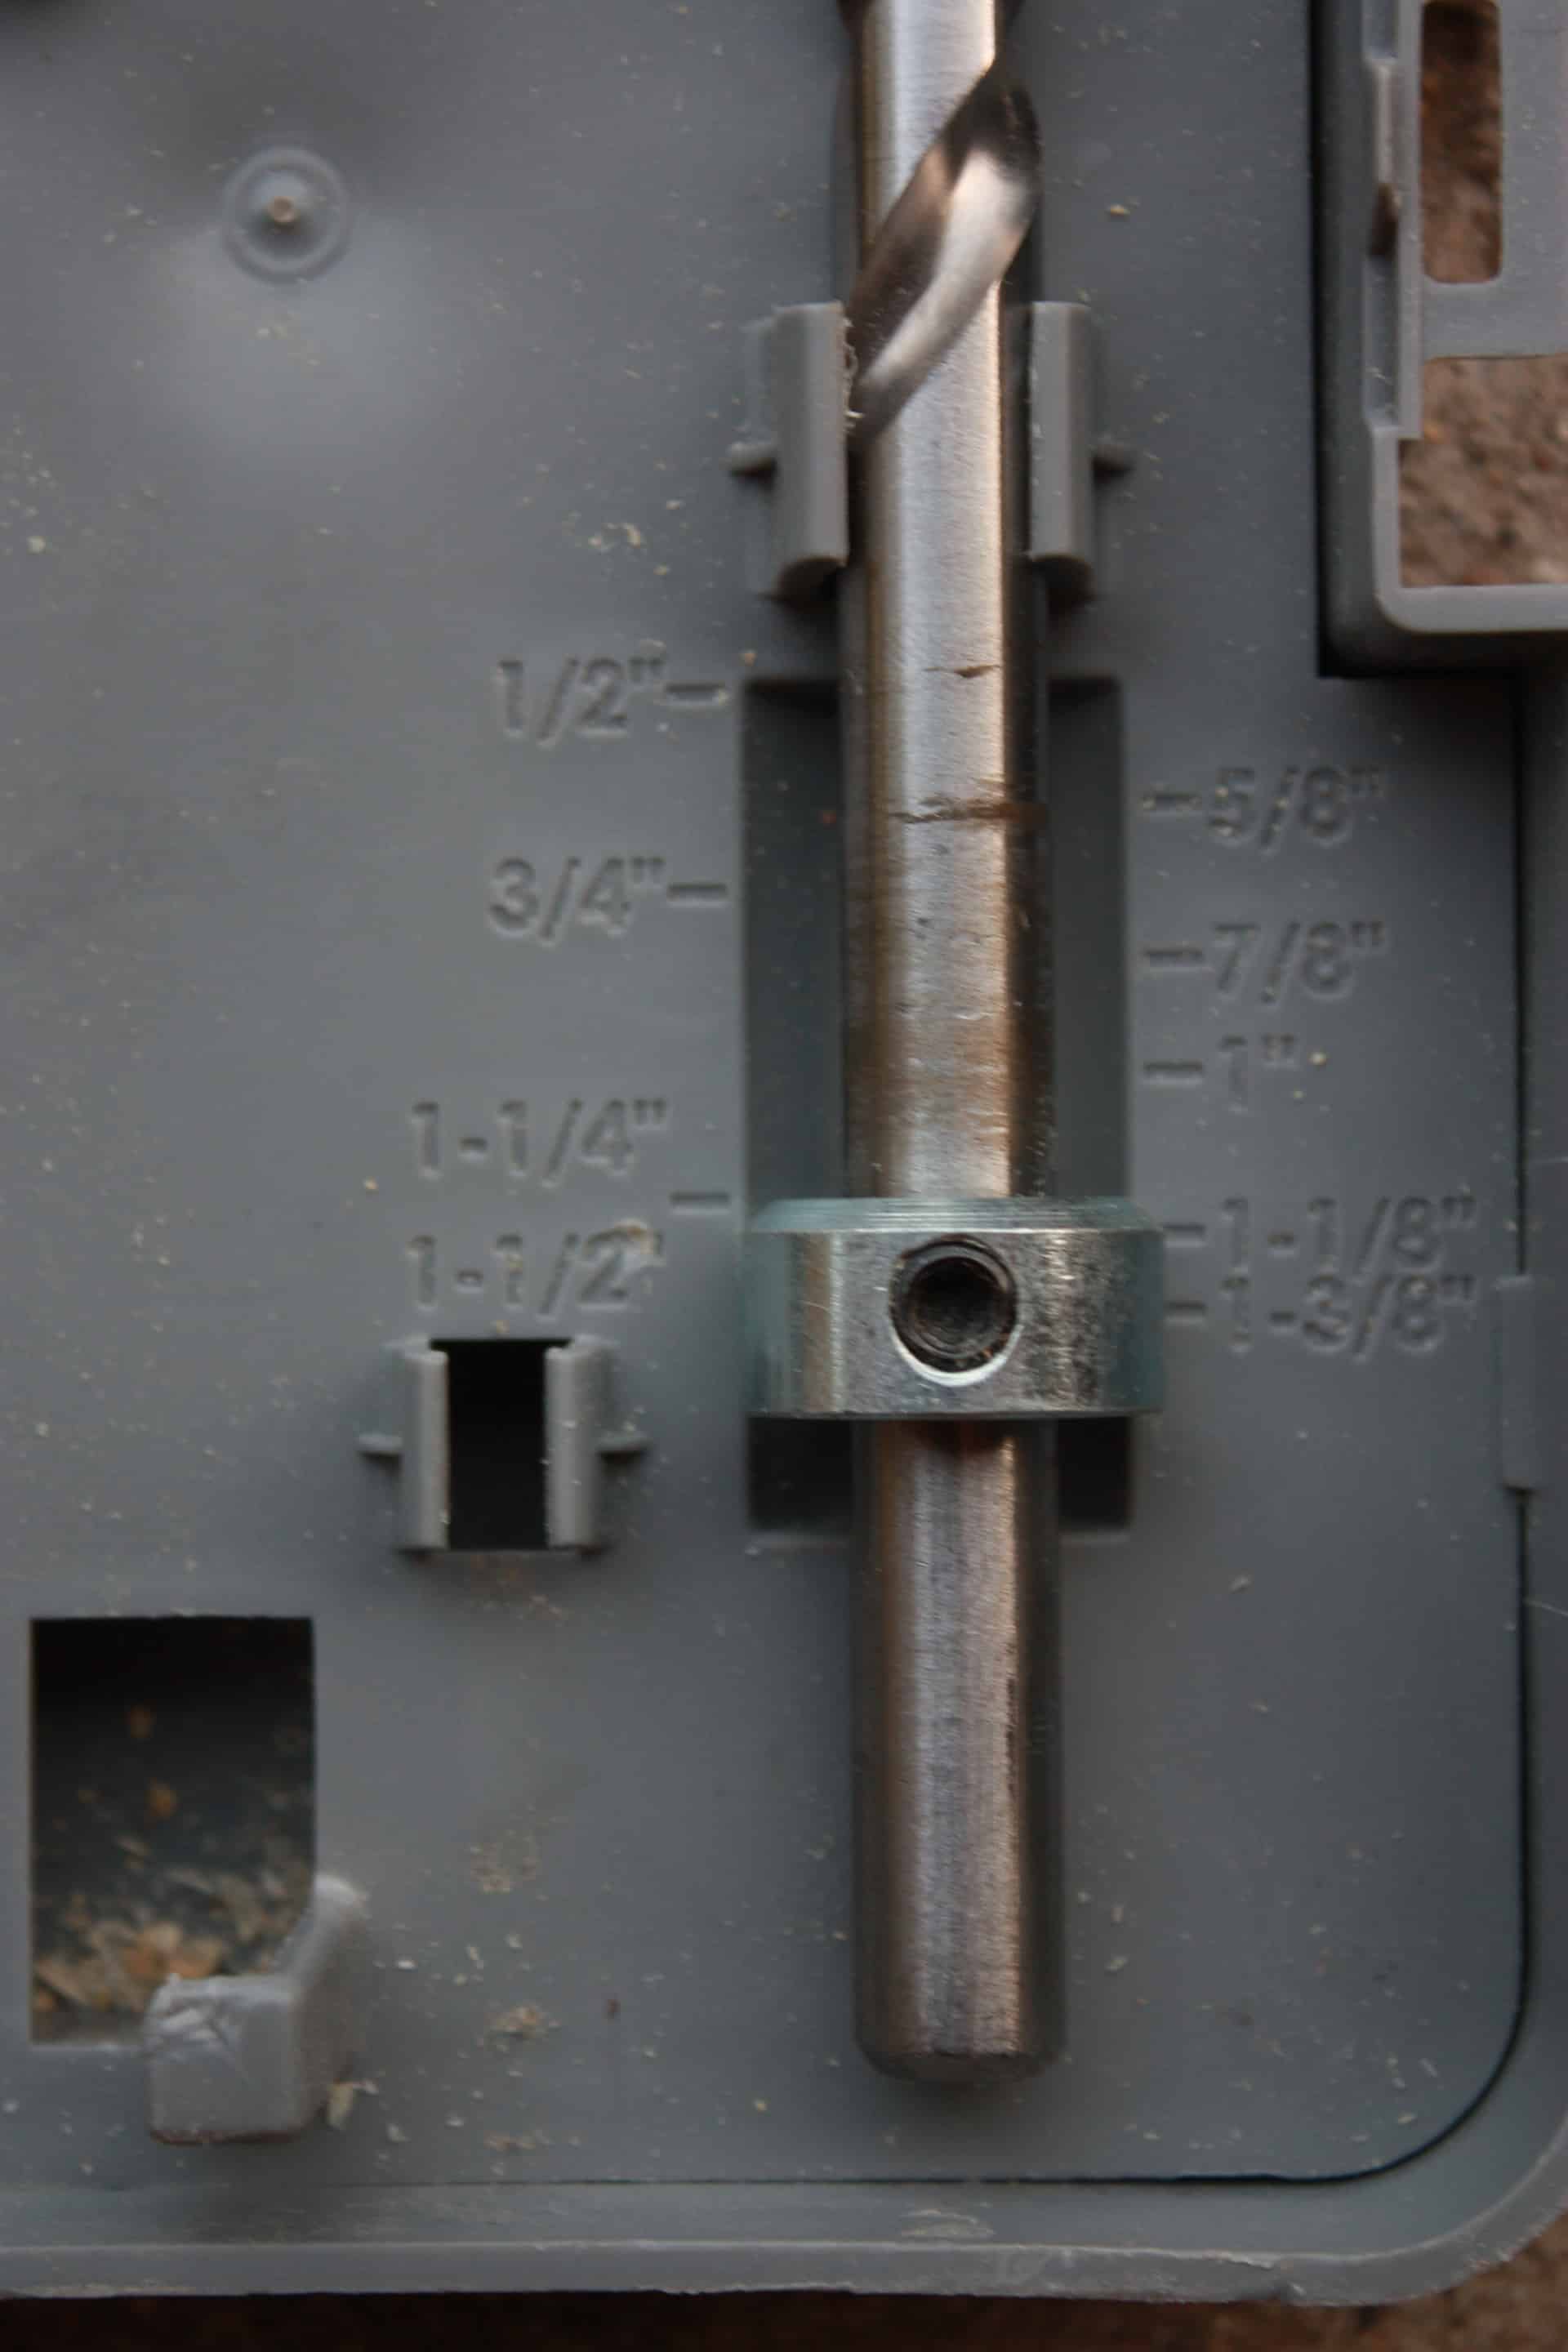
The ring will move up or down and you tighten it where you need it, now that we have it set perfect…insert the bit into your drill…and drill baby!

Now you have pocket holes drilled! It’s so easy my boys even love drilling pocket holes for me!
Alright so after drilling the pocket holes (you will see where the pocket holes need to be placed on the side table in the pictures below) we can start attaching our boards together to build the face frame! I always glue my joints before I screw them together!
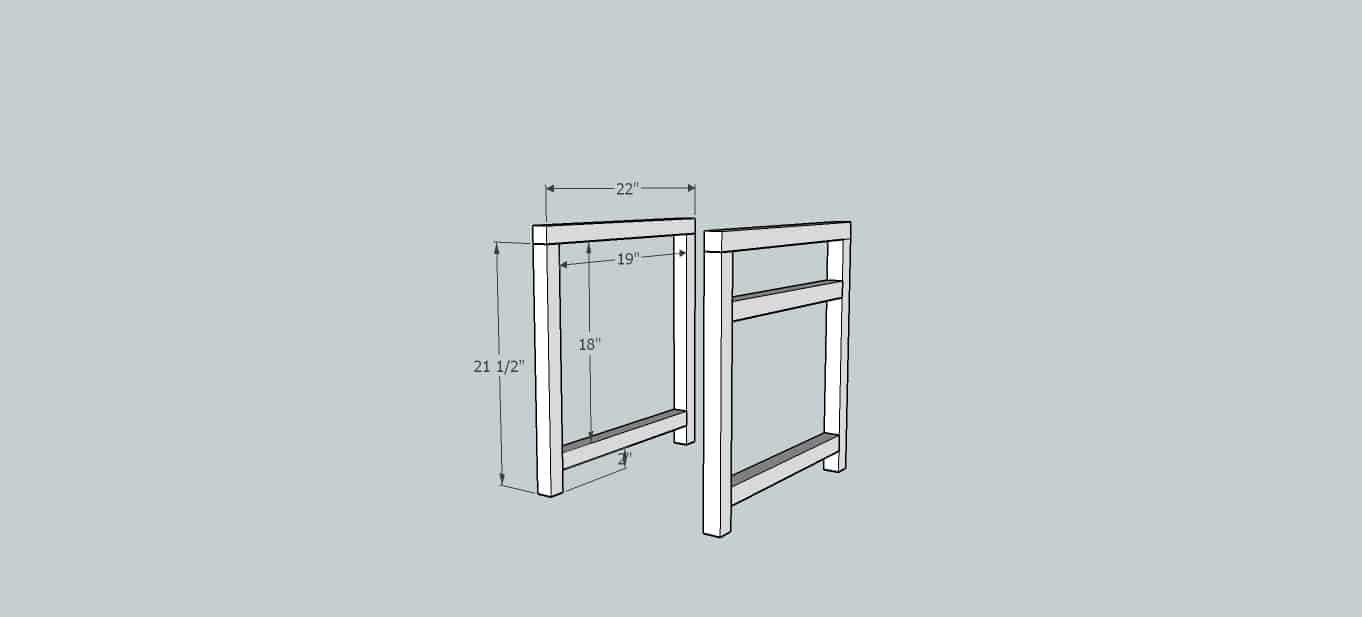
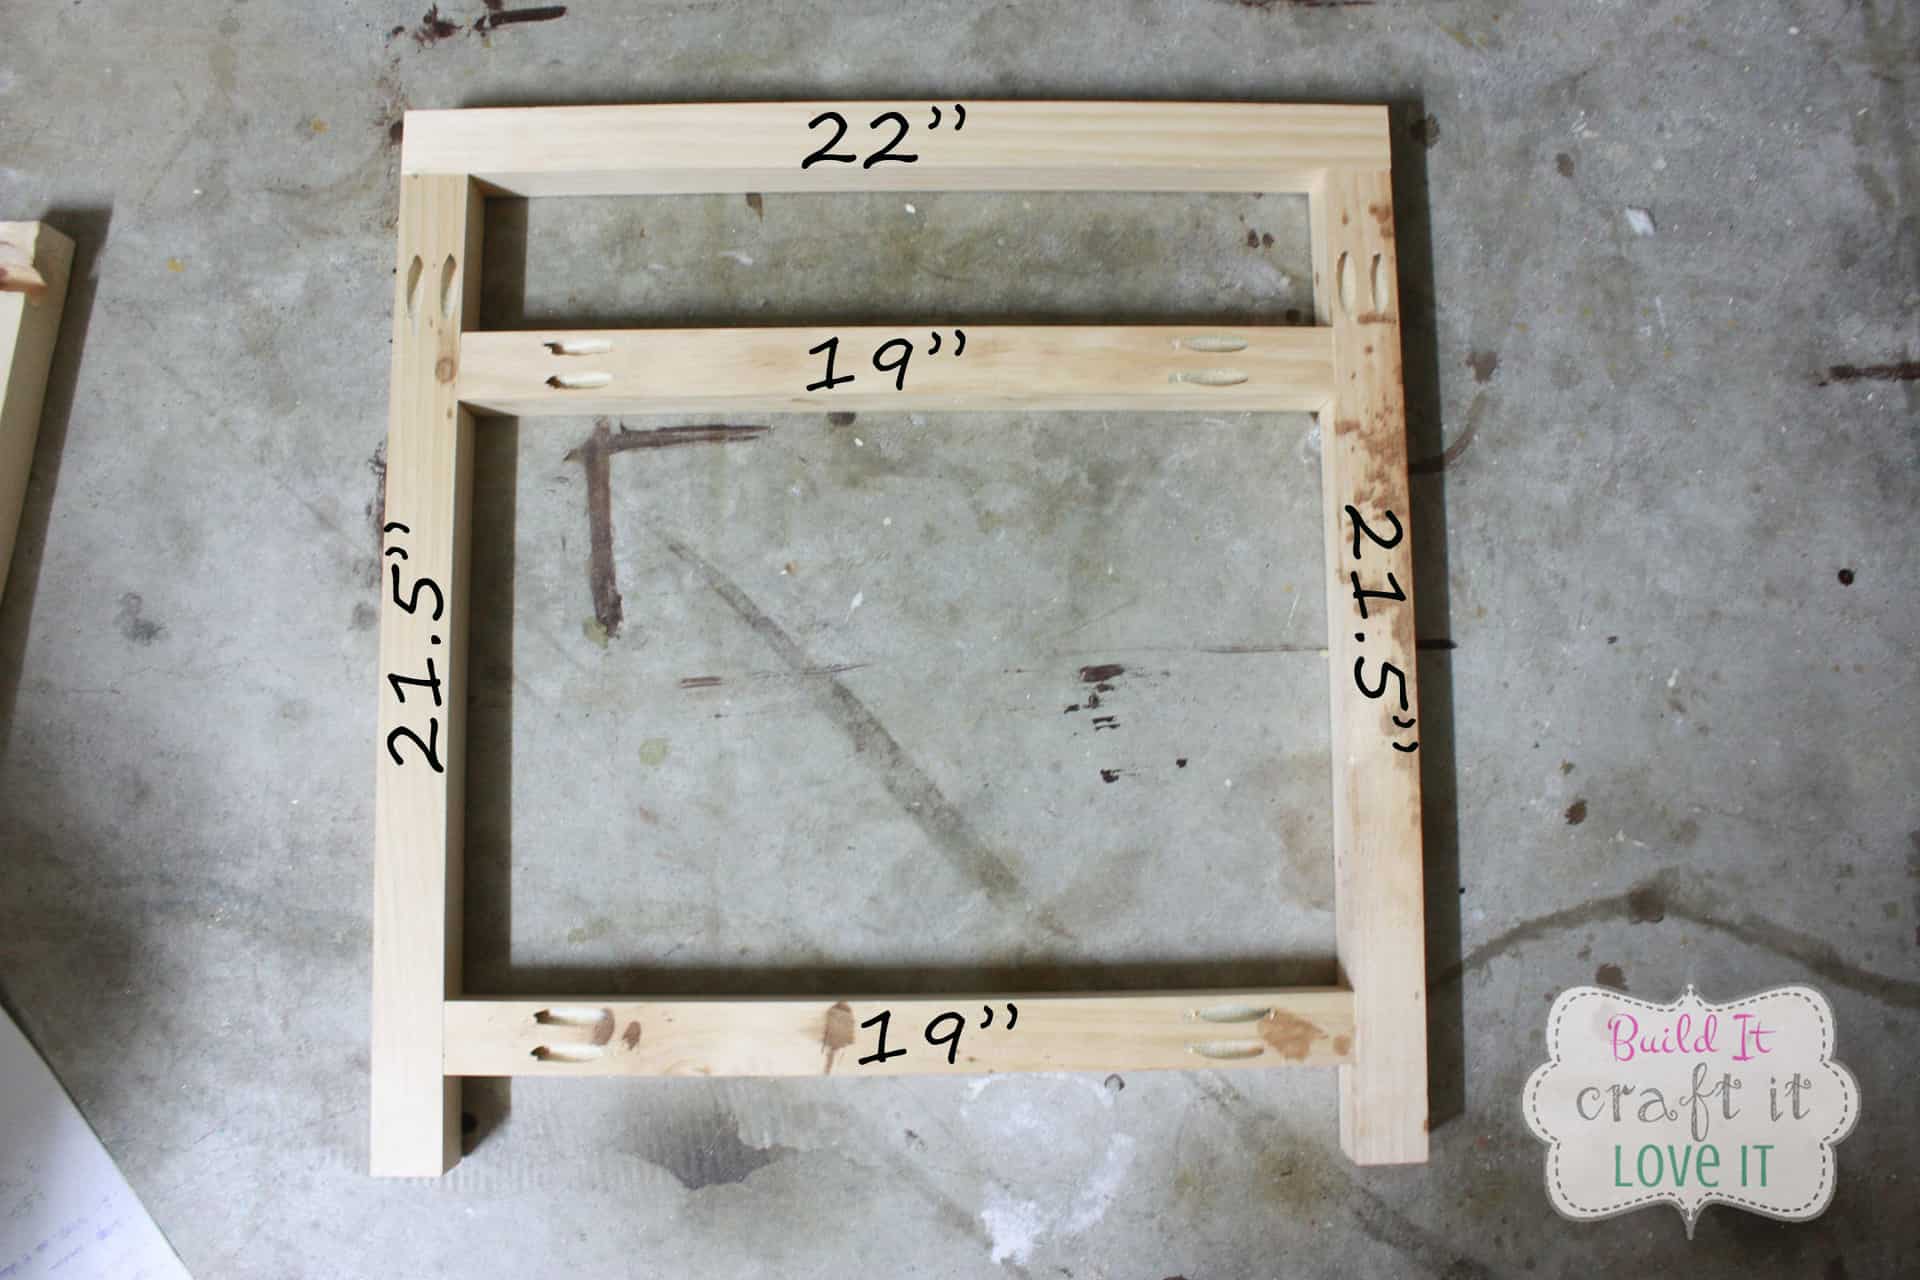
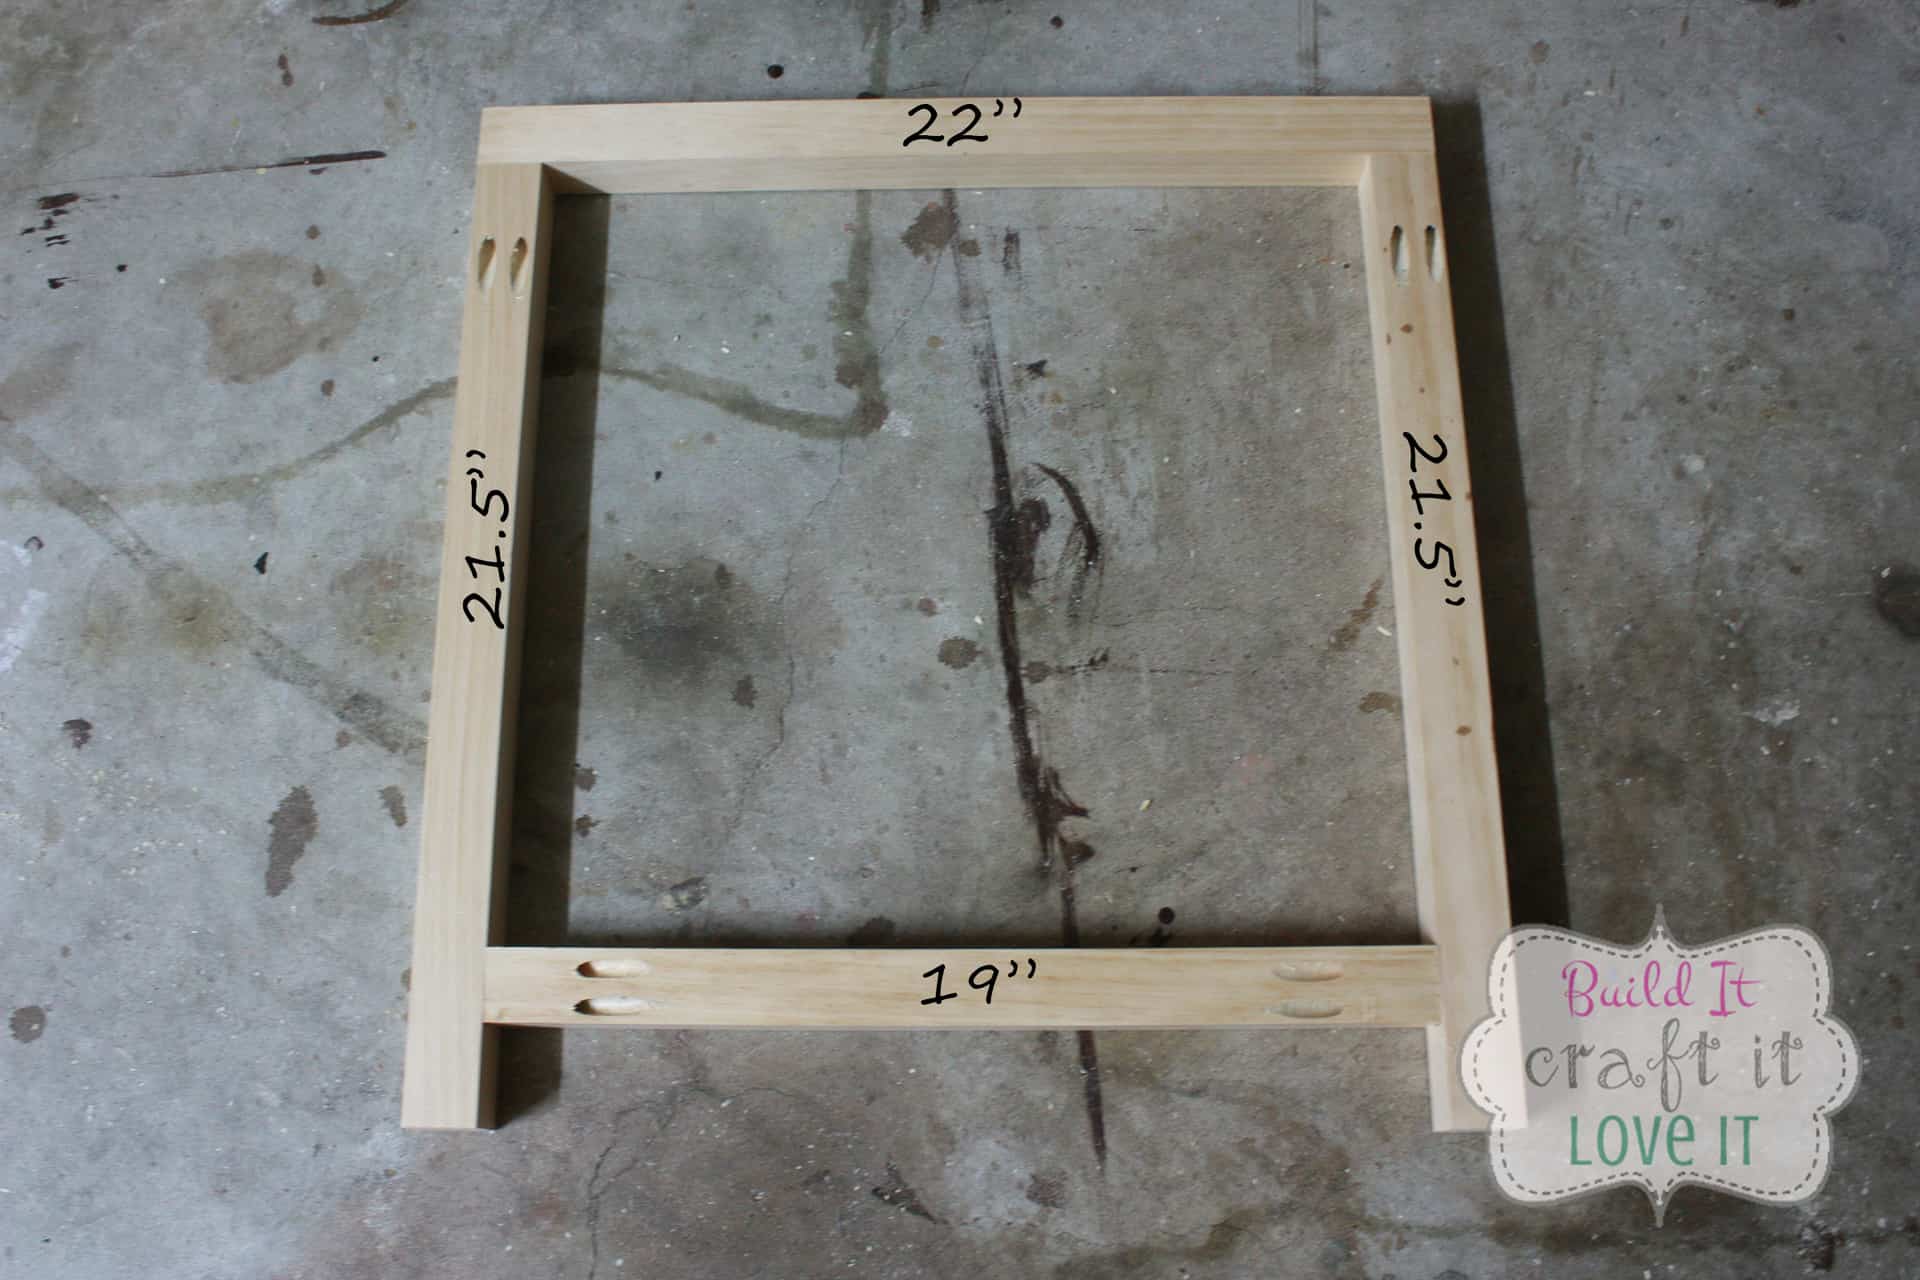
Since the frame is 2×2’s we are going to use 2 1/2″ pocket hole screws to screw it all together. The bottom board is raised 2 inches up from the bottom and the middle board is placed 3 3/4″ down from the top board. (see Sketchup plans above if you need)
When I was making my faux barn door room divider, I spilled a whole can of stain…my 2×2’s were splashed by the crash of the stain…that is why you see all the splotches in the picture! LOL!
Now onto the back frame, the bottom board is placed 2 inches up from the bottom.
That was easy peasy! And looking good so far!
Now we can add the side 2x2s, which are all 15.5″ to start making it become 3D and really starting to look like the DIY side table it’s supposed to be! The bottom boards are placed 2 inches up from the bottom just like the other two were, and of course, the top board is placed flush with the other two top boards.
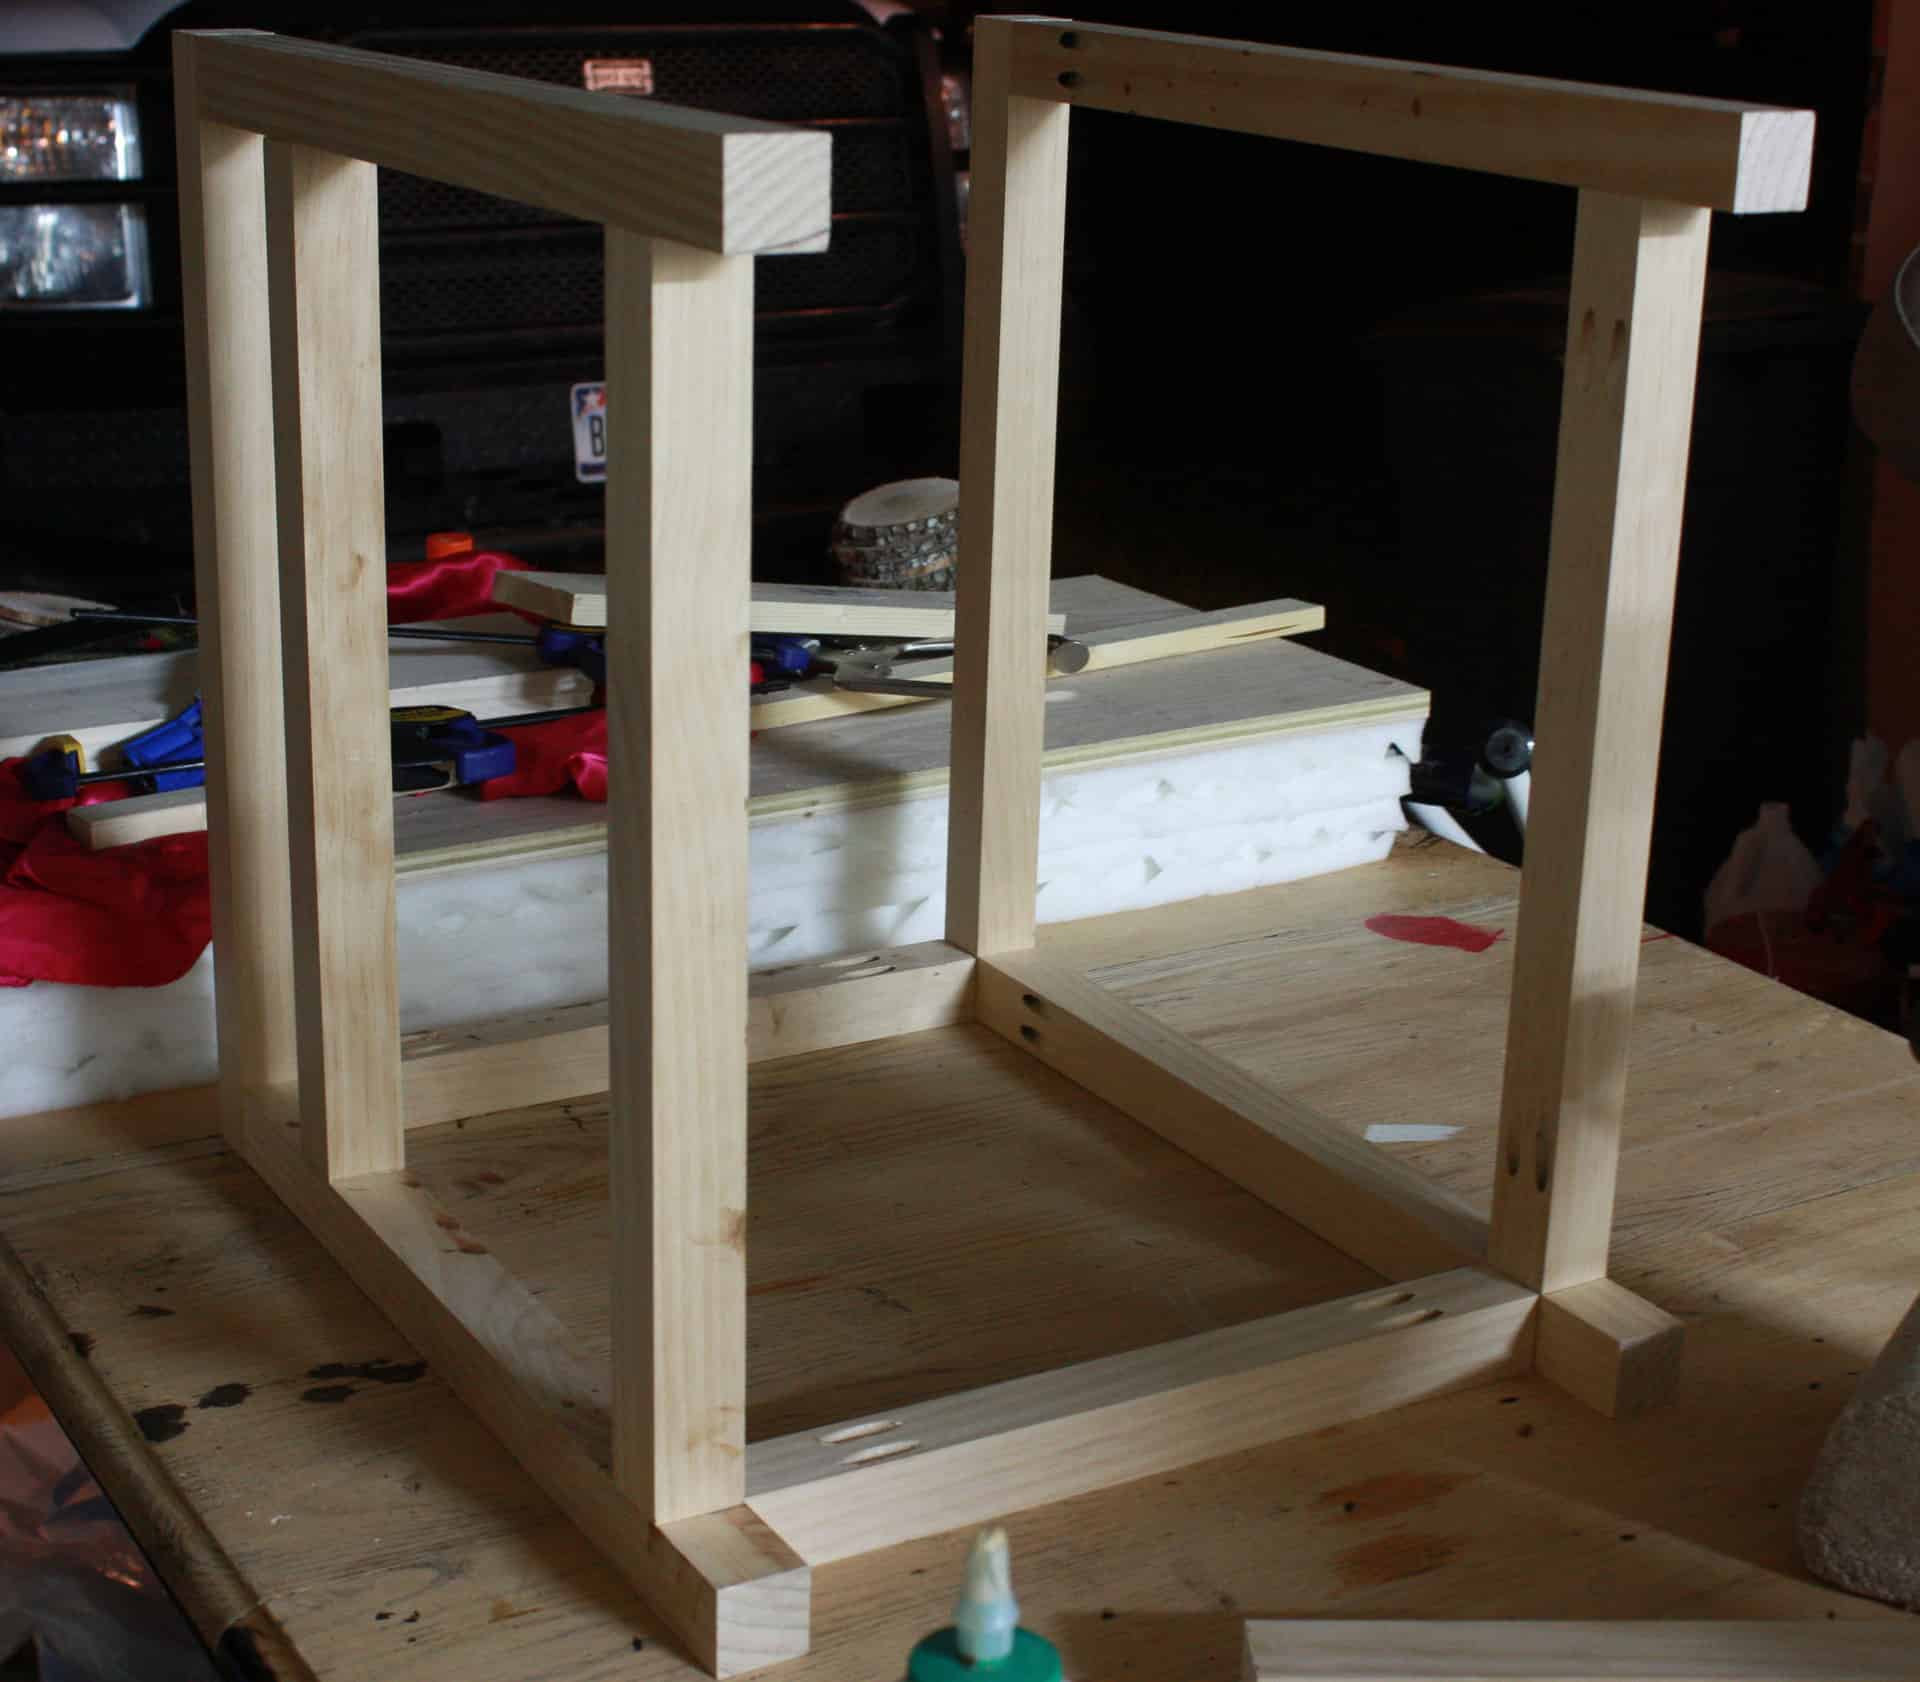
I’m sorry there is always a lot of distracting junk in my pictures…apparently, I work well in complete chaos! 🙈
Now when you have both sides on, you can stand it up and it is really taking shape!
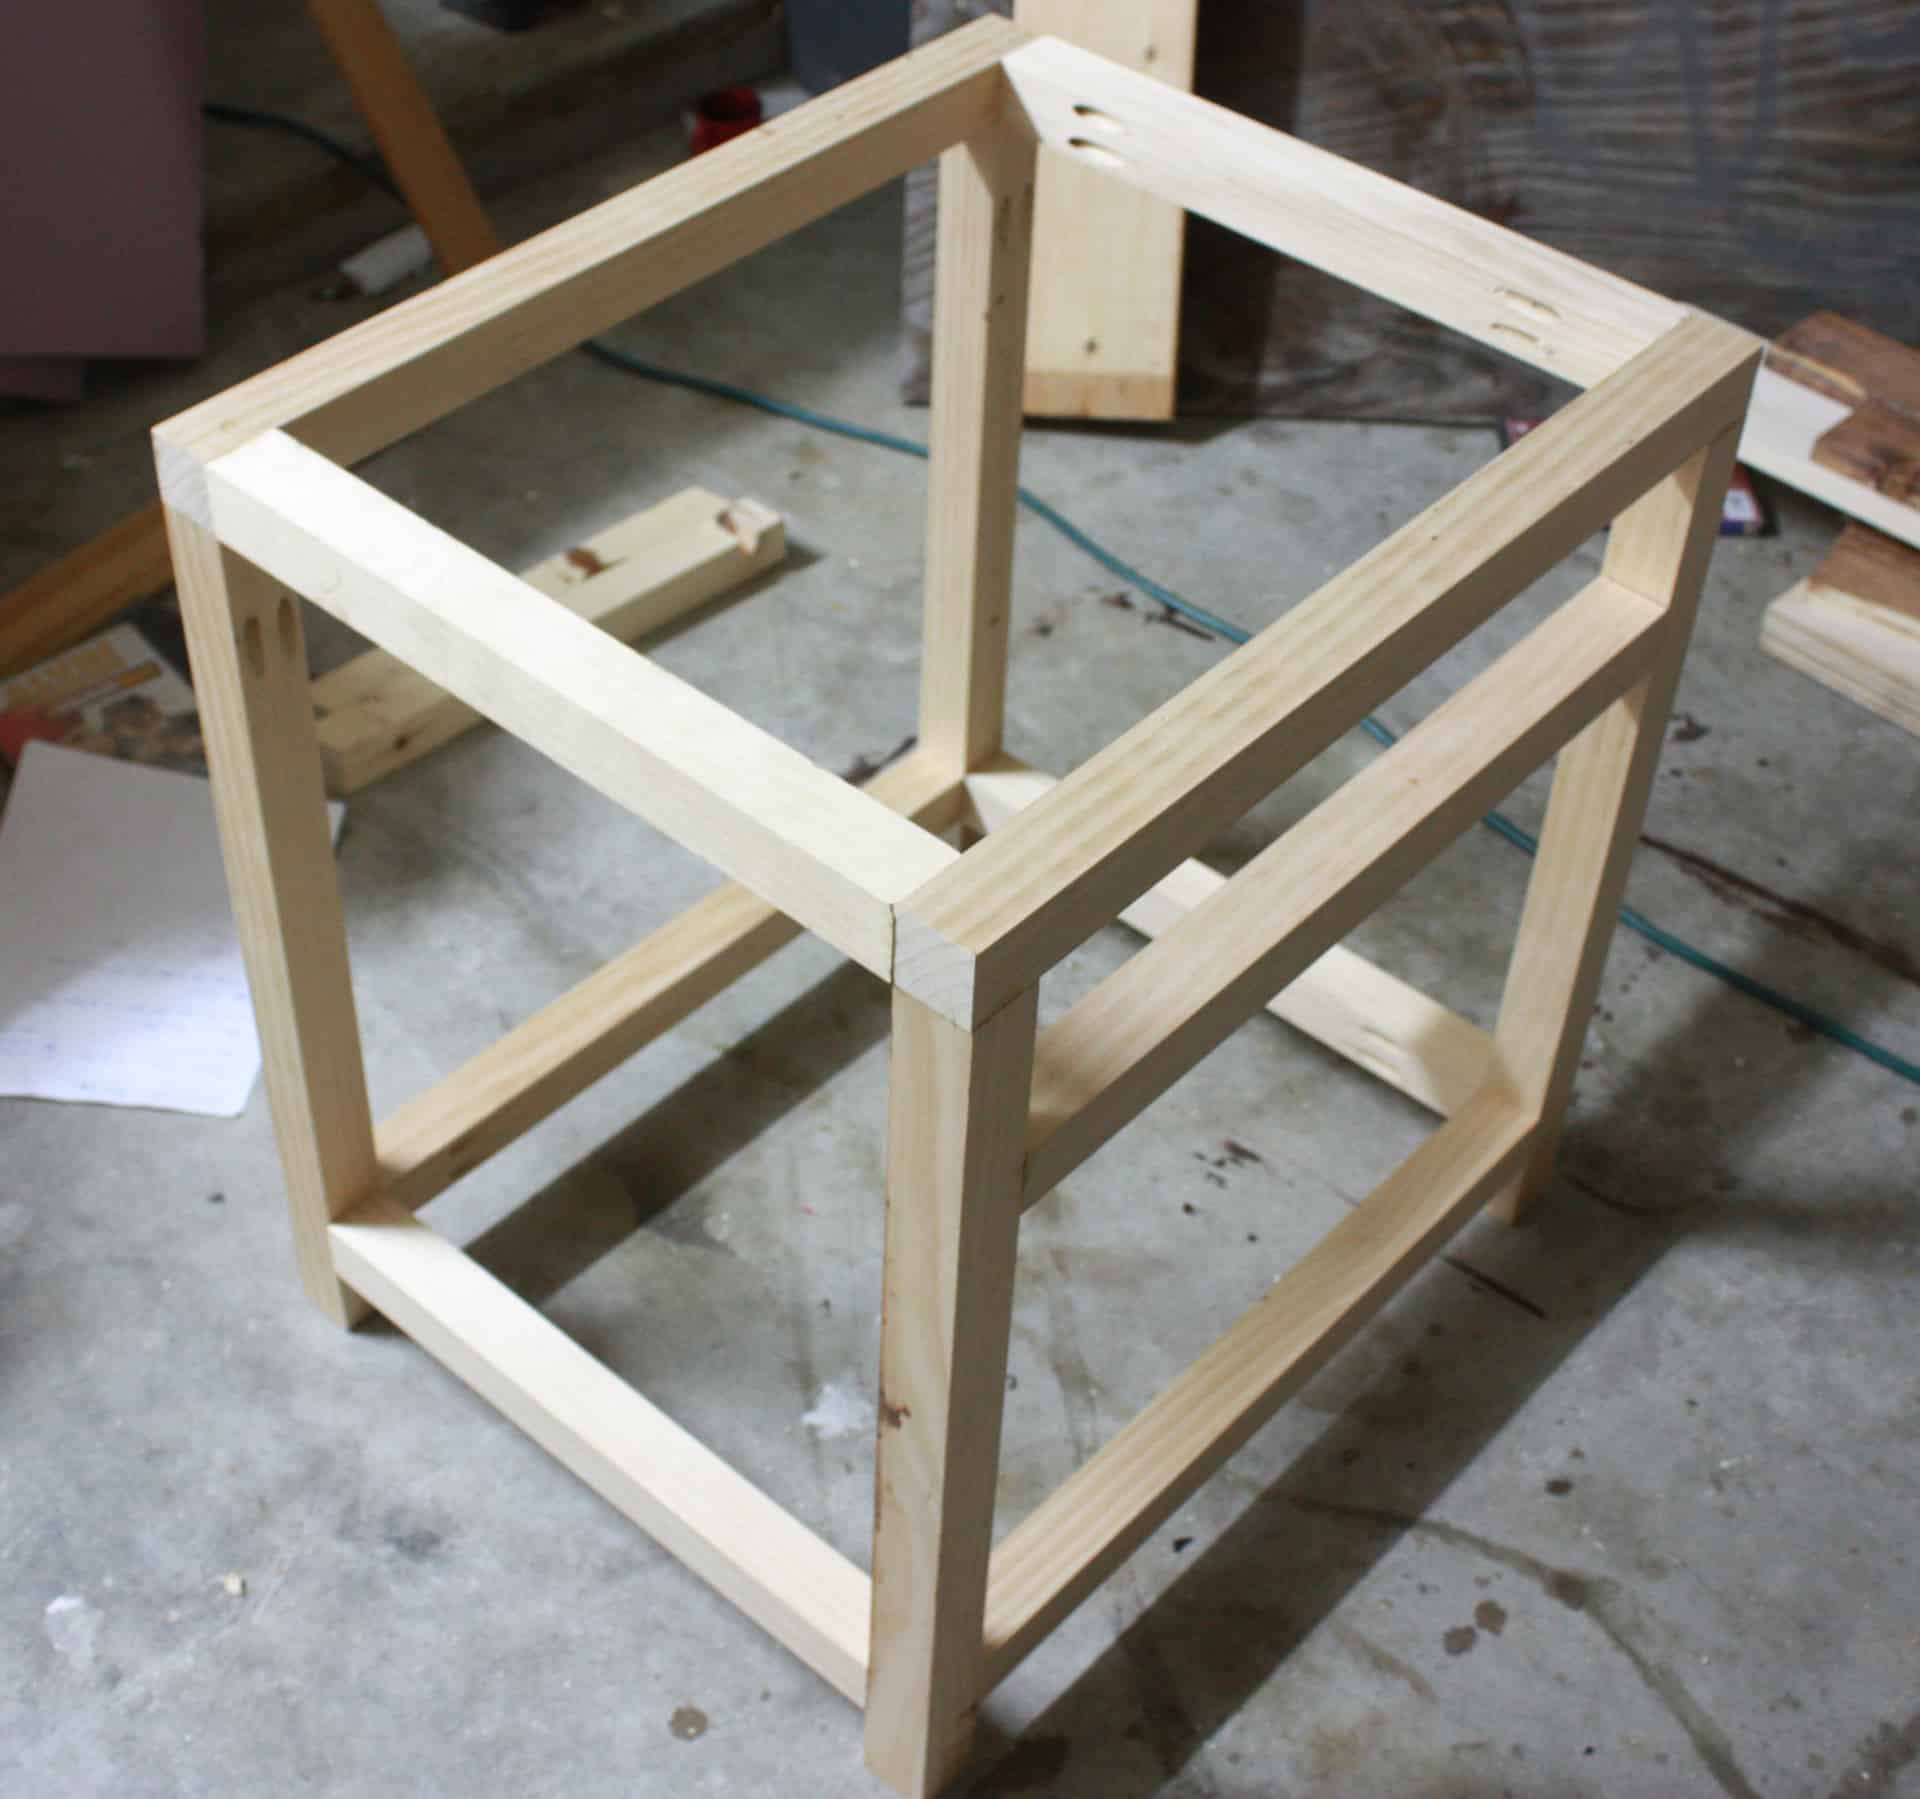
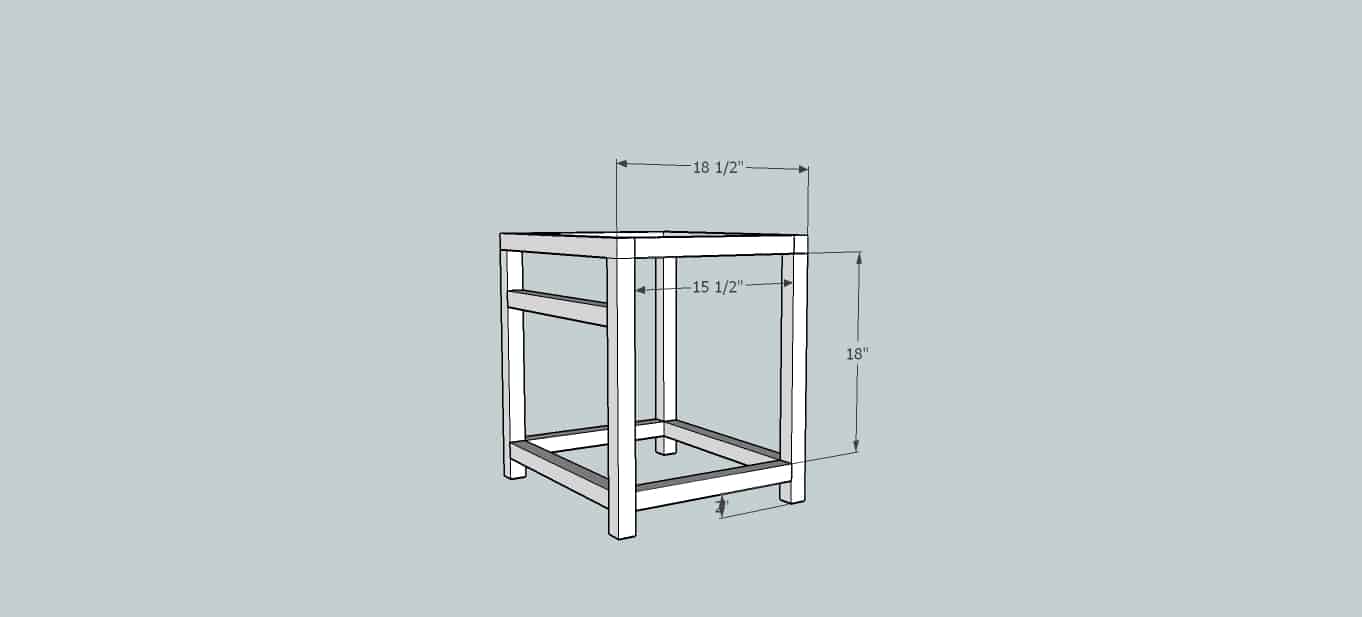
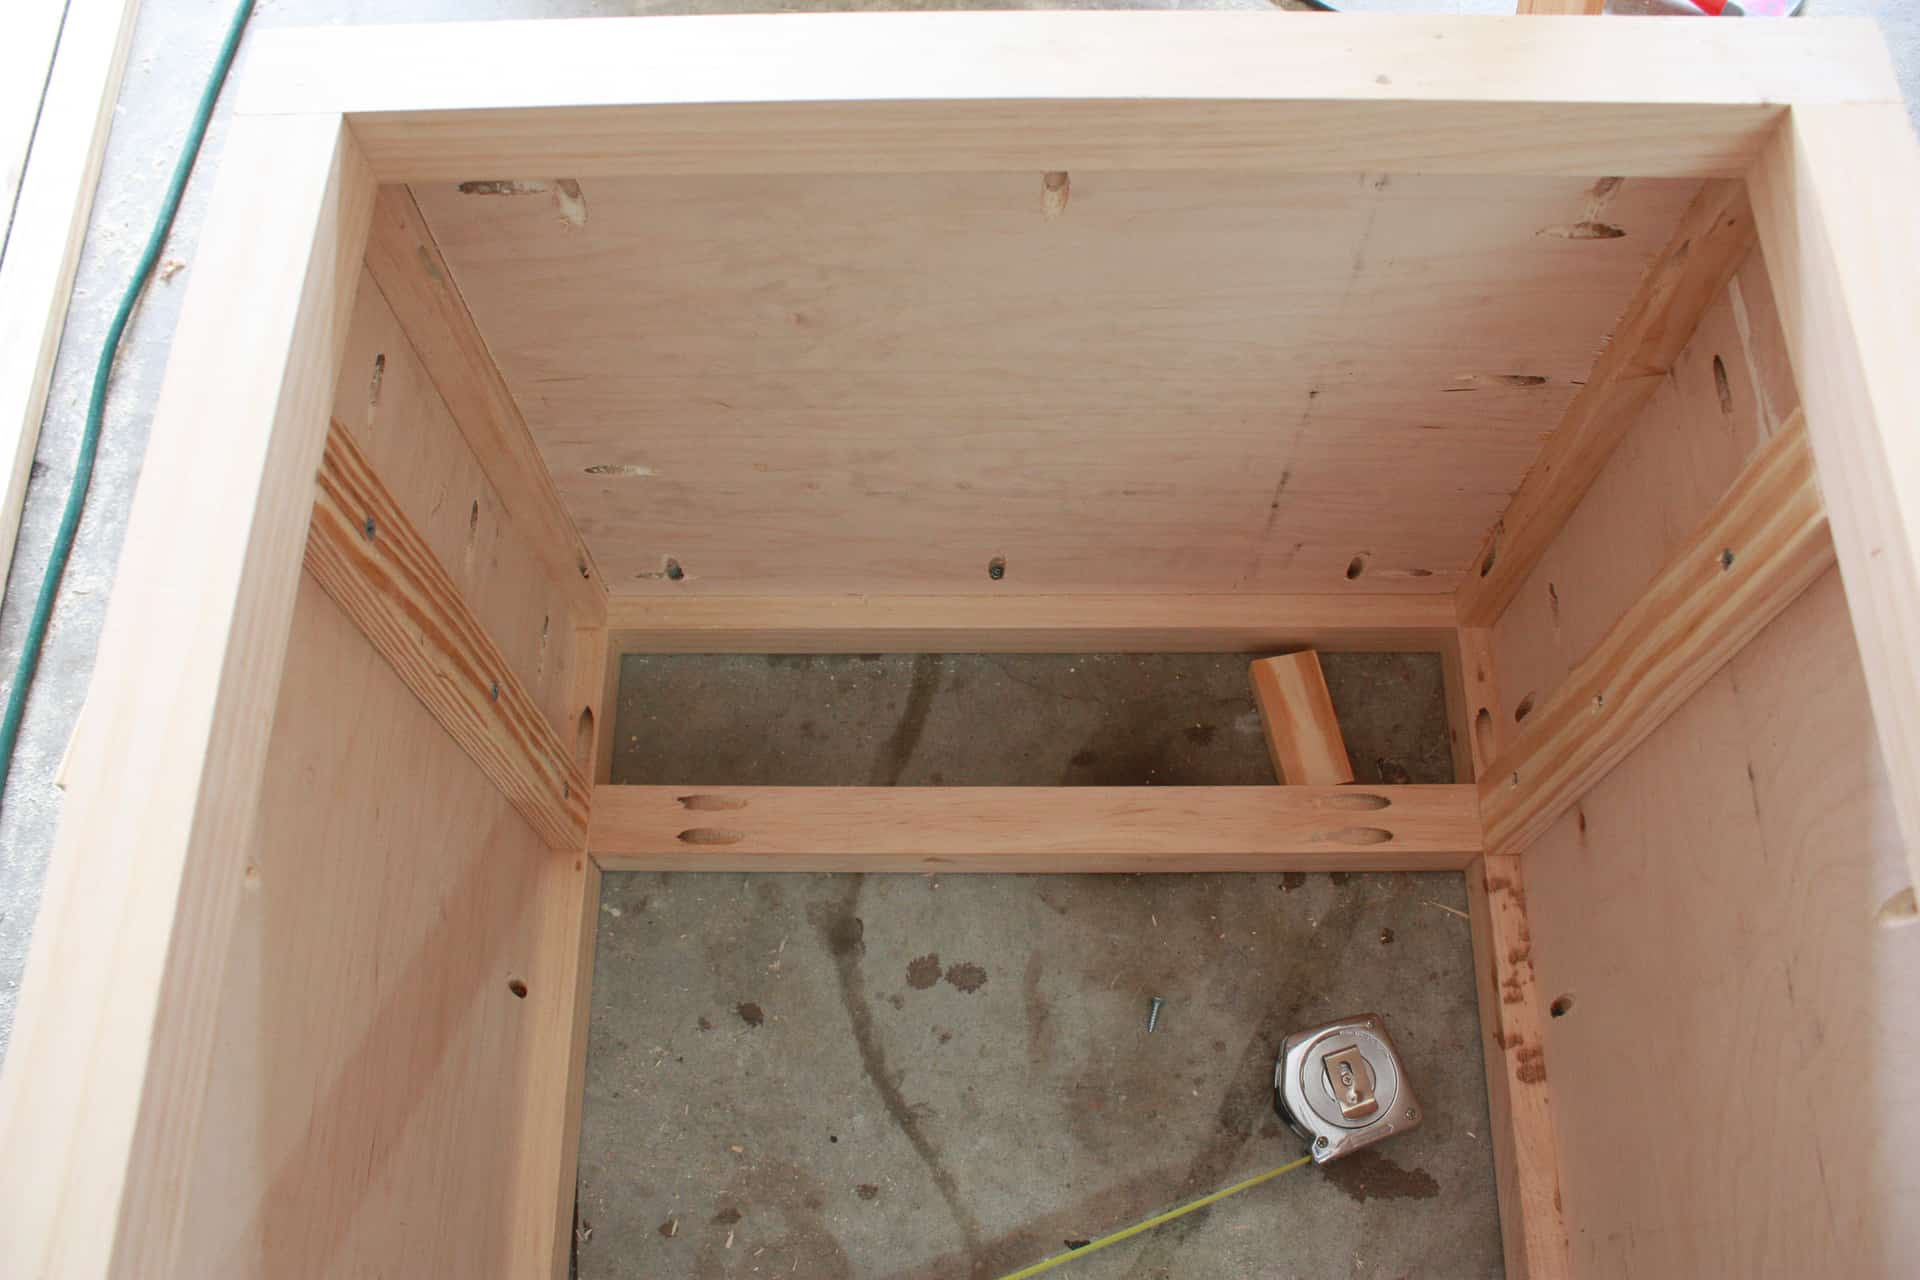
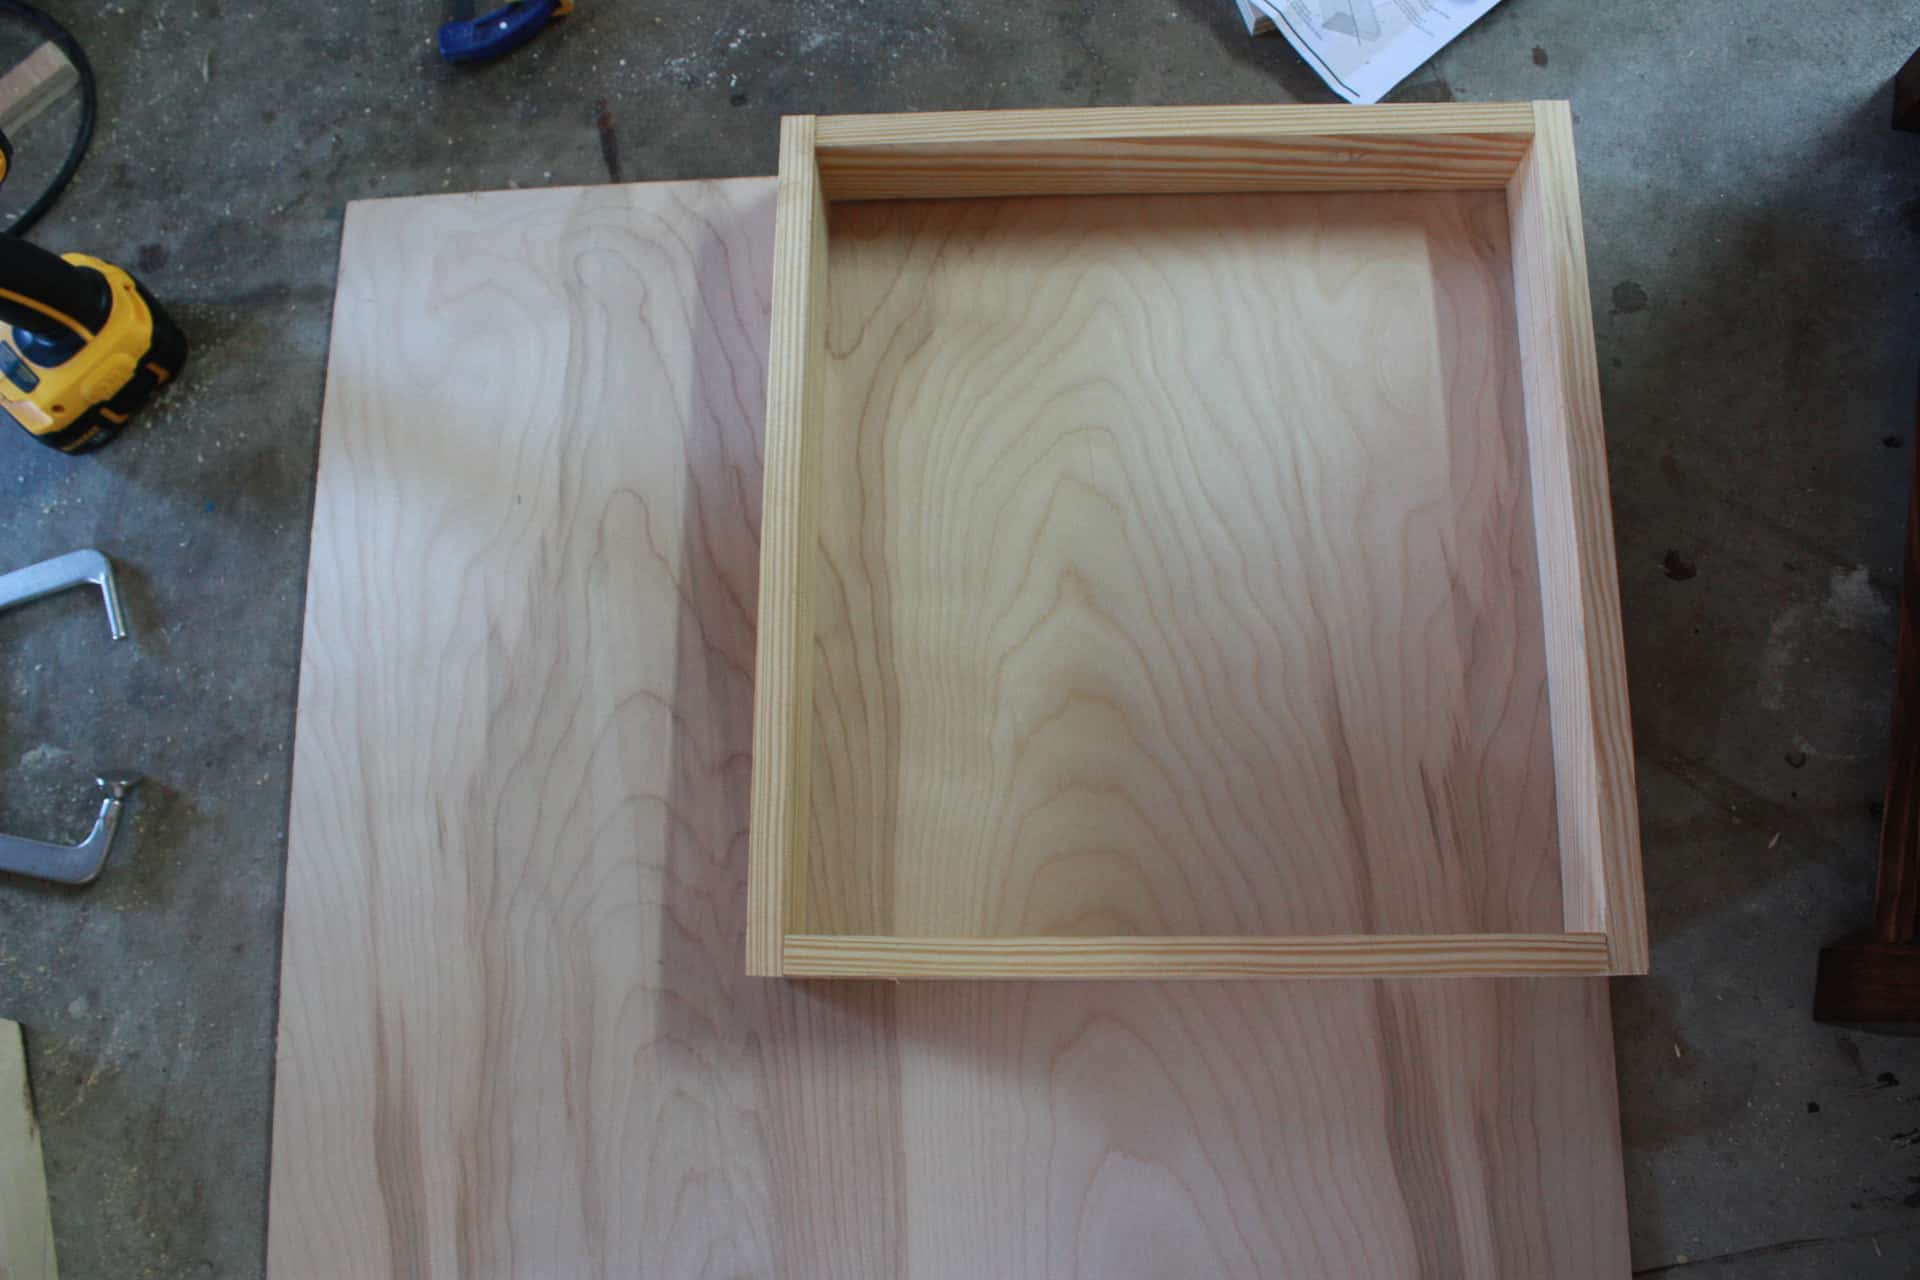
Ooh-la-la!!! Okay now, just measure from top to bottom, side to side, in between the 2×2’s on the two sides, top, and bottom! Your measurements should be somewhat close to 18″x 15 1/2″. Then you will cut your 3/4″ plywood to fit.
I chose to use PureBond Plywood on this project… and pretty much ALL projects that require plywood if they are going to be indoors for sure! Not only is PureBond Plywood the most beautiful plywood to look at, it is different from regular plywood in that it uses soy-based adhesives to glue the particles of wood together inside of the pretty exterior. Other plywood uses a urea-formaldehyde adhesive which then off gases pollutants into your home!
It is also dangerous to inhale while cutting the plywood! You can get PureBond Plywood at Home Depot, if they don’t carry it in your store, they can special order it for you! It is totally worth the wait! I have little ones and I try to keep the interior of our home as pollutant free as possible…but that’s a whole other blog post! Lol!
After cutting your plywood…and making sure it fits the space you cut it to fit…you will need to drill pocket holes all around the perimeter of the plywood piece. Now that you are using wood that is only 3/4″ thick, you are going to need to change your jig and your drill bit to 3/4″.

And drill them holes!
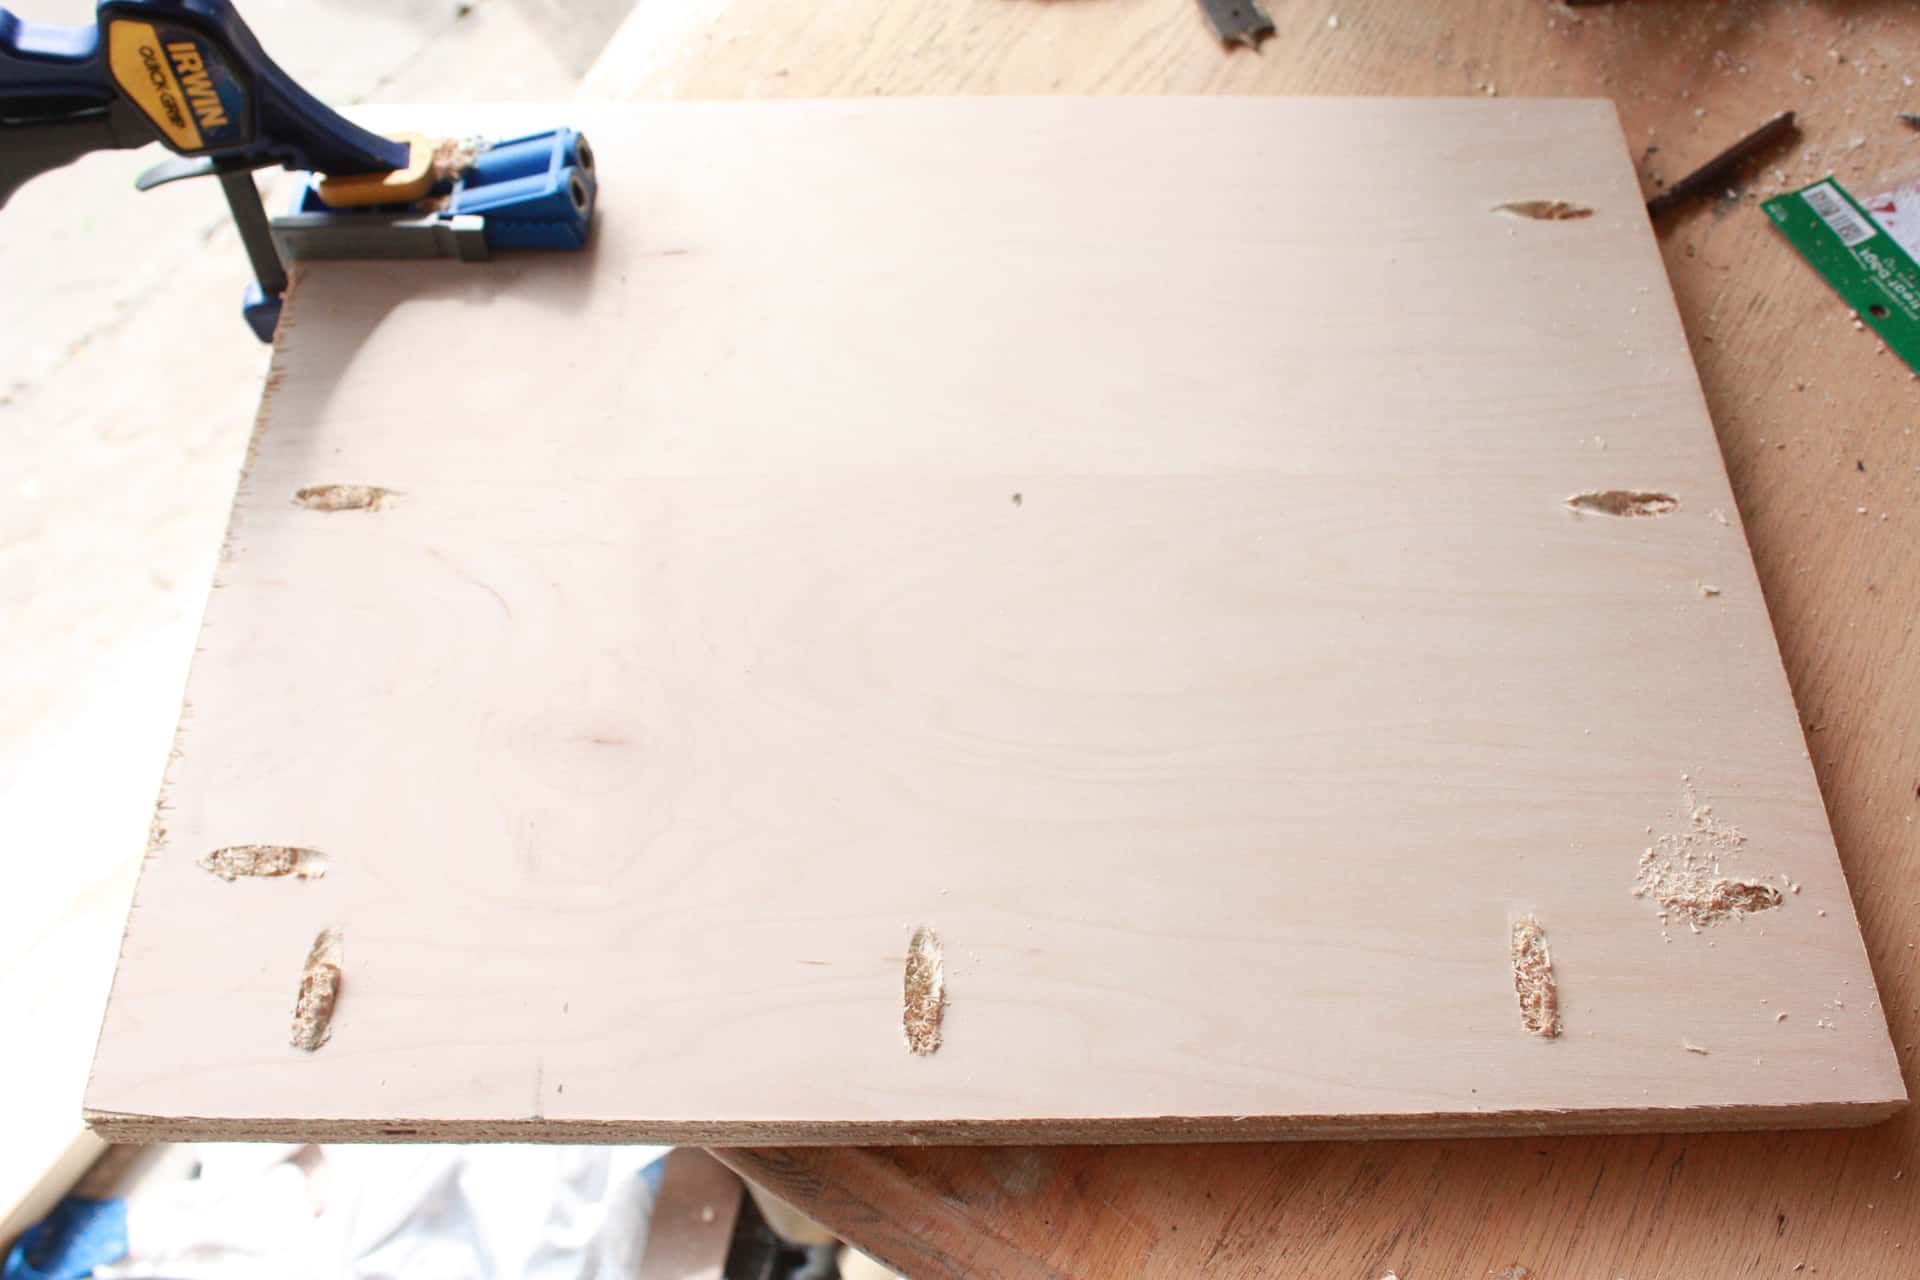
Looking good! Continue this on all the boards…of the sides, top and bottom!
Then using 1 1/4″ pocket hole screws, screw them into place! Whoop!
From the bottom.
Building the Door for the DIY Printmaker’s Side Table
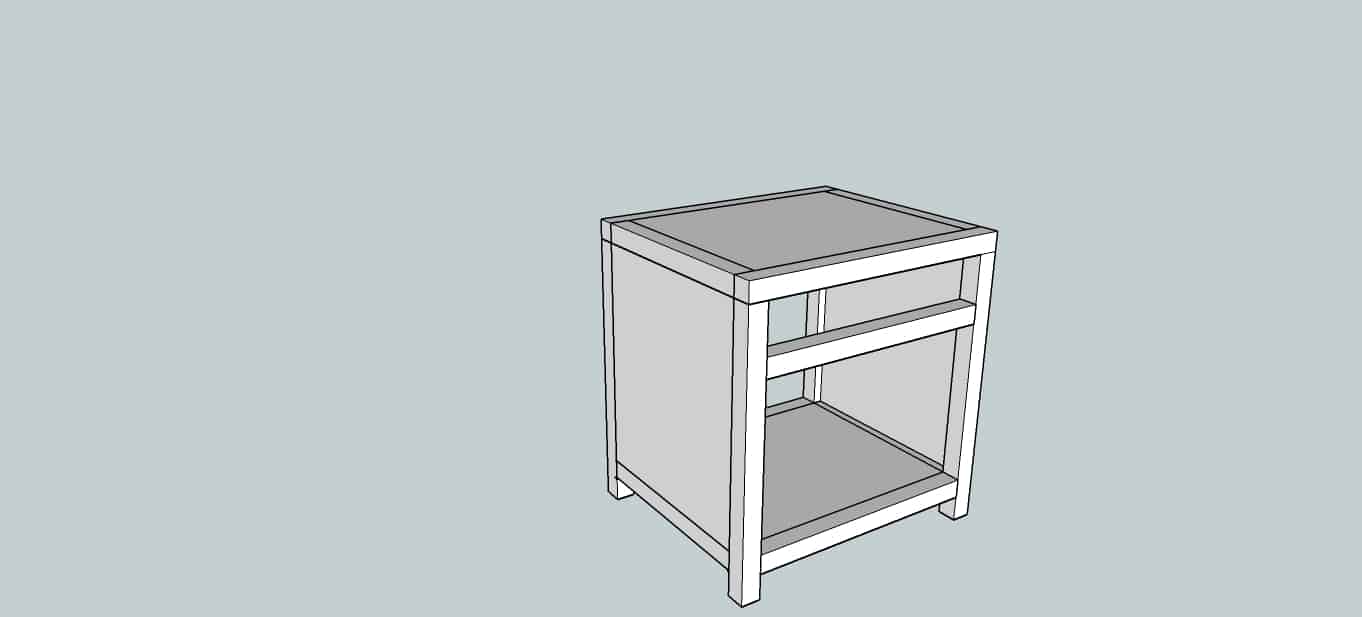
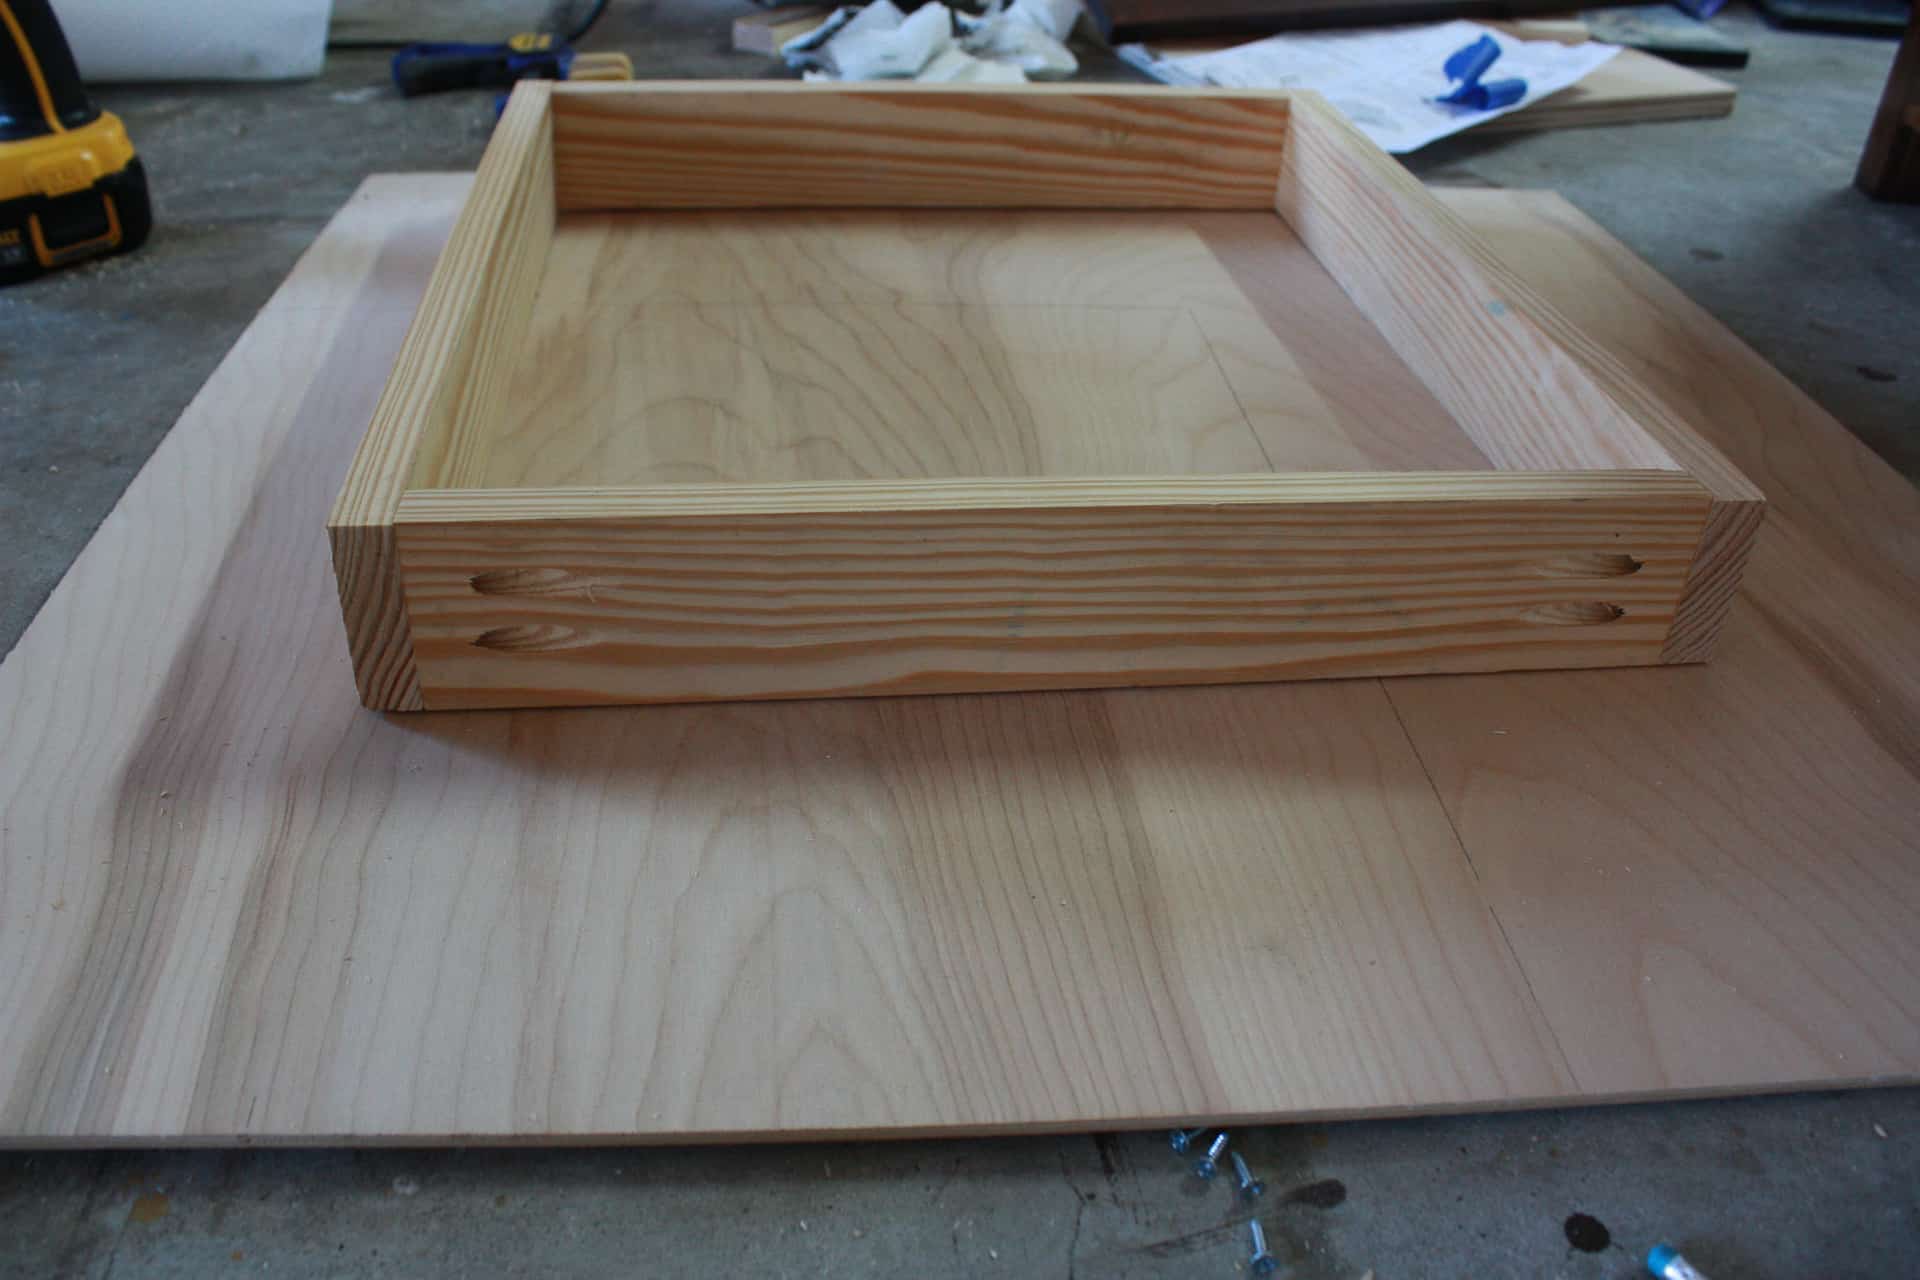
So close at this point, I was getting REALLY excited! You can completely tell that it is a DIY side table at this point, no questions asked…it’s a table!
Now you have to make the door for the side table, apparently, I didn’t think you needed pictures of this part since I didn’t care to take any! Sorry! It is pretty simple, you are going to use the 2 – 1×6’s @19″ and the 1×2 @19″ and put them in the order of 1×6, 1×2, 1×6 and on the back, you will use 1 1/4″ regular wood screws to attach the 1×2’s @ 10.5″ to the planked boards – make sure to glue before you screw them into place.
Here is the best picture to help you see it, the boards are just laying there but it gives you the visual!
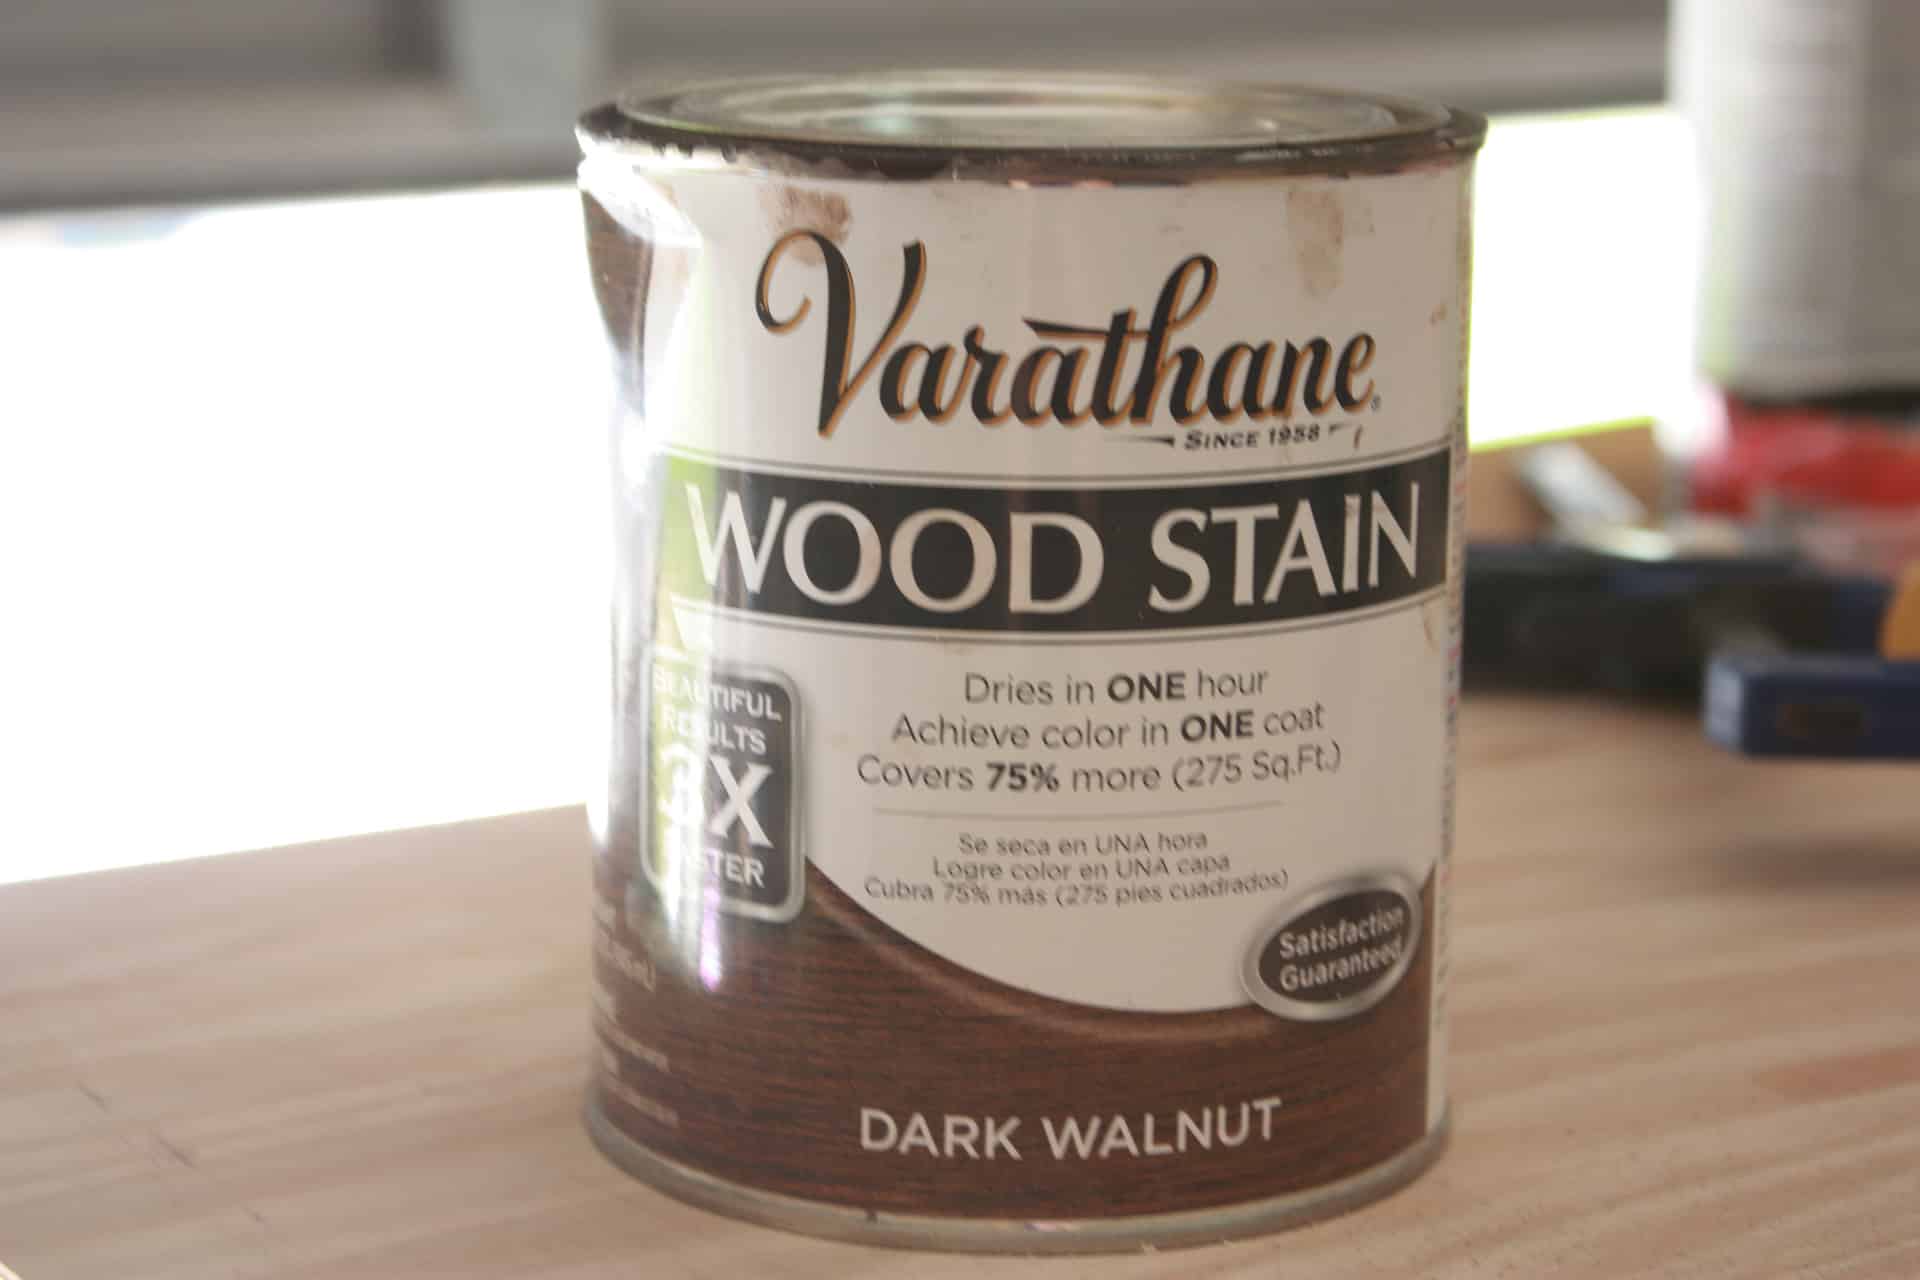
I went ahead and lightly sanded and stained my side table at this point before adding the door and drawer, I just thought it was easier this way rather than trying to contort myself in crazy ways to try to stain all of it put together! But if contortion is your thing…by all means completely put it together and then stain and contort away!
I used my absolutely FAVORITE stain…just like I do on EVERY project pretty much! Varathane Dark Walnut! This stuff is AWESOME! 1 coat, 1 hour, it rocks my world!
Building the Drawer for the DIY Side Table
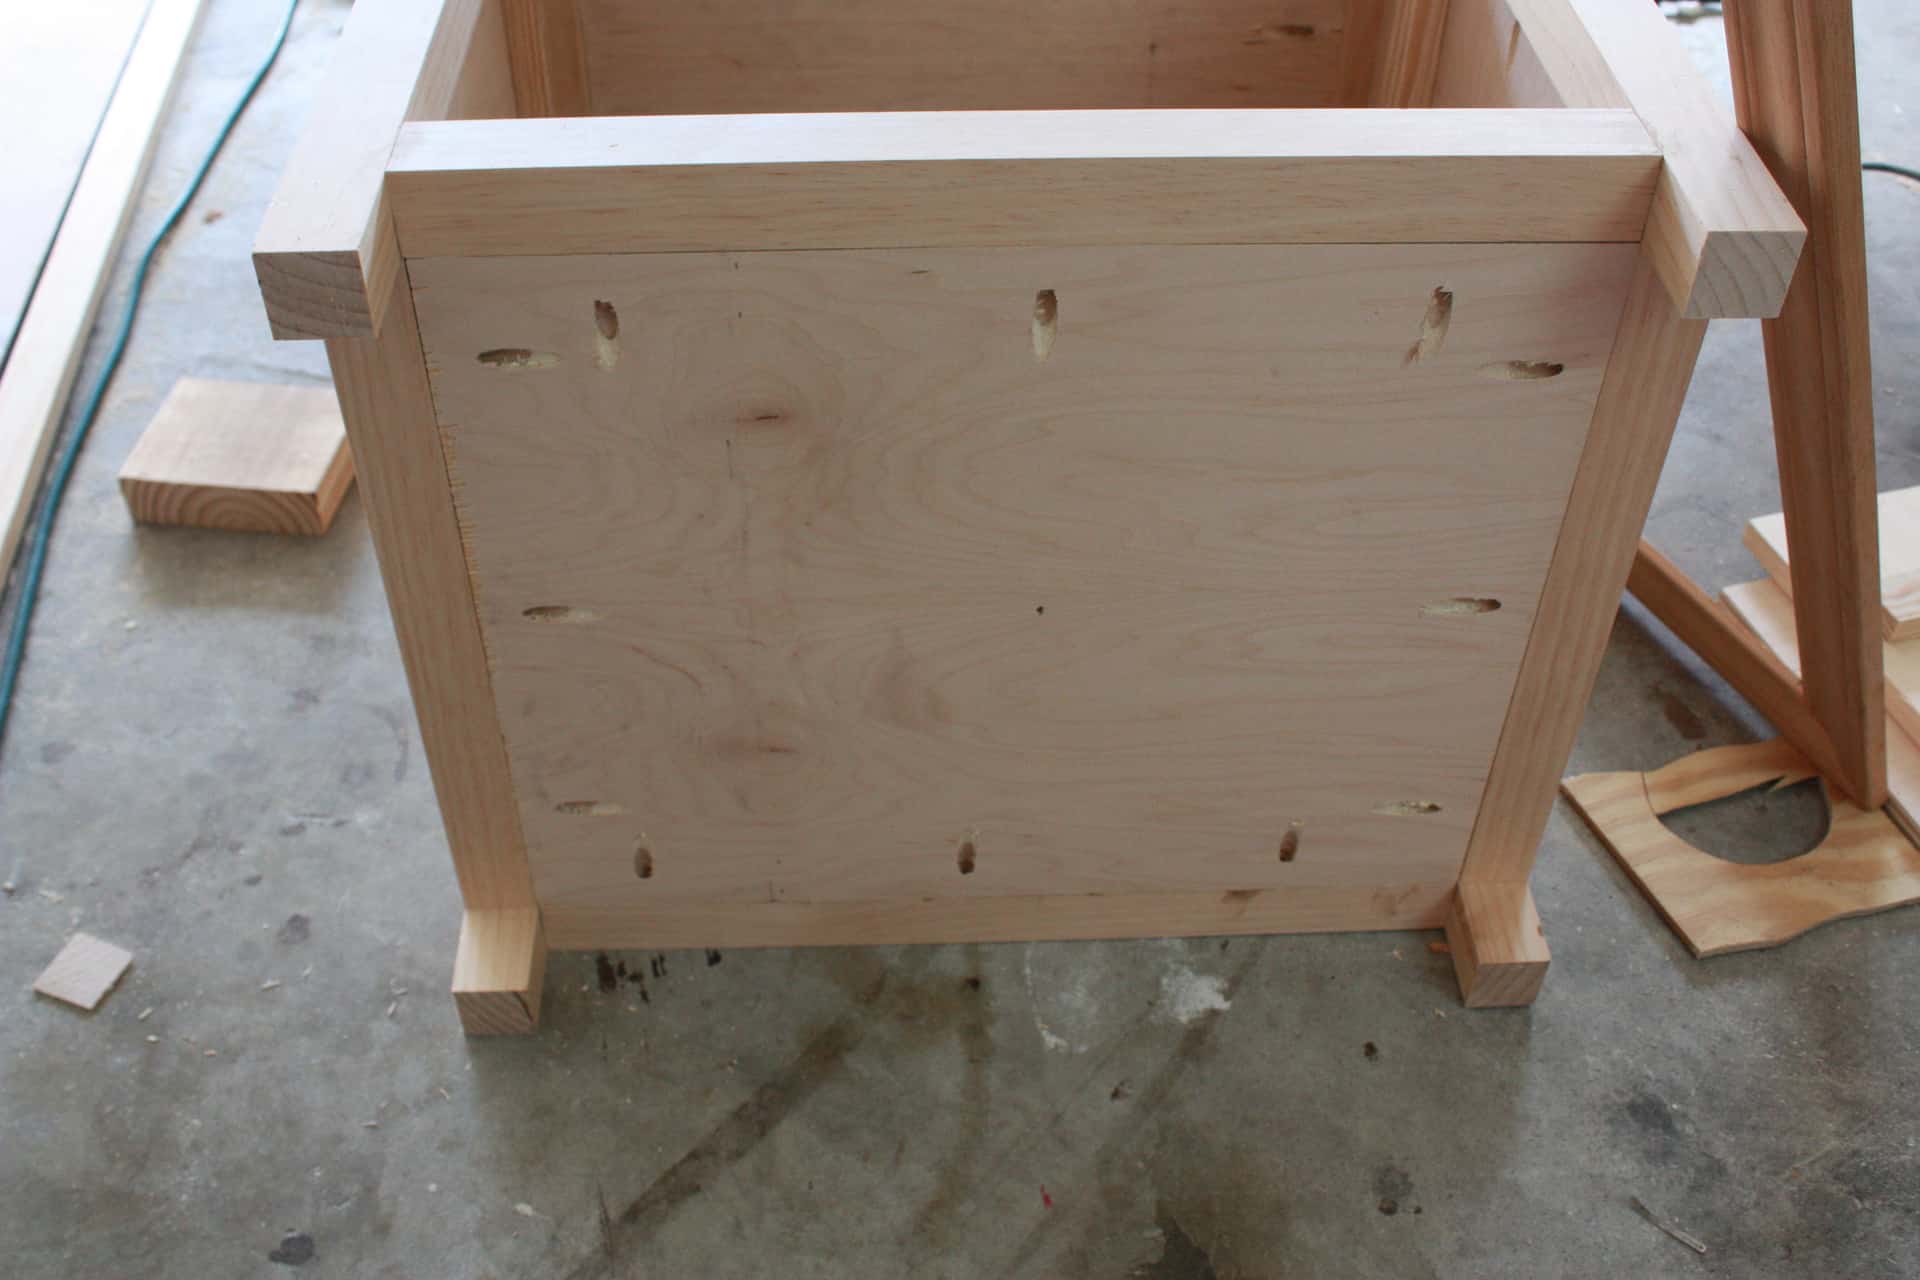
First, you have to screw your 1×2’s cut @ 15.5″ into the inside of the table.
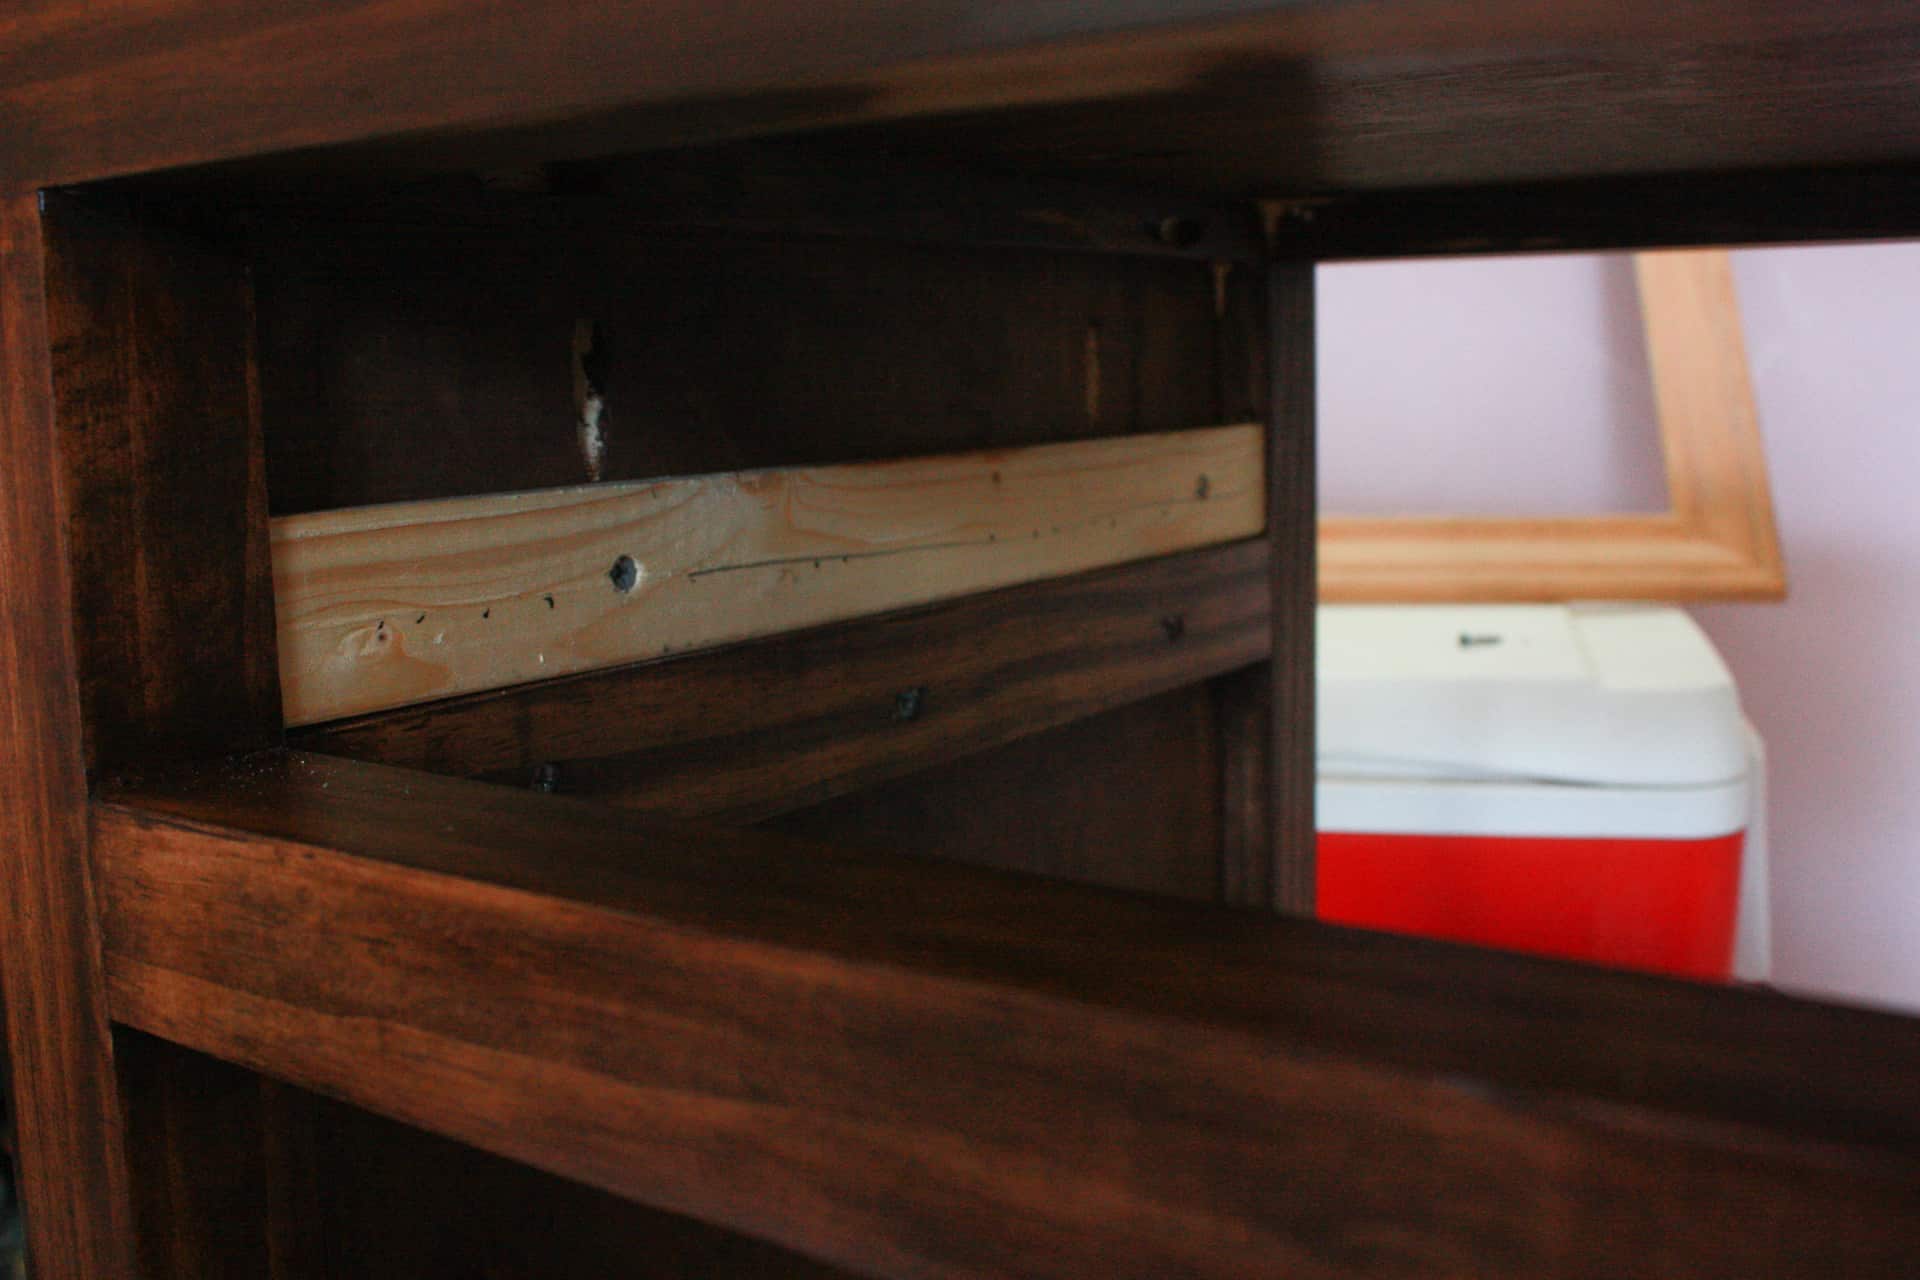
The board that is not stained is the board to look at position-wise – the 1×2 down below that is stained was mistake #1 while making the drawer! I placed my 1×2 at the same height as the 2×2 on the front frame, but you want to make sure the bottom of your 1×2 lines up with the top of the 2×2! Mistake #2 was using a furring strip 1×2 since I ran out of select pine 1x2s and I live an hour away from the nearest Lowe’s or Home Depot!
So I opted to use a furring strip…problem is furring strips are slightly smaller than a select 1×2 so instead of being 3/4″ wide it is a hair smaller – which ended up making my drawer slide rub the edge of the opening ever so slightly! Ugh!
You will need to now screw in your drawer slides. There are two parts to the drawer slide…the part that attaches to the inside of the table and the part that attaches to the bottom of the drawer.
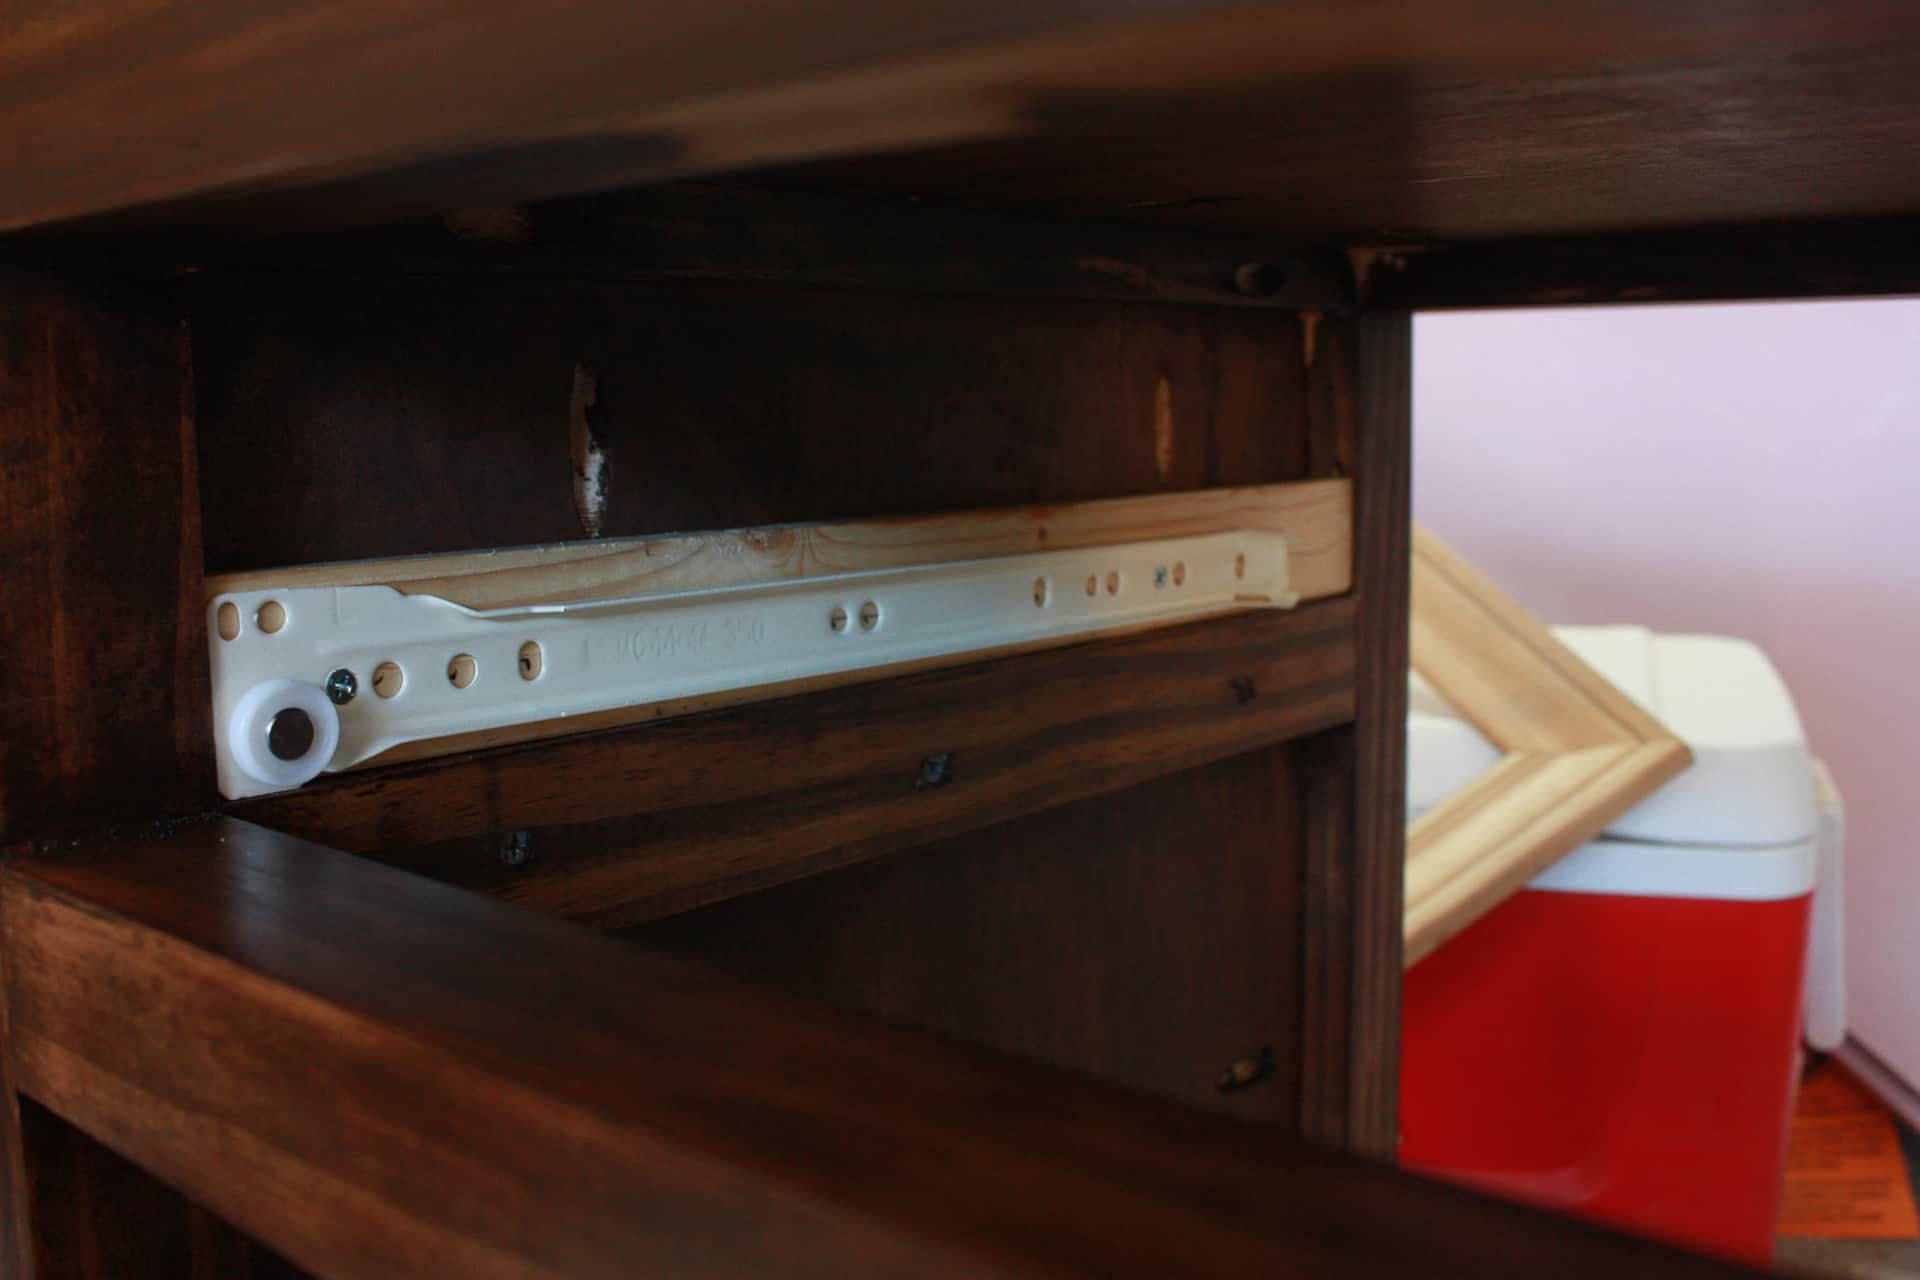
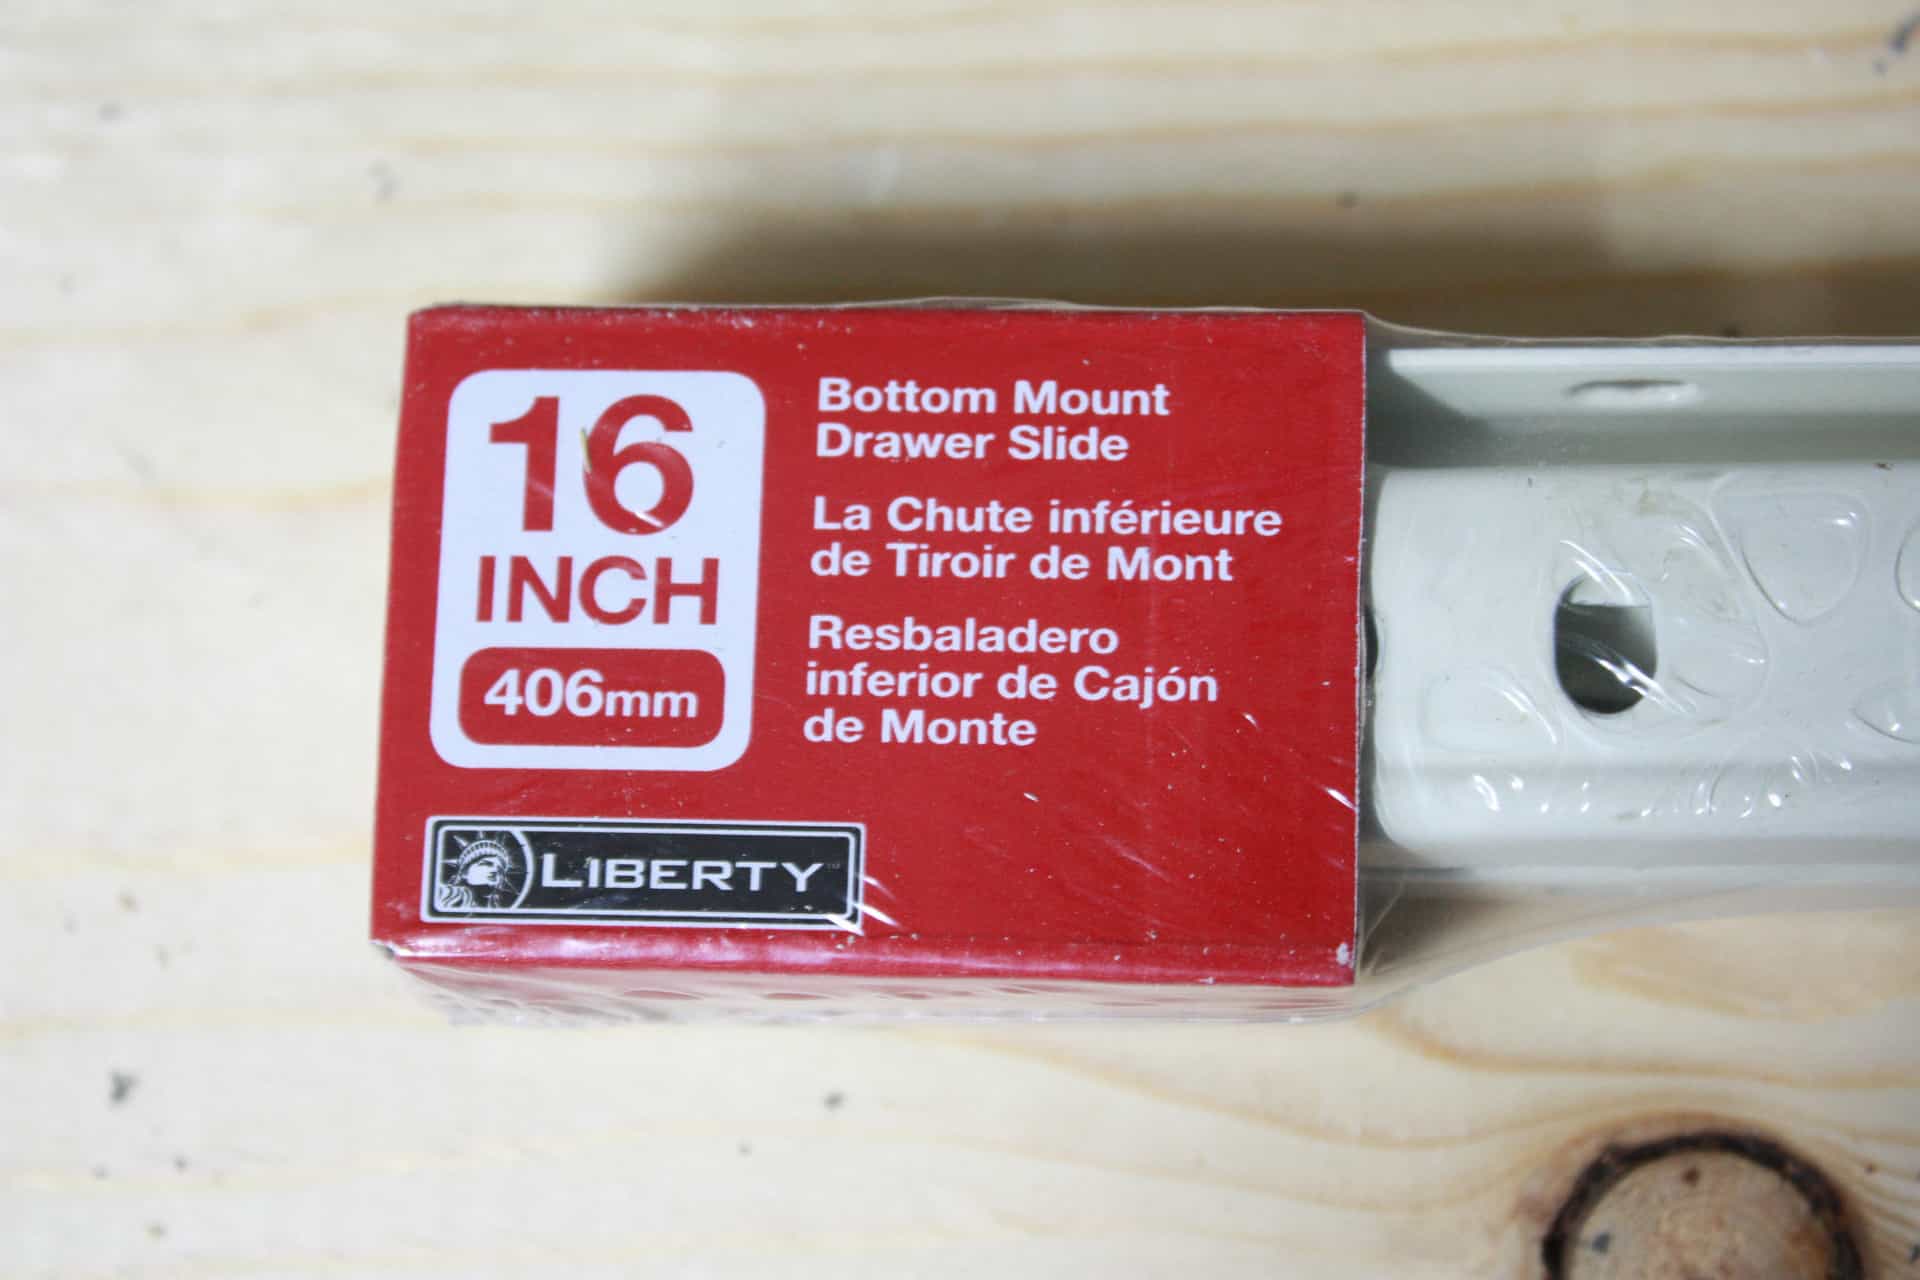
Now another thing – I used a 14 in. drawer slide because of my mistake in using the furring strip- I could not attach a 16 inch drawer slide because of the indention of the furring strip that was slightly more narrow than the 2×2, but since you are NOT going to make the same mistake – you will use a 16 in. slide! Kapeesh!
The slides you will need are just like this.
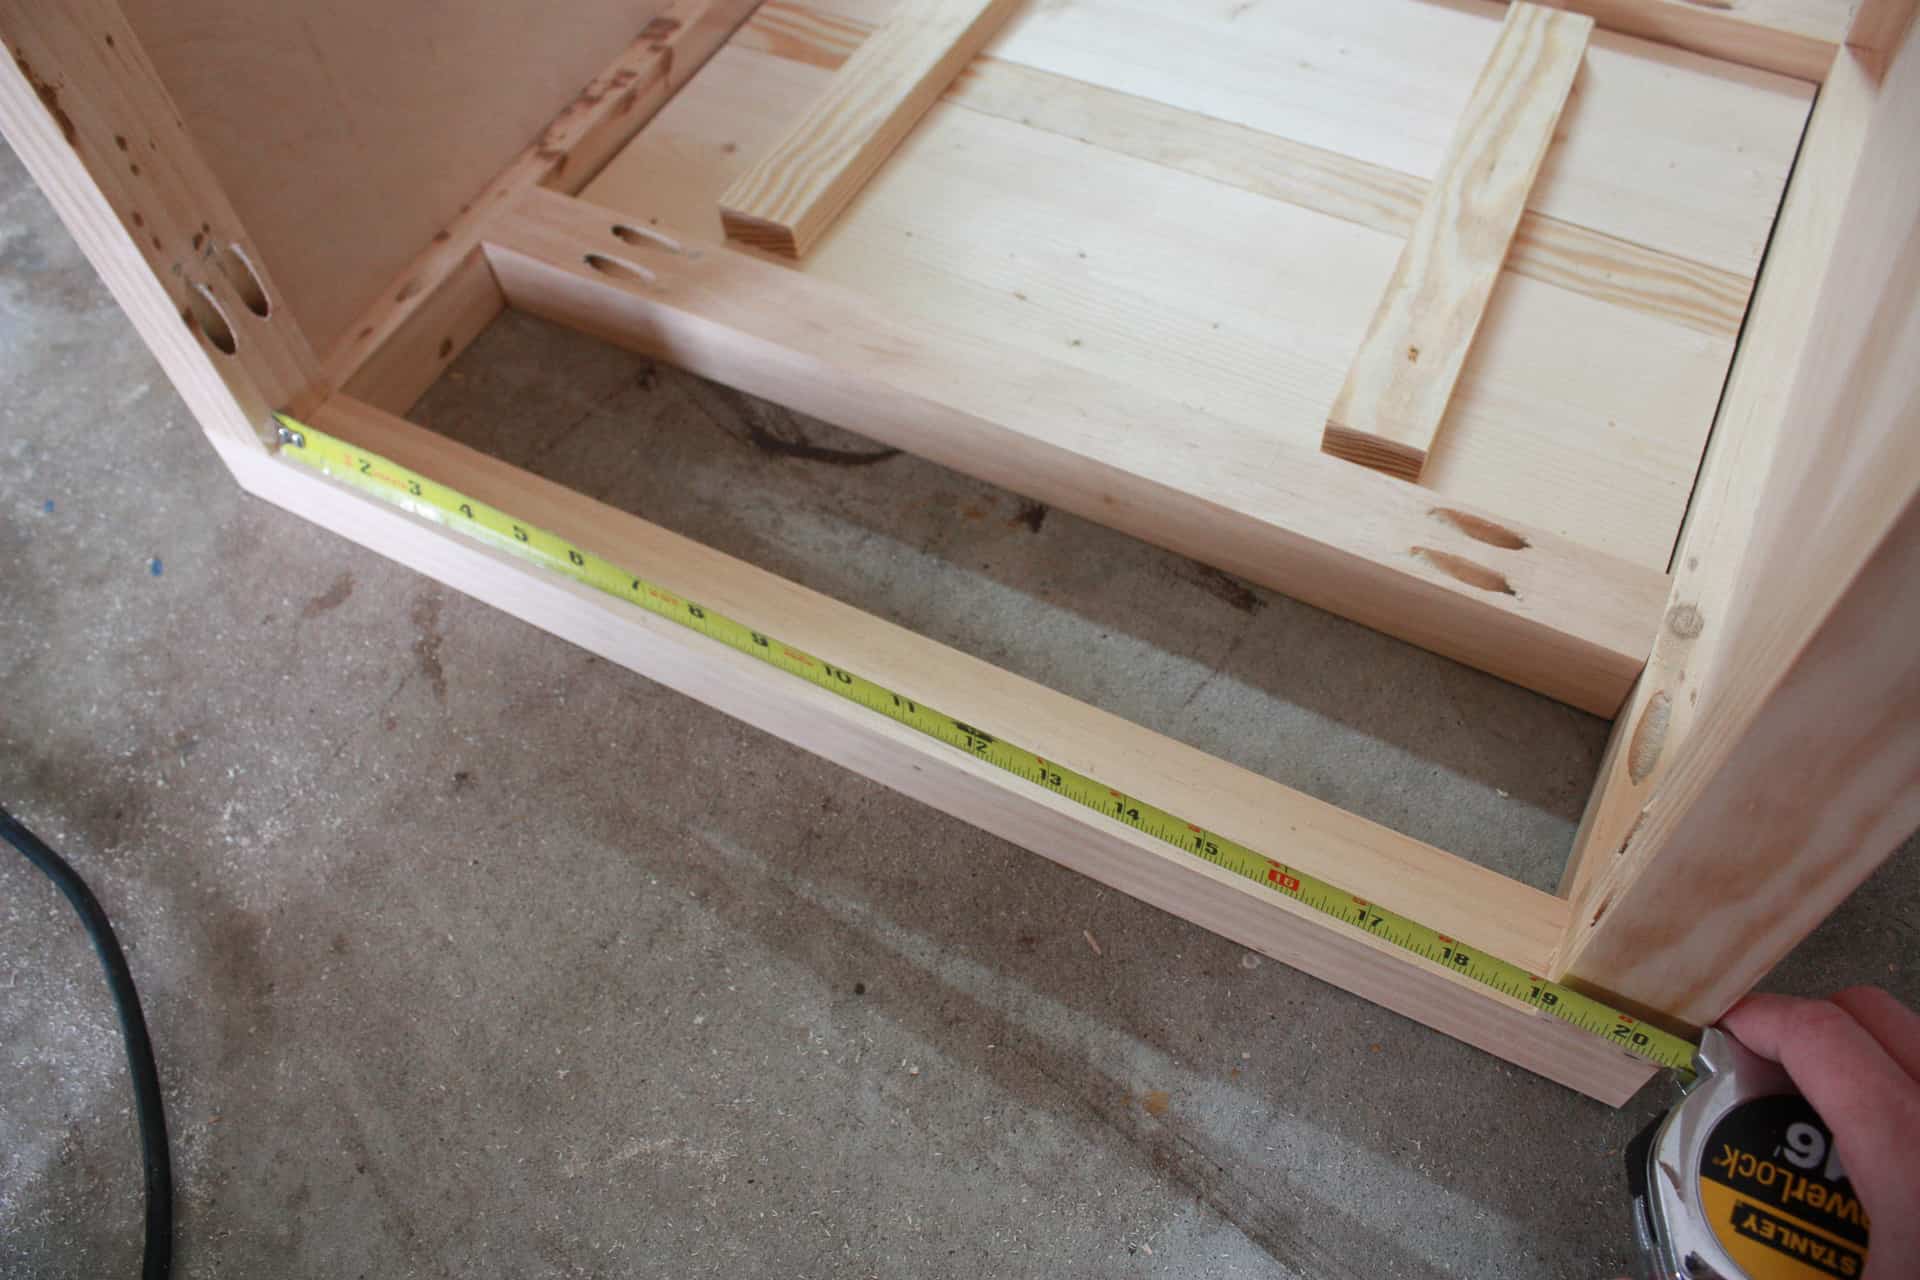
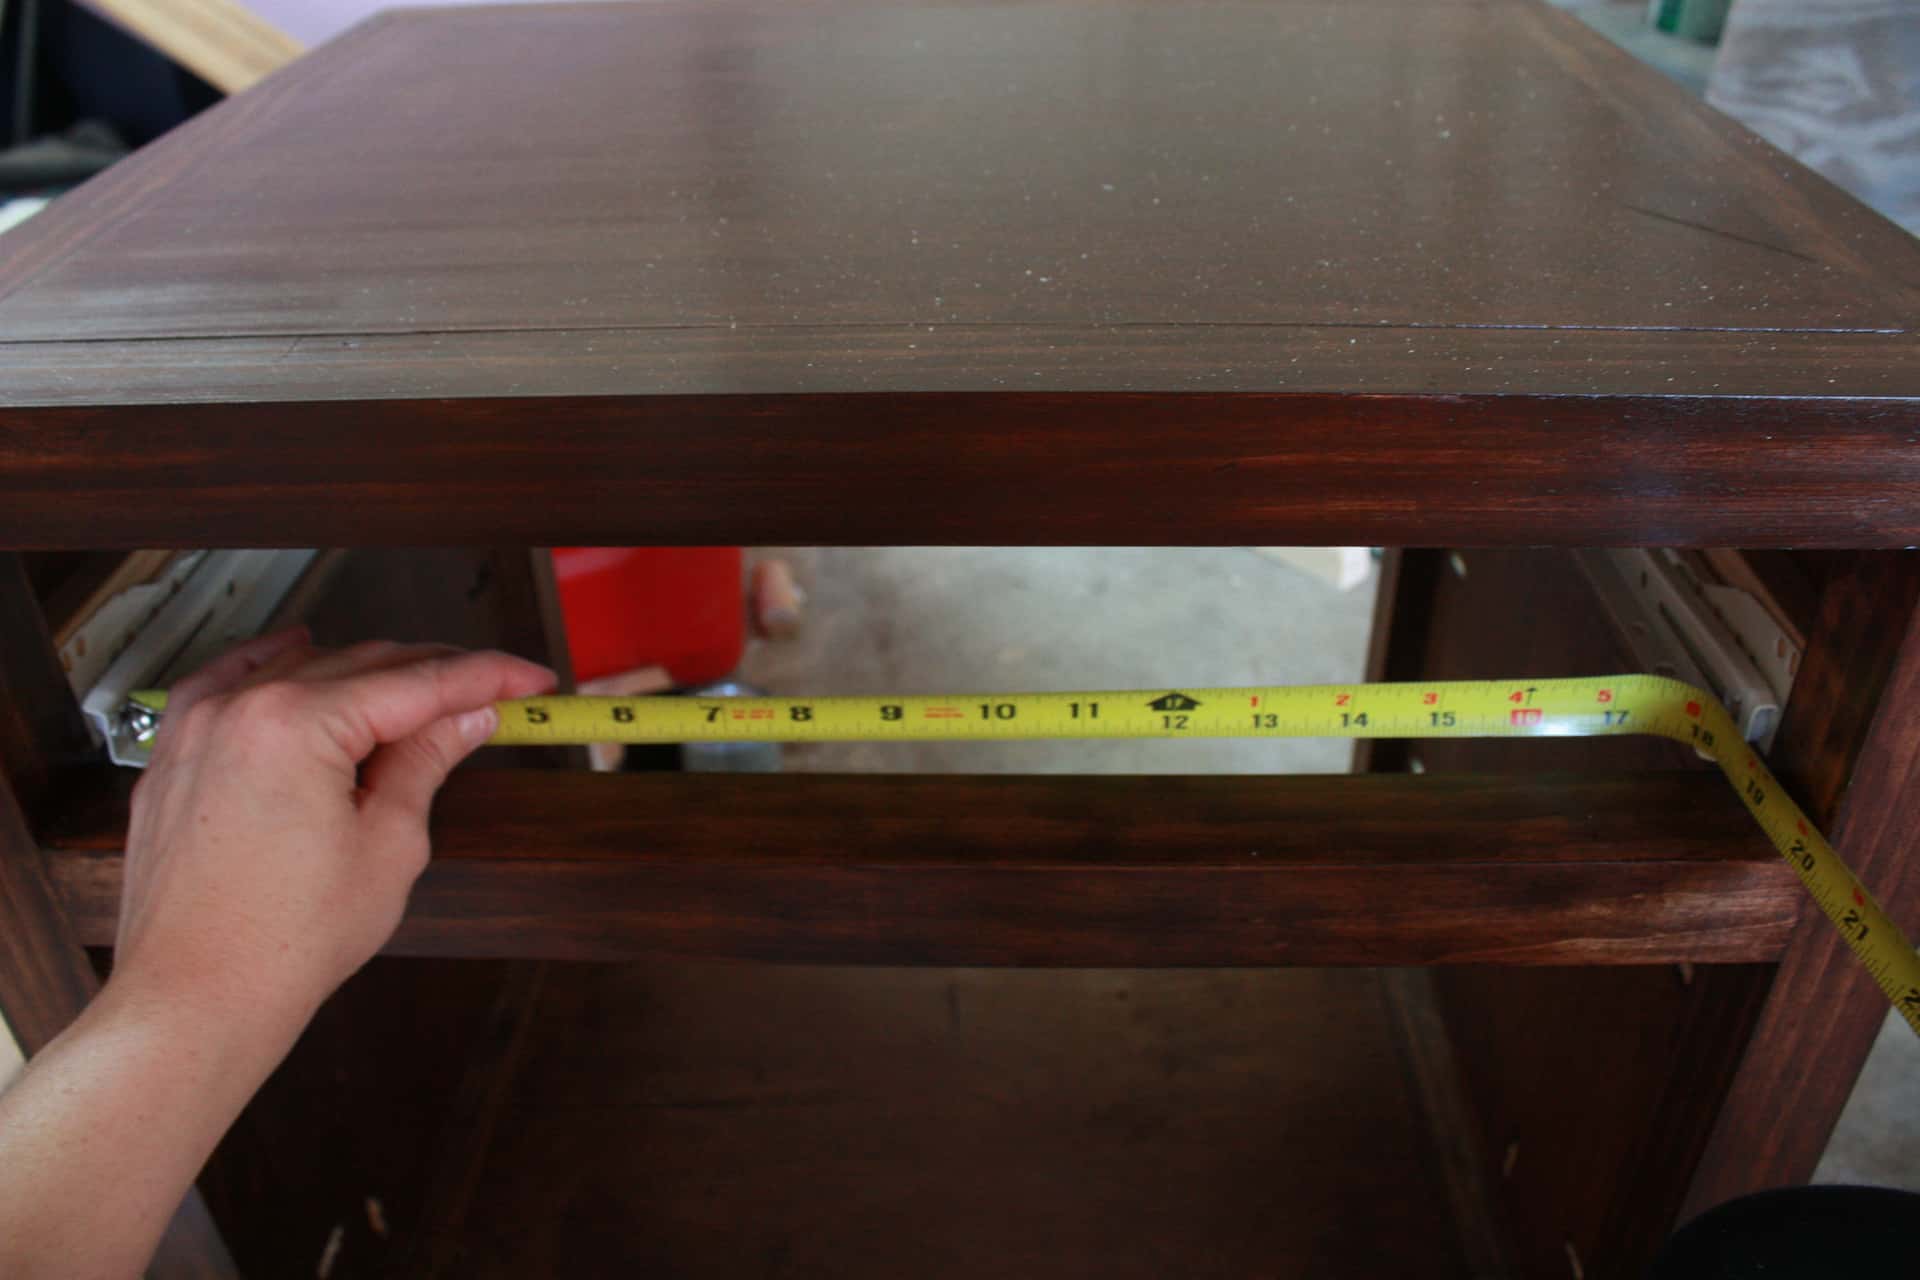
So, you will get your drawer slides attached to the interior of your table and then you will slide the other piece of the drawer slide into the one you just attached – does that make sense? Here’s a picture to maybe help. You will measure in between the two slides to get the measurement of the drawer.
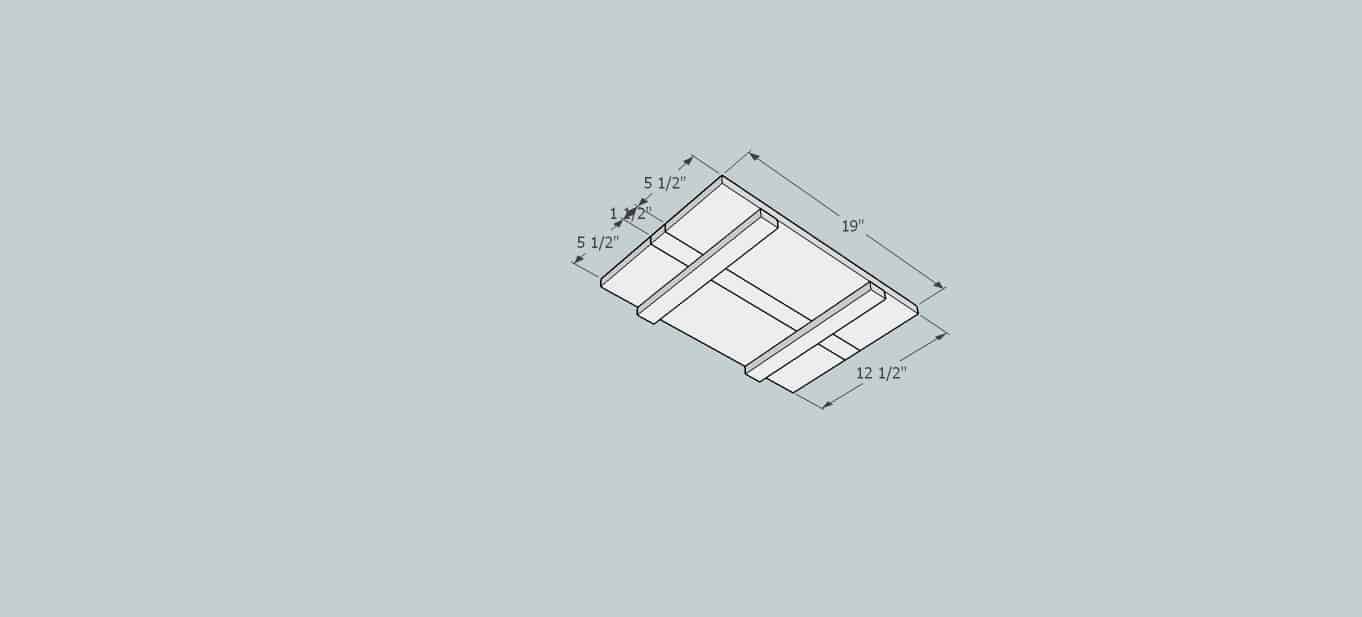
After taking your measurements in between the drawer slides – you will cut 2 1x3s @ the length you measured, this will be the front and back of your drawer, you will need to cut 2 more 1x3s at 15 1/2″ and they will fit inside of the front and back 1x3s you cut. You will place the pocket holes (drilled at 3/4″ again since what you’re drilling into is 3/4″ thick) on the outside of your box you make, and drill the holes into the 15 1/2″ pieces.
Alrighty then! Moving on…Once you have pocket holed your drawer together with glue and 1 1/4″ pocket hole screws, you can place the drawer on your 1/4″ plywood and trace it. Again, I chose PureBond Plywood even for my 1/4″ plywood! I LOVE this stuff! Look at how beautiful it is!
Cut that out and attach it to the bottom with some glue and staples (I just glued mine and clamped it while it dried because I didn’t have my brad nailer). Now at this point, you slide the drawer into the drawer slides without actually attaching the slides to it. Then mark where you need to attach the drawer slides, making sure the drawer is set back 3/4″ into the opening…I am so upset that I didn’t take a picture of this part because it is a little hard to explain.
Once you have marked them, while the drawer is still sitting there, make sure and set the 1×4 @ 19″ in the slot in front of the drawer because this will be attached to the front of the drawer. It should line up flush with the front of the table. If it all lines up, you can attach the second part of your drawer slide to the bottom of the drawer at the spot you marked, if not, move it forward or backward to where it is flush and mark!
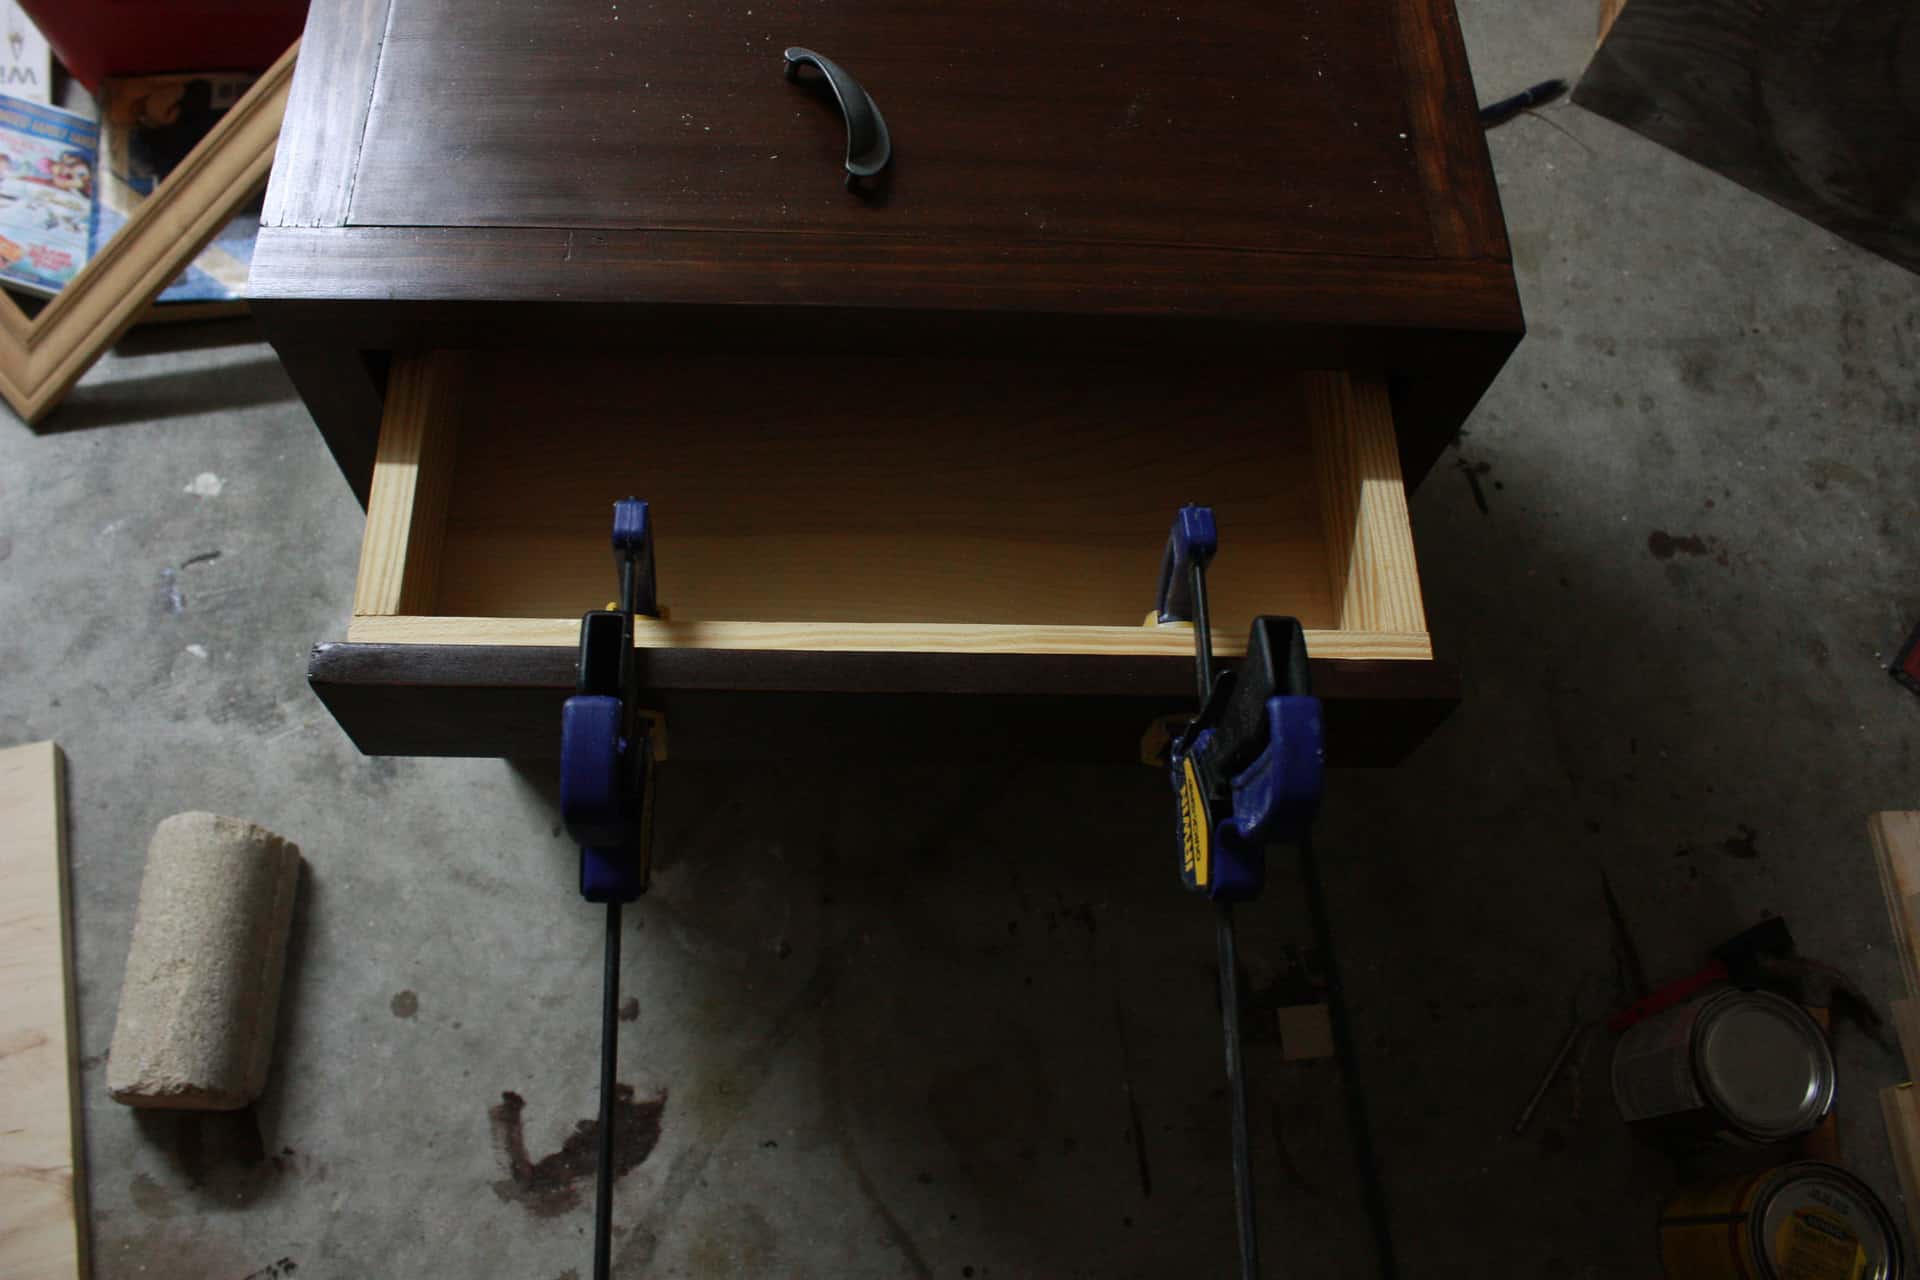
Then slide that sucker in! At this point in the journey I was ECSTATIC that even though it rubbed ever so slightly, it was a working drawer! WHAT? ME? I DID THAT? It was a great feeling…like I could take on the world! Ok, Ok, maybe not quite! Lol!
Now to add the face onto the drawer, I had my hubby help me, we lined it up where we needed it so that all the way around we had an even 1/8″ gap around the board and he held it in the front where we wanted it and I pushed the drawer out from the back of the table, I had not placed the 1/4″ sheet of plywood on the back of the table and I would advise that you not get ahead of yourself and attach it early on – it’s really nice to have the back wide open!
So after we very carefully got the drawer open with the board still in the correct position, we clamped it so we could screw it in from inside the drawer.
Once that was attached, it was time to drill holes for the pulls! Oh, how great it felt like I was almost at the end of a marathon! Whew!
Now, I did this the hard way and then later found this amazing and inexpensive yet extremely helpful jig to attach your cabinet hardware.
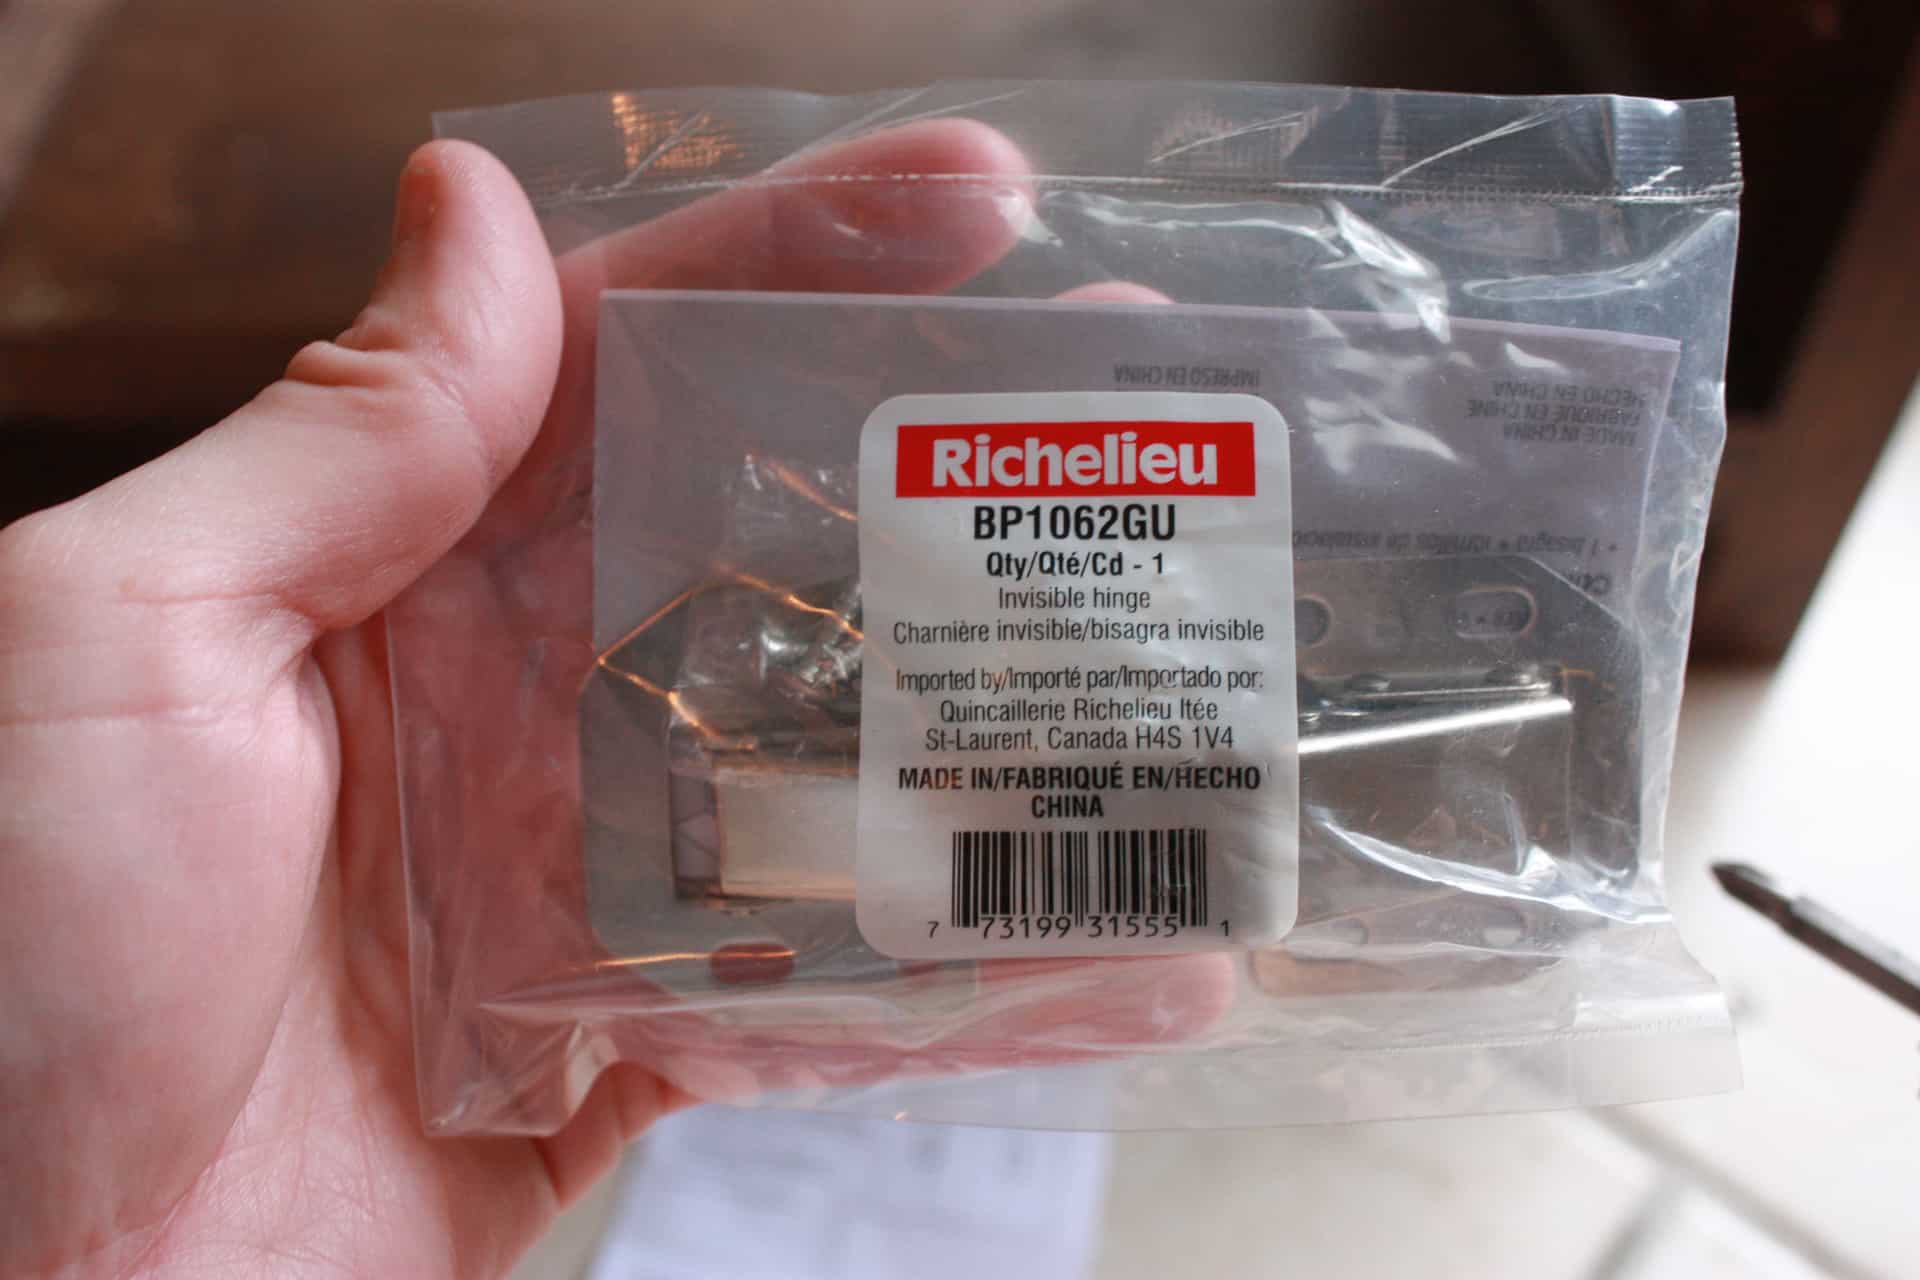
Get your pulls put on, and one of the last things (not the actual LAST thing but almost) is hanging your hinges and door on your DIY side table!! Oh my gosh, excitement is exploding everywhere!
You will need two scrap pieces of 1×2, or I used a 1×4 and sliced it right down the middle and made my own 1×2! This is needed because the hinges are a little bigger than the 2×2.
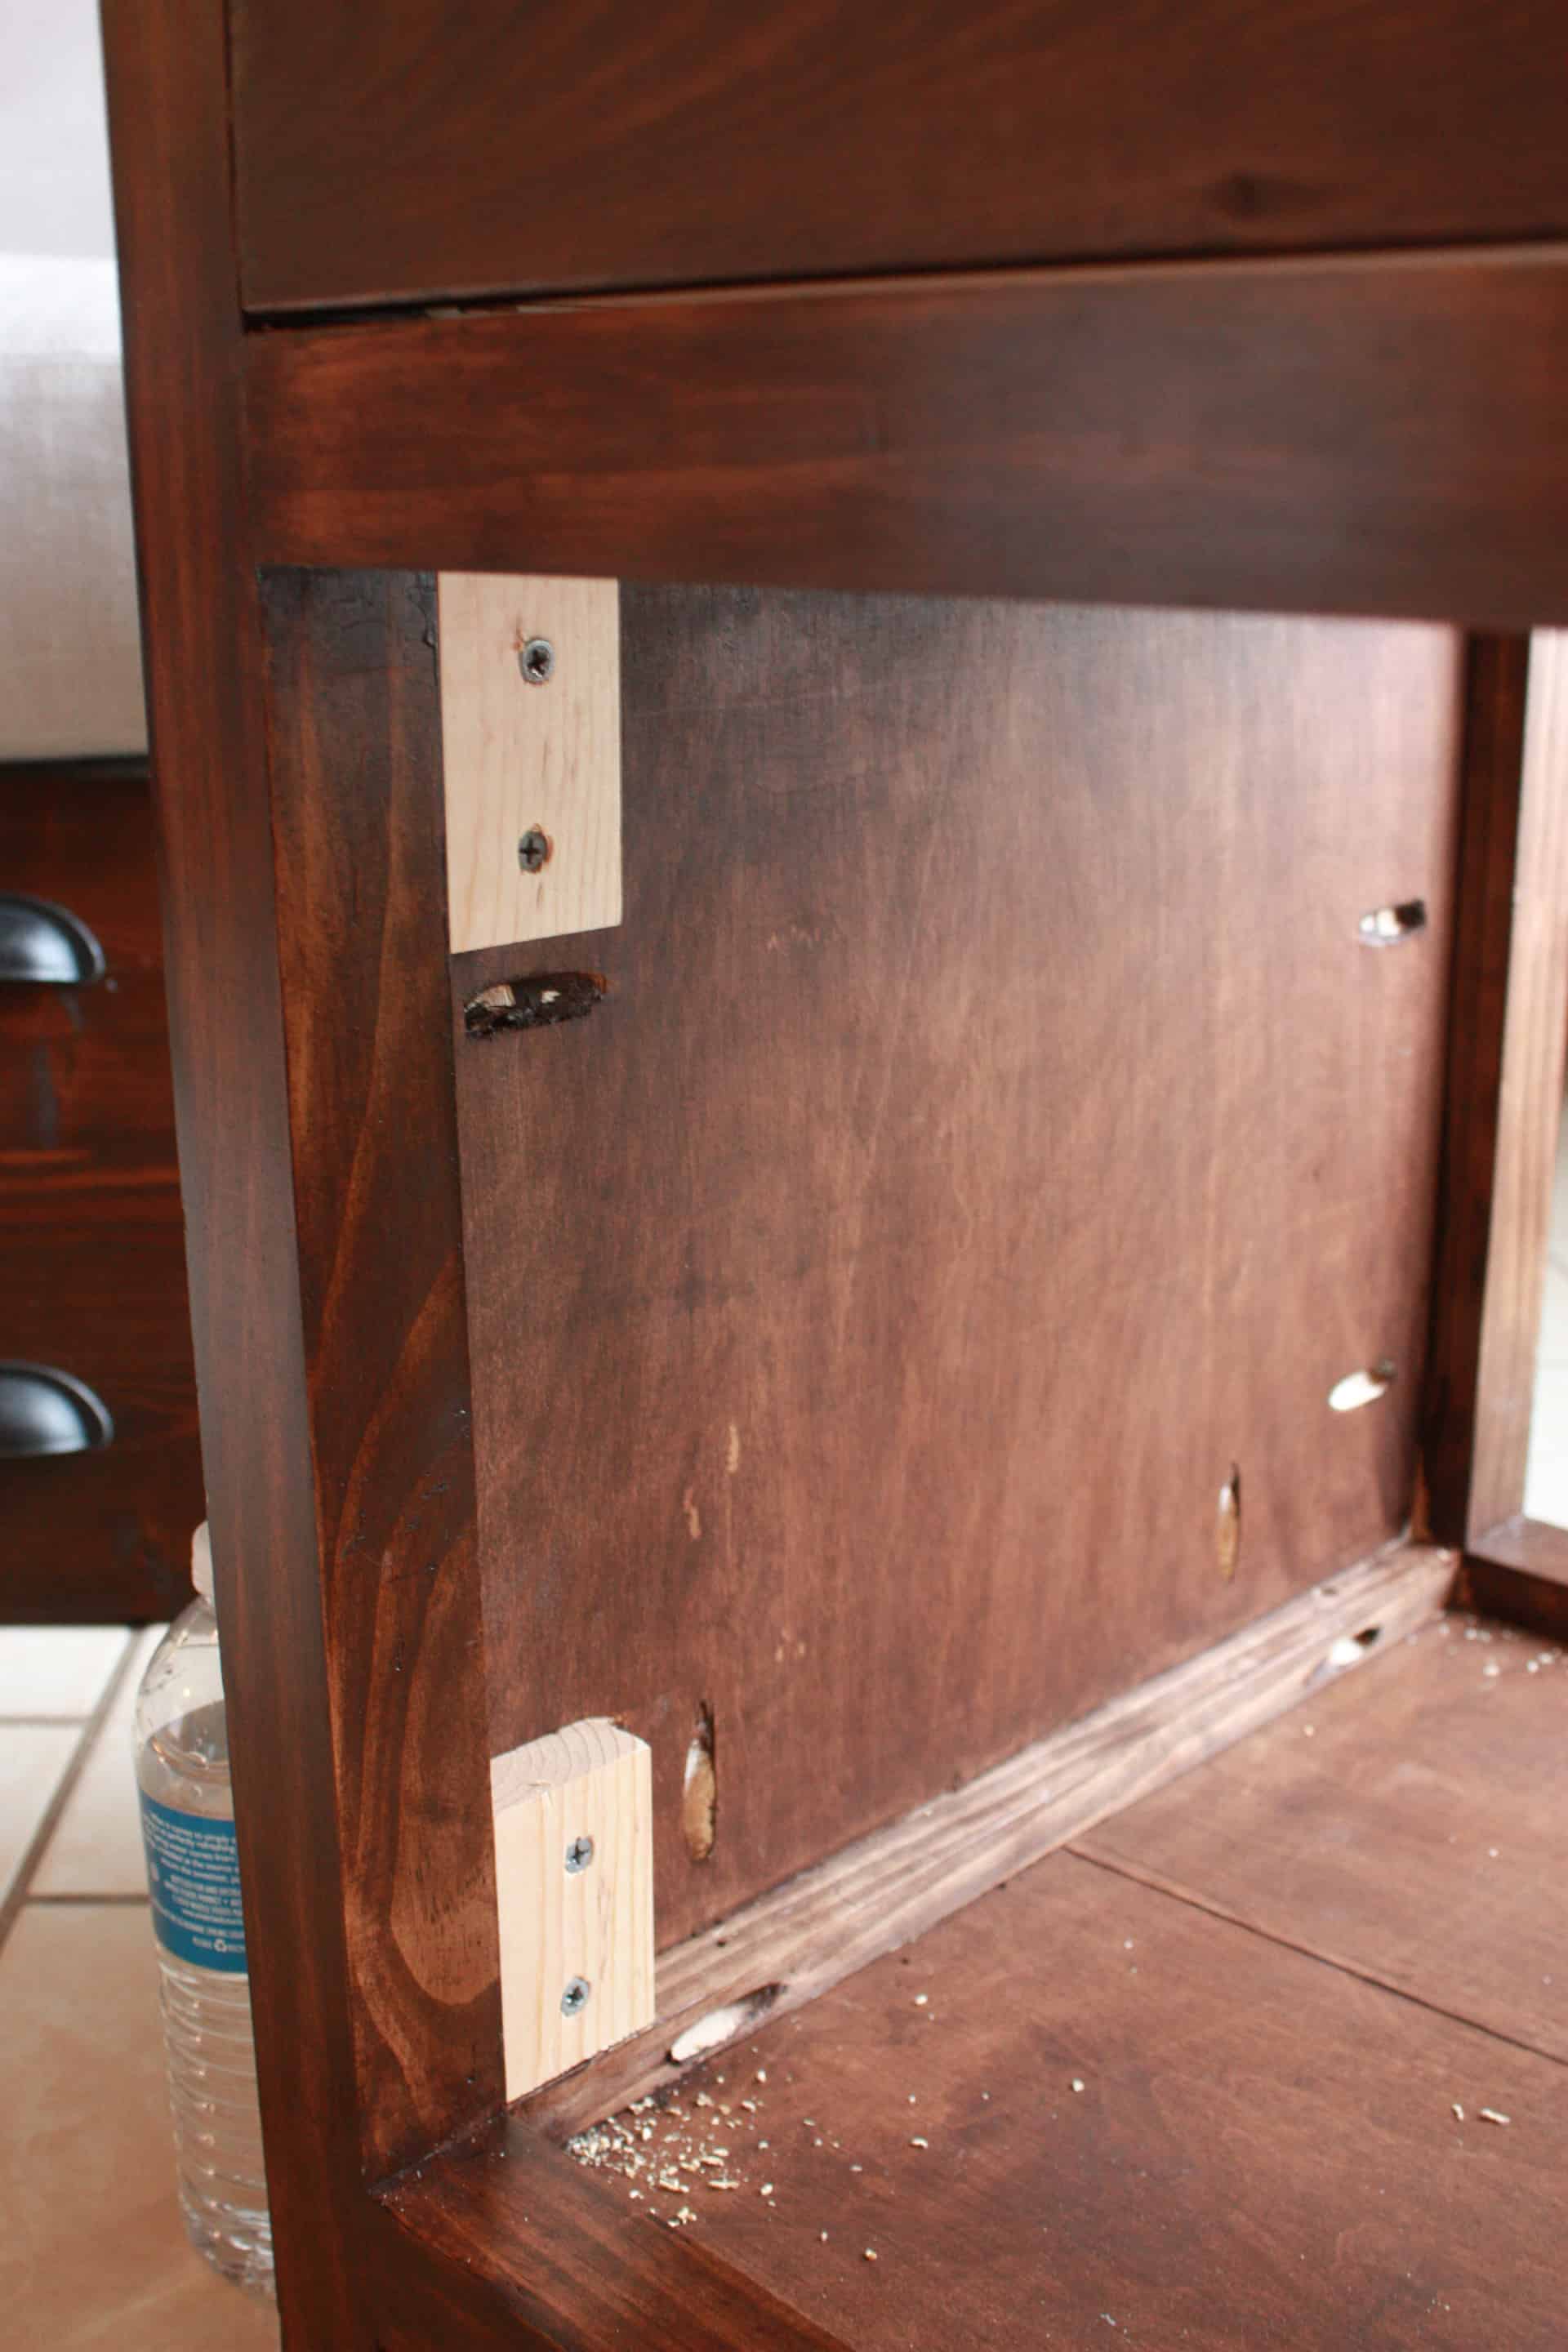
Now you can screw the hinges into the table, I used these hinges here.
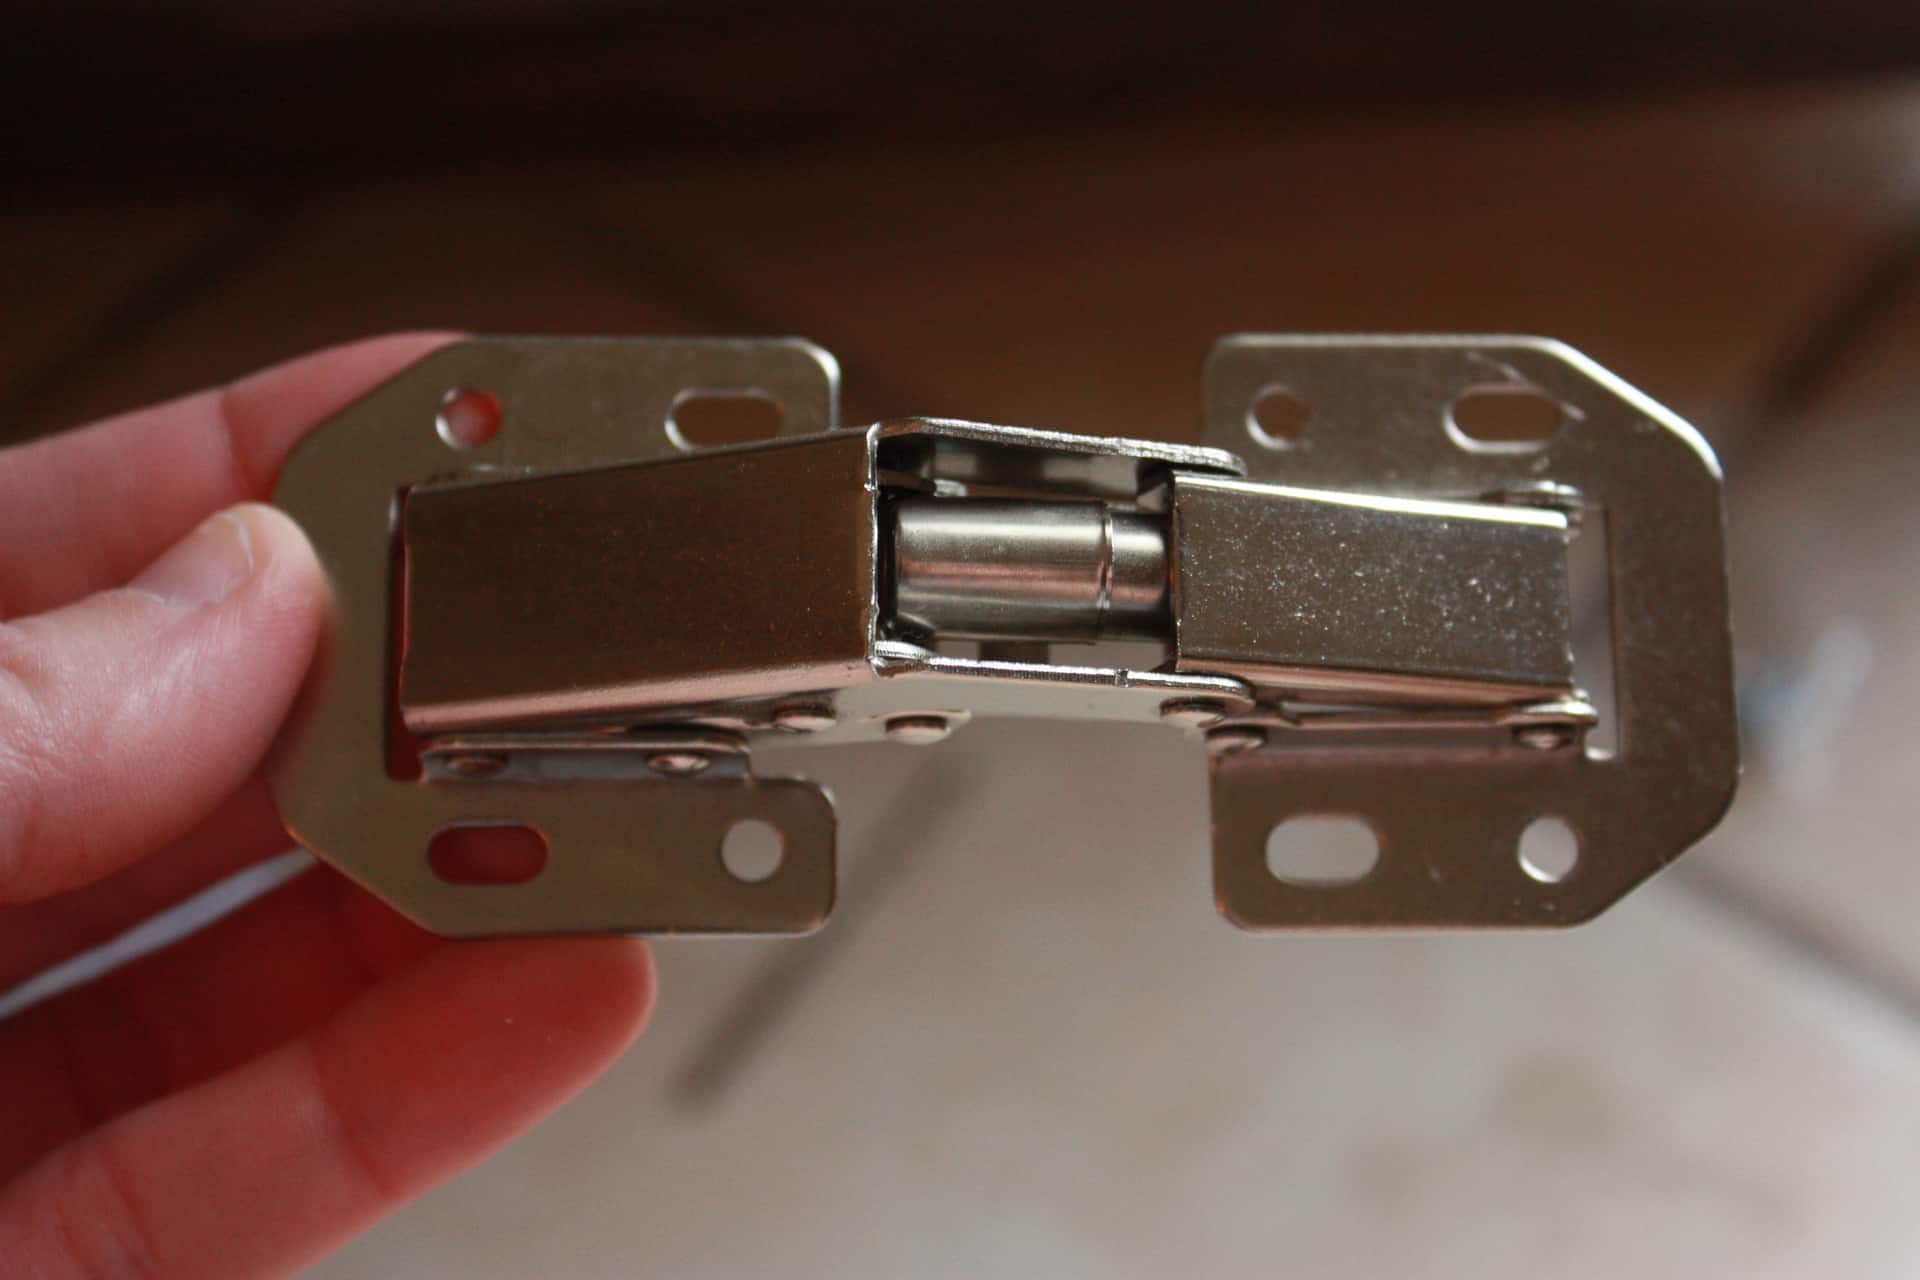
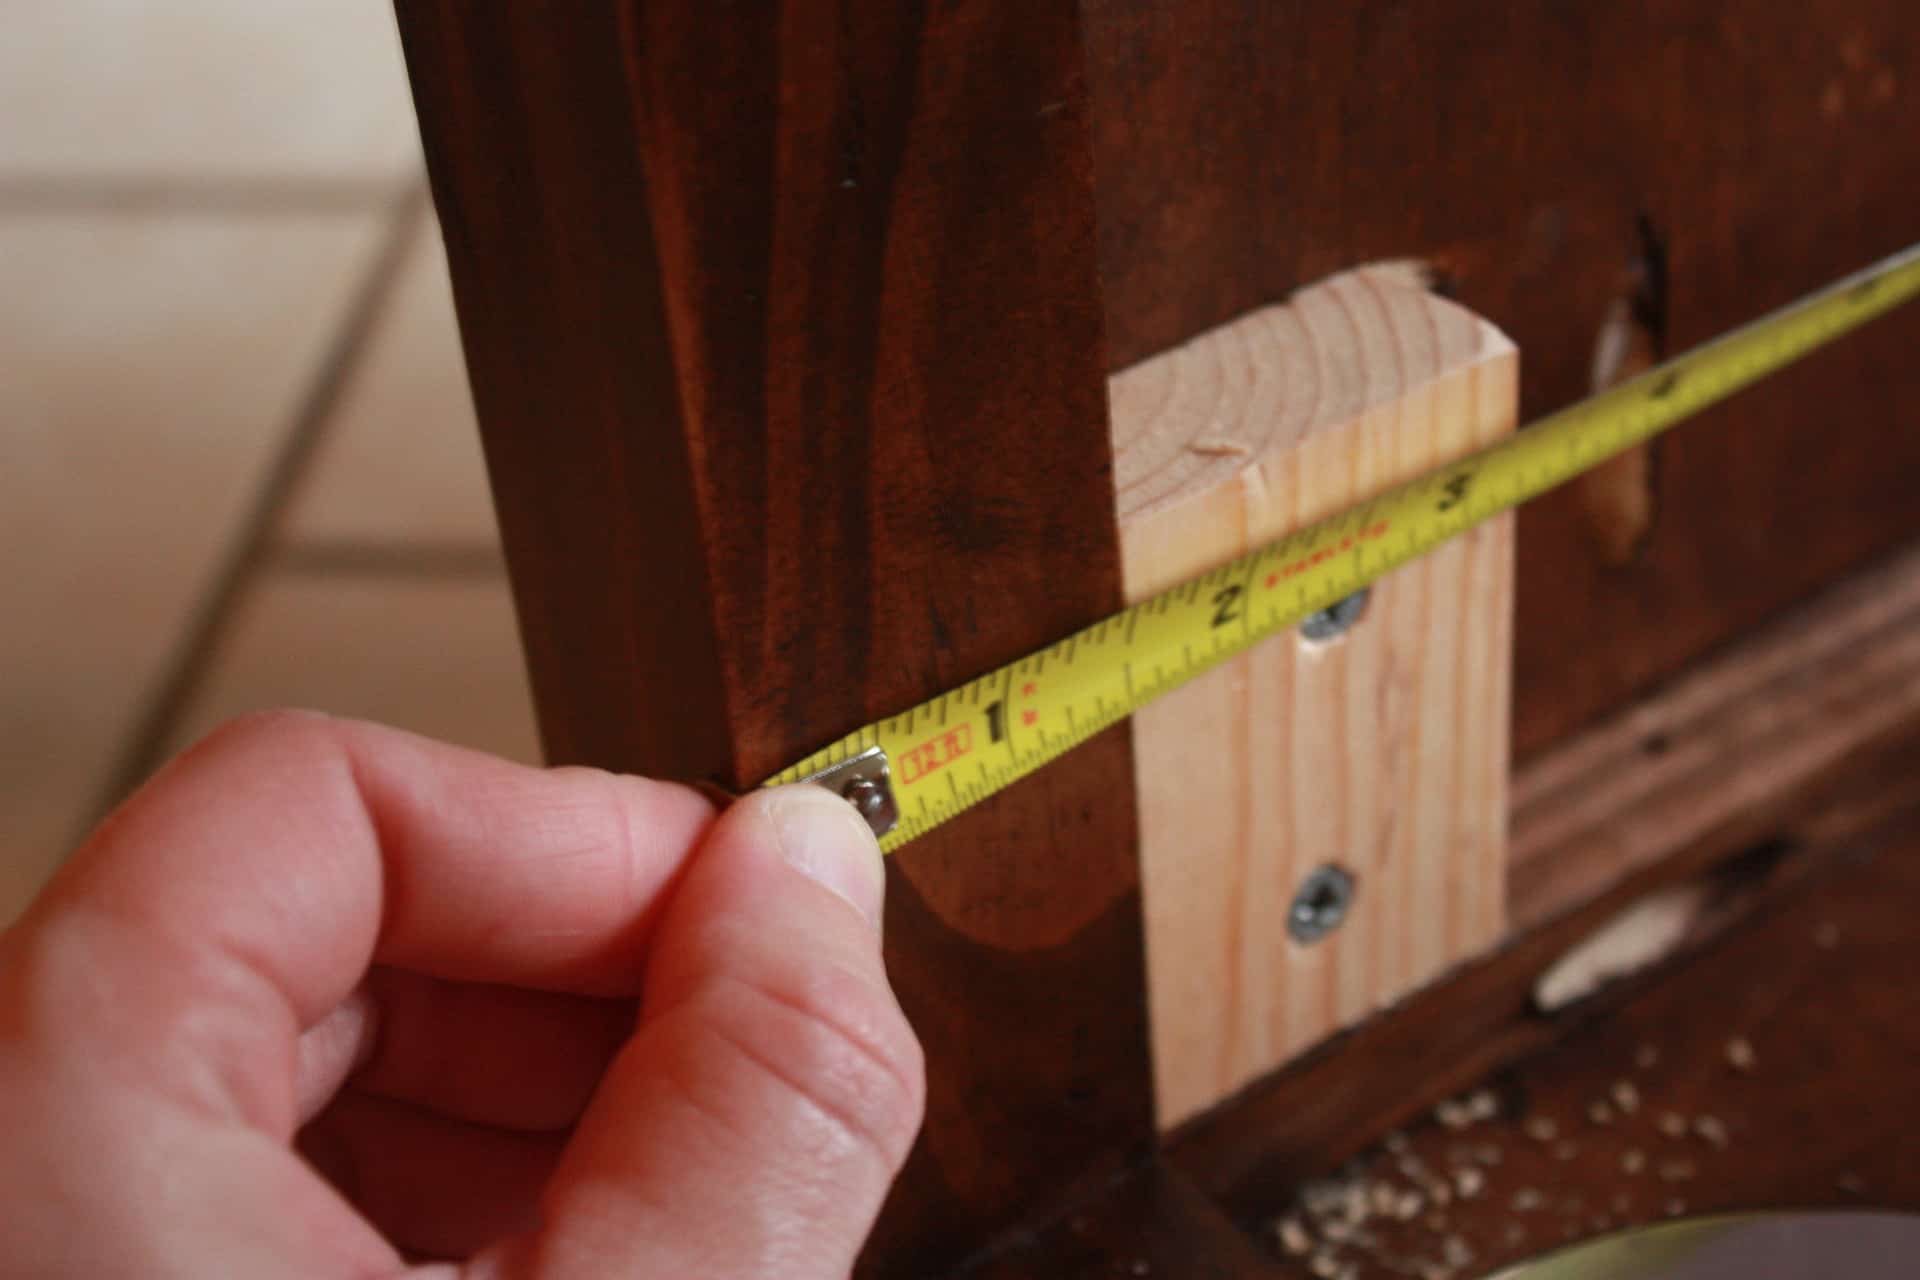
Here again I didn’t take a picture after I attached them to the inside of the table but you need to make sure and measure where they will need to go, I did this by closing the hinge (as if the door was closed) and measures 3/4″ back from the face of the 2×2.
It was tricky because I didn’t have anyone to help with this part so there were times I was holding things in place with my feet! Now things are starting to make sense as to why they are not perfect when I build them! LOL!
After I attached them to the inside of the table, I left them “closed” this is not the “correct” way to hang a cabinet door but this is what I found to work since I had no one to hold anything for me! I was able to set the door up against the closed hinges and to make sure I had the even 1/8″ spacing all around I had to get creative, I found CDs to be the most helpful, I could stack them up perfectly, 3 CD’s had it just right! Then I painters taped them in place.
I did the same thing for the sides and then I taped around the whole front of the table to help me hold the door in place! It definitely looked silly!
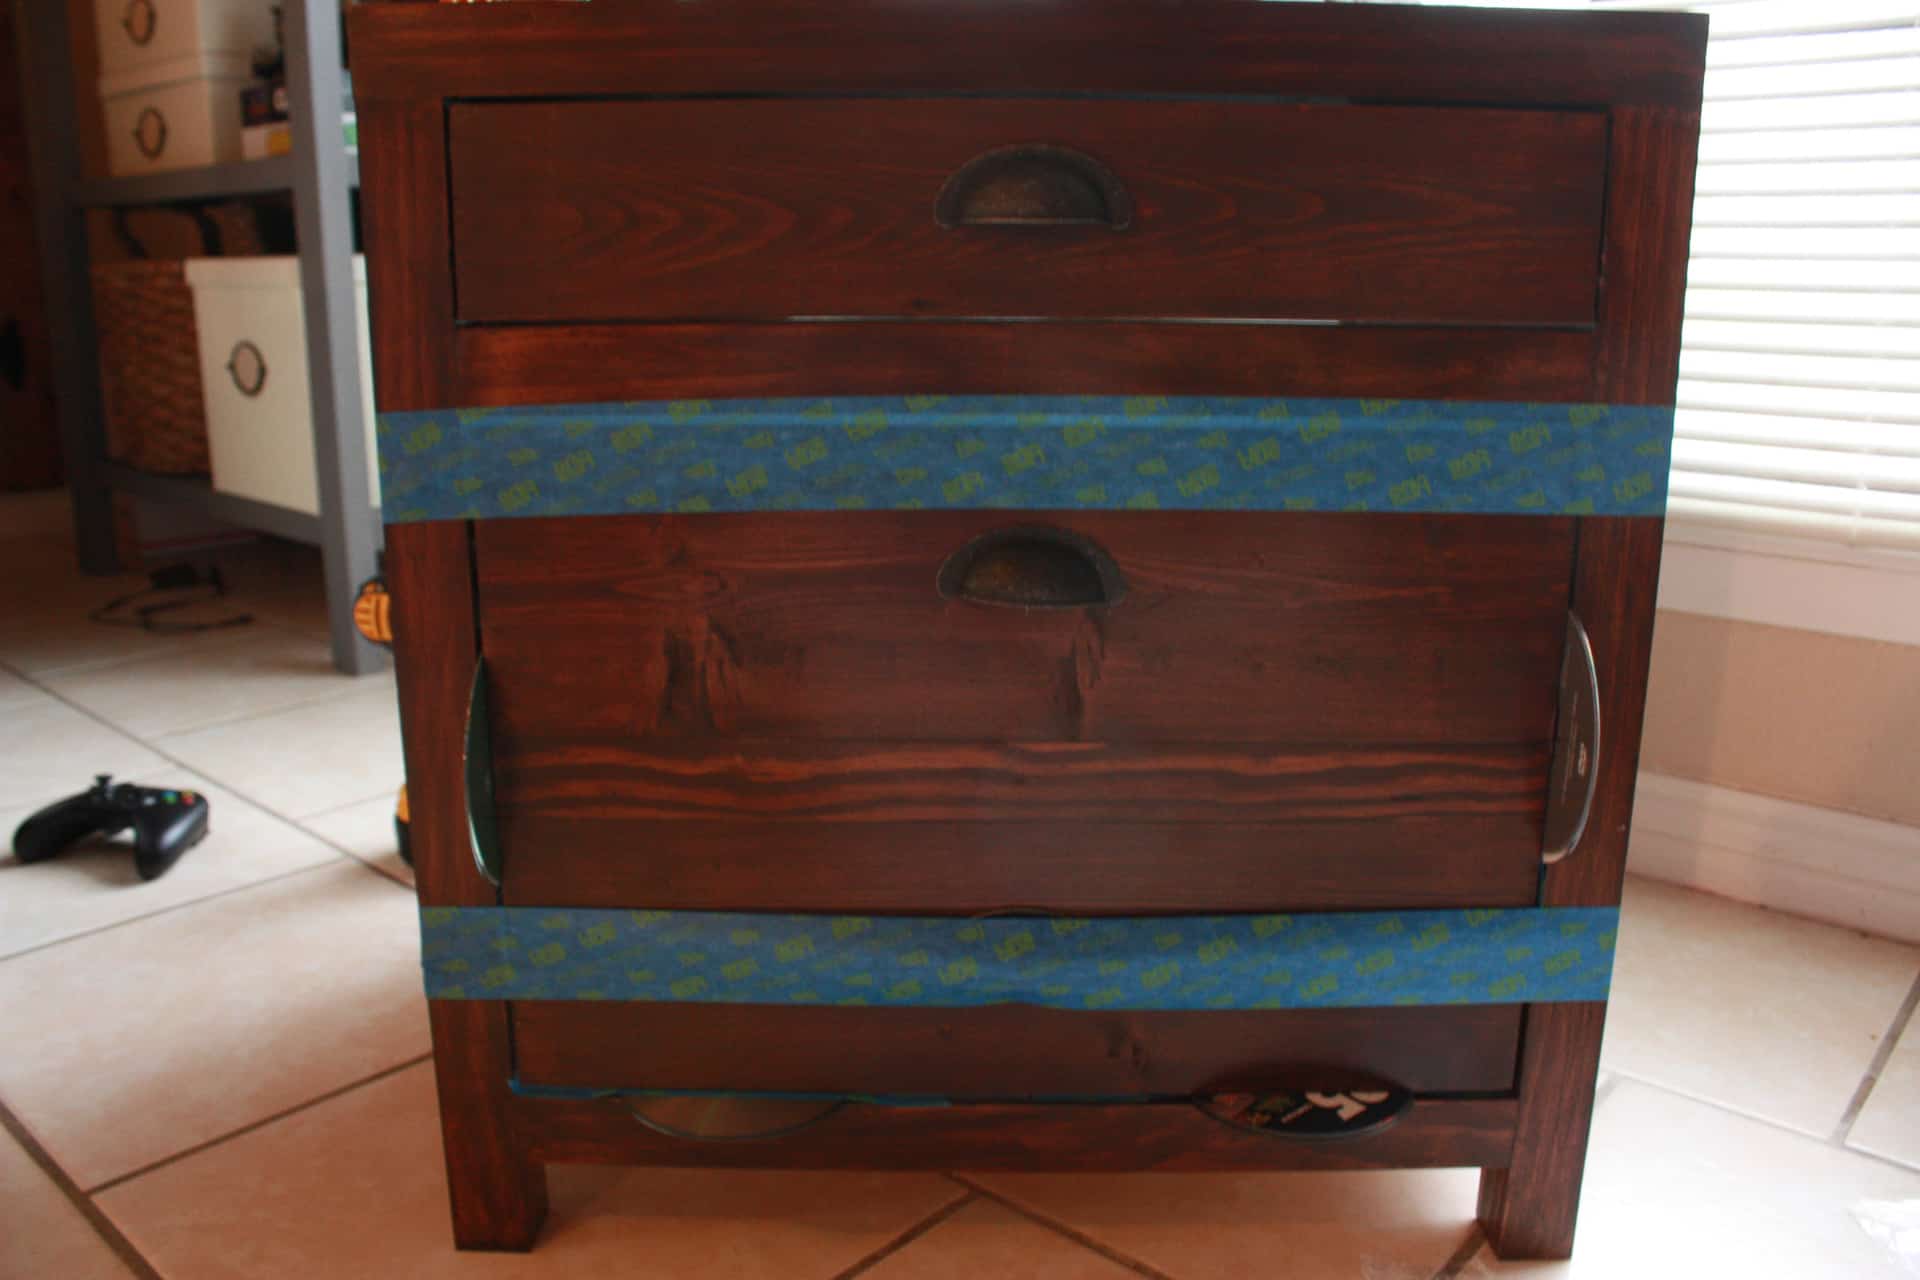
Oh yeah! Looking good! Ha!
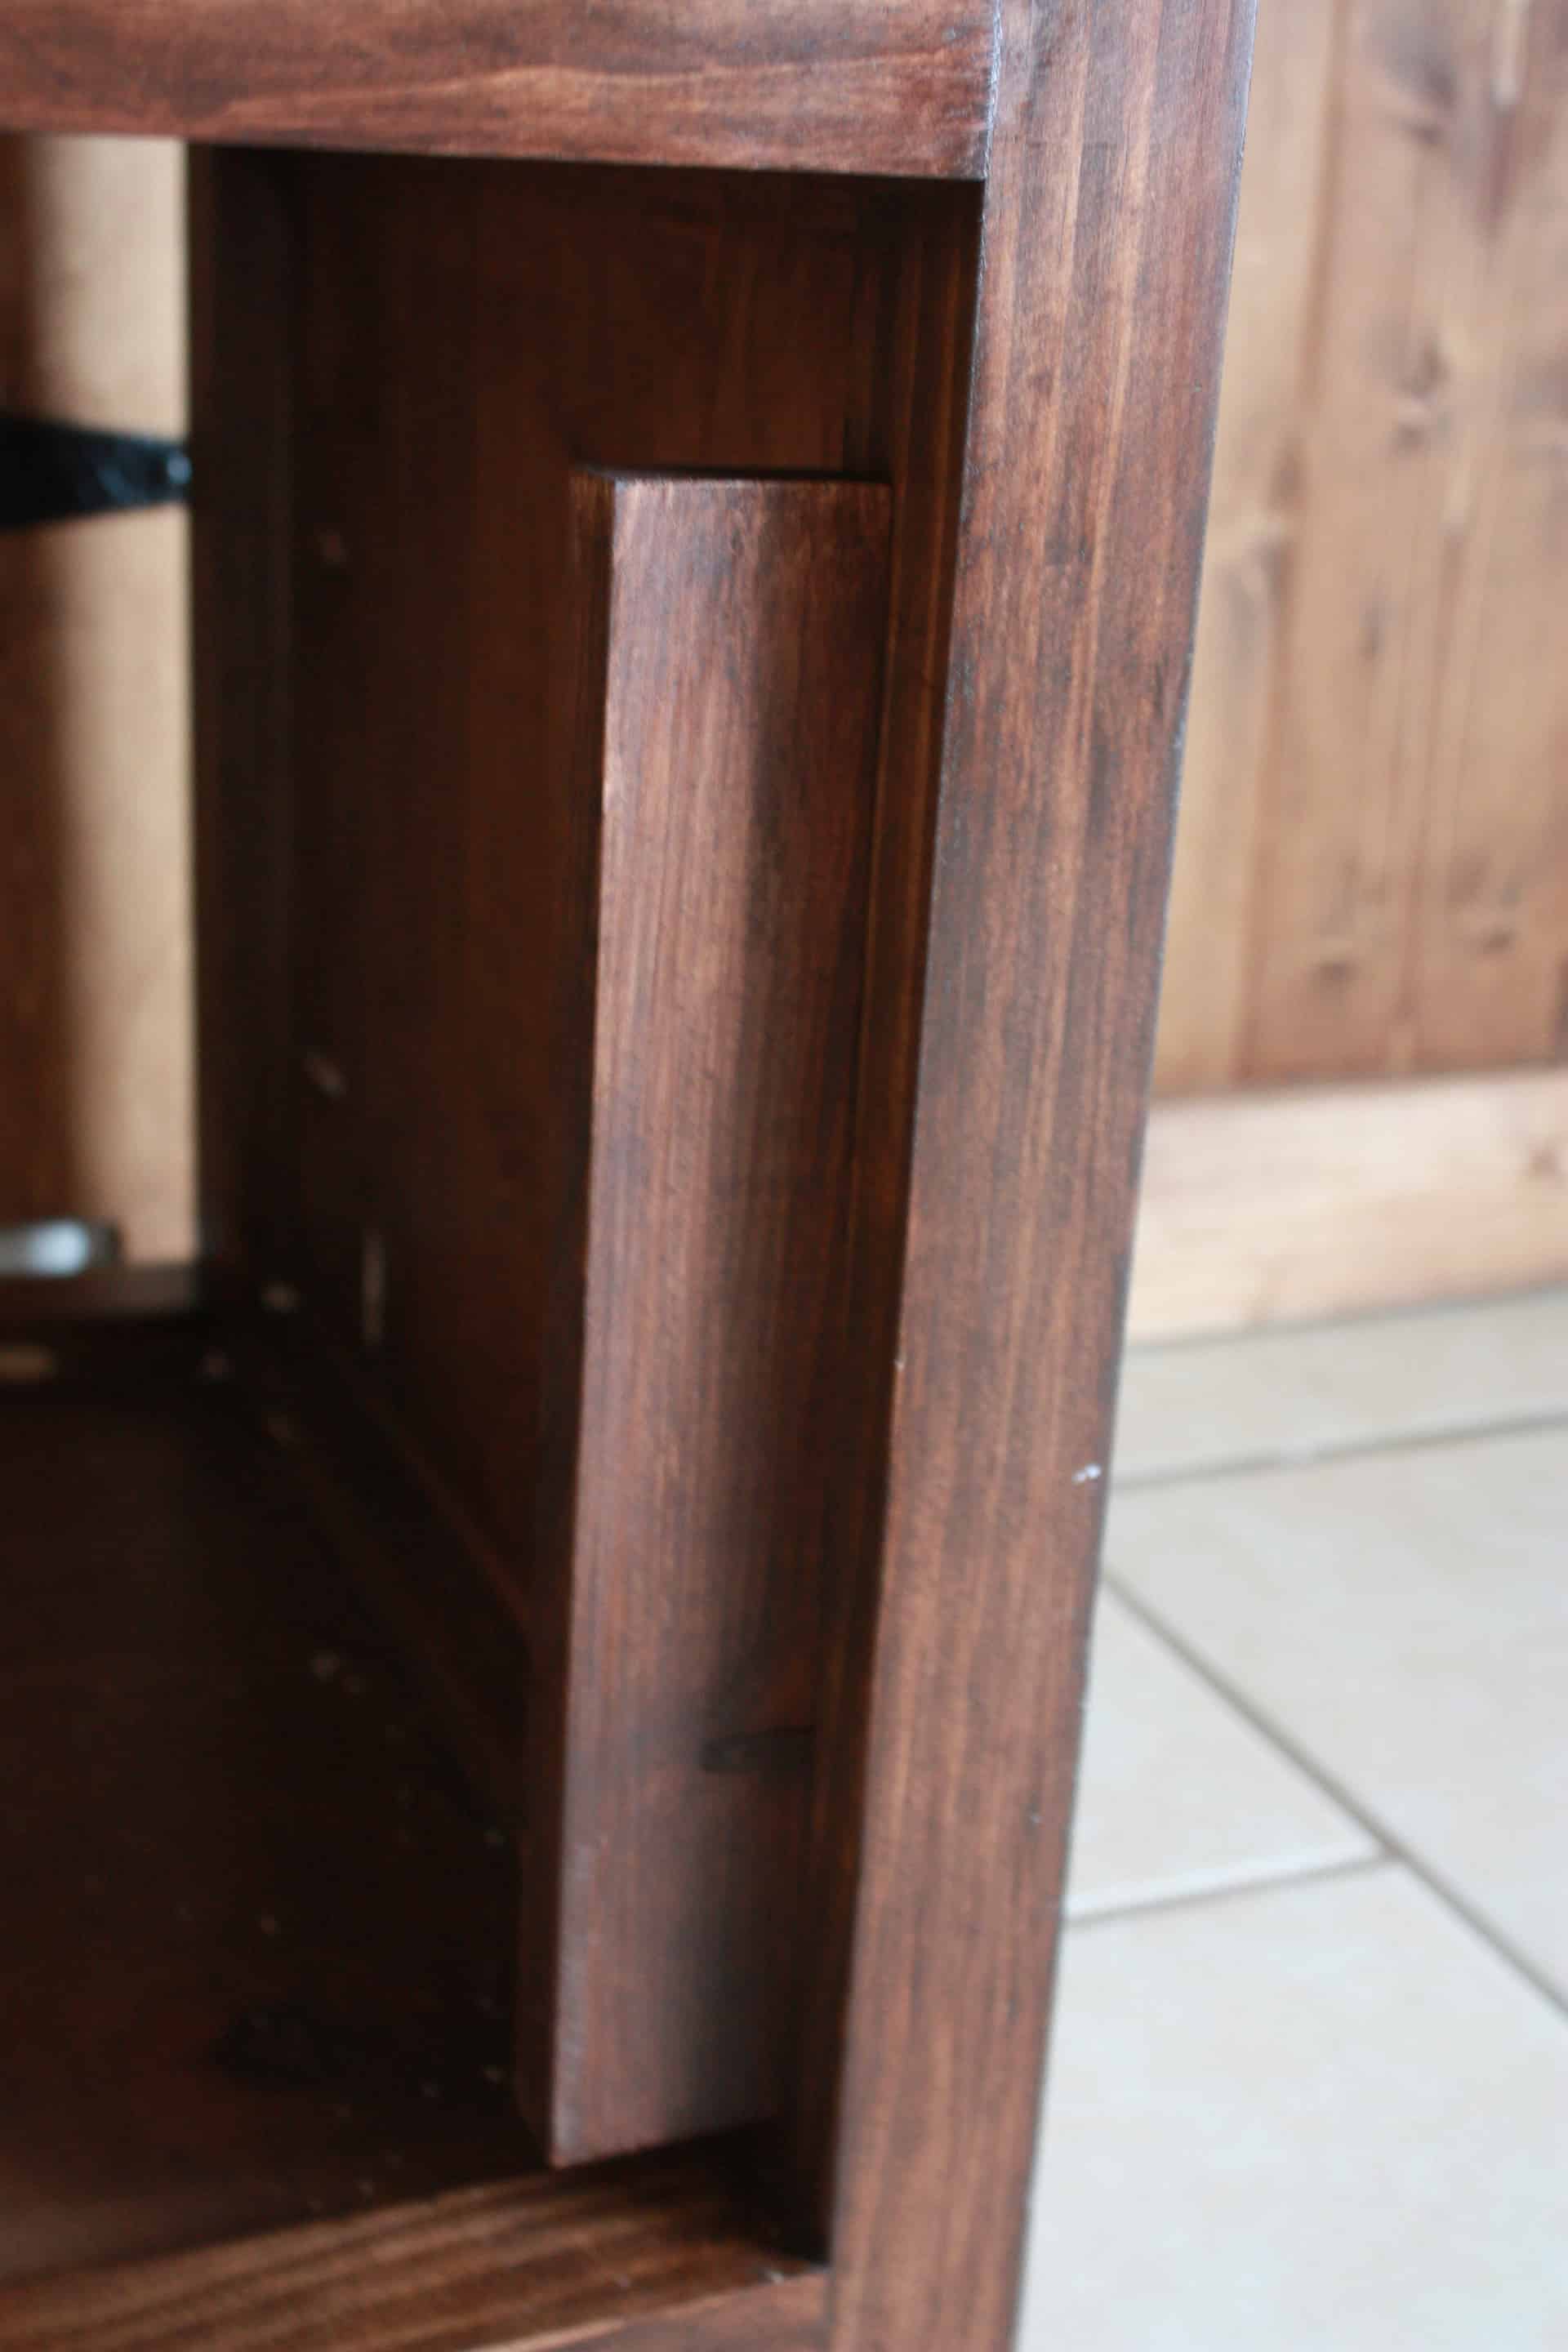
One last thing that I didn’t realize until I was at the very end of the project, thinking I was finished with my table…well, I wasn’t quite! The door will sink into the frame without something to stop it…so I ran out to the garage, grabbed another scrap 1×2 and drilled three pocket holes, stained it quickly, and came back inside and attached it to the table!
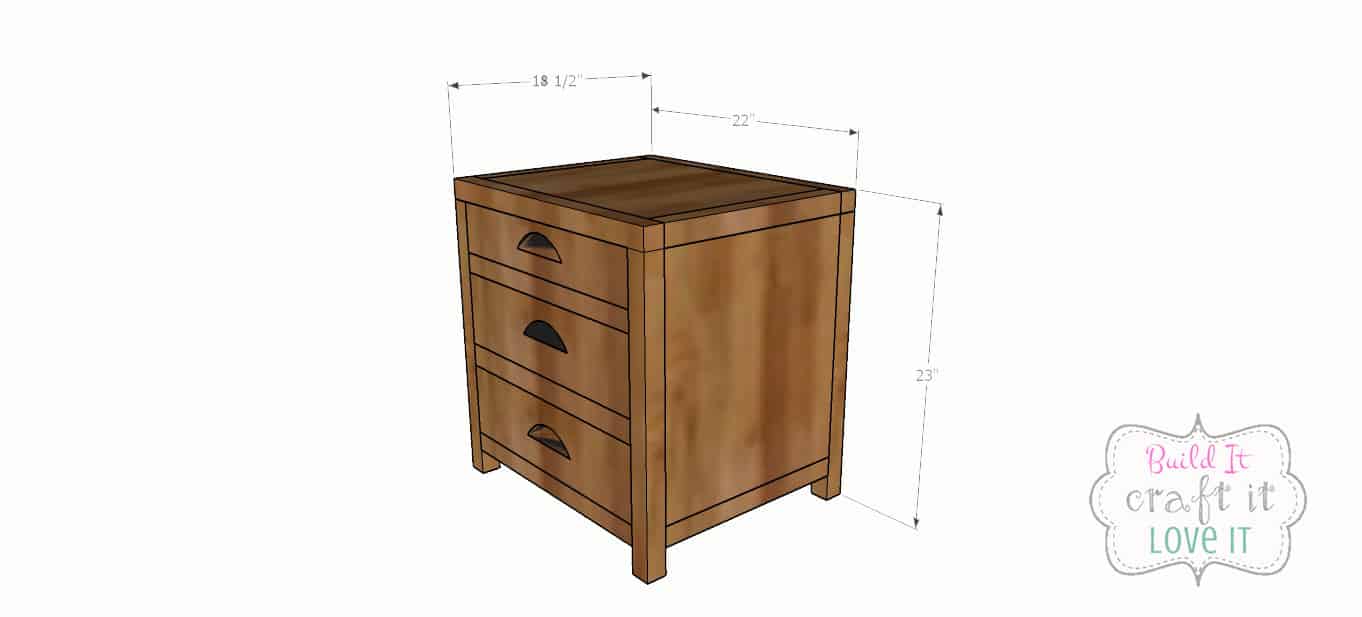
You can make this piece smaller if you’d like or you can even make it bigger if you would want it to fill the whole space…totally up to you!
LAST step…staple your 1/4″ plywood to the back of your DIY side table! I still haven’t done that…even though I have cut it…Pure laziness!
Now stand back and stare at your hard work and determination that has paid off! Woohoo!
One more mistake I would like to mention is that I cut the boards for my door early on in the project and they warped a little on me, but in my little IMPATIENT brain, I thought the hinges would pull it into place! Well…not really, if you look closely here you can see the top of the door bows out a little and is not flush…it’s not that obvious in person so it is on my to-do list to make a new door…later!
I am not looking forward to rehanging it! LOL! But just FYI, if a board warps on you don’t try to use it anyway…it’s best to bite the bullet and re-cut it at that time, or else, you just pay for it later! Speaking from experience here!
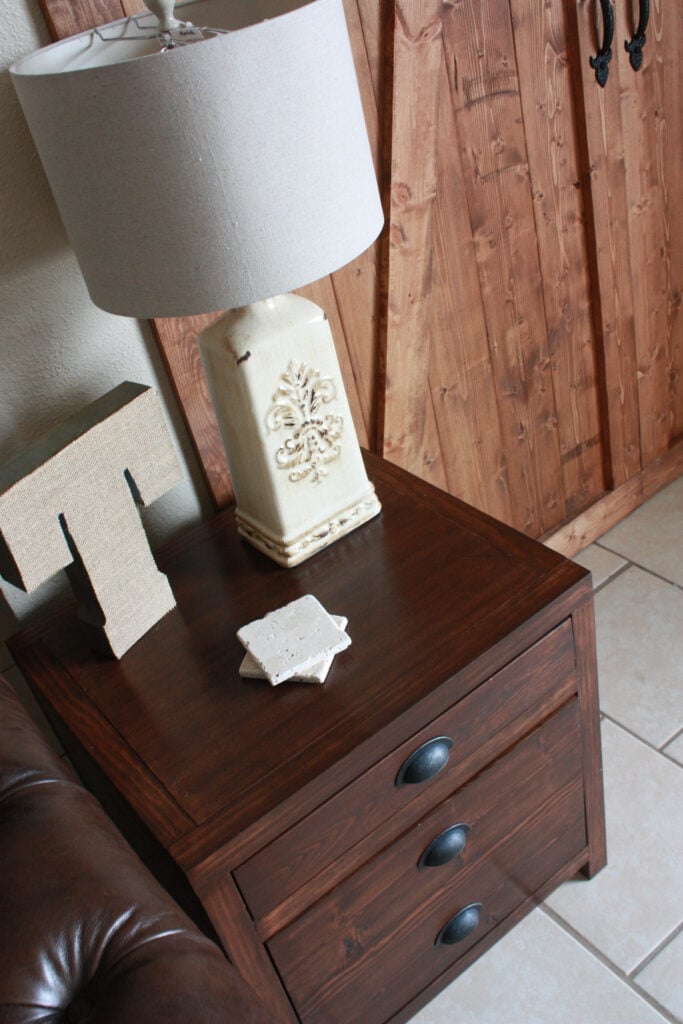
Wow, that was a lot of reading and building, but you made it through, and hopefully, you have a beautifully built DIY side table!
If you have any questions or comments about building this side table, let me know below! Be sure to follow me on Instagram and Pinterest to get sneak peeks of projects I may be working on right now and any new projects I post, or sign up for them to be emailed to you! Let’s keep in touch! Have a great rest of the week!
Lots Of Love,

Want to save this DIY side table for later? Pin It!
My hubby and I are about to jump off the deep end into DIY woodworking…lol. Mostly for the need to save money. Partly because it’s so hard to find things I’m really loving, and also for the joy of knowing we made it ourselves. Saying that, we have little woodworking tools and even less knowledge. We do have a circular saw! What other must haves would you suggest? Thank you so much for this post! This is one of the things I’m wanting to do. A local guy posted a pic of a dining table he made, I fell in love with it, can’t find one like it, can’t afford to have him build it, so that led to my searching of DIY woodworking. So, a dining table, bench, side tables, hall table and bookshelves are on my to do list. LOL. Lord help me! Hopefully we don’t end up spending a ton of $ making too many mistakes. Any suggestions on tools, guides, or whatever would be awesome!
Hey Wendi!! I’m so glad you landed here in your woodworking search!! I started out with a circular saw, a drill and the Kreg Jig R3…I bought it with a gift card I got from a Christmas gift exchange!! Lol!! My husband helped me because I had never even used a power tool of any kind to that point… But after using them the first time it was all over… I was addicted and started building everything!! Lol!! I think you’ll be surprised at how easy it is… As long as you put in the time designing your pieces before you start building them!! To this day, I mess up and waste wood on projects that I rush to get out and start building and don’t have a perfectly designed plan…I still haven’t learned my lesson, I was better at that in the beginning than I am now!! ???? I am excited for you… Getting into wood wording is always fun… Feel free to email me with any questions you may have at any point, my email is [email protected]!! If you find a picture of something you like but you aren’t sure how to go about building it exactly… Shoot me an email, I’ll be glad to help out!! It has saved me a ton of money building my own stuff even with a few mistakes!! ???? You’ll do great!! I asked everyone for tools for my birthday, Christmas, anniversary… Any time there could be a gift involved I asked for tools… & Ryobi Nation is a great place to sign up and post your projects… They give away $1000 worth of tools every month to two different winners!! That’s a great way to get some awesome tools… for free!! I always say where there’s a will, there’s a way… You can definitely make it happen… I even borrowed tools at times from relatives or asked neighbors to use a tool in their shop!! ???? #no shame!! Lol!! Thanks so much for taking the time to ask… I how this helps you a little… and if not feel free to ask any other questions!! Have a great one, and good luck in your woodworking endeavors!! ????
Not sure if I’m right, but isn’t there an error on one of the photos. It shows 22.5 on the back legs and it looks like (according to the SketchUp and other picture above) its supposed to show 21.5 like the front legs. Did I miss something?
Yes Zuber!! You are correct!! They are supposed to be 21.5″ but when I edited this picture for some strange reason I put 22.5″!! I will edit it immediately!! Thank you so much for bringing this to my attention!!! Have a good one!!!
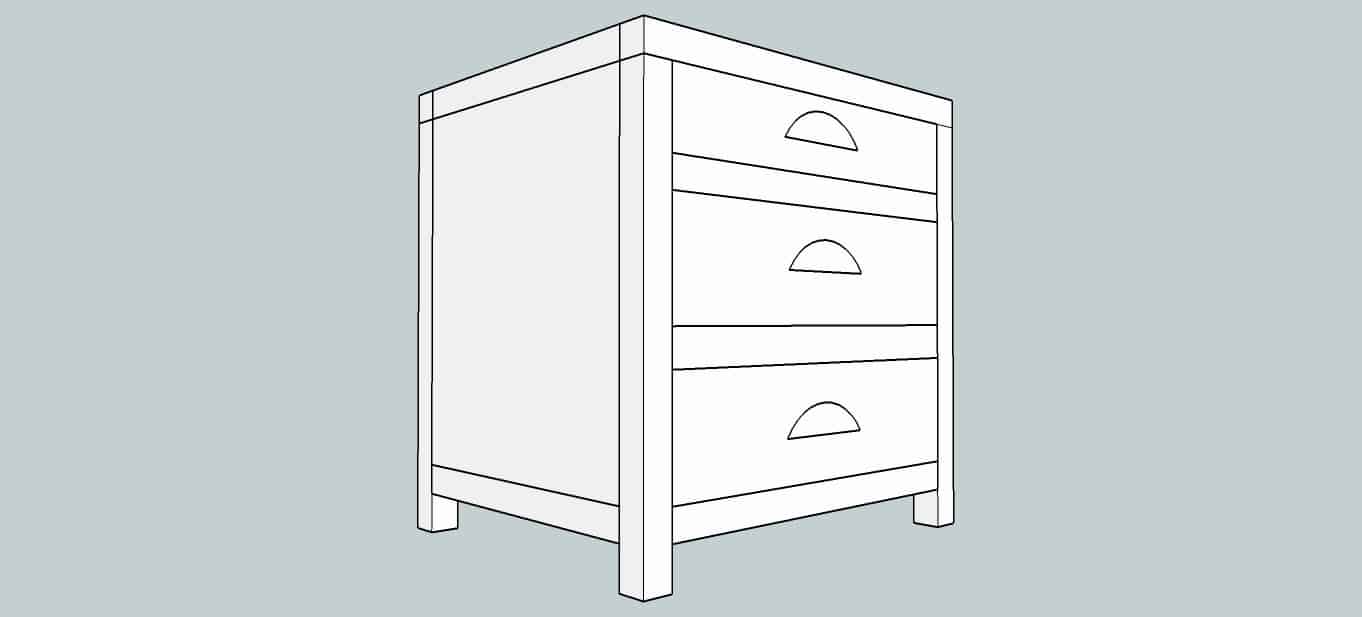
How much time and $ would having 3 drawers run? I like the your piece but I would probably see more benefit from the extra drawers. Thanks!
I would say, it really wouldn’t take much more time or really cost any more…you have to buy two extra sets of drawer slides but your saving the $ of the hinges which are almost the same cost as the slides! The extra drawers would be deeper than the top drawer so you would need a board that is wider than 1×3, which if you buy a sheet of plywood you can cut them from that to make a 1×5 (not a typical size board but would work great for the deepest size drawer)! If that makes sense! And the time it takes to construct the door and hang it on the hinges, you could probably make the extra drawers! Whoop! I needed the one big open space but I totally see the benefit of three drawers! If you make it I would LOVE to see it! If you have any other questions feel free to ask! Have a good one!
Looks great. Can you talk about the finish? I see you posted the stain you use. How long do you let it sit before wiping the excess? Did you use polyurethane after staining? Thank you
Hey Ben,
Thank you! I actually meant to go into detail about the finishing process & apparently got sidetracked in all my story telling!! LOL!! Sorry about that!! I will try not to write you a book here! Okay, so I just used a sponge brush and brushed on the dark walnut, the can says to let it sit for 2-3 minutes…which is normally how long I leave it on during the summer and it is perfect, if you leave it any longer than that it will start to gum, but since I was staining this in the winter, at first I had trouble finding the correct amount of time to leave it on, I tried wiping it off after 5 minutes but that was way too soon, the stain had hardly taken at all! So, I let that completely dry and the next day I tried again and brushed the stain on and left it for 20 minutes and it took much better and is the color you see here! As for polyurethane, I did not poly the table… yet…I should have…but I got really excited to bring it inside and see how it would look…and yeah – I haven’t taken it back out to the garage to poly it! :0 When I finally get off my booty and do it… I will use Minwax Wipe-On Poly…it is the greatest poly EVER! It is so easy and you don’t have to worry about air bubbles or anything! You just grab an old t-shirt and pour some onto it, rub it into the wood, using a circular motion… and viola!! It leaves the perfect satin protective sheen! I LOVE this stuff, and this is coming from the girl who used to HATE polying anything until I found this!! LOL! I hope this helped answer your questions! If you have any other questions feel free to ask! Good luck on your table if you give it a go!!
Hey Cara,
I have my project built, but I am having issues with the finishing. I was hoping we could talk a little more about the process you used to achieve the finish on this project. This is my first project so I apologize in advance if any of my questions or statements are trivial.
Are you using pine wood? I am using cabinet grade plywood (unsure of brand) and select pine boards from home depot. I practiced finishing on some scrap pieces. I sanded the boards with a palm sander using 120 grit first followed by 180 grit. I applied Varathane Dark Walnut with a foam brush. The stain immediately soaked in and there was very little excess to wipe off. It appears almost as if I had painted the wood brown. It was about 60 degrees outside when I stained. Did you use wood conditioner before staining? If so, what brand do you use? Any advice on the problem I am having or additional tips you may have to achieve this finish are greatly appreciated. Thank you.
Ben
Hey Ben,
So glad to hear you got this little beauty built!! Let me first tell you that there is NO question too trivial and I have NO problem answering a thousand more questions if you have them… well, if I know the answer!! LOL! I can absolutely relate to wanting to ask all kinds of questions before actually trying it on your piece because I wasn’t that smart, my first bookshelf I built, I jumped right in – didn’t even test the stain on a scrap piece of wood…STUPID I know!!! LOL!! Anyway, I learned the hard way, I stained it and left it on too long, so I sanded it down and stained it again. Then I tried poly for the first time and ruined the stain with all the air bubbles I had in my poly…so I sanded it down AGAIN and stained it AGAIN!!! LOL!! Luckily, third time was a charm…HAHA!! Since you were smart enough to test your stain on scrap wood you are off to a much better start than I! You are using the same wood as I did, select pine and cabinet grade plywood, I did not use a wood conditioner, & your sanding is right on par! So far so good…how long did you leave the stain on? In 60 degree weather, I probably wouldn’t leave it any longer than 4 minutes! When I stained mine, it was in the 40’s, which is out of the suggested temperature window, which is why I had to leave it on so long! Just to note, after my first time of using this dark walnut stain, I thought the same thing, “Whoa, this stuff is very dark brown, almost paint like…I think I did something wrong!” But if you don’t leave it on too long and you wipe it with a lint free cloth or napkin, along the grain of the wood, in a back and forth motion a few times, it does lighten quite a bit and you can see the golden undertones highlight the grain! One thing I did in the beginning of my trial and error of staining, was to take a scrap board and cut a bunch of 6 inch pieces from it, then I stained them all dark walnut and set a timer, I gave it 1 minute on the first scrap and then wiped it off, 2 minutes on the next scrap and wiped it off, and so on until I was on board number seven and the stain was stuck(this was summertime)! Ha! But that helped me find the right amount of time needed to achieve the color I liked! Also, keep in mind that in this picture my table is sitting right next to a window that lets in a lot of sunlight, in my garage before I brought this inside, it looked a lot darker, and at night in the dim light of my living room it looks darker! I hope this helped some…but if not feel free to ask as many more questions as you feel necessary! Thanks Ben!
Cara
OOOooo… LOVE this little sideboard, Cara! …and it will go just perfectly with the coffee table I’m building next week! It’s definitely going on my “Must Build” list!
— Scott ヅ
Thank you so much Scott! I’m glad to help you fill up your “must build” list! Lol! I would LOVE to see pics when you get it built! Good Luck on your coffee table!
Great job, girl! It looks awesome! Wasn’t it so fun to build? Do you have a Kreg Rip-Cut? I’d recommend it – it helps so much when you want to cut or rip plywood down to size. So precise! I have an affiliate link on my site 😉 Also, it makes a world of difference when you use a plywood blade – almost NO tear-out! I installed those little magnetic clasps so that the cabinet doors would click into place and not sink in past the carcass. Hope those little tips helped – I love your little side table! 🙂 P.S. Thanks for the shoutout! <3
Hey Jen,
Squeal!!! What?!!! Jen Woodhouse was on my blog!!! LOL! I got so excited I may have peed my pants…just a little, no big puddle!!! LOL! Thank you for checking out my little table! You are so sweet to take the time to leave me some advice! You rock! I have the Kreg Rip-Cut on my “to buy list”…& I will happily purchase it off of your blog link! 😉 The only reason I didn’t buy it for this project was that I normally have my Dad cut all my plywood for me and I left a large piece in his workshop and he cut something out of it…something full of curves…lol…anyway, I purchased a Bora clamp because I didn’t have a straight edge to cut along – I needed to straighten out the curves he left on my wood! How dare he, right? Lol! And you are exactly right, my Hubby told me AFTER I cut my plywood that I needed a plywood blade! Luckily, I was able to “hide” the splintered edge on the very bottom or inside, where no one will ever see! Oh, well no one except the whole world because I posted it on the internet! Haha! I sooo appreciate your inspiration and helpfulness! Come visit anytime!
Cara
Hey Jen,
Squeal!!! What?!!! Jen Woodhouse was on my blog!!! LOL! I got so excited I may have peed my pants…just a little, no big puddle!!! LOL! Thank you for checking out my little table! You are so sweet to take the time to leave me some helpful advice! You rock! I have the Kreg Rip-Cut on my “to buy list”…& I will happily purchase it off of your blog link! 😉 The only reason I didn’t buy it for this project was that I normally have my Dad cut all my plywood for me and I left a large piece in his workshop and he cut something out of it…something full of curves…lol…anyway, I purchased a Bora clamp because I didn’t have a straight edge to cut along with the Rip-Cut – I needed to straighten out the curves he left on my wood! How dare he, right? Lol! And you are exactly right, my Hubby told me AFTER I cut my plywood that I needed a plywood blade! Thanks Babe! Ha! Luckily, I was able to “hide” the splintered edge on the very bottom or inside, where no one will ever see! Oh, well no one except the whole world because I posted it on the internet! Haha! I sooo appreciate your inspiration and helpfulness! Come visit anytime!
Cara
You’re so funny, Cara! We builder gals have to support each other, right?! I’m bookmarking your site – can’t wait to see what else you come up with! Lemme know if I can ever help with anything. 🙂