DIY Cookbook Stand
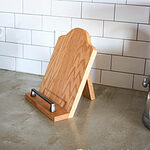
If you spend any time in the kitchen, you know that cooking from a recipe book is not always easy when you keep having to walk over and look over the pages while trying to complete the steps! Well, this little DIY cookbook stand has you covered and will keep your cookbook or iPad angled perfectly so you can easily see it while you are cooking or baking!

This cookbook stand makes the perfect hostess gift, Mother’s Day gift, or Christmas gift and it can be made with scrap wood and a cabinet pull!

Look how well this recipe book holder also holds an iPad!

Such a simple little build that makes me so happy! It’s adorable!

Alright, you want to build one yourself? Here’s all the deets!
Looking for other awesome kitchen DIYs, here are a few you may like such as this DIY wine server, this DIY cup dispenser, or maybe something way bigger for the kitchen like this DIY kitchen vent hood!
Gathering Supplies for the DIY Cookbook Stand
This little cookbook stand I was able to make from some scrap oak I had from when I built these GORGEOUS Cornhole Boards, and so my only cost was the drawer pull and the hinge on the back, so about 7 bucks! Lol! If you want to make one out of oak, it will cost around 30 dollars but you can easily make it out of pine for about 15 bucks!
Use up any scraps you have laying around, that is the great thing about little projects like this! If you have one foot left over of a 1×10, you don’t even have to do all the work joining the boards with the dowels, just cut the pretty little curve at the top!

Materials for the Cookbook Stand
- 1x4x2′ – oak or pine, oak is sold by the foot so you can just purchase 2 feet, but pine you have to buy the whole board!
- 1x3x3′ oak board (same as above)
- drawer pull
- 2″ hinges – I purchased them at Home Depot but they do not show them anywhere online that I can find! These that I linked are not black!
- dowel jig – they discontinued my dowel jig and for good reason, it sucks! Lol! But, the one I linked has great reviews!
- 5/16” dowels – if you don’t want to buy a dowel jig because you don’t think you’ll use it enough to make it worth the money, purchase this drill bit and dowel set!
- wood glue
- brad nailer
- miter saw
- jig saw
Cut List for the Cookbook Stand
- 2 – 1×4 @ 12″ beveled @ 22.5 degrees off square on one end
- 1 – 1×3 @ 12″ beveled @ 22.5 degrees off square on one end
- 1 – 1×3 @ 9 1/2″ beveled on one edge @ 22.5 degrees off square
- 1 – 1×3 @ 8 3/4″ longest end, beveled @ 22.5 degrees off square on one end
Building the DIY Cookbook Stand
Alright, building this DIY cookbook stand is pretty easy and straight forward! I made it a little more complex because I didn’t want to see any fasteners since the back is seen just the same as the front when it is angled and being used, so I used a dowel jig, but don’t let that scare you off from making this adorable cookbook stand! It’s easy, I promise, I had it made in two hours or so worth of work while building my miter saw station!
First things first, cut all your boards down to size! Once you have the back boards cut, they will look like so!
Upright cookbook stand boards!

Bottom board

The back kick stand board was cut later so I don’t have a picture, but you can cut it now, I just didn’t know what length to cut it, but you have it in the cut list! Lol!
Using the dowel jig and an additional clamp to clamp all three back boards together where you can drill into the sides of the boards.


Make sure the bottoms are the same as this so that the boards will have the holes drilled in the correct sides when the bottoms are all flush, you only have to drill two holes, there really isn’t a need for three, I actually only ended up using two!

Which ever board is going to be your middle board will have to be flipped and drilled again on the opposite side!


Once you have your holes drilled for the dowels, add a little wood glue and insert the dowels!


Once you have the boards planked together for the back of the cookbook stand, you can draw your curves at the top!

Once you have the design you want at the top, you can cut it with a scroll saw or jig saw!

I went ahead and drilled the holes for the drawer pull, measure and drill, use a counter sink drill bit on the bottom to make sure the screw heads don’t lift it up!
top

bottom

I sanded everything down at this point and got it all ready for assembly!

Now you can assemble the cookbook stand!
I used glue and brad nails to attach the bottom board!

I stained everything at this point! I used Golden Oak by Varathane.

Attach the drawer pull!

Now the last thing is to attach the hinge and back board as the kick stand!

And viola! It is complete! I came back later and added a ribbon to the bottom of the cookbook stand and the bottom of the kick stand board to keep it from sliding out! I just hot glued it to both!
So cool that I made that! Lol! I am still amazed with EVERY project no matter how small, and it is such a wonderful feeling when you make something with your hands!
Have you made anything that amazes you lately? Let me know in the comments below!
Thanks for stopping by! Have a good one!
Happy Building!

Want to save this DIY Cookbook Stand for later? Pin It!


Is the ribbon attached to the back of the stand and the front of the kick stand so that it doesn’t open up too far? Can you show a picture of that? Thanks