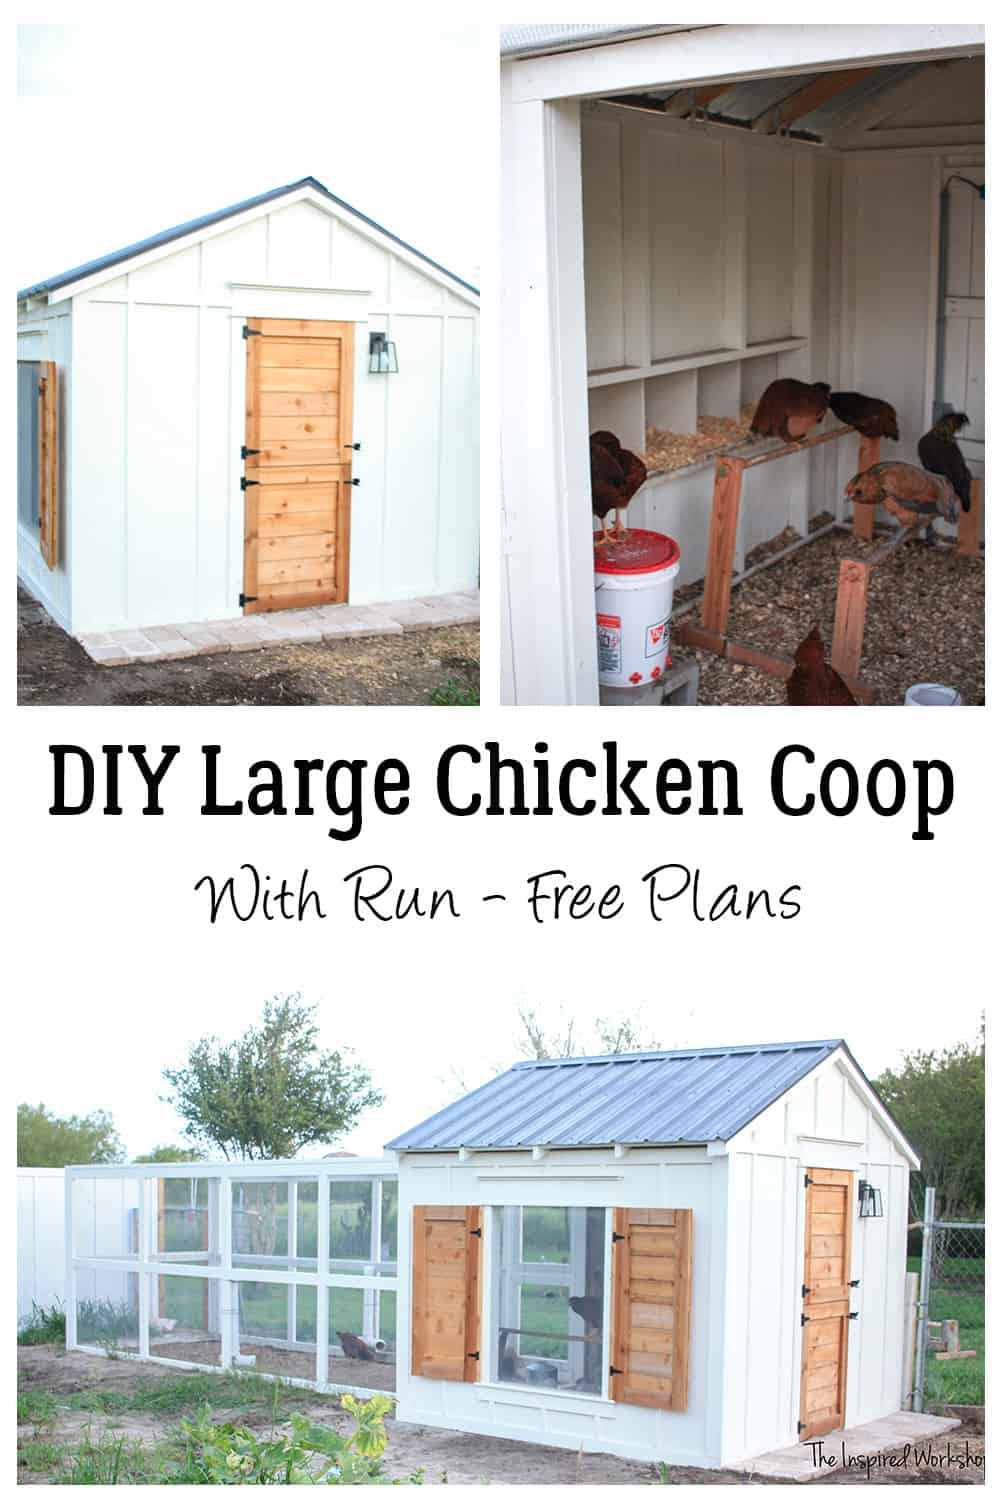
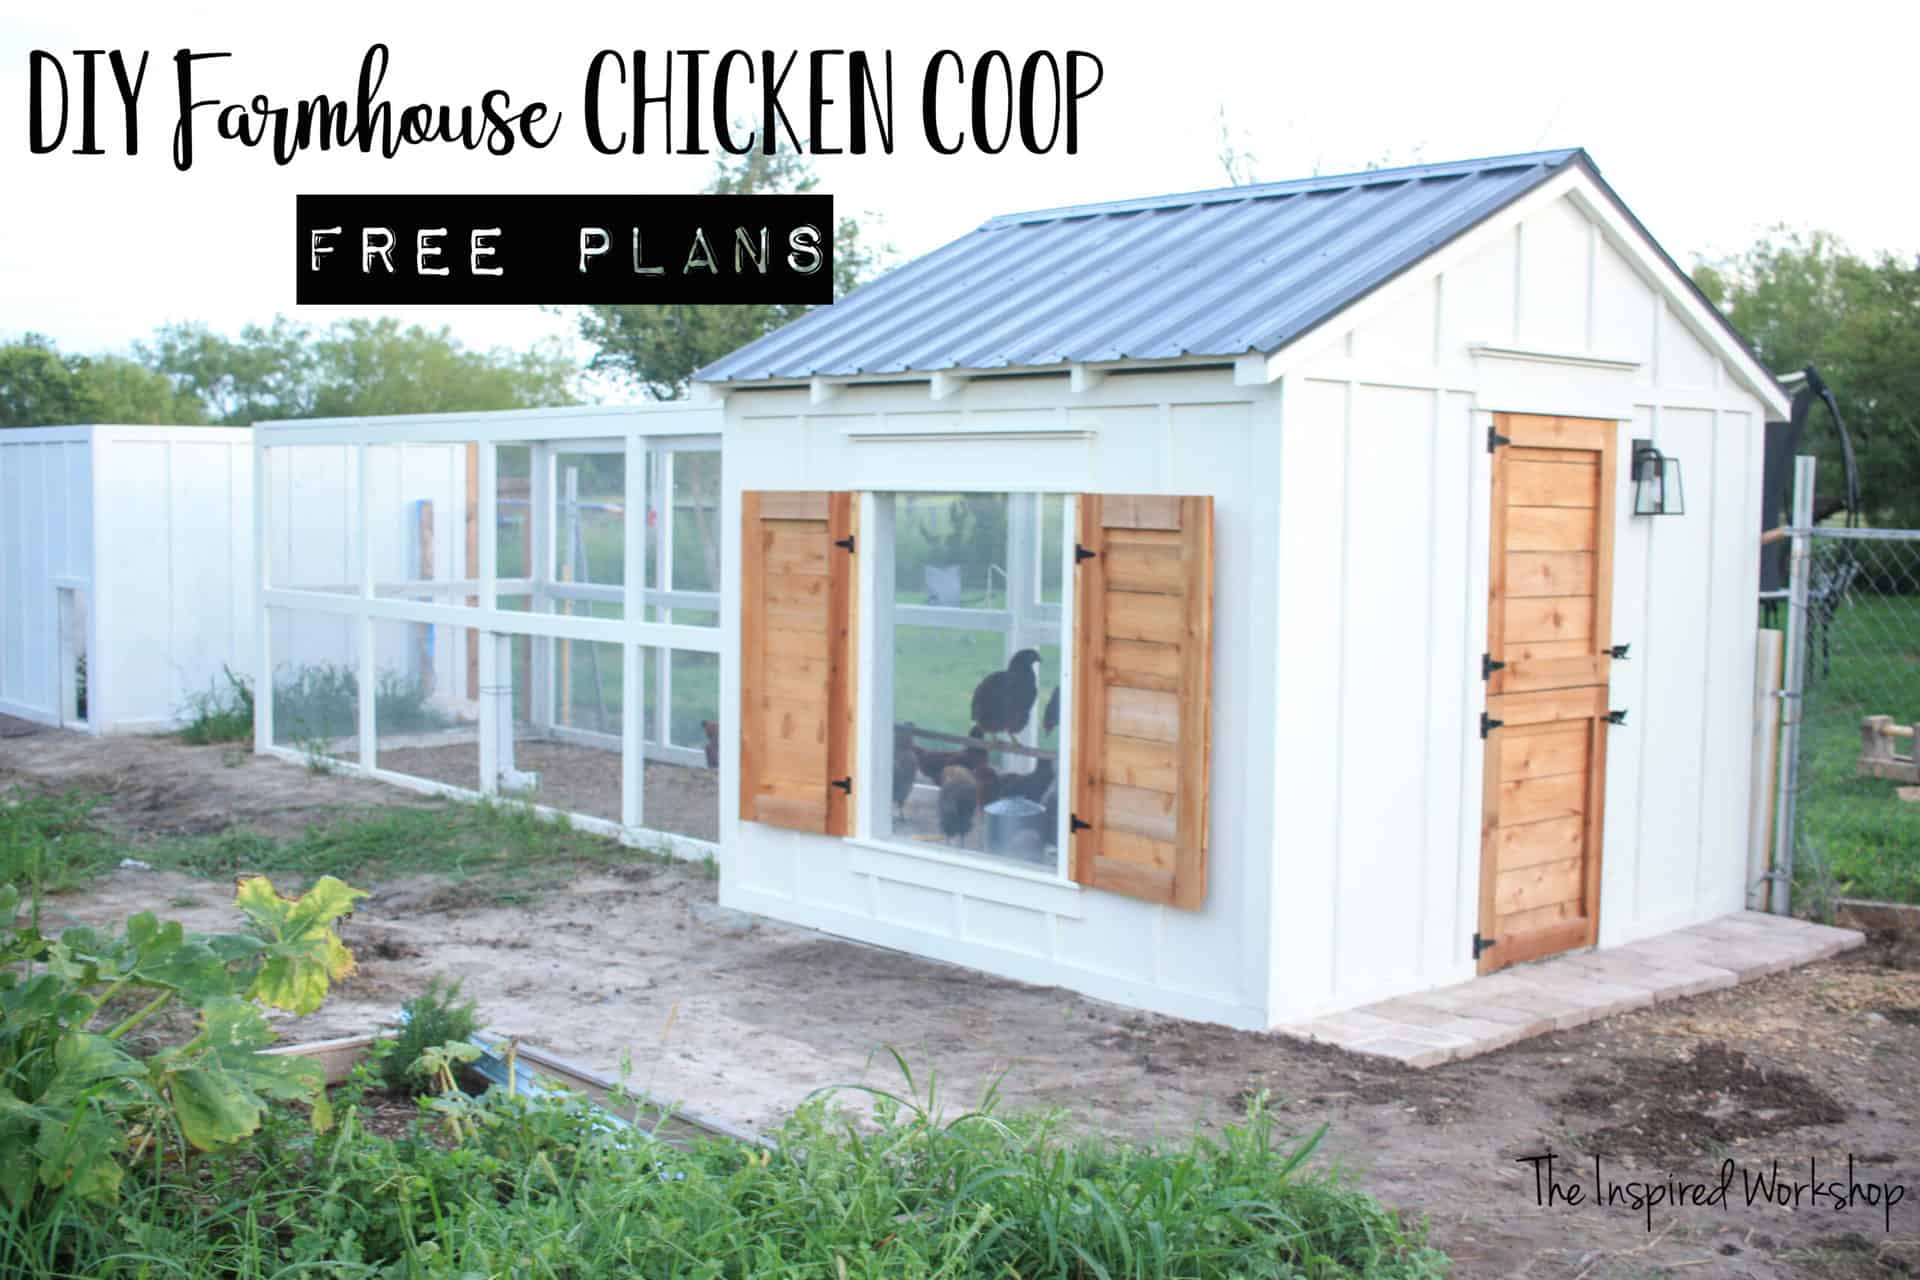
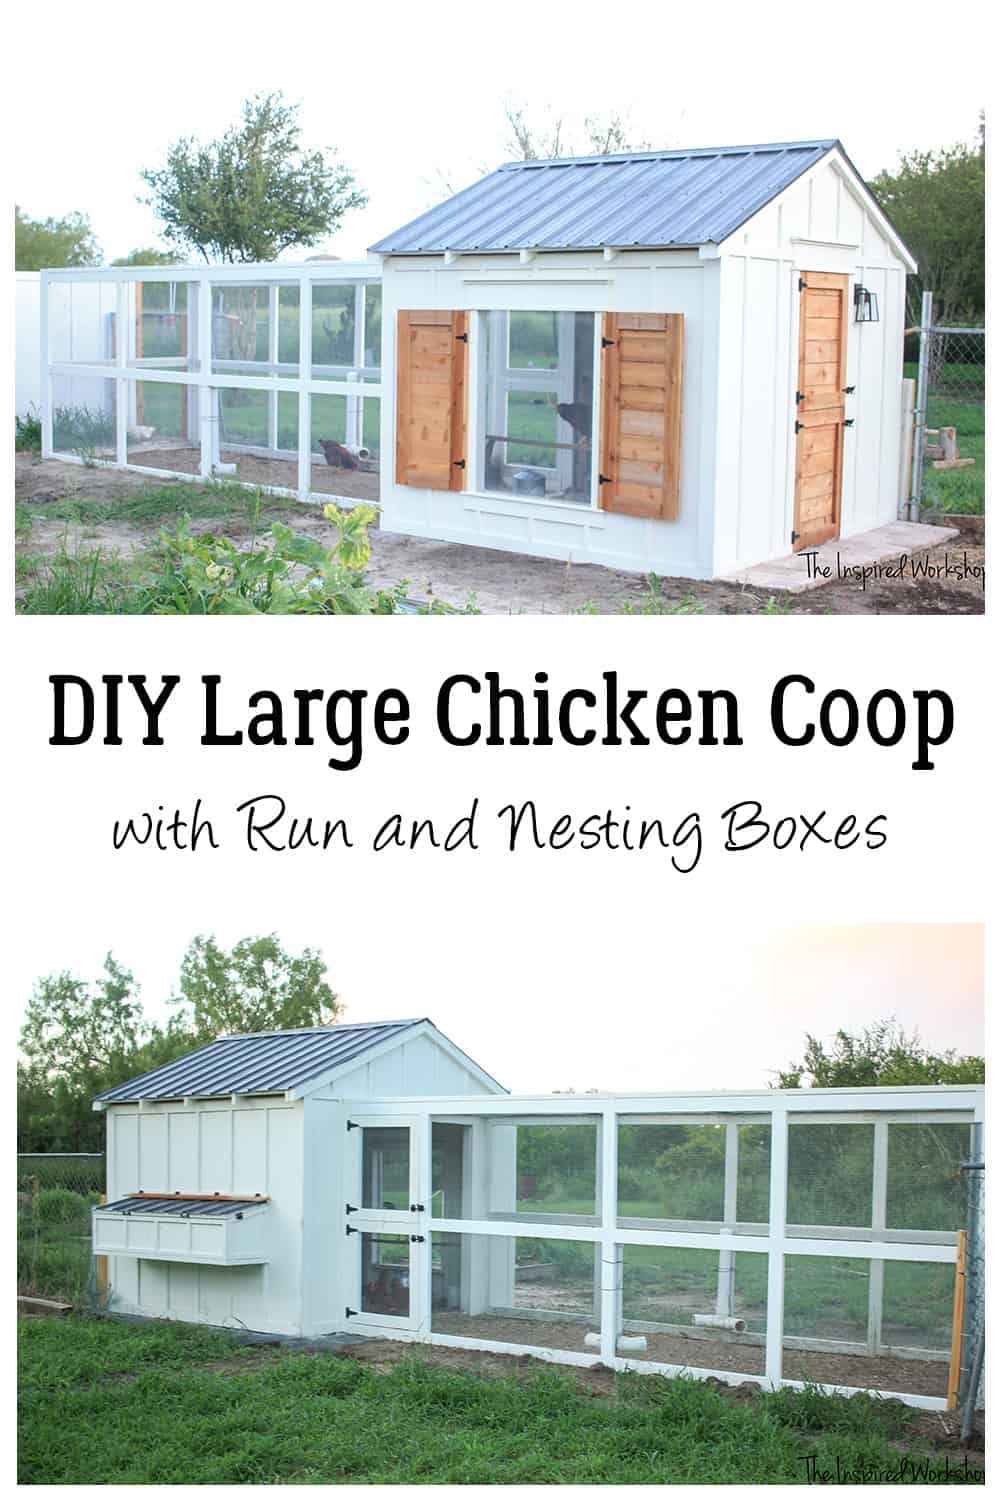
DIY Chicken Coop Plans
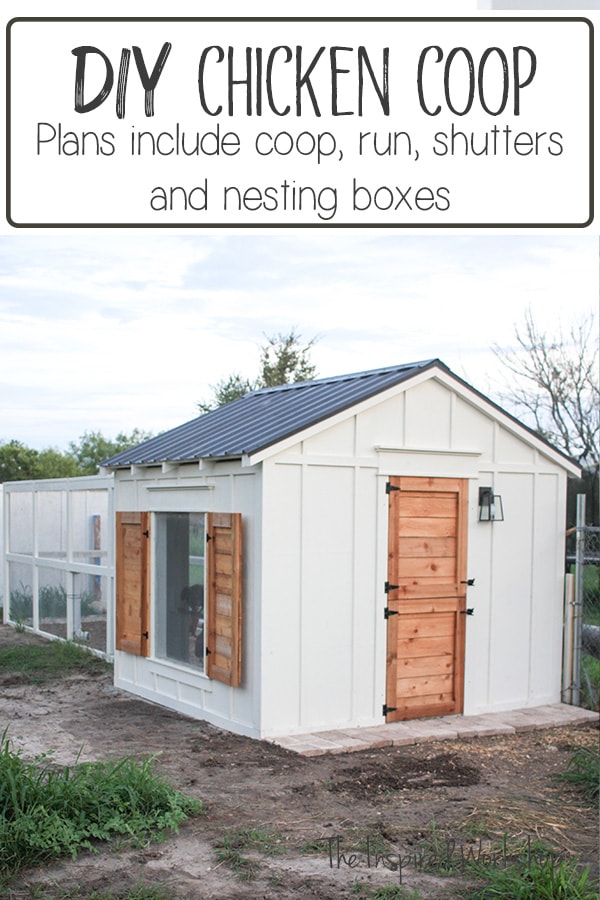
This chicken coop is the perfect coop for anyone just starting out with chickens or if you’ve raised chickens for years. It is great for a couple of chickens or 20! It has so many great features like real working shutters to keep the rain out, a large run to give the ladies some sunshine, and nesting boxes to easily grab eggs! You are going to want this chicken coop built in your backyard or on your farm today!
Here it is! The post and plans you all have been waiting for…DIY Chicken Coop Plans…okay, maybe I have just been waiting to share them! Lol! This set of plans has me so excited because it’s a big build but so rewarding! You may not realize that you need chickens in your life, but you do I swear!😉
I have a funny story for you all! Remember when I posted the plans for my small chicken coop? Well, in that post I tell the story of getting a rooster and how I had to quickly make a coop for him because he couldn’t be in with my hens… he was big and they were small! All that work and HE started laying eggs! 😂
That’s not even the best part, we don’t know if we mixed him up and he’s been living in the big coop with the ladies, or HE is actually a HEN!! 😅 But either way, I promised chicken coop plans for a large chicken coop…and here they are! I am beyond excited with how it turned out and how well it works for our chickens…and possibly rooster!😆
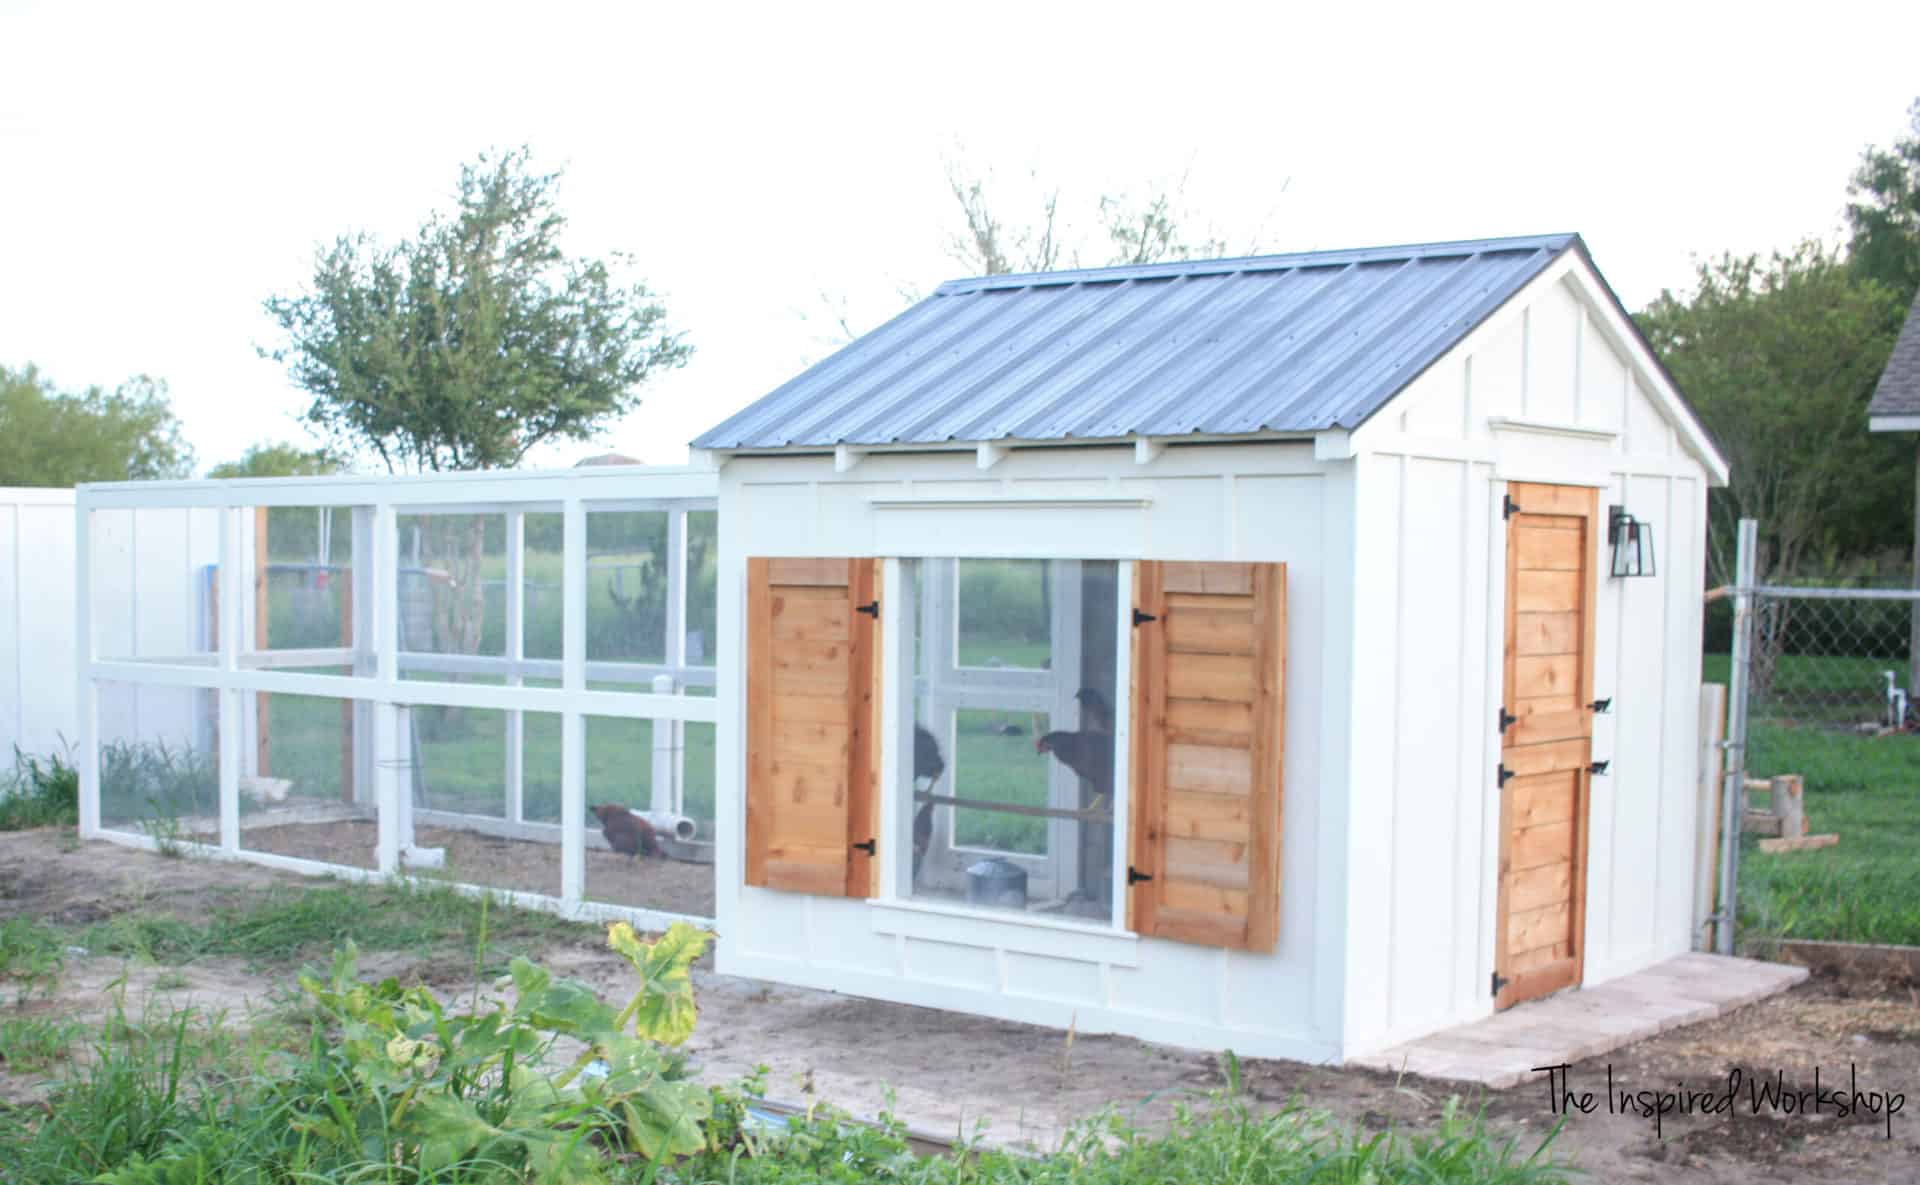
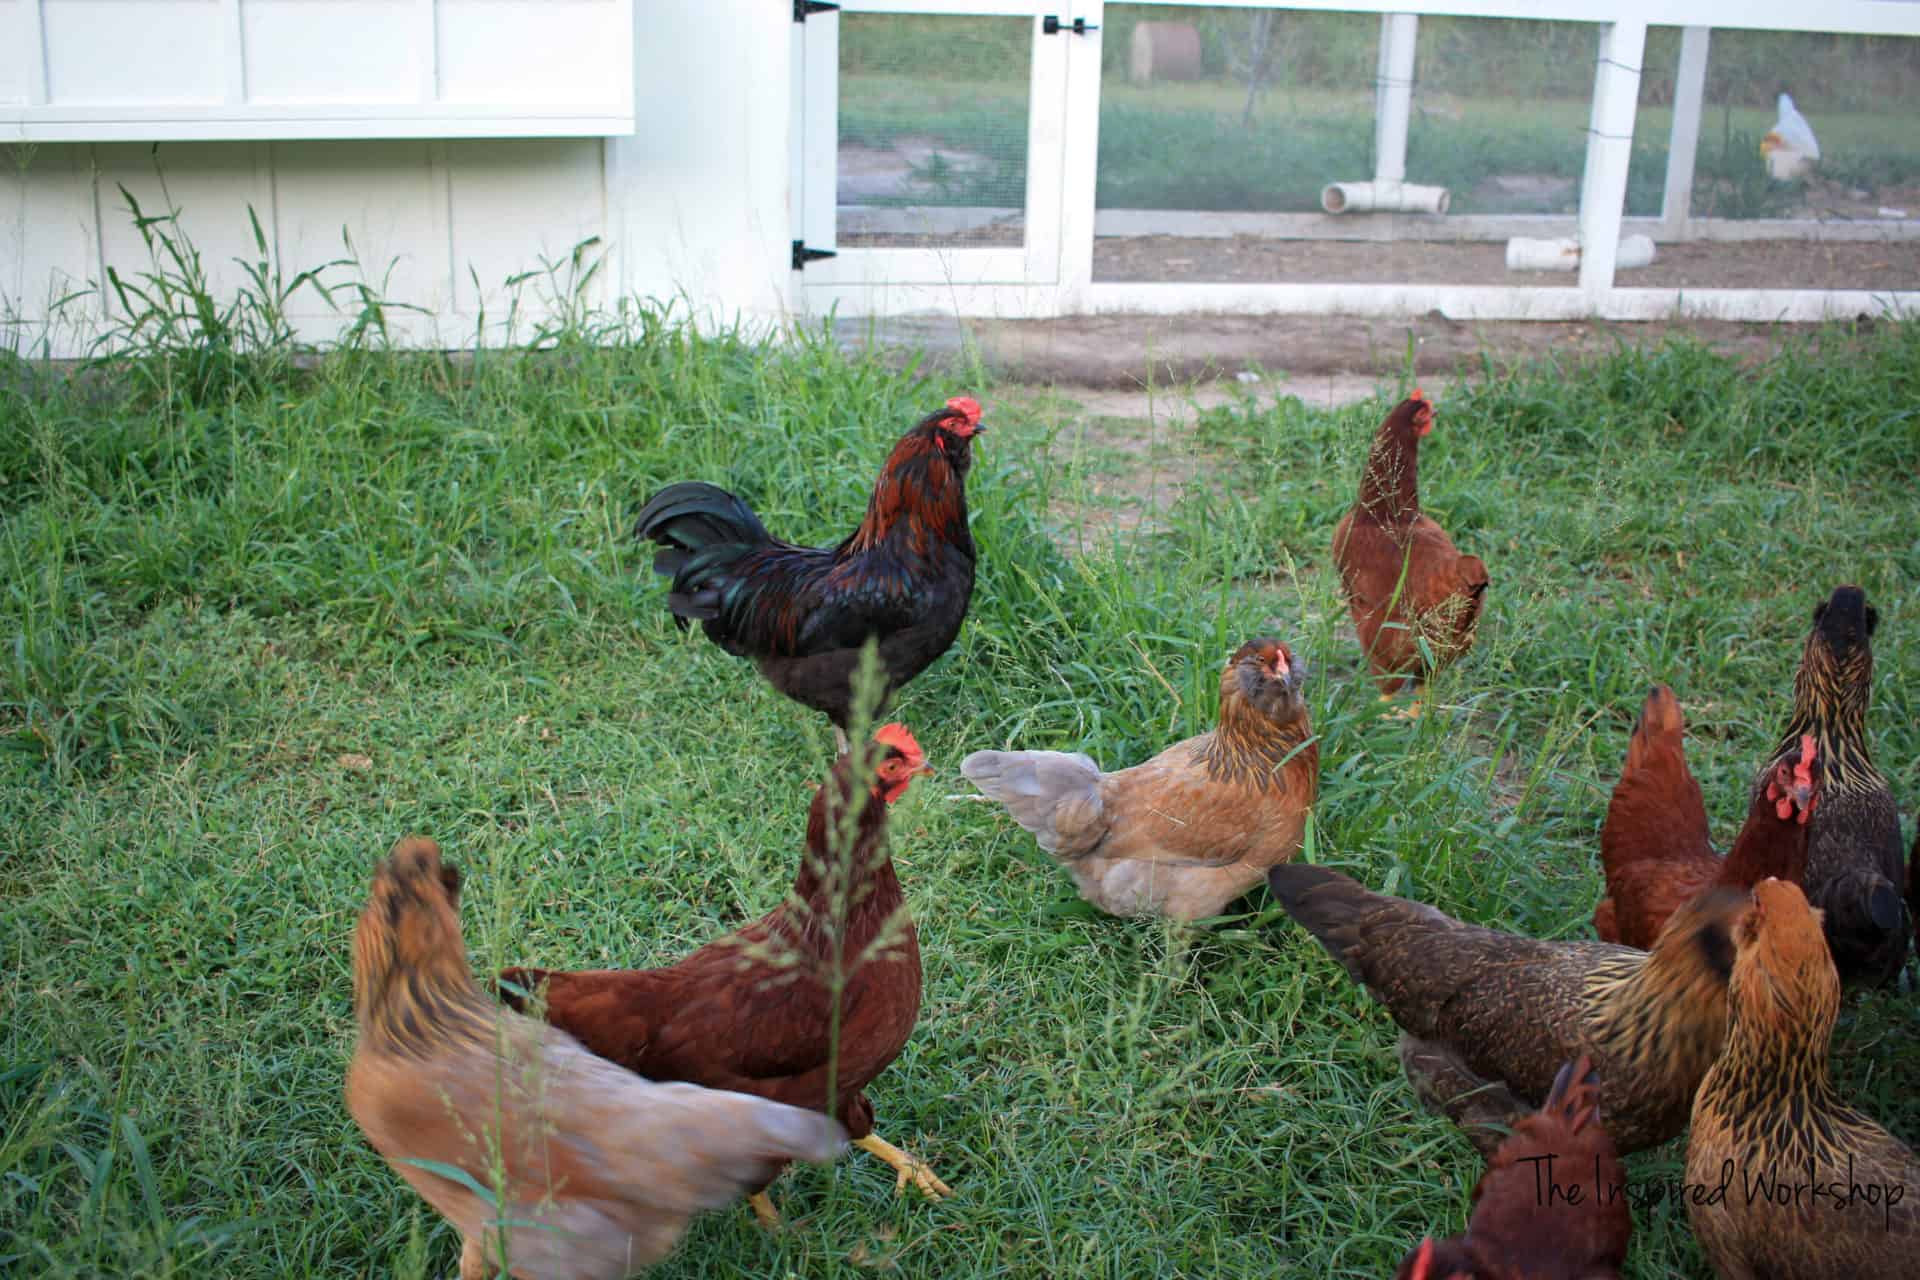
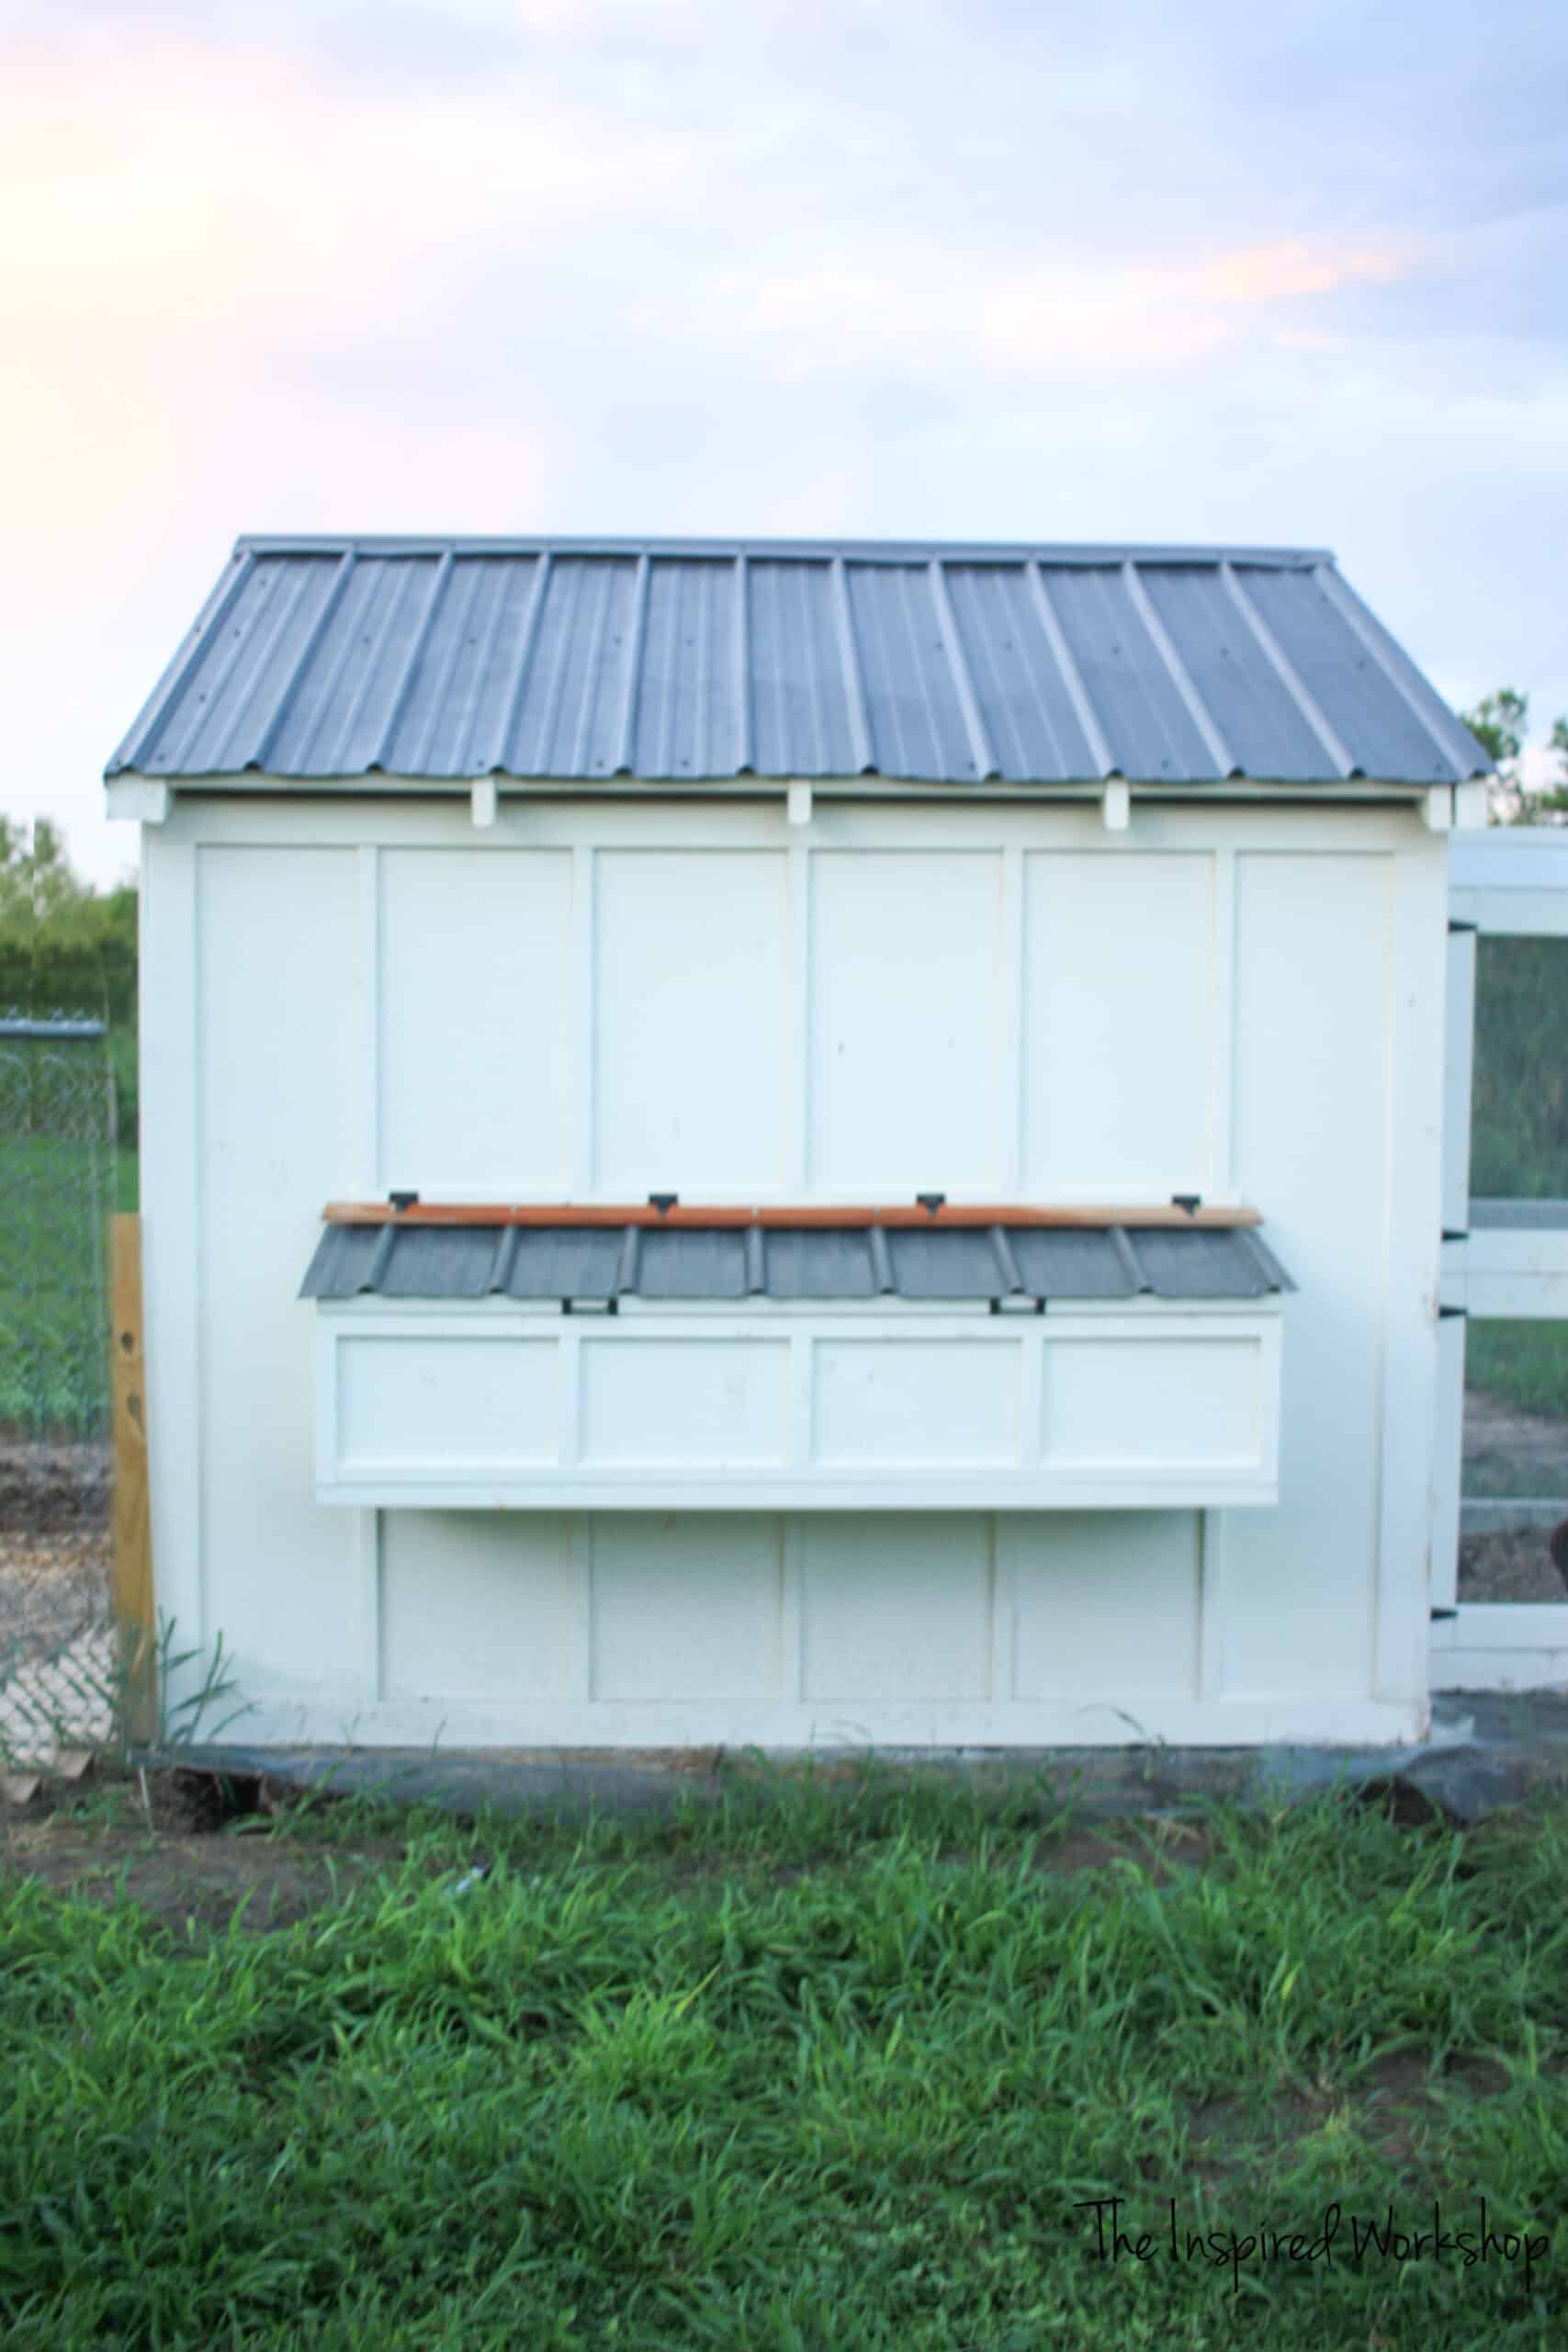
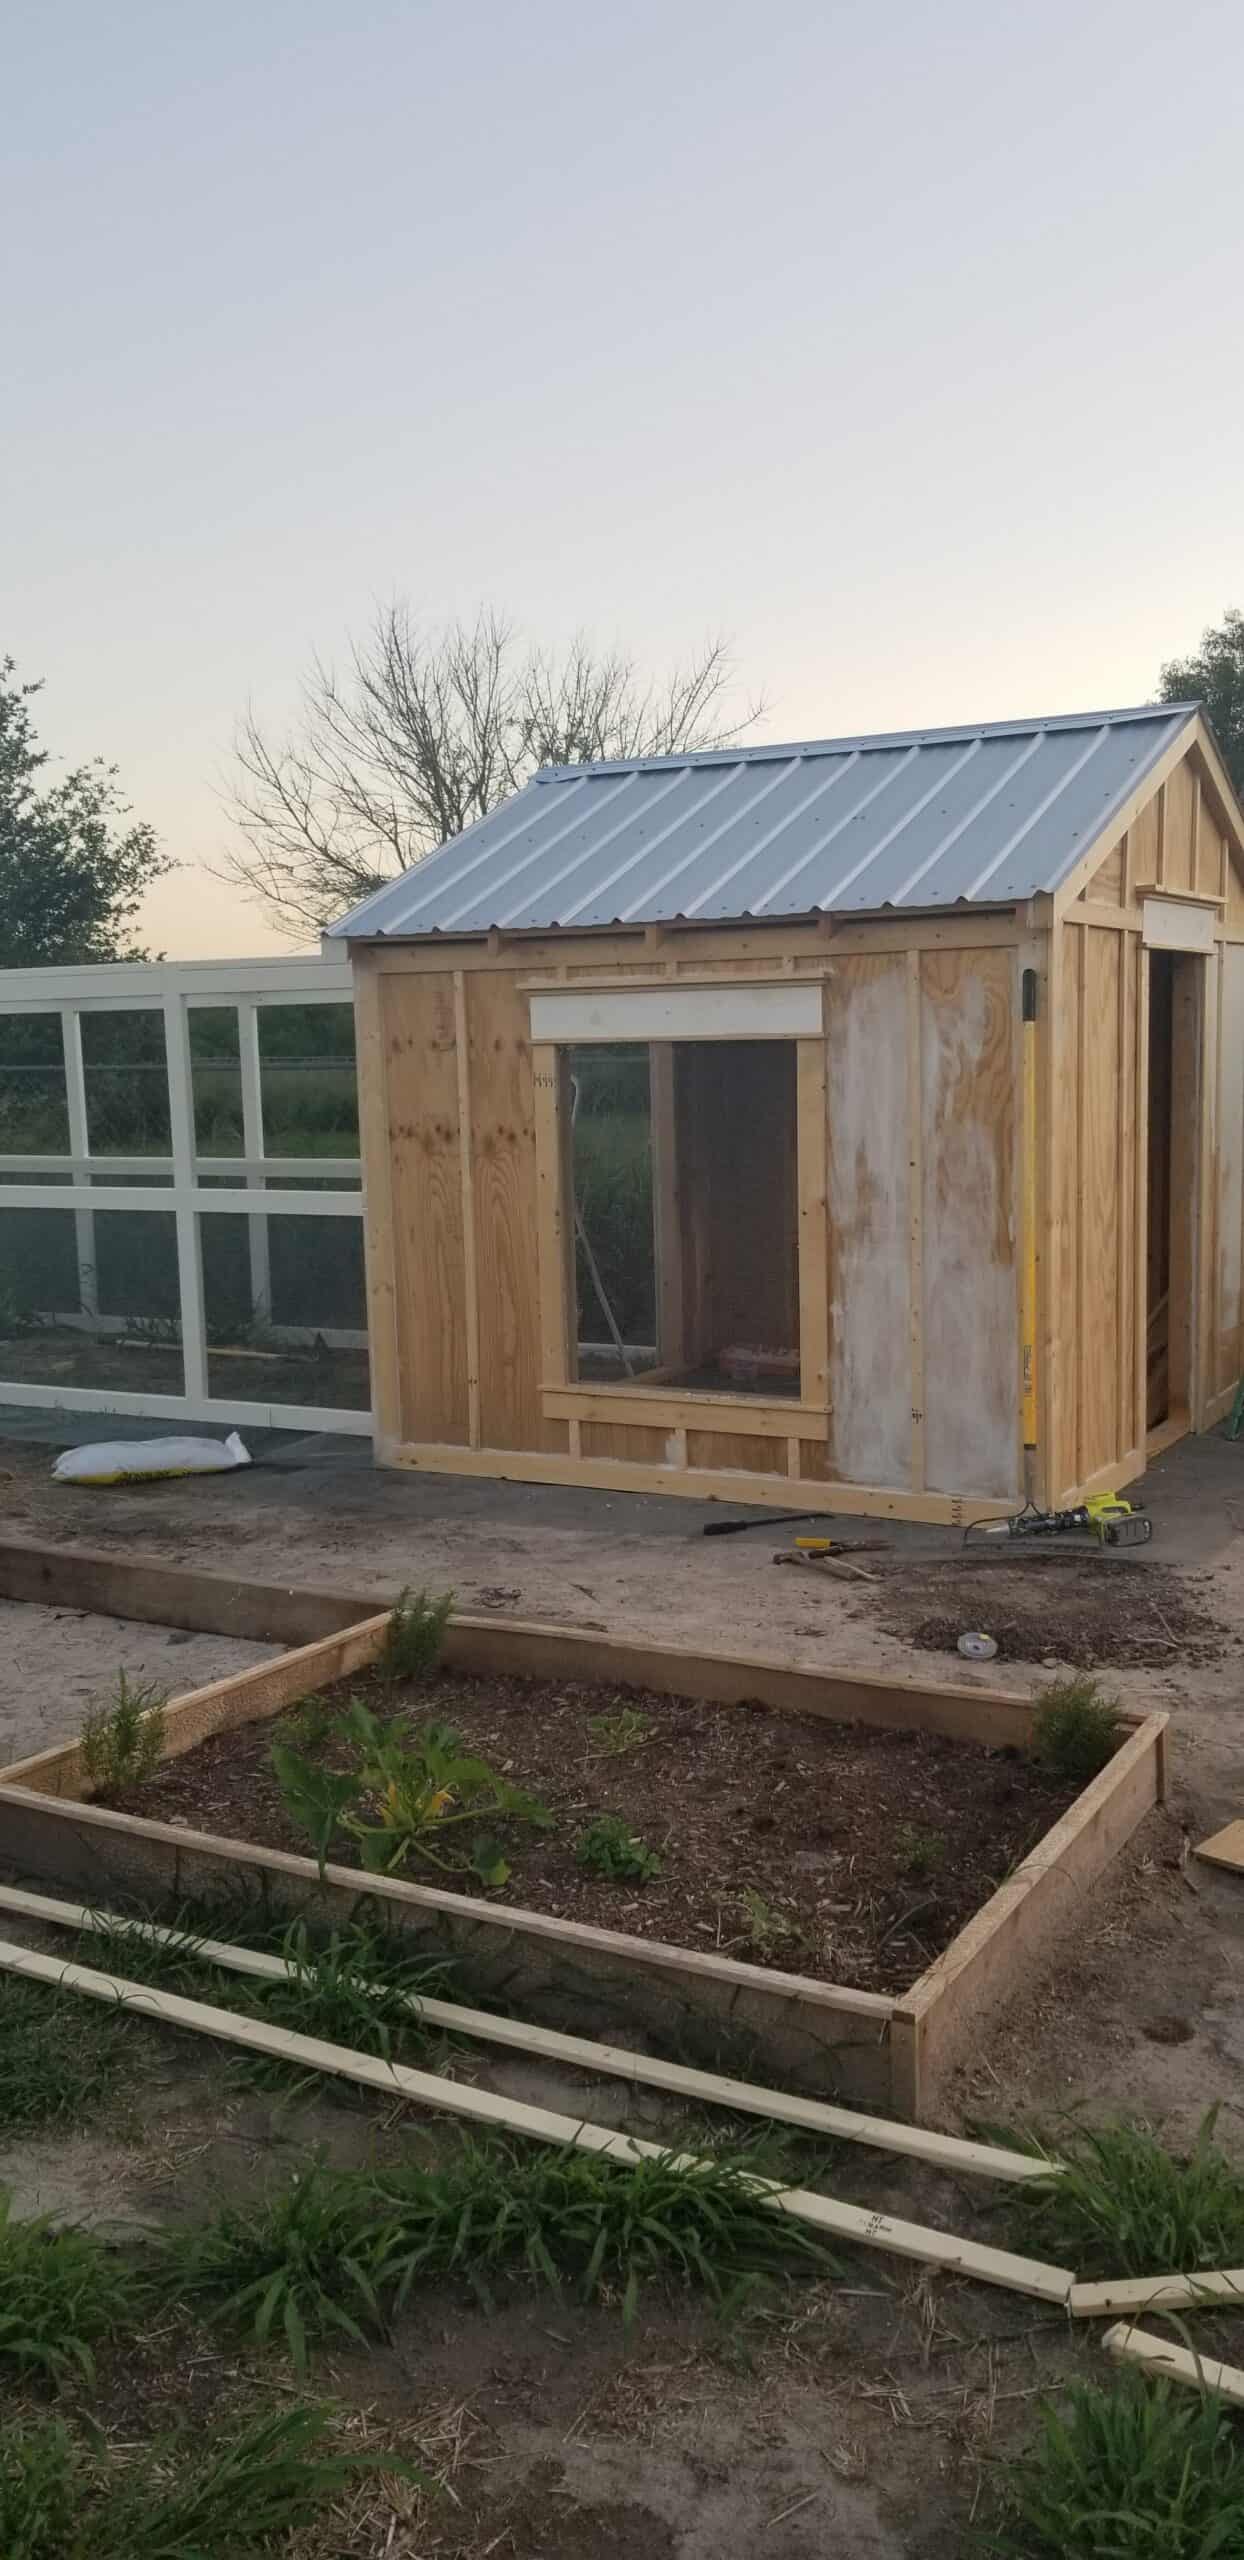
Don’t mind that the chicken coop is already dirty and large weeds are growing everywhere, it has been raining here, Hurricane Hanna hit south of us a little while back, so the rain was constant for what seemed like weeks, and then more rain came! Plus the chickens have been living in the coop for well over two months now!😲 And the hideous fence is coming out soon, but these things take time… so for a small while, I have to look at a couple of fence eyesores! Lol! Our whole yard, our house, the goat shed… everything is under construction!😆 If only I could clone myself for free labor! Lol!
Y’all never in a million years could you have told me that I was going to have chickens and hug them and love them, would I ever believe you! 😂 But I do!! They are hilarious and we LOVE them as a part of our family! I laugh when I think of this because they are chickens…CHICKENS, I never liked chickens, but now I’m in love, not just with them, but with their coop as well!😁

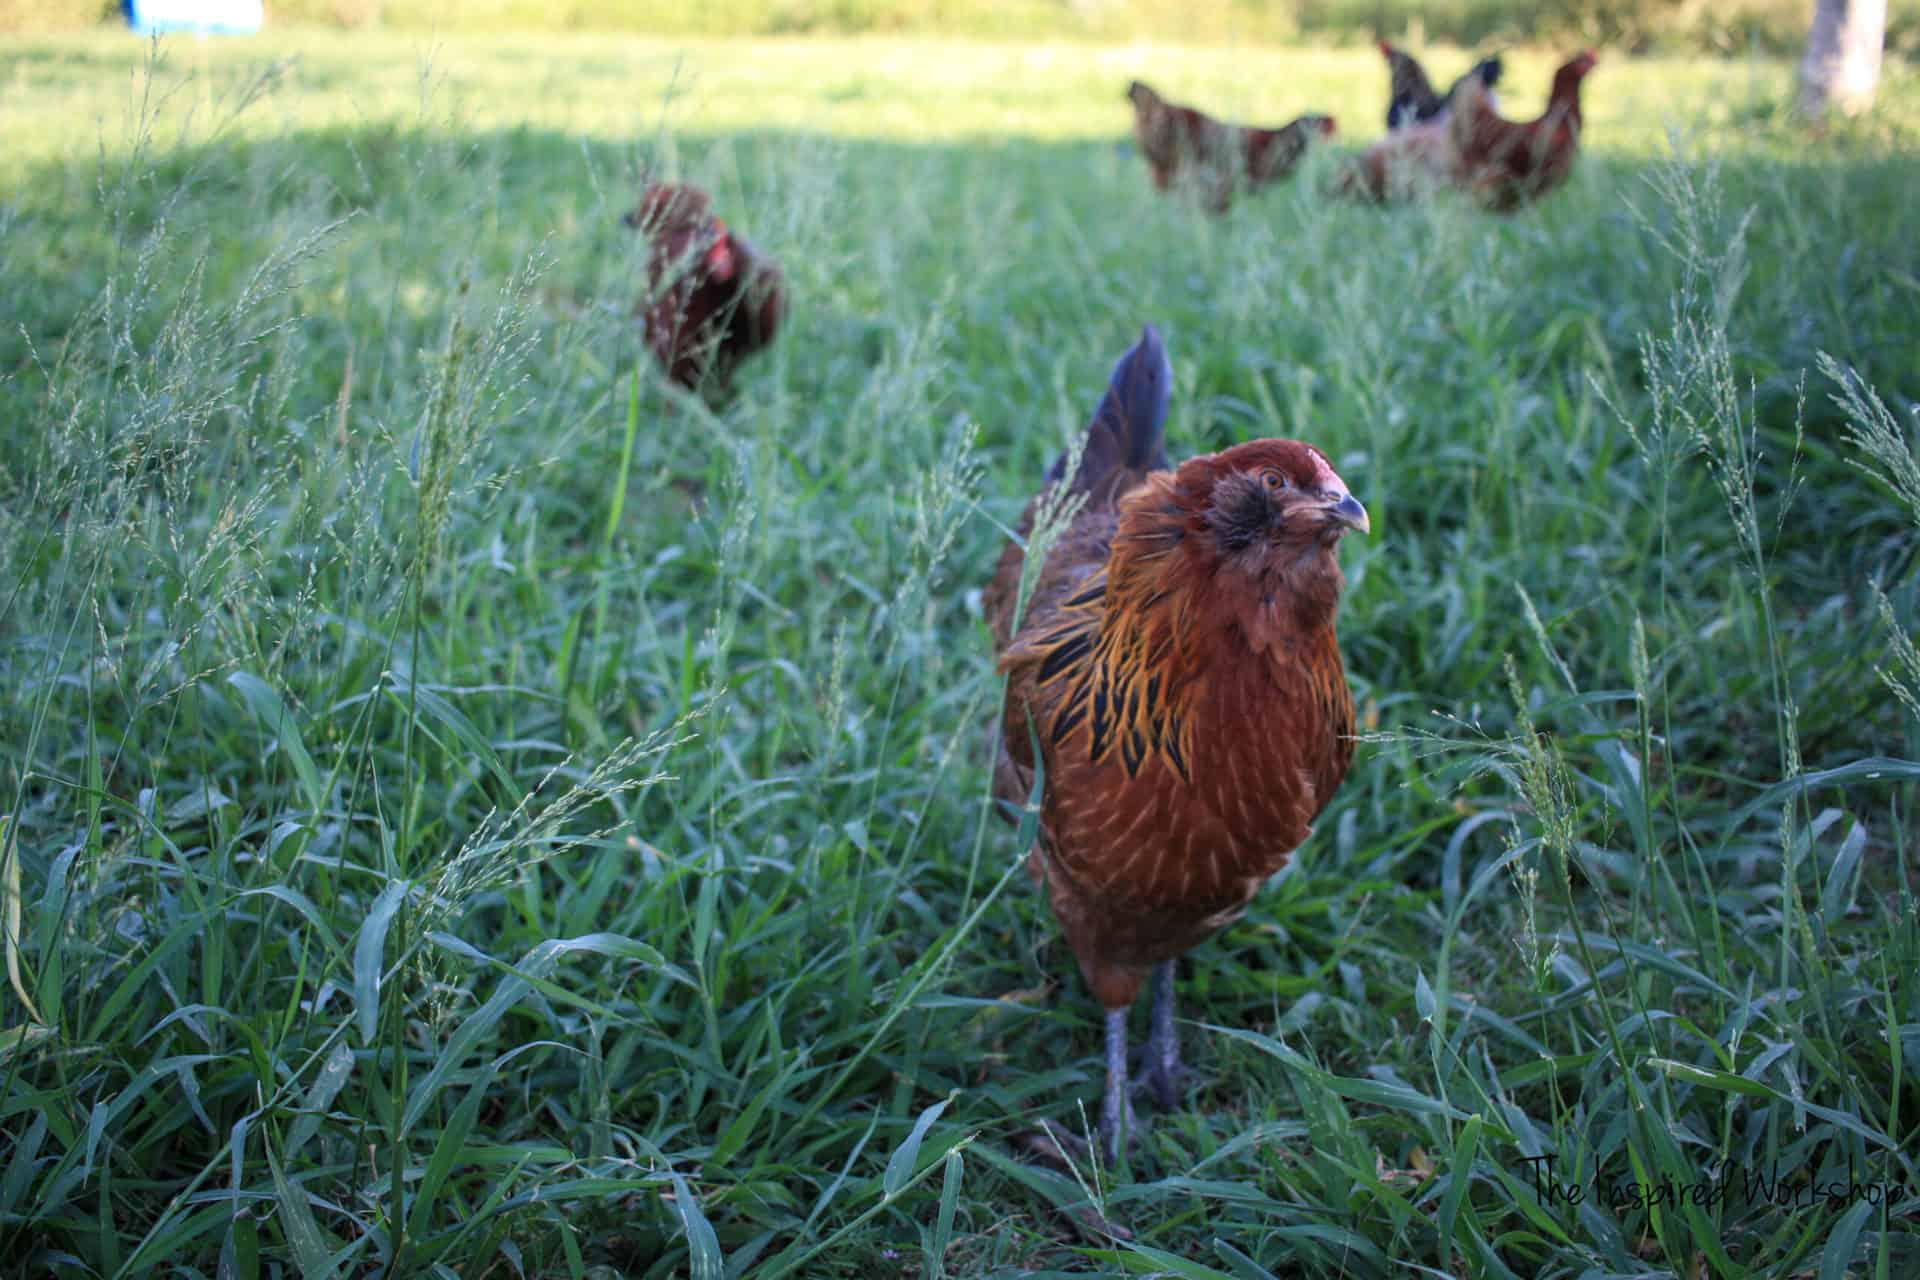
Anyway, I could sit here and share 8000 pics of my ladies but I will stick to the plans…chicken coop plans that is! Lol!
I am not going to lie, it was a trial and error, and oops, and dang it, all the time on this build! It was some of the dumbest things that I forgot to take into consideration! For instance, I was making the chicken coop plans for 8’x8′ to utilize the supplies, well in my haste to get started and get this baby built…because the chickens were living in MY HOUSE 😲😅 I built all four walls at 8 foot long! *Forehead in palm!!!! Why?! Oy!
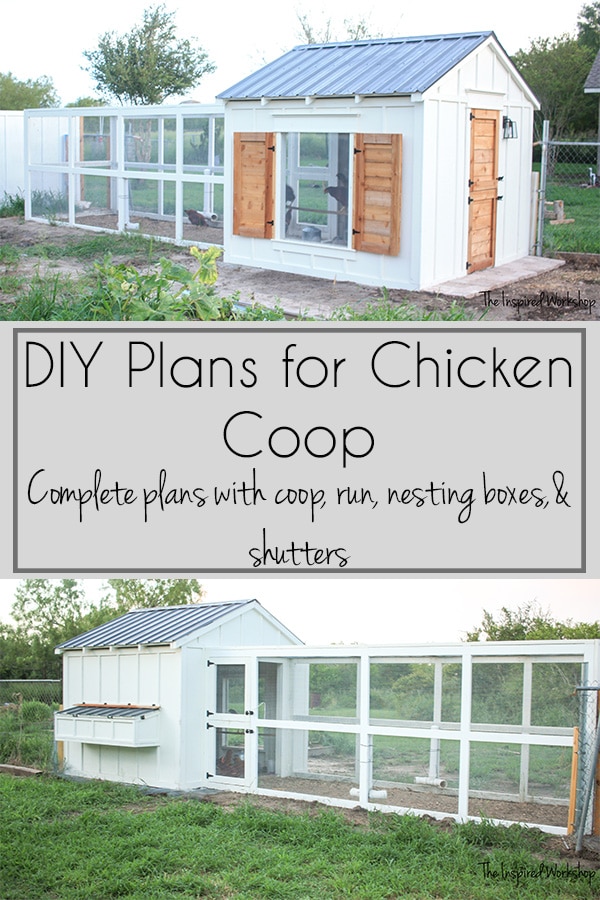
But despite the setbacks and mistakes, I got it built and with minimal extra materials! So the chicken coop plans will be exactly like as I built mine and if I get around to it, I’ll try to draw them up at the 8’x8′ if I have time later on! The dimensions are 8′ x 8′ 7″ for the main coop and the run is an additional 6’x16′ for a grand total of 8′ 7″ x 24′.
All in all, for materials I believe I spent around $1200-1300. Now it can be more or less depending on the cost of materials in your area. And I don’t even want to add in the gas, food, and Starbucks every other day when I made a material run because I forgot something! Lol!
There are ways to minimalize cost though, for instance, the roof rafters were cut at roughly 63″, I can easily get 8-foot boards into my van, but not 12 footers, if you can get 12-foot boards you will save 10 bucks just on the rafters. It seems small but then you look at all the trim boards as well, the vertical frame boards, and before you know it, boom it is a hundred dollar savings or more and I will take that ANY DAY OF THE WEEK!!🎉
The materials list consists of 12-foot replacements where available but shows the number of 8-foot boards if you are like me and cannot easily carry 12-foot boards, or they don’t deliver to your area!
Alright, are you ready to become a crazy chicken lady and build your very own chicken coop and love your chickens like family?😂 Here are the chicken coop plans!
Printable Plans for Chicken Coop
I separated the plans up a bit because it is a lot for one file. The plans and tutorials for the other parts of the coop are below, but if you sign up for the email once you will receive all the files so you don’t have to enter your email 5 times! Lol!
Chicken Coop Run
Shutters
Nesting Box
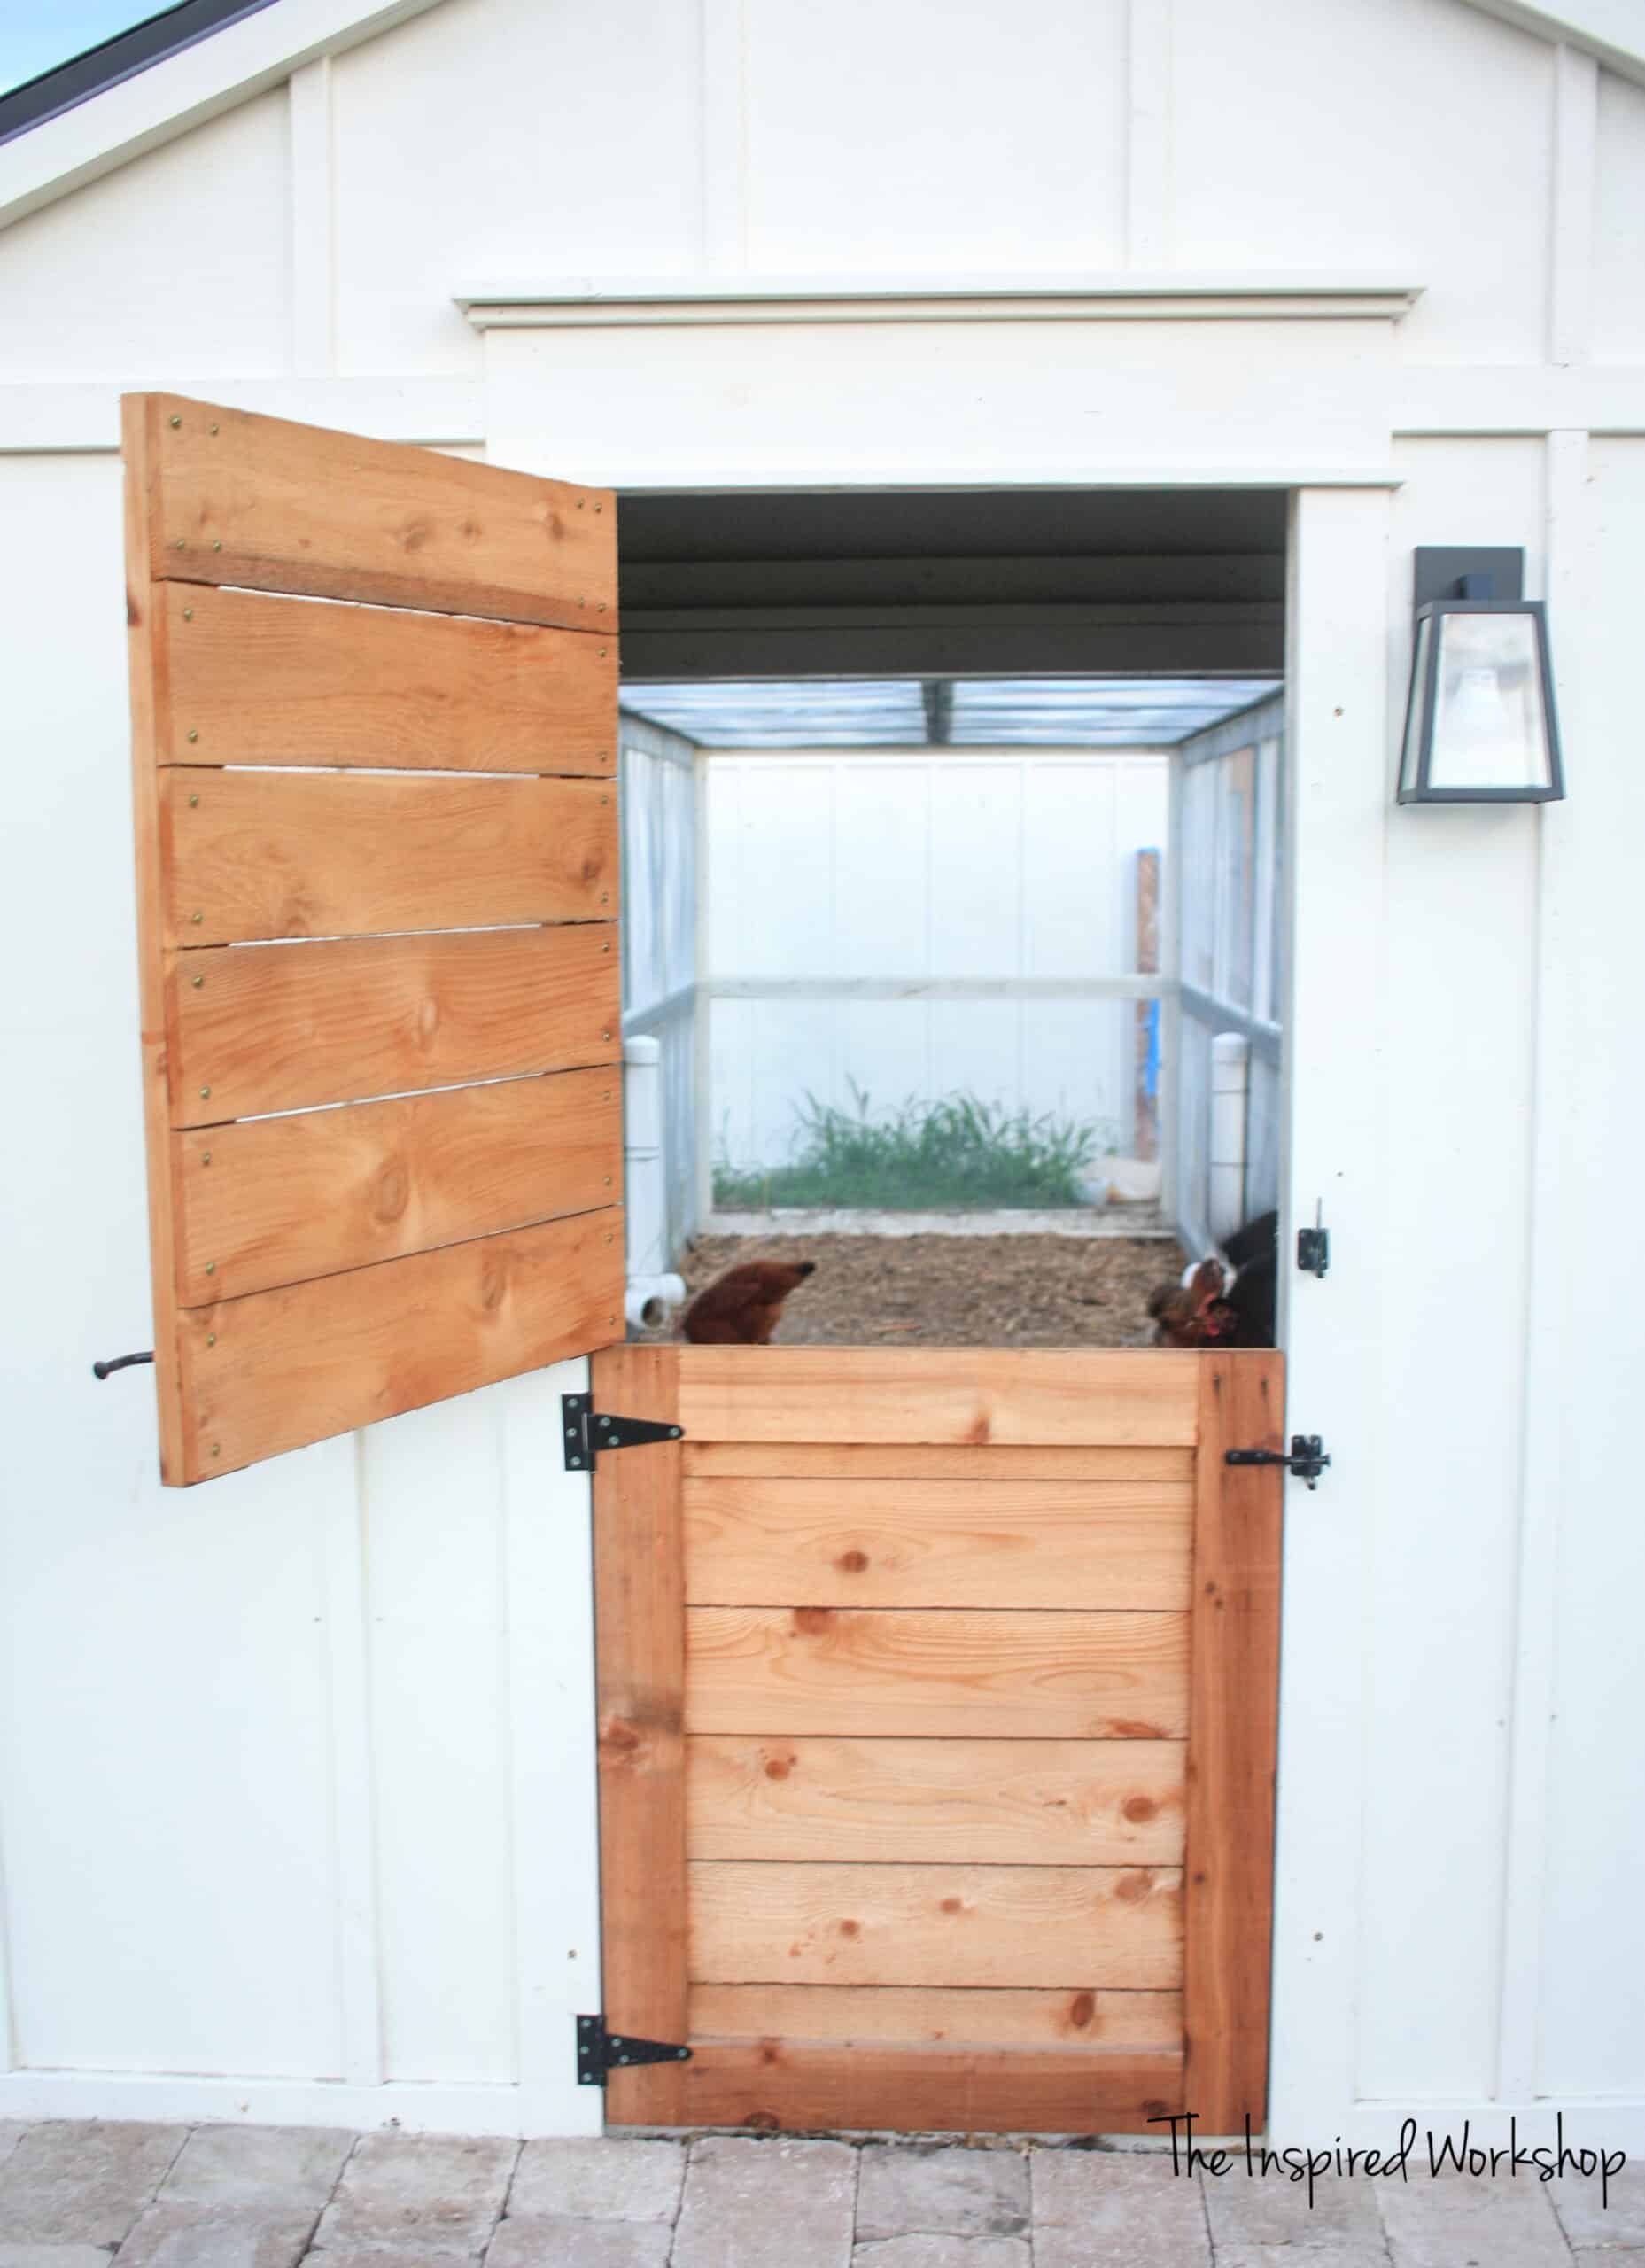
Chicken Coop Dutch Door
Love this large chicken coop? Know someone else who would love the free chicken coop plans too? I would LOVE for you to share or PIN the chicken coop plans for later!
[social_warfare]
Gathering Supplies from Chicken Coop Plans
Materials for DIY Chicken Coop Plans
This material list only has the materials for the main coop, the run materials will be at the link above along with the plans for that, shutters the same, etc.
*Note: Amazon links below are affiliate links! Affiliate links work in that when you make a purchase after clicking on a link below, I make a small percentage of commission off of your purchase at no extra cost to you! It is a real win-win for us so I can keep this content coming for free! Thanks in advance! Also note, ONLY Amazon links are affiliate links, all other links are just provided to help you find products!
- 23 – 2x4x8
- 17 – 2x4x12 (or add 30 – 2x4x8s to the above number if you can’t get 12-foot boards in your car like me!😉)
- 2 – 2x4x10
- 9 – 4×8 sheets of 1/2″ plywood
- 3 – 3′ x 12′ sheets of steel roofing panels
- 1 – 10′ steel roofing ridge
- 1 – 1x6x8
- 15 – 1x2x8 (I used furring strips)
- 21 – 1x4x8 (I used furring strips)
- 1 – bag of 1 1/2″ steel roofing screws with a neoprene washer
- 1 – bag of 2 1/2″ steel roofing screws with gasket
- 1 – box of 3 1/8″ screws
- 1 – box of 2 1/2″ screws
- 1 – large container of 2 1/2″ Kreg screws
- brad nails in sizes from 3/4″ to 2″ lengths
- 12 – small Simpson Strong-tie roof brackets
- 6 – large Simpson Strong-tie roof brackets
- 1 – box of Simpson Strong-tie hex head screws for roof brackets
- 100 ft roll of 1/2″ or 1/4″ hardware cloth- 36″x100′
- 50 ft roll of 1/2″ or 1/4″ hardware cloth – 36″x50′
- 5 gallons of paint of your choice (I used Behr Exterior paint, color-matched to SW Alabaster)
- 5 cans Charcoal Gray spray paint for the roof
- Drill
- Miter Saw
- Circular Saw
- Kreg Jig
- Paint Sprayer
CUT LIST for the Chicken Coop:
Run Wall:
- 2 – 2×4 @ 96″ (top and bottom rails)
- 6 – 2×4 @ 69″ (studs)
- 2 – 2×4 @ 55″ (header)
- 4 – 2×4 @ 6 1/2″ (supports to attach run to)
Nesting Box Wall:
- 2 – 2×4 @ 96″ (top and bottom rails)
- 4 – 2×4 @ 69″ (studs)
- 2 – 2×4 @ 65″ (horizontal nesting box opening)
- 2 – 2×4 @ 32″ (top studs)
- 2 – 2×4 @ 20″ (bottom studs)
- 2 – 2×4 @ 14″ (sides of box opening)
Door Wall:
- 2 – 2×4 @ 96″ (top and bottom rails)
- 4 – 2×4 @ 69″ (studs)
- 1 – 2×4 @ 28″ (header)
- 8 – 2×4 @ 13 1/4″ (supports to attach plywood)
Window Wall:
- 2 – 2×4 @ 96″ (top and bottom rails)
- 6 – 2×4 @ 69″ (studs)
- 2 – 2×4 @ 45″ (vertical window boards)
- 2 – 2×4 @ 38 1/2″ (horizontal window boards)
- 1 – 2×4 @ 10 1/2″ ( bottom stud)
Rafters:
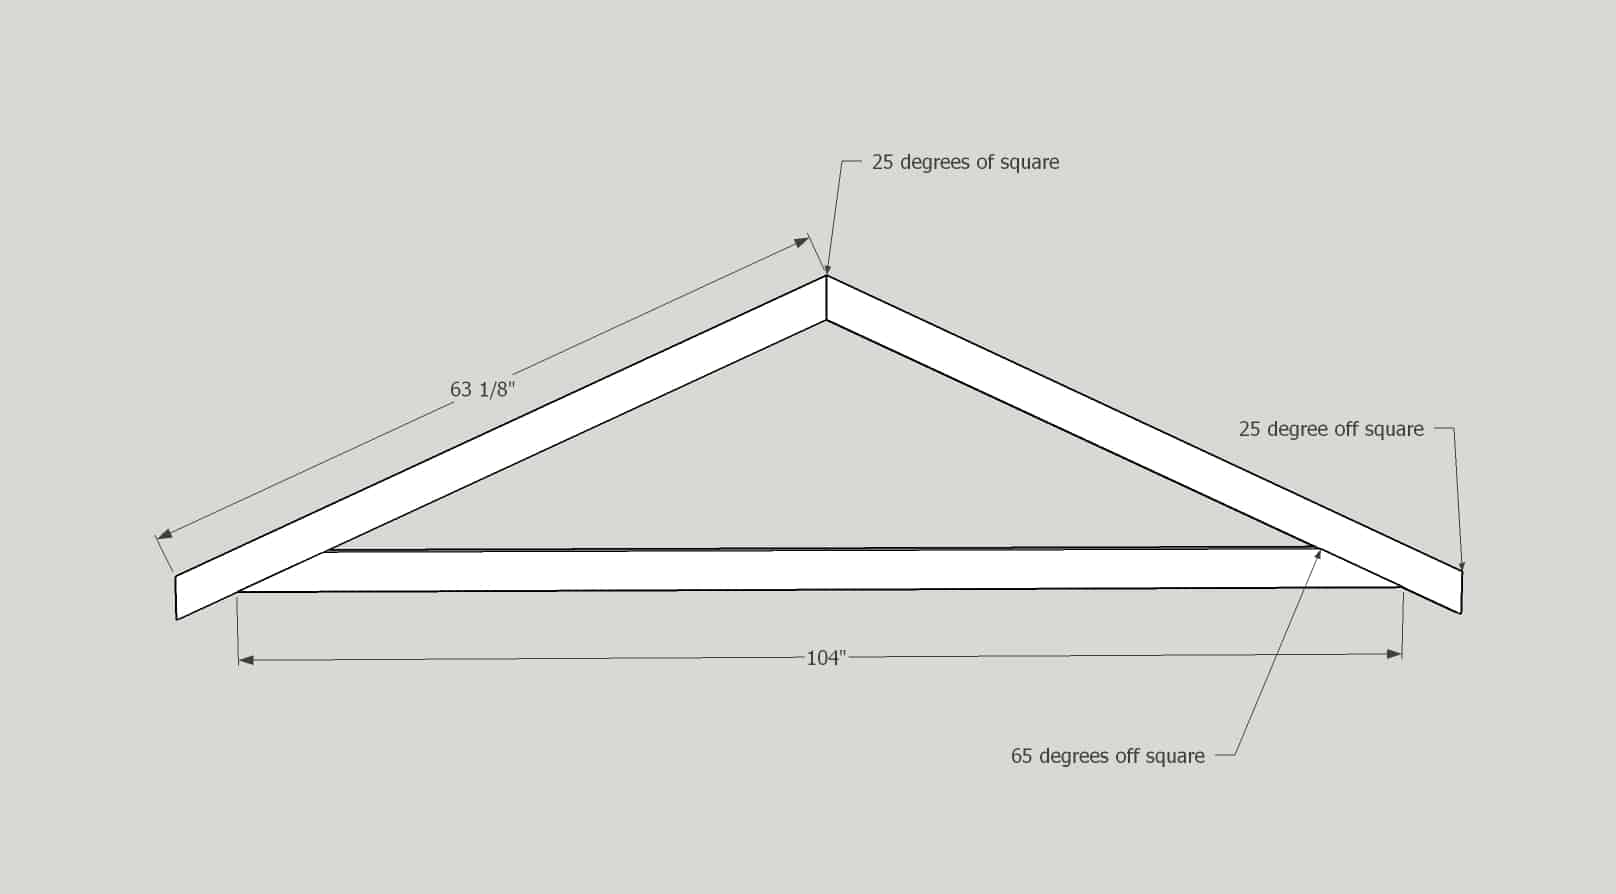
- 10 – 2×4 @ 63 1/8″ – mitered @ 25 degrees off square both ends, parallel
- 2 – 2×4 @ 104″ – mitered @ 65 degrees off square both ends, not parallel
- 24 – 2×4 @ 22 1/2″
Plywood for walls:
- 5 -1/2″ sheets of plywood cut down to 71 1/2″ cutouts will be shown below, 4 sheets will stay 8′.
TRIM BOARDS: (You will want to measure your actual spaces to cut trim boards, they may differ from mine slightly!)
Run Wall:
- 2 – 1×4 @ 16 43/64″ (bottom horizontal trim)
- 2 – 1×3 @ 3 1/2″ (bottom horizontal trim)
- 2 – 1×4 @ 67 5/16″ (opening trim)
- 1 – 1×4 @ 62 3/64″ (opening trim)
- 1 – 1×3 (ripped down from a 1×4) @ (top horizontal trim)
- 2 – 2×4 @ 63 1/8″ both ends mitered at 25 degrees off square, ends parallel (roof peak trim)
- 2 – 1×4 @ 63 1/8″ both ends mitered at 25 degrees off square, ends parallel (roof peak trim)
- 2 – 1×2 @ 68 1/2″ (battens)
Nesting Box Wall:
- 2 – 1×4 @ 97″(top and bottom horizontal trim)
- 2 – 1×4 @ 65 13/32″(vertical side trim)
- 1 – 1×4 @ 68″(vertical board above nesting box)
- 5 – 1×2 @ 25 35/64″ (battens on top of nesting box)
- 5 – 1×2 @ 17 7/8″ (battens below nesting box)
Door Wall:
- 2 – 1×4 @ 35 11/64″ (bottom horizontal trim)
- 2 – 1×3 (ripped a 1×4 furring strip down) @ 31 23/32″ (top straight horizontal trim)
- 2 – 1×4 @ 69 11/16″ one end mitered at 25 degrees off square, longest end (side vertical trim)
- 2 – 2×4 @ 63 1/8″ both ends mitered at 25 degrees off square, ends parallel (roof peak trim)
- 2 – 1×4 @ 63 1/8″ both ends mitered at 25 degrees off square, ends parallel (roof peak trim)
- 2 – 1×4 @ 69″ (door frame)
- 2 – 1×2 @ 36″ (door frame)
- 1 – 1×6 @ 35″ (door frame)
- 1 – 1×3 @ 37″ (door frame)
- 4 – 1×2 @ 67 5/16″ (bottom battens)
- 2 – 1×2 @ 4 45/64″ one end mitered at 25 degrees off square, longest side (top battens)
- 2 – 1×2 @ 11 63/64″ one end mitered at 25 degrees off square, longest side (top battens)
- 2 – 1×2 @ 16 9/32″ one end mitered at 25 degrees off square, longest side (top battens)
Window Wall:
- 2 – 1×4 @ 97″ (top and bottom horizontal trim)FYI – I did not purchase expensive 1x4x10s for these boards, I cut roughly 5 inches off of my 8ft 1×4 furring strip and cut a 6″ piece off of scrap board.
- 2 – 1×4 @ 65 13/32″ (side vertical trim)
- 2 – 1×4 @ 45″ (window trim)
- 1 – 1×4 @ 42 3/4″ (window trim)
- 3 – 1×2 @ 43 3/4″ (window trim)
- 1 – 1×6 @ 42 3/4″ (window trim)
- 1 – 1×3 @ 44 3/4″ (window trim)
- 3 – 1×2 @ 2 5/32″ (battens above window)
- 3 – 1×2 @ 5 5/8″ (battens below window)
- 2 – 1×2 @ 65 13/32″ (battens)
Building the DIY Chicken Coop
Just a little note for you all before we start building…I am NOT a professional construction worker, home builder, architect, or any other PROFESSIONAL of any sort! I am a mom who figures out ways to build what I want, consulting professionals at times, and making it up as I go along other times! 😁
It all works out in the end even though it may not be considered the RIGHT way to do it! Lol! I’ve realized since starting this blog that pretty much EVERYONE has an opinion and they all differ on the CORRECT way to do something! But I am simply sharing the way I did this project and it may not be the BEST way, but it worked! Take that for what you will! 😅
Alright, if you are brave enough to continue on this project with me, let’s get started!😏
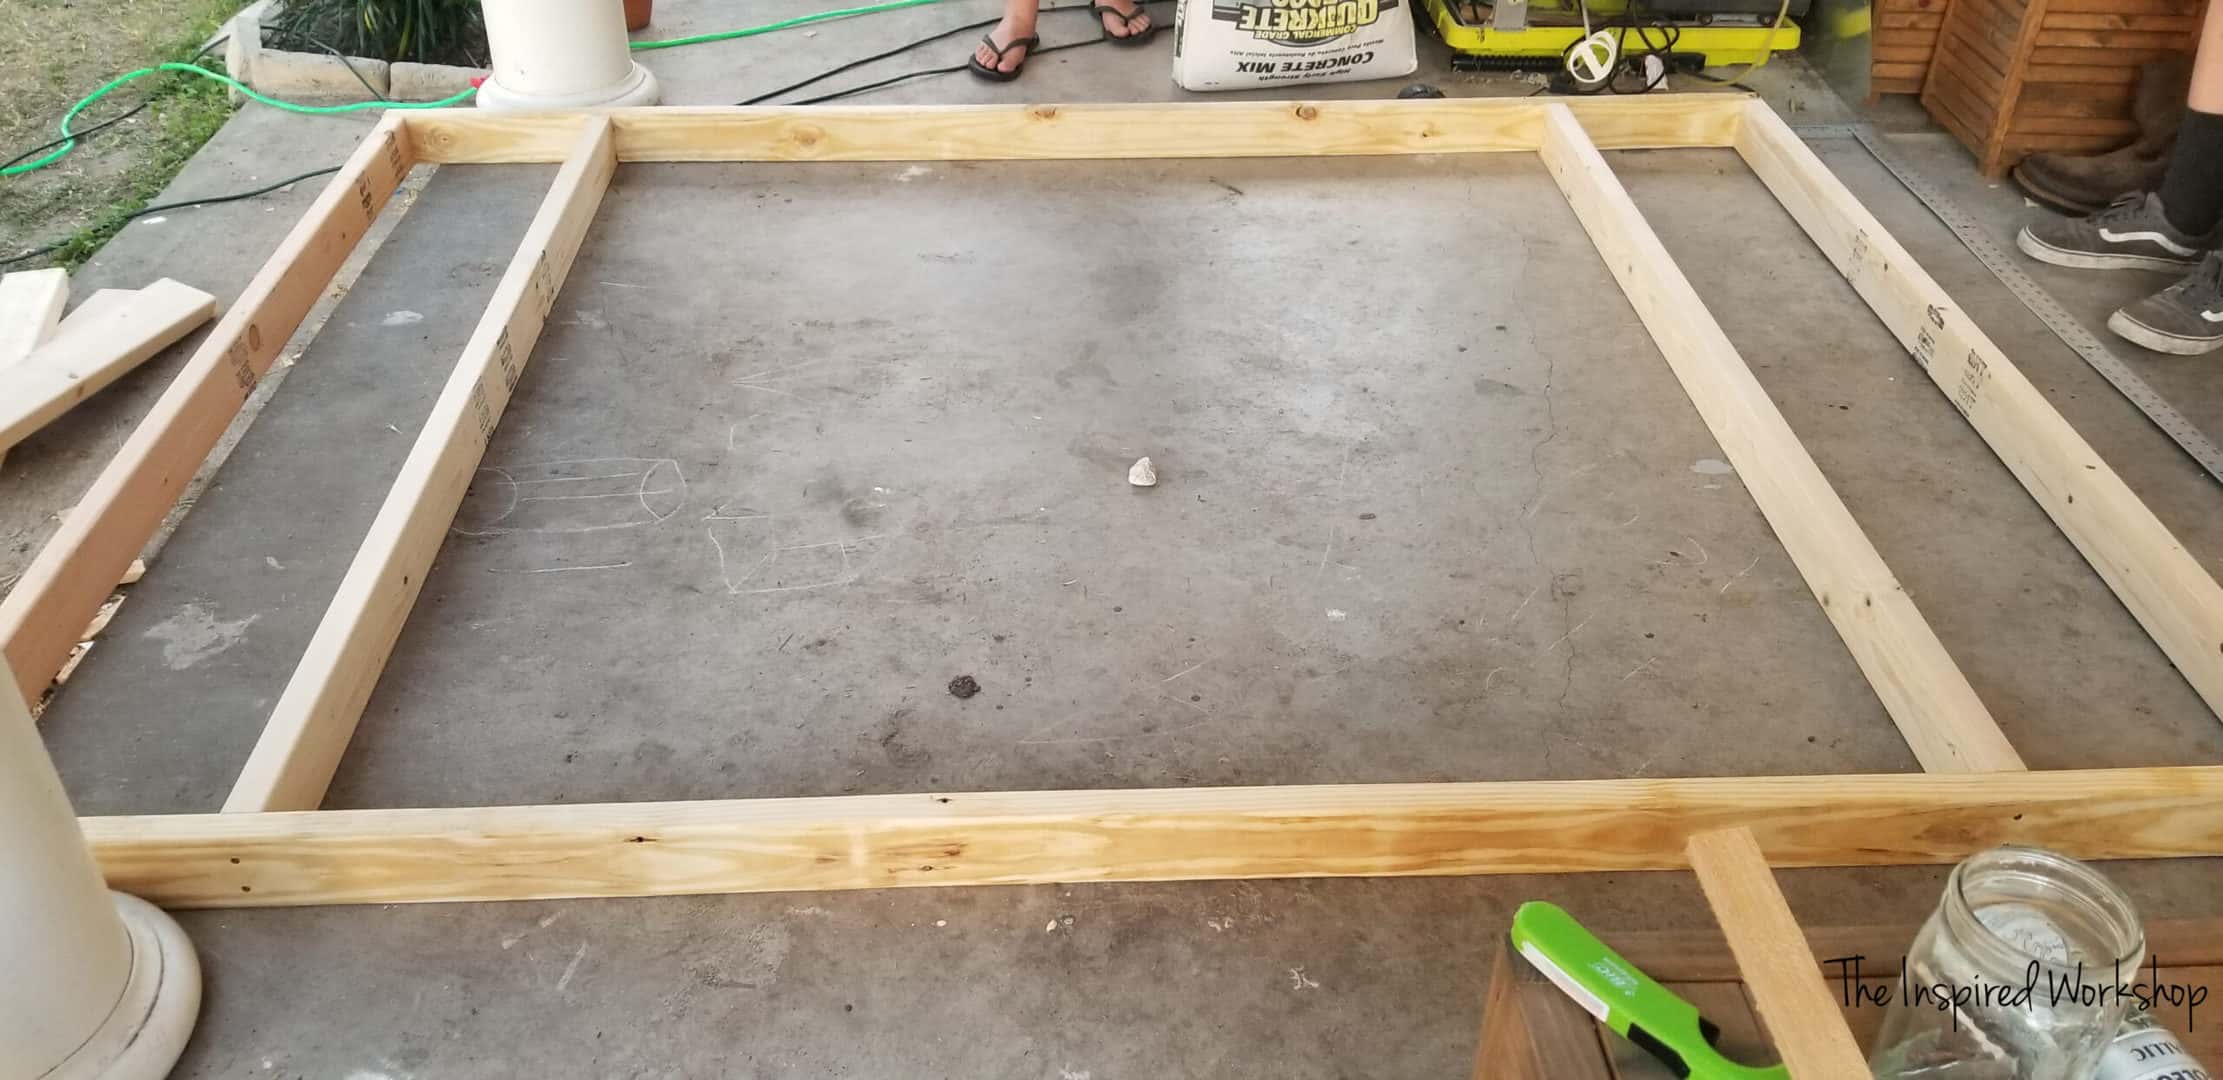
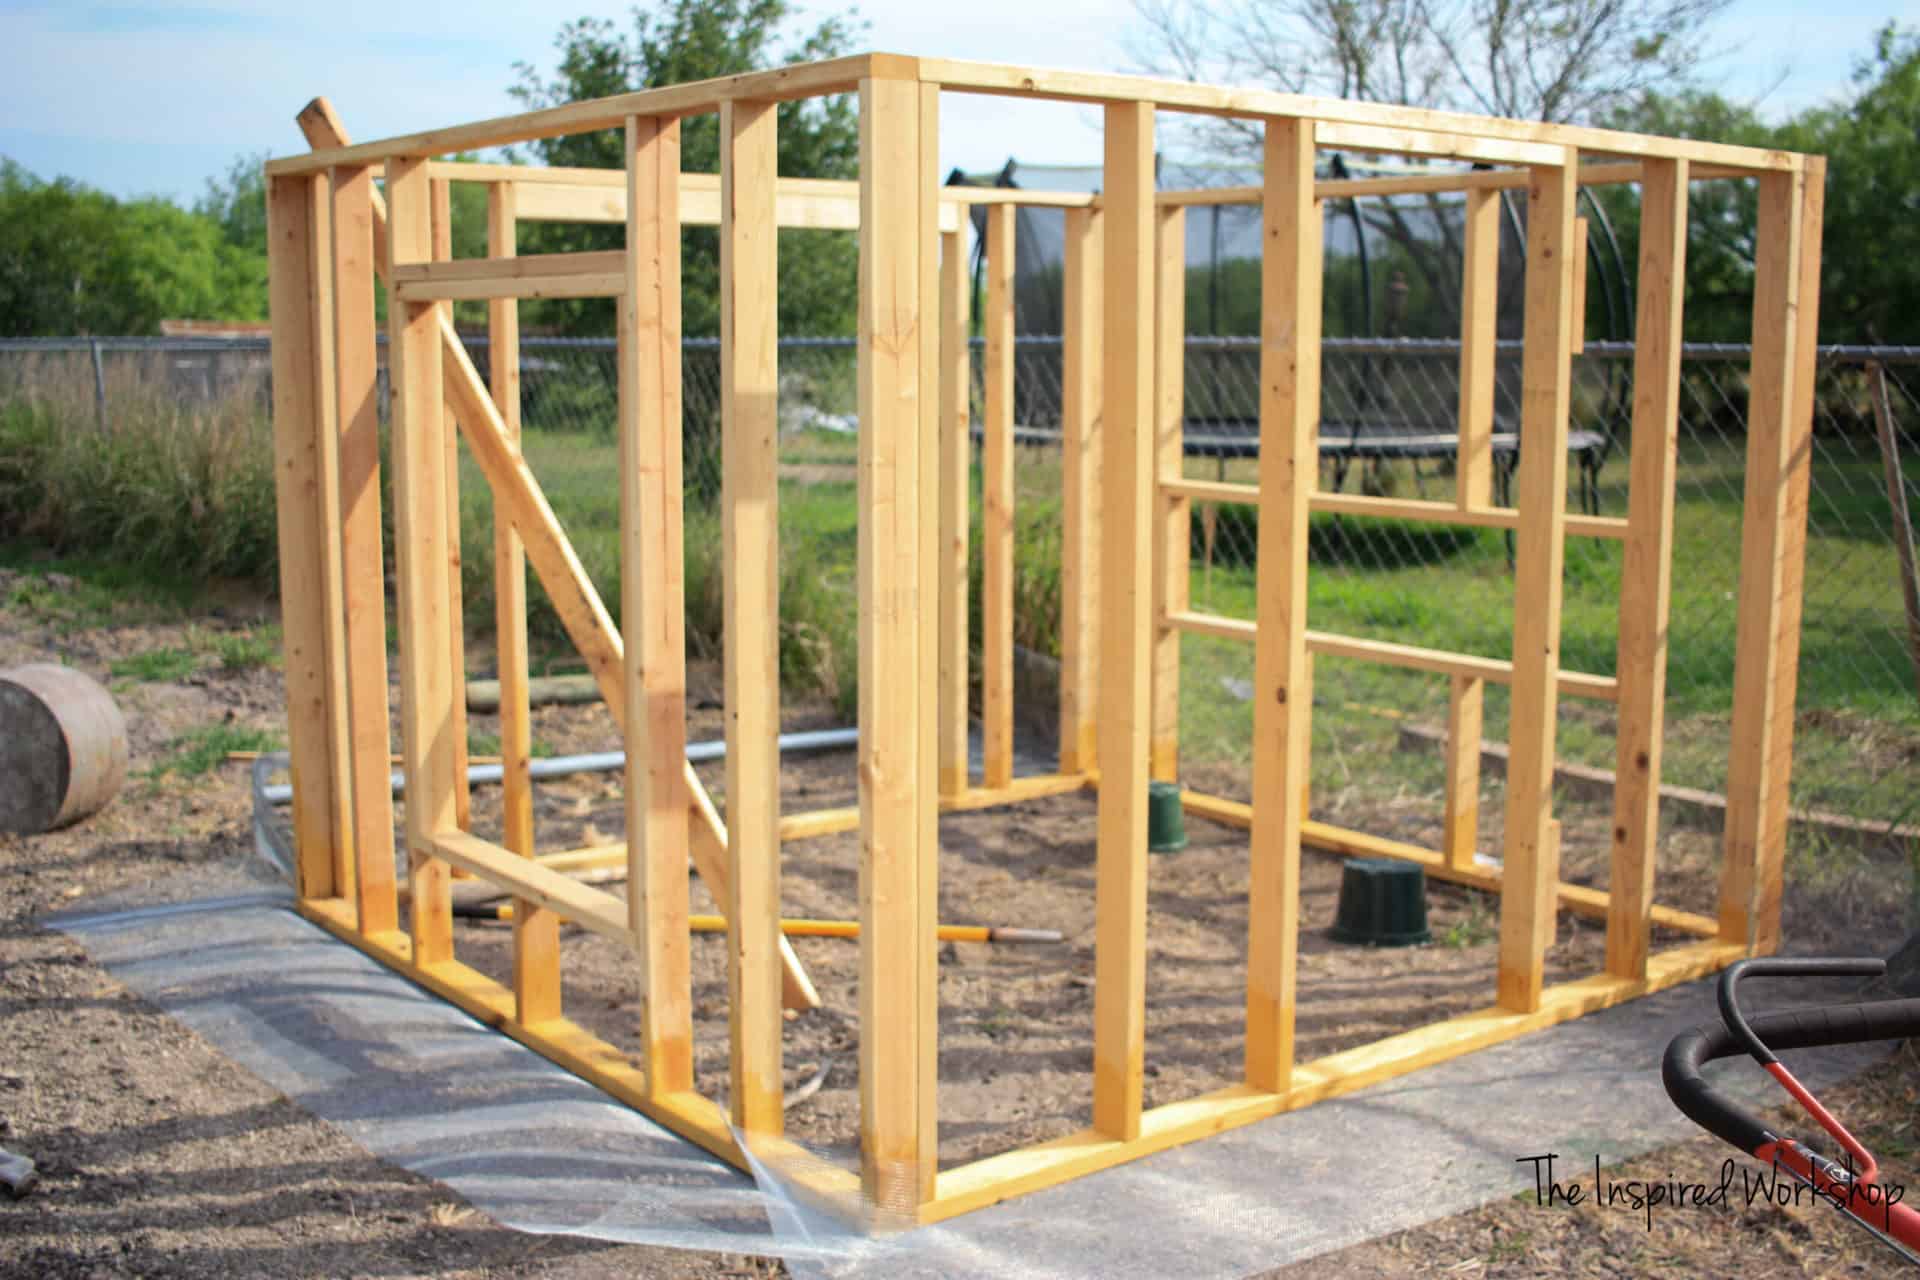
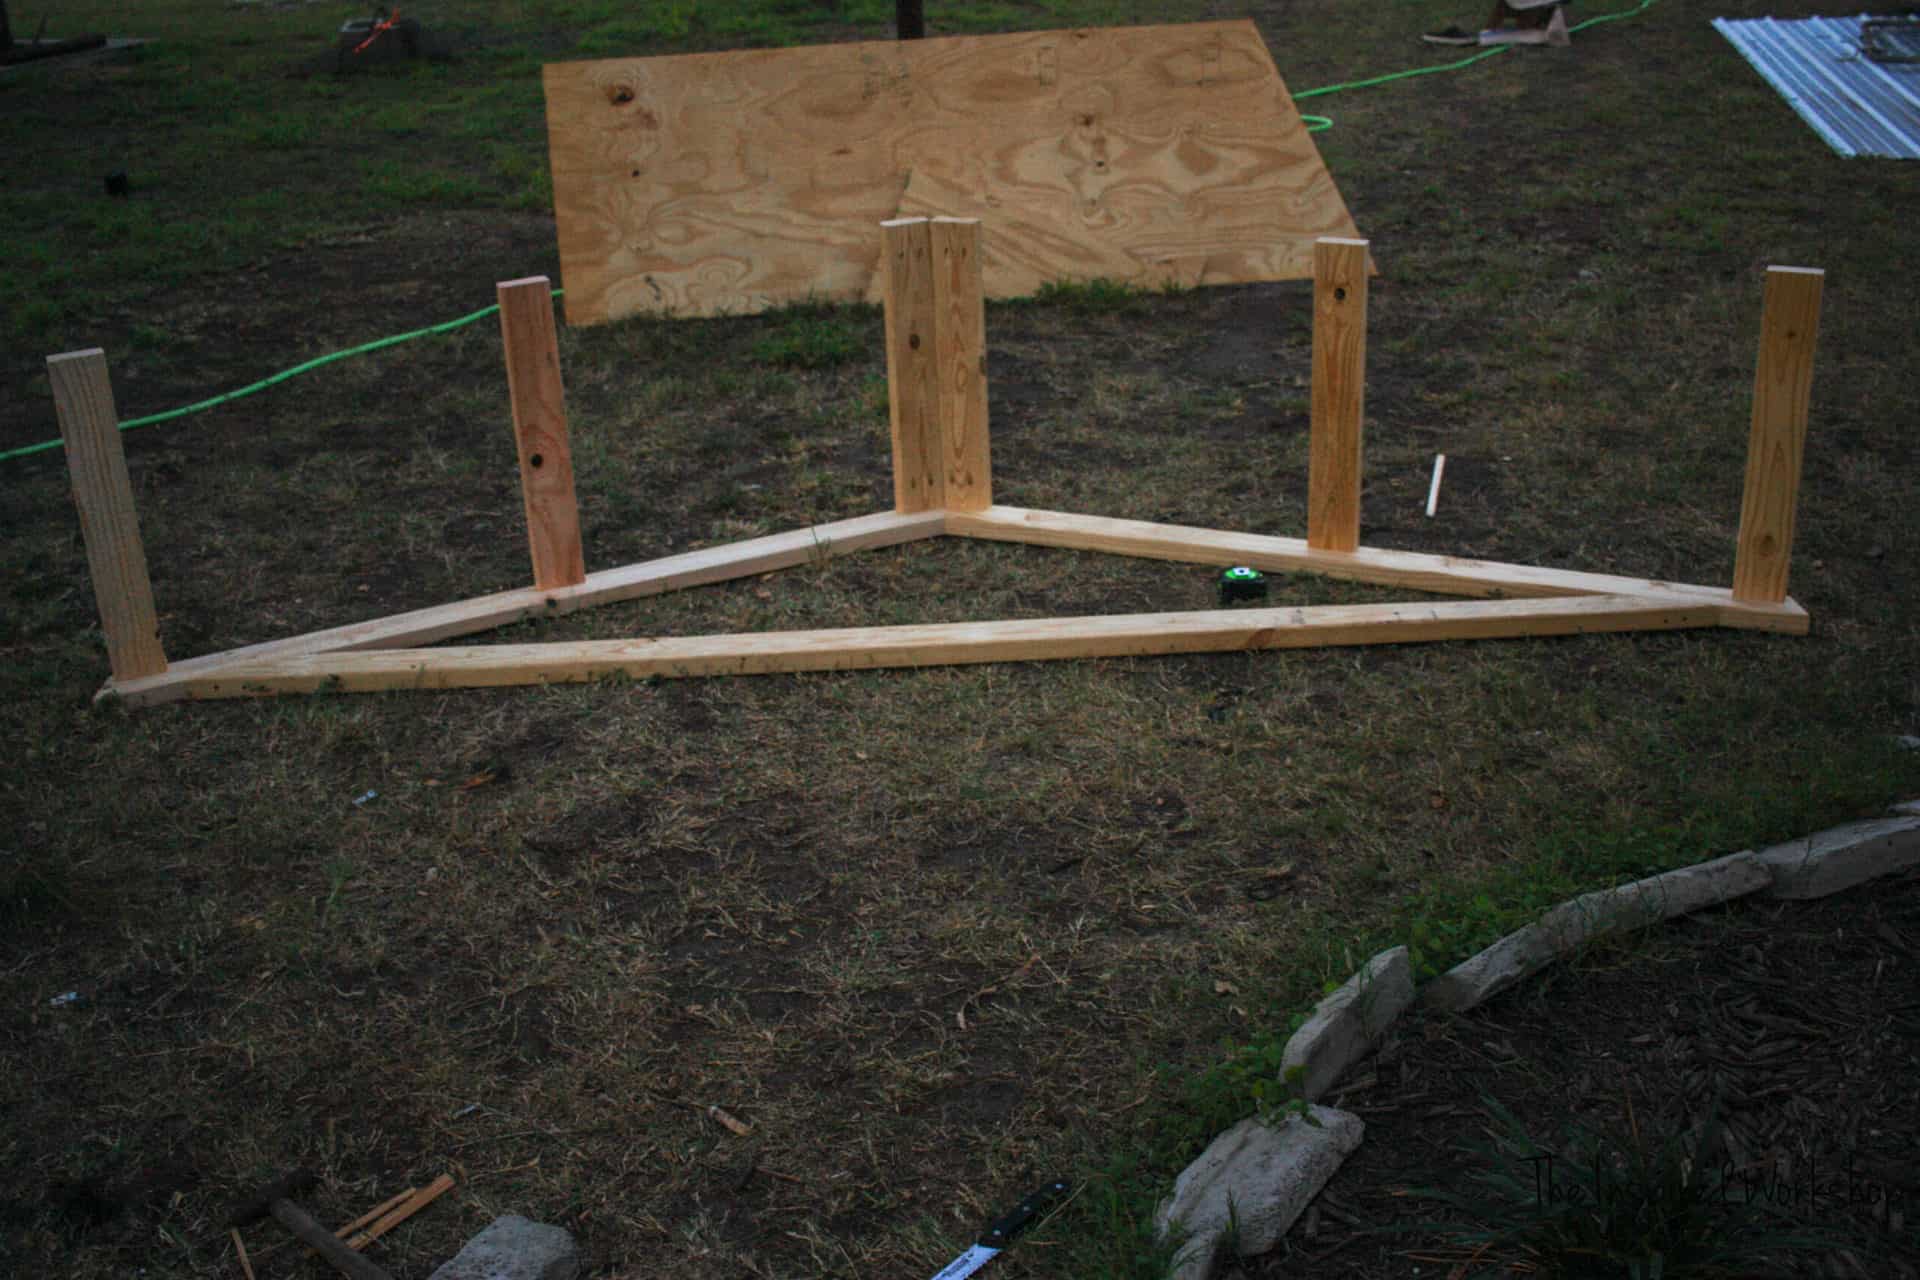
Framing Out the DIY Chicken Coop
As with any structure we have to frame out the walls very first! All the walls are basically the same idea, a top and bottom plate, then 5 vertical studs arranged to support whatever openings you want! Some walls have a few extra boards to brace the openings for windows, nesting boxes, etc.
Framing the walls will take the 3 1/8″ screws listed in the materials. All boards will be screwed directly through the 2×4 plates and into the studs unless otherwise stated to drill pocket holes!
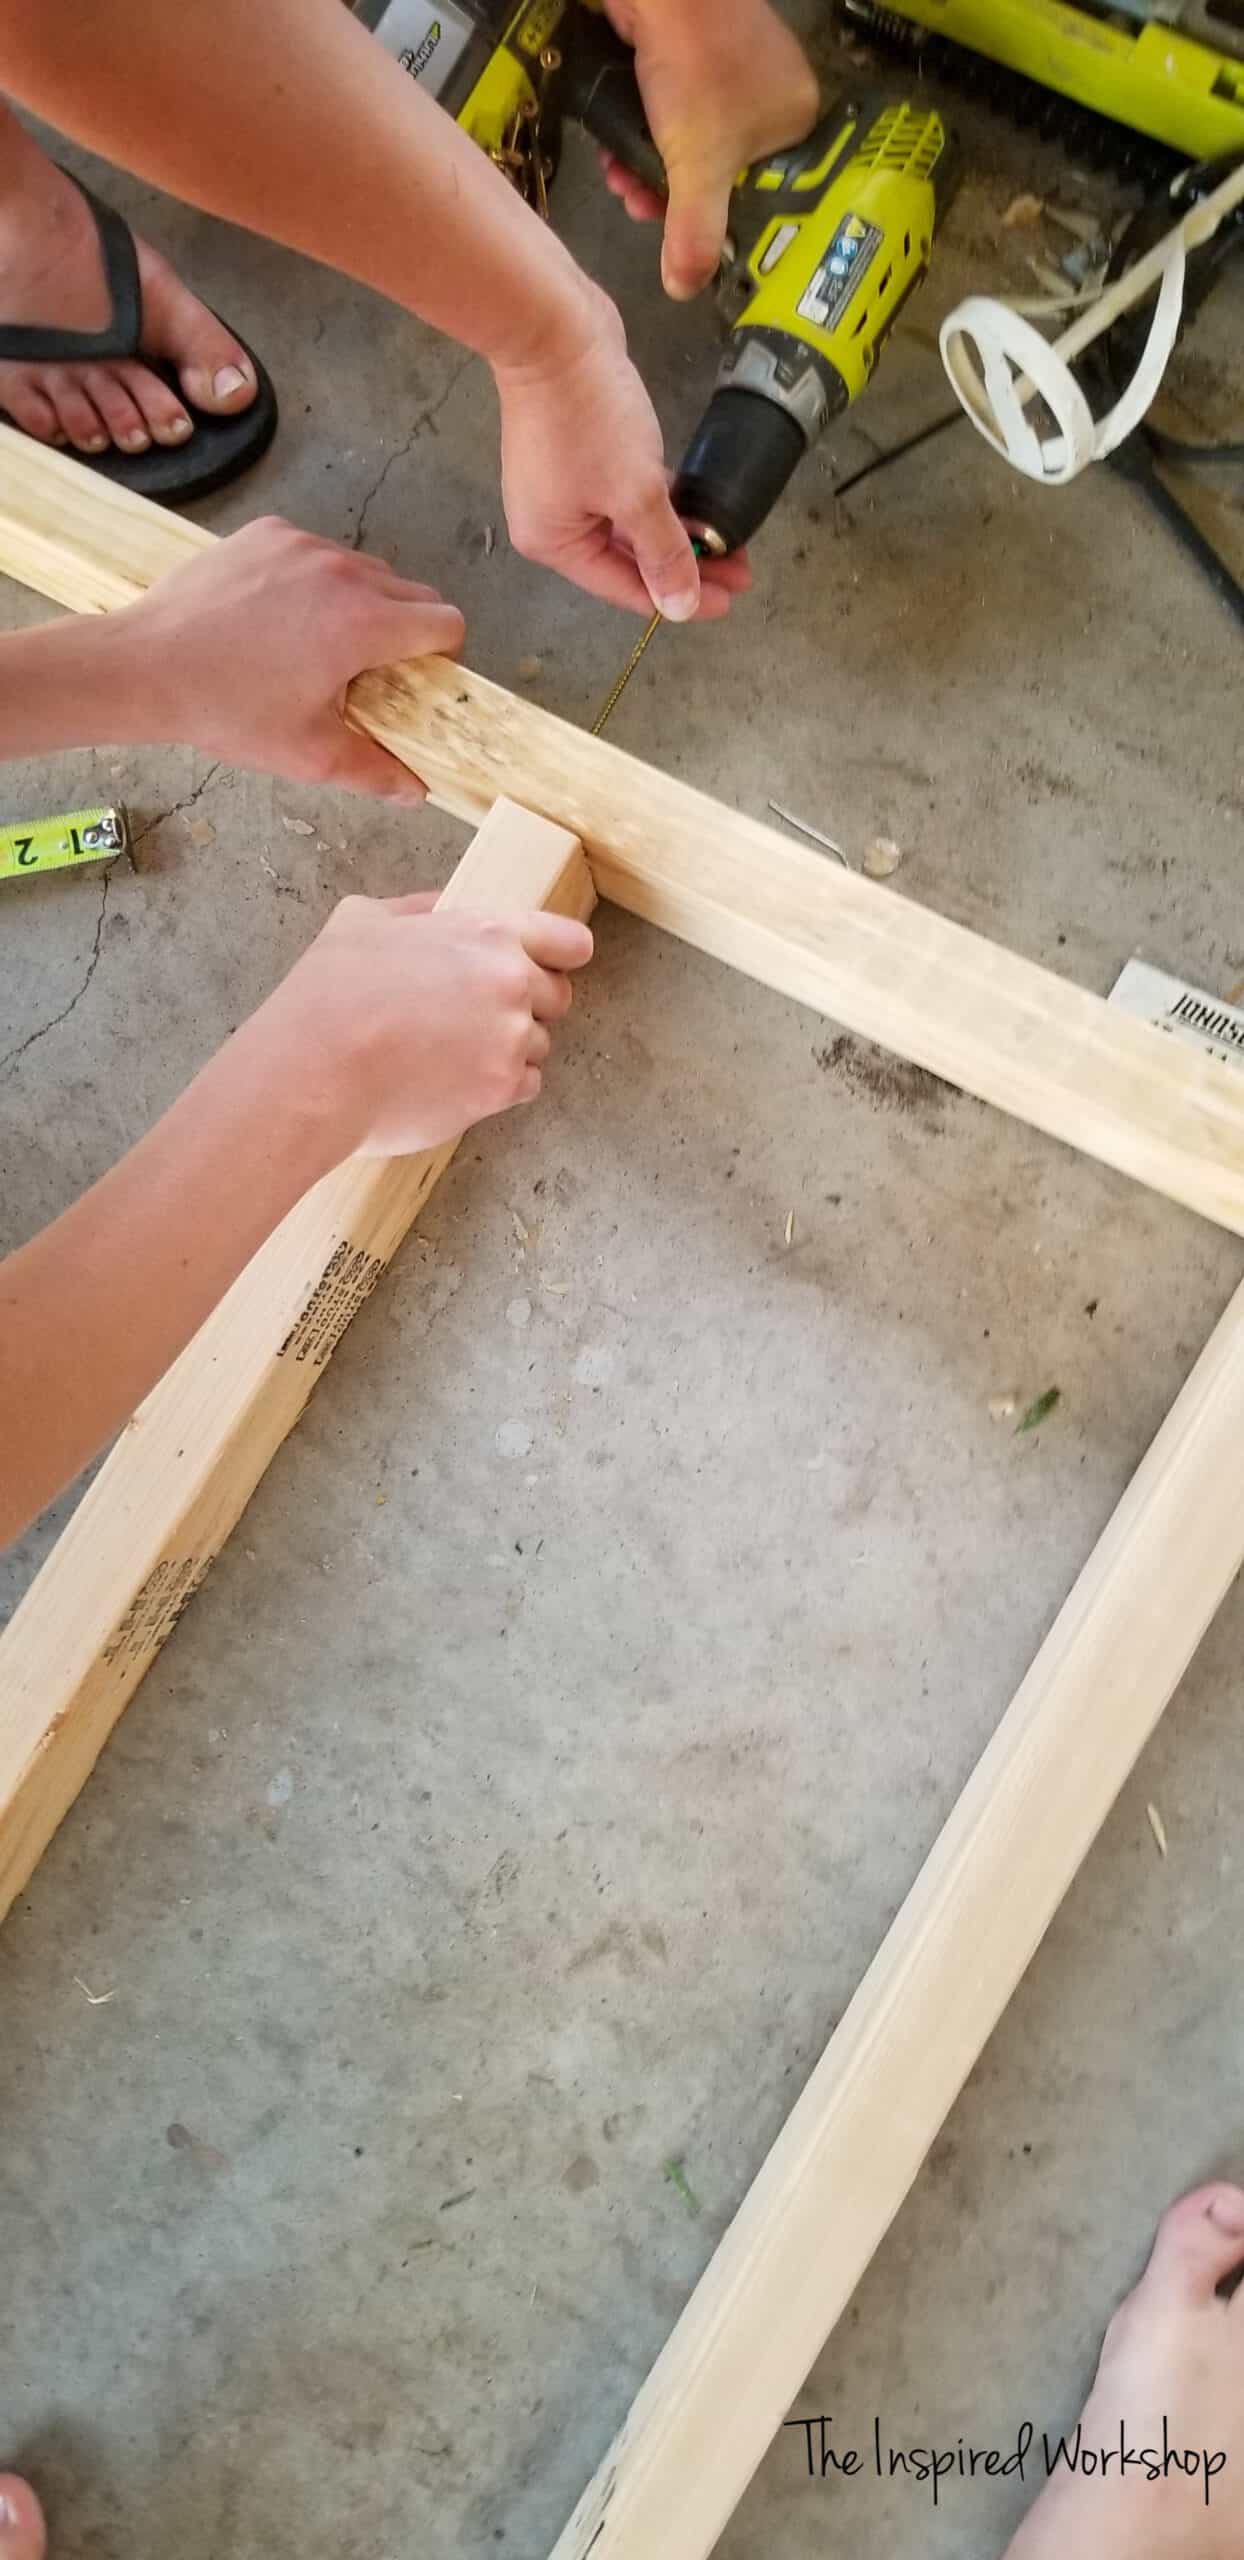
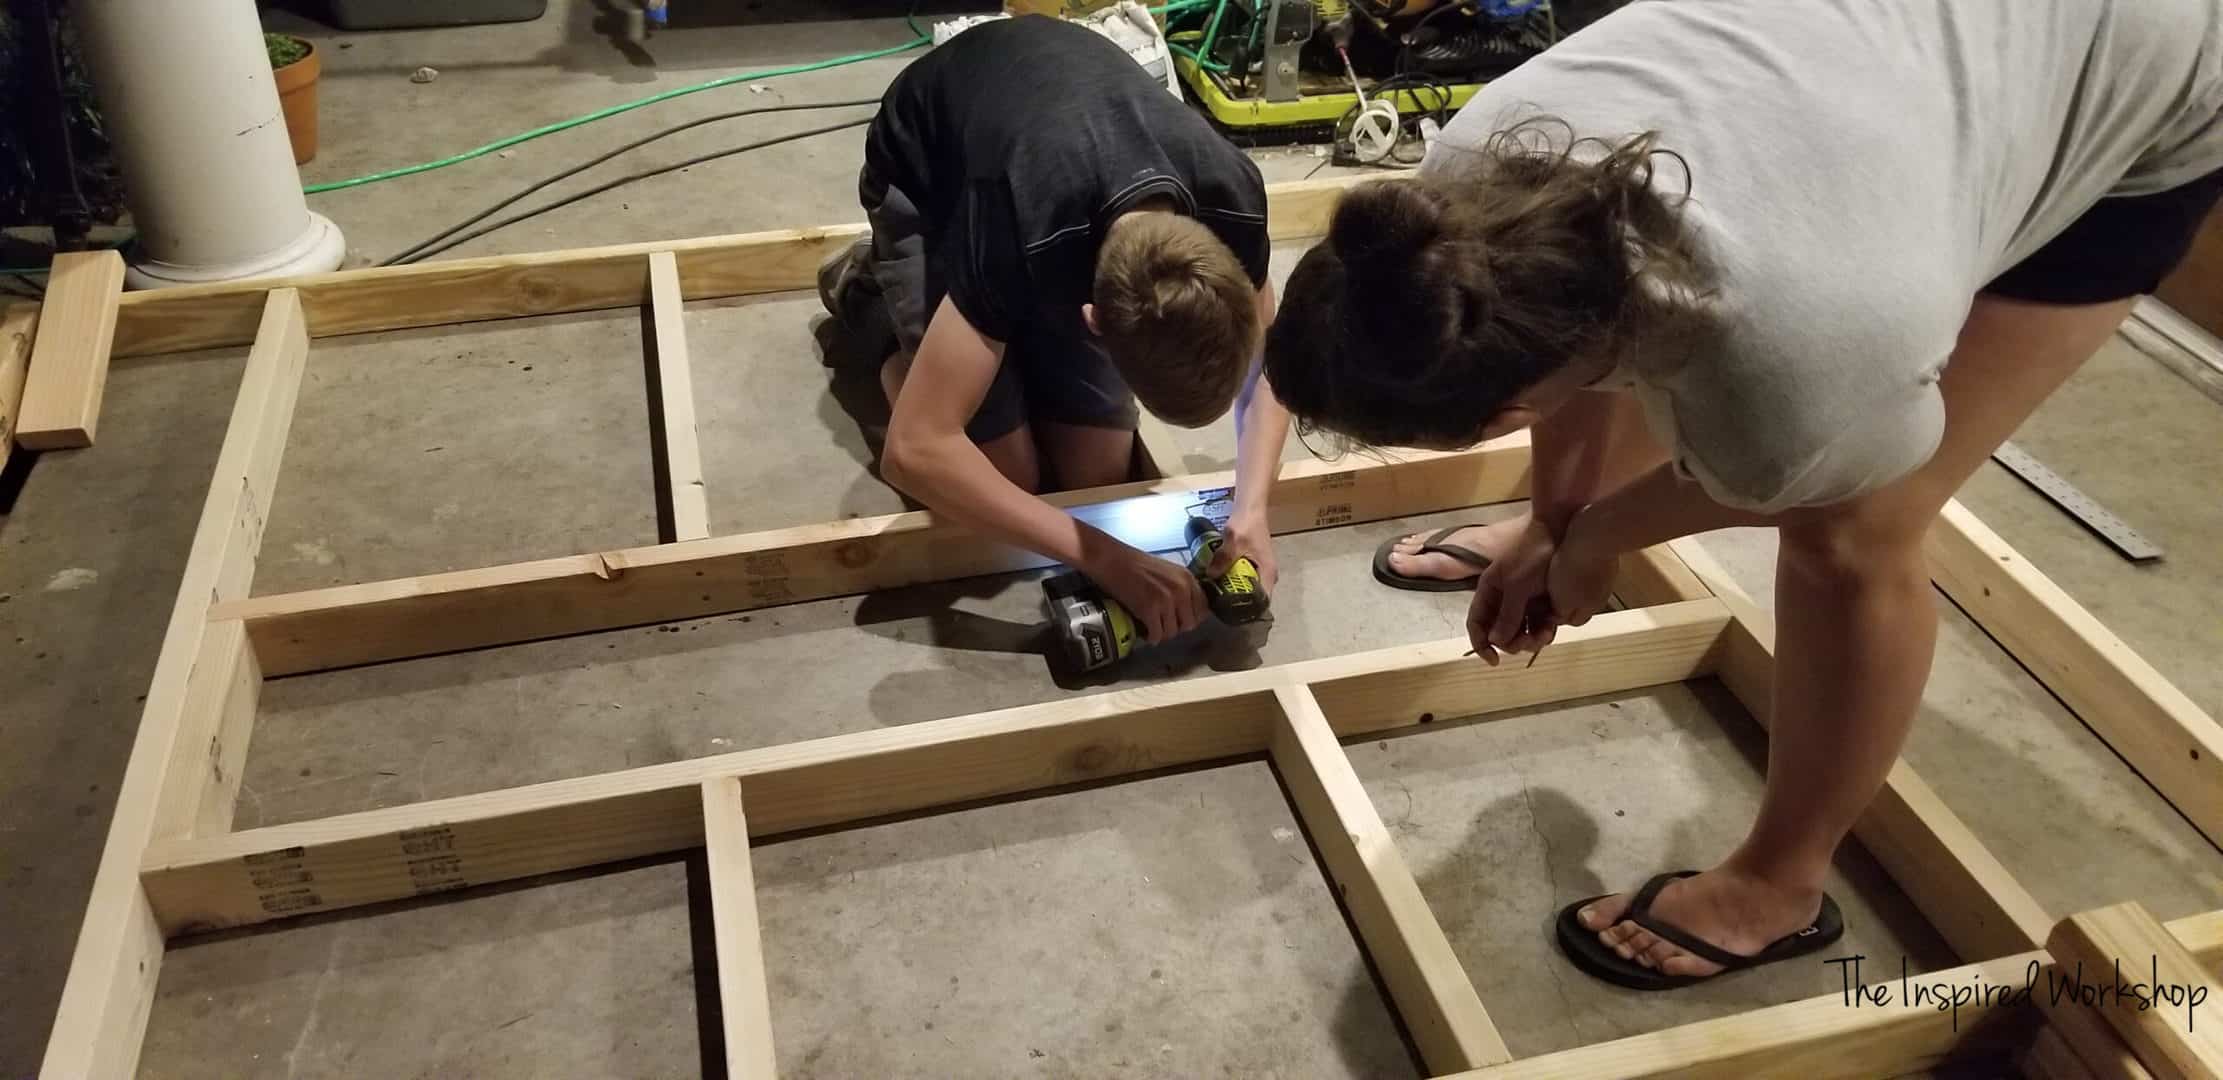
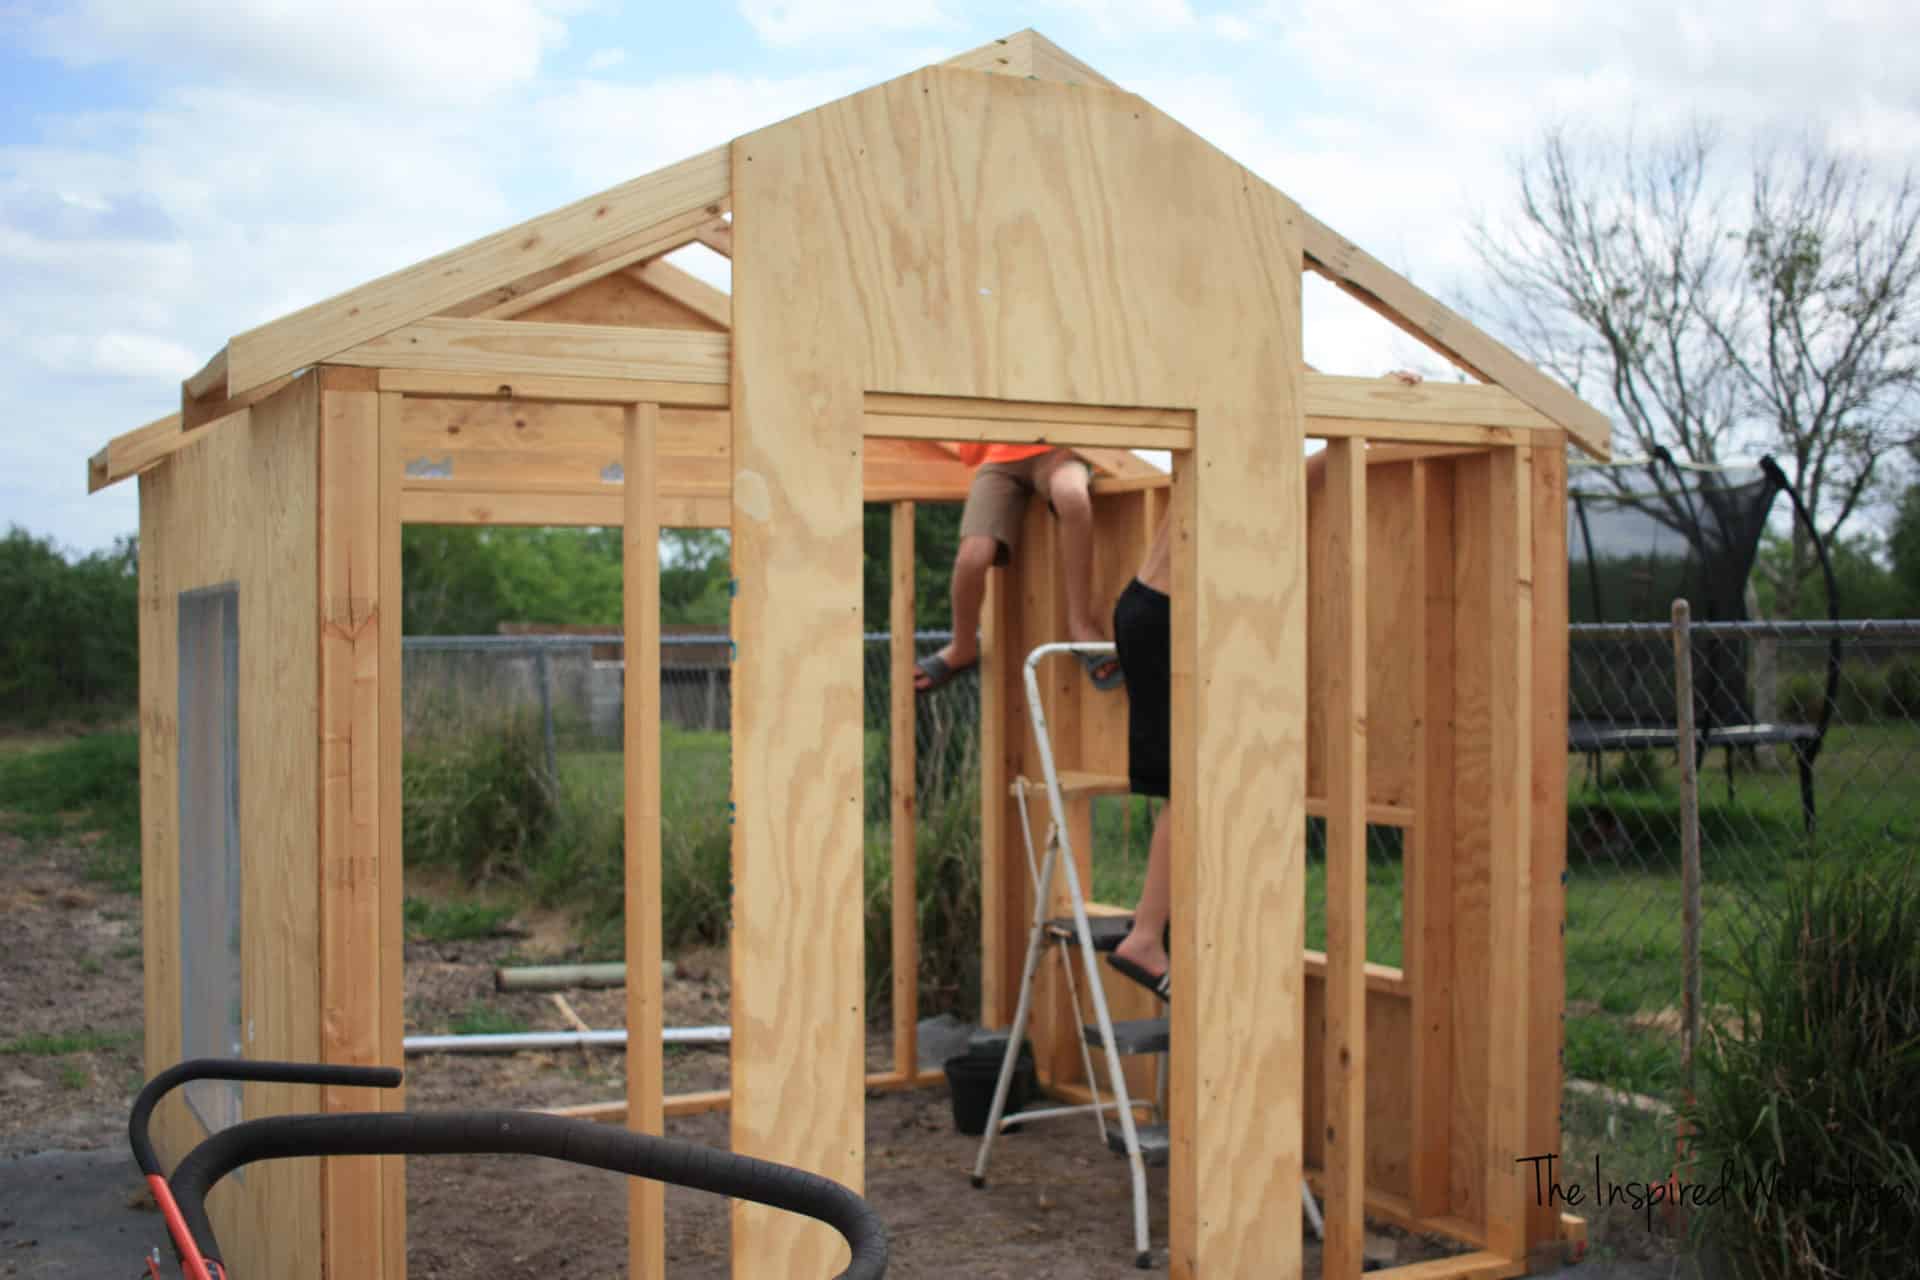
It is certainly helpful to have a second or third set of hands, even if they are kids! My boys helped a TON on this project, but walls can also be built by one person, as I built a couple on my own as well so don’t fret if you don’t have help, you can still build this chicken coop!
Building the Run Wall for the Chicken Coop
This wall is a pretty simple build! I intentionally left this wall wide open to the run because it faces south for us, and that is where our breeze comes from all summer long! Heck in Texas it’s about 9 months out of our year and the ONLY way to survive is to have shade and breeze!
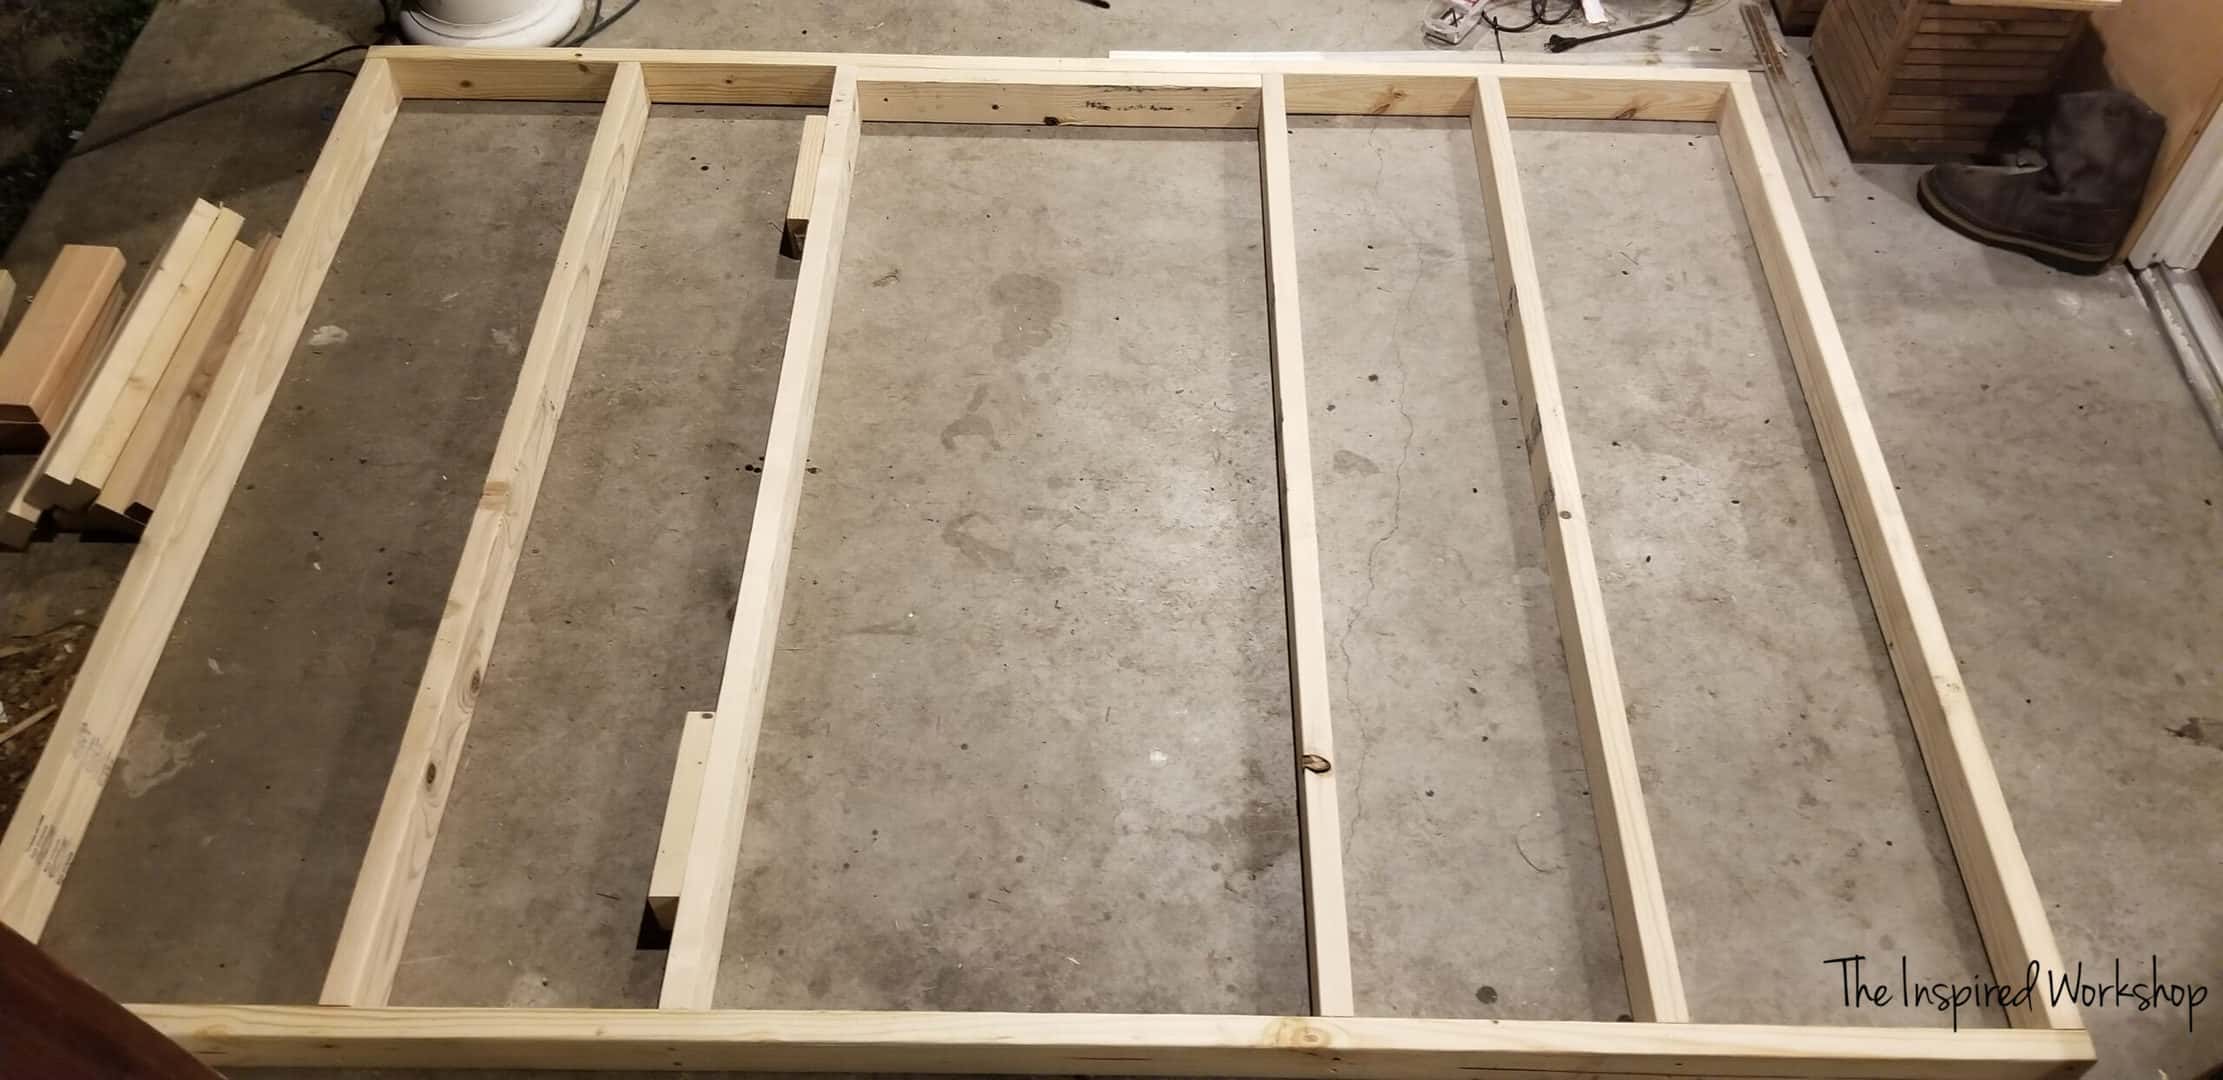
Basically, build an 8 foot by 6-foot rectangle and add studs where needed! It is easiest to add the studs at 19″ from the outside edge, then place the header boards in between. Screw the header boards to the side supports and put a couple of screws from the top 2×4 down into the header.
Adding the second support boards, closest to the edges after, allows the drill room to get in between to screw the header in…hope that makes sense. The second support boards will be placed 11″ from the outside edge.
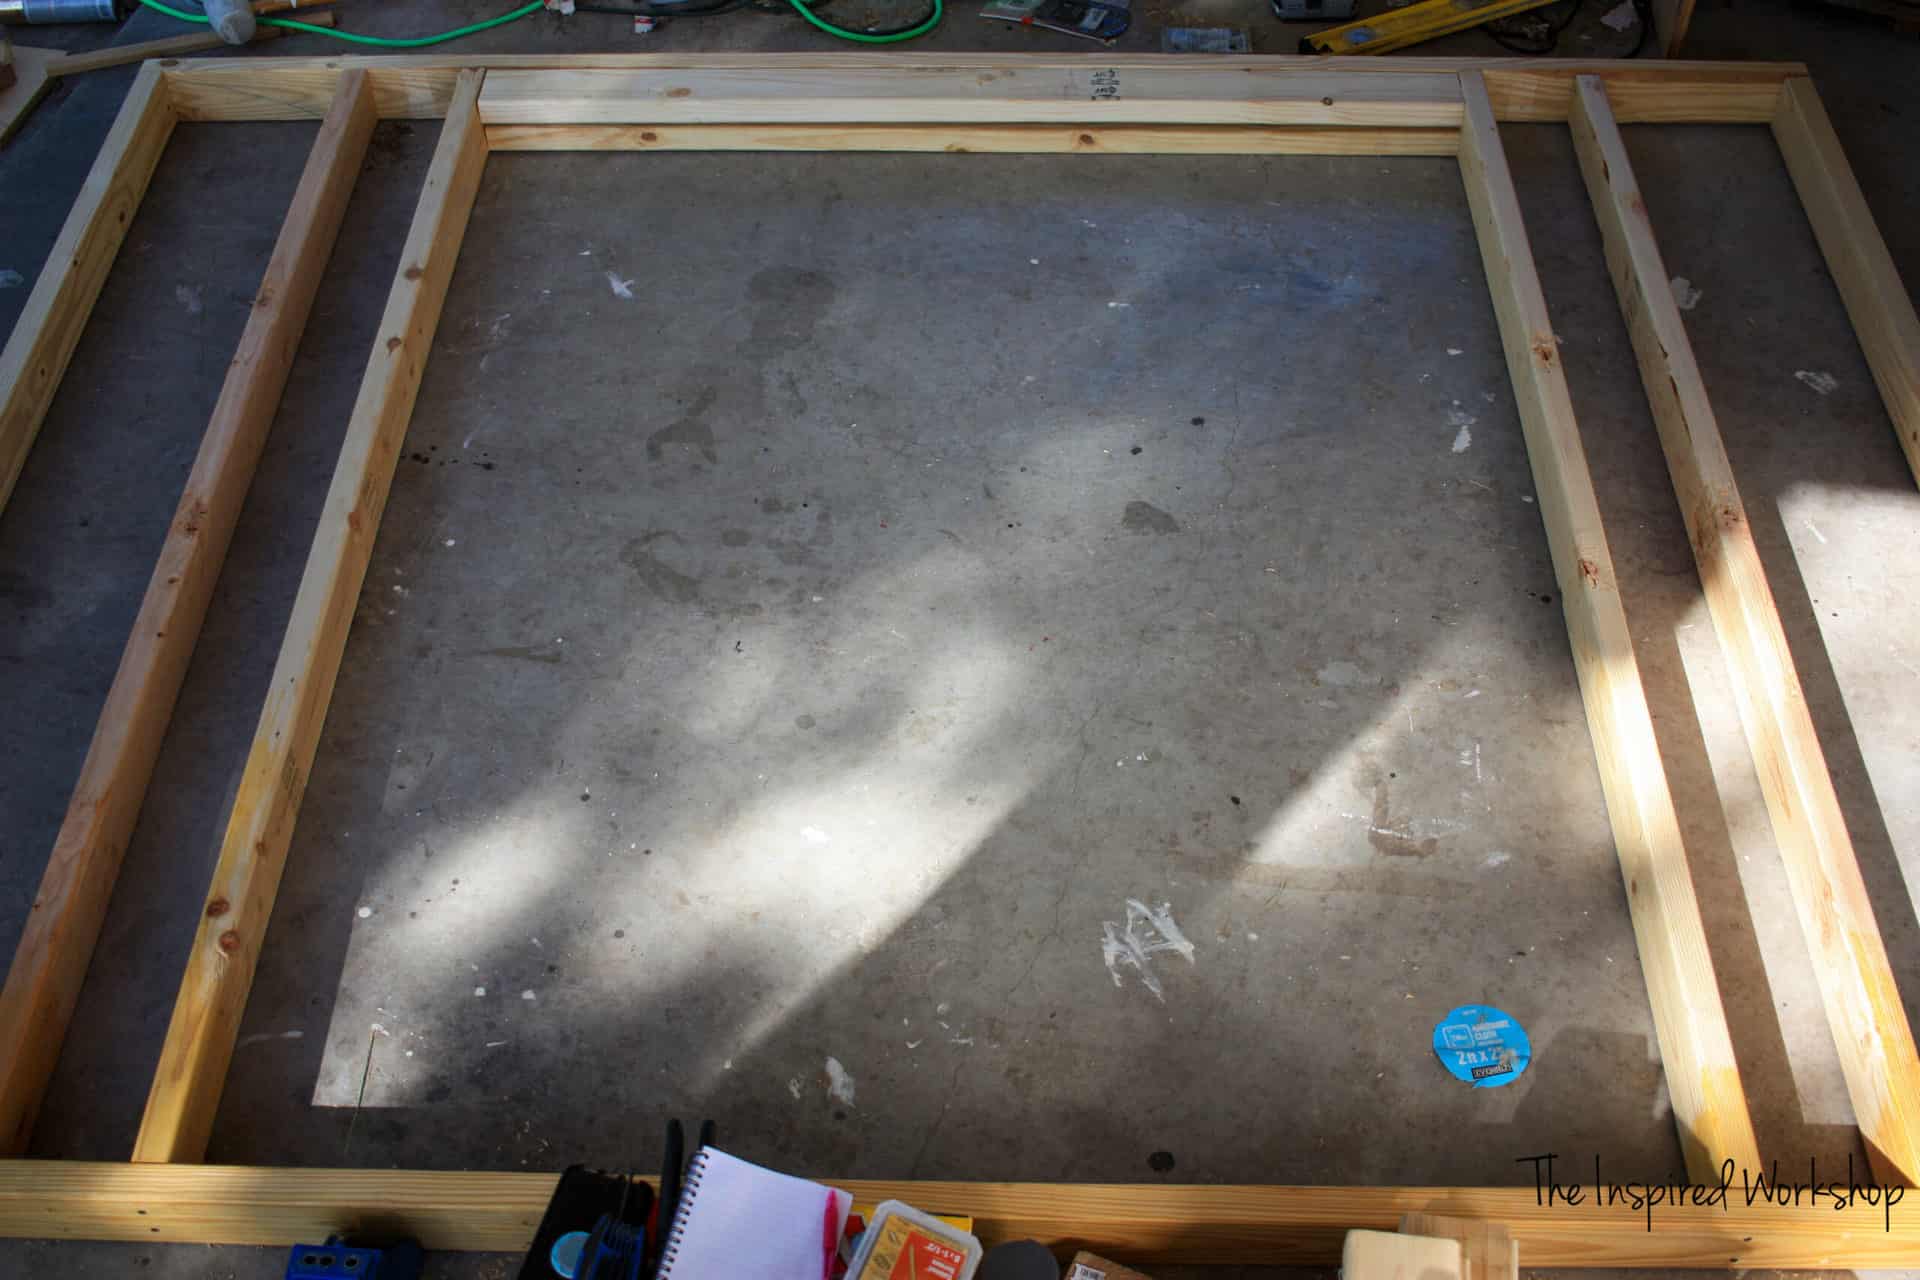
This creates your run wall, one down, three to go!
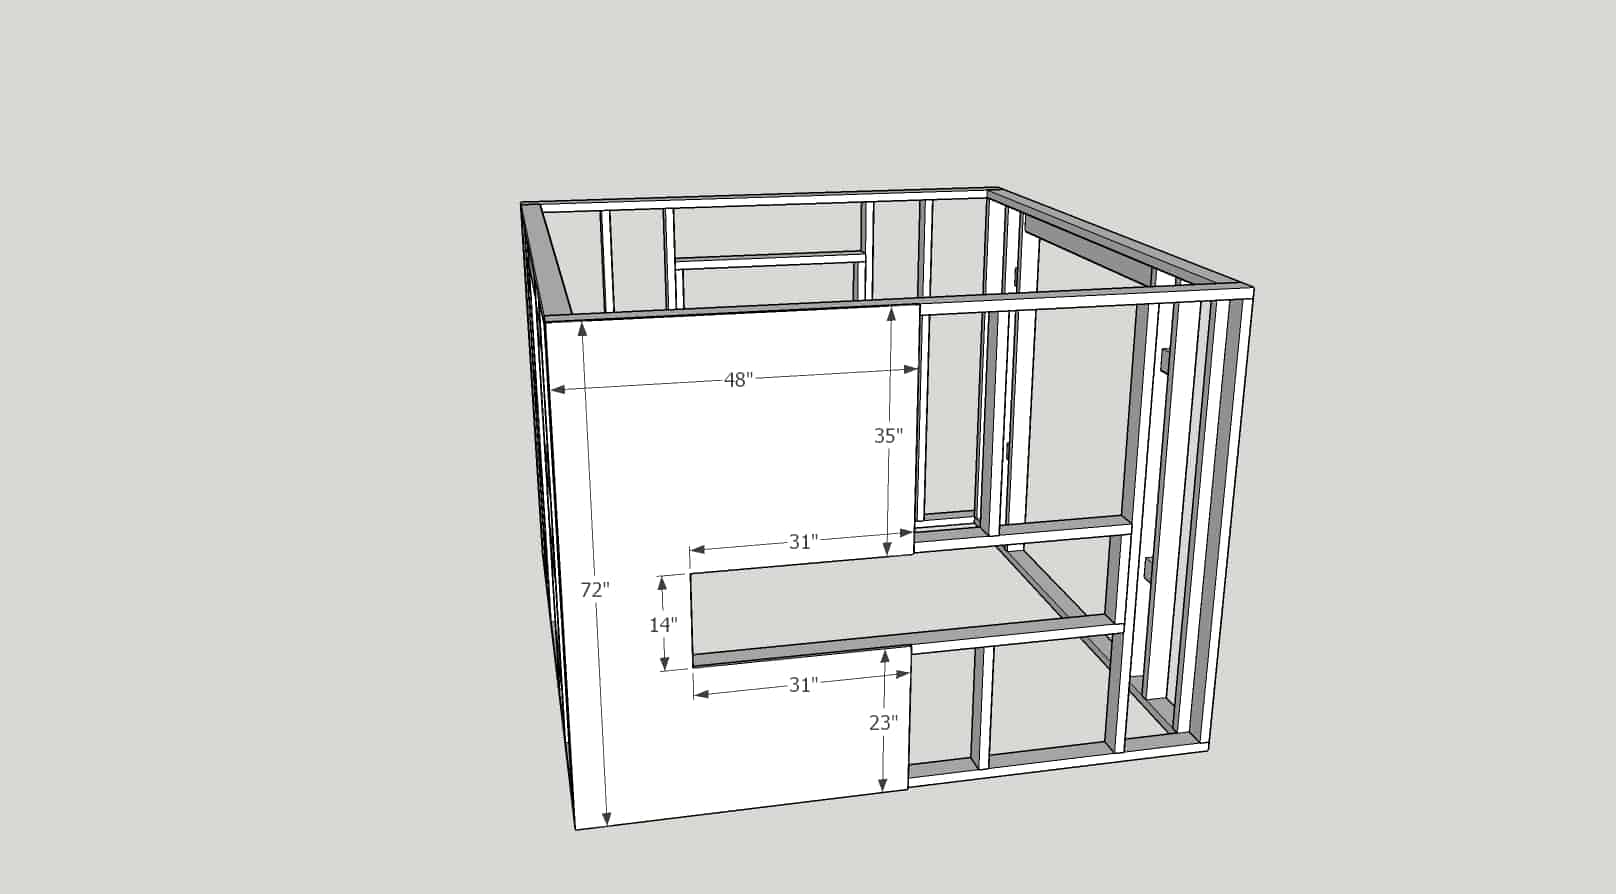
Building the Nesting Box Wall of the Chicken Coop
The same concept as the run wall, build an 8 foot by 6-foot rectangle. Add studs 14″ from the outside edge.
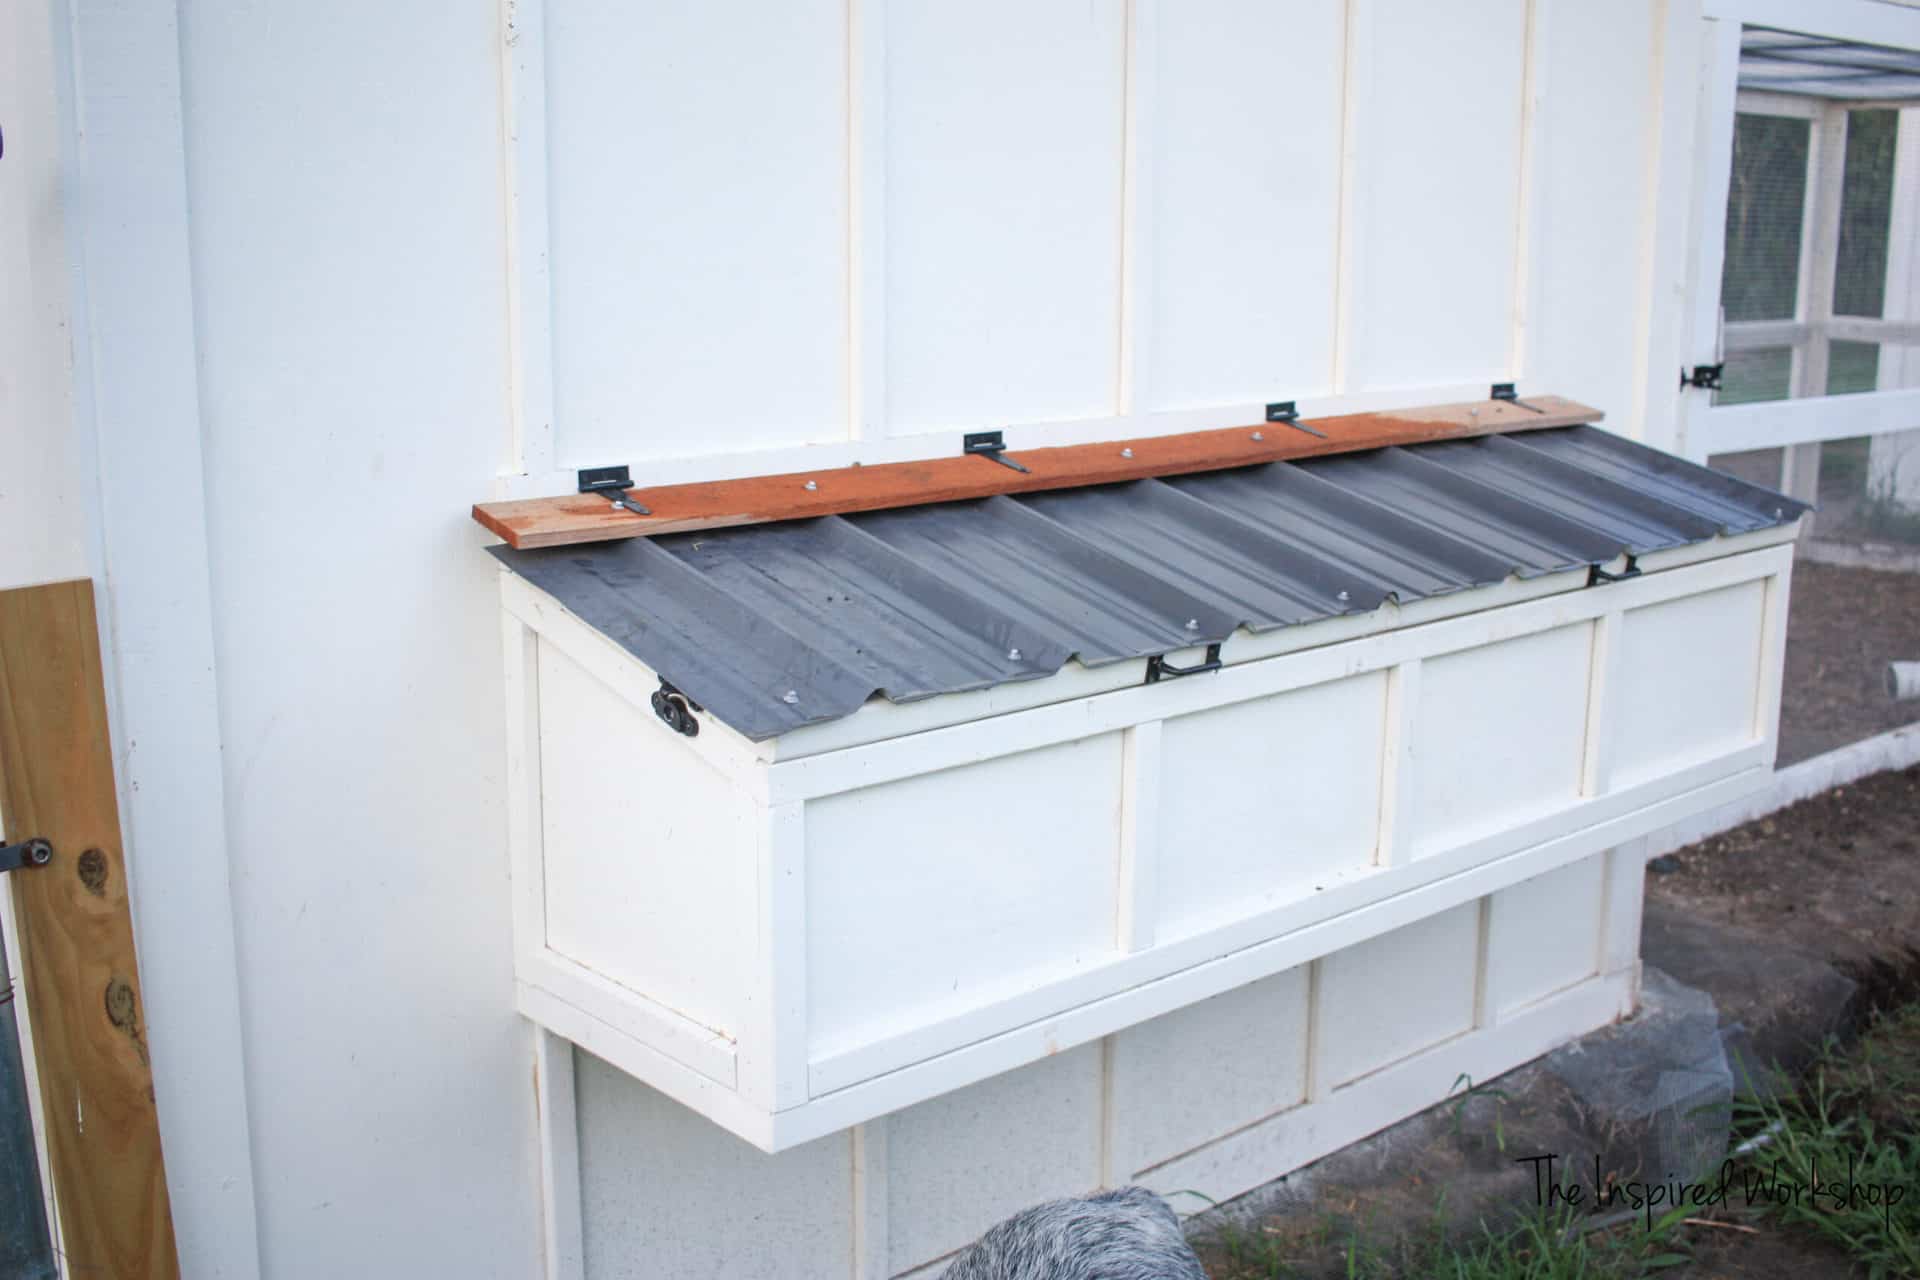
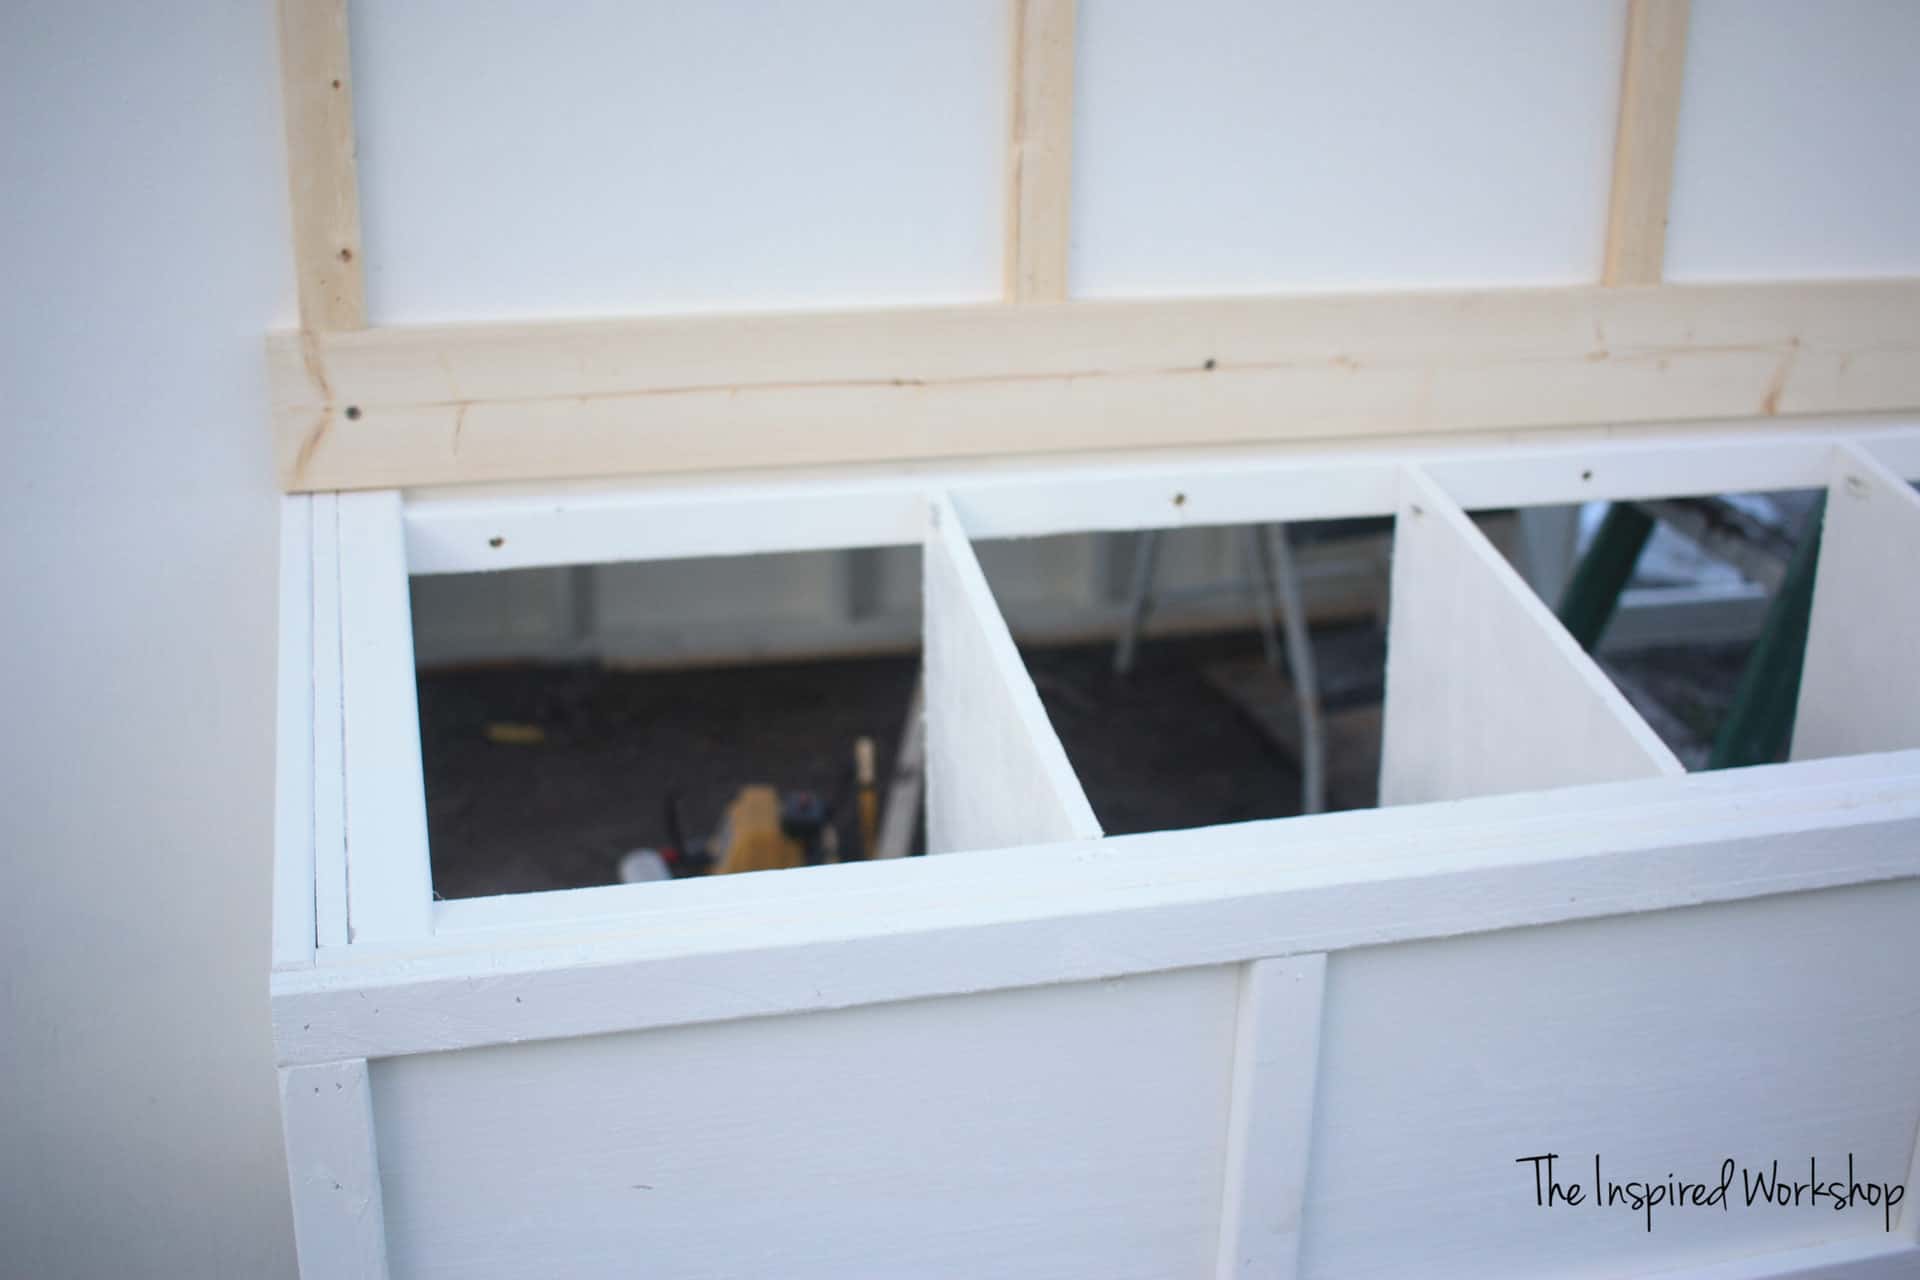
Build a box that is going to frame out the nesting box. Use 2- 2x4s @ 65″ to make the vertical boards of the box and 2 – 2x4s @ 14″ for the vertical. This photo also has the bottom studs added! They are 20″, 22″, and then 20″ apart. Or you can make them 21″ apart…not sure exactly how I ended up with the above! Lol!
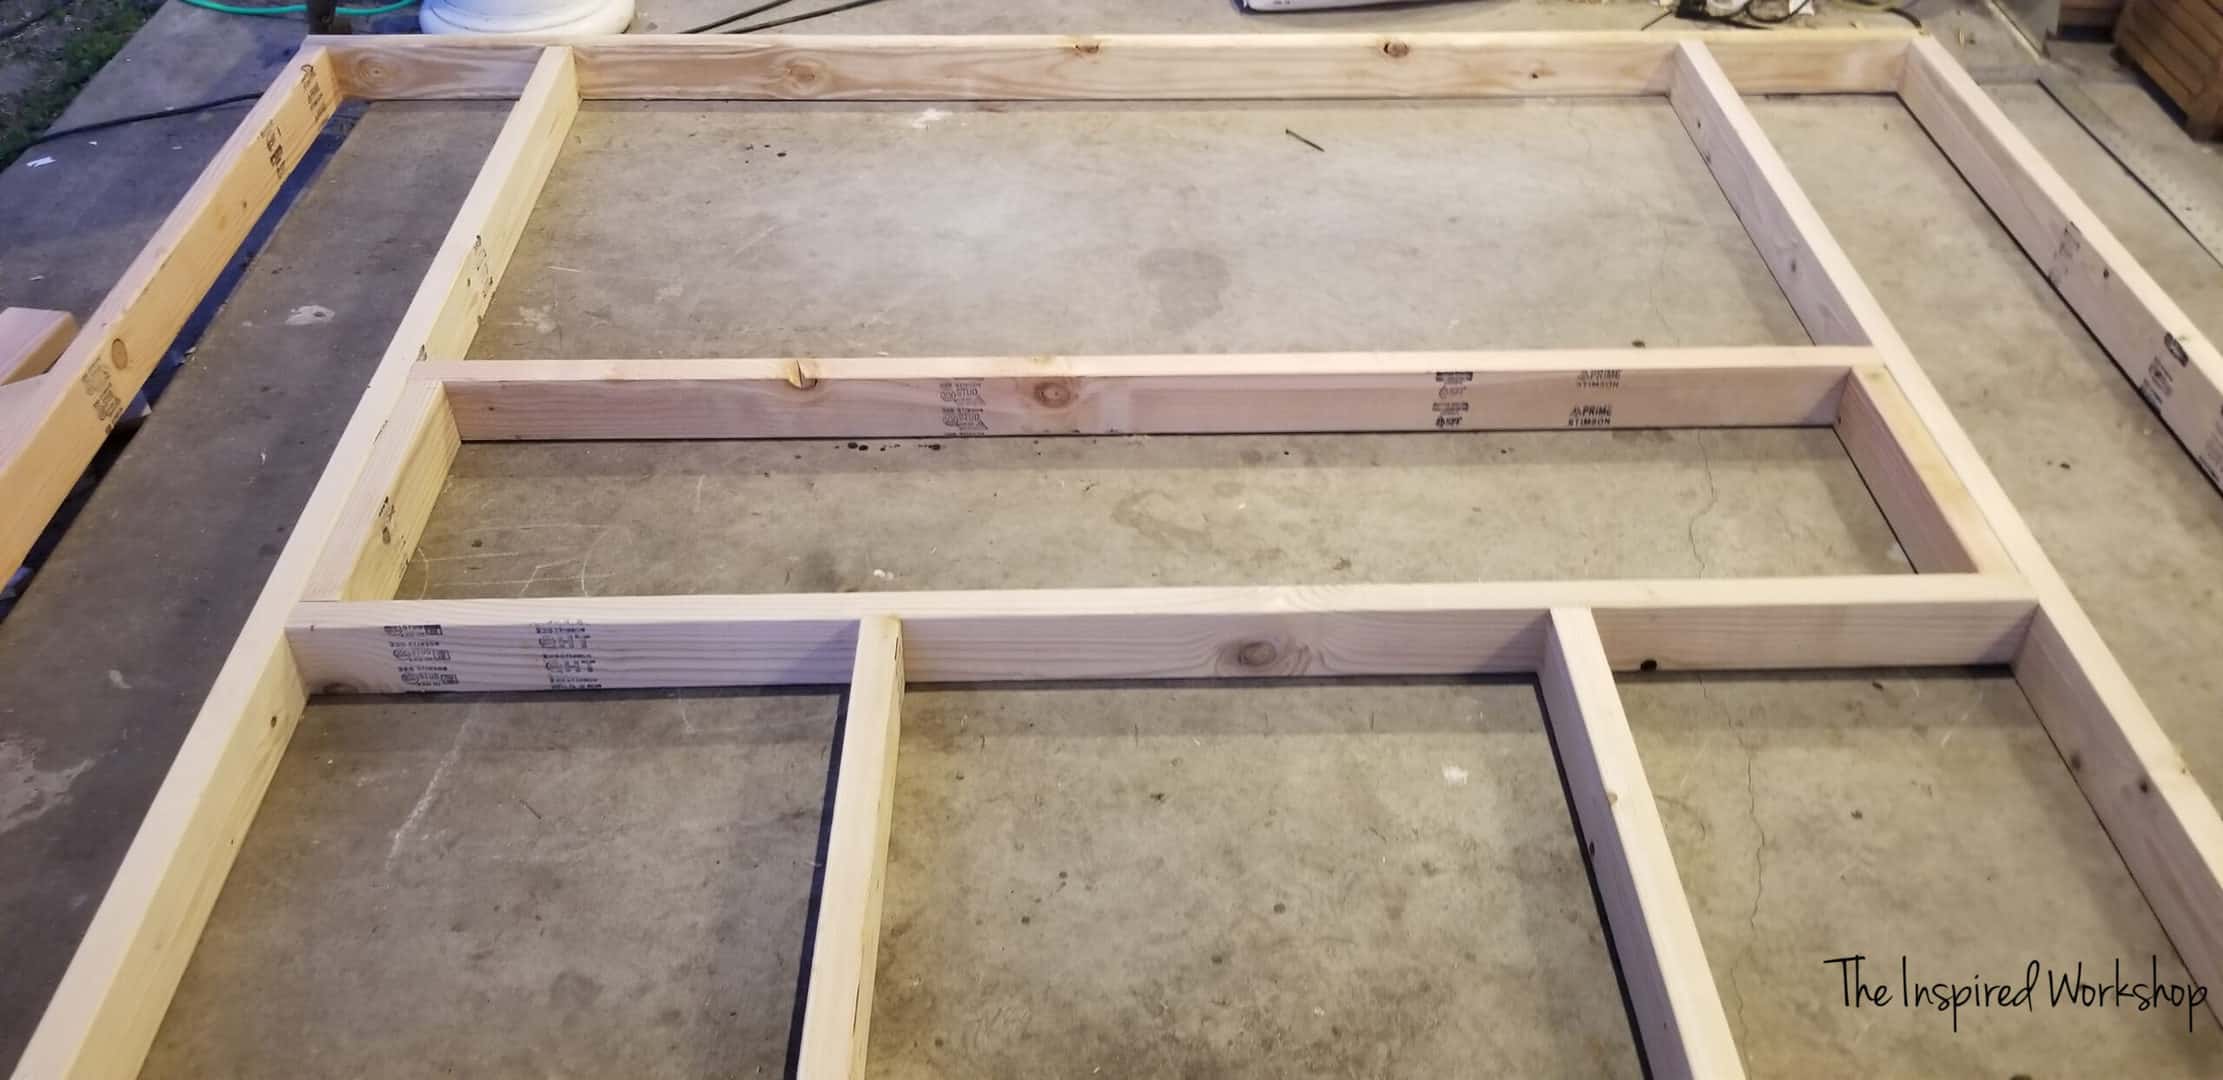
Add the top studs. They are 32″ long and spaced the same as the bottom boards.
Nesting box wall…✔
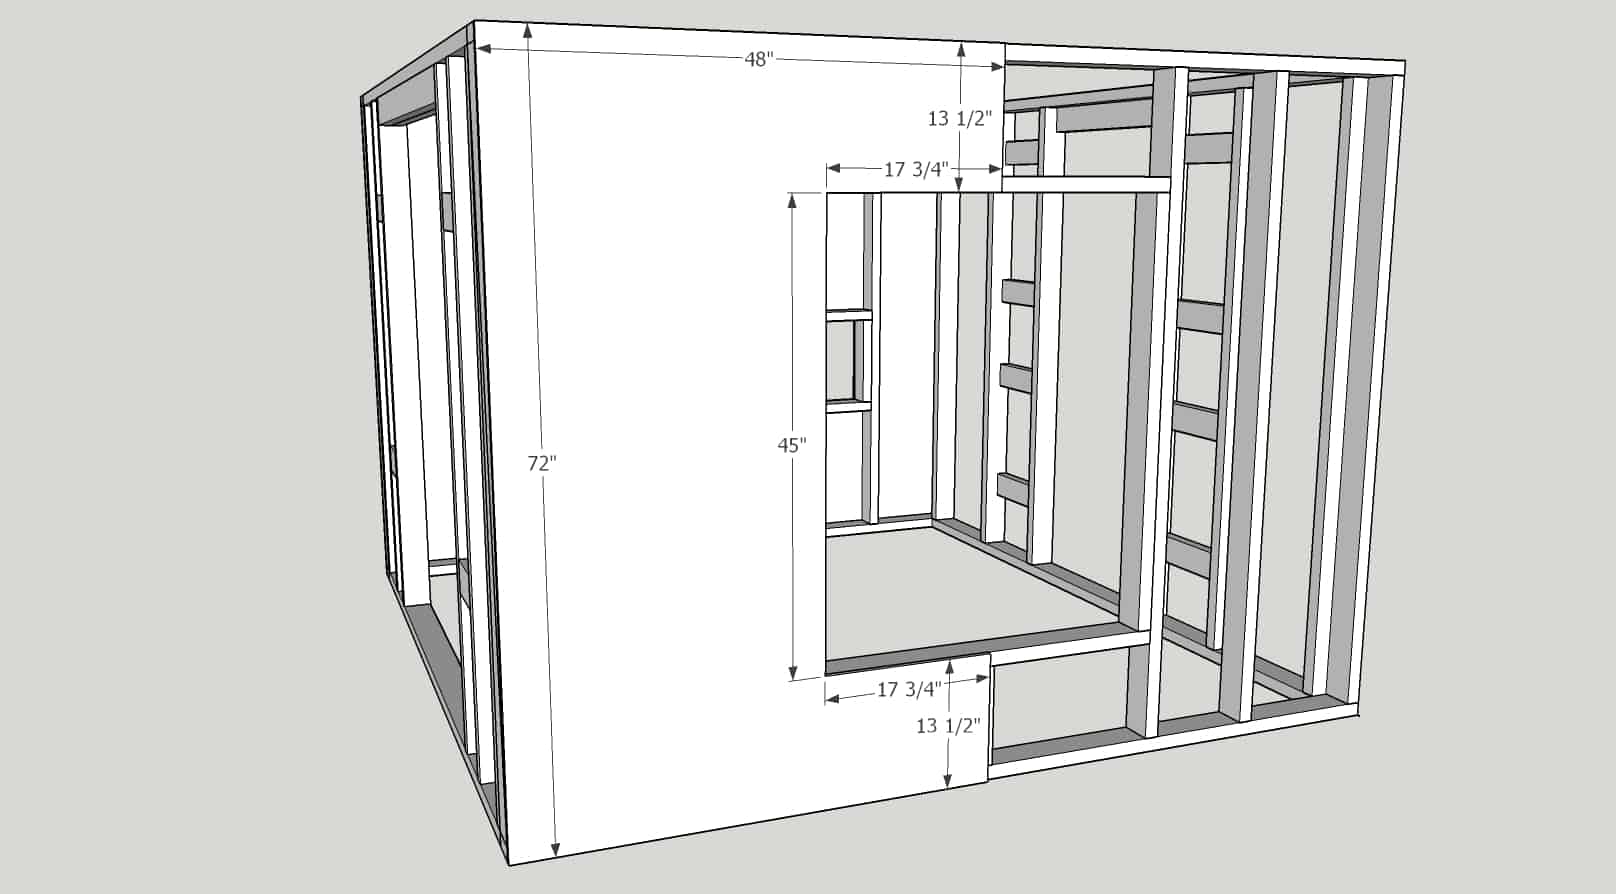
Building the Door Wall of the Chicken Coop
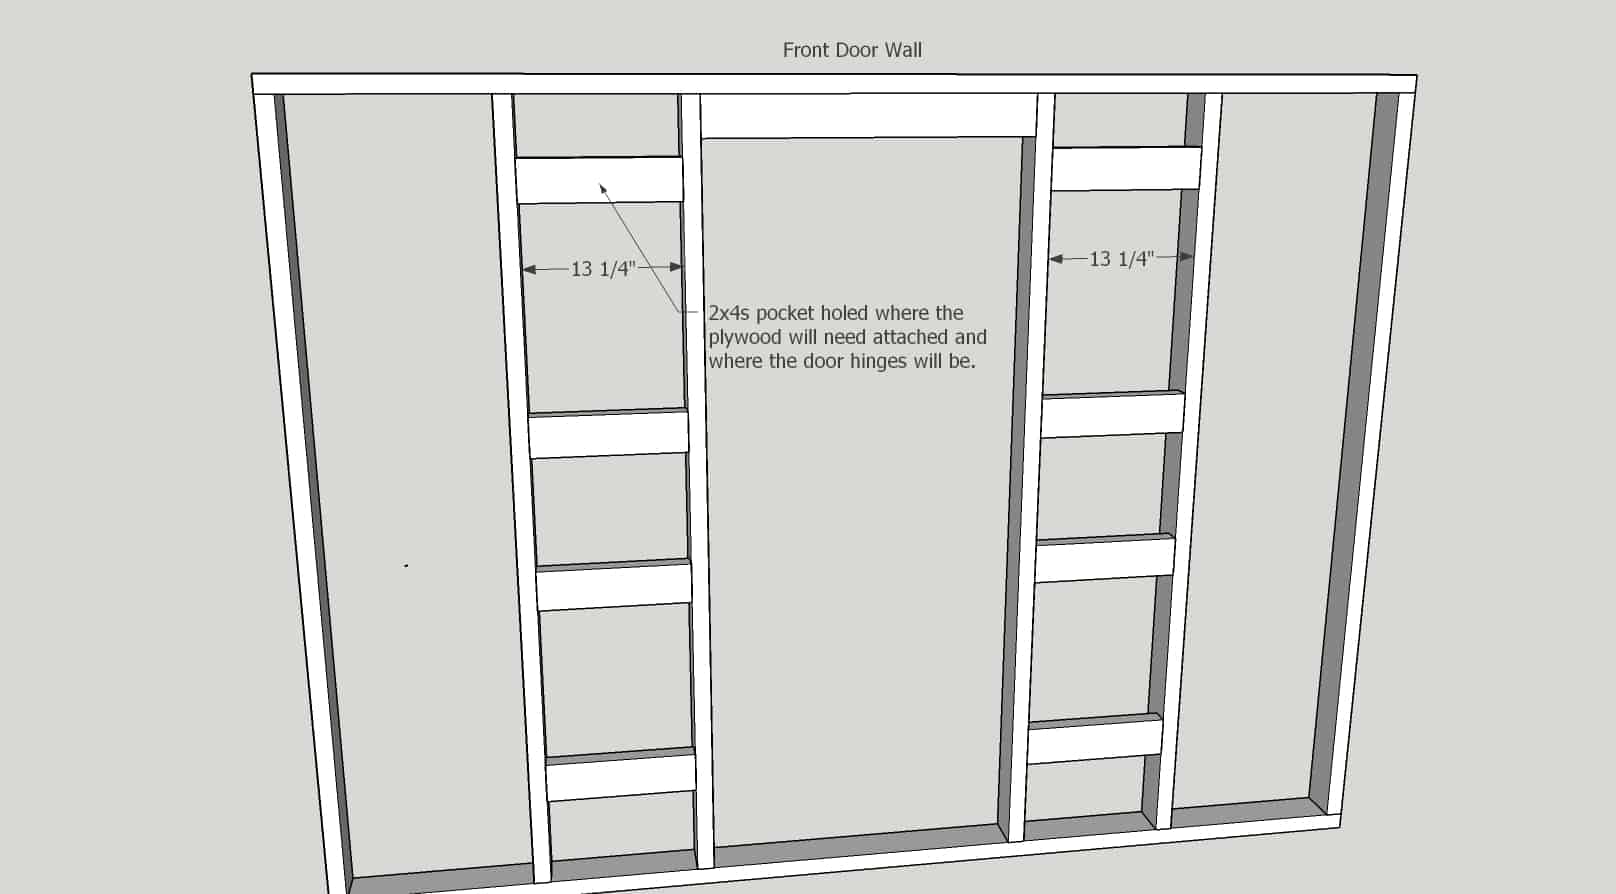
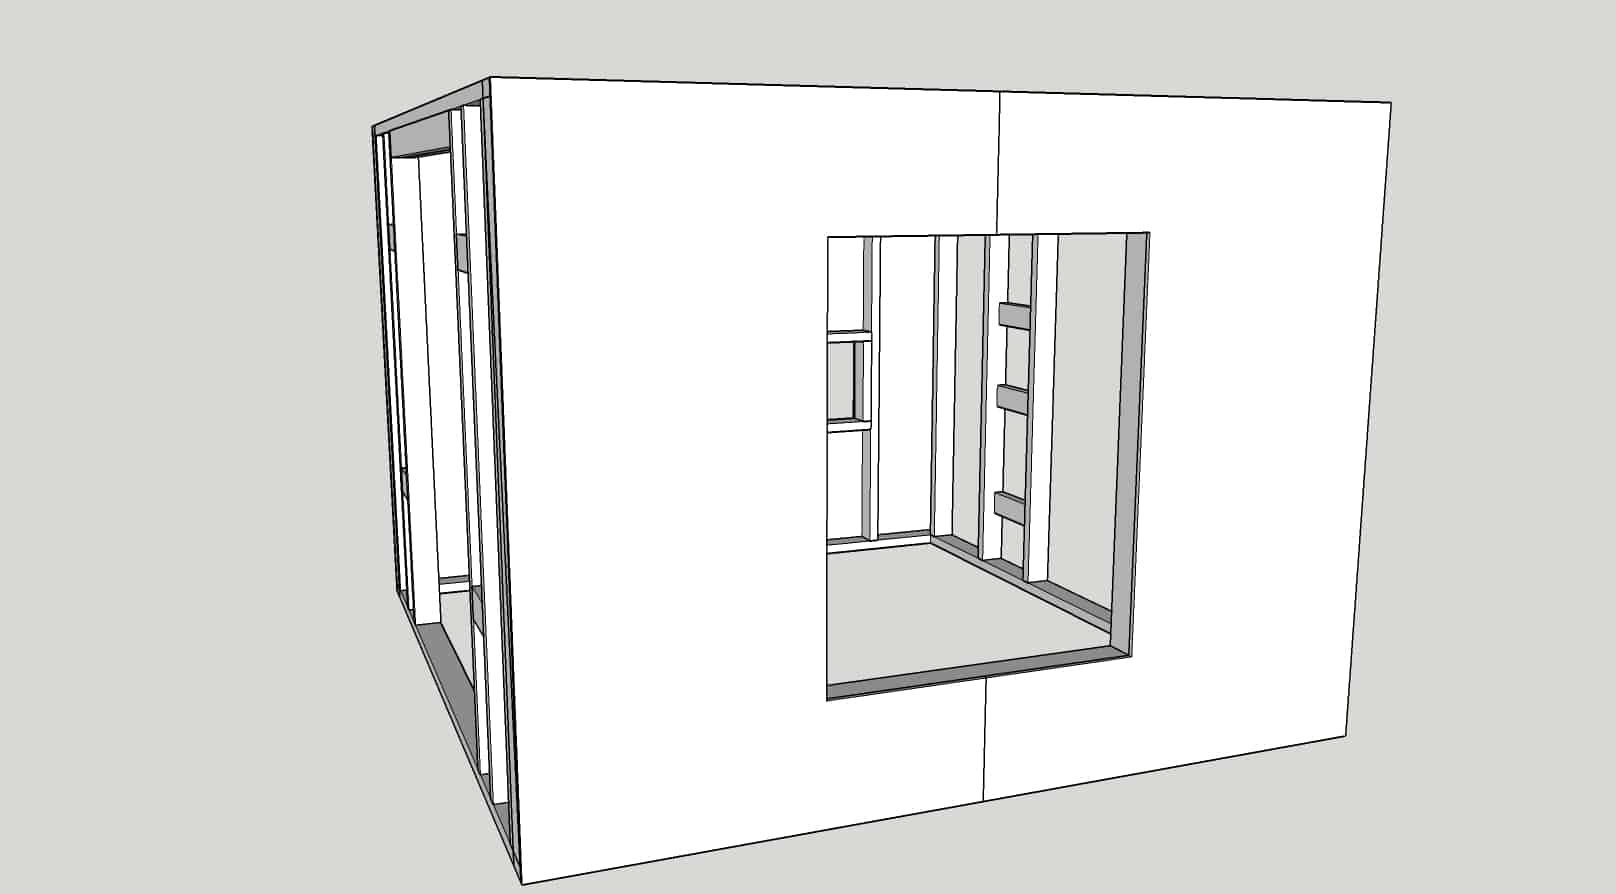
Again, start off with an 8 foot by 6 foot rectangle. Add two studs 17 3/4″ from the outside edge. The second set of studs will be 32 1/2″ from the outside edge. A small header of a 2×4 @ 28″ in between the closest two studs, at the top, will be for the doorway! I added scrap 2x4s for hinges but ended up not using them! Lol!
What you will need though that I didn’t realize until later, is 8 – 2x4s @ 13 1/4″ pocket holed, to allow a brace to attach the plywood to. Here’s the Sketchup photo to show you! (Ignore the 2×4 header that is turned the wrong way below, it should be flipped up to where you see the 1 1/2″ edge as in the photo above! Sorry for the confusion!)
Door wall DONE! Can you believe it…3 walls down…only 1 to go! Yeah!
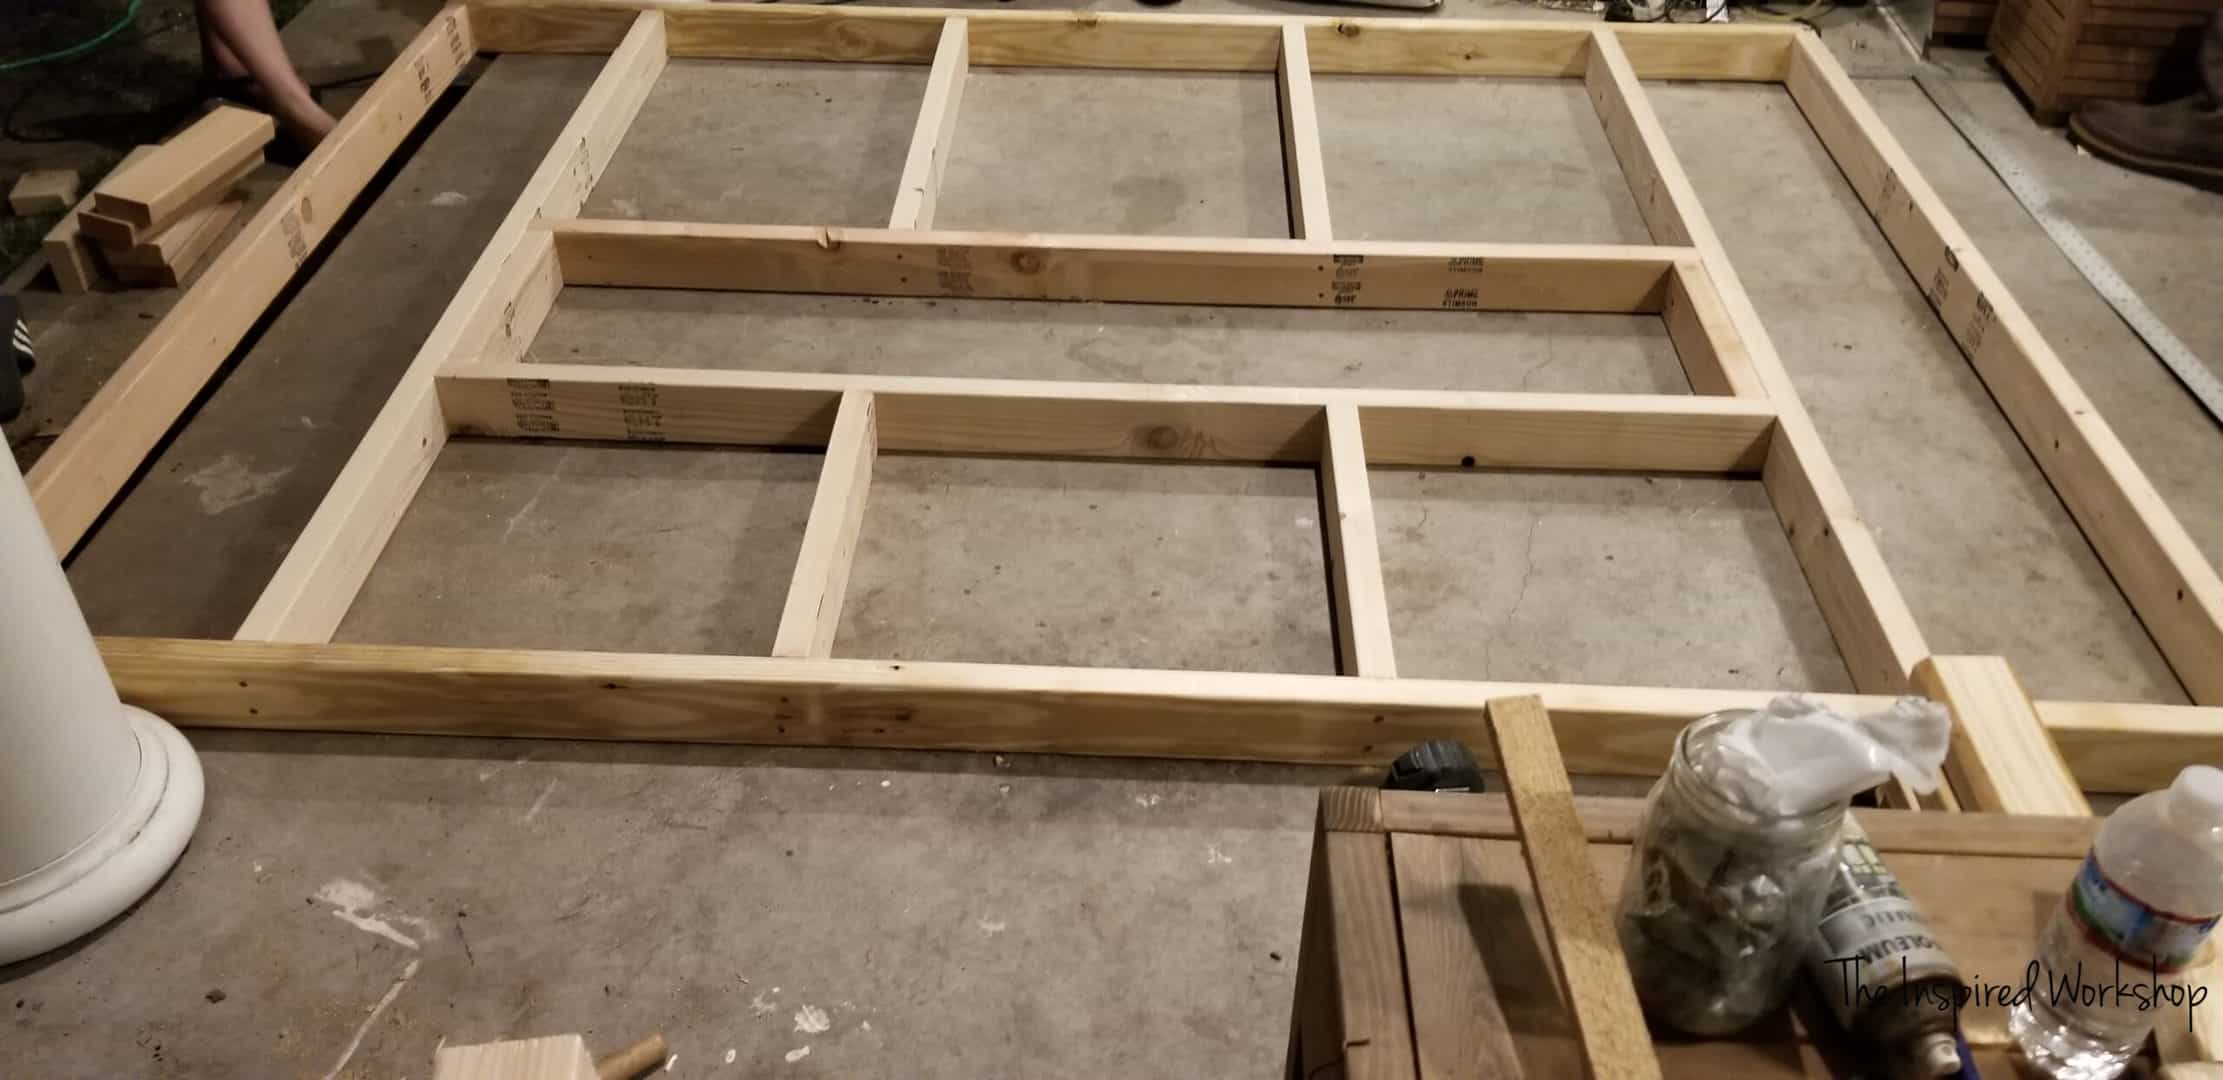
Building the Window Wall of the Chicken Coop
The last wall to go, and then you can put them all together and start seeing the chicken coop come together!
Last time you have to build an 8 foot by 6 foot rectangle! Lol! And for this wall, you will want to put 2 studs at 13 1/2″ from the outside edges, and then 2 studs at 25 3/4″ from the outside edges.
Build a rectangle for the window. Use 2 – 2x4s at 45″ to make the vertical window boards and 2 – 2x4s at 38 1/2″ to make the top and bottom of the window. Luckily you can screw these boards into place through the window!
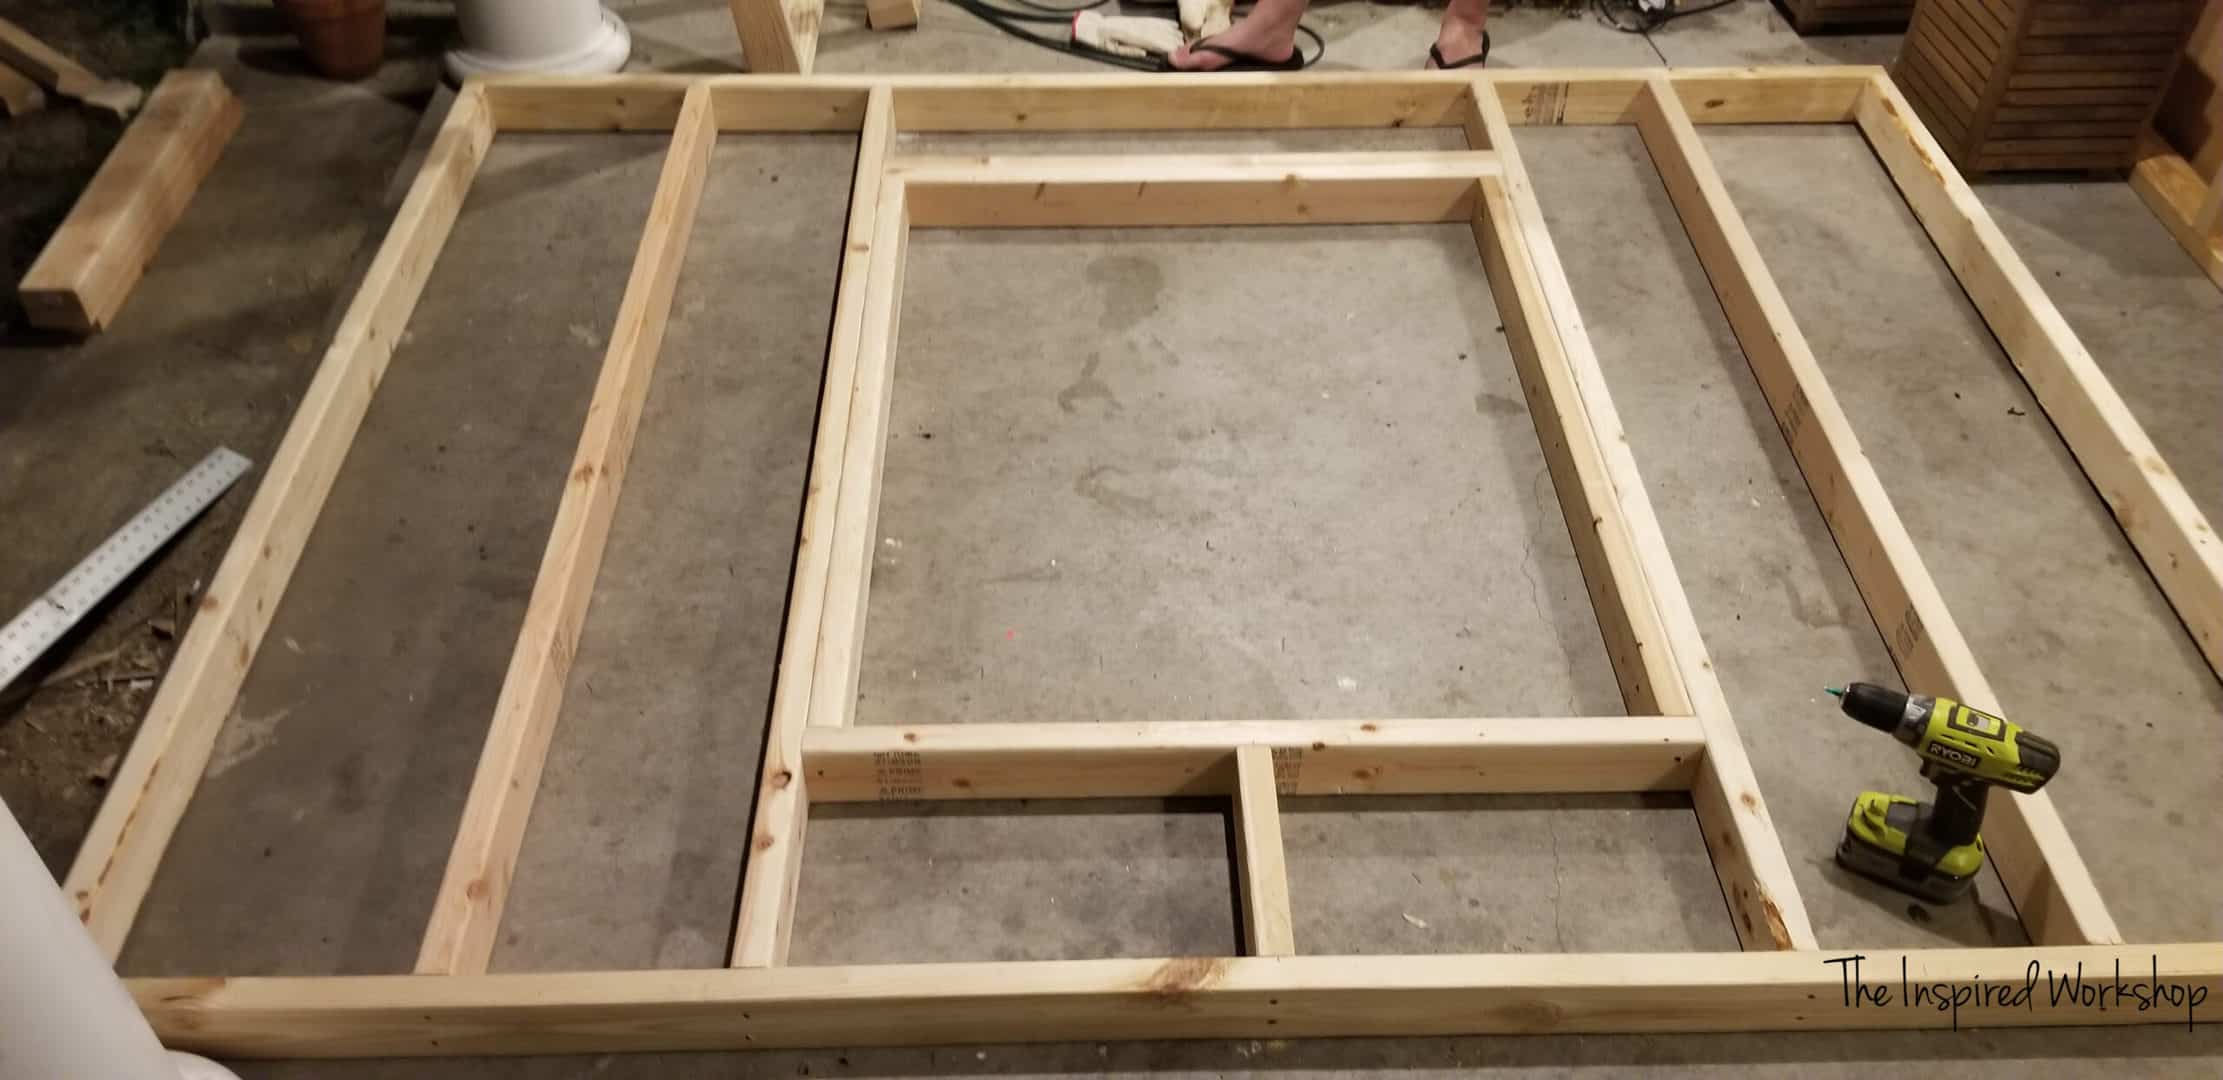
ALL FOUR CHICKEN COOP WALLS ARE BUILT!! WOOHOO!!
If you have any questions as to the dimensions or locations of boards, make sure and download the printable plans for chicken coop above to see detailed photos with dimensions!
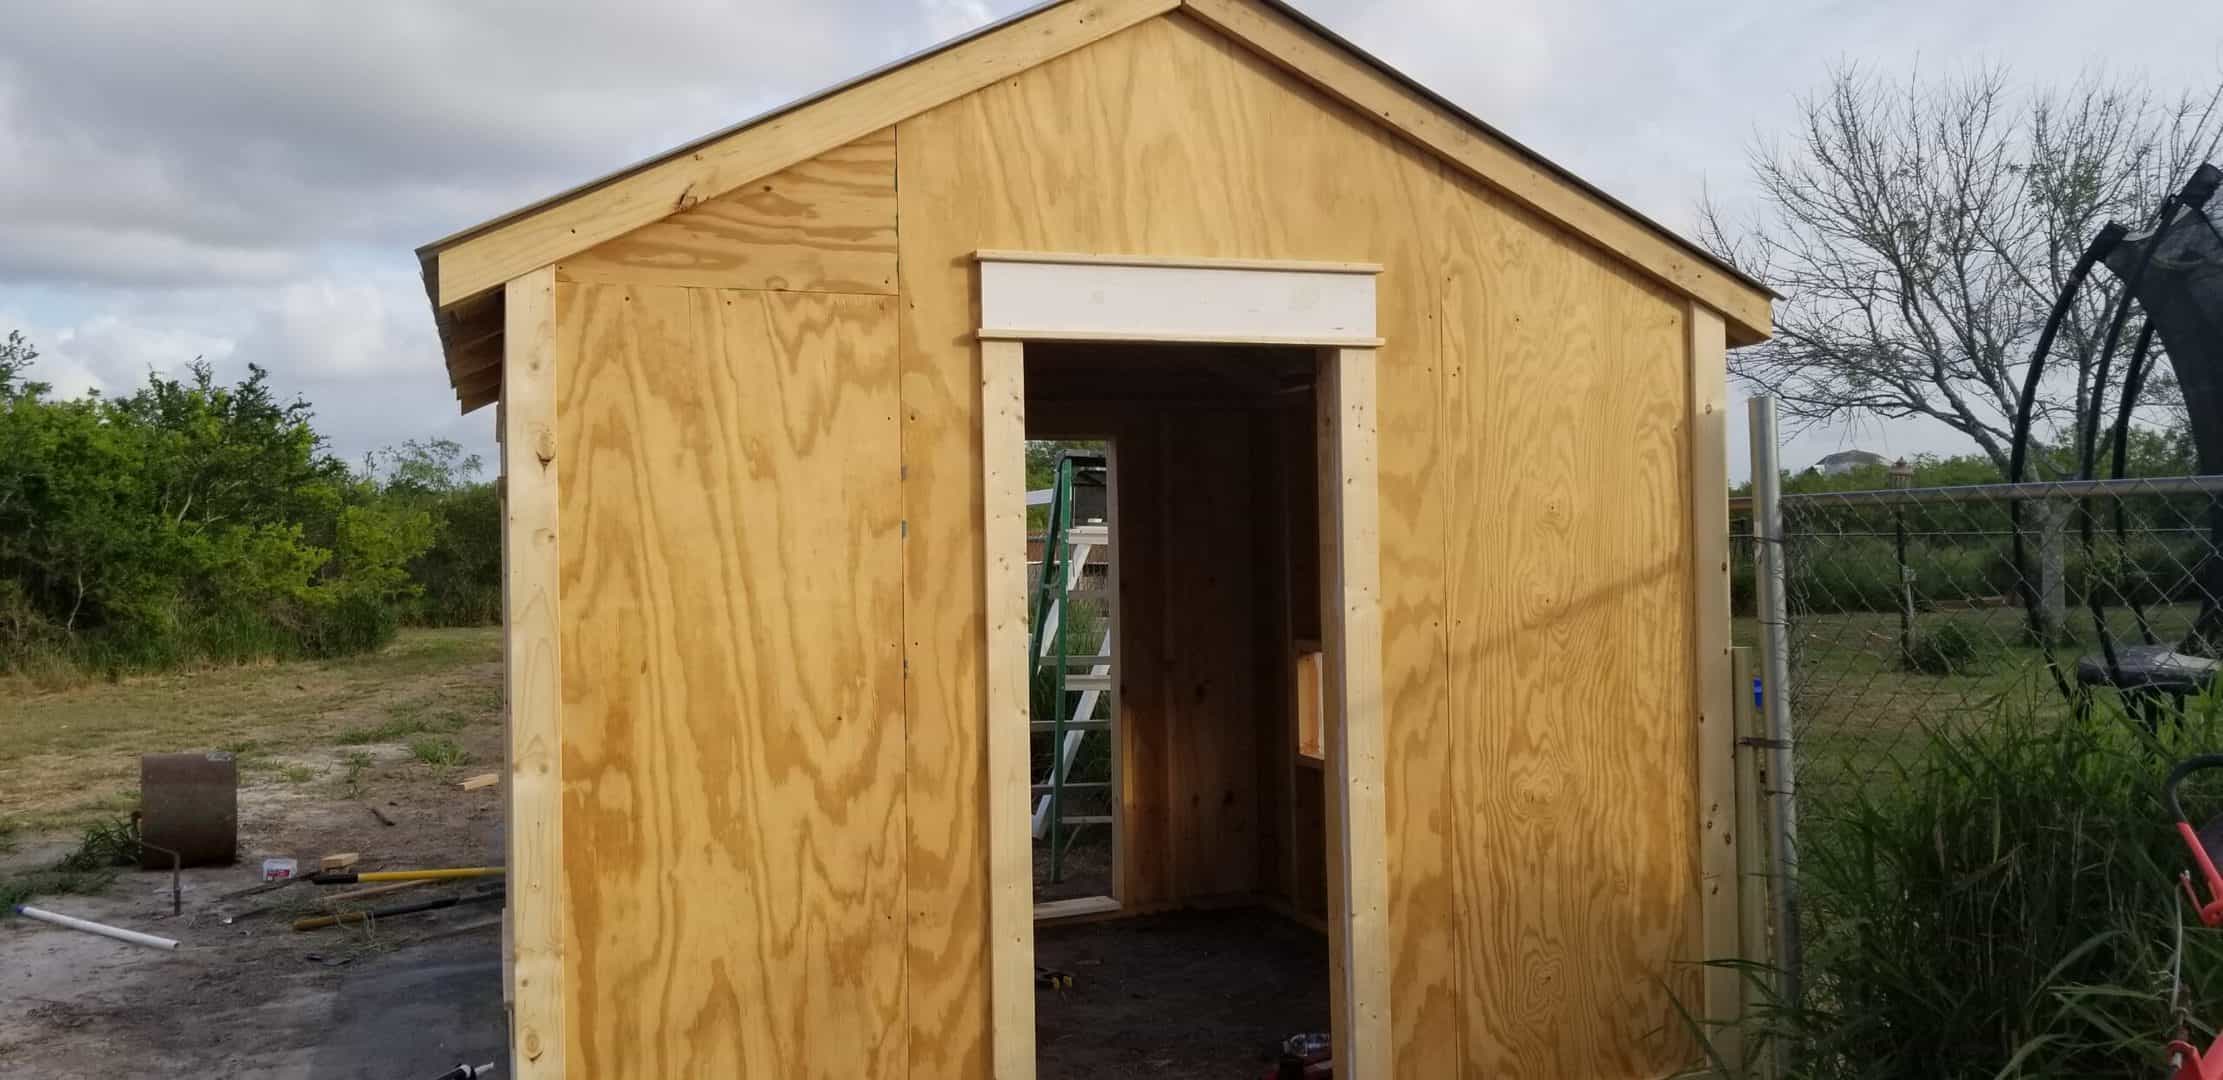
Setting the Frame of the Chicken Coop
At this point, before setting the walls, I sealed the bottom of all the 2x4s that would be touching the ground and attached hardware cloth with screws to the bottoms so that no animals could dig under the coop!
Here’s how she looked!😍
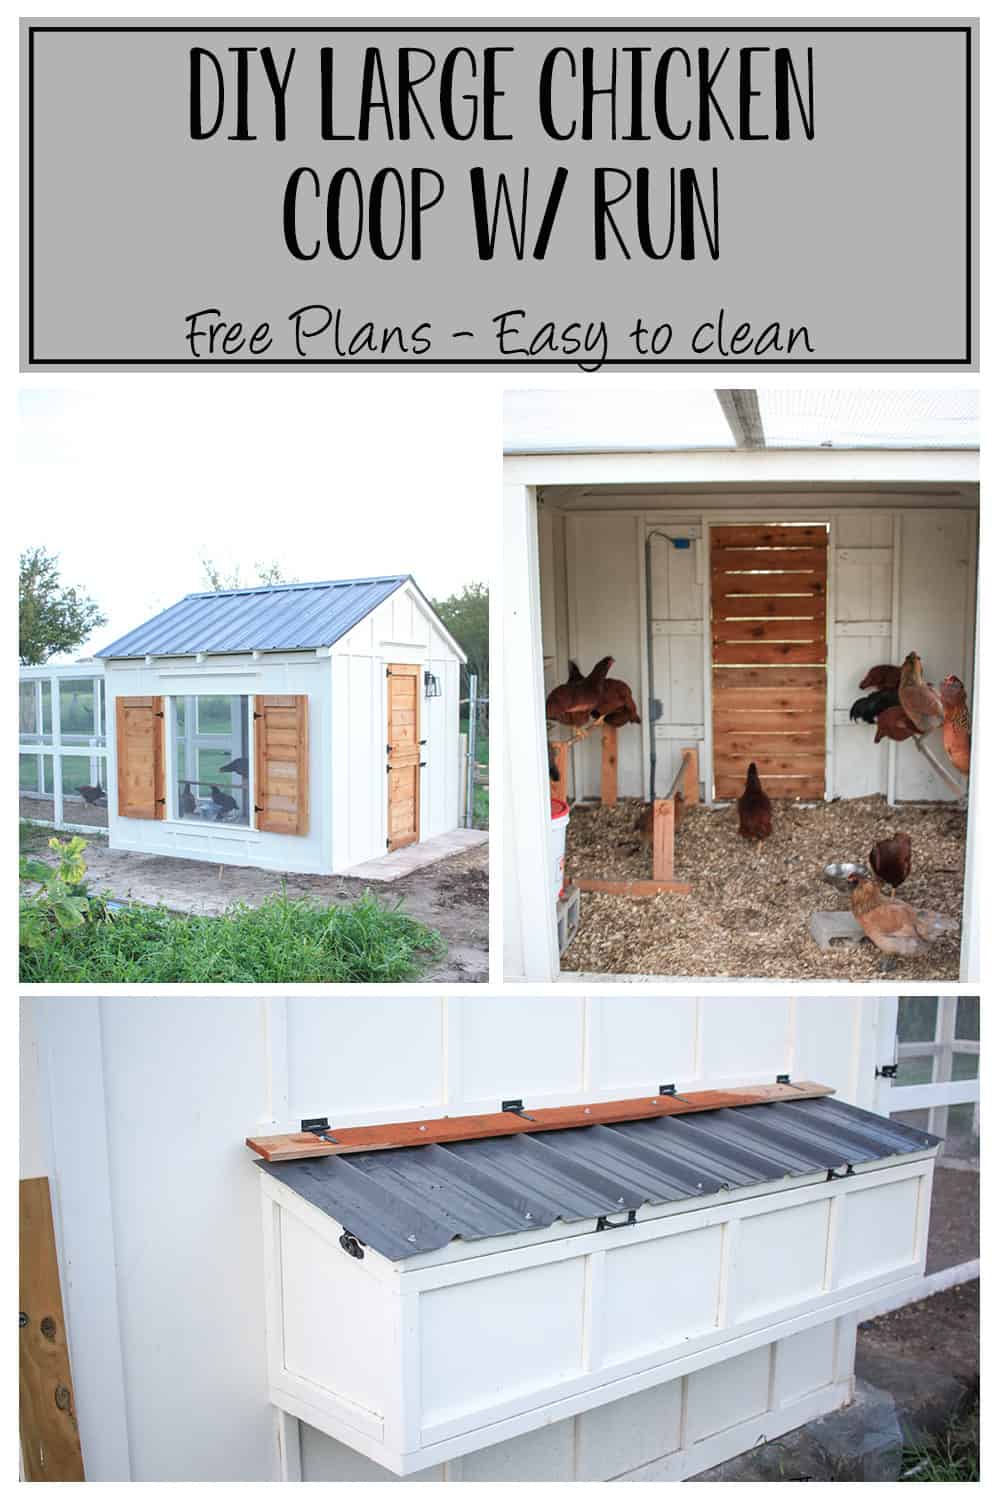
Now, we are doing the deep litter method, so there is no floor in the coop, the dirt makes the floor and you just add pine shavings weekly…it is AMAZING because there is no chicken poop smell at all! I did a lot of research before choosing this method and I am so glad I did! Plus, once a year, I have compost ready to be placed in the garden!
Literally, no cleaning the coop…we add pine shavings, and dust out the nesting boxes, THAT IS IT, and the ladies keep turning their poop into the dirt so you NEVER smell anything…besides dirt! Lol! Yes, there is a dust layer all over because of how they work the dirt, but that’s why we have great ventilation with the eaves, window, and open run wall! I COULD NOT BE HAPPIER that we went with this method!!
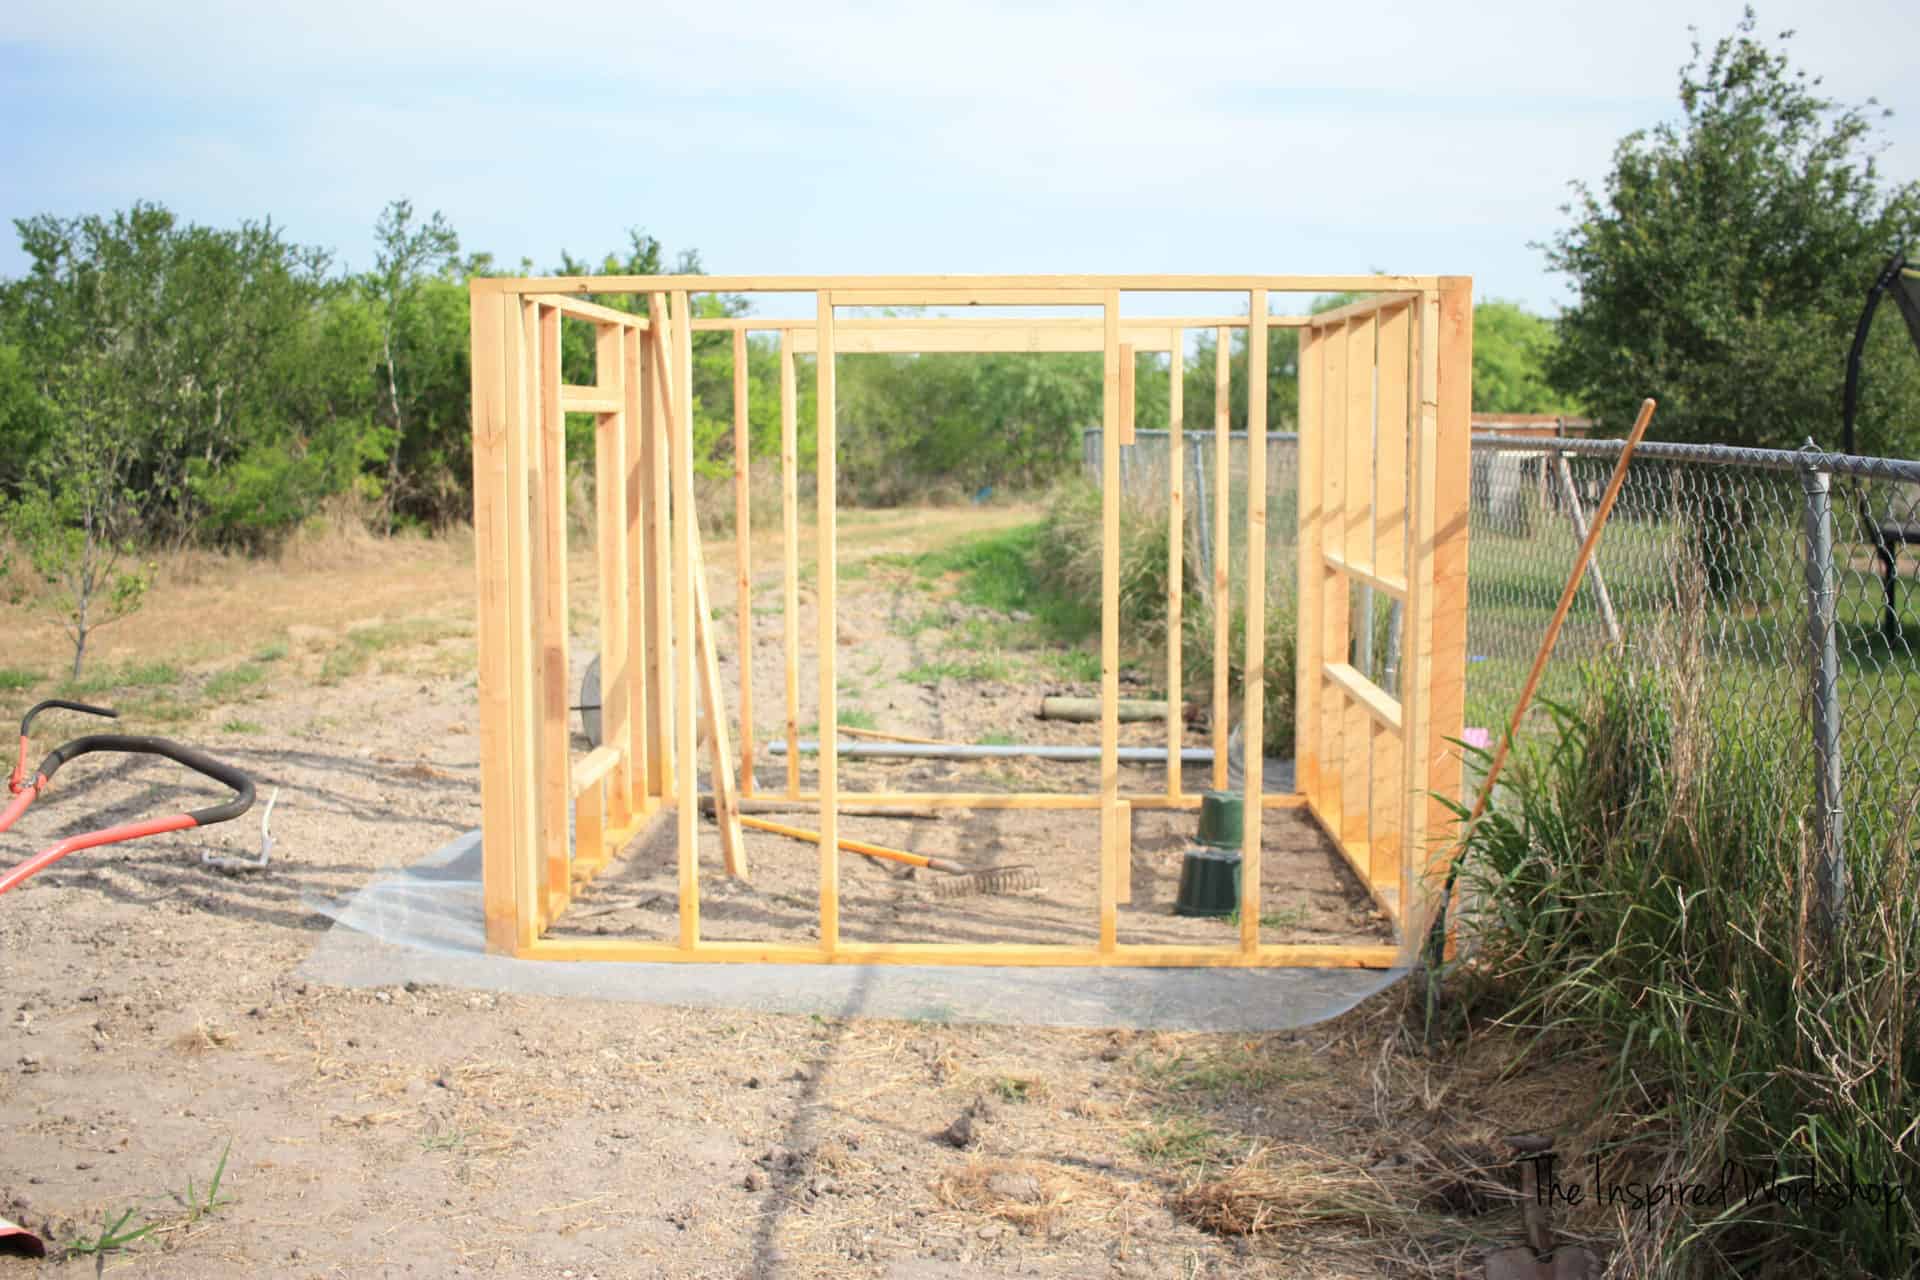
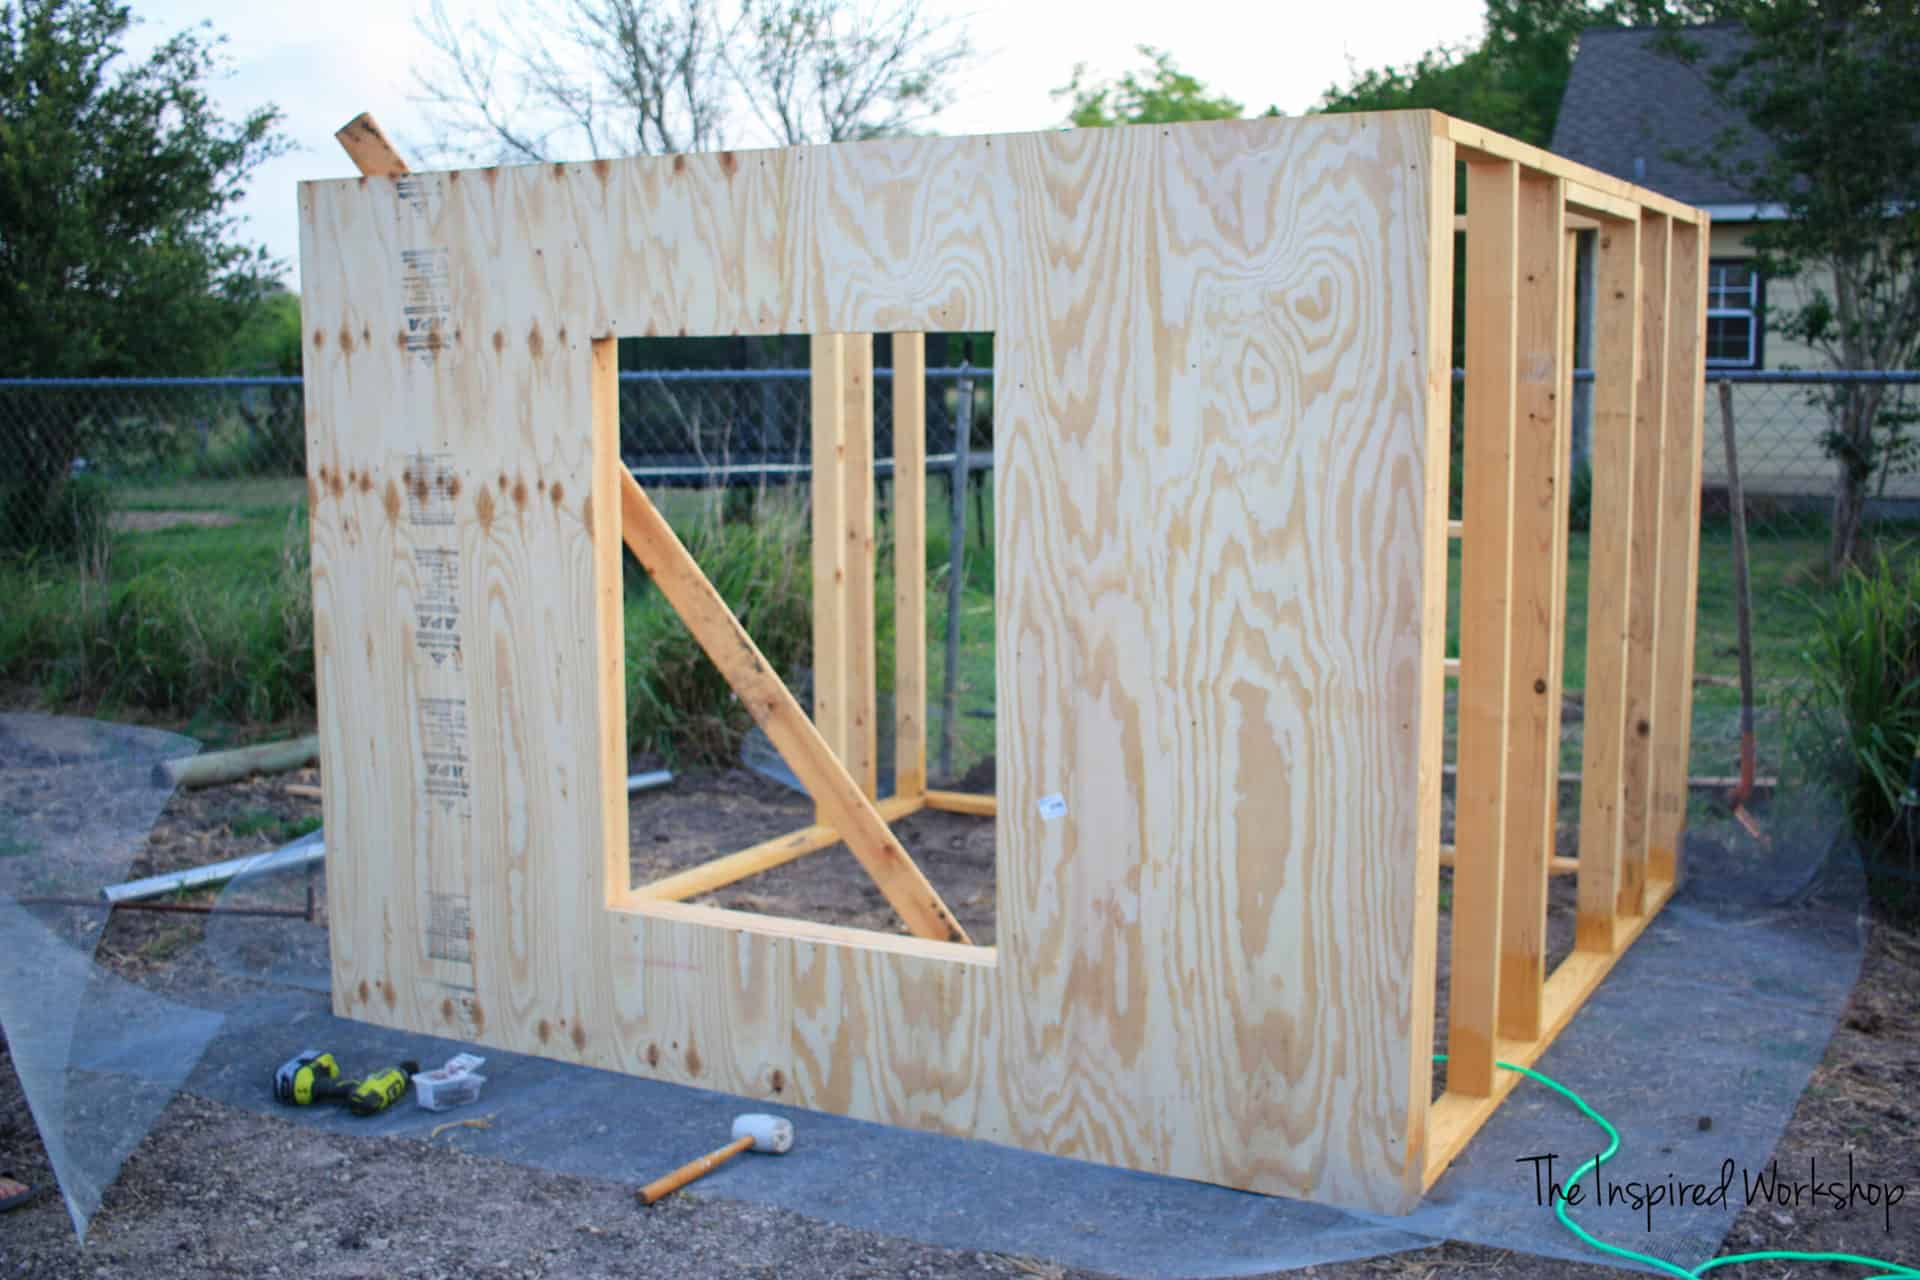
Anyway, back to setting the walls, I screwed the door wall to the window wall on the left, and the nesting box wall on the right. That leaves the run wall attached to the window wall and the nesting box wall on the backside!
***Make sure the walls are level on the ground…and each other before screwing them into place!***
Maybe this will help you see the final outcome!
Once everything is level and screwed together, you can add the plywood to the walls.
Adding Plywood to the DIY Chicken Coop
You will want to measure all walls and openings prior to making any cuts in your plywood! The measurements given here are based on exact measurements, any small changes in measurements affect the measurements given below!
I attached plywood to the two sides that will remain 6ft. and then had to attach the roof rafters before adding plywood to the other two sides…measurements are based on doing it in this order.
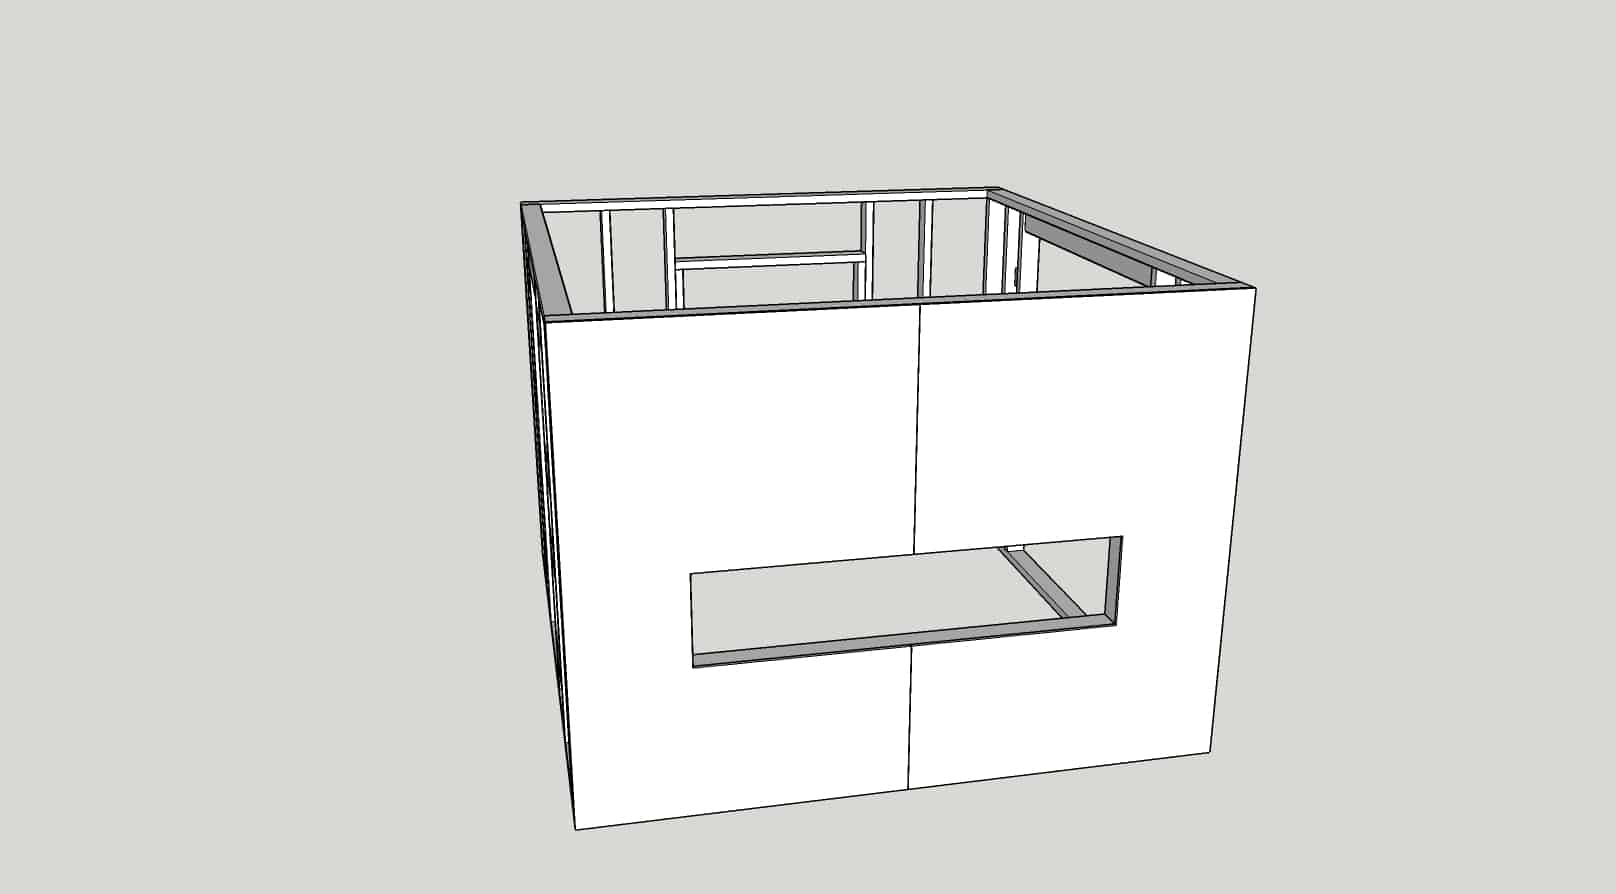
Nesting Box Wall Plywood for Chicken Coop
Using 2 sheets of plywood that are cut down to 71 1/2″, make the nesting box cut out as shown below. (I altered the 72″ to 71 1/2″ to leave a gap between the edge of the plywood and the soil to keep it from resting on the dirt, which will make it rot faster!)
Then using the same measurements cut another one opposite of the one above, or the same, and flip it over! Lol!
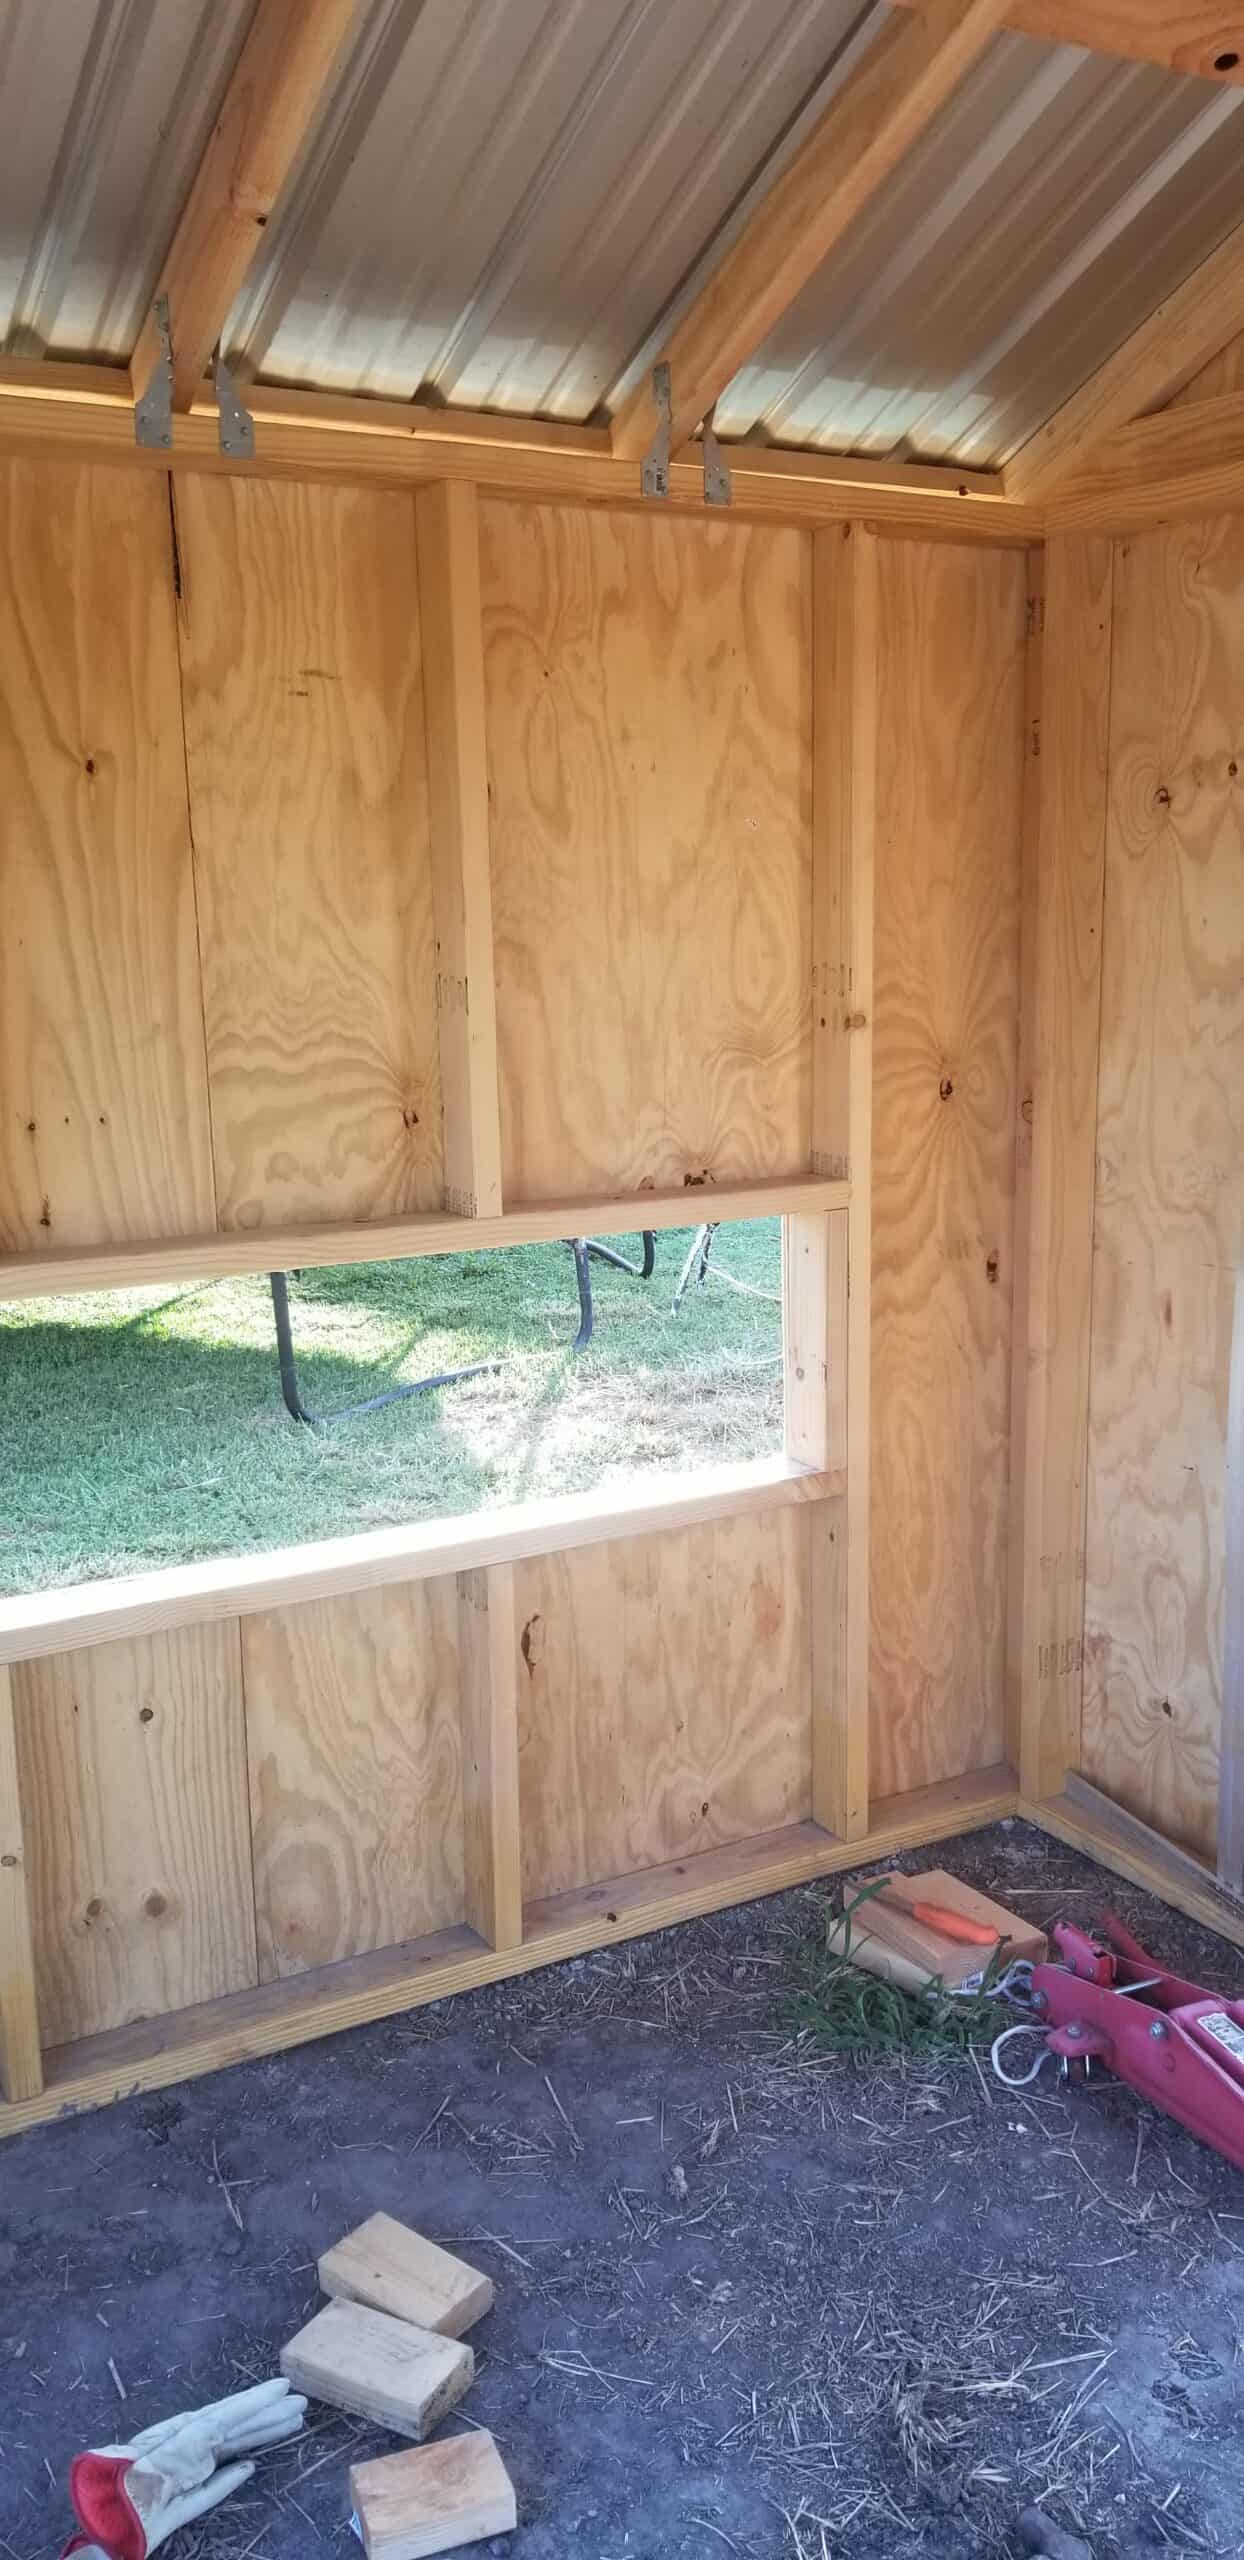
Window Wall Plywood for Chicken Coop
Using 2 of the 1/2″ plywood sheets that are cut down to 71 1/2″, make the cutouts as shown below to accommodate the window opening! Again, you will cut two that are ultimately the same, just flipped opposite directions!
Before adding the other plywood on the run and door wall, you will have to build the rafters!
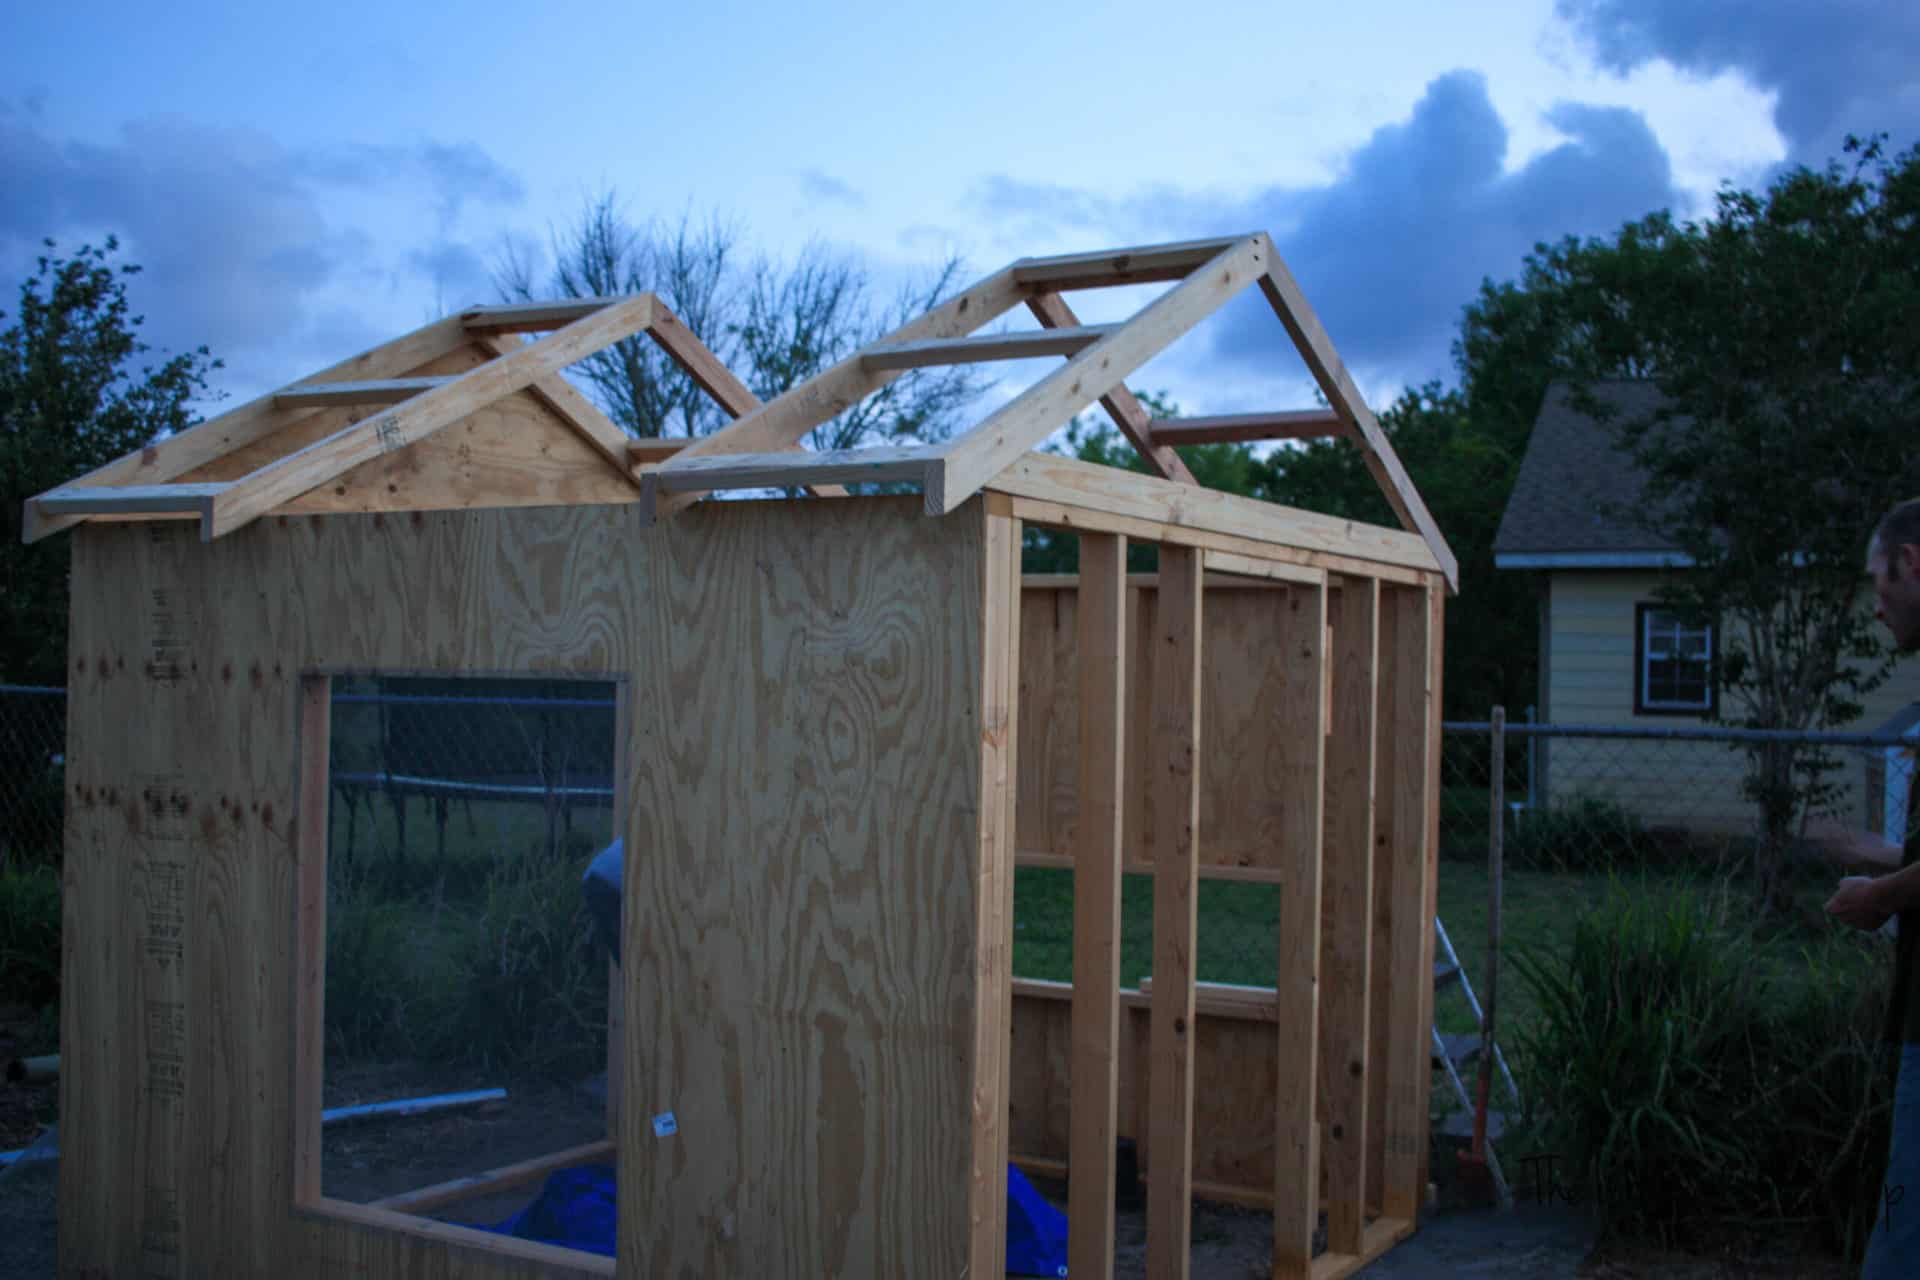
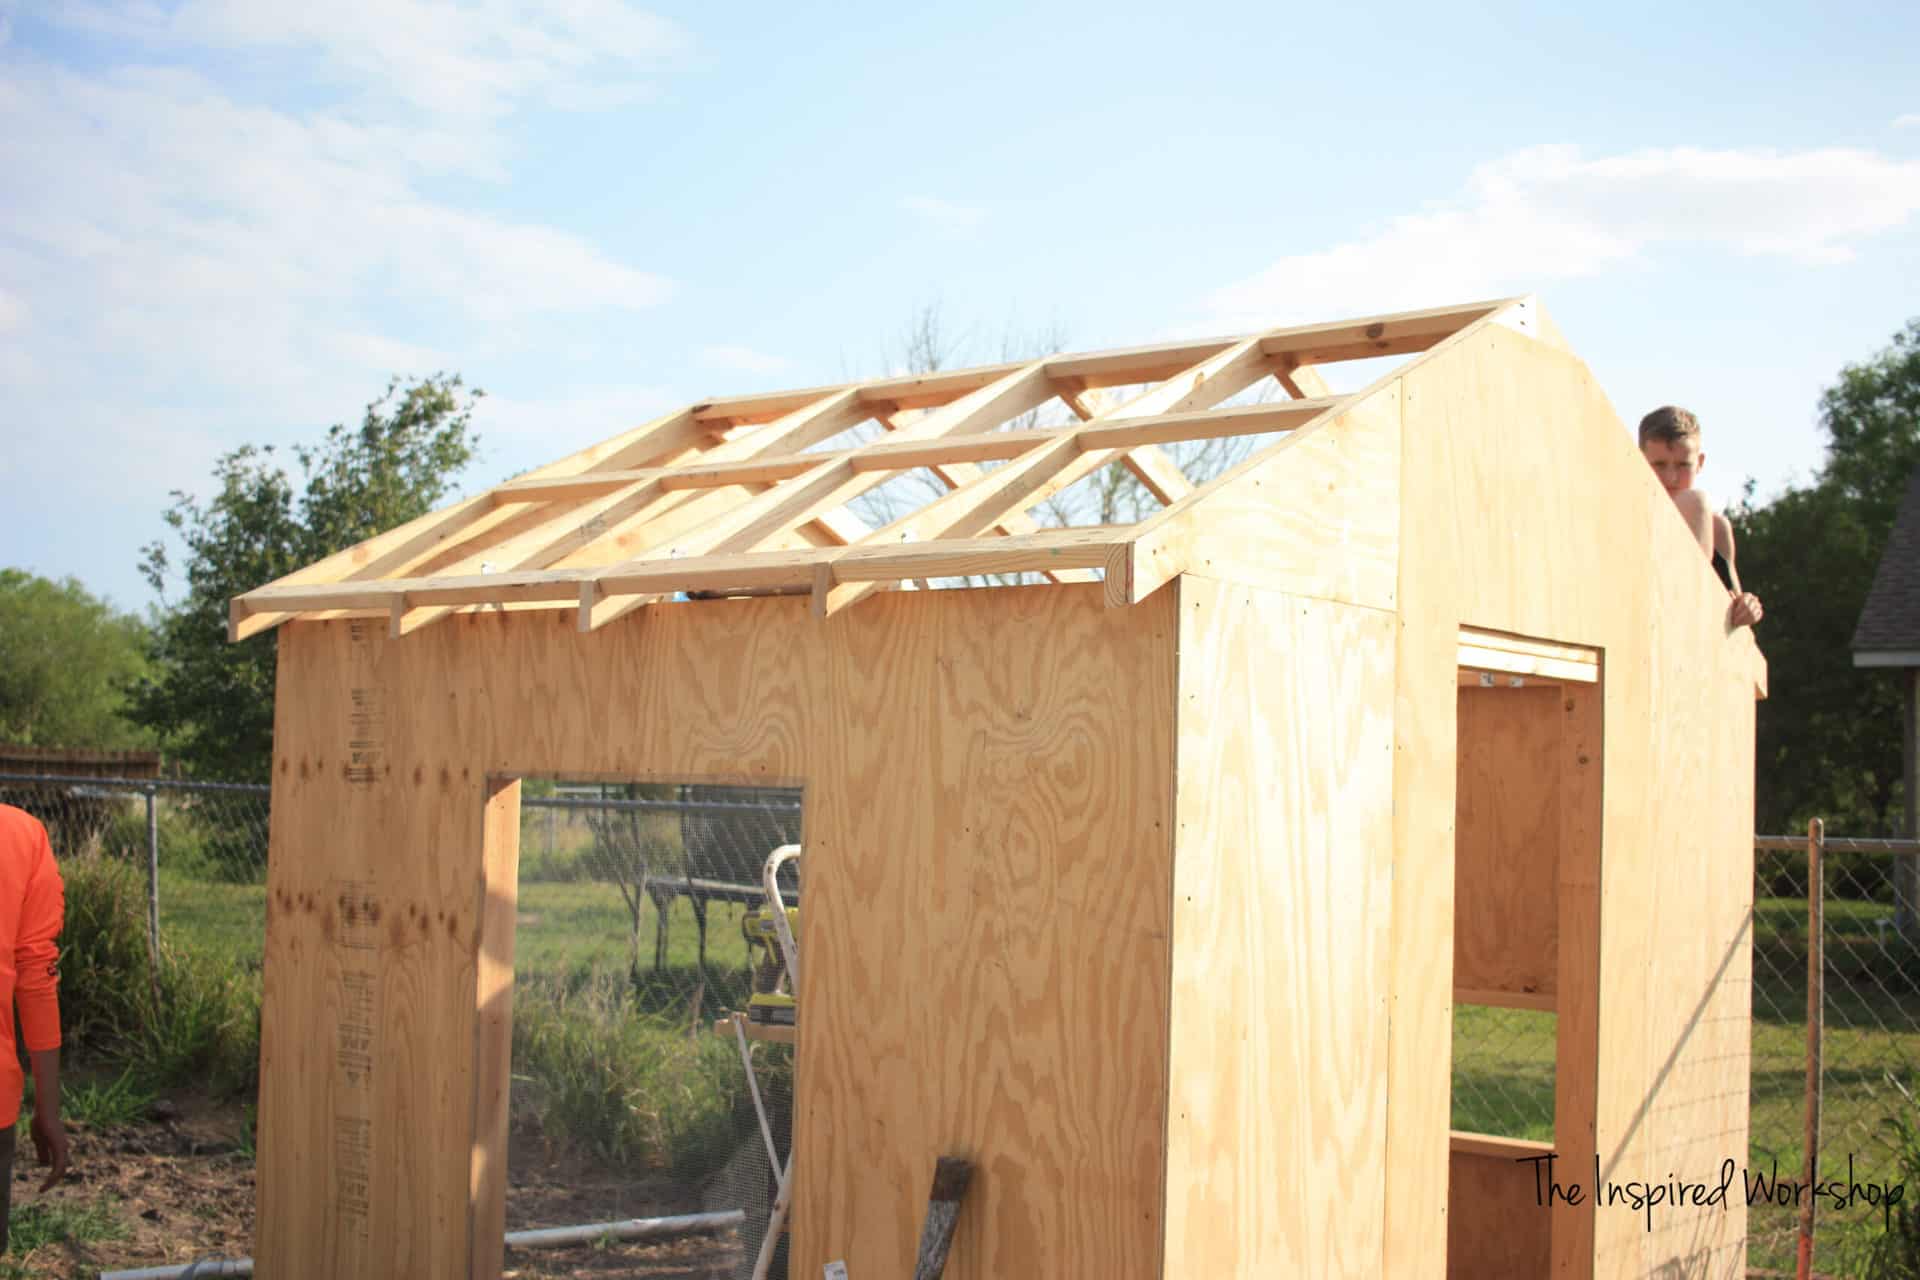
Building the Rafters for the DIY Chicken Coop
Time to add the rafters and REALLY make it look like a house of some sort!
You will make a total of five sets of rafters, 2 will have an extra board across the bottom of the rafter as seen below. I left the other 3 without this board so that the ceiling is open inside the coop and my hubby won’t hit his head! Lol! You can easily add a small brace towards the top if you’d like, but I found after the boards are added in between the rafters and all, there really wasn’t a need, they were pretty darn sturdy! We hung all over them and climbed on them and nothing was shifting whatsoever!
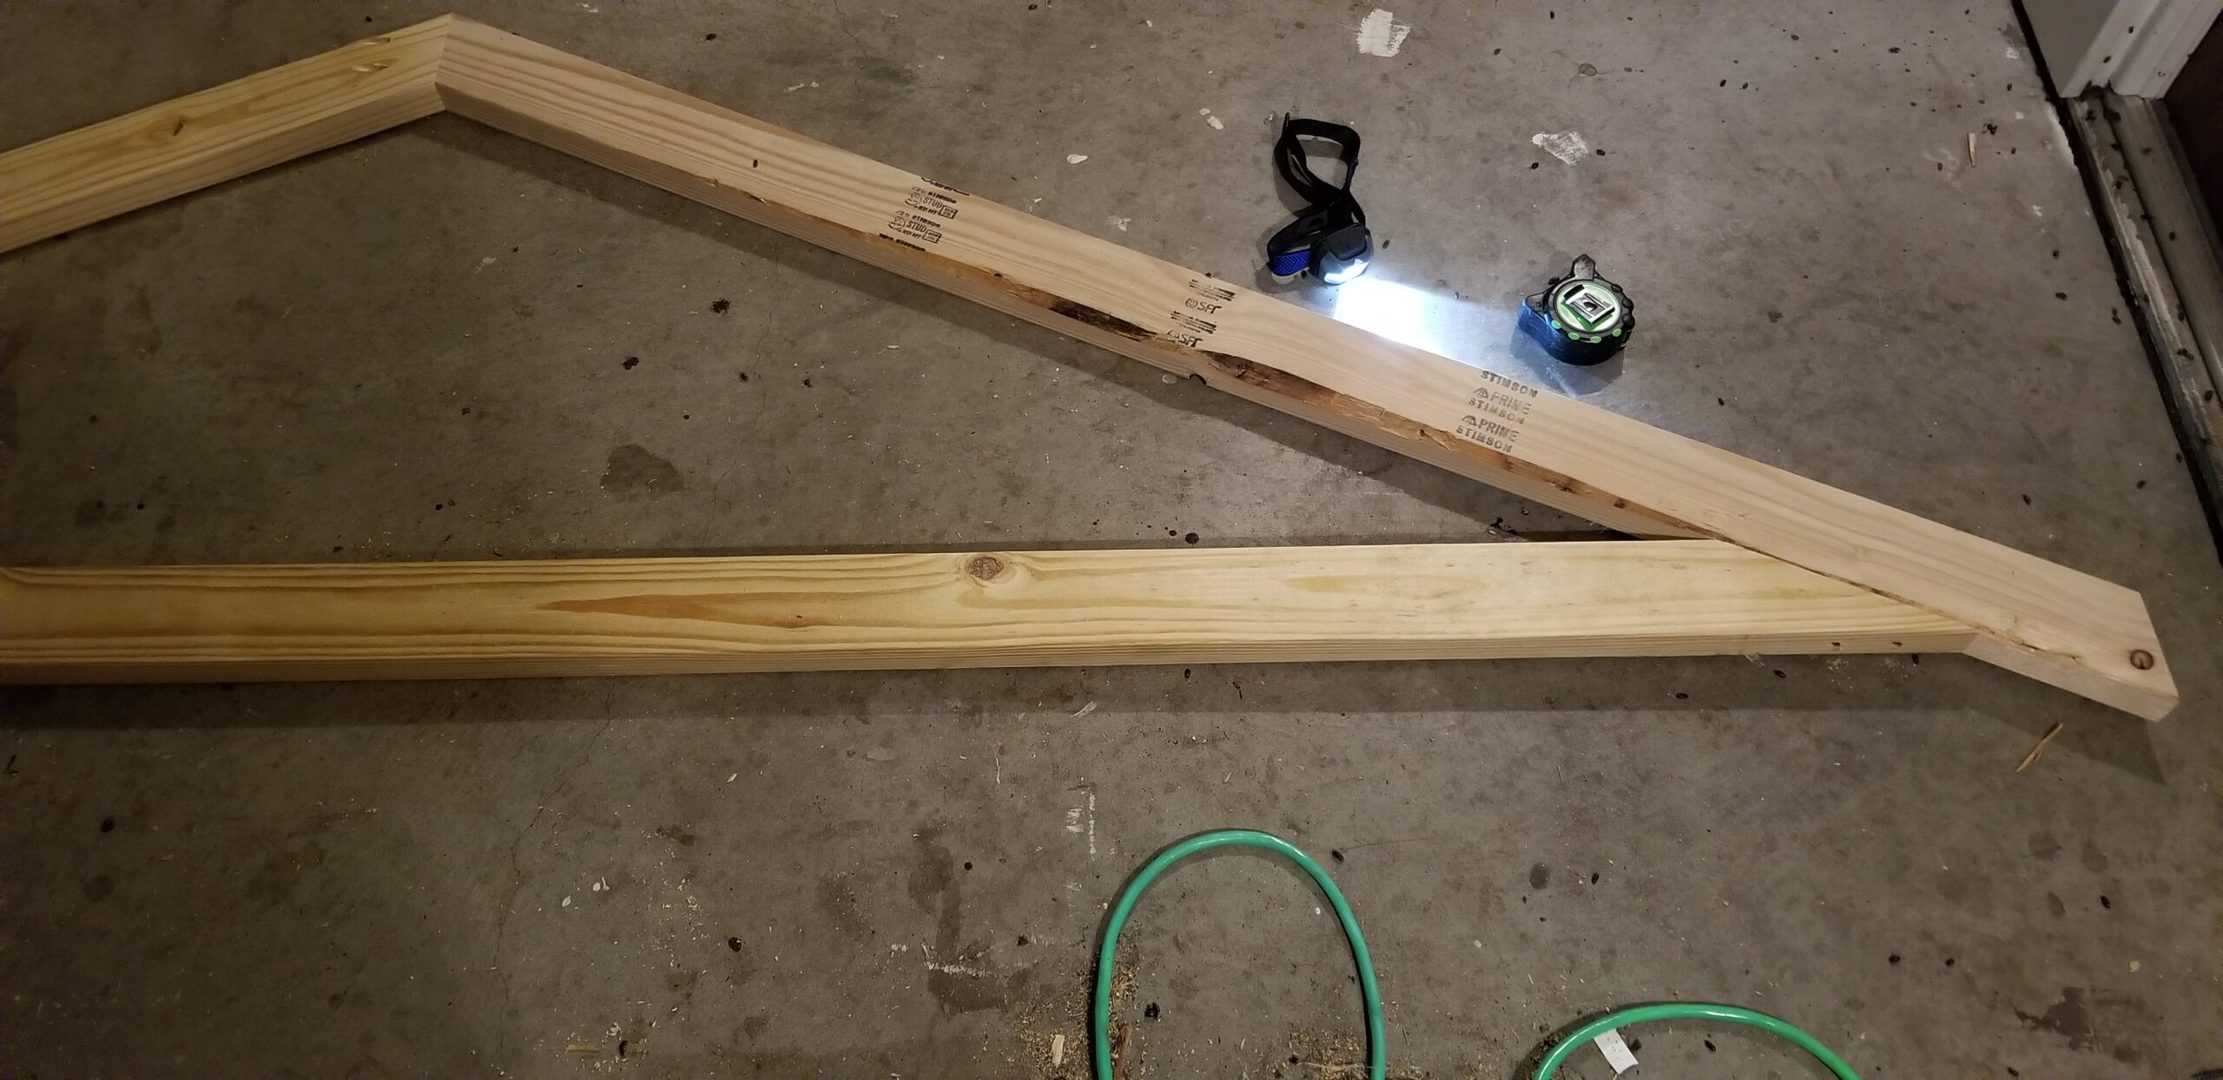
To build the three middle rafters, you will cut 2 boards at 63 1/8″ with both ends mitered at 25 degrees off square, ends parallel. Use pocket holes to attach the two boards together, drill pocket holes on one end of only one of the boards, holes will be drilled at 1 1/2″ deep and 2 1/2″ screws will be needed along with wood glue!
You can hardly see them, but the pocket holes are at the top on the left board!
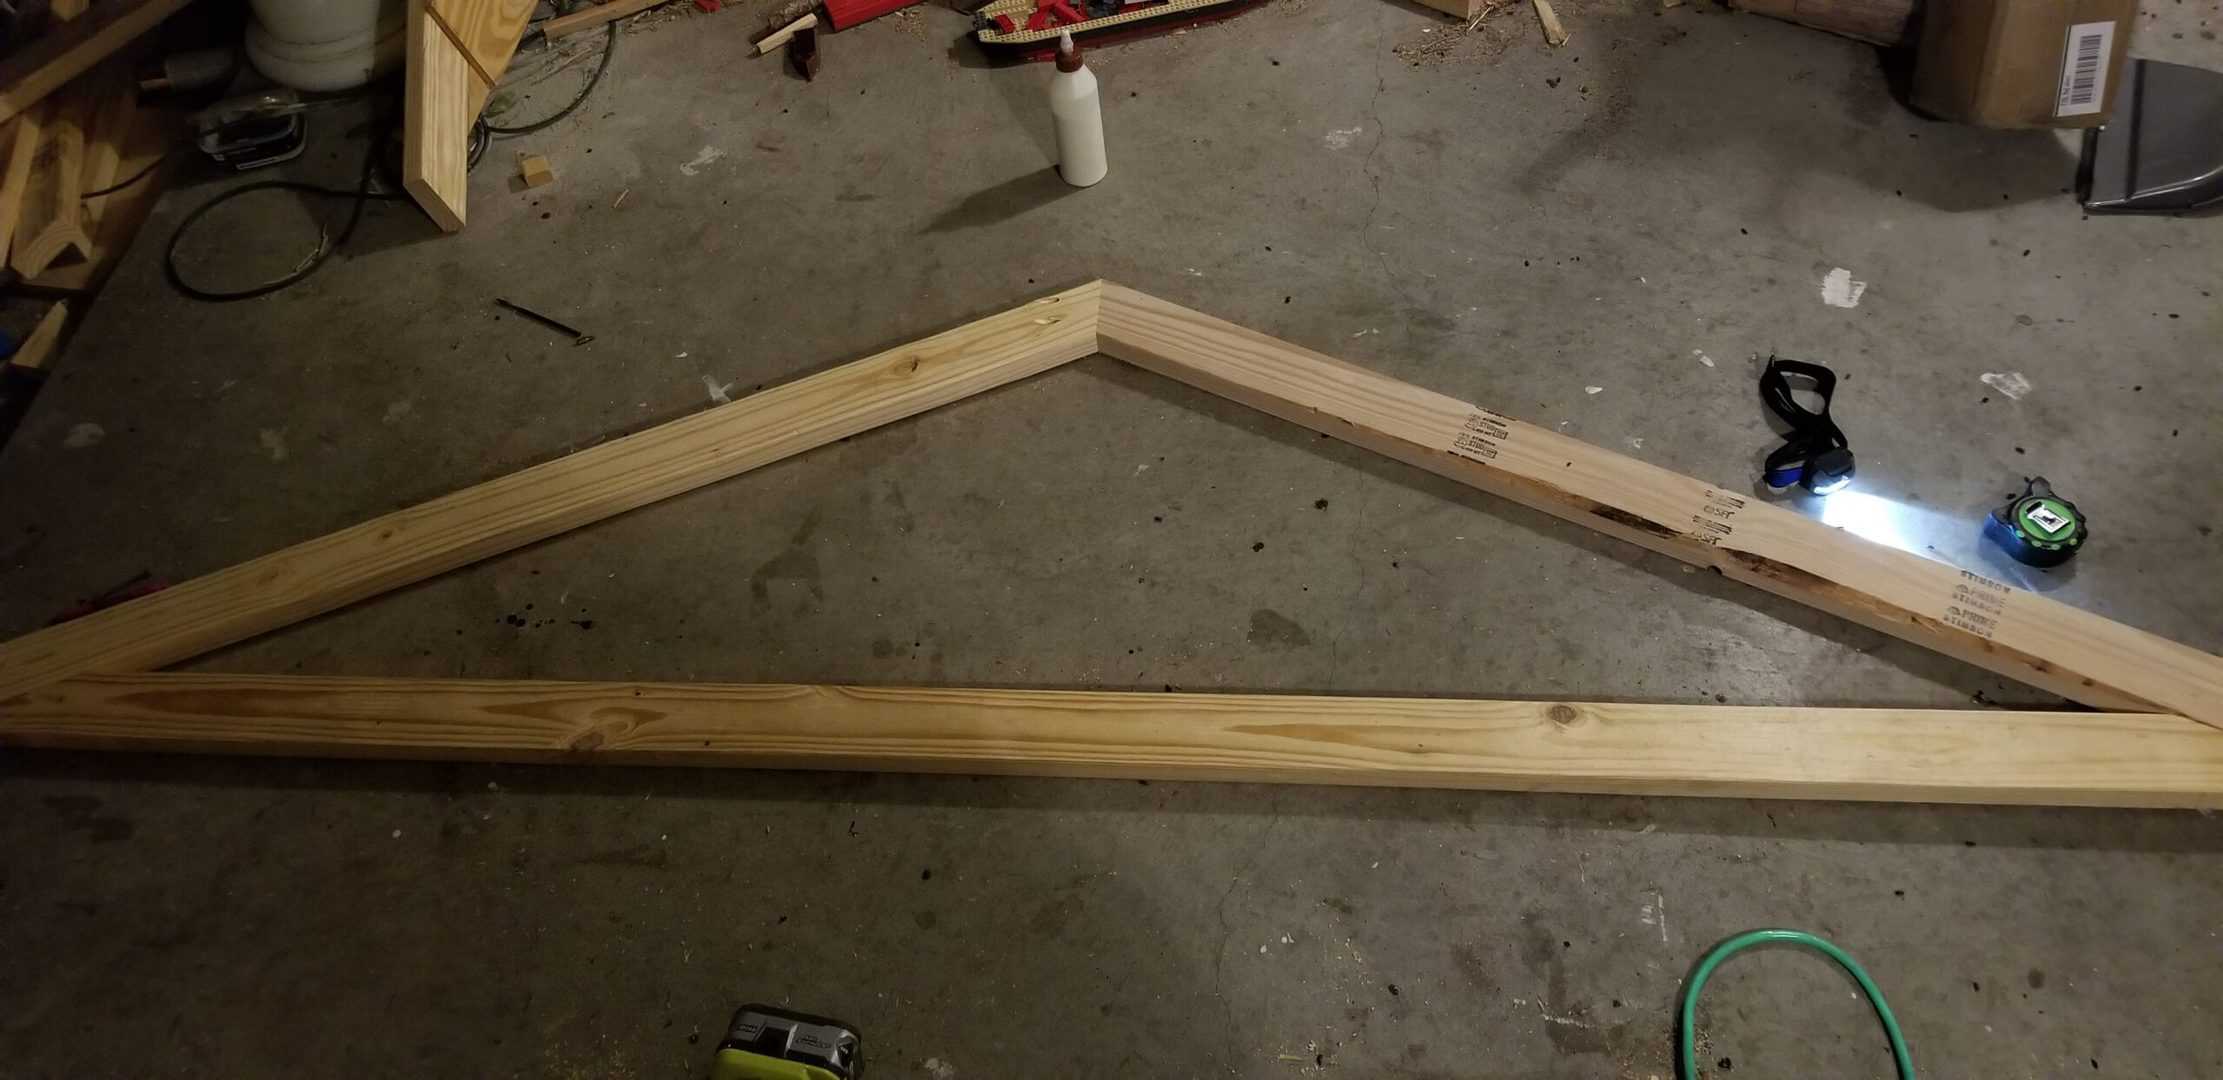
The bottom brace that will be on the end of two rafters will be screwed in on the ends. This board will be cut at 104″ long with both ends mitered at 65 degrees off square, ends not parallel. It should be 6″ up from the end of the board it’s being attached to.
Now, I realize that typically, they notch the rafters to lay flat on the 2×4 of the wall, I tried and failed on two different 2x4s and gave up, found an option that was far easier for me, and rolled with it! Lol! I just attached the roof brackets directly to the 2x4s on both sides and it was sturdy enough…I mean crap, it has already survived a pretty good storm when hurricane Hanna came through! 😅
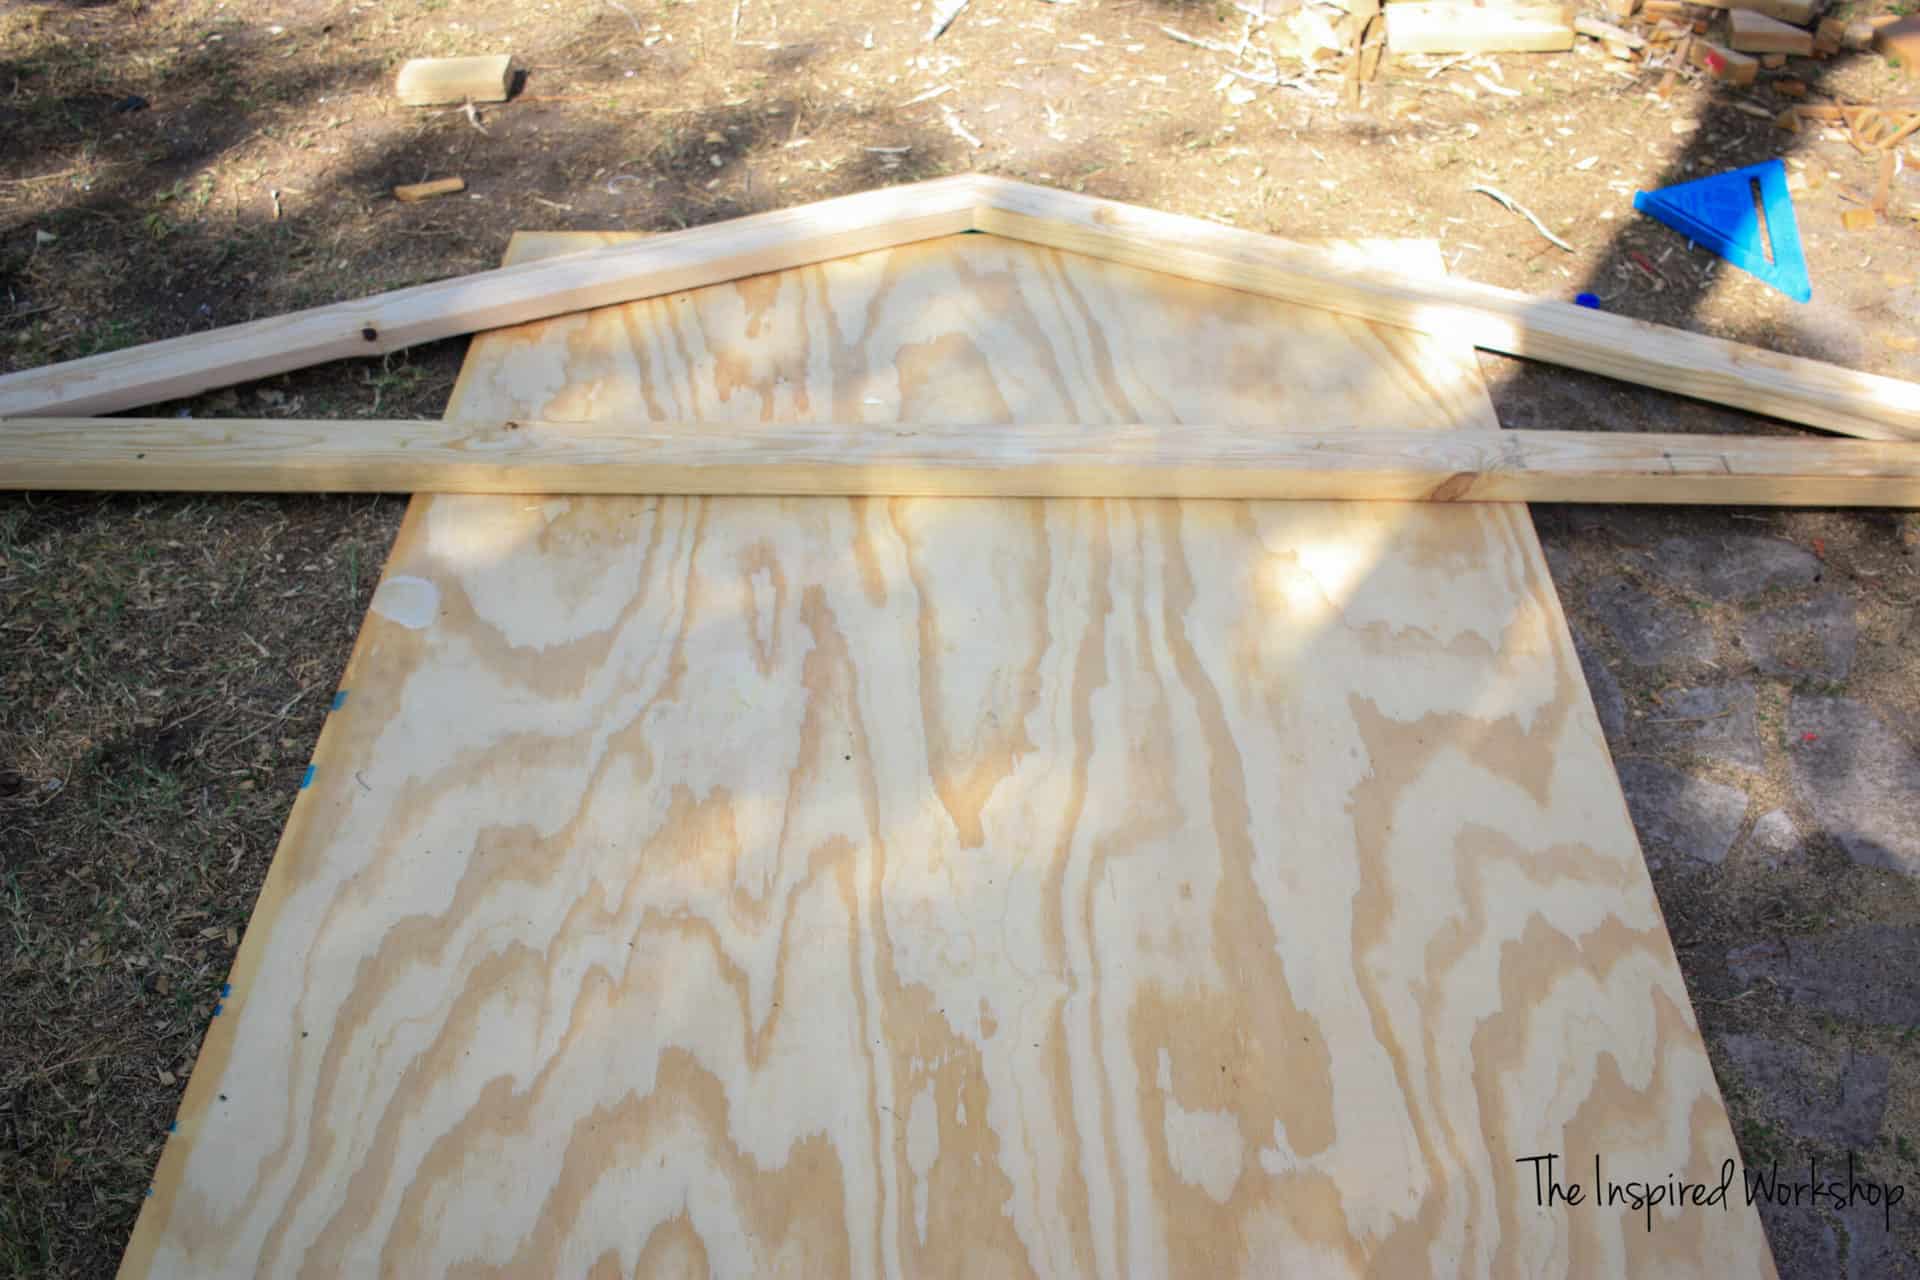
But before I get ahead of myself, let me show how I did a couple of things first! So to make cutting the plywood to fit over the rafters easier, I traced the rafter onto my plywood and cut it, before placing the rafters on the coop that way it wouldn’t be guessing at where to cut!
Make sure and measure up 71 1/2″ from the bottom and then lat your rafter there completely centered at the top. It will not reach the top completely! It’s okay, it will be covered by trim boards and no one will ever know! Lol!
The photo above is for the door wall. I added another sheet of plywood that was going on the side and traced the rafter onto it as well. And because I made a mistake on one of my pieces of plywood, I had to piece together the door wall of the coop, you will have three solid pieces though!
This sounds a little confusing as I am trying to explain it, but it really isn’t…let me show you the photo of how the door wall plywood went on.
See how the pieces are pieced together. Your left side should look just like your right though, instead of two pieces patched together yours should be one! You will want to cut the door out before hanging the plywood as well!
Run wall plywood will look like this.
That is one 8ft sheet running longways. I cut it and attached it to the rafters before I put the rafter up to make it easier!
BACK TO THE RAFTER CONSTRUCTION!
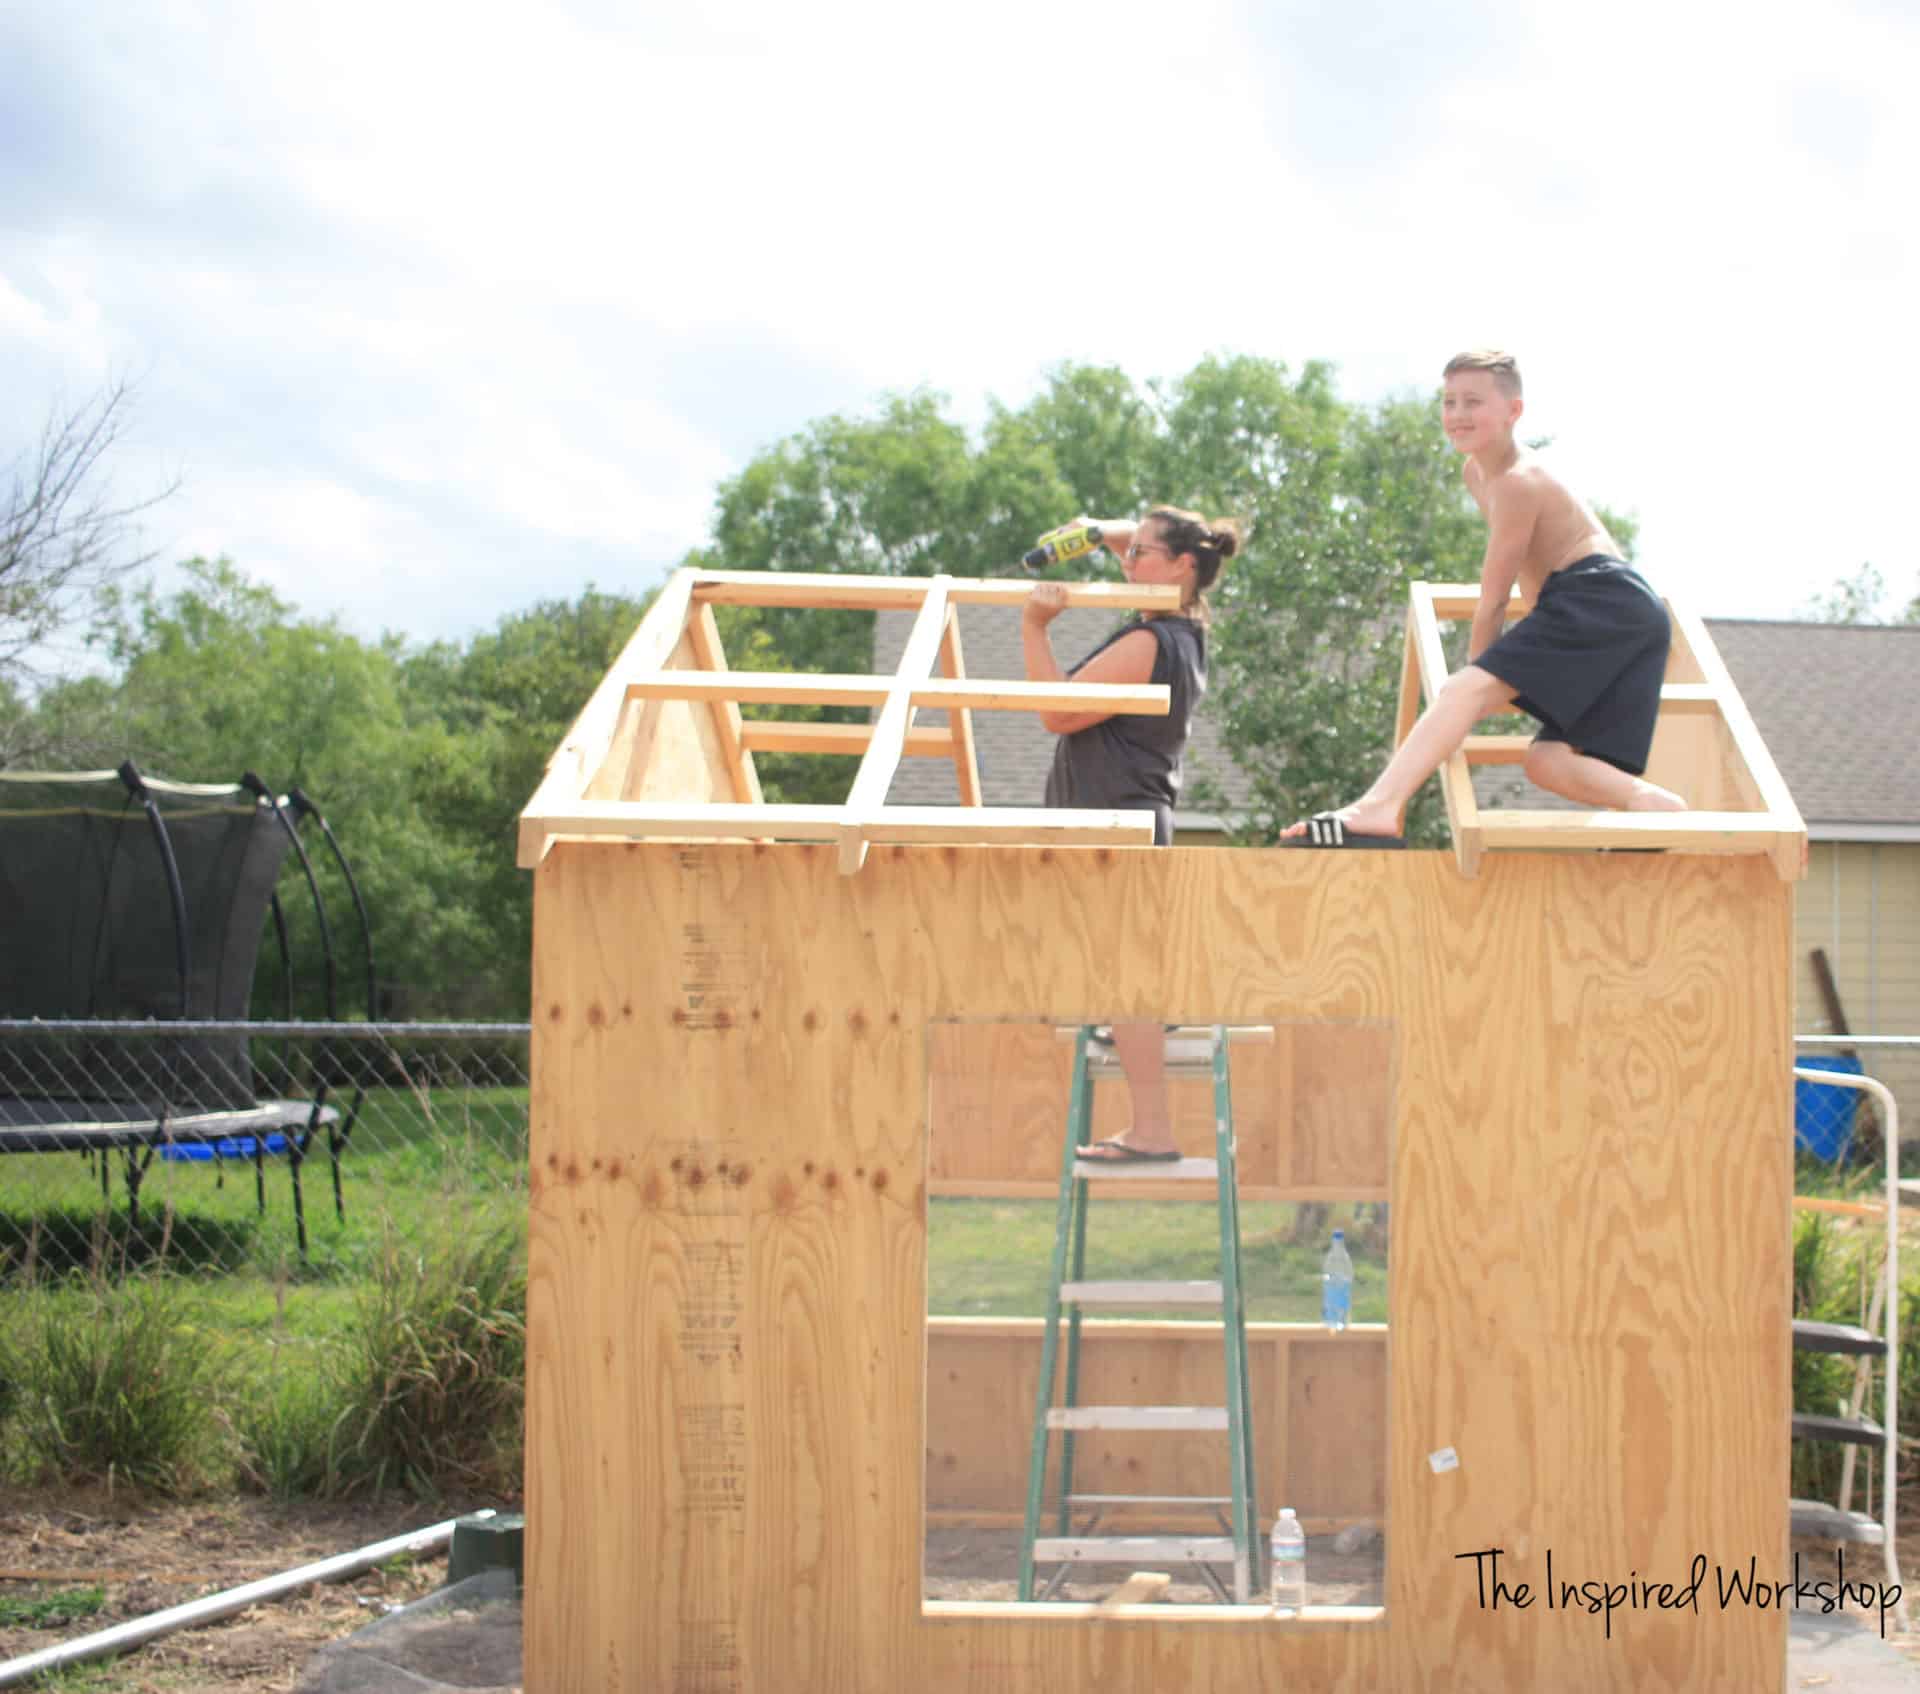
So to make putting the rafters up easier, I attached the end rafters to another rafter while on the ground. You do not have the do them this way, it just helped us throw them up and attach them a lot quicker than if we had to add the middle boards while up on top of the coop. We only had to add the middle rafter, and that one took way longer! Lol!
So basically, I placed each end rafter down and attached the boards as below…use pocket holes drilled 1 1/2″ deep and use 2 1/2″ screws with wood glue to attach them to the boards. Place another rafter that is not an edge rafter (no bottom board) on top and pocket hole it into place! (Sorry I didn’t take the pic with the other rafter on, but the next pic shows it well enough I believe!)
Then attach the large rafter sections to the chicken coop.
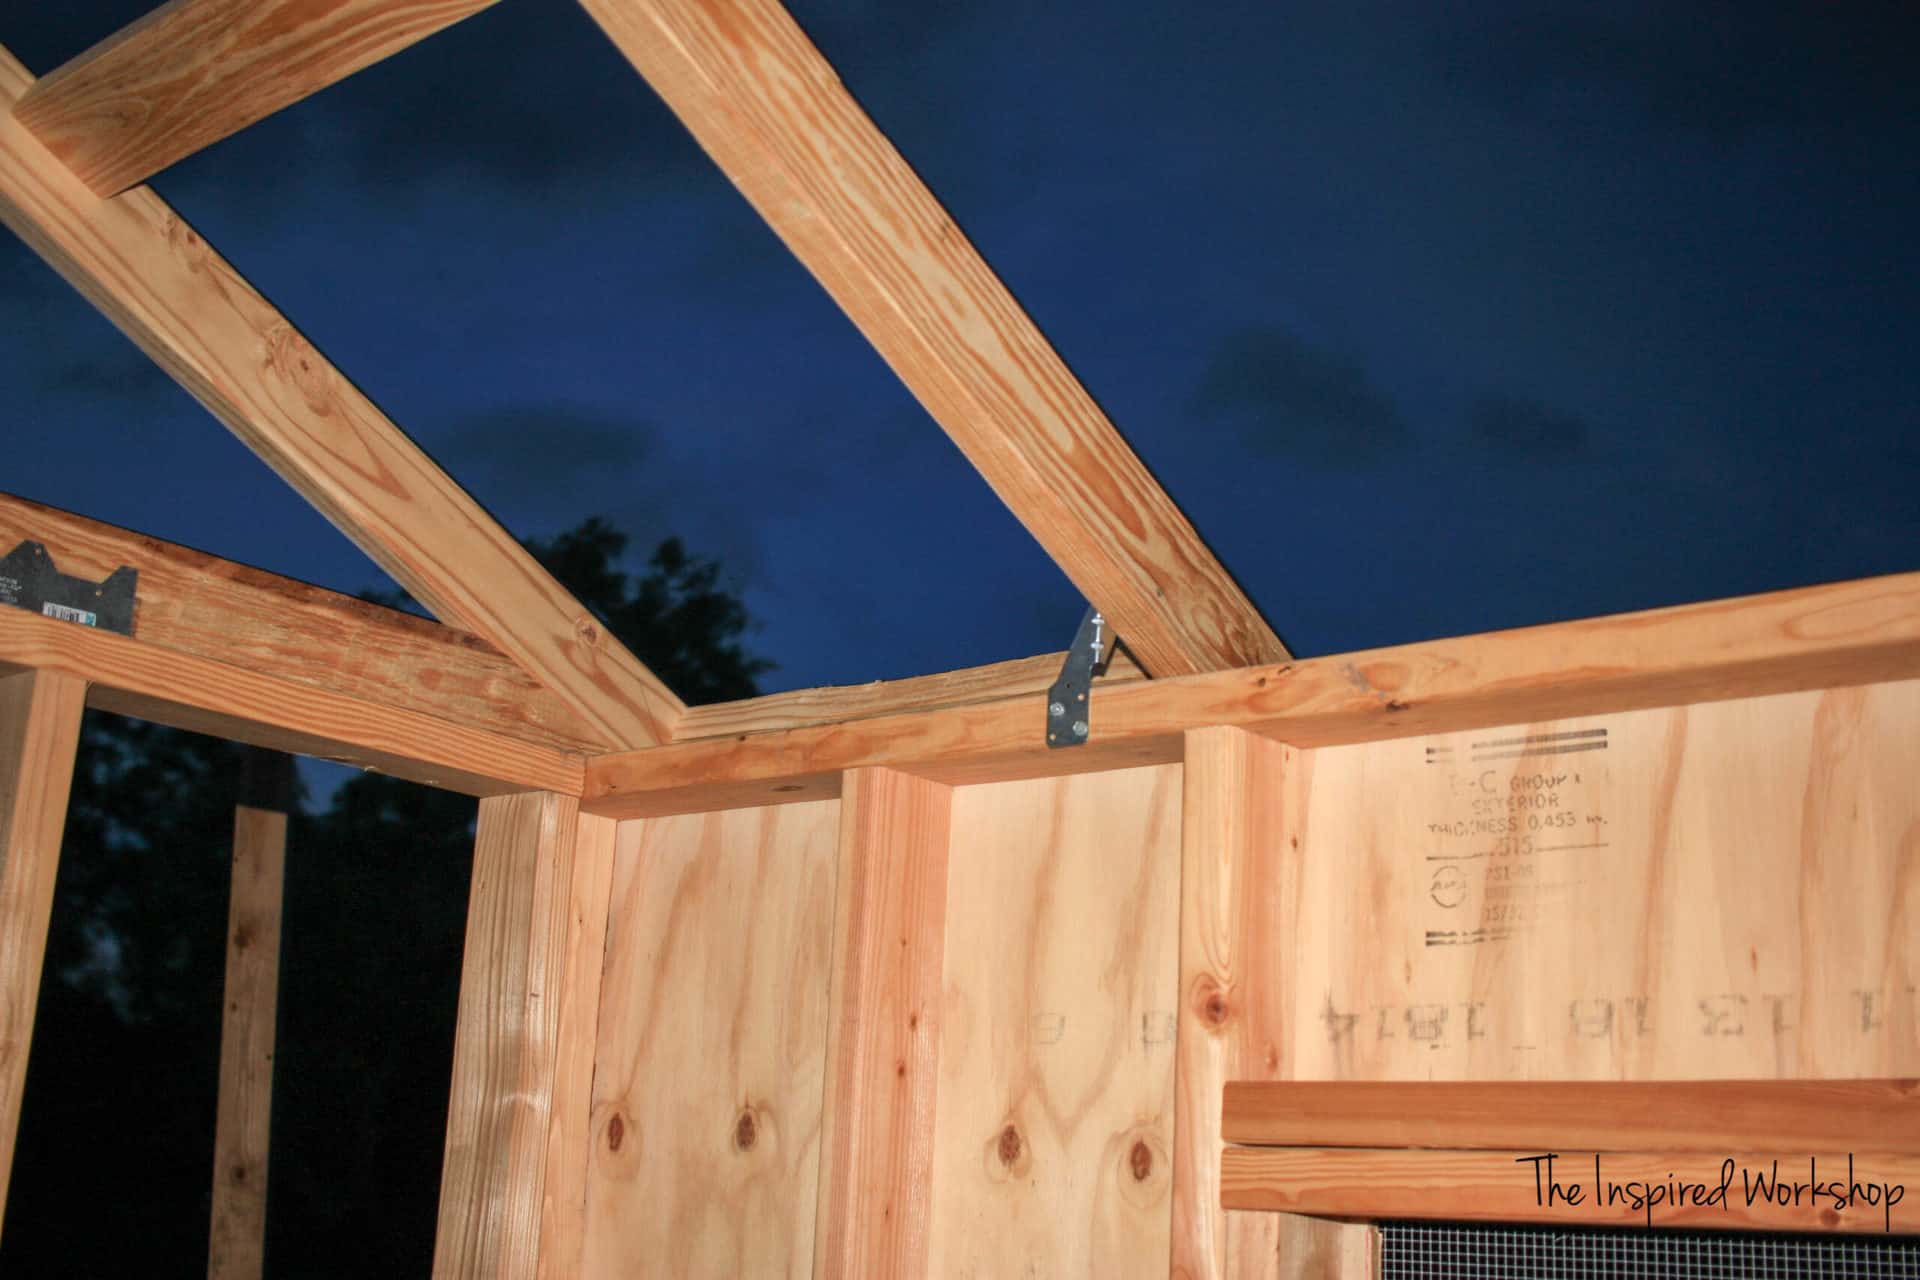
Just FYI, we added another bracket on the outside of that 2×4 as well…2 on every rafter. In the middle of the left side of the photo, you can see the brackets I used on the end rafters, I placed three along the rafter.
Not to jump ahead of ourselves, but here’s a pic of the rafters with both brackets!
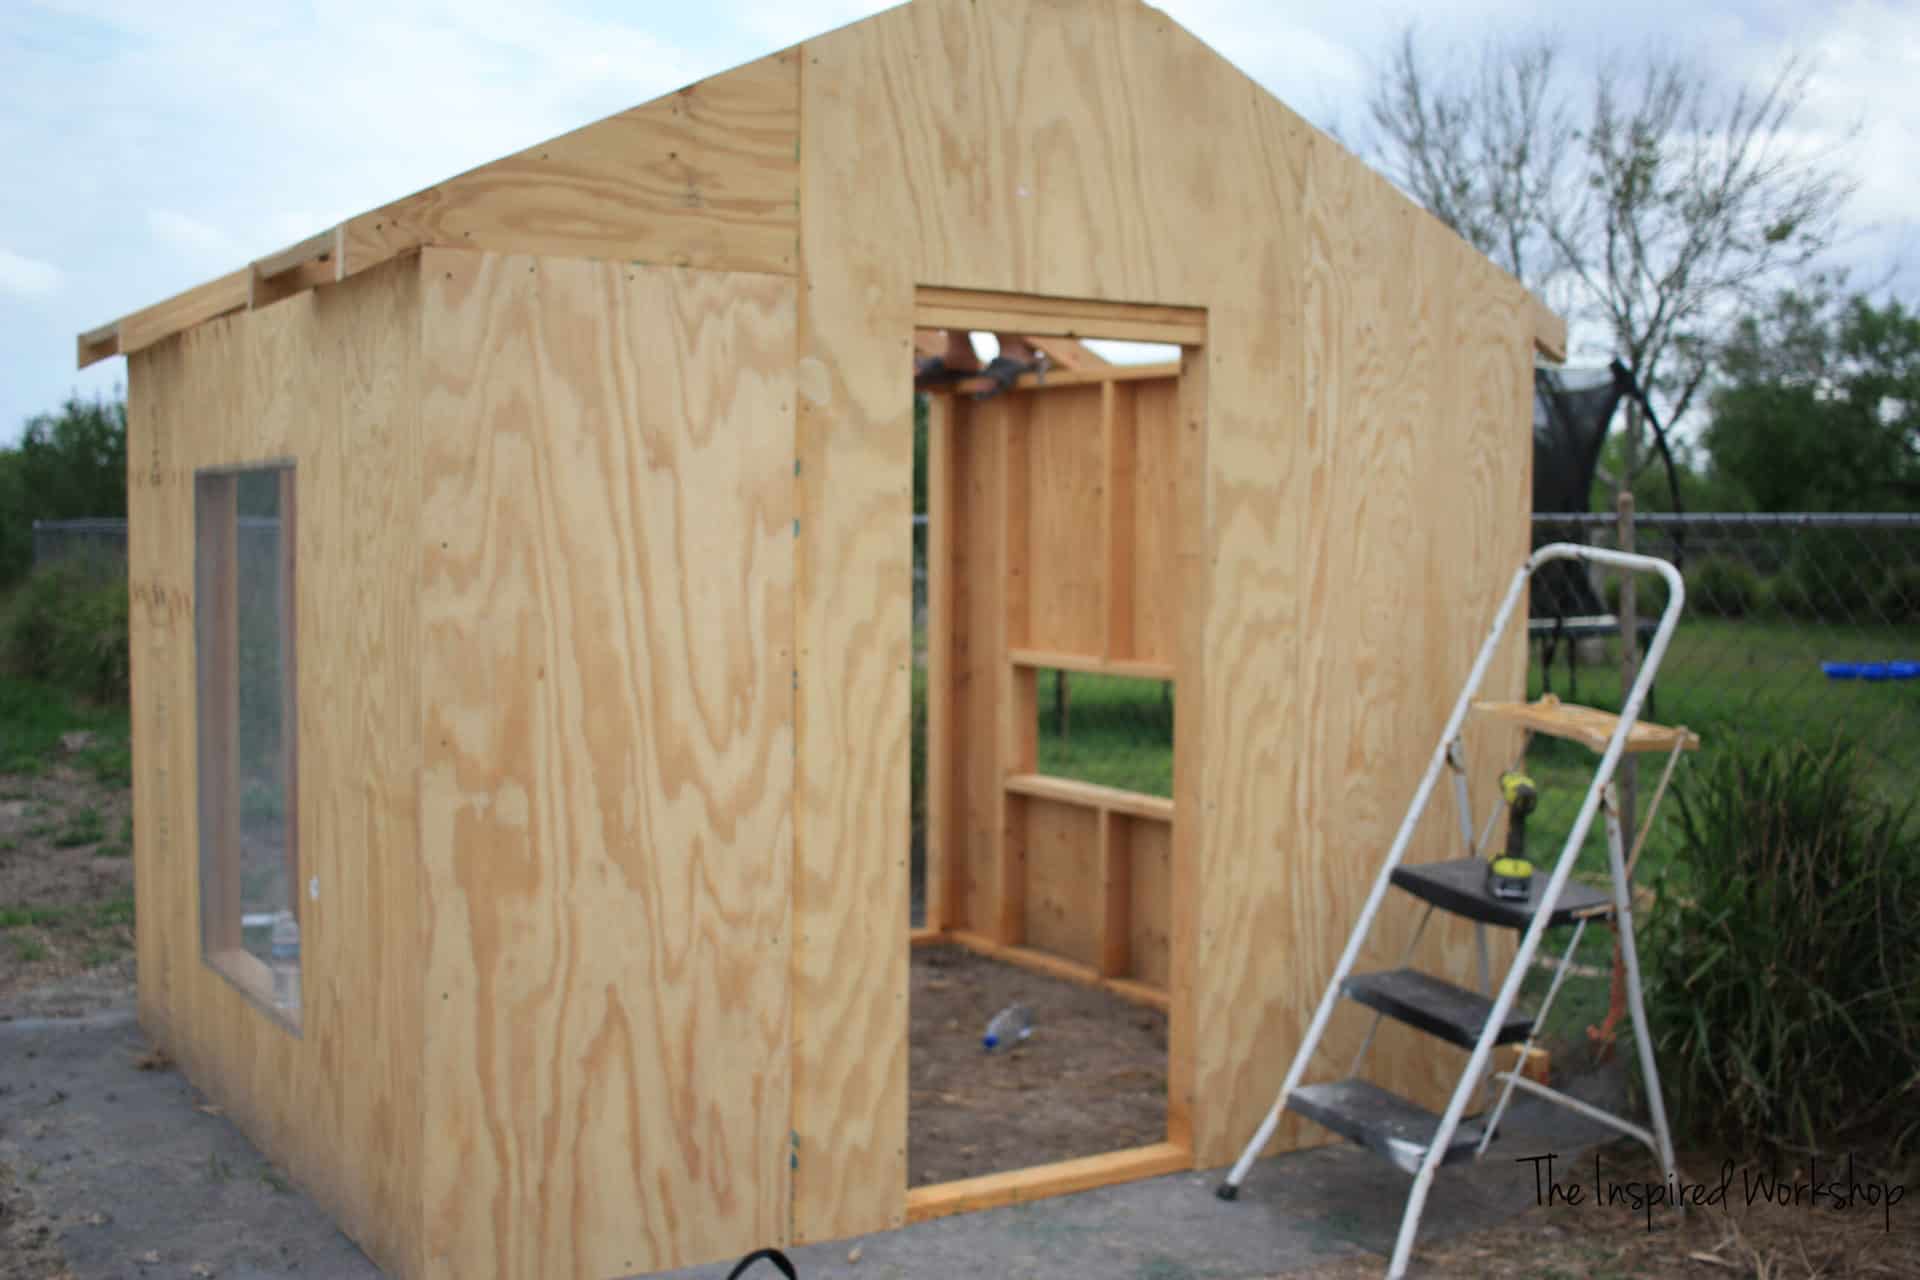
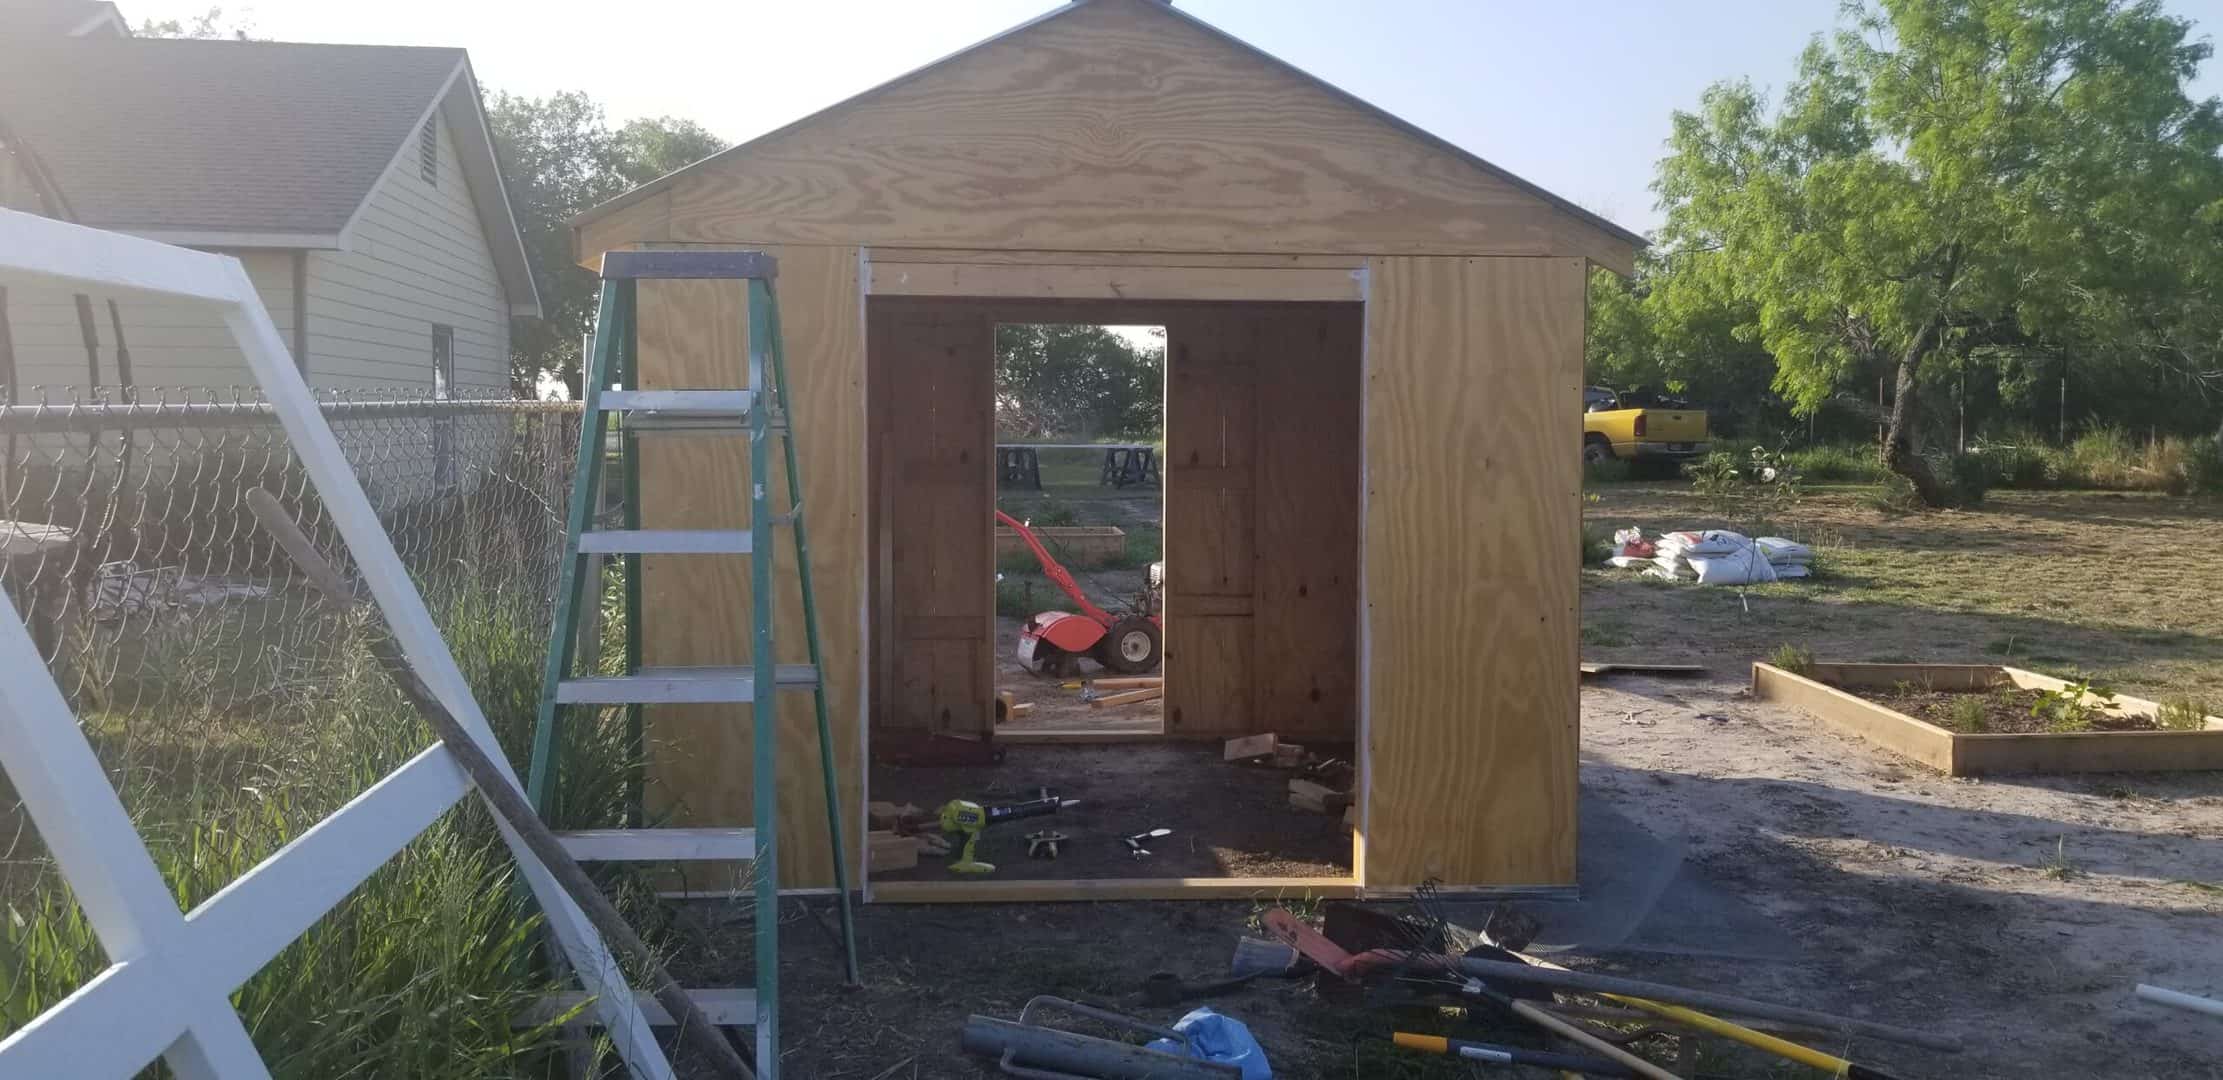
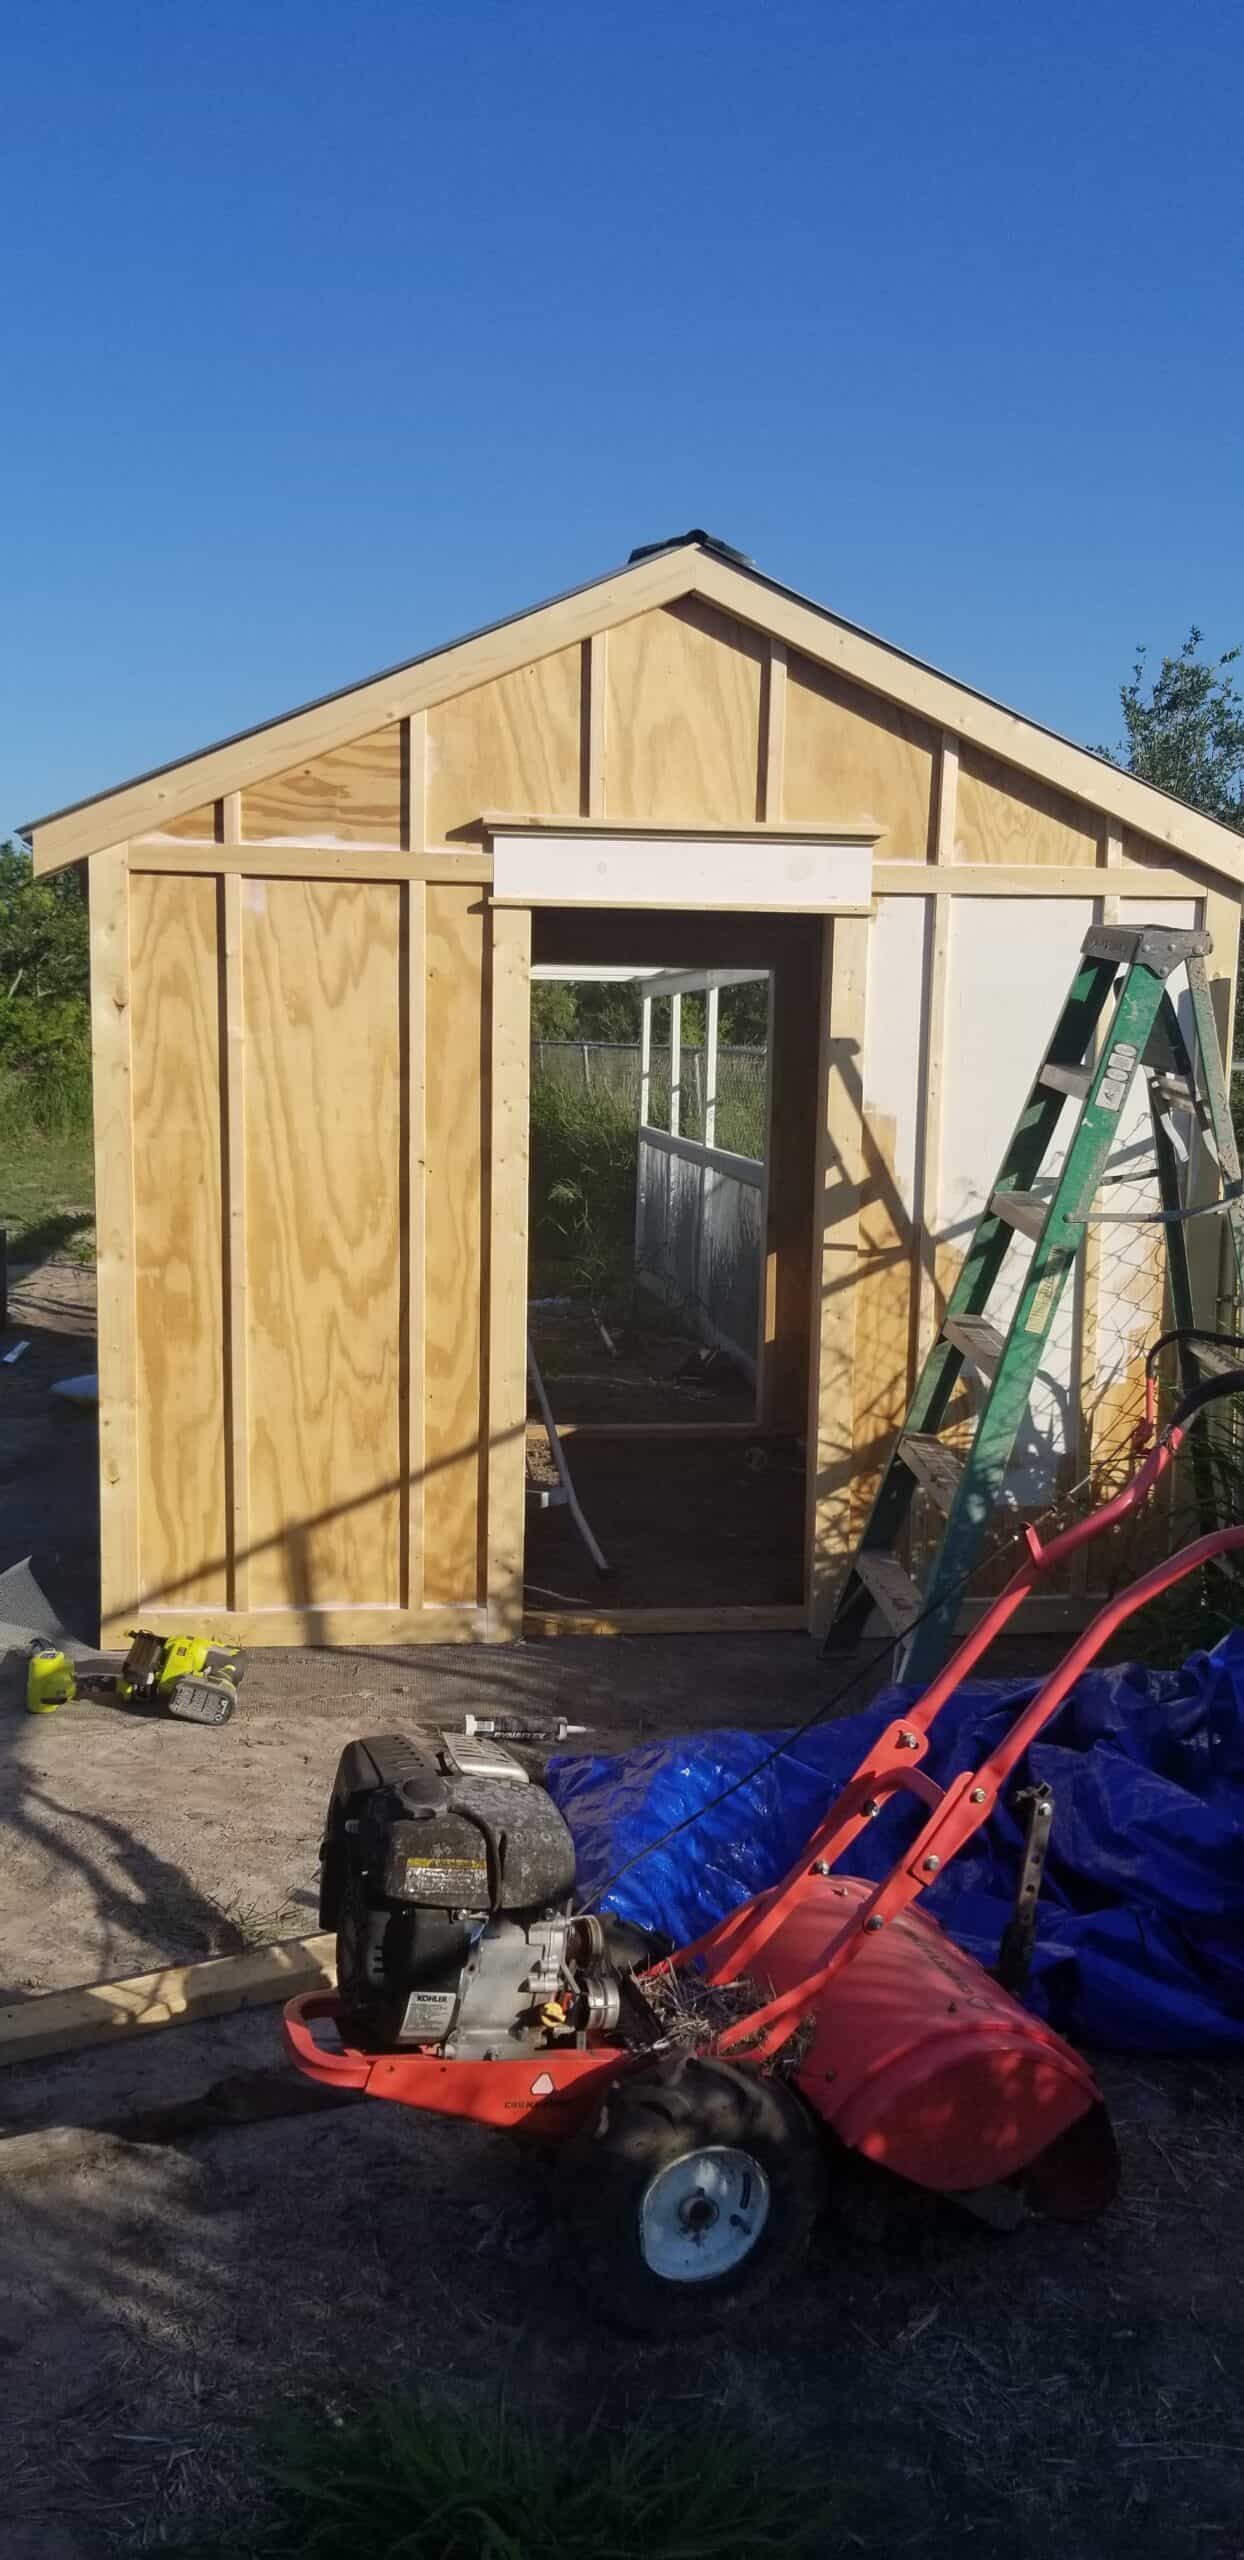
Adding Plywood to the Chicken Coop Door Wall
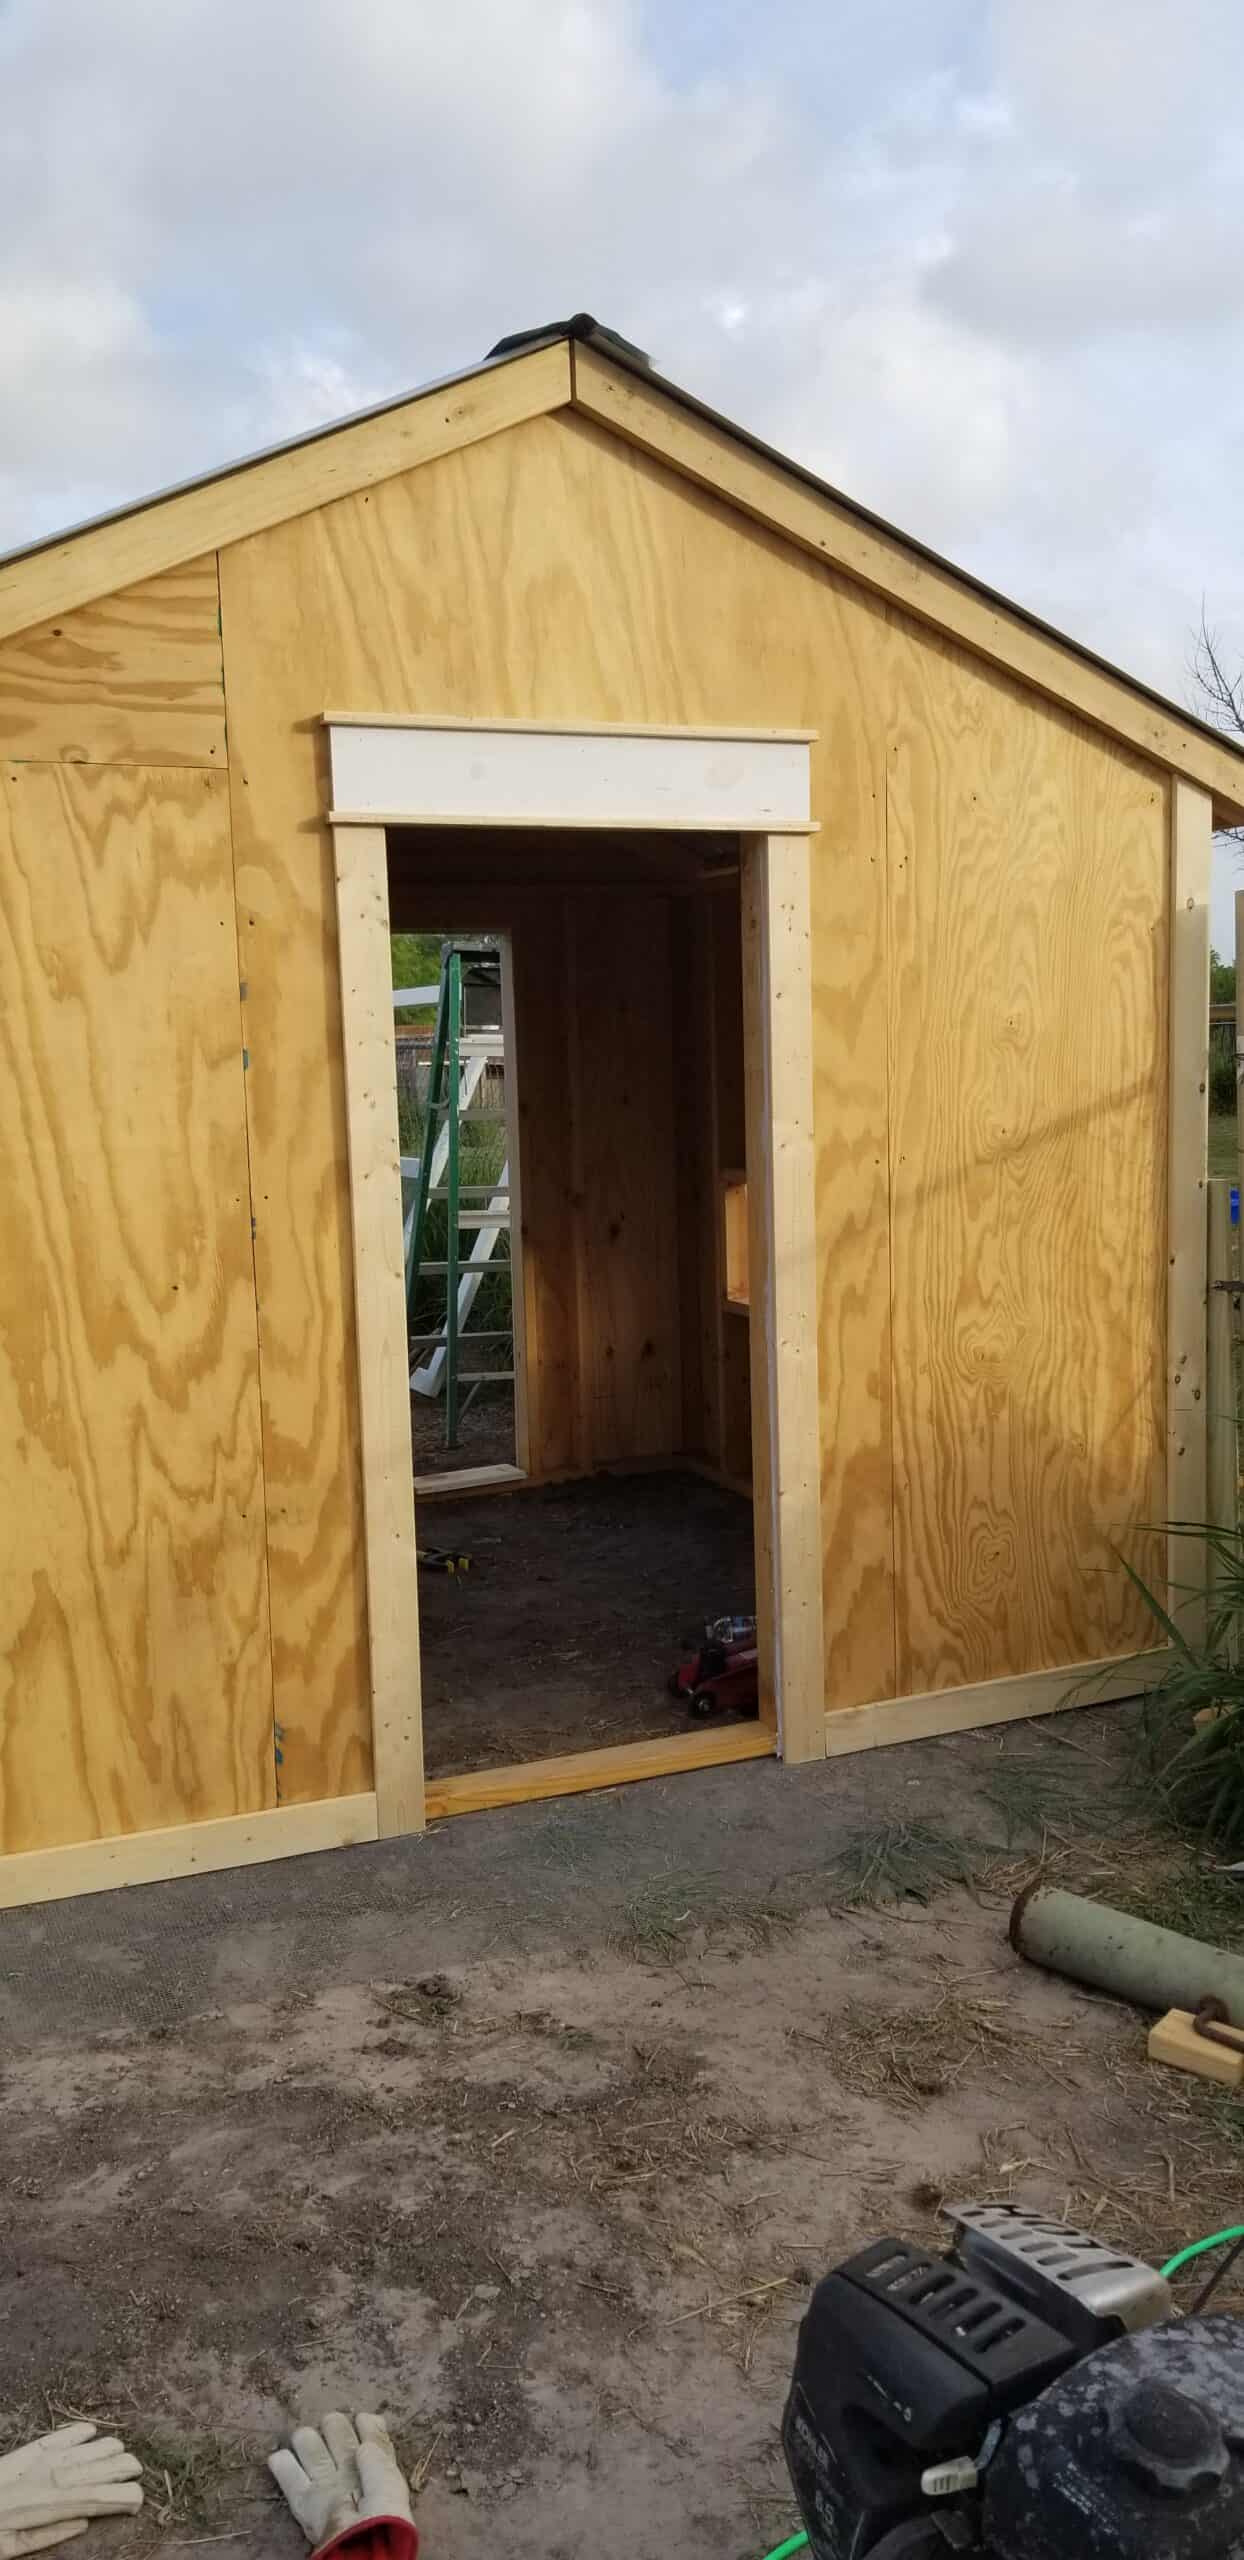
You can then add the next rafter, or I went ahead and attached the plywood to the door wall (the front) to stabilize the rafter as we placed the middle one! Plus the plywood was already cut so it was quick and easy to throw up there!
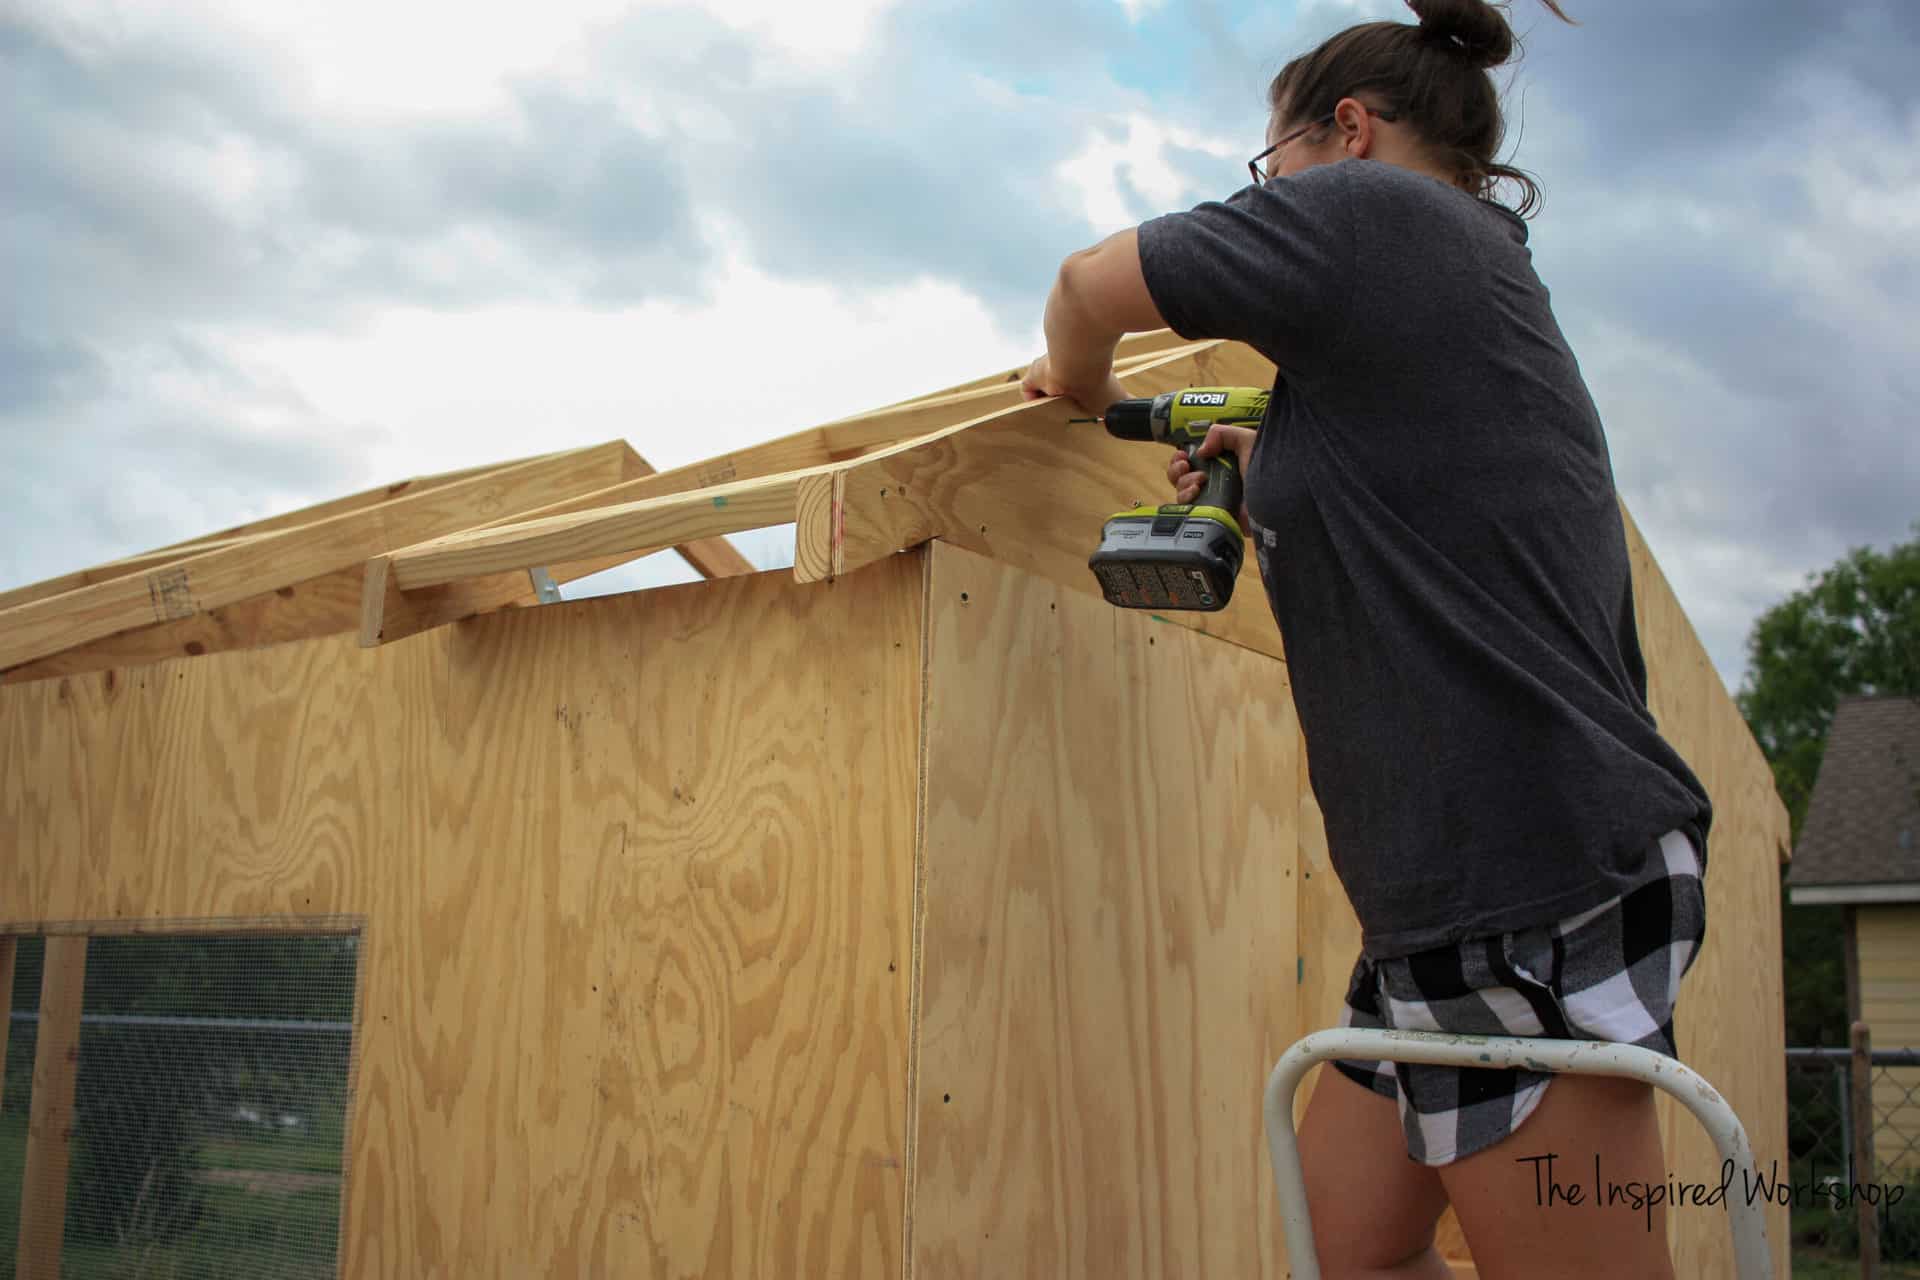
Yes, I get dressed up to work! 😂 Don’t mind me over here in my glasses and pajamas!😅
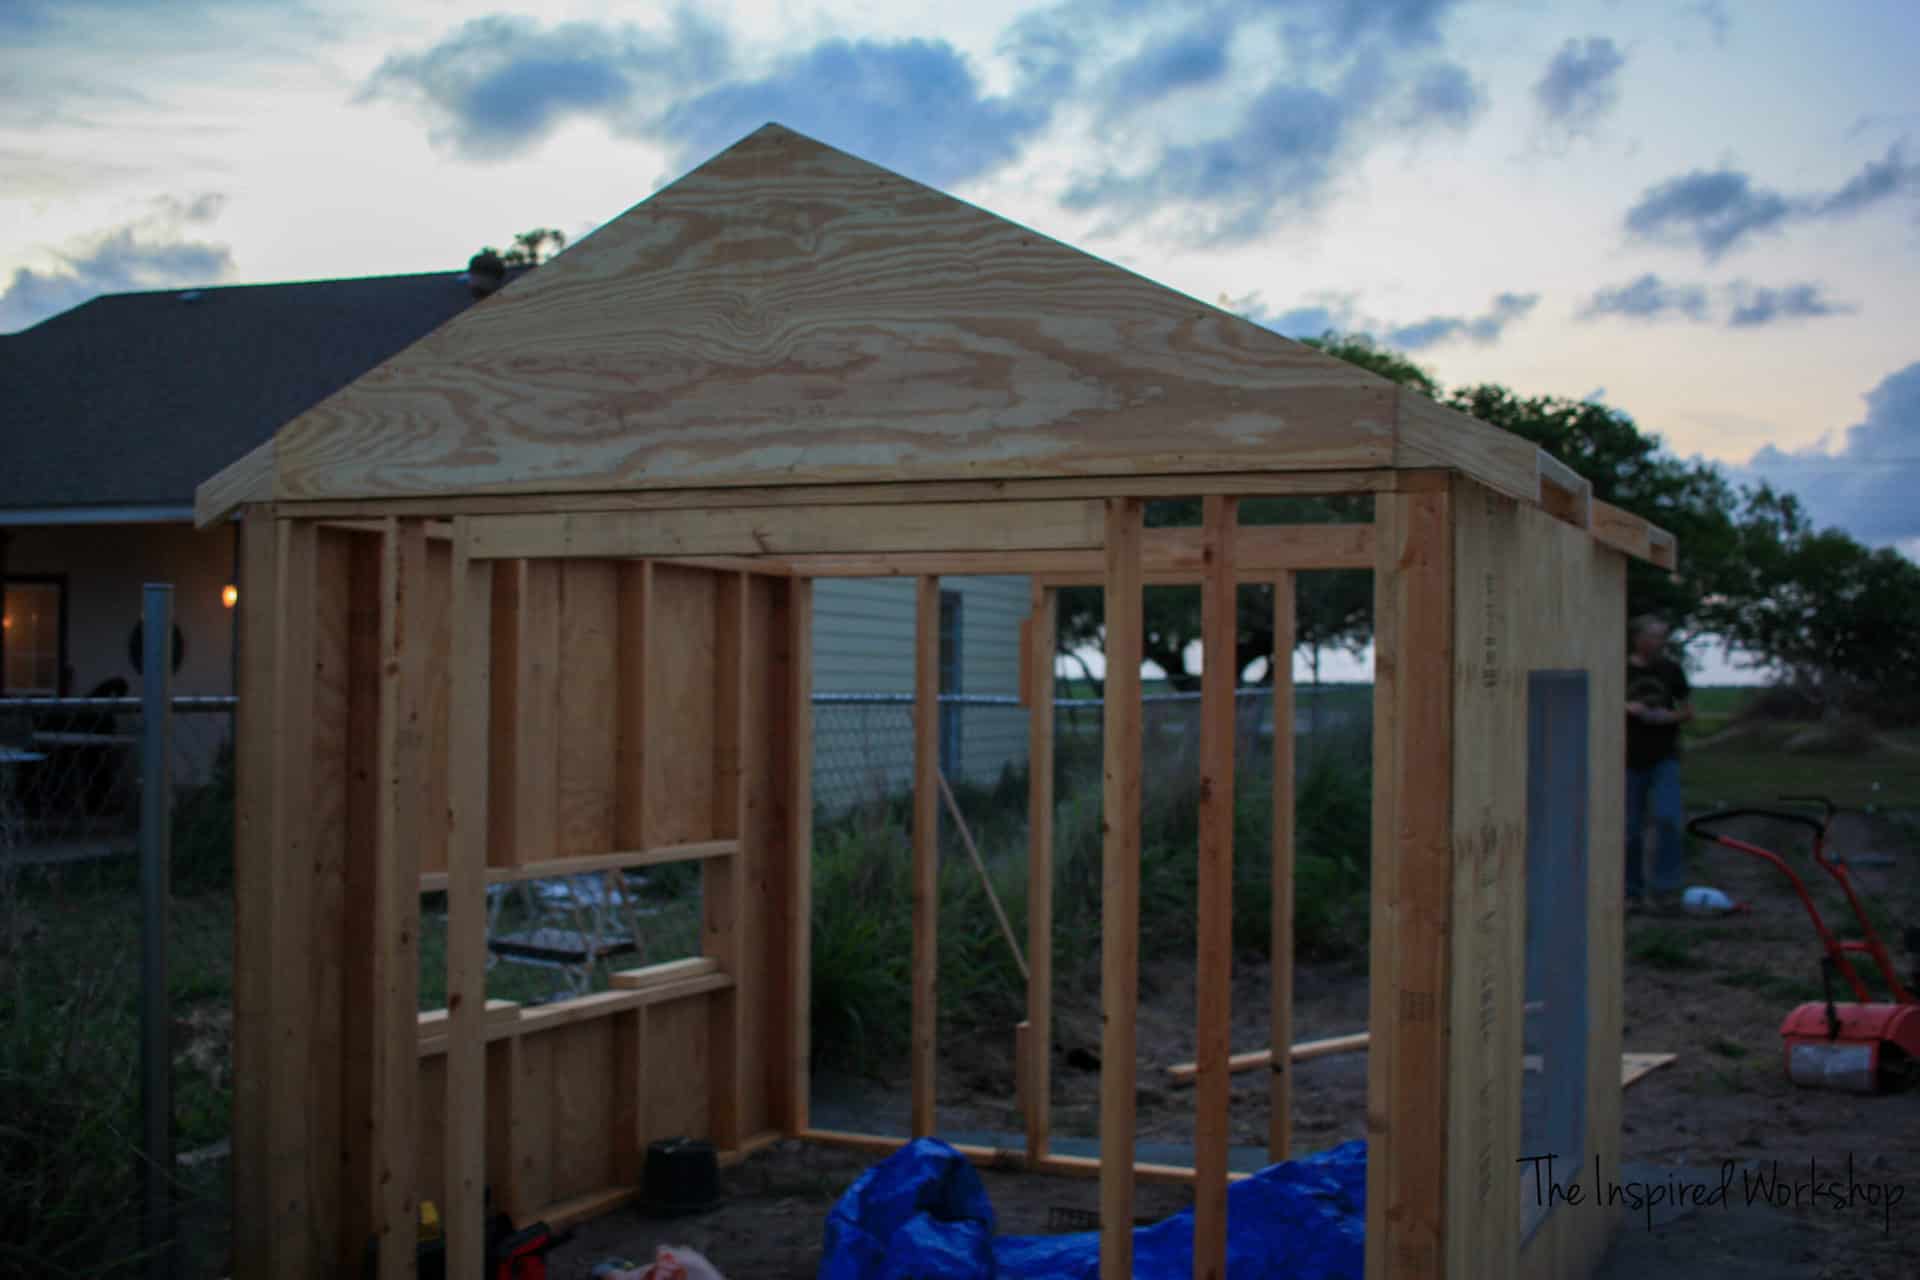
Alright, back up in the rafters, attach the middle braces and the middle rafter!
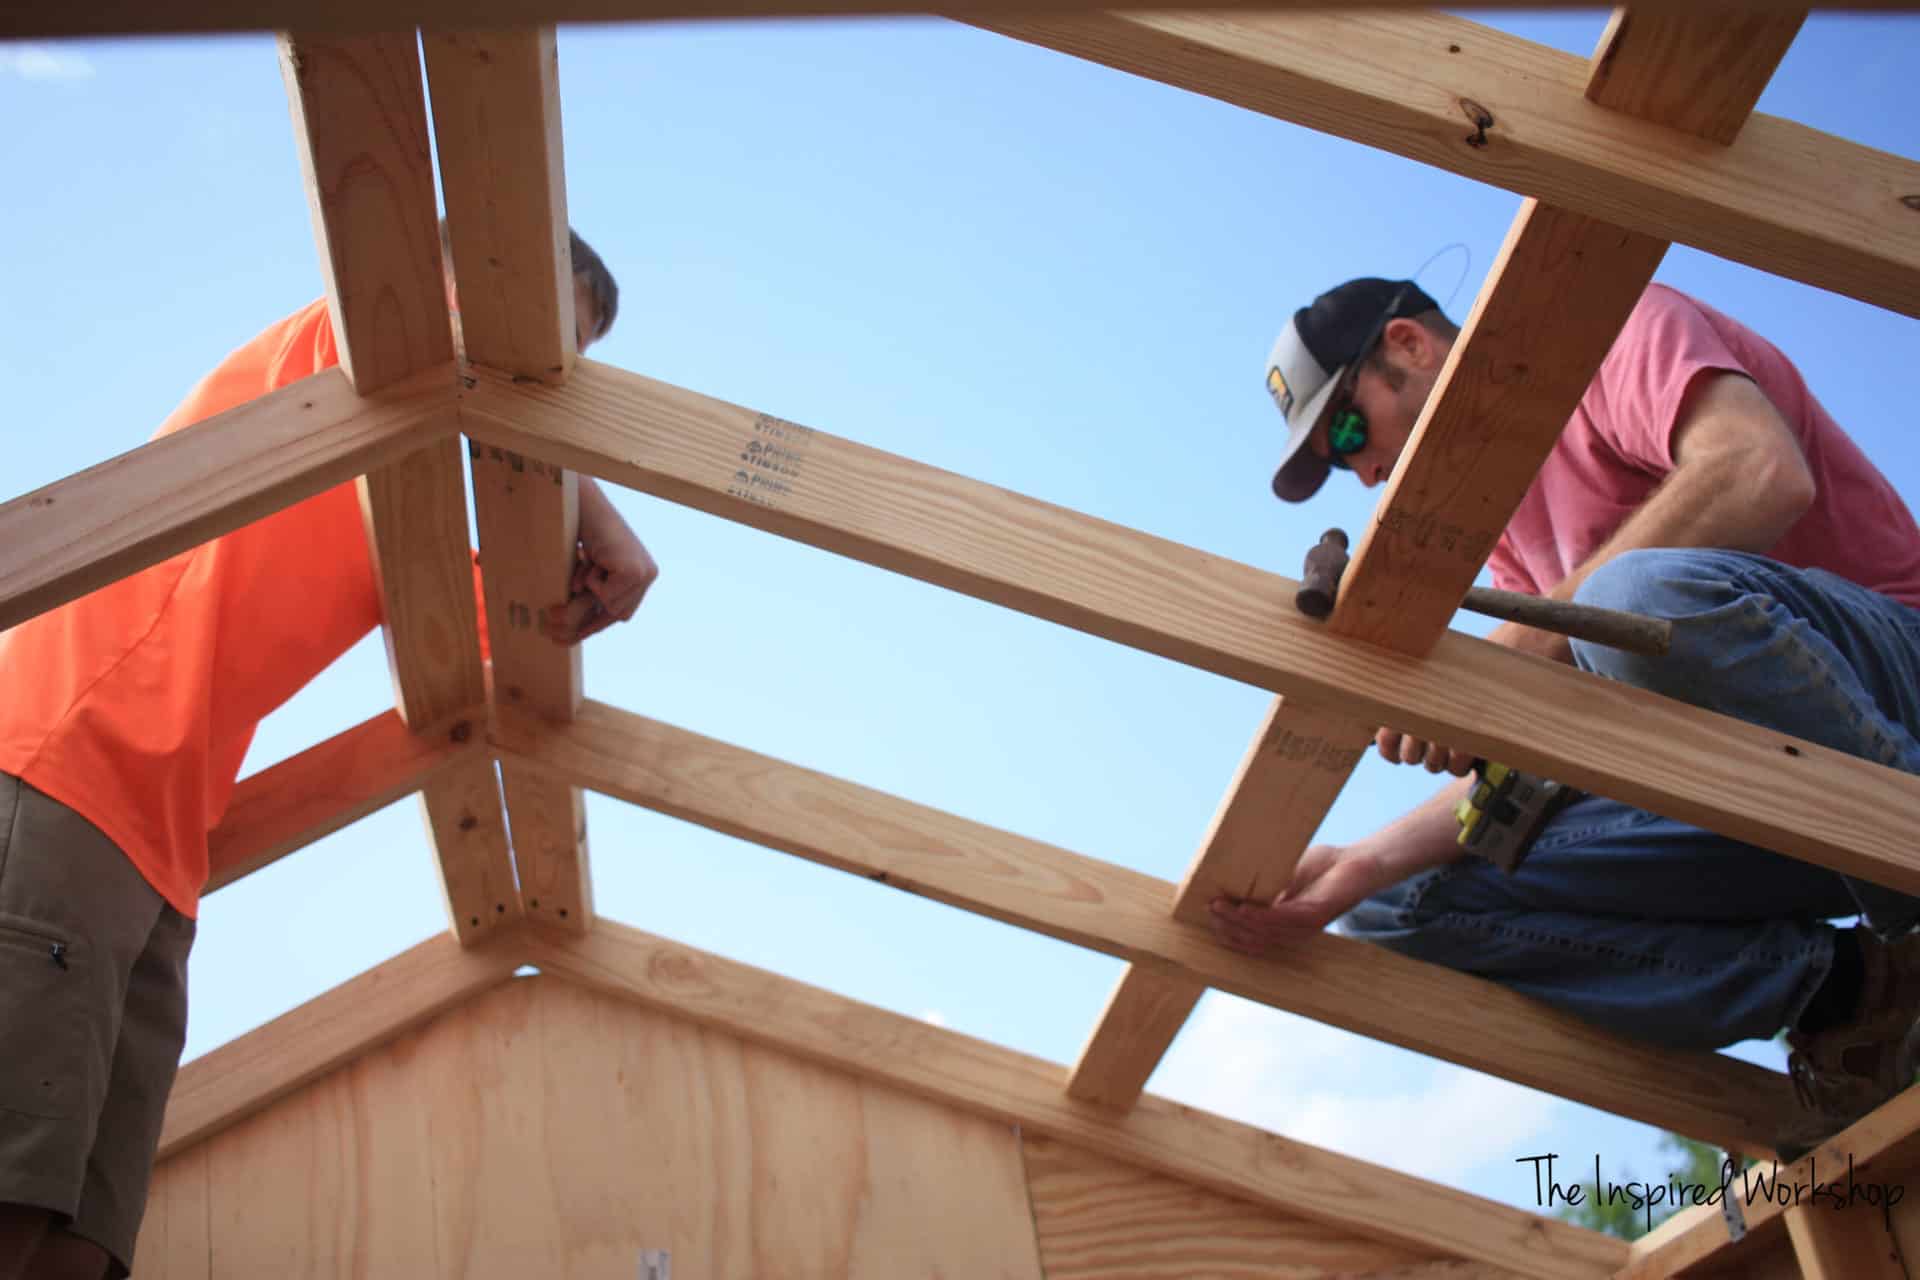

Ooh, la la!!
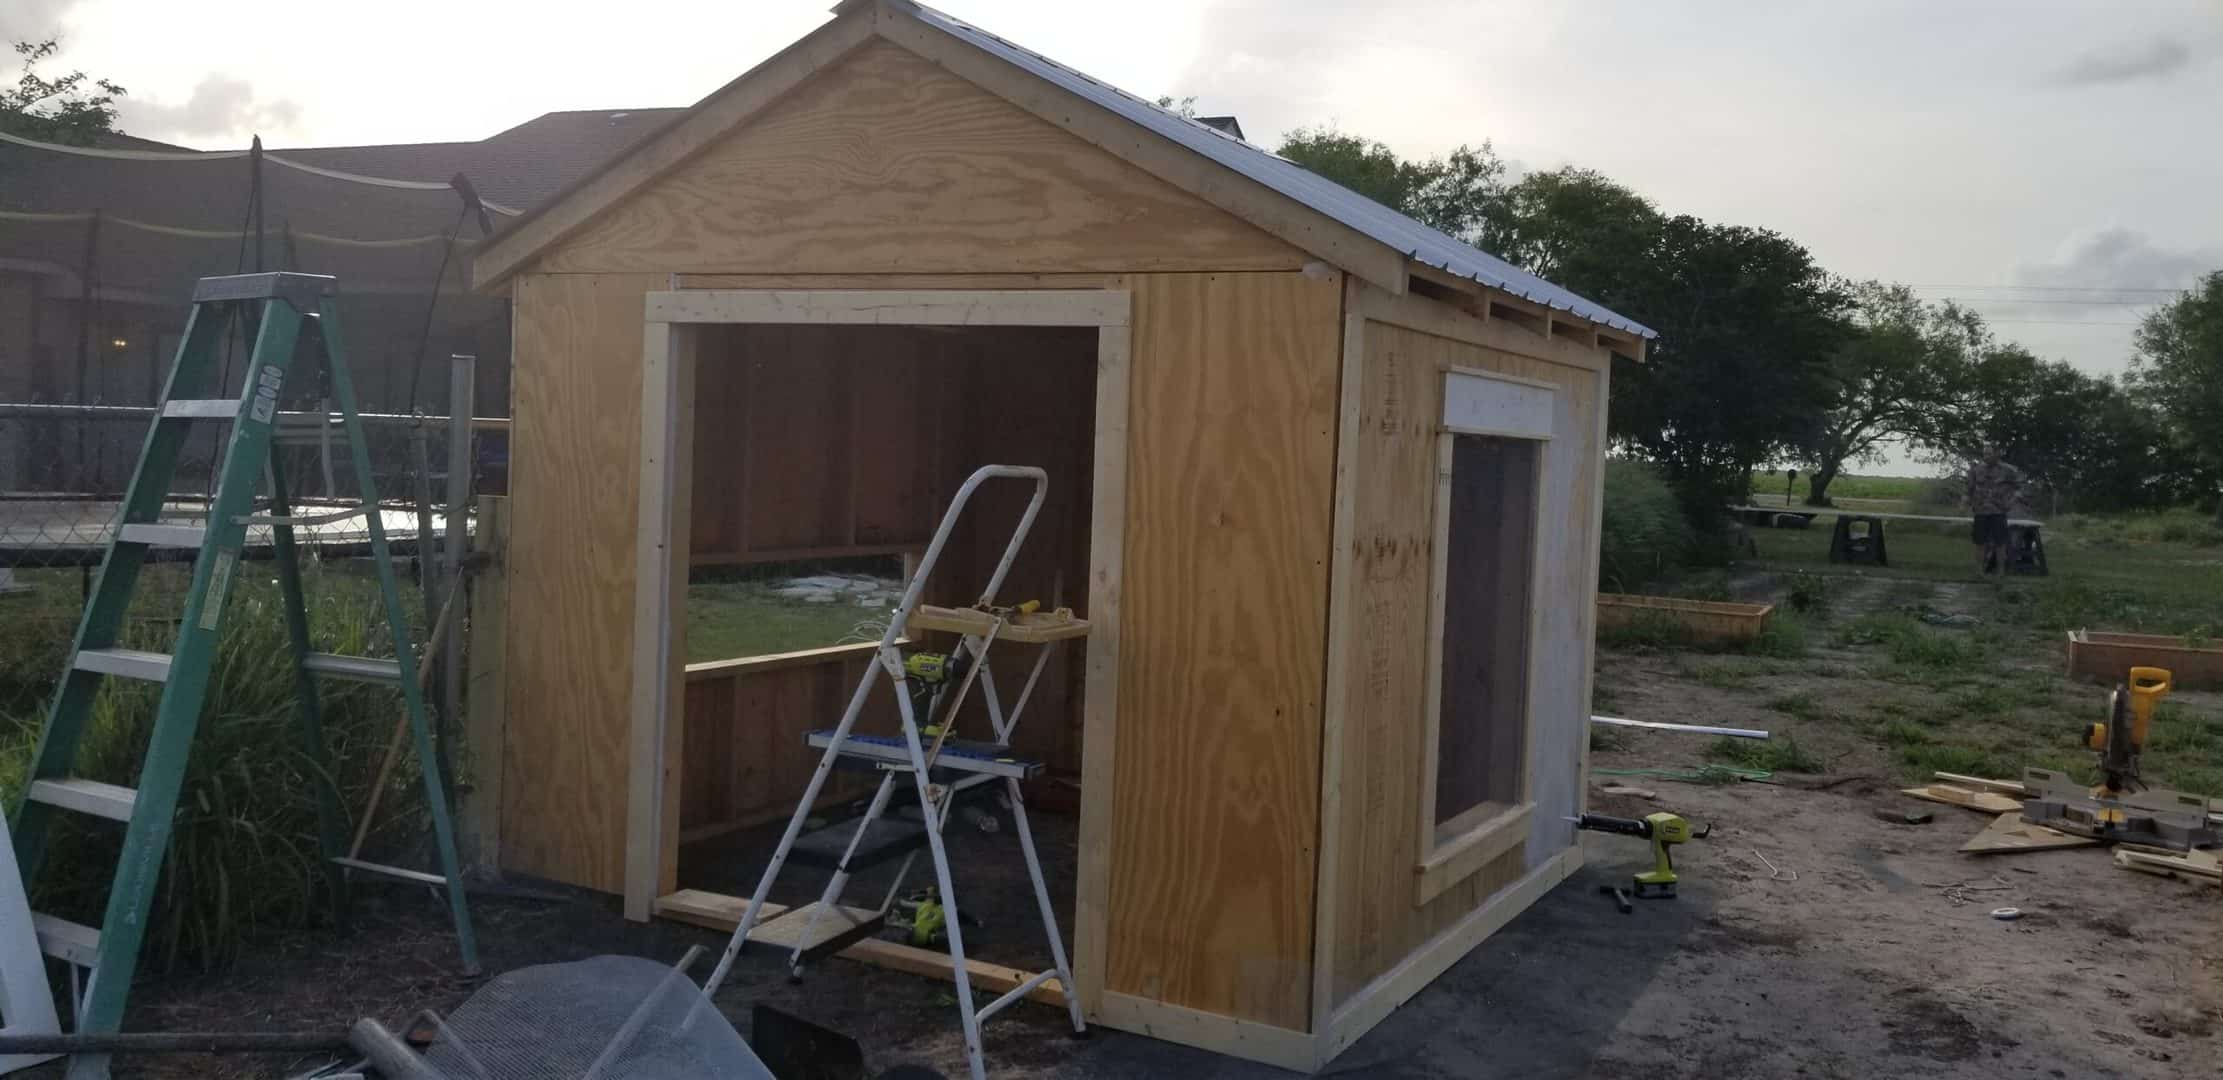
Time to layout and screw down the roofing panels! I of course have no pictures of us putting it on because it was windy as heck that day so it was all hands on deck…er roof! Lol!
I spray-painted my galvanized steel roof panels because it was going to take 6 weeks to get the charcoal gray in since they aren’t carried in-store. Boooo! I didn’t want to wait but it ended up taking us that long to build it anyway! 😂 I should have just ordered it, but I did save a few dollars (maybe 20 bucks) by painting it vs ordering it, so there’s that!
If you choose to spray paint yours, make sure to wipe the steel down with vinegar, clean it really well with the vinegar so that the spray paint will adhere well to the galvanized coating!👍
Adding Plywood to the Run Wall of the Chicken Coop
Time to add the plywood to the last side that needs it! The run wall still needs its plywood! Using one of the sheets of plywood that you cut down to 71 1/2″, and cut it directly in half at 24″, so you end up with two 24″ x 71 1/2″ pieces!
Okay, now that all the plywood is on, time to trim out the entire thing! 😆
Trimming Out the DIY Chicken Coop
I am going to pretty much show the pictures of the trim and offer any helpful tips I may have, and you can download the plans if you want to see exact measurements!
Run Wall Trim for the Chicken Coop
I attached the run to the wall of the chicken coop before completing the trim work, you can do it whichever way you want, I just wanted to be able to trim around it without being perfectly precise in my measurements!
I framed around the opening of course and then added the run to be able to complete the trim.
If you need the plans for chicken coop run, get them here: DIY CHICKEN COOP RUN
After attaching the run to the chicken coop, I added trim to cover any plywood seams!
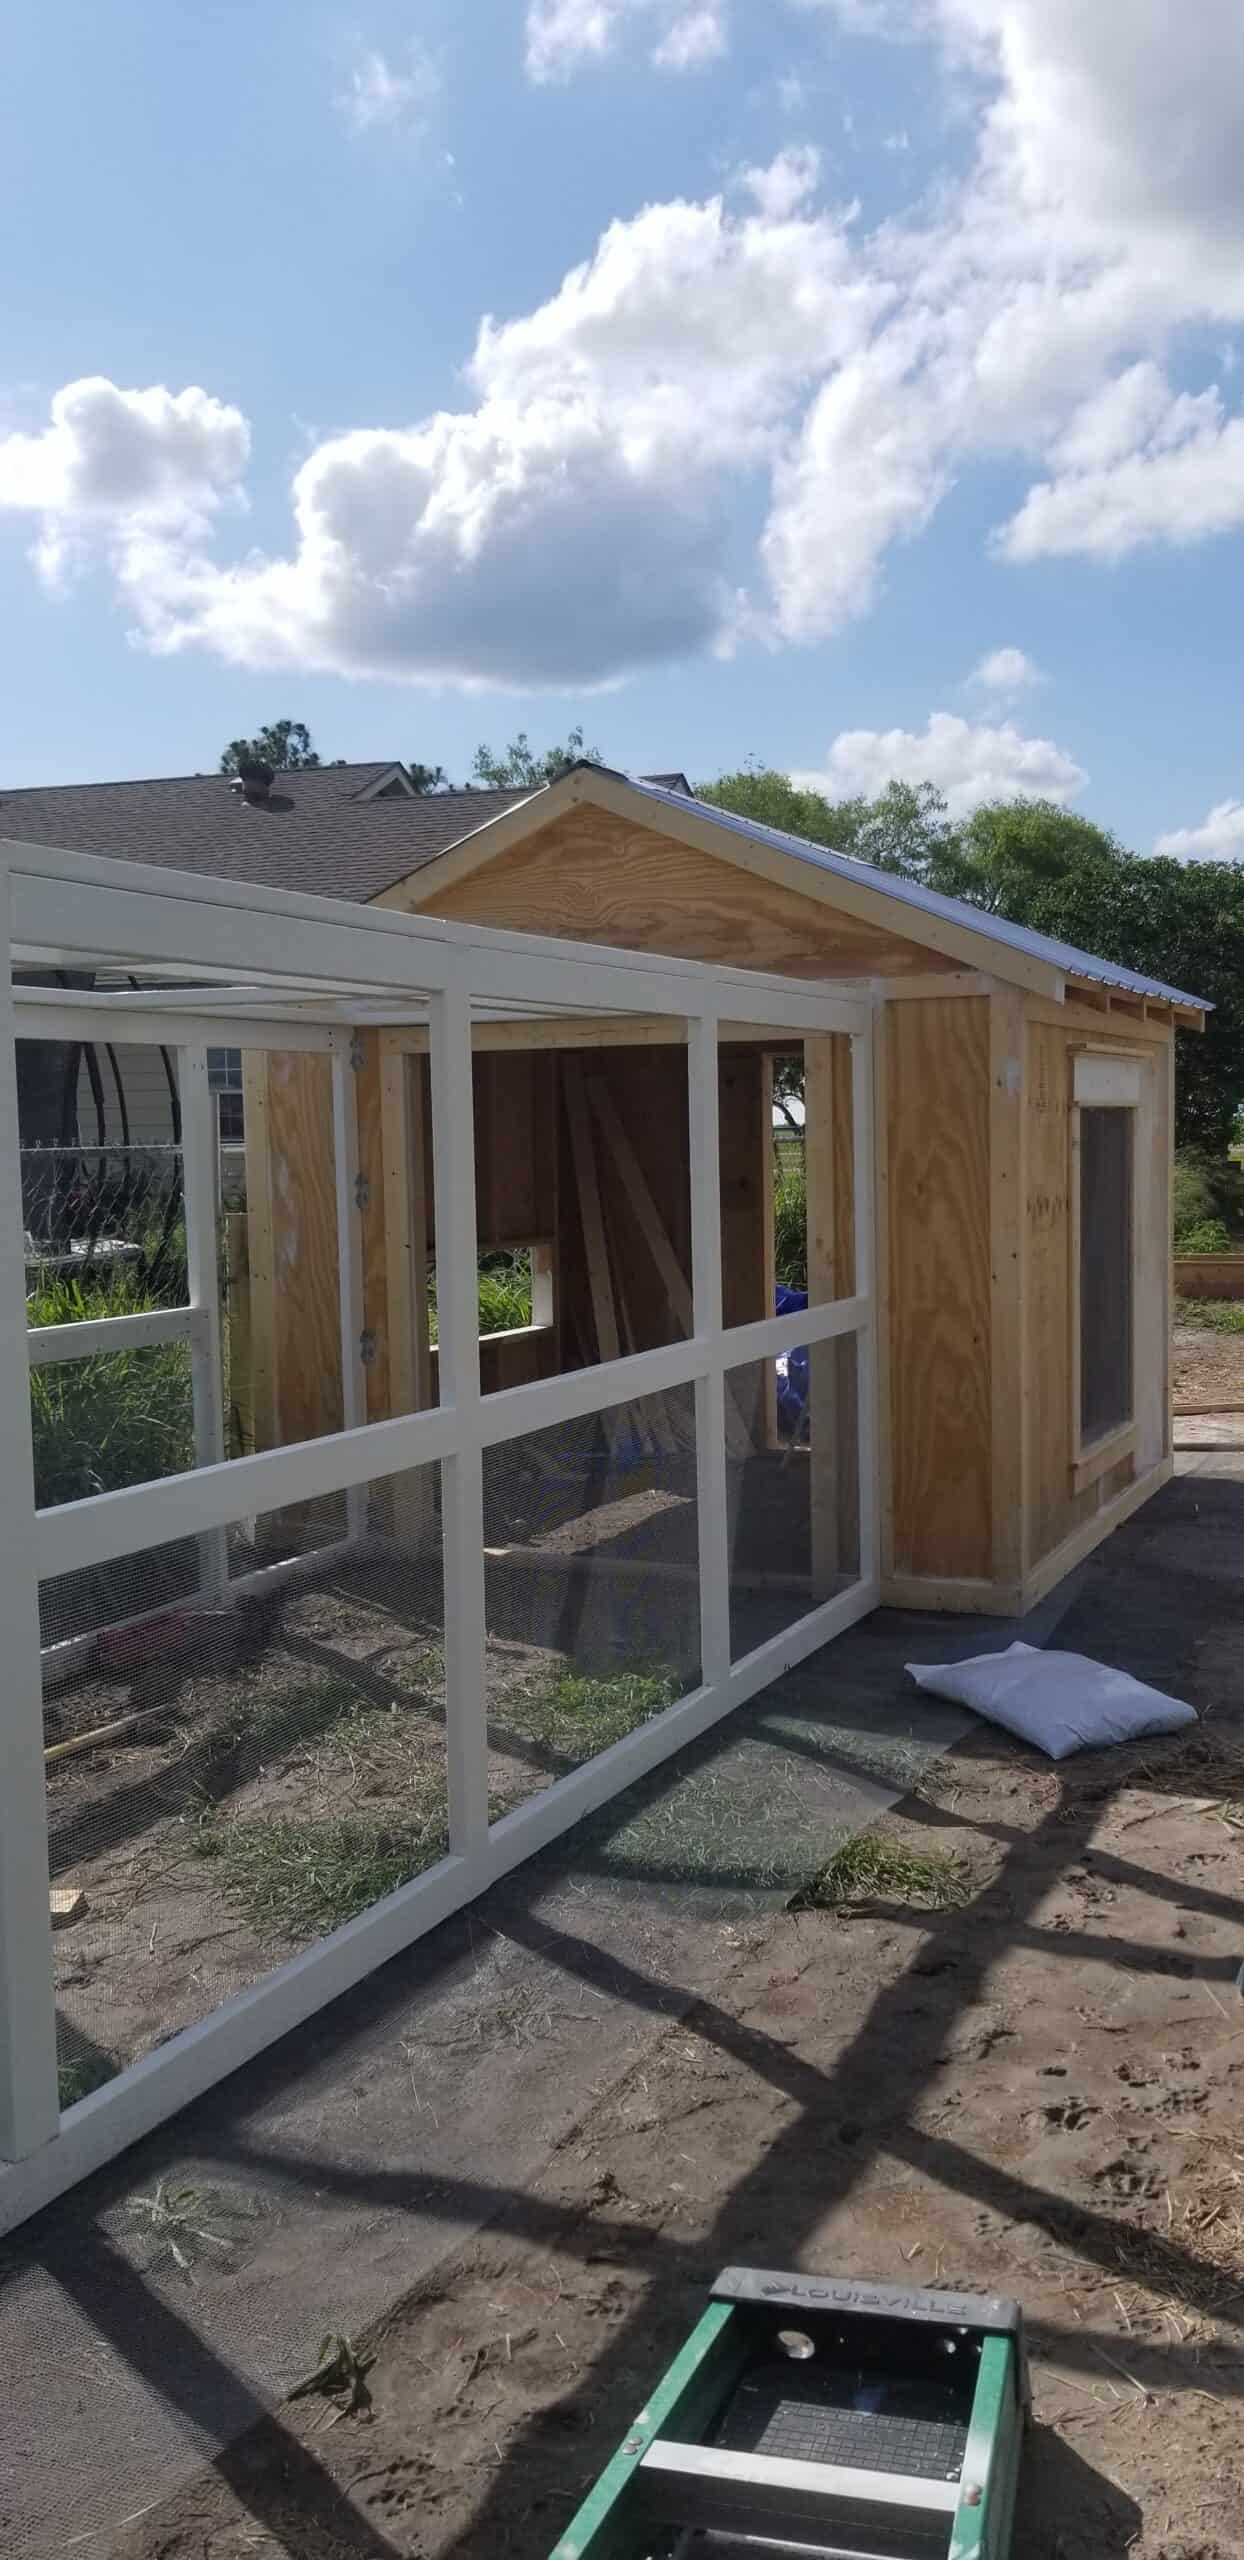
You can see the brackets we used to attach the run in the photo above as well! It is also screwed into the coop from the inside!
In the final addition to the trim on the run wall that is not pictured, I added the battens to the top. They are mitered at 25 degrees off square on one end.

Nesting Box Wall Trim of Chicken Coop
The nesting box will need to be built in order to trim out this wall!
Get the nesting box plans here: DIY NESTING BOX
Well, guys, this is the extent of nesting box wall trim that I took! 😆 Apparently it was getting dark and I was just trying to hurry up and finish! So, you will definitely want to check out the plans for this one!
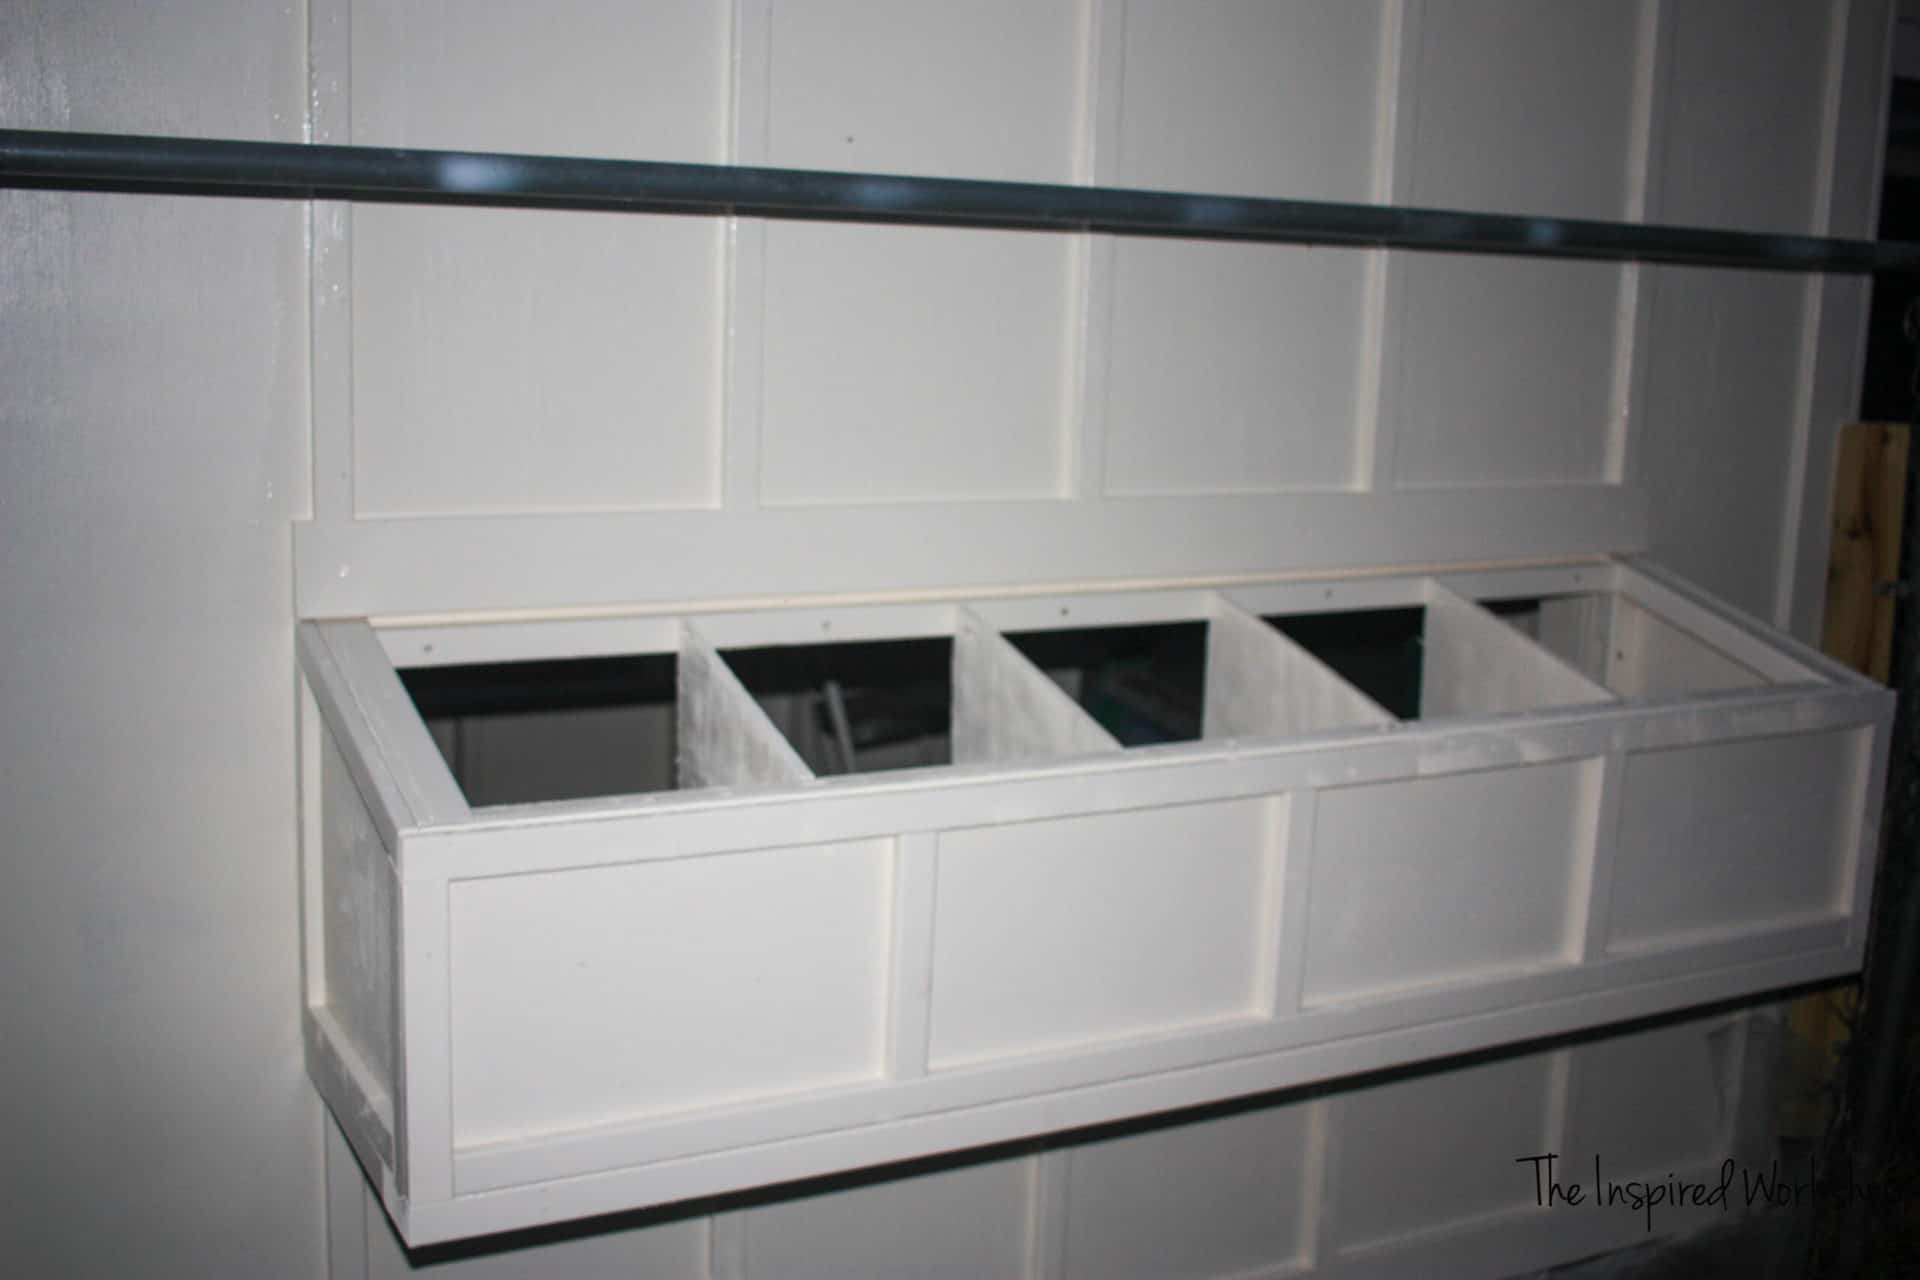
That gray bar is not supposed to be there…so don’t wonder which step you missed that told you to add that!😂 It’s the top rail of the fence that we were taking out!
Door Wall Trim of Chicken Coop
Don’t mind that large gap at the top, those boards will be covered!
Window Wall Trim for Chicken Coop
Make sure and add the hardware cloth to the window before adding trim. You want the trim to not only hide the hardware cloth but keep it pinched between the plywood and trim!
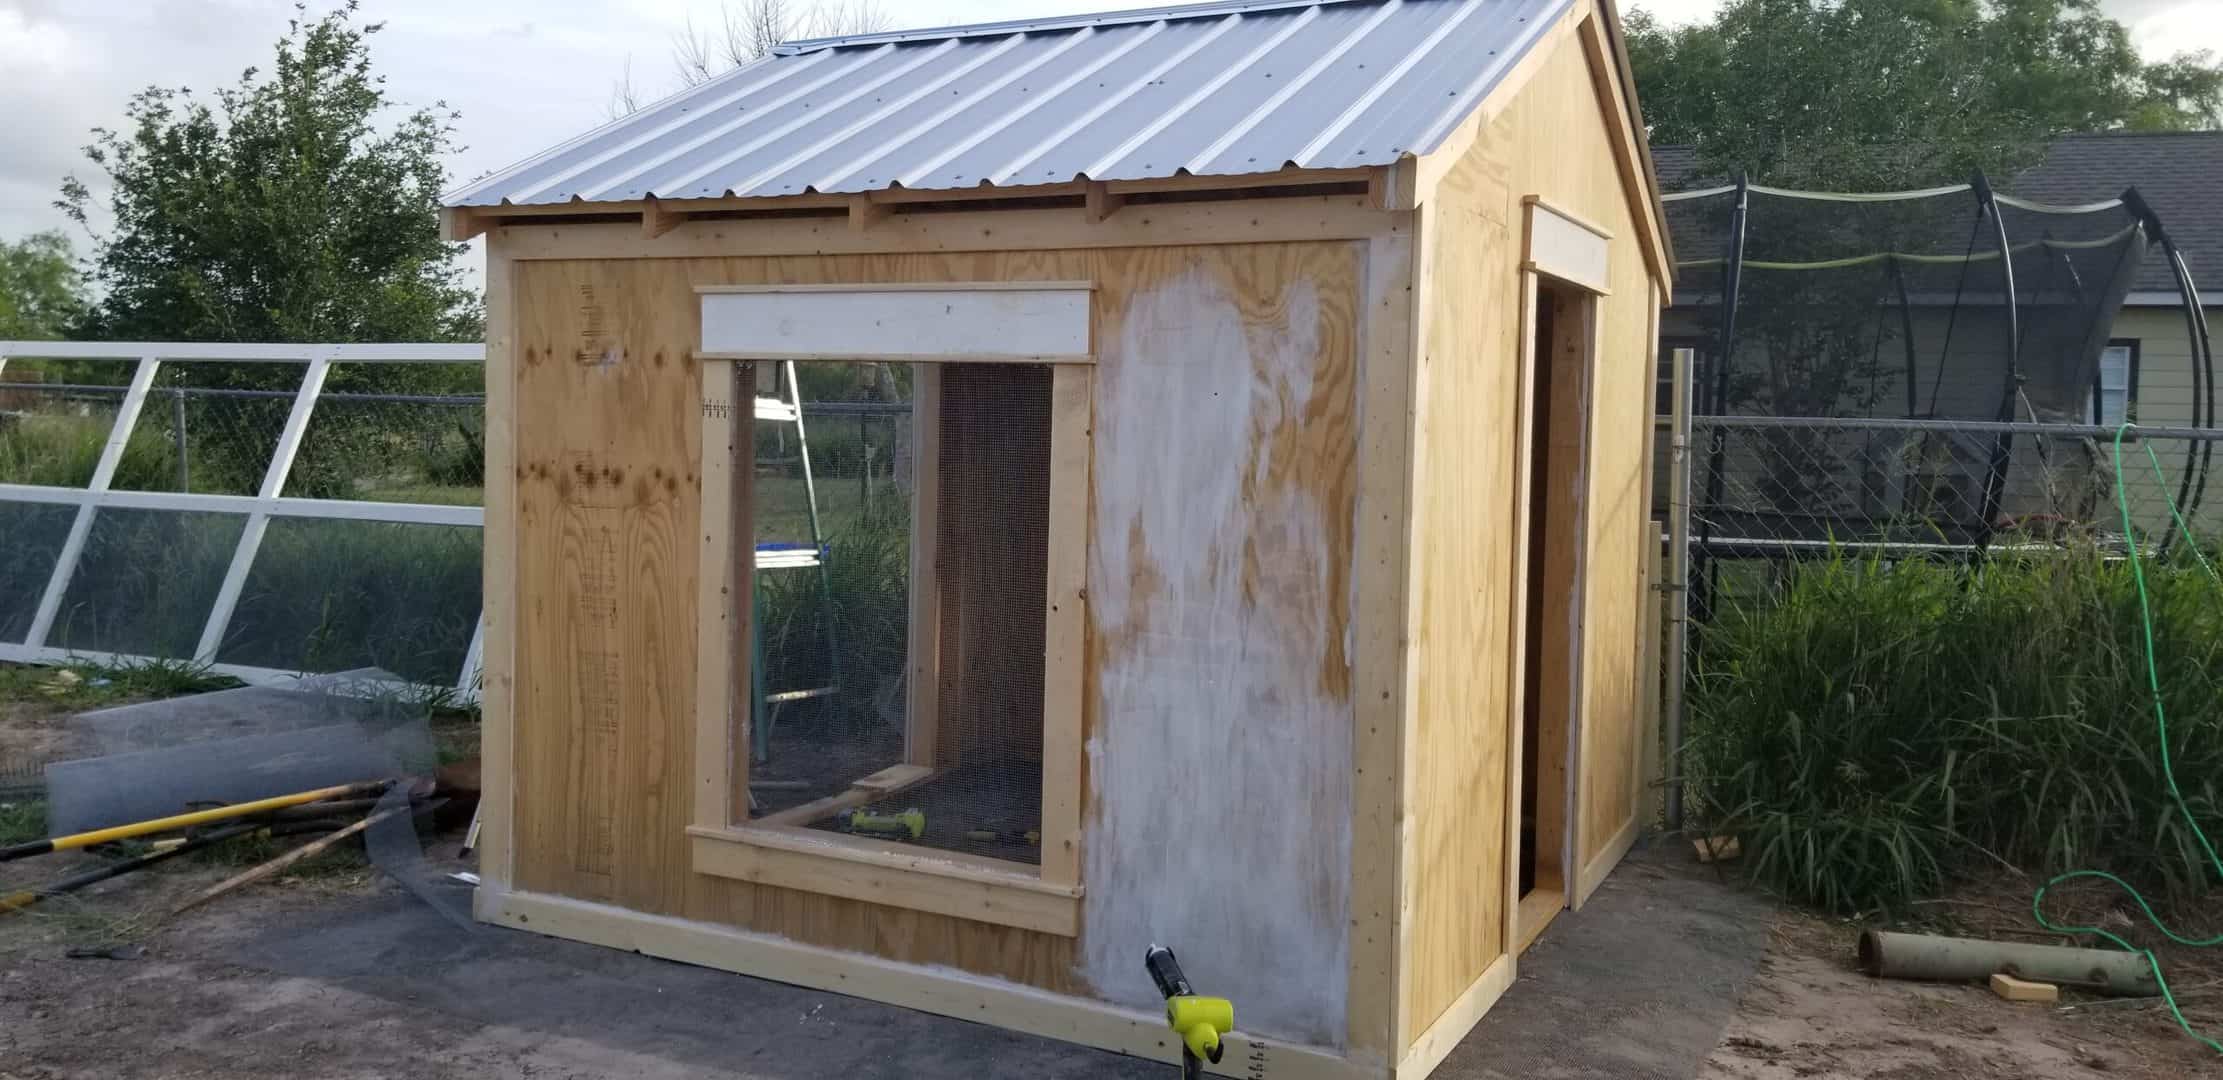
Don’t mind the caulk all over the wall…this particular area started cracking after the rain, so I thought I’d try a little caulk to seal it and cover it!🙄😀I did caulk all the horizontal boards to make sure water doesn’t seep behind them and cause the wood to rot!
Then I started painting baby!
Painting the DIY Chicken Coop
Using my Home Right sprayer, I was able to quickly spray the inside and outside of the chicken coop!
I LOVE this paint sprayer, I also have the older model but for this particular project, I suggest this one because it has three different tip sizes that allow you to use the largest one and spray really fast! I am talking 3 minutes max for an entire wall!😵
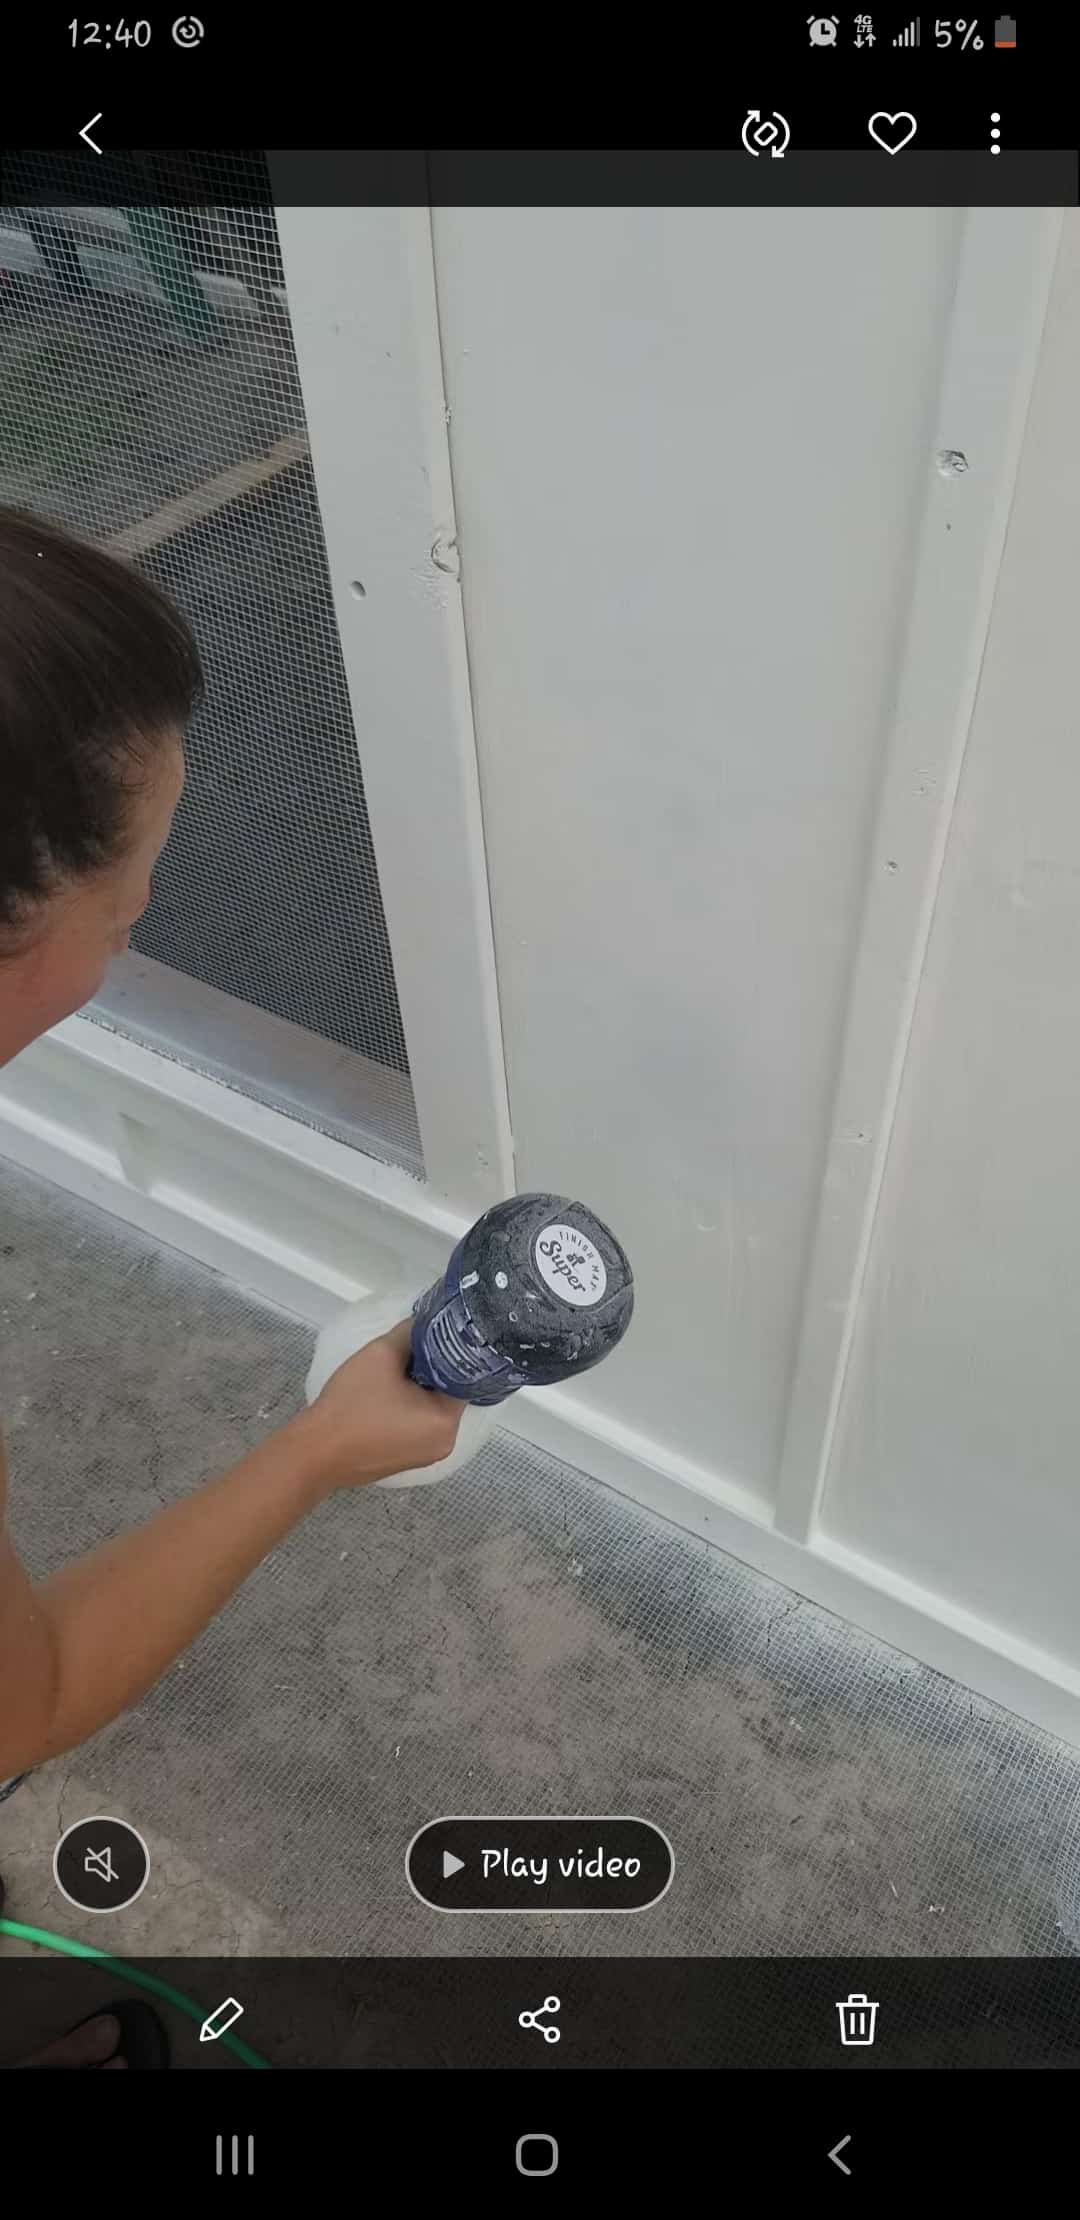
That’s not actually a video! Lol! Only a screenshot from the video because it was on my phone and too big of a file to send and I haven’t had the time to download it to my computer! Sorry folks!
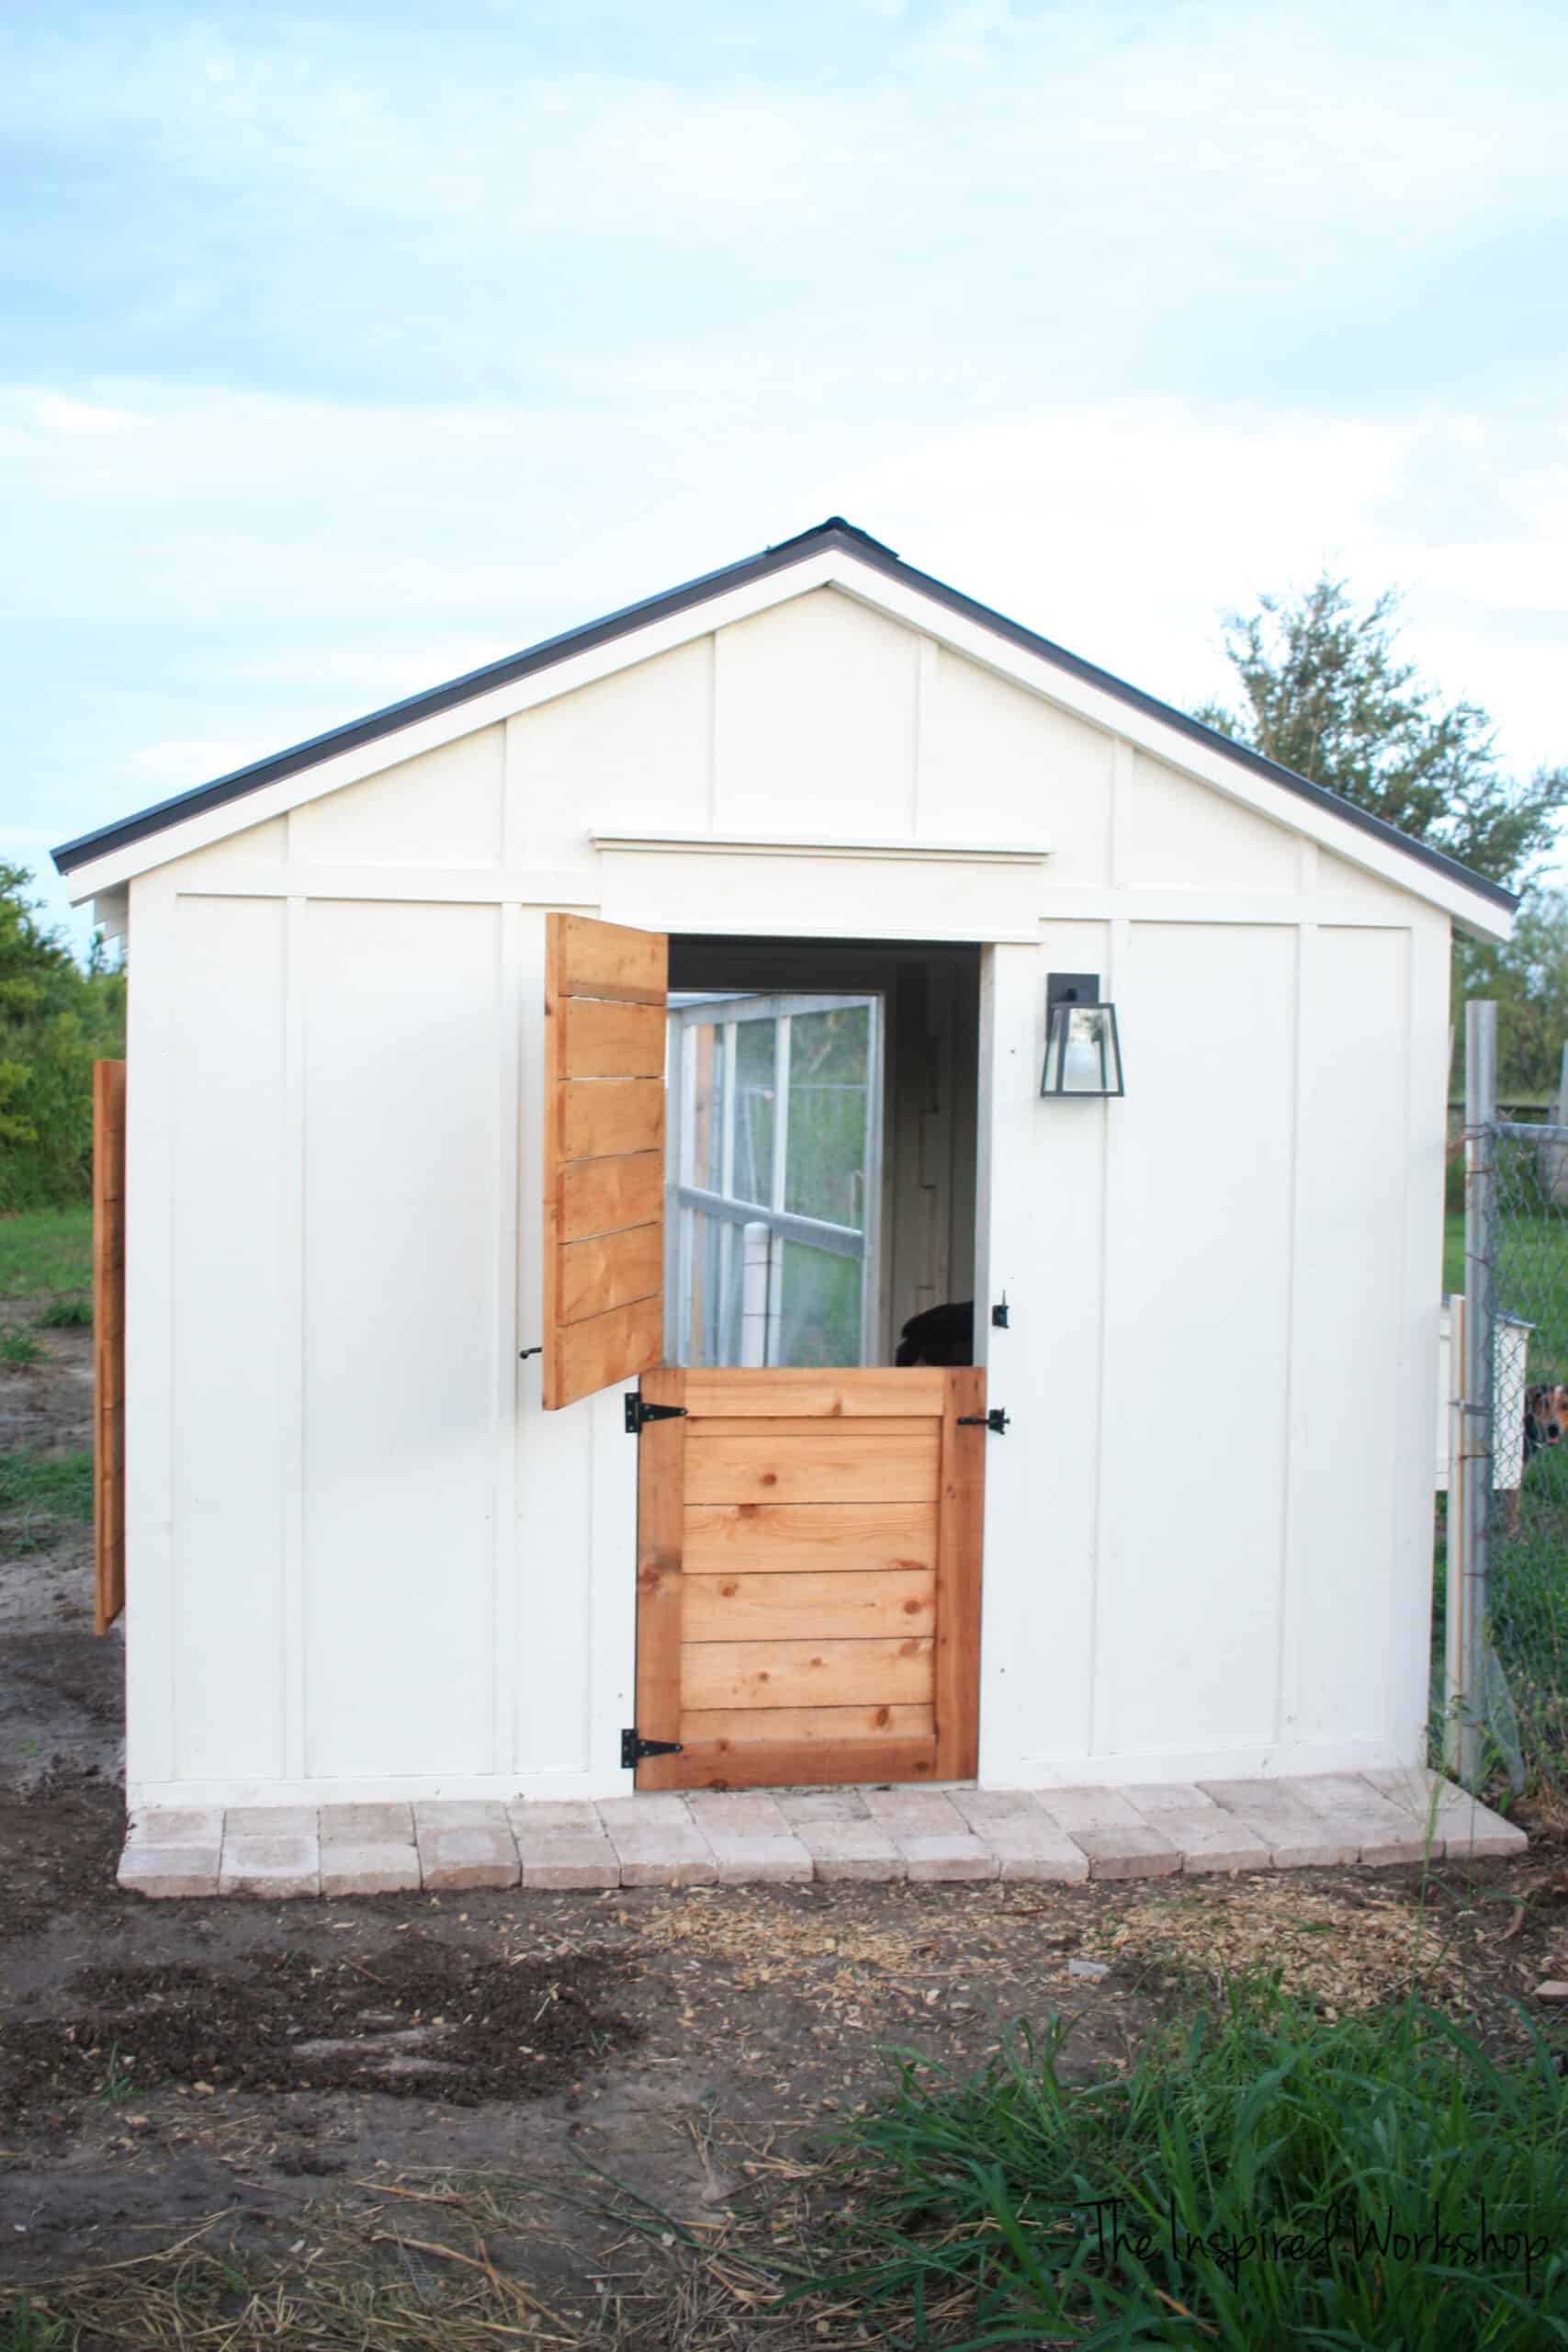
After spraying it inside and out, I just had to build and hang the DOOR and SHUTTERS to complete the building process!
The last thing I did before allowing the ladies to move in was add hardware cloth to the eves to keep coons and other sly little critters out!🐭🐍 Using screws with a wafer head, I was able to just screw the hardware cloth to the frame and 2×4 on the rafters!
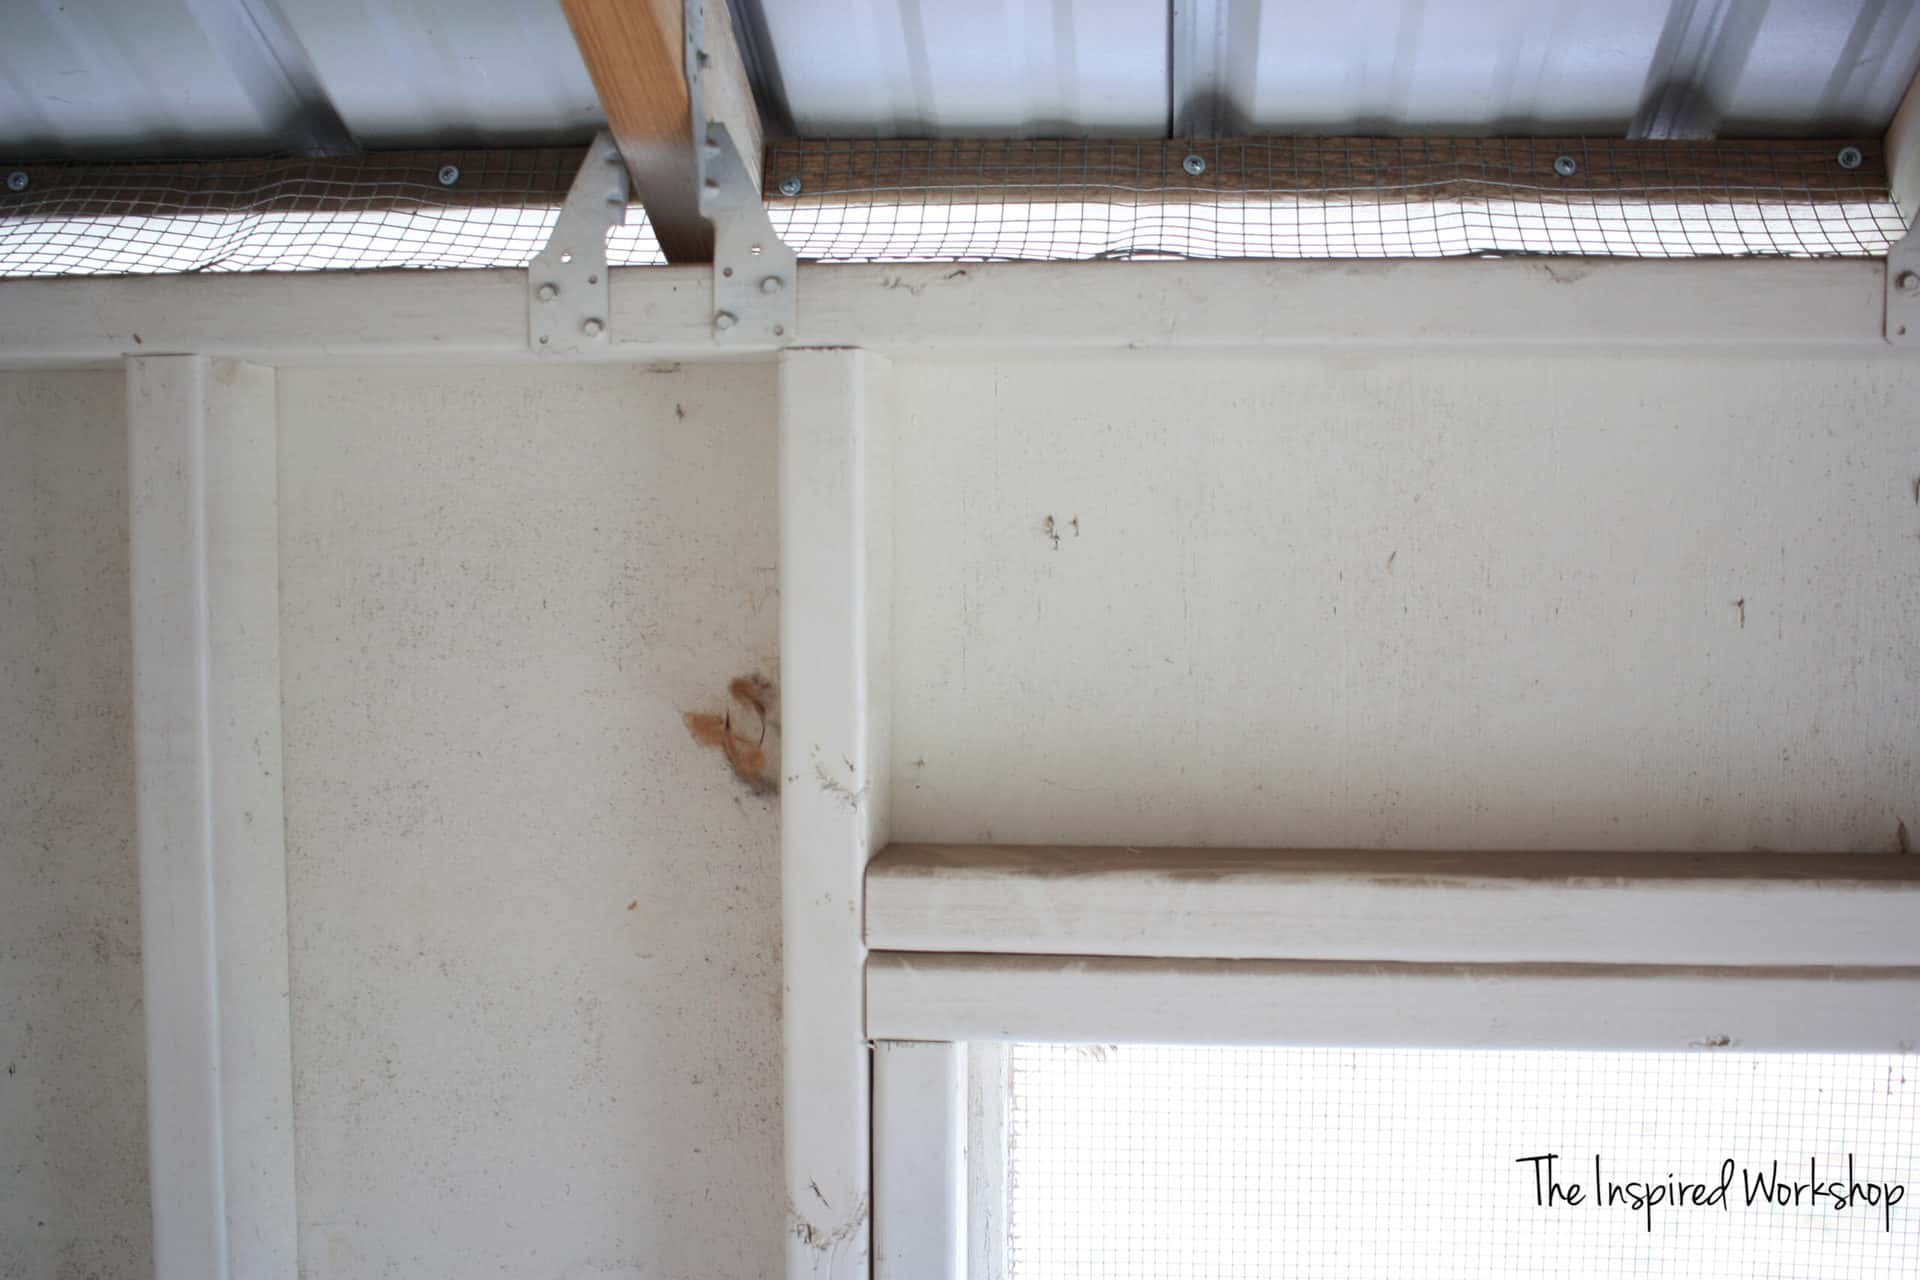
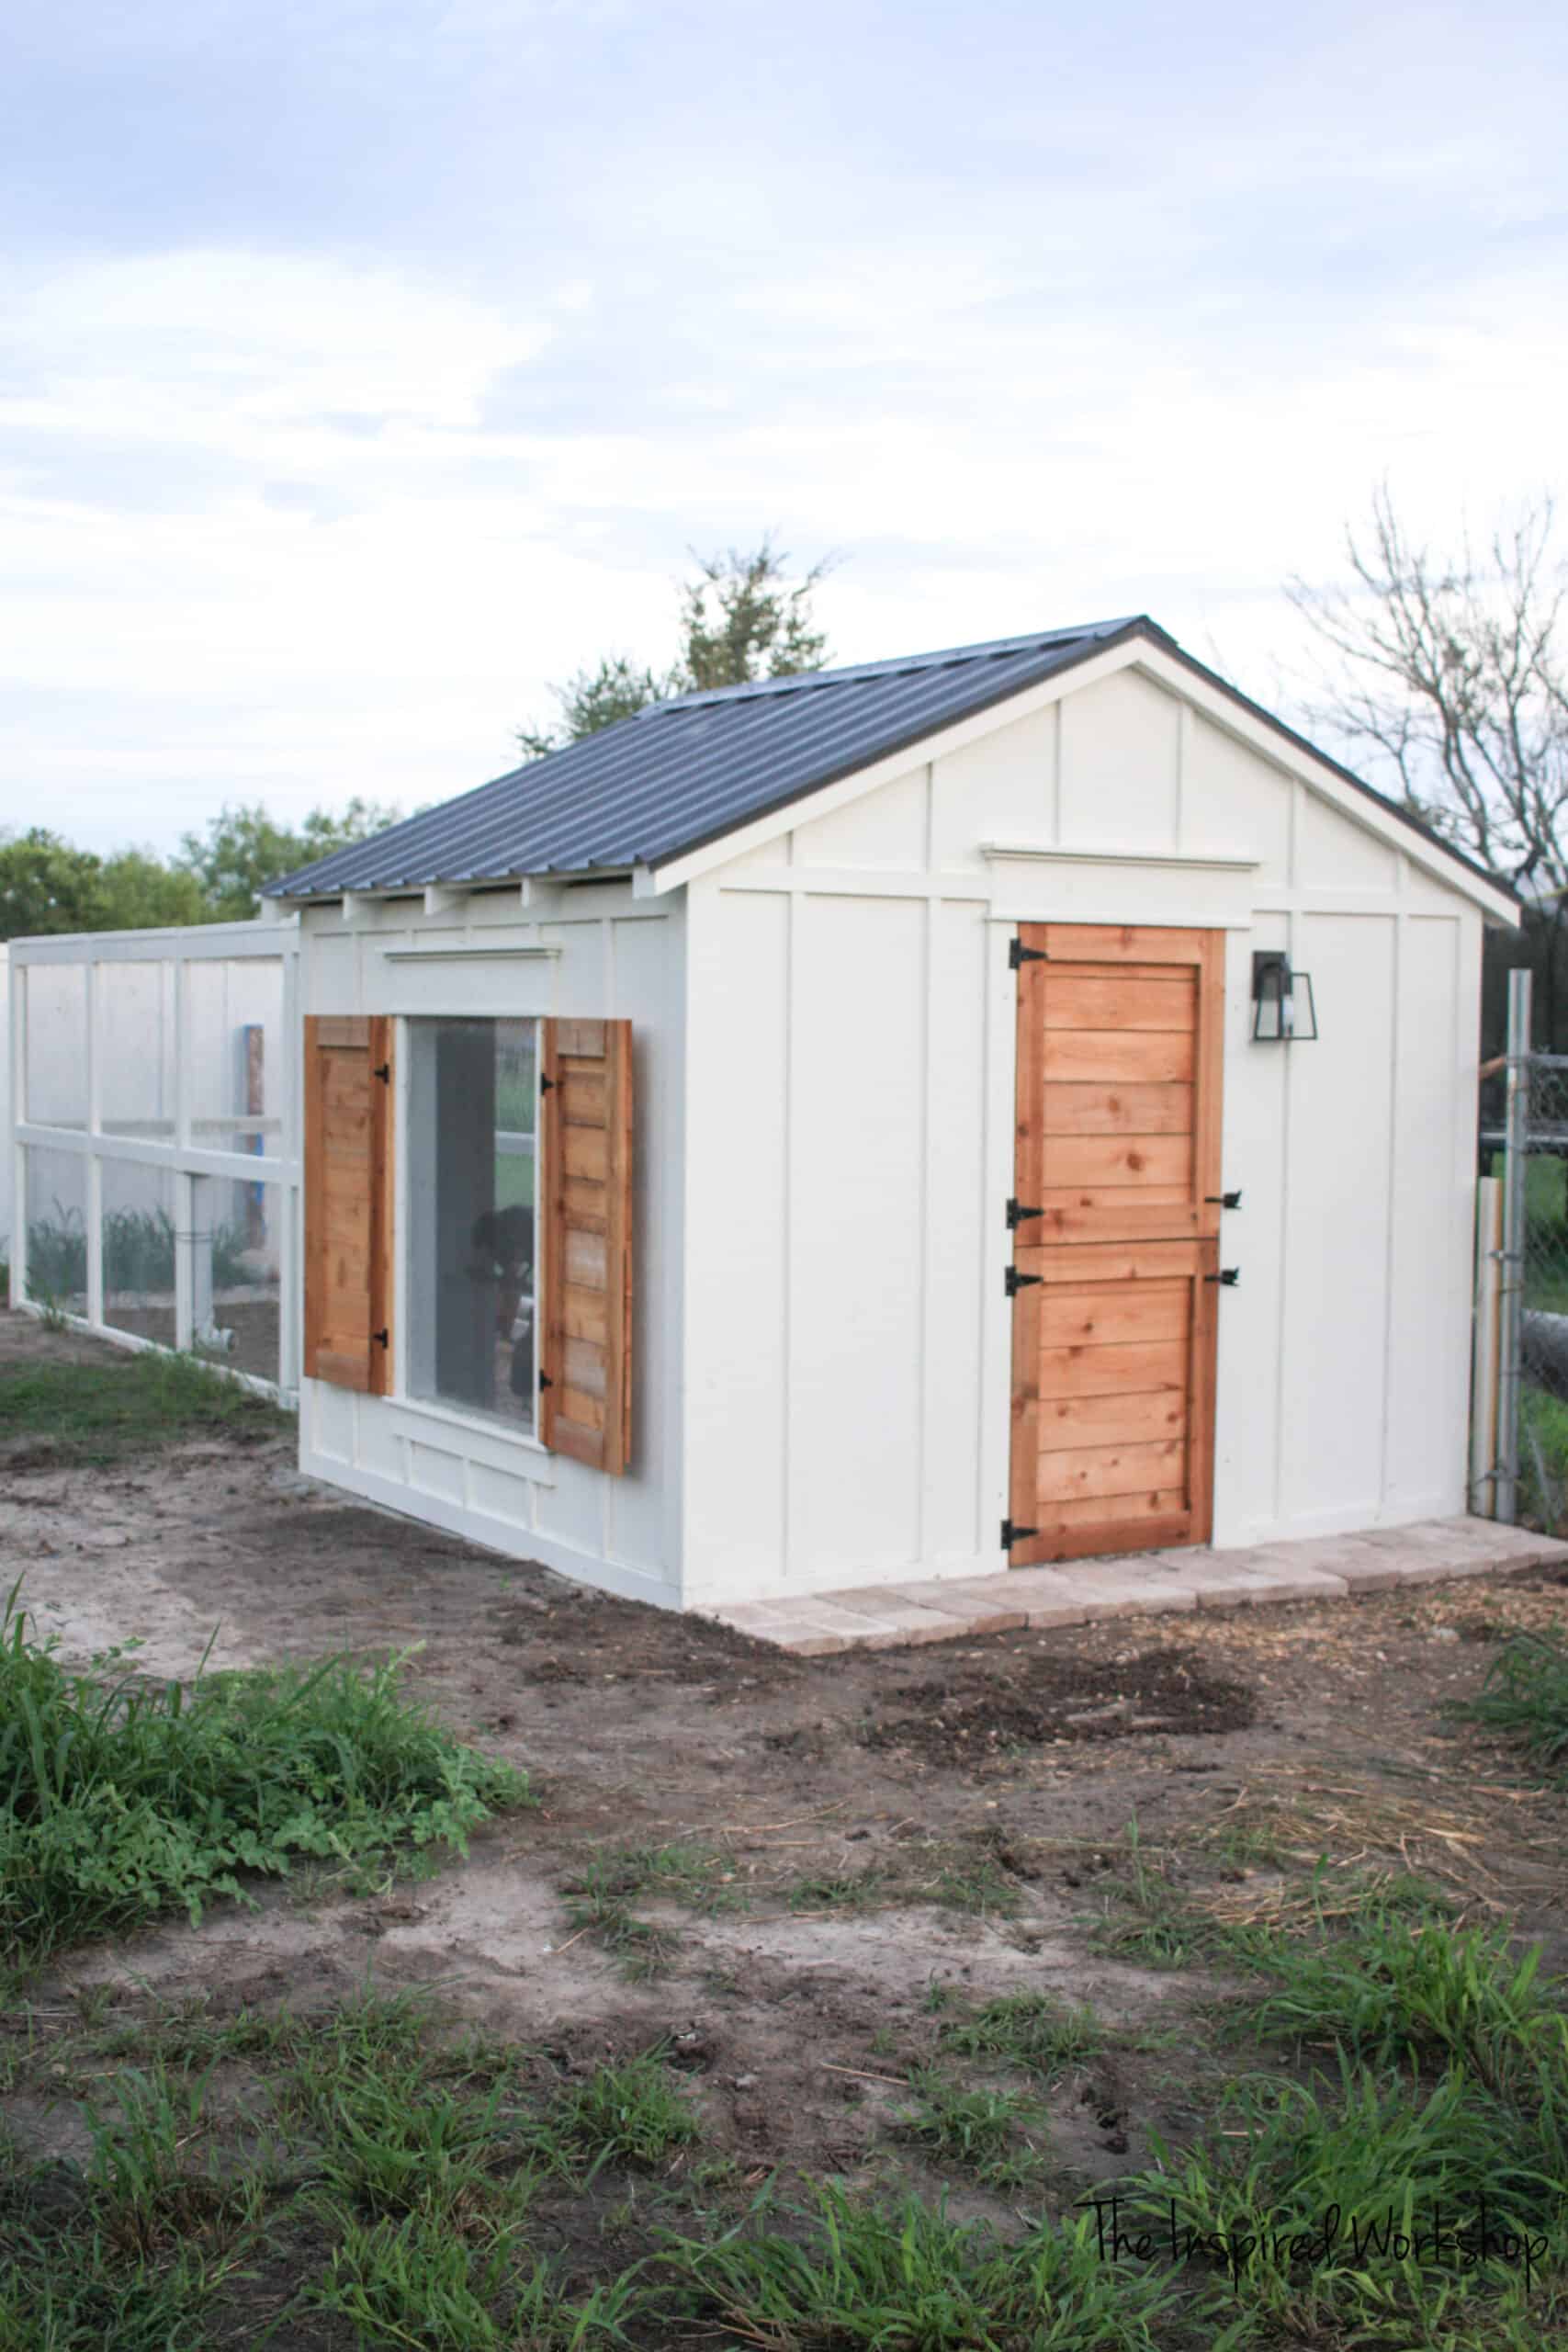
From the outside, you can’t even see the hardware cloth! It’s perfect! And DONE!
I’m beyond excited to share these chicken coop plans with you all, and would love for you to share them with your friends!
[social_warfare]
If you love this chicken coop but it doesn’t work for you, here are some other chicken coop plans you may love!
- https://www.ana-white.com/woodworking-projects/shed-chicken-coop
- https://thetanglednest.com/2010/02/our-urban-chicken-coop-plan/
- https://www.ana-white.com/woodworking-projects/small-chicken-coop-planter-clean-out-tray-and-nesting-box
FAQ About Building a Chicken Coop
Is it cheaper to build your own chicken coop?
Yes, absolutely! When you buy a chicken coop you are paying for the materials, time involved in building, and the store’s percentage for selling the chicken coop. You can save yourself so much money by putting in your own time to build the chicken coop and only paying for materials!
How to build a chicken coop?
There are so many ways to go about building a chicken coop! The main thing is deciding how many chickens you plan to have, then find a design that you like that can house that many chickens. Always go a little larger than you plan because trust me, you’ll end up with a few more chickens that you start with! If there are plans available, purchase them, or download mine for free above, or draw up your own if you would like! There are really no rules here! Then, build that chicken coop and enjoy your crazy two-legged ladies!
How many chickens can a chicken coop hold?
There is a general rule of thumb on this, and it is 2-3 square feet per chicken. Now, don’t forget that chickens love to roost, they really don’t sleep on the floor! Make sure you utilize all the square footage of a chicken coop by building or placing tons of roosting bars inside the coop! Give them each 1-2 feet on the roosting bars and you can easily add addtional square footage to your chicken coop to hold a few more chickens! Don’t forget that if you free range your chickens you don’t need nearly as much square footage per chicken because they only sleep there!
How many nesting boxes do I need?
This is a good question. If you keep your chickens in your chicken coop and never let them out to free range, you will want to have enough nestings boxes so that no more than five chickens are ever expected to share the same one. I would say to keep your feathered friends happiest, don’t make more than 3-4 chickens share a nesting box! Now if you free range them, nesting boxes aren’t nearly as important because when they have access to the oustide world, they find a place they love the most and lay their eggs there no matter how many nesting boxes you have! Lol!
Can chickens stay in a coop all day?
The answer is yes, they sure can, they will definitely survive. But do you want your chickens surviving, or do you want them thriving! Free ranging your chickens keeps them far lessed stressed which leads to better health for the chickens and more eggs for you! Less disease when they are allowed more space to roam!
How often do I need to clean my chicken coop?
This is depends on a few factors. If your chickens stay locked in the coop day and night, you will have to clean the chicken coop far more often than if they are able to free range during the day. A weekly cleaning will be neccessary if they are in the coop constantly. But if they are able to roam outside the coop during the day, you can skip to a monthly cleaning. Also, if you have a floor in your chicken coop, you will have to clean more often than if you use the deep litter method, where the chicken coop has a dirt floor that the chickens are able to basically compost their own poo! The deep litter method allows you to remove the pine shavings and fresh dirt compost once every six months to a year!
Thanks for stopping by to see my chicken coop plans! Hope to see you again soon!

Wanna save the chicken coop plans for later? PIN IT now!
Hello Cara,
My name is Rich Vaughan. I’m in the process of building your chicken coop as we speak. While reading through your notes you briefly touched on the lady’s floor. Is there any chance that you might be able to break that down even better then what you wrote. I would really like to try it.
Thanks
Vaughan, Richard D
Army Veteran D-VET
Hey Rich!
Correct me if I am wrong, but you are asking what I did for the floor? There is no floor in the chicken coop, the wall boards are laid straight on the ground, and the floor is the ground! I wanted it this way to do the “deep litter” method of throwing pine shavings down on the ground, it is the coolest thing the way the chickens turn the dirt and the pine shavings (while scratching) to create almost a compost for you. This keeps the smell away and there is never any visible poop! I just go in there every week or so and add more pine shavings (takes 2 seconds to throw out a couple of handfuls), then once the layers get too high or I want the dirt mixture added to my compost, I will go shovel it out and start over at bare dirt and throw down some fresh pine shavings. I honestly have left it in there before until it is almost composted fully by the chickens, I didn’t add any more pine shavings for well over a month, could have even been two, we were super busy and I kept forgetting to grab more every dang time I went to the store. It did not stink at all, and the pine shavings were almost not visible from them turning the dirt so much! Lol! Now, my ladies do free range during the day, they don’t stay in the coop, but they do come in and out and lay their eggs, stay out of the heat, etc. If you put an actual floor in the coop, you have to clean the coop weekly and replace the pine shavings or whatever you use because it will rot the wood of the floor, I have seen people add tile to the floor or waterproof vinyl to help keep the wood from rotting, but it still has to be cleaned all the time or else it smells whereas the dirt absorbs so much of it! I love my animals, but I want it as easy as possible to take care of them…I have too many other projects to do! Lol! The thing that most people say with using the ground as your floor is that they worry about animals digging under to get the chickens, I have never had this happen, I do have the hardware cloth all the way around the bottom of the coop and run though so nothing can dig. My dog is also my chicken protector and has free reign around the chicken coop which I think keeps most predators at bay even though he comes inside at night, they don’t come around. Actually, we did have an opossum sleeping in the chicken coop once, but he walked right in the little chicken door like he owned the place and oddly enough, he did not hurt any chickens! Lol! Okay, now I am just blabbing over here! 😂 Let me know if you have any other questions, or if I didn’t even answer your question, let me know! Hope that helps! Have a good one!
Cara
Good afternoon, I’m completely in love with this coop and surprisingly so is my husband! Unfortunately I subscribed but never received the coop plans 😢. Could you please email them to me. We’re hoping to start building next weekend. Thank you so much.
Hey Sarah!
First, thank you so much for your kind words, I still love it too and it has been over 4 years now! Lol!
Check your email, I sent the plans over to you so you should have them!😉 Let me know if you have any problems retrieving them!
Good luck on your chicken coop build, I hope it turns out beautiful! Thanks for stopping by, have a wonderful day!
Happy Building!
Cara
Hi, Cara,
First of all, thank you so much for the plans and cut list—having step by step instructions and a detailed cut list was what I have been looking for! I am a newbie to all things chicken and am definitely not a super skilled carpenter, so I was hoping to glean some knowledge on how to make all of the minute cuts for the nesting box—how do you get a measurement as precise as 61/64ths of an inch or 14.6 degrees for the mitered cuts? Our saw only has whole degrees and my tape measure only goes down to 16ths—if you have any tips or tricks to help a beginner, I would really appreciate them!! Thanks for sharing your chicken knowledge with us!
Hey Kristy!
Thank you so much for your kind words, I am so glad the chicken coop plans are what you have been looking for!
Okay, I thought I mentioned it in the post, but maybe I didn’t, the 3d modeling program I drew the plans up in is extremely precise, I do not cut things that precisely! Lol! I would round that baby to 15/16″ or you can round up to the nearest 1″! And as far as the angles go, my saw only has whole numbers as well, but you can just set it slightly over the half way point (in between the 14 and 15) and it will be good enough! If you were building a piece of furniture or something you would want to get out your digital angle finder (you can search that on amazon, they are not expensive) and find the exact angle! But for this, eye ball that the red indicator is slightly over what looks like halfway and it will be fine!
Hope that helps, sorry I saw this so late…there is so much spam in my dang comments and the real comments get lost! Ugh! I apologize!
Thanks for stopping by, have a good one!
Cara
I love this coop and how you provide pictures and plans. Wish it was as cheap as when you built it. It looks like it will cost about double now in 2024 after doing a rough estimate, but it’s still way cheaper than anything this size, and most of what you can have custom built doesn’t include the run. And then the more affordable pre-built ones from Tractor Supply that claim they are predator resistant are cheaply built and FAR from predator resistant when I actually looked at them. Everything has gotten crazy expensive in the last couple of years. I have 3 pullets that I need to get outside soon and trying to figure out how to protect them from predators. The small coop I have them in inside is far from predator proof and it has me stressing. I’m hoping I can fit this into the budget and build it soon, then I can just move them into it, and plan to go ahead and get some more chicks. We have pretty much all the predators, excluding bears, so I have to cover all the bases, which with the hardware cloth apron, this one looks like it should do the trick…at least I’m hoping.
The only thing I’m wondering about is the open wall between the coop and the run. I’ve read that they need to be locked inside the coop at night for protection. Have you had any issues with the open design for protection or for keeping them warm in the winter?
Hey Michelle!
I am so with you on the cost of everything! Ugh, is it ever so frustrating! I have cut back on building so much just desperately hoping for prices to go down! Lol!
I have not had issues with the coop being open on the one end, now I live in south Texas so the heat is far more of my concern than cold, we only have about a week every February that it gets into the teens overnight and they are perfectly fine! I actually go into the coop to warm up when I am out taking care of the goats! Lol! I have it situated to where the door wall is facing north, and the nesting box wall is west since that is where our cold winds come from. Then the window wall is able to be closed with the shutters and that one foot that the run wall comes inward keeps any wind from whipping around and into the coop! But we don’t have snow, just freezing temps/rain for short periods and it works fine for this!
As far as predators go, the coop is in our backyard on the nesting box side, and the run is kind of like part of our fence (not sure if that makes sense) but our dogs are in the backyard all day and some nights, this helps keep the predators at bay. But I will say, my chickens free range all day outside of their coop, and there is a tiny door on the run door that we leave open to the backyard that the chickens can go in and out on their own and we have never had a chicken attacked while in the coop overnight or in our yard during the day, the only chickens we have lost are the ones that go outside our fenced areas to nest on eggs in the brush! They are not the brightest I tell you! Lol! The backside of the coop where the dogs can’t normally protect, my goats even broke through some of the wire and (knock on wood) but I haven’t had any predators try to get in through there, I do let the dogs feed the goats with me to poop and pee on that side of the coop! I think their smell is a huge deterrent for predators! So if you have a dog, that will help, as long as they are good with your chickens!
Also, I am currently drawing up plans for a medium size chicken coop to build, it won’t be as big but it will be more cost effective! It is only 4×4 with a 4×12 foot run, it will be able to house about 8 chickens so I don’t know how many more you plan to get, but I can send you the rendering if you would like to see that!
Hope this helps! Let me know if you have any other questions or if you want me to send the rendering! Thanks for stopping by and for the sweet words! Have a good one!
Cara
Here in Alabama it gets pretty hot in the summer and in the teens and even single digits occasionally, but rarely any snow, in the winter. We have about 4 acres and none of it is fenced yet. That’s another item on the to do list, but I might have to wait until next year after I get some of my other projects paid off. But I do plan on getting a Pyrenees pup to guard the animals once the fence is in place. It may be more practical to build the bigger coop later and do something smaller closer to the house if it can be moved into the paddock to be better protected later. I’m just impatient and want more chickens now. 🤣🤣
What kind of wood did you use for your chicken run?
Hey Ruth!
I just used regular 2x4s, I will say though, I will definitely use treated 2x4s when building it again! My goats broke some of the boards on the run (trying to get in to get themselves some chicken feed 😅) and where there was no paint, on the broken boards, they rotted which wouldn’t have happened as quickly if they were treated! Hope that helps! Thanks for stopping by! Have a good one!
Cara
we live in mn and decided to duplicate the door wall twice removing the large open space to the run. we also are adding windows in other locations vs a large one. we added a space for our automatic door so we don’t have to let them in and out of the coop on the daily and hope it keeps things more dry/ clean.
Hey Jennifer!!
That sounds perfect for your colder climate, I’m so glad you were able to modify it to fit your needs! Thank you for sharing, I would love to see pictures if you want to share them!
Thanks for stopping by, have a good one!!
Cara
Hi, this is a great looking coop. How many chickens is this for? Could you please email me the links and plans?
Thanks
Sarah
Hey Sarah!
Thank you so much for your kind words! I had 20 chickens closed up in the coop and they were fine, I then had 26 in the coop but they only slept in the coop, they would free range all day! If you are going to keep them in the coop all the time, I would not go over 20! If you free range them, you can easily house 30 in here but they will need plenty of room to roost on roosting bars! Hope that helps!
Also, I emailed the plans to you, so make sure and check your email and if you don’t see them, check your spam folder!
Thank you so much for stopping by! Have a wonderful day!
Cara
Hi,
I am preparing and going to slowly accumulate the lumber and other building supplies. I was going through the list that you have for Meterial and the cut list. There is one that does not say what it is, and was wondering if it is also under the (is used furring strips) material? its the 1x6x8 one.
also, in your cut list it does not say which lumber 2x4s that you cut for each section. studs and header… etc.
could you possibly help with a little more detail in regards to this.
Also, do you have a layout or DIY step for the Run?
Thanks.
Hey Jessica!
Okay, I think I know which ones you are talking about, but feel free to correct me if I am wrong! They don’t make 1×6 furring strips so that is a regular 1x6x8, it is only used in two places, above the front door as trim (1×6 @ 35″) and above the window (1×6 @ 42 3/4″) as trim! Let me know if that was not what you were wanting to know! Lol! And as far as the 2x4s, in the cut list each item has the designated use in parenthesis next to it! There are three cuts under rafters that don’t specify but that’s because they are all parts of the rafters! I can try to clarify a little on that though, the 10 – 2×4 @ 63 1/8″ are the top boards of the rafters, the 2 – 2×4 @ 104″ are the bottom boards for the two rafters that sit on the door wall and run wall, and the 22 – 2×4 @ 22 1/2″ are the middle braces that will go in between the rafters when they are attached to the roof! Hope that helps, but let me know if not!
I emailed all the plans including the run plans so you will have them all together in one email to easily reference when needed! Good luck on your chicken coop build!
Thanks so much for stopping by! Have a good one!
Cara
Hi, I subscribed to get the plans but nothing in my email yet. Can you send them to me? Thanks!
Hey Lindsey!
I emailed them to you! Sorry, I am not sure what happened, but you should have them now!
Let me know if you need anything else! Thank you for stopping by, have a wonderful evening!
Cara
I am building a coop with this as inspiration, we are upgrading this build to 12×12 for extra room and a storage space…. What would the cuts be for roof rafters for a building that is 12×12 and how many rafters would be needed?
Hey Brittany!
Oh how I wish I had the time to whip up plans for you to make it so much easier while building, it takes so long though and unfortunately I don’t have the time, lol! But I did quickly sketch out a roof rafter for you so you will know measurements and angles! I emailed the picture to you because I can’t post it here, but I included all the info in that email! Hope that helps!
Let me know if you have any other questions! Have a good one!
Cara
Hello!
We were looking through the plans and found all of the material for the coop, run, and nesting boxes, but am having a hard time finding material list for doors and shutters!
Thanks so much in advance!
Hey Ellie!
Check your email, I sent the door plans to you! I am also linking the door post here just in case you need it for any reason, which it has a link to the plans within the post as well! Thanks for stopping by! Have a good one!
https://theinspiredworkshop.com/diy-dutch-door-for-chicken-coop/
Cara
When did you build yours and how much did the materials cost you approximately? We are trying to weigh our options here. This would be our first time building anything haha complete newbies!
Hey Jennifer!
I built this coop in the spring of 2020 when we couldn’t get eggs in the stores! Lol! Our cost was $1200-1300 back then, unfortunately it will probably cost around $2000-2400 now I would imagine! Everything has gone up in price since I built it! The best thing to do is print the materials list and get online at Home Depot or Lowe’s (or wherever you would purchase the materials) and price it out! It can take a little while but it is worth it to give you a good idea of cost! Costs can vary greatly depending on where you live too, which can be better or worse for you! Lol!
Hope that helps! Let me know if you have any other questions! Thanks for stopping by, have a wonderful evening!
Cara
These plans are exactly what I was looking for! I can’t wait to start building. Could you email the plans for the coop over? The link on the site wasn’t working. Thanks!!
Hey Michael!
Check your email, I sent the plans over to you (check the spam folder if you don’t see them in your inbox)! Let me know if you have any other questions along the way!
Thanks for your kind words as well! Have a great day!
Cara
Hi Cara! I’m so glad I found your page and these plans for a deep litter coop. Do you keep the shutters open at night? Have you had any trouble with burrowing predators? I’ve read to bury the hardware cloth 18in down around the coop, but that is so labor intensive- would prefer not to lol!
Thanks!! Lindsey
Hey Lindsey! Thank you so much for your kind words, I am so glad you found my page too!😉 I do keep the shutters open all summer long (which is like 10 months here in south Texas, lol) but in the winter they stay closed pretty much the whole time just to keep it warmer and keep the cold rain out should it rain! I don’t worry about summer showers because my chickens will play in the rain in the summer! Lol! I screwed the hardware cloth to the entire bottom of the coop and run and covered it with dirt (pavers in the front), which does keep any animals from being able to dig under, their feet or paws just move the dirt off of the hardware cloth and then they can’t get anywhere with their digging! I hope that makes sense! I can try to take a video for you if not! But no, I have not had any predators burrow or dig under, but my dogs are always in the yard on the one side, and I let them into the back area weekly to pee on stuff just to help ward off raccoons because we have a family that lives in the brush nearby!
Hope that helps! Let me know if you have any other questions! Thanks so much for stopping by, have a good one!
Cara
Hey Cara,
We live in a somewhat forested area in Ohio right next to a creek – We have raccoons, foxes, hawks, eagles, coyotes, etc. – Would this coop hold up against these types of predators?
Hey Mike!
Yes, the coop is built to guard against the typical chicken predators! We screwed hardware cloth along the whole bottom of the coop to keep coyotes from being able to dig into the coop! Now, raccoons will take advantage if the hardware cloth is ever to get ripped so make sure to make repairs right away if you see any! Do you want to know what this coop is not made to withstand? Goats! Lol! They break through hardware cloth like it is nothing…granted they won’t hurt your chickens but they will eat all your chicken feed and destroy your pretty coop! Ask me how I know this! 🤣🤦♀️ Hope that helps! Let me know if you have any other questions!
Thanks for stopping by! Have a good one!
Cara
Did you add roosting bars or a storage area inside for feed and tools? I’m hoping to build something similar, but trying to see if I can sneak some space for feed and bedding that the hens can’t get to. I love your plan though and thank you for sharing, I know it takes a lot of time in creating.
Hey Kahlan!
Thank you so much, I love sharing them with you all! I did add roosting bars, one 8′ long one that runs the length of the coop in front of the window, which they prefer to roost on, and then a smaller stacked set that some of the “outcasts” roost on! Lol! I did not include an area for storage but man that would have been smart, and I sure wish I would have! You could probably add shelves higher up on the nesting box side for pine shavings/bedding and feed! Hope that helps! Thanks for stopping by! Have a good one!
Cara
Hi there! After looking through dozens of different options, I think this is the coop that I would like to build. Can you please send me the plans along with the instructions for the shutters and the door?
Thanks!
Nate
Hey Nate!
My apologies that I am just seeing this! Plans are in your inbox!
Thank you so much for stopping by, let me know if you have any other questions! Good luck on your chicken coop, hope the build goes perfectly!
Cara
What a great construction. I bought a flat pack kit coup and run 2.5 years ago. What a waste of money that was. It is disintegrating at a very rapid rate and I will be lucky to get another 6 months out of it (admittedly it has been a very wet few years). I will have a go at your lovely and sturdy looking design with a few modifications. I’m going to get help from someone who has a bit more time and skill than I do to assist. It will cost a bit more, but will be worth it in the long run. Thankyou for the inspiration and plans.
Hey Justin!
Thank you so much for your kind words! I appreciate them! I agree, those coops are not made to last which is unfortunate because they are still not cheap! I am so excited for you to build this coop, you will not be disappointed! I hope the building process goes perfectly! Let me know if you have any questions along the way!
Thanks for stopping by! Have a good one!
Cara
Do you sell this plan on Etsy?? I ask because this is on there with all your photos.
Hey Jennifer!
I do not sell my plans on Etsy at this time! People come download the plans from my site for free, and then list them on Etsy! It is a huge problem a lot of DIY websites are having right now and it is so frustrating that people are trying to make money off of our hard work! I will go report them! Thank you so much for letting me know, I appreciate it!
Thanks for stopping by! Have a wonderful day!
Cara
Hello, love your coop. I am planning on getting started on mine next week and am using your list. Did you put flashing under the metal roof panels?
Hey Linda! Thank you so much! Yes, I completely forgot that I added it! 🤣 I did put flashing under the metal roofing panels, but I did it backwards, I came back and added it after I attached the roof panels! Lol! I did not add the flashing on the goat shed and I have not had an issue, I just thought it looked better with it on the chicken coop! Hope that helps! Good luck on your chicken coop build, hope it goes perfectly! Let me know if you have any other questions!
Thanks for stopping by, have a great day!
Cara
Very nice setup. I downloaded your plan and will make it as close to your as I can (not a handy man). I also live in Texas on West side of Houston. I think my biggest change in all this would be building the rafters and getting them to the top of the Coop.
Sorry, meant to say…my biggest challenge is installing the rafters.
Hey Thomas!
Thank you so much! The rafters can be a challenge just make sure to have some help when lifting them onto the coop! 😊 If you have any questions about the rafters as you get to that part, feel free to reach out! Thanks for stopping by, have a good one!
Cara
I love it! I’m just finishing up my own build and I wish I would have done the board and batten look for the exterior. 🙁 I’m so happy to read that you color-matched SW Alabaster… I just spent $91(!) on a gallon for my coop and was so nervous that it would come out too gold, but this is gorgeous! Can I ask what stain you used for the wood, and what type of wood the door is made of to get that color? This is exactly the natural look I’m going for but have no idea what to buy. Thank you!!
Hey Shannon!
Thank you so much for your kind words about my coop! All the unpainted wood on the chicken coop is cedar, it is not stained only sealed with Hellsman Spar Urethane! I saved money by using cedar fence pickets to get the look of cedar without the expensive price tag of regular cedar lumber! Hope that helps! Thanks so much for stopping by! Have a good one!
Cara
Hi Cara,
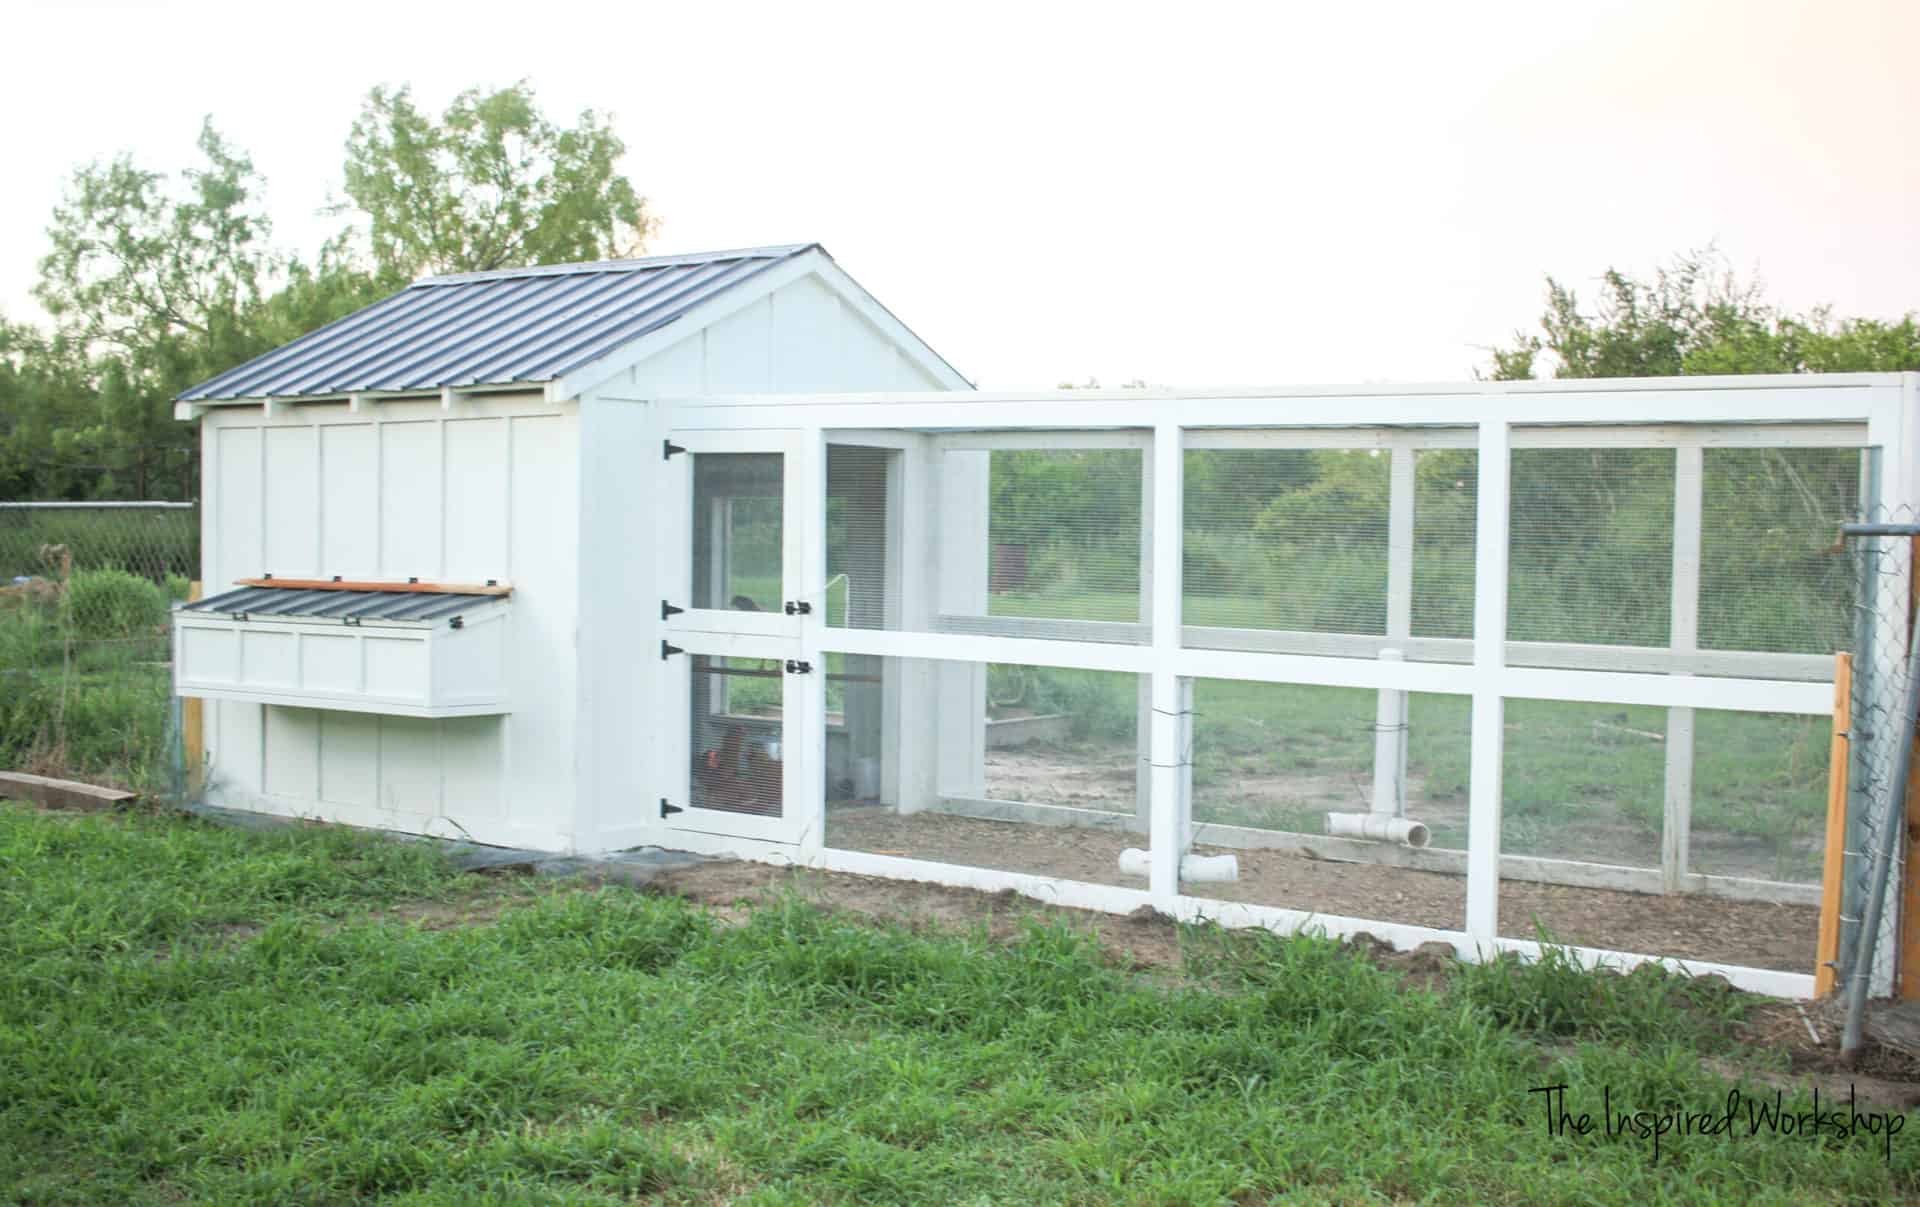
I found your plans on Pinterest and we are in the process of building it. Is there any reason you didn’t make the run the same width as the house? My husband wants to make it the same width.
Thanks for your time,
Kathy
Hey Kathy!
You can absolutely make the run the same width as the coop! No reason not too, I just wanted the change in dimension to give it more depth, so in essence it was only for looks! Lol! Hope your coop build goes great! Thanks for stopping by!
Cara
Hi! I absolutely love your chicken coop!! This is exactly what I’ve been searching for! I LOVE the shutter windows! Can you please send me the plans along with the instructions for the shutters and the door?
Thank you!!
Samantha
Hey Samantha!
Thank you so much, I kinda love it too! Lol! I have emailed you the plans and links to the tutorials that should help walk you through building everything! I hope the building process goes perfectly and you can enjoy your sweet chickens in your back yard soon! Thanks for stopping by, have a good one!
Cara
I followed you plans, and my chickens are loving their coup, it turned out great! I have pics if you want to see it, thank you !
Hey Whitney! That is so awesome to hear! I would LOVE to see pics of it, you can email them to me at cara.theinspiredworkshop(at)gmail.com or DM me on Instagram @theinspiredworkshop! I am so excited to see it! Thank you so much for stopping by! Have a wonderful day!
Cara
Hi! Love the look of this chicken coop! I’m getting ready to build it but the nesting box plans page says not found. Can you help? Thank you!
Hey Laurel!
Thank you so much! Try this link for the step by step nesting box post: Nesting Boxes! And this link for the download nesting box plans: Nesting Box Plans! There is a problem with this link on Safari browser for some strange reason and I have not been able to figure it out! If the links I just gave still don’t work, search nesting boxes in the search box and it should come up! Let me know if it still gives you problems! I apologize for the inconvenience!
Good luck on your chicken coop build, I hope it turns out perfectly! Thanks for stopping by! Have a good one!
Cara
Hi Cara
Whats estimated price to build this coop? TIA
Hey Jen!
I believe I spent round about $1200-1300 when I built it, but with all the increases in lumber and costs varying by location, it is really hard to say what it will cost you! I think when I recently priced out the materials, it was closer to $1800 now! You will be able to get a better estimate by checking the materials list at your local hardware/lumber store or on their website!
Hope that helps! Have a good one!
Cara
Cara,
Thank you for sharing how to make your beautiful coop, they’re so many smart and aesthetically pleasing features! Do you happen to have a design for a medium size coop.
Happy Spring,
Wilhelmina
Hey Wilhelmina!
Thank you so much! I do not have a medium chicken coop as of yet, but I am planning the build of a medium sized one that should be done in the next month or two! I will surely email you the plans when I have them created! Thanks for stopping by! Have a good one!
Cara
Hi there. We are new chicken owners in upstate New York. I am going to try and build this coop and run with a modification of having the door walls on both ends to avoid it being left open on the run wall. We have a lot of fox, coyote, etc. The one part that I am struggling with is the tin roof. Where did you buy yours from? What were the cuts that you made and what do you cut it with?
Hey Ted!
The tin roof was purchased from Home Depot! Here’s a link to the same panels I purchased so you can check availability in your area, it is an affiliate link – Galvanized Roof Panels! I thought I explained cutting the roof panels in the post, but maybe I didn’t and I am so sorry for that! I cut them an inch longer than the length of the roof trusses using a circular saw and metal blade! After cutting them, I wanted them to be a dark gray as the plain galvanized metal was too washed out with the white chicken coop (so if you are painting your chicken coop a darker color, the galvanized color may be great already without painting) but I wiped them down with vinegar and rinsed them with water, let them dry, and then spray painted the panels with Rustoleum Charcoal Gray matte spray paint! We hung the panels on the coop and then attached the top ridge (affiliate link), I also added the trim (affiliate link) around the front of the roof as well to keep it from being sharp, just to be safe! If you have any other questions about the roof panels, feel free to ask! Hope this helps! Thanks so much for stopping by! Have a good one!
Cara
I tried to look in the comments for the answer but didn’t see it, so sorry if you are repeating yourself, but about how much did it cost to build this coop and how many chickens do you have? I love it!
Hey Jamie!
It’s no problem at all! So when I built this in April 2020, it was before lumber prices skyrocketed and I only paid right around $1200, when I more recently priced everything on Home Depot’s website (during the height of the crazy lumber prices) it was right at $2500 but some prices have come down some since then…that was when 2x4s were 8 bucks a piece! So I wish I had an exact amount to give for today’s cost but depending on your area, I would say you are looking between 1500-2300! If you sit down with the materials list you can price the lumber on Home Depot’s website (or whichever place you purchase your lumber from) and set it for your area to get the closest idea of what you will need to budget for it! I sure wish we could go back to pre-2020 prices on everything! Lol! Hope this helps!
Thanks so much for stopping by! Have a good one!
Cara
Hello! Halfway through building this coop, or my version of it at least, awesome instructions!🙂 the links don’t seem to be working now though. Is it possible to get the correct link for the nesting box plans?
Thanks so much!!
Hey Keely!
I am so sorry the links are having issues on certain browsers for some strange reason and I cannot figure it out to fix it! 😬 I am listing the link to the plans and to the tutorial just in case you need that as well! If they still don’t work, let me know and I will email them to you!
Nesting Box Plans
Nesting Box Tutorial
Hope that helps! Thank you so much for stopping by! Have a good one!
Cara
This looks great! Would love to get the full plans layout! Does this include the making of the Dutch door or was that an extra add? I may have missed it in your write-up.
Hey Travis!
Thank you so much for your kind words about my coop! I emailed you the links for the Chicken Coop plans and links to the tutorials for each part of the chicken coop as well so you have it all in one place! Hope that helps! Let me know if you have any other questions! Thanks for stopping by!
Cara
Hello, you did such a great job on this project! I downloaded the plan and my son is going to build this for me. I am going to put mine on a base/floor. I may have missed it, but what are the outside measurements of the coop?
Hey Linda! Thank you so much for your sweet words! The outside dimensions of the main coop are roughly 8′ 3″ x 8′ 10″, the run is 16′ long so a little over 24′ overall when the run is attached! I am so excited for you getting a chicken coop and how sweet of your son to build it for you! I hope it all goes perfectly, and if he has any questions along the way feel free to have him email me!😊 Thanks for stopping by! Have a good one!
Cara
Hi! I love your chicken coop!! Can you please send me the plans along with the instructions for the shutters and the door?
Thanks!
Debbie
Hey Debbie!
Thank you so much for your sweet words about my chicken coop! Please check your email, I emailed all the plans and links to each post so you have them all in one place! Make sure and check your junk mail/spam folder since there are a lot of links in the email it can easily be sent there! Lol! Hope that helps! Thanks for stopping by! Have a good one!
Cara
Hello, can I please have the plans for this? I don’t see how to get them! Thanks!
Hey Rachel!
I emailed the plans to you as the download button doesn’t seem to be working for some strange reason! Hopefully I can remedy that quickly but I sent you all the links in your email so you can get started building as soon as possible!
Hope that helps, let me know if you have any other questions!😊 Thanks for stopping by! Have a good one!
Cara
Hello Cara
We are excited to build this for our new flock to be in. I tried opening the nesting box link but it says something is wrong. Is there a different link but chance? Making sure we don’t miss any steps. Thank you so much for your beautiful story I have enjoyed reading it.
Hey April!
Thank you so much for your kind words about my chicken coop and thank you for reading all the crazy in the post! Lol! But seriously, I really appreciate it!
I emailed you all the plans so you will have them all in one place (including the nesting boxes) and all the links to the blog posts in one place as well! Hope that helps, and feel free to email me or comment here with any other questions you may have while building the coop! I hope it all goes perfectly, and you are raising your chickens in their new home in no time!😉
Thanks so much for stopping by! Have a wonderful day!
Cara
Cara
Hello Cara,
This is so awesome! We too are new to chicken raising world!!
May we get the plans and nesting box links emailed to us too? Do you have a mid size coop plan to share too?
Thank you so much!
Helena
Hey Helena!
Thank you so much! Get ready for a really fun journey that you never knew you needed in your life! Lol! I love my chickens so much and when I am feeling stressed, I head outside and watch them scratch around in the dirt, it is soothing to my soul, I don’t know why it is…but it is!🤣 Anyway, check your email, you should have the links to all the plans for the chicken coop! And unfortunately I do not have the plans for a medium size coop yet, I do have that on my to-build list and as soon as I do, you’ll get the email!😉
Thanks for stopping by, have a good one!
Cara
Without having any kind of foundation securing it to the actual ground, how secure is it? I saw you said a hurricane came by and I assume it’s very heavy.
Hey Ashlee!
So, I have done nothing to secure mine at this point, it has been on the ‘to-do list’ since I built it! Lol! It should be anchored though as that is best, yes mine has survived a minor hurricane but that’s not to say it would survive another, and it’s always best to be safe and anchor it! Preaching to myself here! 🤣 There are many ways you can anchor it, before starting the build you can place 4x4s into the ground on the four corners where you are going to be building the coop and then use hurricane straps from the coop t the 4x4s once you have it built! Or in my case, since I didn’t think ahead at that time, I have purchased a tie-down kit for sheds, trampolines, etc and I will use that, they are the corkscrew looking anchors! It is really heavy and with the length of the run I really do think it is pretty well set but you just never know! Hope that helps! Let me know if you have any other questions! Thanks for stopping by!
Have a good one!
Cara
If you haven’t built it yet you could also concrete the 4×4’s in. Just a thought 🤷🏻♀️
Yes, that would work really well!😊 Thanks April!
This is just what I am looking for. Could you please send me plans and instructionsfor this large coop and run?
Keep up the great ideas and work!
Thanks ,
Jimmy B.
If you don’t mind I would like the nesting box plans emailed to me please because when I try to click the link it comes back with “page not found”. Im absolutely in love with this coop and have finally convinced my amazing husband to build to build it for me. Thank you for sharing your ideas.
Hey Laura!
I sent you an email with all the links! Hopefully they work and you can print your plans, fingers crossed the building process goes smooth and easy!😉 Let me know if your hubby has any questions along the way!
Thank you so much for stopping by! Have a good one!
Cara
Hi Cara,
I am super excited to have found your shop and chicken coop plans. Just a quick question, Did you use pressure treated wood for any of the project. We are in FL and go through some serious weather. Just curious on this.
Thanks!!
Hey Sarah!
I did not use pressure treated lumber (2x4s) for the chicken coop because I am using the pine shavings/dirt out of the chicken coop for my compost, and I didn’t want my soil contaminated! Hindsight, I don’t know that it would really matter, and if you aren’t composting your chicken poop, then I would for sure use pressure treated! I haven’t had any rot yet but it’s only been three years and we made sure to build the coop up so water runs away from it! The plywood on the walls is exterior plywood, so it is treated but I don’t think it is treated for ground contact! I am close to the southern coast in Texas so our weather is probably a lot alike, if you are worried about the longevity, you can surely use pressure treated wood! 😊 Thank you so much and good luck with your chicken coop, let me know if you have any other questions! Thanks for stopping by!
Cara
Hi!
We are gathering materials to start building this weekend, could you please send me the plans for the run and doors/shutters?
Thank you so much for sharing! I’ve read this over and over and can’t wait to get started!
Madeline
Hey Madeline!
I am so sorry I am seeing this so late! I have emailed you the plans for the doors and shutters! I hope I am not too late in getting them to you! How exciting to be starting on the coop though, I hope the building is smooth sailing! Let me know if you have any other questions!
Thank you so much for your sweet words! Have a good one!
Cara
I have put my email several times to receive the plans and I have yet to receive anything.
Hey Mekai!
I have emailed you the plans, just click the links within the email and it will open the PDF files! So sorry for the confusion, let me know if you have any issues with the plans after you receive them! Make sure and check your spam/junk folder if you don’t see my email waiting for you! Thanks for stopping by! Have a good one!
Cara
Do you suggest using pressure treated wood or is regular lumber fine?
I love your coop so much!! You did an amazing job.
About how long did it take you to build it all? I’m so impressed with your coop and your instructions and all the lists. 🙂
Hey Brandi!
Thank you so much for the sweet words about my chicken coop and plans, I really appreciate it!
So the build took me far longer than it should have…lol…but it was more because I wasn’t sure how I wanted to do certain parts so I would get to a certain stage and think on it for a couple of days! Since the plans are completed now, you should be able to build it in two-three weeks if you work slowly, or a week, maybe a little over if you do build regularly and push it to get it done quickly! Basically breaking it down, the main chicken coop frame was completely built in a day, the roof took me two days to build and put the tin on, plywood and trim were another two days, the run was a day, doors, nesting boxes, and shutters I would give 3 days to be safe, and last painting was a day with a paint sprayer! As you can see I don’t work but a couple of hours a day! Lol! Others could have had several things done in one day that took me 2-3!😅
Hope that helps! Let me know if you have any other questions! Thanks for stopping by! Have a good one!
Cara
Hi. I just read about the time it would take to build, and i’d like to know if this is working full days or like weekends? I work during the week and want to plan aprox time. We just got chicks and want to start building to have it ready for them. I love the coop and am excited to build.
Thank you
Hi Cara ~
Thanks a million. It’s going to be fun. My wife’s latest honey-do project. She just has to have chickens now! I can build it, but I don’t know anything about raising chickens. Short of going to the University of Google I’ll ask a few questions of you before a deep dive.
1. I assume the 36″ hardware cloth is because all dimensions end up at 72″ basically. I’m thinking of fencing the bottom row at 48″ to trench and burrow 12″ for tunneling critters. Do you have any thoughts on that or is my plan a solution without a problem?
2. We’re in Ohio. I gets cold and windy here in the winter and we live in the country with open fields all around. How do these chickens feel about very cold windchill with only hardware cloth in the eaves? Should I insulate in the winter? Heat lamps?
3. I read your FAQ. Is a floor a good idea? Or some ground cover? Paver blocks, maybe, rather than potentially mud?
Thanks for sharing…
Thom
Hey Thom!
Thank you so much for your kind words! I really appreciate it, makes my day when I log in to find the sweetest comments!
And, I agree it will be fun! LOL! Chickens are really great and until two years ago, I had no idea what I was missing out on, I thought chickens were nasty and never wanted any! I was so wrong! They are not nasty at all, they are so much fun, we love our ladies…and rooster! 🐓
Now to answer your questions!
1. Yes, the hardware cloth is 36″ because the run is 72″ tall and it fits perfectly with a slight overlap along the middle boards! You can do the 48″ and bury it as you mentioned because digging critters can be a problem! Maybe I didn’t mention it in the post, I will go back and check and add it if I didn’t, but included in the hardware cloth amount needed, I have included enough to go around the entire coop 12″-18″. I didn’t trench it, I just screwed it to the bottom of all the bottom 2x4s and it lays outward, flat on the ground and we covered it with dirt. If anything tries to dig it just ends up on the hardware cloth and can’t dig! I hope that makes sense…I can email pictures if not! So far, we have not had any issues and no animals have even tried to dig around our coop, but we also keep our dogs outside most of the time and even when they are inside they will wake us up if they hear anything outside, and they can run around the coop so they keep the raccoons, bobcats, and coyotes away for us!
2. I live in south Texas so I do not have a lot of experience with the cold! LOL! I have to worry more about heat than cold hence why I have it so open! Granted, I will say, we did have our crazy freeze that lasted for a week where it was 13-17 degrees overnight and stayed below freezing during the day and we did nothing to the coop besides close the shutters and it was warm inside! The chickens were happy and cuddled a little more than normal but I was not worried about them at all, I would go inside the coop to get out of the wind and warm up a little while I was out taking care of all the animals! Now, as I have mentioned before, positioning of the coop is key so that the north wind is blocked by the solid wall of the front, the eves are to the east and west, and the open run is to the south! Keeps them cool in the summer and warm in the winter, but that is not to say that it will be warm enough in an Ohio winter and I do believe the run may need to be closed in and the eves covered during the winter! Insulation probably wouldn’t hurt with how cold your winters are! As far as heat lamps, I don’t use them, I did run electricity in case we ever need to, but we haven’t! If you are on Facebook, I love my chicken groups I am in that I can always ask questions and get answers from experienced people in my area, and that would be great for you to be able to ask other people living in Ohio about how they manage winter with their chickens! I wish I had more experience with the cold to offer…but alas, TEXAS! 🤣
3. I love my chicken coop without a floor! I like my chickens to be as maintenance-free as possible and not having a floor allows me to not have to clean out the coop very often at all! Honestly, I have removed the pine shavings twice since I have had my chickens for two years and the only reason I removed it was because I wanted to use it in my garden! The way they turn the soil and pine shavings to compost the soil is one of the coolest things I have ever seen in my life! I know it sounds like it’s weird but it DOESN”T smell at all because they do all the work scratching to keep it clean! They basically throw fresh dirt over their poop every day! I have to clean out the nesting boxes once a week or so because some of my ladies like to sleep in the nesting boxes, but that doesn’t even take me five minutes to scrape them out! I have friends with coops that have a floor and they have to clean the whole coop once a week, shovel and scrape the floor, and change out bedding every week…and it still smells like chicken poop! I love that I don’t have to do it! I don’t have an issue with mud, but we built our coop up slightly and sloped all sides away from the coop so water (even hurricane rains) doesn’t make it into the coop! Every once in a while we will get a really hard rain and the shutters will stay open because I forget and it gets slightly damp below the window but nothing that affects the chickens in any way!
Hope that helps! Sorry, I wrote a whole book!😅 Let me know if you have any other questions! Thanks for stopping by! Have a good one!
Cara
Thanks Cara,
You are a real gift to us chicken newbies.
I will do as you suggested with the hardware cloth. It makes more sense than to trench 40′.
I do without the floor as you suggested. I’ll slope the ground away from the coop outside and all should be well.
I’ll keep some insulation at the ready in case we have protracted cold, windy spells. I don’t want our egg layers to be ready for the freezer. I don’t know what I’ll use yet. Maybe just some plywood on the eave openings to keep the wind out.
Thanks so much for the reply. You’re a huge help!
~Best
Thom
Hi Cara,
I love your chicken coop and run, but have problems getting the plans. I checked the spam and it didn’t go there either. Would it be possible for you to email it to me?
Hey Ute! Thank you so much for your kind words, I apologize that you are having trouble retrieving the plans! I am emailing them to you now, let me know if for some reason you don’t receive them! Thanks again!
Cara
Hi Cara, Loving the build and just finished the four walls… just wondering what stakes you would recommend to hold the coop down in case of winds? Thank you for your amazing plans.
Hello, thanks so much for sharing your coop! I am going to build a very similar coop here in North Texas in a few weeks. Can you post more pictures/instructions on how you did your roosting bars and about how much length is needed per bird?
Hi there!
This is THE coop for us 🙂 I was wondering – did I overlook the plans for the doors / shutters for the window? I checked a few times in the post and couldn’t find them. I LOVE THEM and they’d be a perfect addition to keep the critters out for us as well!
Hey Jennifer!
Thank you so much for your kind words! The plans should have been included in the success pop-up right after you entered your email! I am emailing the file to you right now though, and if for some strange reason you don’t receive it, please let me know! I will double check the pop-up as well, and I apologize for the inconvenience! I wish you all the best in building the chicken coop, and of course, if you have any questions along the way, feel free to email me! Have a good one!
Cara
Hi Cara, I’m also trying to find the plans and have been unsuccessful. I plan to build your exact chicken coop in the next few weeks. Do you care you send me the plans to my email?
Thank you so much.
Hey Brittany!
I apologize that there seems to be a problem with the plans! I will surely email them to you! Make sure and check your spam/junk folder just in case you don’t see them in the next few minutes! Thanks for stopping by! Have a good one!
Cara
Hi Cara,
Thank you for being generous and sharing your plans. Your coop looked so good I finally stopped researching plans and just started building, so certainly inspired me. I didn’t follow your plans exactly but used your dimensions and modified the design to fit the Aussie climate and specific spot I had picked for the coop. Since I wasn’t building the run I used the split doors on both ends but I also built a frame in the top of each door with hardware mesh AND a shutter door so when our hot summers hit, I can push ventilation to the limit at night if required. Wood is so expensive (and hard to find) so for now the door is a ply panel but I’ve plans to make it like yours once prices drop. It also needs more of the trims to look as nice as yours – something else I have to wait a little longer for. The chickens look so happy when it is bed time and during the day, I keep finding my ducks in there – probably wondering why their house isn’t as nice as the chickens house. Thanks again, it really did inspire me to just get started and stop overthinking it.
Nat
Hey,
Did you cut the roof panels? I can’t see anywhere that says you did, but I assume you must have. If you did, what size did you cut them to please?
Hey Lizzie!
I sure did cut the panels, sorry if I didn’t mention that in the post! Oy! Off the top of my head, I think the rafters were cut at 63 1/8″, and I cut the panels at 64 1/8″. Basically, I just added 1″ to the length of the rafter boards to have a small hangover! Hope that helps! Let me know if you have any other questions!
Cara,
Did I miss it or is there not a door on the run wall that can be closed during bad weather? My wife and I are new chicken parents and plan to build your coop as soon as the price of lumber comes back down. We will use the small coop we have until then. I love your coop, it will be perfect for our girls.
Hey Sean!
Thank you so much for your kind words about my chicken coop! And I apologize that it has taken me this long to reply, comments were lost in the spam filter and I had to wade through over 12,000 comments to find this one! Lol! Sorry about that!
Anyway, I do not have a door on the run side, I had planned on building sliding barn doors to close when needed, but honestly, the run faces south on our coop, and after using it for a year and a half, I have not had a need to have doors on that side of the coop! Our rain really only blows hard from the north with a cold front and with the slight walls on the run side, it manages to keep the rain out when the wind/rain is out of the south! I’m not sure, if you live in a really cold climate, you may want to add them… even though we had that crazy freeze this last February and it was down to 15 degrees at night and in the 20s during the day, since the north wind was blocked my ladies were perfectly fine!
Hope that helps! I would LOVE to see the coop when you get it built! Let me know if you have any other questions!
Cara
Hi there! I cannot wait to take your plans with some modifications to build our own coop!! I wanted to ask if you had plans for the nesting boxes because the link didn’t work above. Thank you!
Same problem with link!
Hey Nikki!
Can I ask which part are you having a problem with the nesting box link? If you click the link in this post, it takes you to the nesting box post, and in that post are the downloadable plans. If you have a pop-up filter on maybe that could be causing the problem? Once you click the link it should ask if you want to open or save them, then they will download! It works for me but I see another comment saying they are having a problem as well, so I’d like to fix it if I can! In the meantime, here is a link directly to the nesting box plans! DIY Nesting Box Plans Thank you so much for your kind words and for letting me know there was a problem! Have a good one!
Cara
Hi! Love this coop! We are still in the process of building. Total cost has been $1800 in Wisconsin. (March 2021). Cost of wood has skyrocketed! It is still much cheaper than buying a well made large coop. We did also double supplies for a second door. We can’t have an open end so we are adding a door on the run wall.
Hey Kate!
Oh my word, you are telling me…I cannot believe the cost increase of wood! It’s insane! So glad you are still able to build it even with the spike in cost! I love the idea of the door on the open end, I would LOVE to see your coop when it is complete! Thanks for sharing the cost update with my readers as well, that’s very helpful to show the current cost comparison!
Feel free to reach out if you have any questions while building! Thanks for stopping by, have a wonderful day!
Cara
Hi!
Do you live in a cold climate? We do, so I am curious how well it keeps the ladies warm with only hardware cloth on the window and the eves. I love the idea for ventilation, but just wonder what you would suggest we modify so they stay warm in winter. Insulate the inside?
Hey Libby!
I live in south Texas, so I definitely live in a warm climate! Lol! But I will say, we recently had that crazy freeze where our temperatures were 13 degrees overnight with freezing rain for a week, the chickens were perfectly fine! I situated the coop to where the north wall is a solid wall when the door is closed (front door), the eves are on the east and west wall which left them pretty much unaffected by the winds, and then the windows have shutters that can be closed, which we closed during the storm. I have yet to add the barn doors to the large open wall (run wall), but you could do that to close off that end and add a little warmth. Insulating it would definitely help, but I was shocked at how warm it was in the coop! I would run and sit in the coop to take a break while out feeding and moving animals around! I had planned to bring the chickens inside if it seemed like they were too cold, but they didn’t ‘huddle’ anymore than normal or anything, they slept exactly like they normally did, and they played all day outside in the freezing temps too! Anyway, the three sides that were fully closed blocked all the wind and it was actually toasty! Now in a really cold climate, I might attach a board (1×4 or 1×6) with hinges over the eves on the inside so that you could flip them up over the eves when it was cold but flip it down when it was warm to get the ventilation! Hopefully, that makes sense!
Hope that helps, and feel free to reach out with any other questions you may have! Thanks for stopping by! Have a good one!
Cara
So this plan costs includes the run and coop together?! I’m a first timer but want to do it right the first time around! Thanks,
Ashley
Hey Ashley!
The cost in the post does include the coop and run at the time I built it, unfortunately, lumber prices have SKYROCKETED lately and so the cost has definitely increased! Another reader is building it right now and said her cost has been 1800 with the increased cost of the lumber, granted she has some added cost as well because she closed in the run wall and added another door on that wall, but I would imagine that would be a pretty fair estimate of cost today. It’s so frustrating that lumber has increased so much recently, and we can only hope it goes back down soon!
Feel free to reach out with any other questions! Thanks for stopping by and have a good one!
Cara
We are using your plans as a reference guide but doing our own touches! I love your coop and it was exactly what we have been looking for.
We are currently about $1200 invested with material cost. But here is our changes….
10′ x 8′ design
Treated plywood floor- 3, 4×8 sheets
4′ x 4′ treated posts cut at 45⁰ for skids – 3 , 10′ posts
2x4x8 treated framing, 9 boards
Then i painted the floor with a porch paint for easy cleaning as laminate was about $100 for this size, paint was $10 and i put 4 coats!
We have been saving pallets(really big ones) for awhile and other than removing all the nails we had all the 2×4 boards we needed for the rest of the framing, score!! More money saved!
We are using tin that we had leftover from a shed build years ago for our roof, yay, more money saved!
Purchased:
1/4″ primed plywood siding, 9 sheets
Roof plywood 1/2″ osb, 5 sheets but need to get one more as i want a 2′ overhang above the door.
Metal vents to be placed on either peak
Metal roof ridge
We are so excited to set this up, we will be putting to roof together this weekend!
Hi there! How many birds do you think can fit in this coop? I’ve got a flock of 20 and love your coop!
Hey Caylen!
Sorry I missed your comment, it was overlooked in a slew of SPAM comments! Oy! My apologies!
Anyway, my flock of ladies is 20 and they have PLENTY of room! They free range all day but when we went on vacation, they stayed inside for 4 days without any issues! I was so worried they were going to have pecked each other and pulled feathers out by the time we made it home, but they were perfectly fine! LoL! I plan on adding a maybe 10 more to my flock after hatching some of their eggs, and I really don’t think that will create an issue! I’ll update when I do!
Hope that helps! Thanks for stopping by! Have a good one!
Cara
Thank you for sharing your plans! I’ve been searching all over the web for plans to give us a starting point for our coop design and this is just about perfect as is.
One question I had was on the coop not having a floor. Are there any issues with moisture from the ground during rainy weather? You probably get more rain there than we do here in California, but our soil is clay and waterlogs with the rain. Does the deep littler protect the coop well enough from ground moisture?
I am dying to make this. I LOVE it so much! Do you HAVE to have the kreg jig ?
Hey Lauren!
So sorry I am so late responding to your comment, I lost several comments in a slew of SPAM comments, and I apologize!
You absolutely do NOT have to have a Kreg Jig! It simplifies the process, but by all means, do not let not having one keep you from building it! Small alterations will keep you from having to have one, for instance on the run, instead of using pocket holes, you can just screw your screws in from the side (on the 1 1/2″ side of the board) and if you start the screw, then pull it back to angle it, it almost makes a pocket hole but on the side as opposed to the face…I hope that makes sense, I can send you a video if that will help! Lol! I just used this method on my garden fence because I was not about to drill pocket holes on all of those boards! Lol!
Hope that helps, and feel free to email me at cara.theinspiredworkshop@gmail(.)com if you need me to better explain the process or send a video! Lol! Thanks so much for stopping by! Have a good one!
Cara
Thank you so very much for these plans! Well thought out and they make me believe I can do it!
Hey Tana!
Thanks so much for your kind words! You surely can do it, and I’m here to help if you need anything at all, feel free to reach out!
Thanks for stopping by! Have a good one!
Cara
What is the sq ft of this coop? How many chickens are you able to put in it?
How much did it cost you to build just the coop without the run?? These plans are amazing btw 😉
Hey Marcelita!
Thank you so much for your kind words! If you did not add the run, you can expect to cut about 300 dollars off the total coop cost, granted that was my cost 10 months ago, BEFORE lumber SKYROCKETED! Also, depending on how you modify the opening to the run, you may save a little more money than that, or it could cost you some of that savings! At today’s cost, the run alone would cost double that in my area, and triple in some areas of the country! I am trying to wait PATIENTLY for prices to go back down but it is not looking promising! Hope that helps!