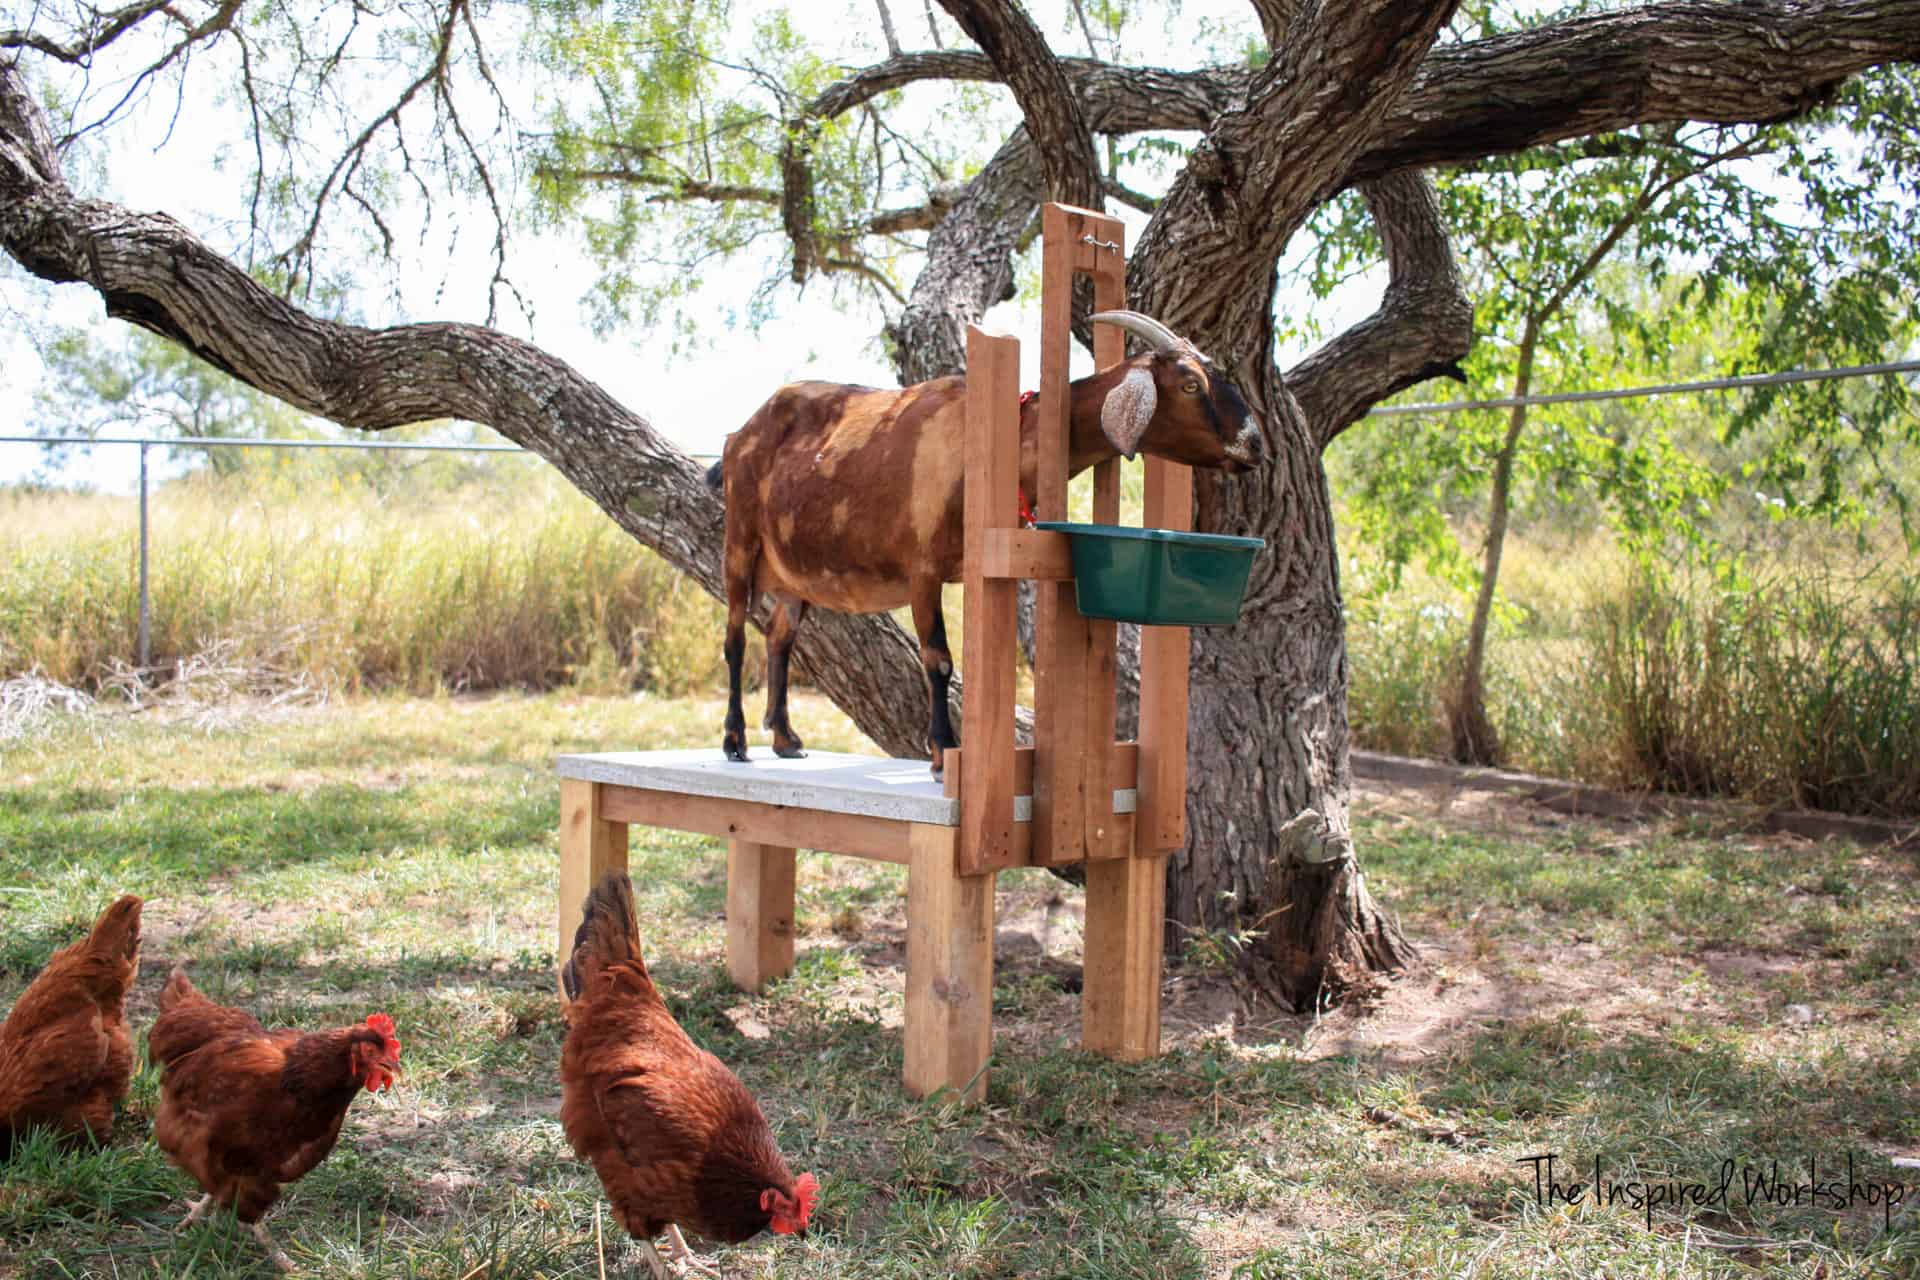
DIY Milk Stand for Goats
Do you want to know what the absolute favorite part of a small homesteading operation is? Drinking the delicious raw goat’s milk that you milk with your own hands each morning! This milk stand for goats is where the milking goes down and you will get the yummiest milk you ever tasted from your ladies, hence the BEST part of homesteading happens right here on the milk stand!
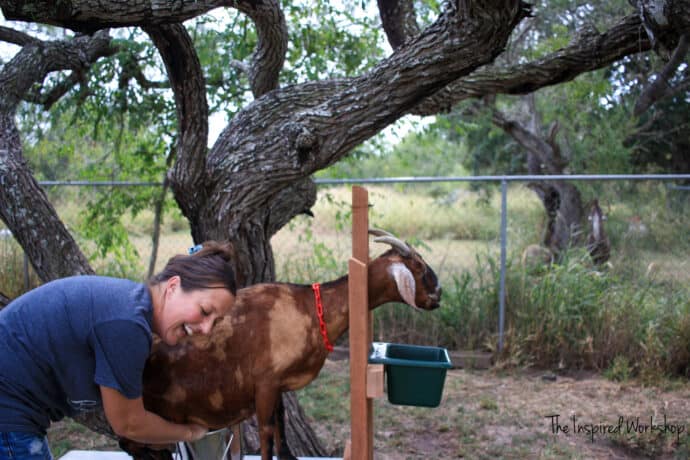
My favorite girl Faith makes the absolute BEST milk, I kid you not, her milk tastes like melted ice cream…I wish I could send you all some to try, it is DELICIOUS! I hate store bought goat’s milk because it has that nasty, stinky goaty twang, but my fresh milk does NOT have any goaty twang at all! It tastes like a slightly saltier thicker cow’s milk to me, almost like drinking heavy cream! YUM! We drink her milk raw so she is pretty dang spoiled with the best dang food too! Lol!
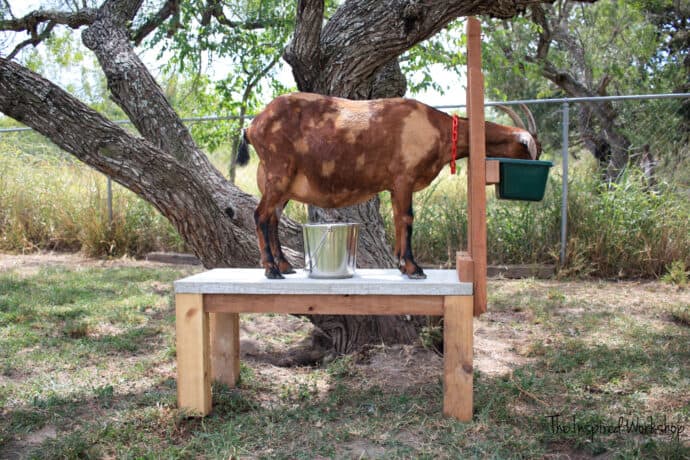
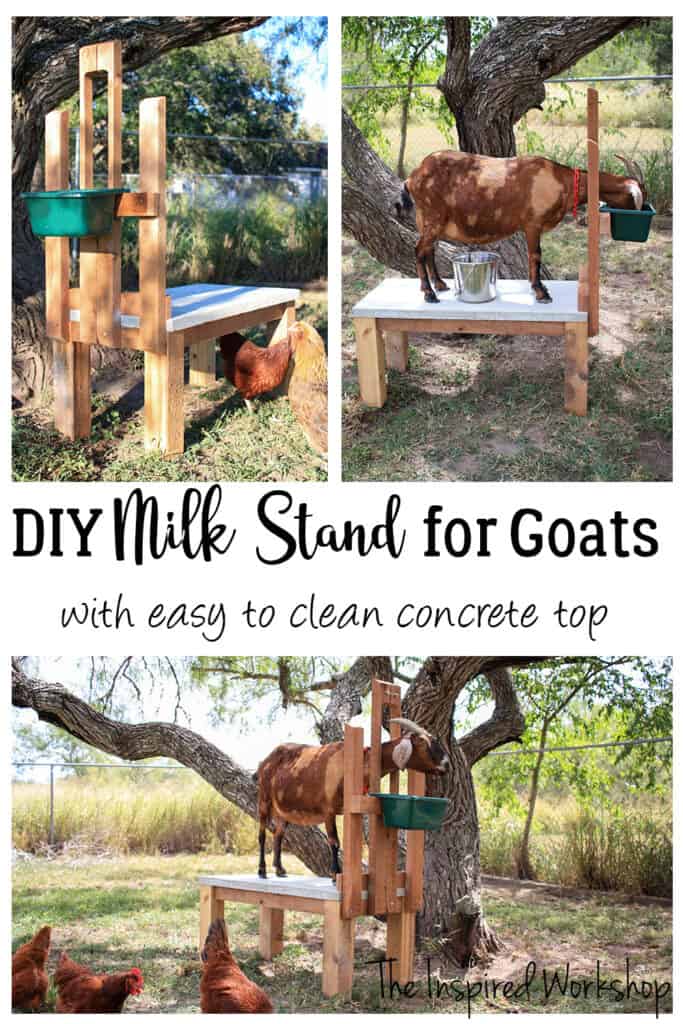
Faith is a mini-Nubian and this milk stand works perfect for her, but it can accompany pretty much all the dairy goat breeds without even modifying it! Use it for full-size Nubians, mini-Nubians, and even Nigerian dwarf goats can use this same size stand!
She looks so sweet standing there right?! Well, I tried to get a picture of her getting milked, and she SAT DOWN on me! OY! This girl NEVER sits down on me! Geeezzz!! This girl!
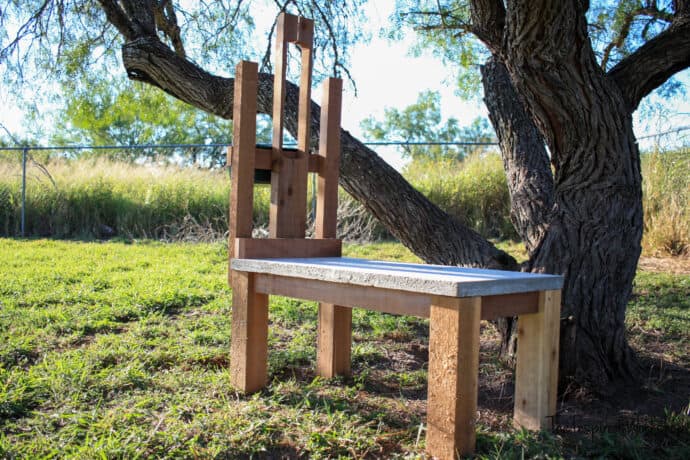
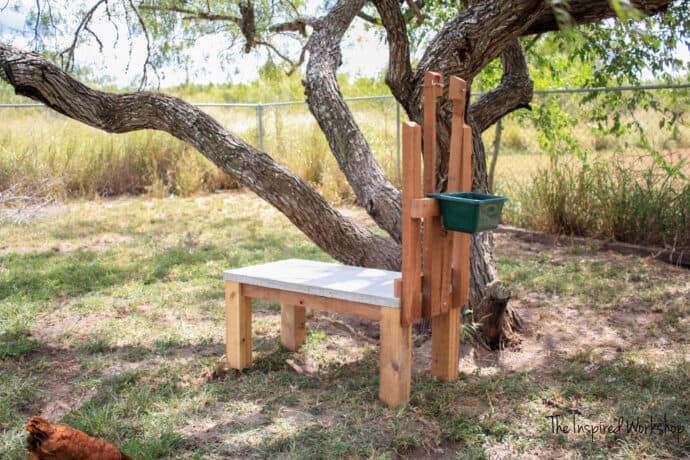
Goats aside, I love how great the milk stand looks in my yard too, and how beautiful the concrete looks with the cedar wood! Beauty and function is the name of my game, as you all know so of course, the concrete top has a purpose, not just for looks, the concrete top is easily cleaned to keep it sanitary!
It is a straightforward build that really doesn’t take any special skills and comes with an all-inclusive price of $120, which is for everything including the bucket! Of course, you will want to check the cedar prices in your area before building to get the exact cost as that can change from region to region!
Want to see some of the other awesome DIY projects for your goats or homesteading? Check out these posts as well! DIY Chicken Coop with Large Run, DIY Small Chicken Coop, DIY Goat House, DIY Small Goat House
I hope to share so many more posts over the next couple of weeks that are in the homesteading category! I am so new to raising and growing my own foods and am not a professional or expert by any means, but yet, I am already making my own organic chicken feed, I have been farming my own mealworms and black soldier fly larvae, and I even treat all my animals holistically without the use of any type of chemical wormers or medication…of any kind. I can’t wait to share all of this in hopes of helping you be able to raise and grow your own food too!

So do you want to build your own milk stand for goats and drink the yummiest milk known to mankind? Keep reading below and download the free plans here!
Materials needed for building the milk stand for goats:
- 1 – 4x4x8
- 2 – 2x6x8
- 1 – 4×4 sheet of melamine
- 2 – bags of concrete
- 1 – hook and eye latch
- 1 – bucket with flat lip
- 3 – 1/4″ x 6″ lag screws
- 1/4″ concrete drill bit
- miter saw
- jigsaw
- kreg jig – have you seen all the new Kreg Jigs? I want one!
- 2 1/2″ pocket hole screws – this is the absolute best way to buy them
- 1 – large head 3″ screw
- pack of 3″ screws
- wood glue
Cut List for DIY milk stand for Goats:
- 4 – 4×4 @ 17″
***rip the 2x6s in half to make 2 – 2x3s (for a total of 4 – 2x3s)*** - 2 – 2x3s @ 40″
- 4 – 2x3s @ 32″
- 2 – 2x3s @ 12″
- 2 – 2x3s @ 18 3/4″
- 1 – 20 1/4″ x 40″ piece of melamine
- 2 – 2 1/4″ x 40″ piece of melamine
- 2 – 2 1/4″ x 21 3/4″ piece of melamine
Building the Milk Stand for Goats
Building the Milk Stand for Goats
Building the milk stand will only take about 4 hours but the concrete top will take 3 days to cure! 3 days and 4 hours
Build the form to pour the concrete top of the milk stand
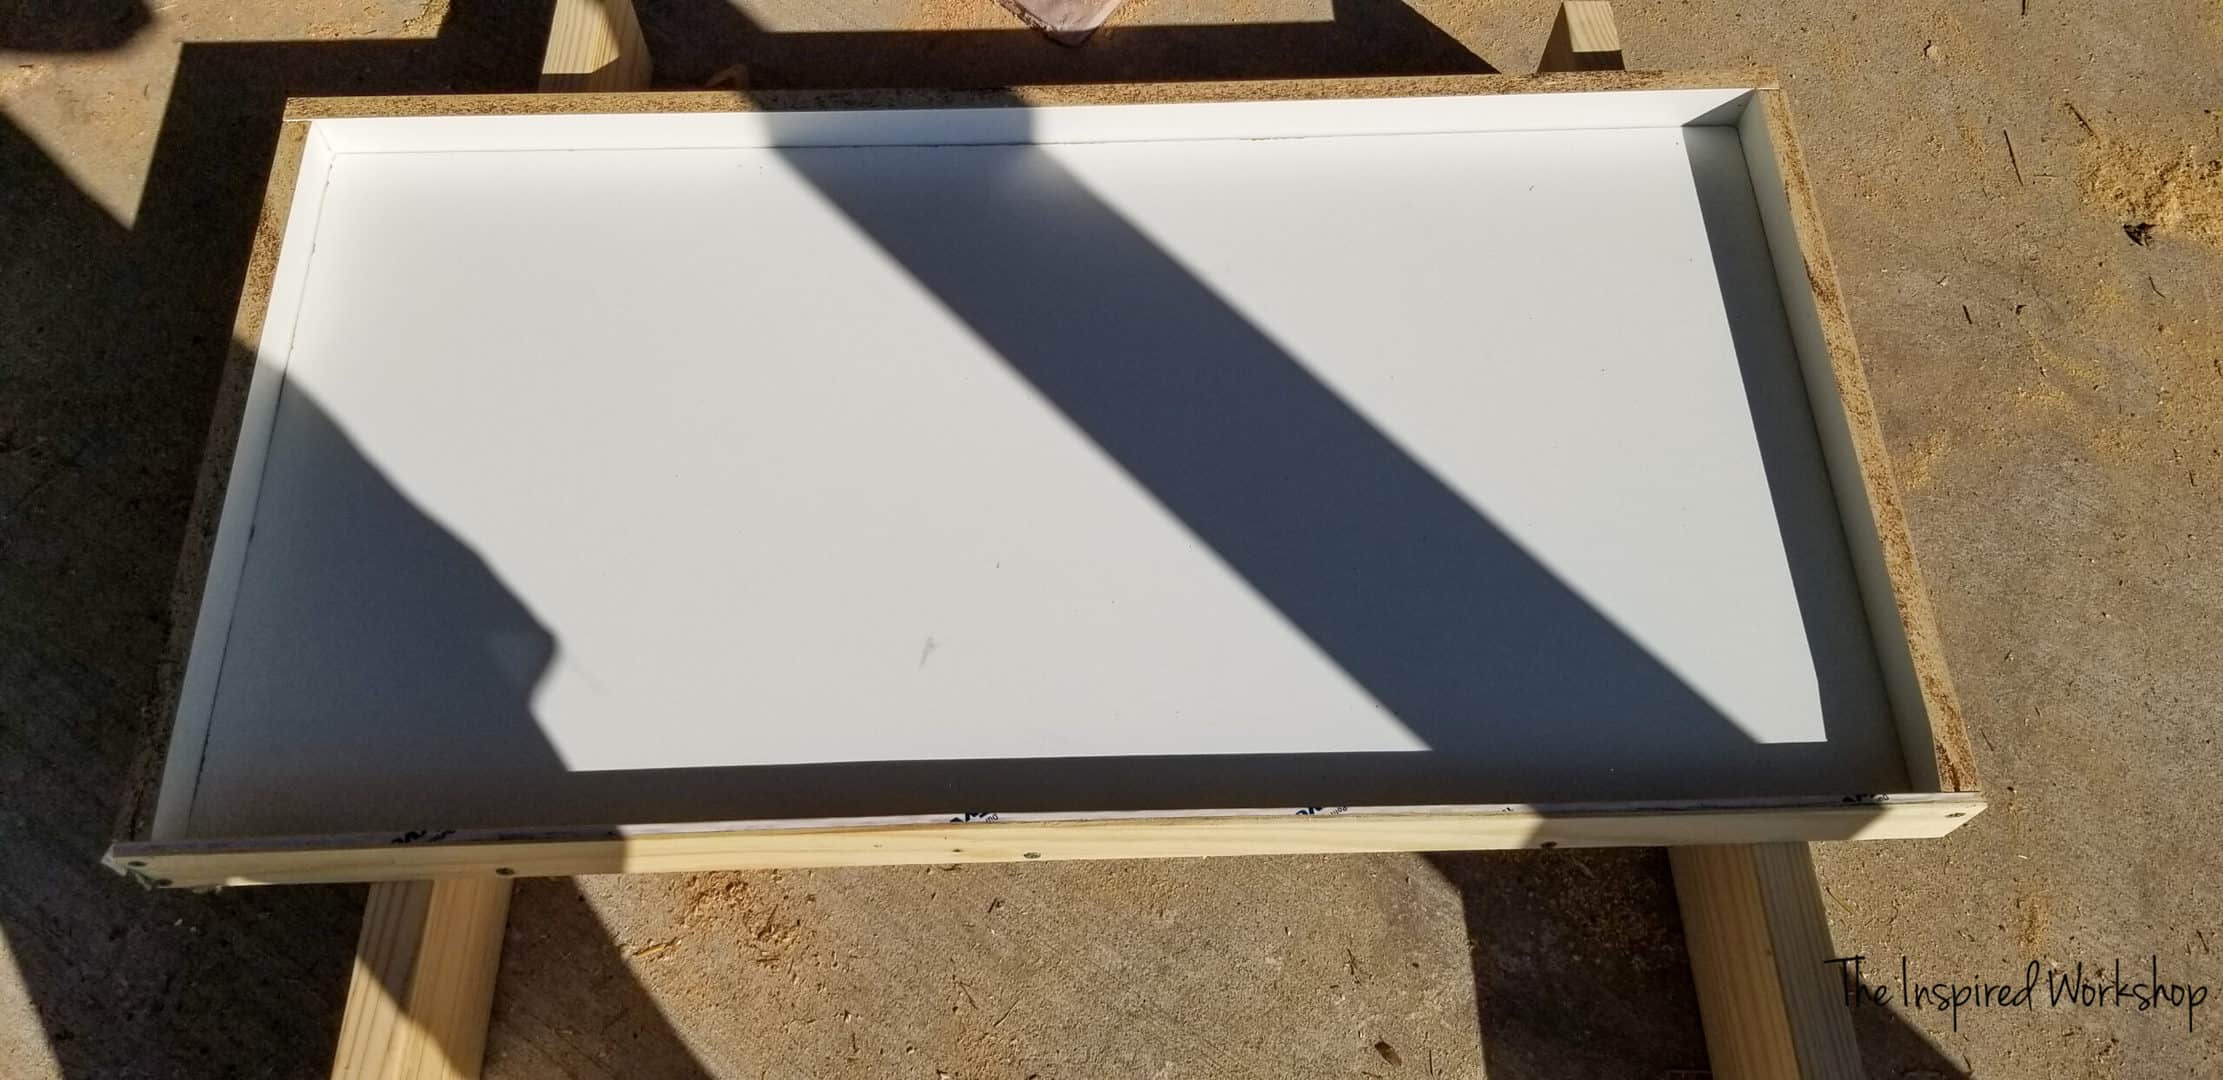
Build a form (or mold) out of melamine to pour your concrete top into. The base of the form will be 20 1/4″ wide by 40″ long. Rip small strips down to build the sides of the form…if you have larger goats, you may want to make the top a little wider than the 20 1/4″ but it’s really up to you, they will still fit! If you need a more detailed post about pouring a concrete top, I have this one to help if you need it! DIY Concrete Vanity Top or this one DIY Concrete Top Bench
Screw the strips into the sides of the base piece of melamine. I used 1 1/4″ screws to attach, make sure to pre-drill holes for the screws, or else you will have the plastic of the melamine bulge and keep you from getting the and can also split the pressed wood underneath really easily!
Apply a bead of silicone caulk to the seams on the inside and let it dry!
Pouring the concrete for the milk stand for goats
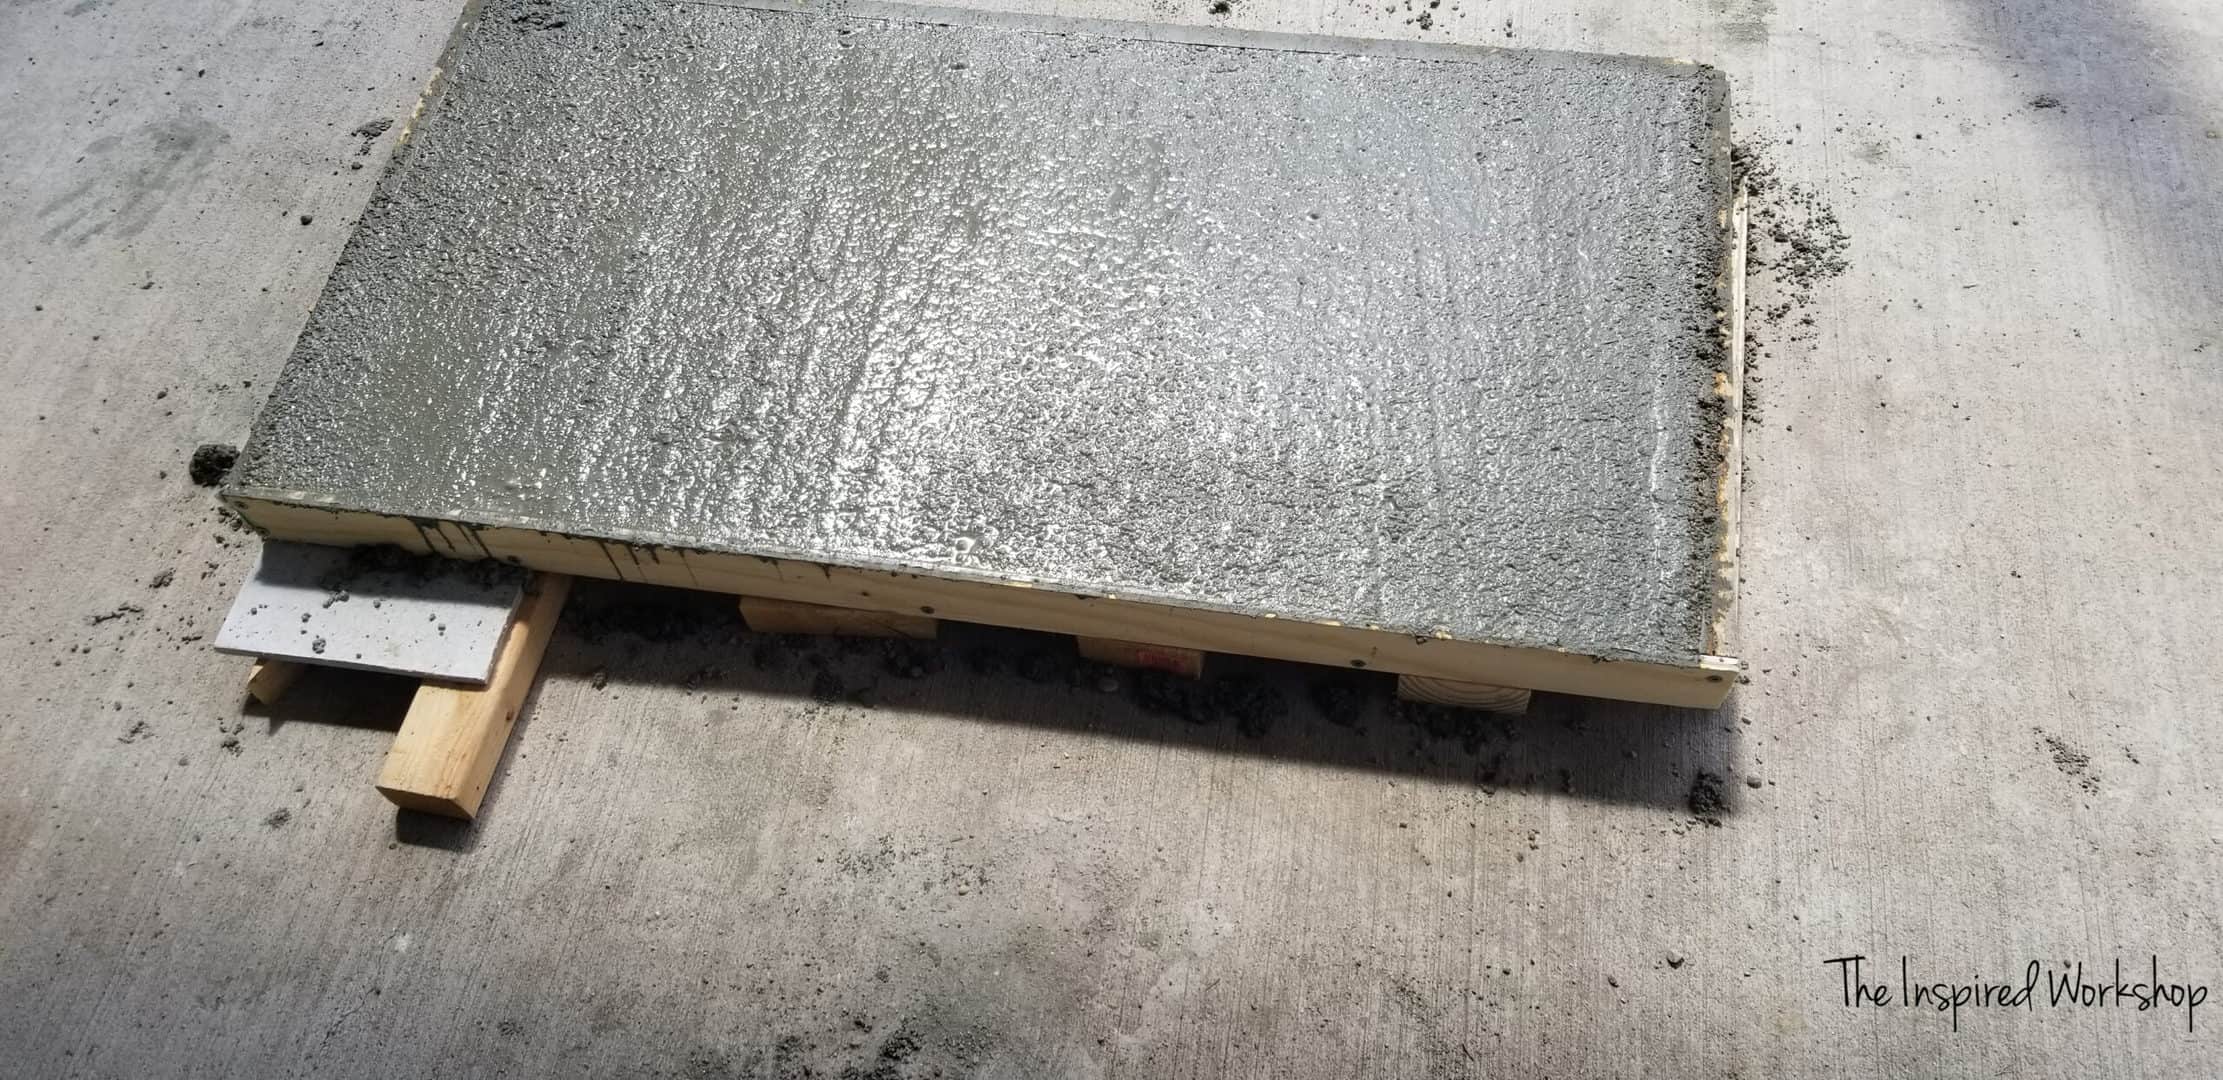
Mix the concrete as the bag says, use a board with a straight edge to level off the concrete and make the bottom flat.
Cover the concrete
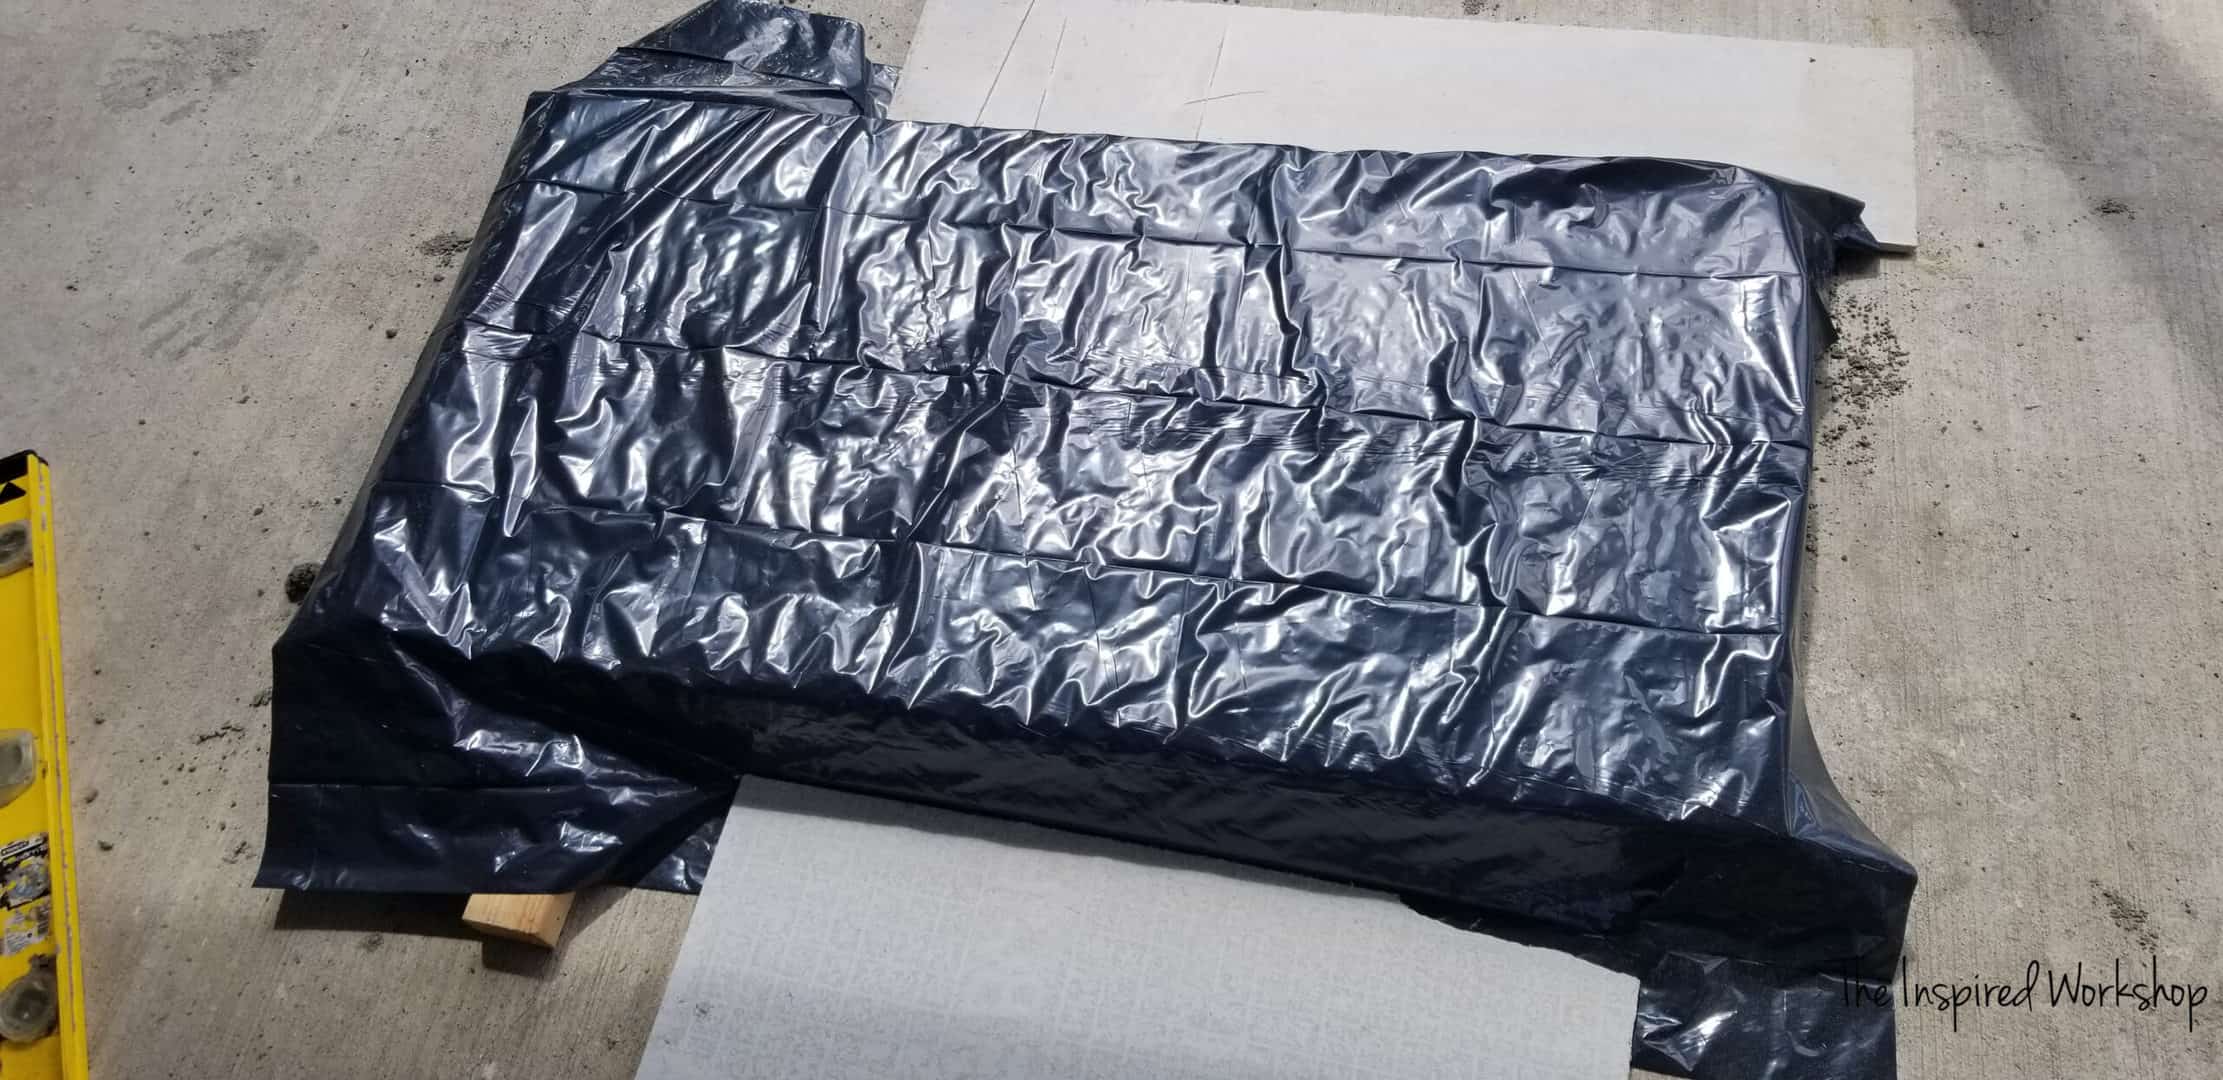
Make sure and cover the concrete with something plastic like a tarp or I just used a black contractor trash bag! Lol!
Build the base of the milk stand
I am not sure how I forgot to take photos during this step, but it doesn’t really surprise me…I mean nothing surprises me anymore! Lol!
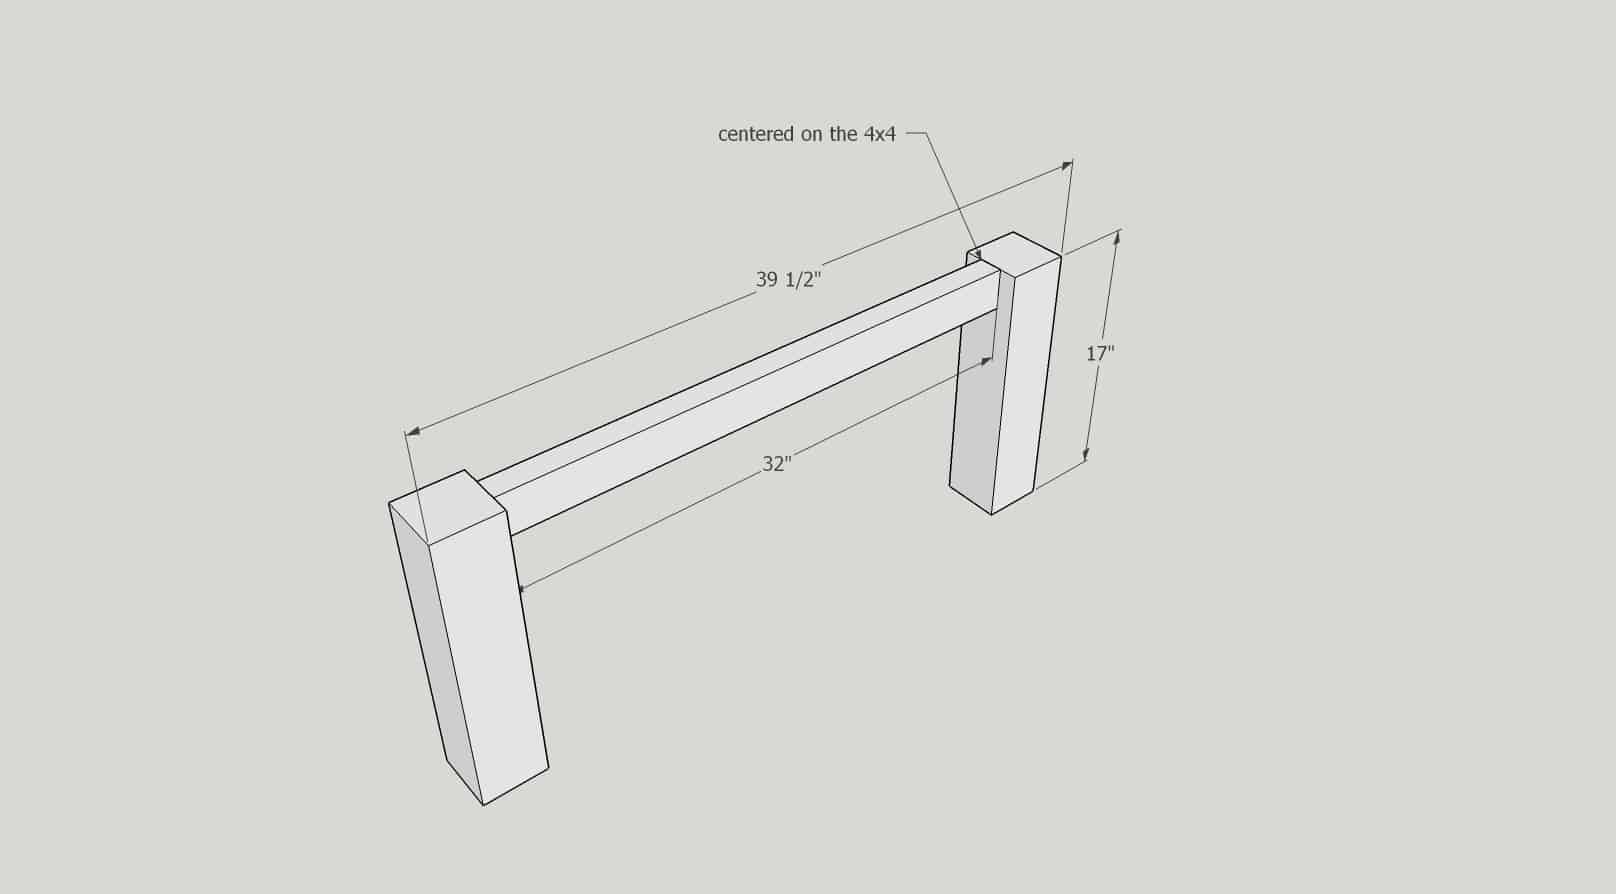
Anyway, build the long sides first. Using 2 – 4×4 @ 17″ place one 2×3 @ 32″ in between the 4x4s and attach with pocket holes drilled at 1 1/2″ deep, and 2 1/2″ pocket hole screws. Make sure and use wood glue on all joints!
This makes the base of the milk stand for goats 39 1/2″ which is what we want so the concrete top can hang over a little in the back!
Building the base of the milk stand (cont.)
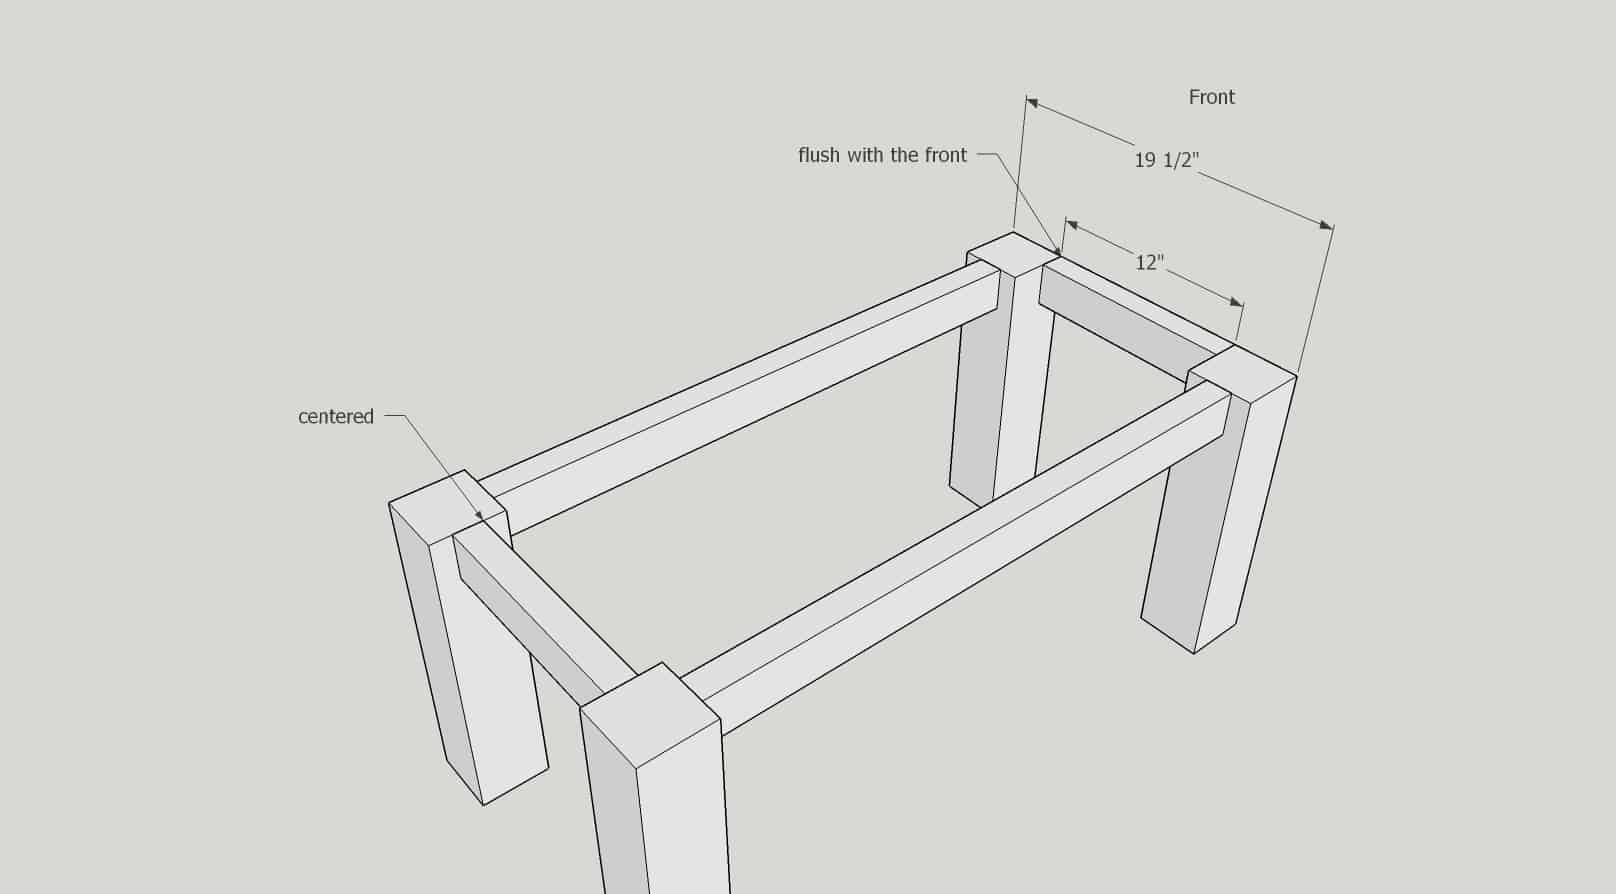
Attach the two long sides you made in the previous step with the 12″ – 2x3s with the same 1 1/2″ pocket holes and 2 1/2″ pocket hole screws. Refer to this post if you are not sure how to drill pocket holes! DIY Emmerson Dining Bench
Unless you have a new Kreg Jig, then you are LUCKY! Lol! But they don’t have to be set to a certain depth, you just clamp and drill!
Building the front of the milk stand for goats
I cut the corners off all the boards on the front of the milk stand at a 30 degree angle just to make it a little more decorative, this does not serve any purpose other than decorative, so you do not have to do it unless you like the look!
If you want to cut them, set the bevel on your miter saw at 30 degrees off square and cut at about 1/2″ from the end of the board.
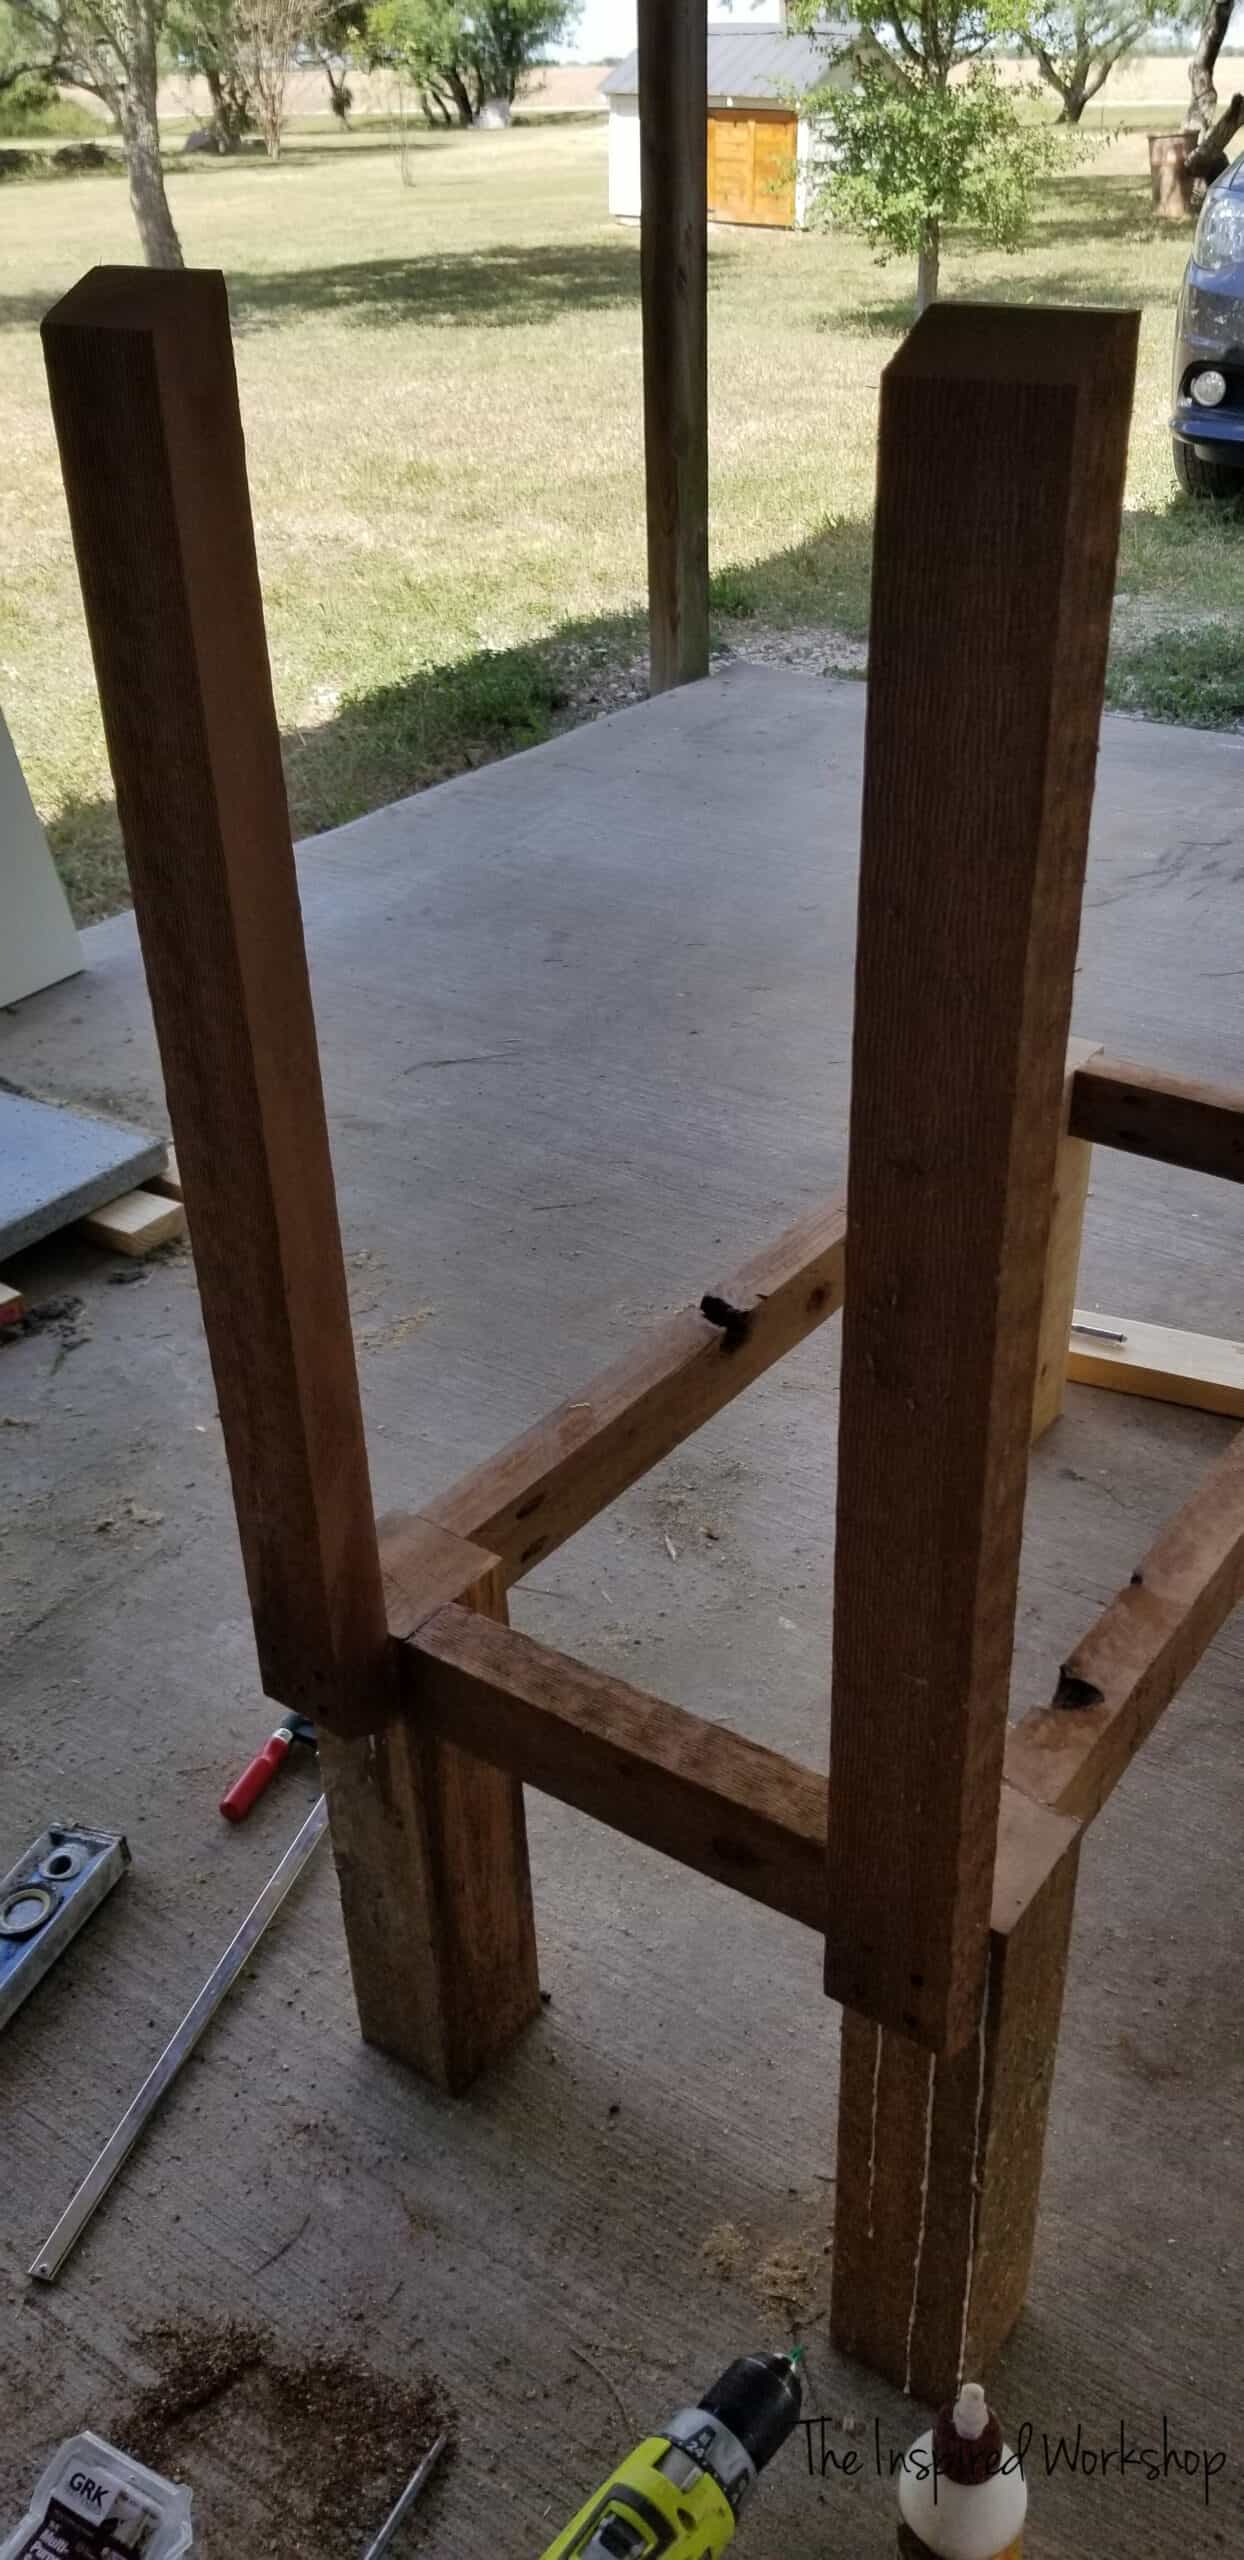
Take the 2 – 2x3s @ 32″ and center them on the 4×4 legs, level them with the bottom of the 2×3 that runs in between the 4x4s. I hope that makes sense.
Using tons of wood glue, as you can see I did…lol…screw straight through the 2×3 into the 4×4 with 4 screws!
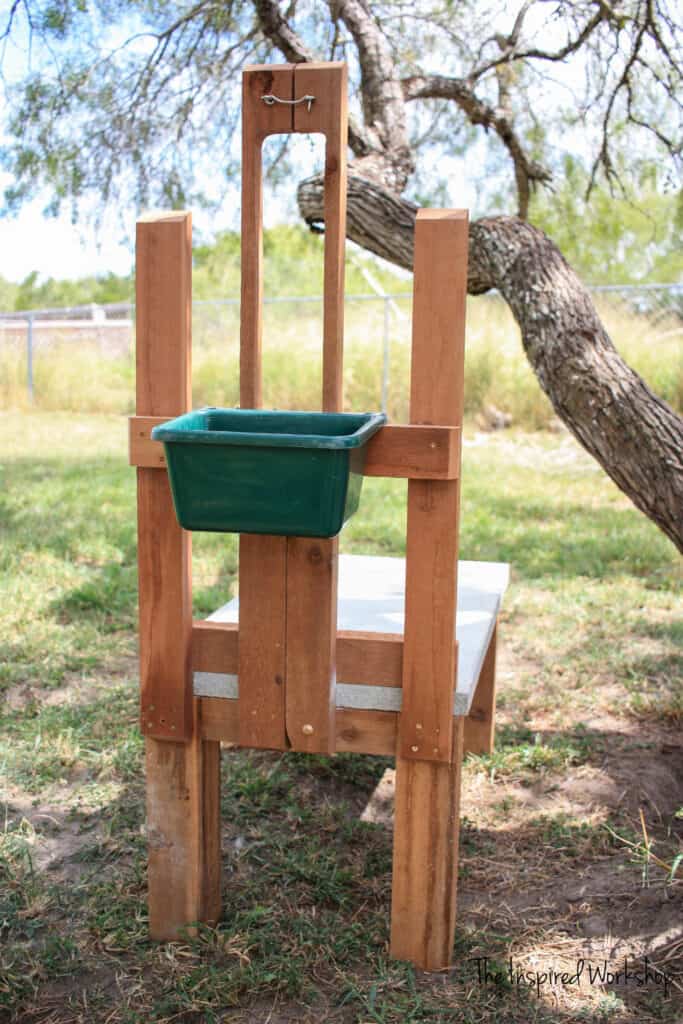
Cutting the head hold for the milk stand
Taking the 2×3 @ 40″, place them together and measure up 19 1/2″ from what will be the bottom of the boards, place a line all the way across both 2x3s with a square. Then measure down about 6 inches from the top and mark all the way across both boards again. Now measure 1 1/4″ in from the inside edges of each board and draw a line between the other top and bottom line you drew! I then just rounded the corners a little.
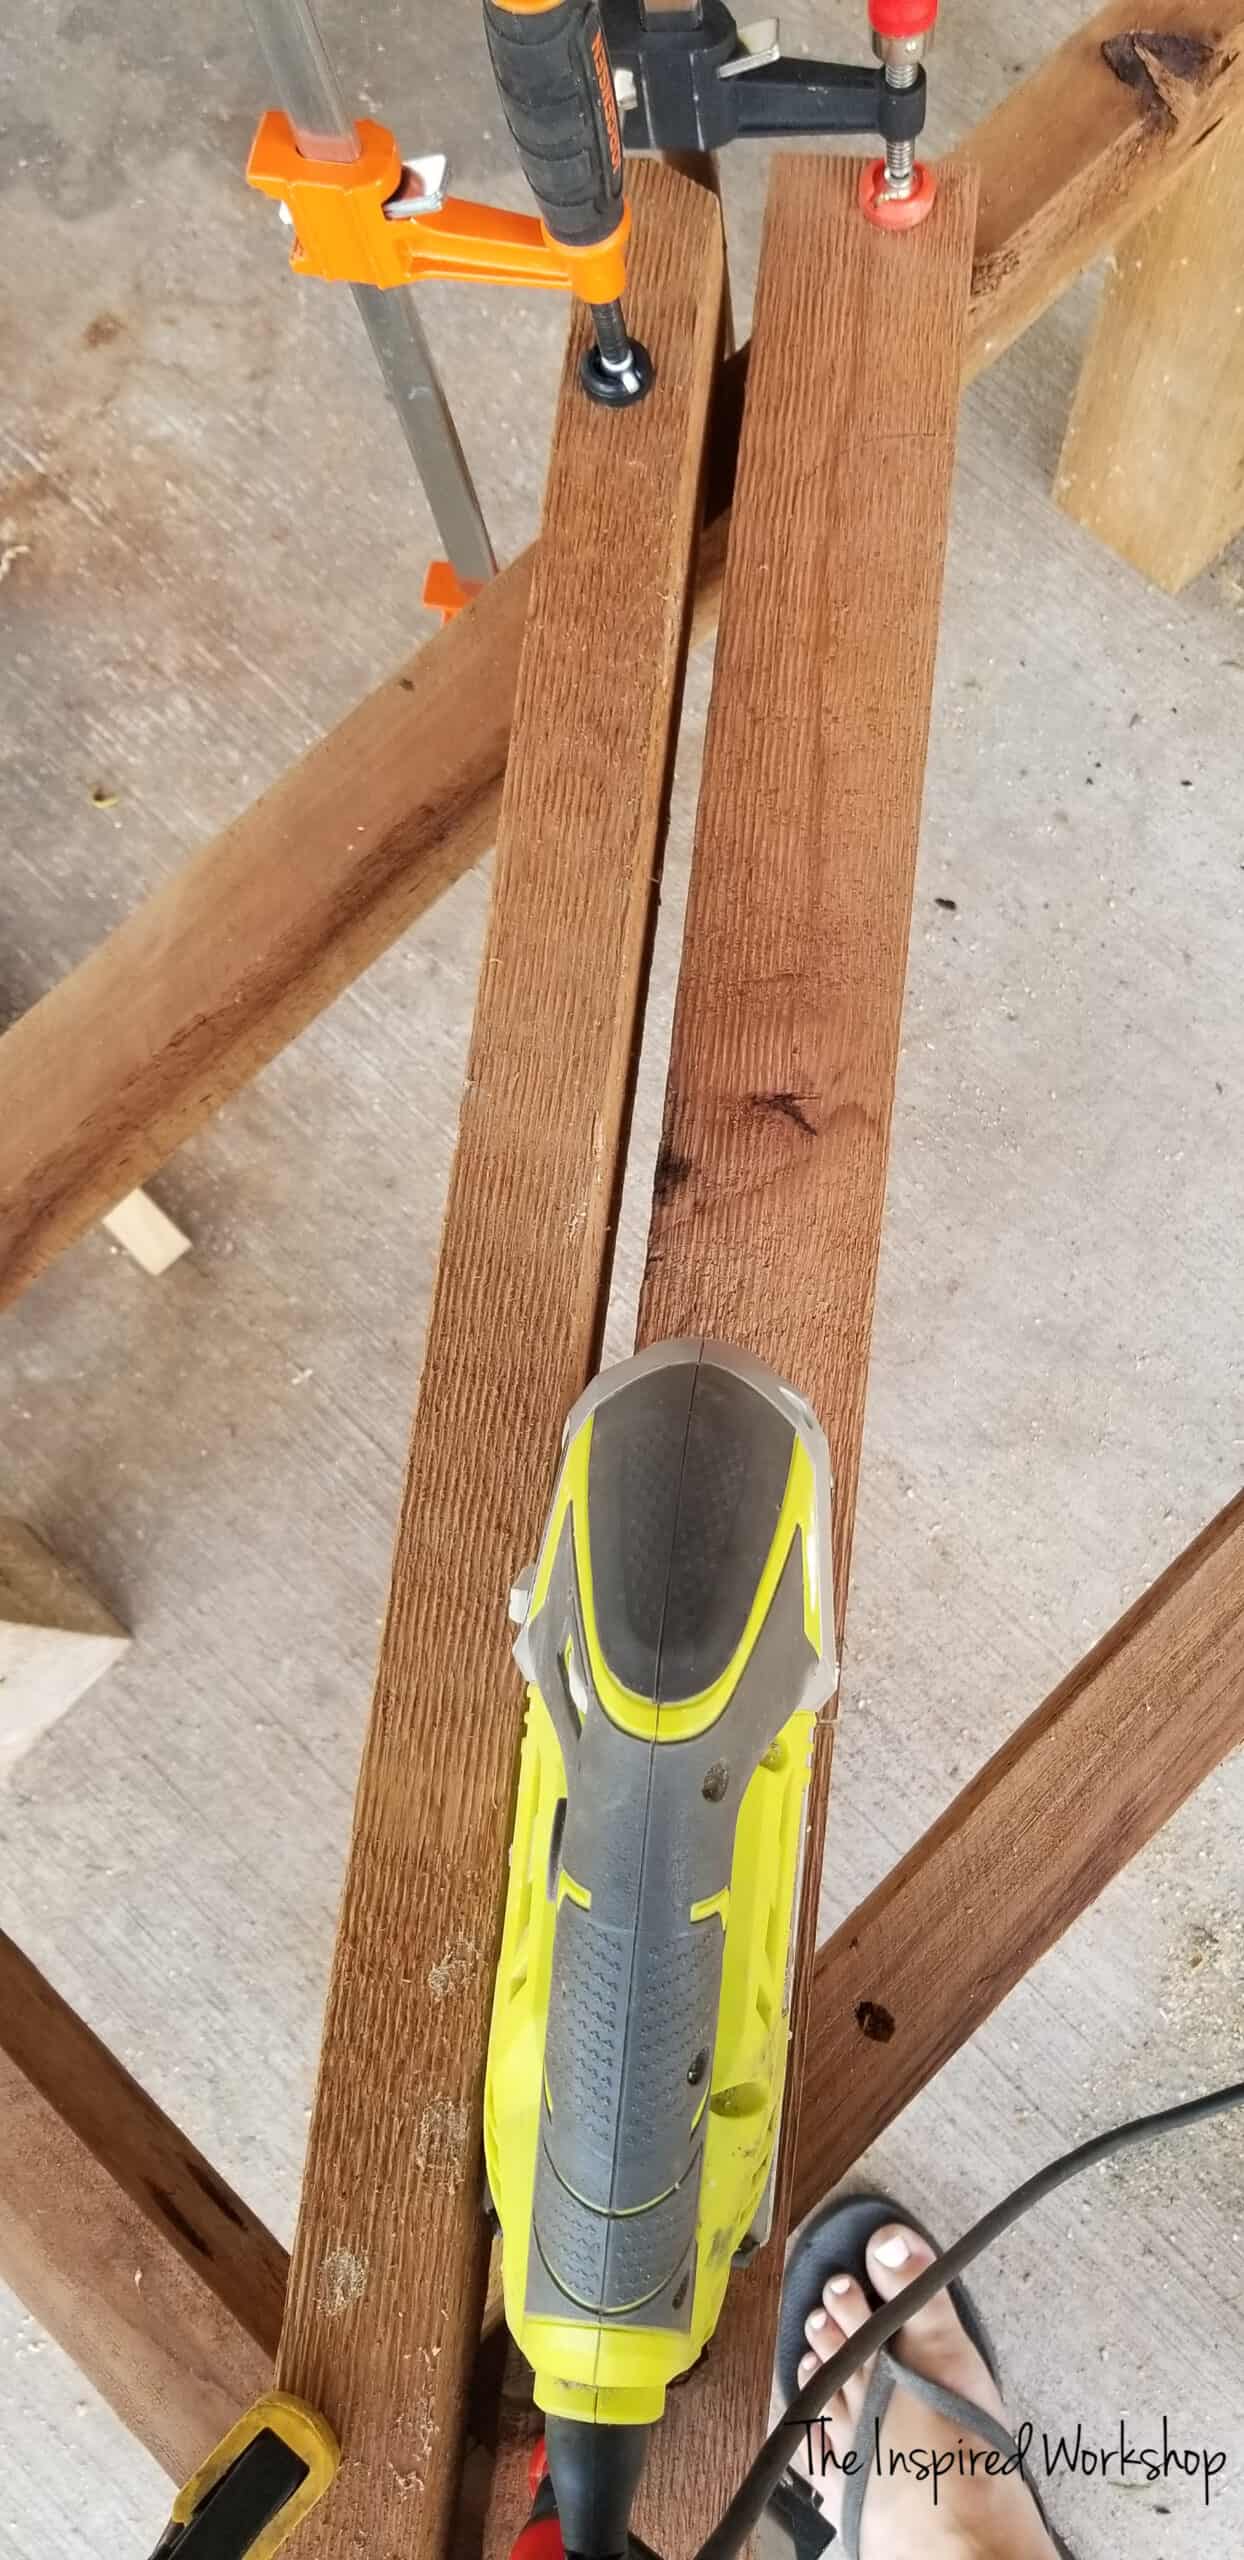
Those are the cut lines for your head hold. I clamped the board to the base of the milk stand to cut them quickly with a jigsaw. I clamped a second scrap board turned up on it’s side as a guide for my jigsaw to cut straight!
Once the head hold is cut out, round the bottom inside corner of the right board, as shown below, so that that board can swivel open and closed.
Attaching the head holder to the milk stand
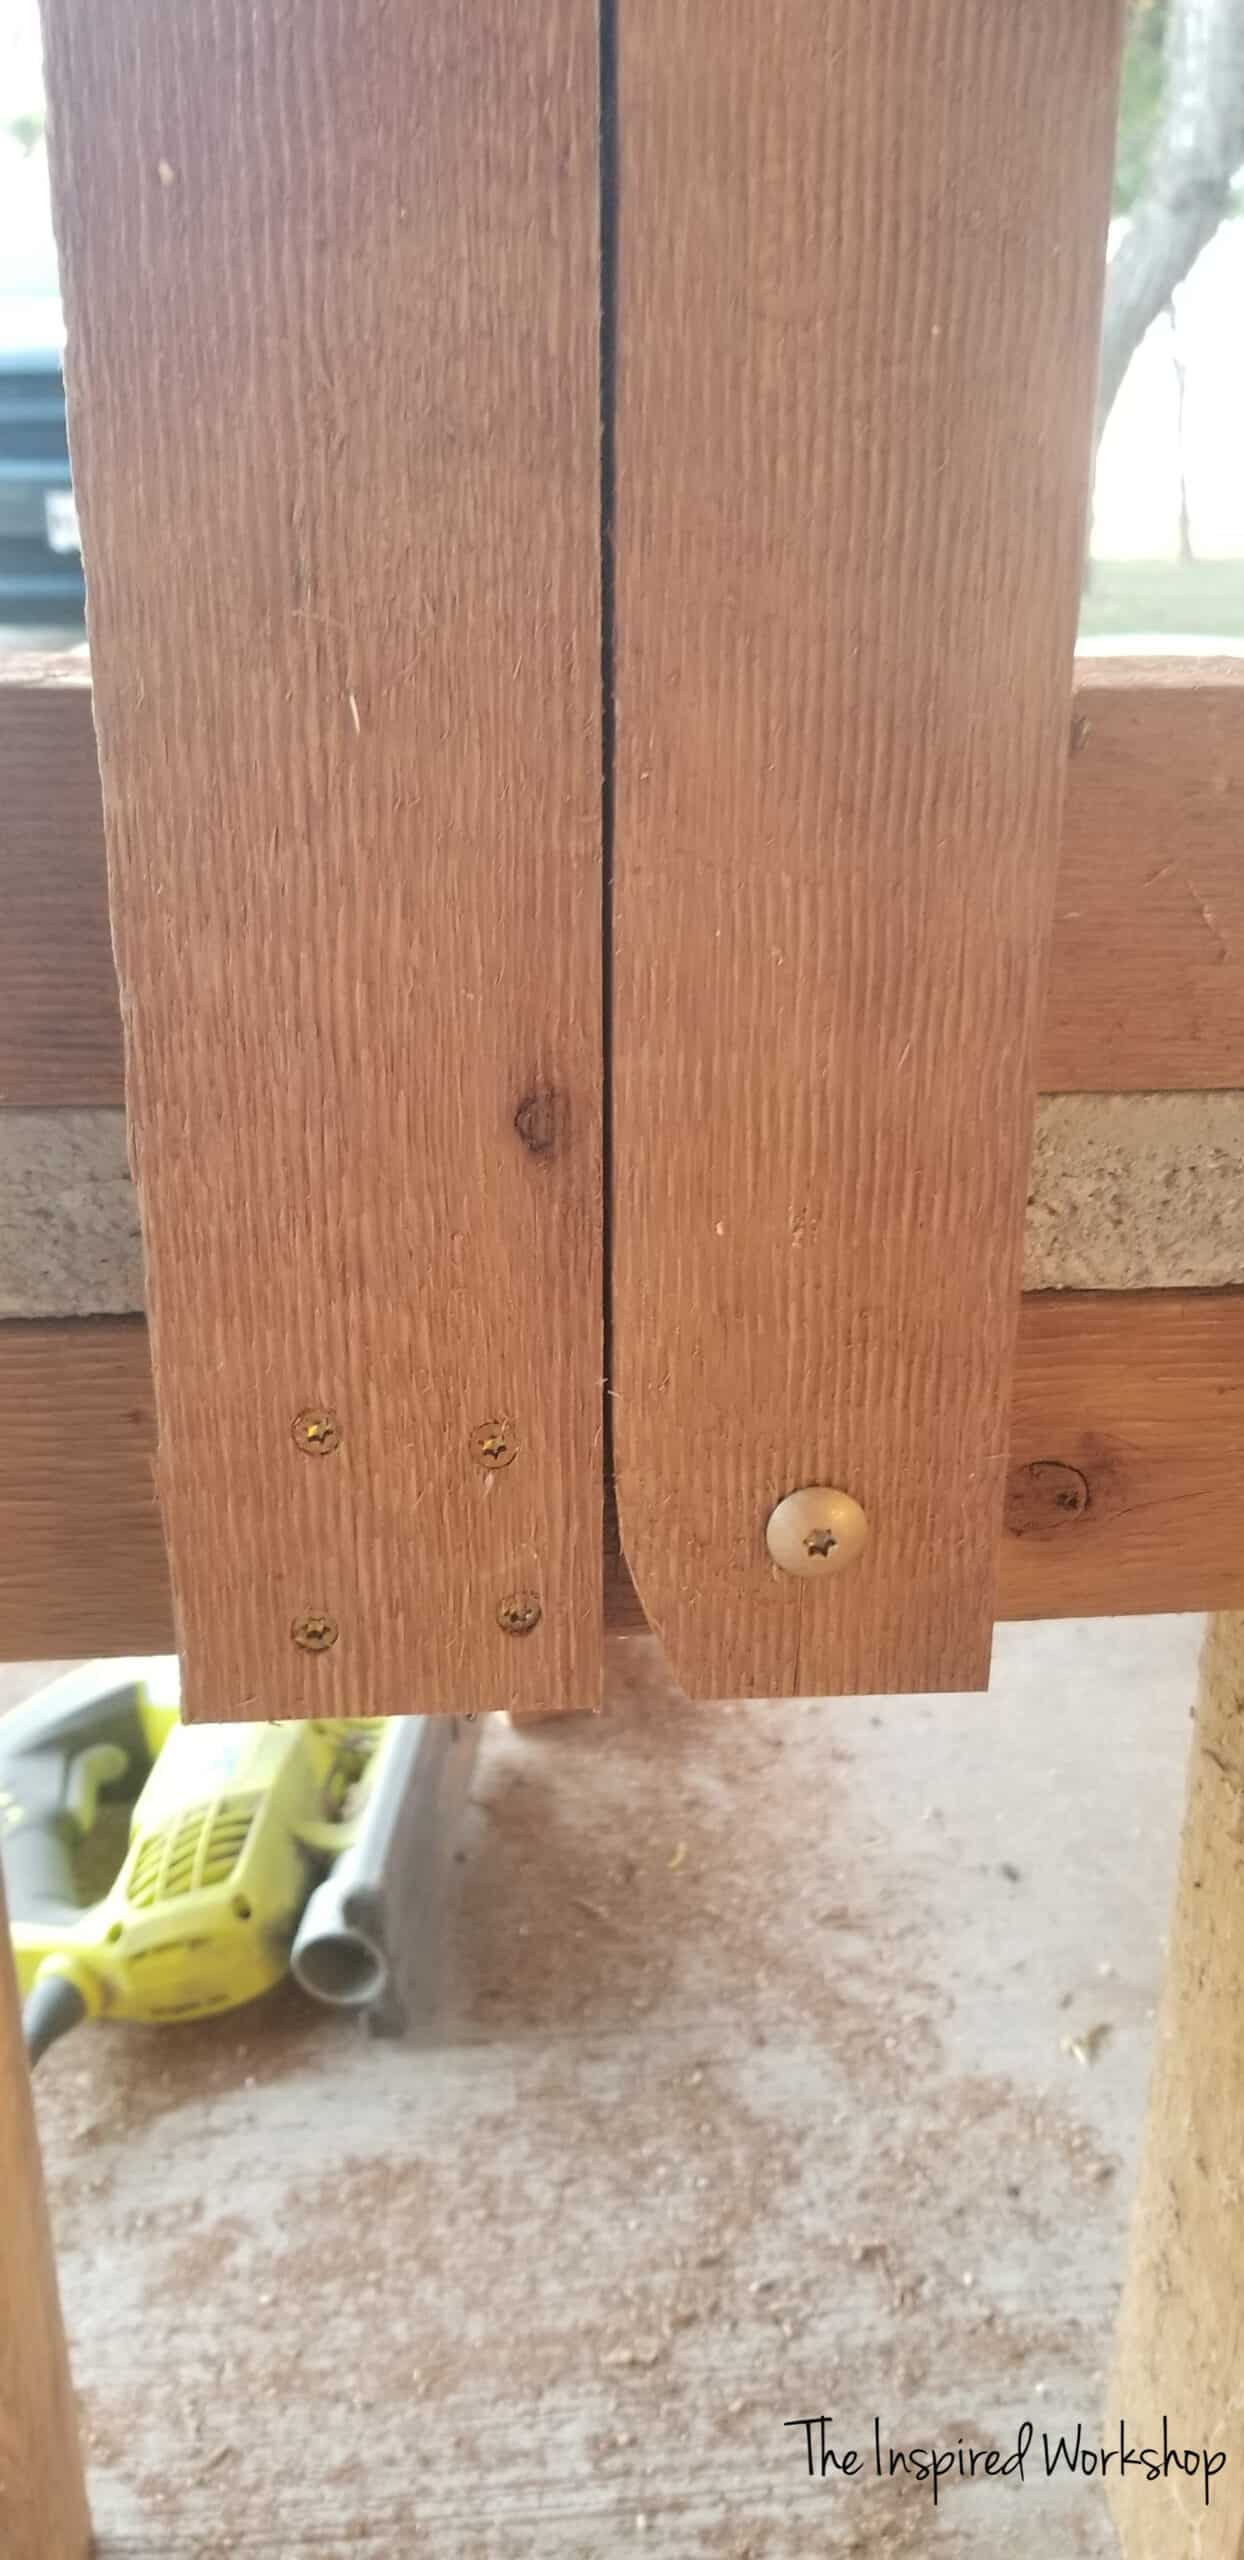
Using wood glue and four screws, attach the left board to the milk stand. Using a large headed screw or bolt…and NO wood glue, attach the right board. Using only one screw/bolt without wood glue, the board will swivel open and closed!
Add a support board to the front of the milk stand

At 20″ up from the bottom of the head hold boards, add the support board that keeps the head hold boards from being able to be pushed too far forward, and makes the perfect spot to attach the bucket!
I attached it with two screws on each end and some wood glue!
Set the concrete top on the base now to see the basic design coming to life with the milk stand for goats!
Attach an inside support board
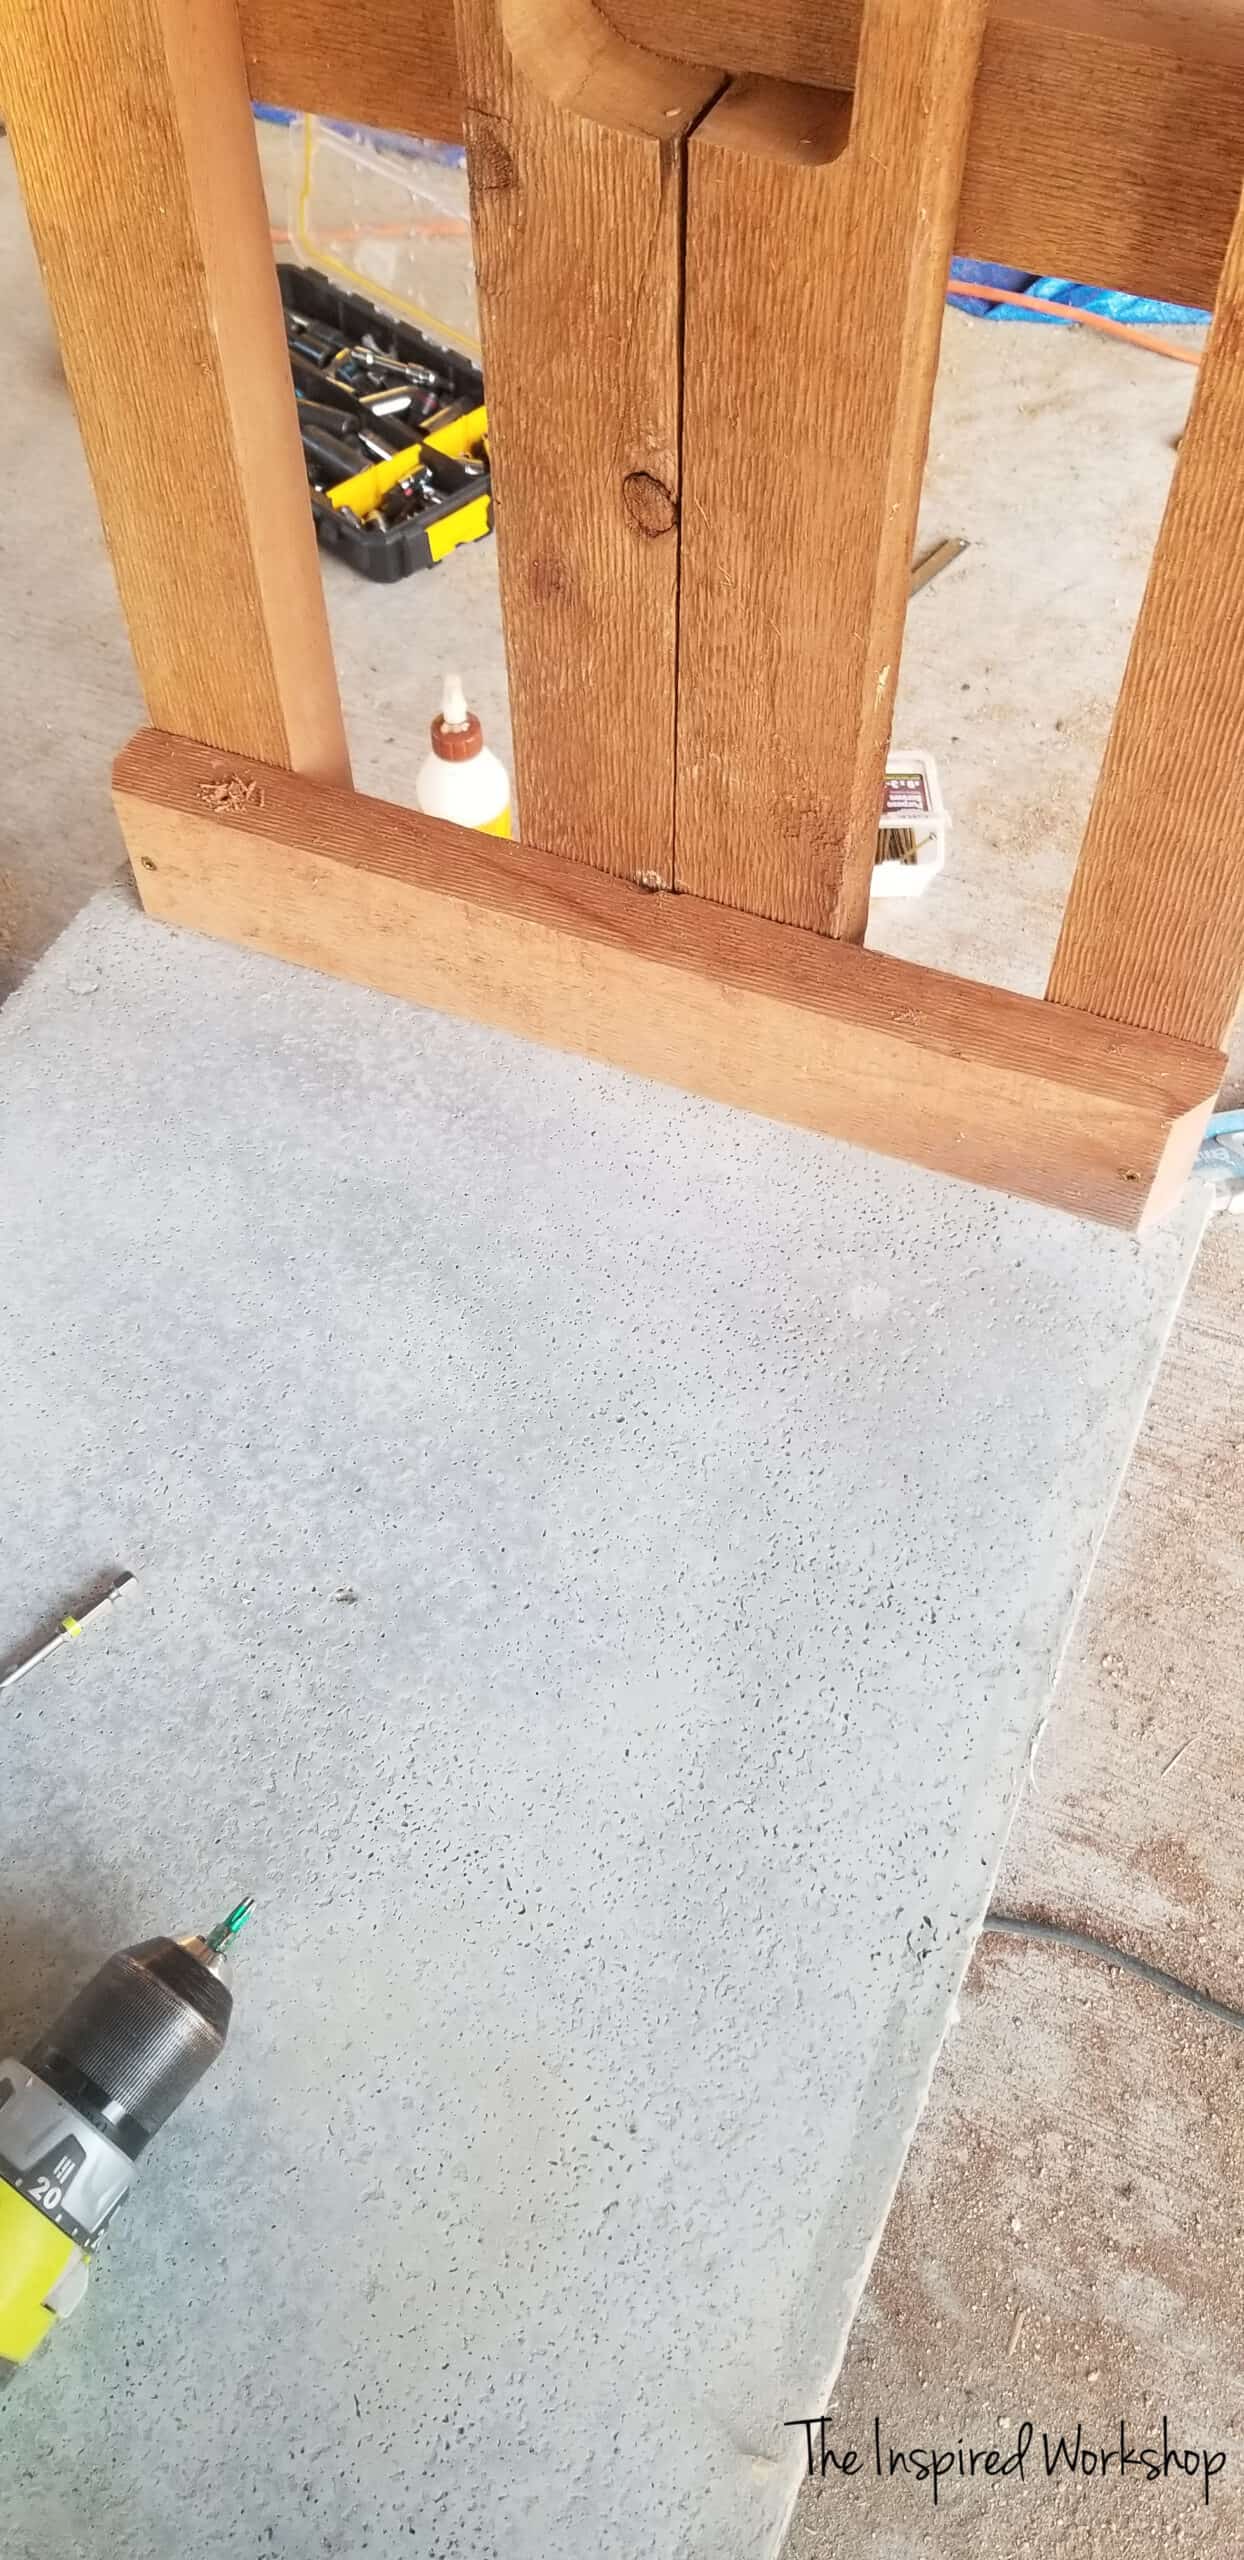
Add support to the backside of the head holder boards. First, use screws to drill through the cedar support board and notch a small spot in the concrete underneath so you know where to drill the holes. Back the screws out and using a 1/4″ concrete drill bit, drill through the concrete top. Insert 1/4″x6″ lag screws all the way through the top support board, the concrete top, and down into the board below!
Add the hook and eye latch to the top, and the bucket to the front support brace…and VIOLA!!! Go get your goat and milk bucket and start enjoying some FRESH milk!
That’s all there is to it! Now you can milk your ladies in style, because not only does this baby make it convenient to milk, but it will look good while out in your yard, barn, or goat house as well! Have any questions, ask away down below!
I just love my new milk stand for goats! I hope you do too!
As always, Happy Building!

Don’t have time to build this milk stand for goats now? PIN IT for later!

I didn’t see where we can download the plans for the milk stand…
Hey Lynn!
You are correct, I can’t find them either! Lol! And now that means I have to recreate the plans because I lost all my plans on my computer when it crashed and I wasn’t able to recover anything from it! Oy! Talk about a tough lesson in backups! 🥴 I will email them to you as soon as I have them made again! I apologize for the inconvenience!
Thanks for stopping by! Have a wonderful evening!
Cara