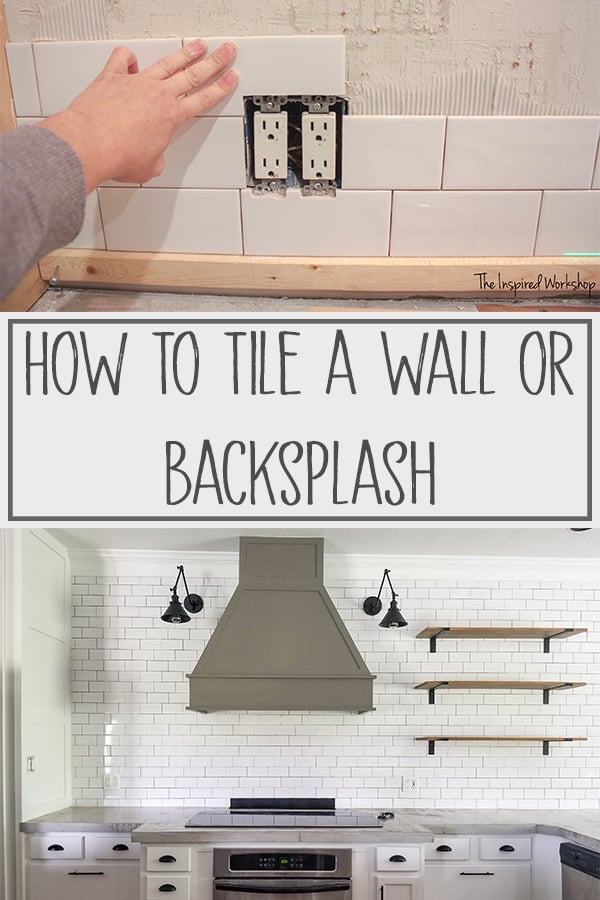
How to Tile a Kitchen Wall
One quick and easy way to update a kitchen is to tile a focal wall or backsplash! Paying someone to tile for you can be expensive, and so with a little help and information in advance, you can surely do it yourself! If you are interested in learning how to tile a kitchen wall or backsplash read on as I threw together this quick post for you on how I tiled our kitchen wall as part of the kitchen renovation we recently completed!
It was such a great learning experience for me because I had NEVER tiled a thing before, and I was able to figure this out… even after so many mistakes were made! That means you can definitely do it as well and maybe this post will save you from making the same mistakes!
Tiling a wall really is easy, I would say easier than tiling anything else. If you only have a backsplash to tile, you are even luckier! Lol! I have since tiled a floor in our bathroom and a shower floor…and they posed their own learning curves! You don’t have to be as great at tiling to do a statement wall as you need to be to do a floor! The process is simply time-consuming, but it’s not hard.
The whole wall took me about 8 hours to tile, plus another 2 or 3 for the grout. I know that sounds long and as a first-timer, I think this is to be expected. Obviously, though, I would expect it to take half that time or less if you are experienced at tiling! Plus, I really get in my own world and start thinking and dreaming, and who knows what else while I am working, so that slows me down quite a bit! Lol!
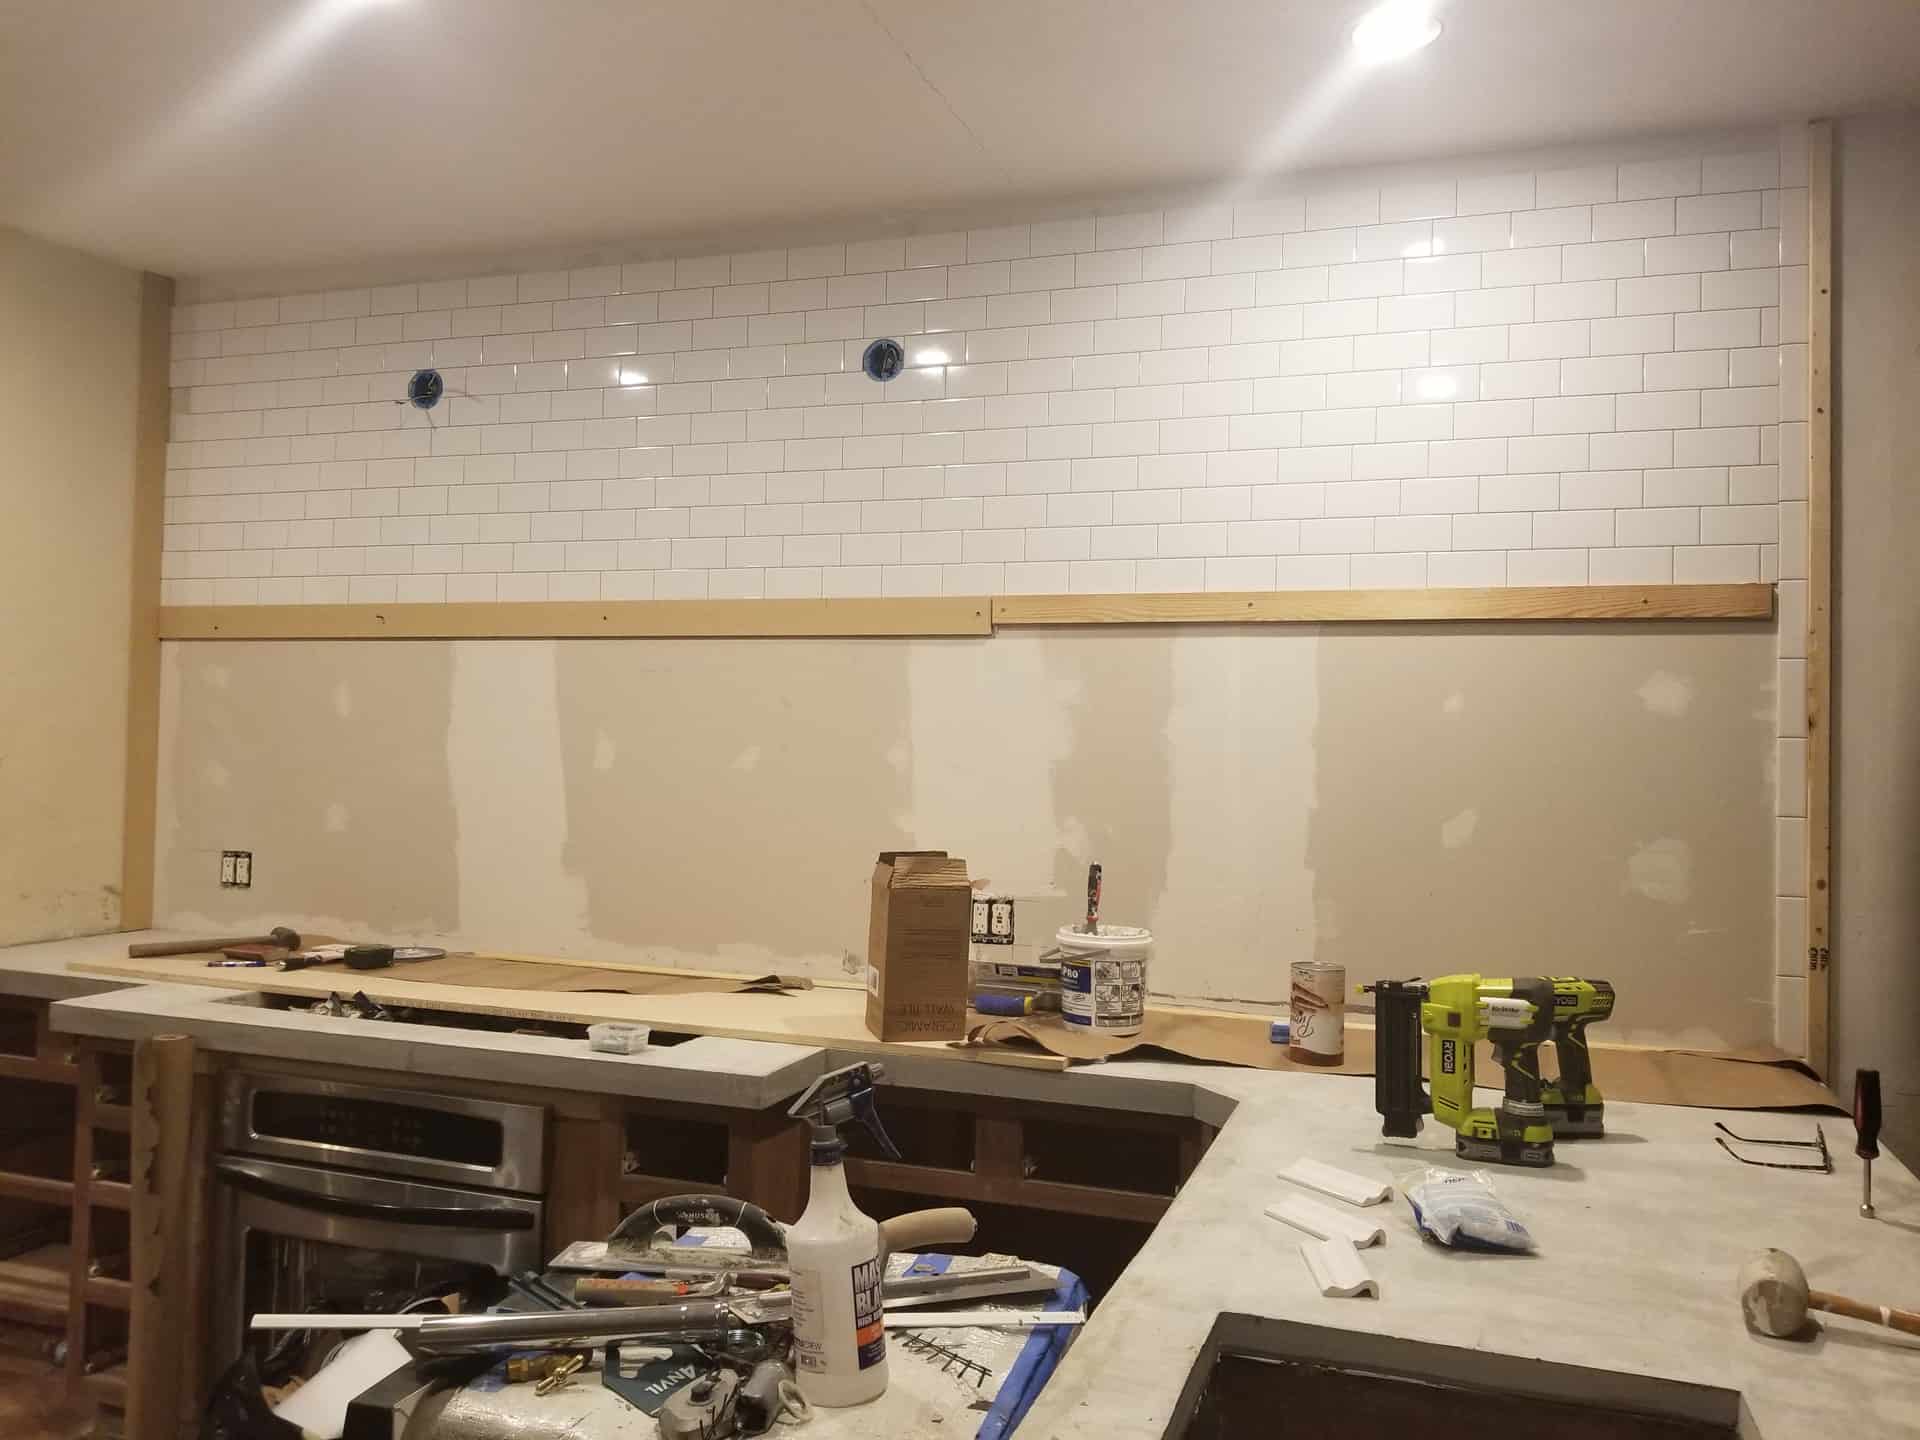
I also made a crucial mistake that cost me a TON of time! My ceiling was not level…I mean like 1 1/4″ difference from one side to the other, couple that with the countertops being slightly crooked (read last week’s post pour in place concrete countertops to find out all about that tragedy, lol) and you have a complex tile job! Anyway, I watched a YouTube video showing to start to tile smack dab in the middle of your wall to make sure it is level. Bad idea! I’ll explain below, but for now, let’s get the materials together to learn how to tile a kitchen wall!
Don’t have time to read it all now, or need it next weekend when you are going to tile? PIN it for later!
Gathering Supplies to Tile a Kitchen Wall or Backsplash
**Note: Some links below are Affiliate Links! You know, where I provide a link, and if you make a purchase after clicking the link, I make a small percentage of the sale at no extra cost to you! The links are included to show you what the products are and look like, but almost all of them can be purchased at your local hardware store! I greatly appreciate any purchases made from the links though!😊
Materials to tile a wall:
- Tile of your choice – I used subway tile from Floor and Decor… the best price I could find anywhere, saved me almost $60 buying it from them instead of Home Depot. (although since I purchased it, there has been a slight increase in price I noticed) Just an FYI, Home Depot sells Daltile subway tiles and they are slightly yellow compared to the Floor and Decor!
- tile adhesive of your choice – I used a premixed thin-set from Home Depot
- Tile Trowel – I used a tiny v notch trowel (trowel size will be determined by the size of tile you are using)
- Metal putty knife – to clean your trowel while working
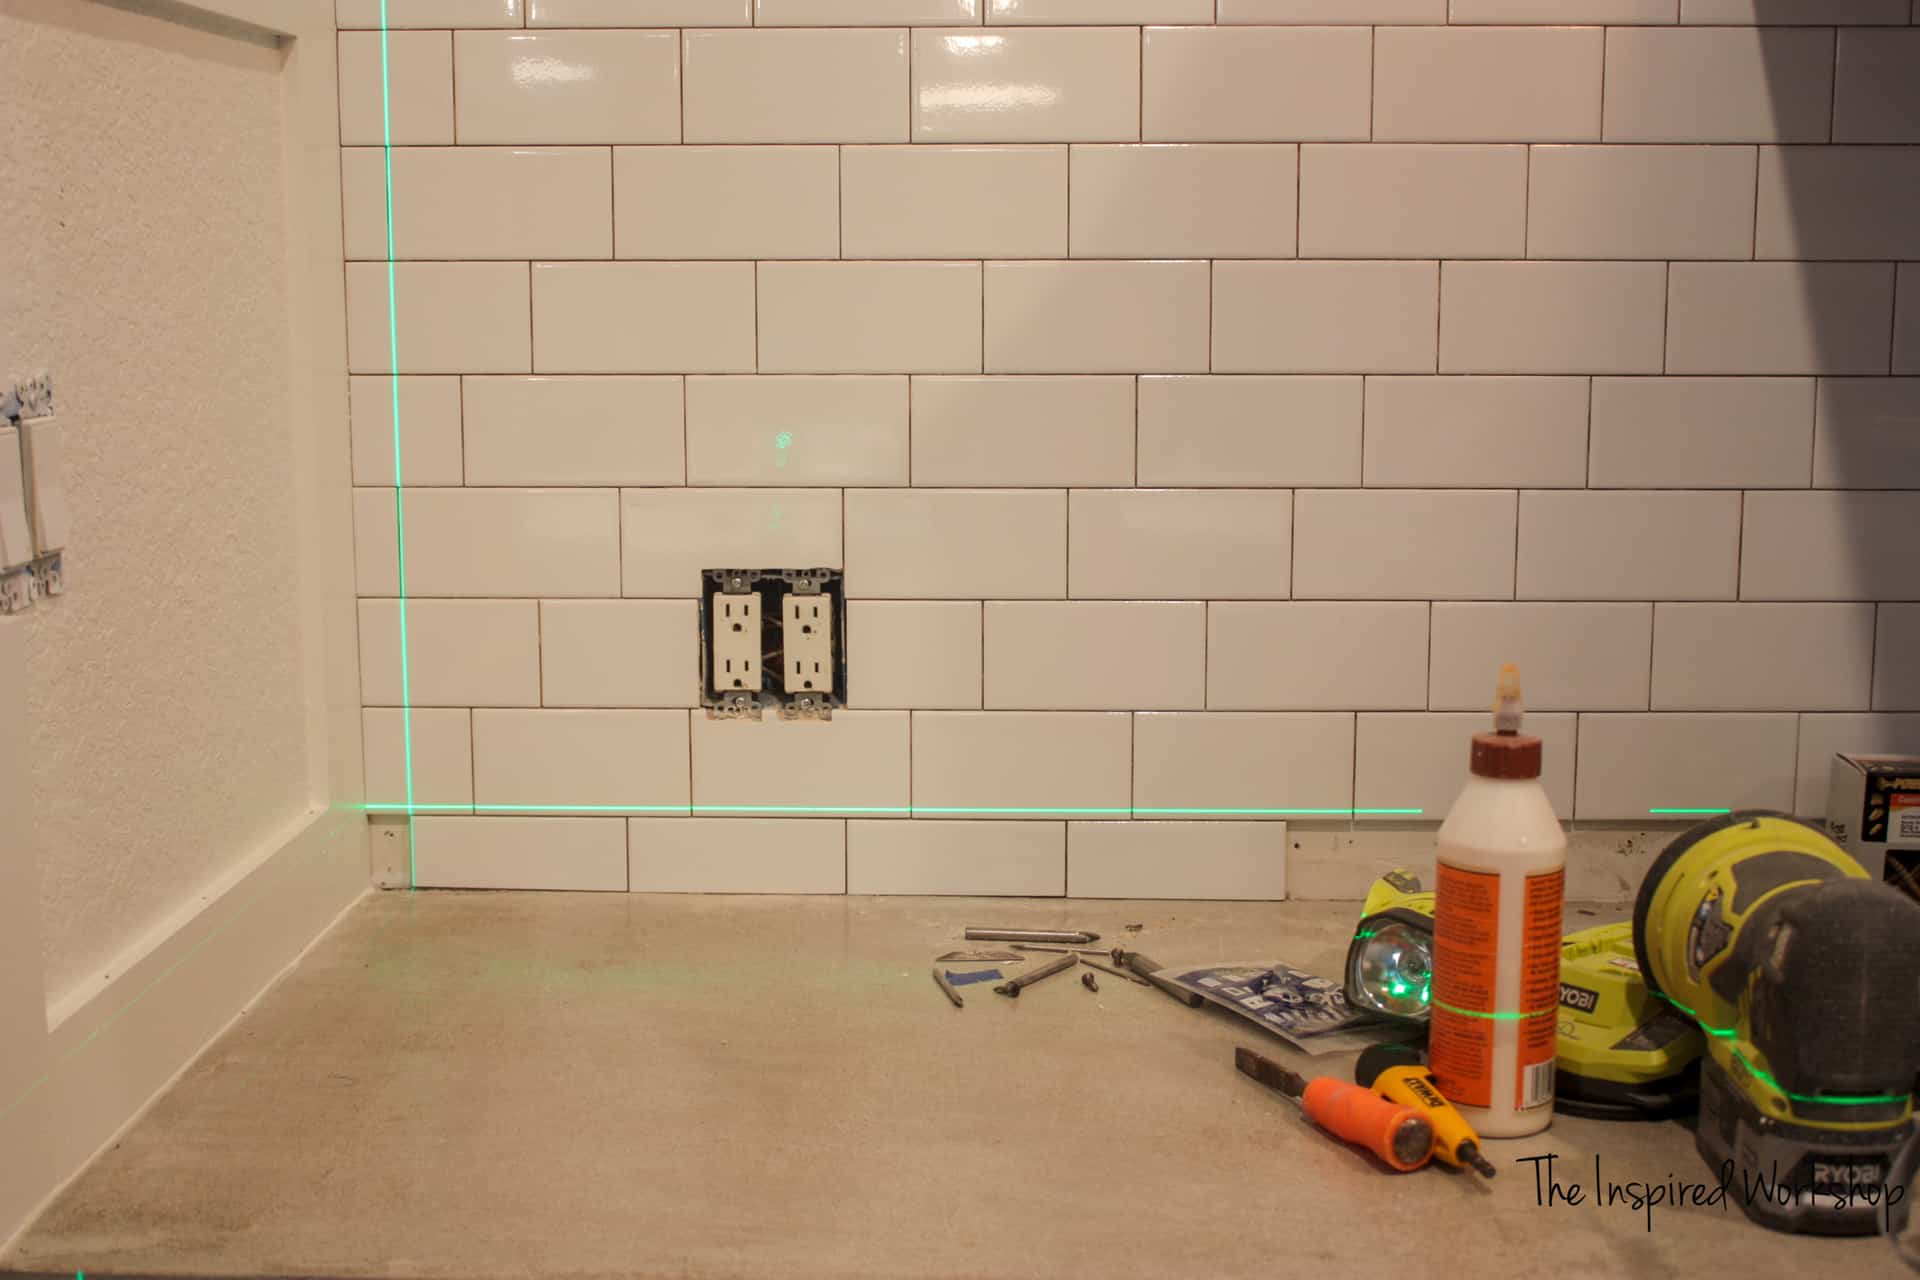
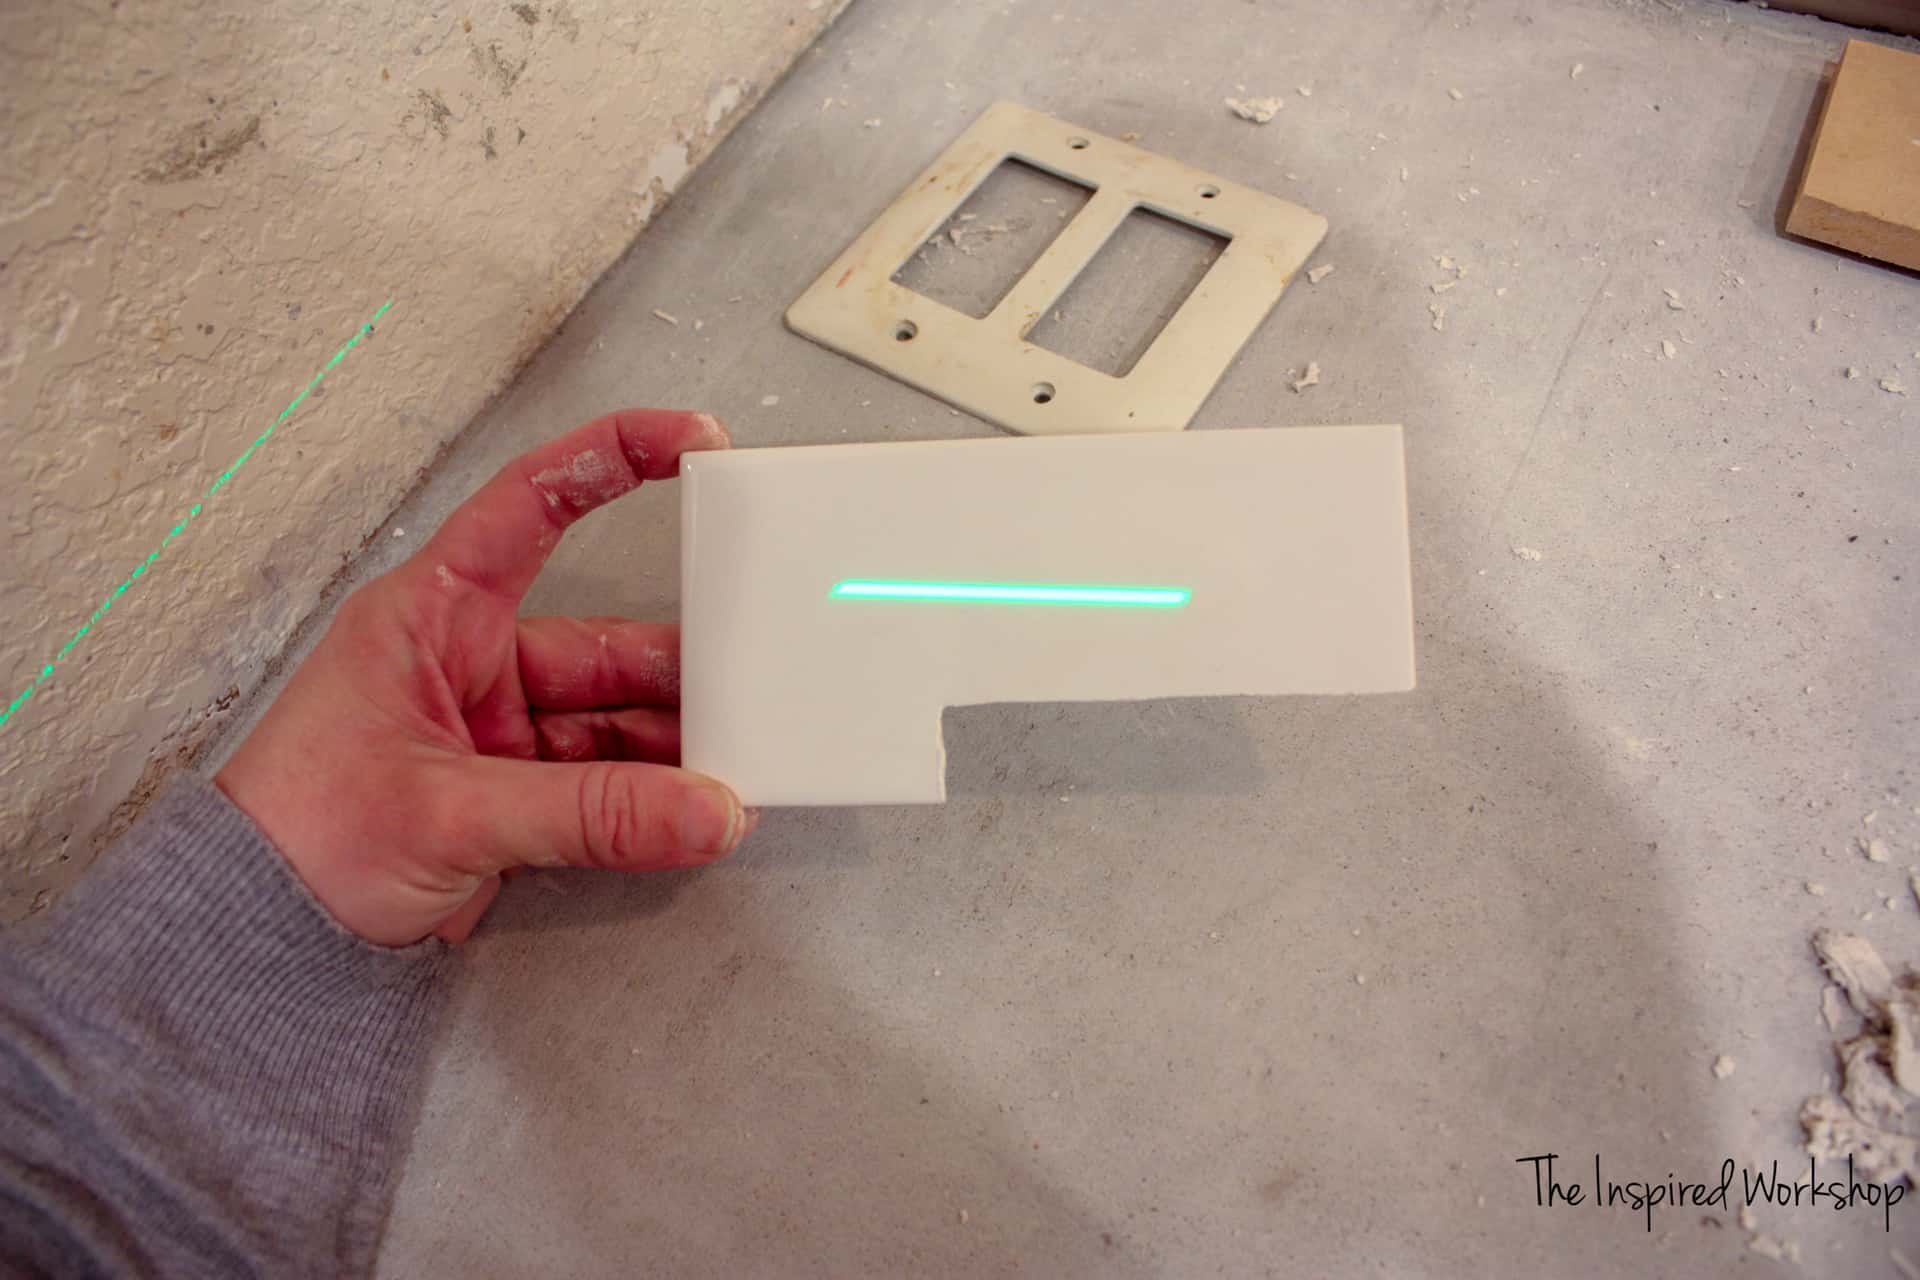
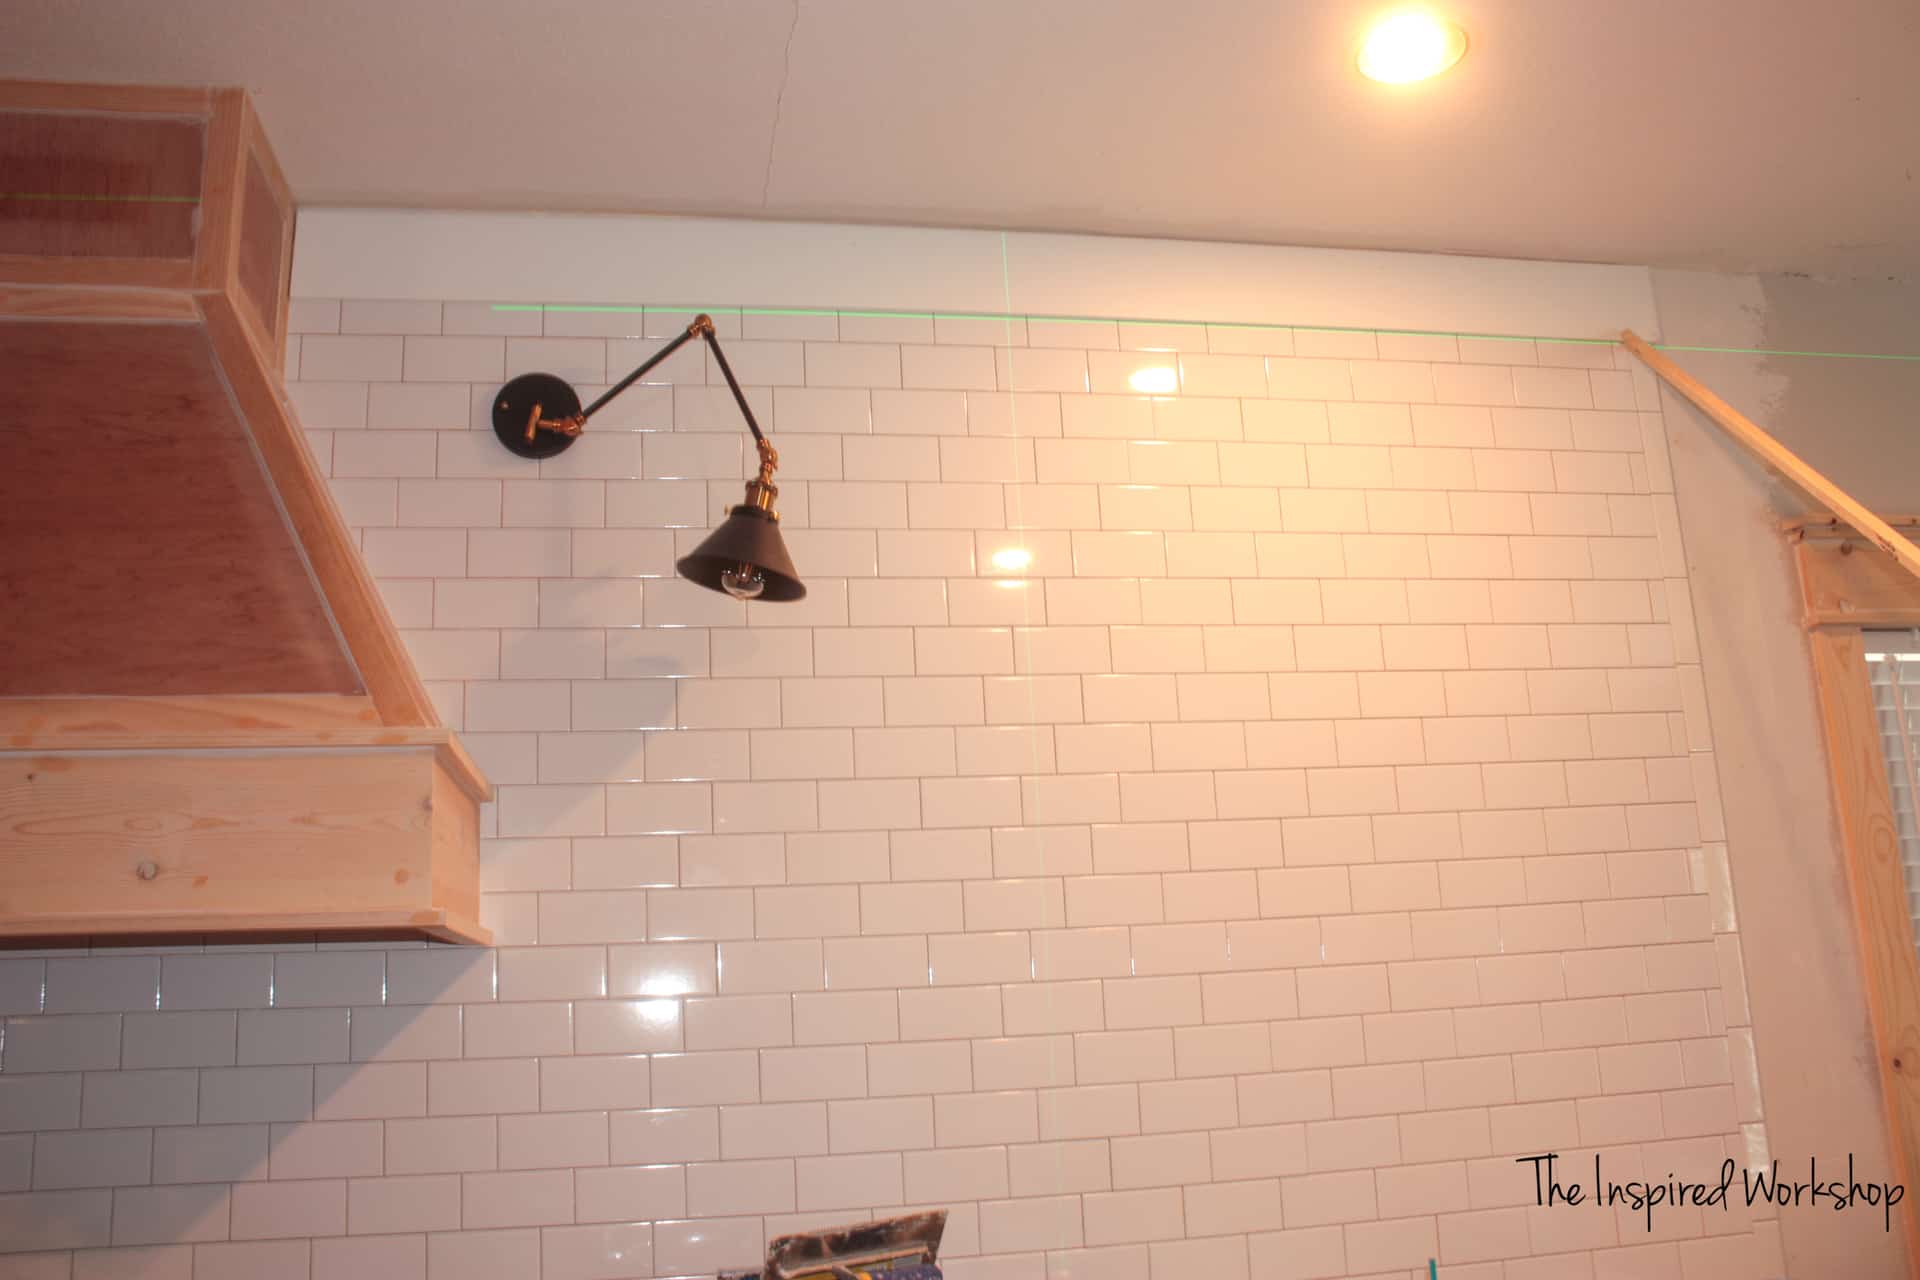
- Laser lever – This was the MOST important part of getting the tile level done properly…I highly suggest investing in a nice level if you are doing any remodeling…but especially if you are tiling a wall!
- Tile cutter – to make the majority of the cuts on the end pieces
- Wet Tile Saw – To make small cuts or cuts along the length of the tile
- angle grinder with a masonry wheel
- a few straight boards of any size – I used a couple of straight 1×2 furring strips I had in the garage and a scrap piece of mdf, to start the tiles
- grout in color of your choice – based on the size of spacers used will determine whether you need sanded or non-sanded grout. I used non-sanded grout (spacers were 1/16″) in the color truffle.
- spacers – if you want 1/16″ spaces as I have, the subway tiles already have the spacers attached.
- grout float
- sponge to clean grout – grab them at your local hardware store – they are only 5 bucks for a six pack!
- paper towels…have tons of paper towels handy
- caulk in grout color to apply where the countertop meets the tile
How to Tile a Kitchen Wall or Backsplash
Getting started, it is best to have calculated the space you are tiling and have ample supplies to get the job done so that you don’t have to run out of supplies mid-project! Ahem, ask me just how I figured this out!🙄
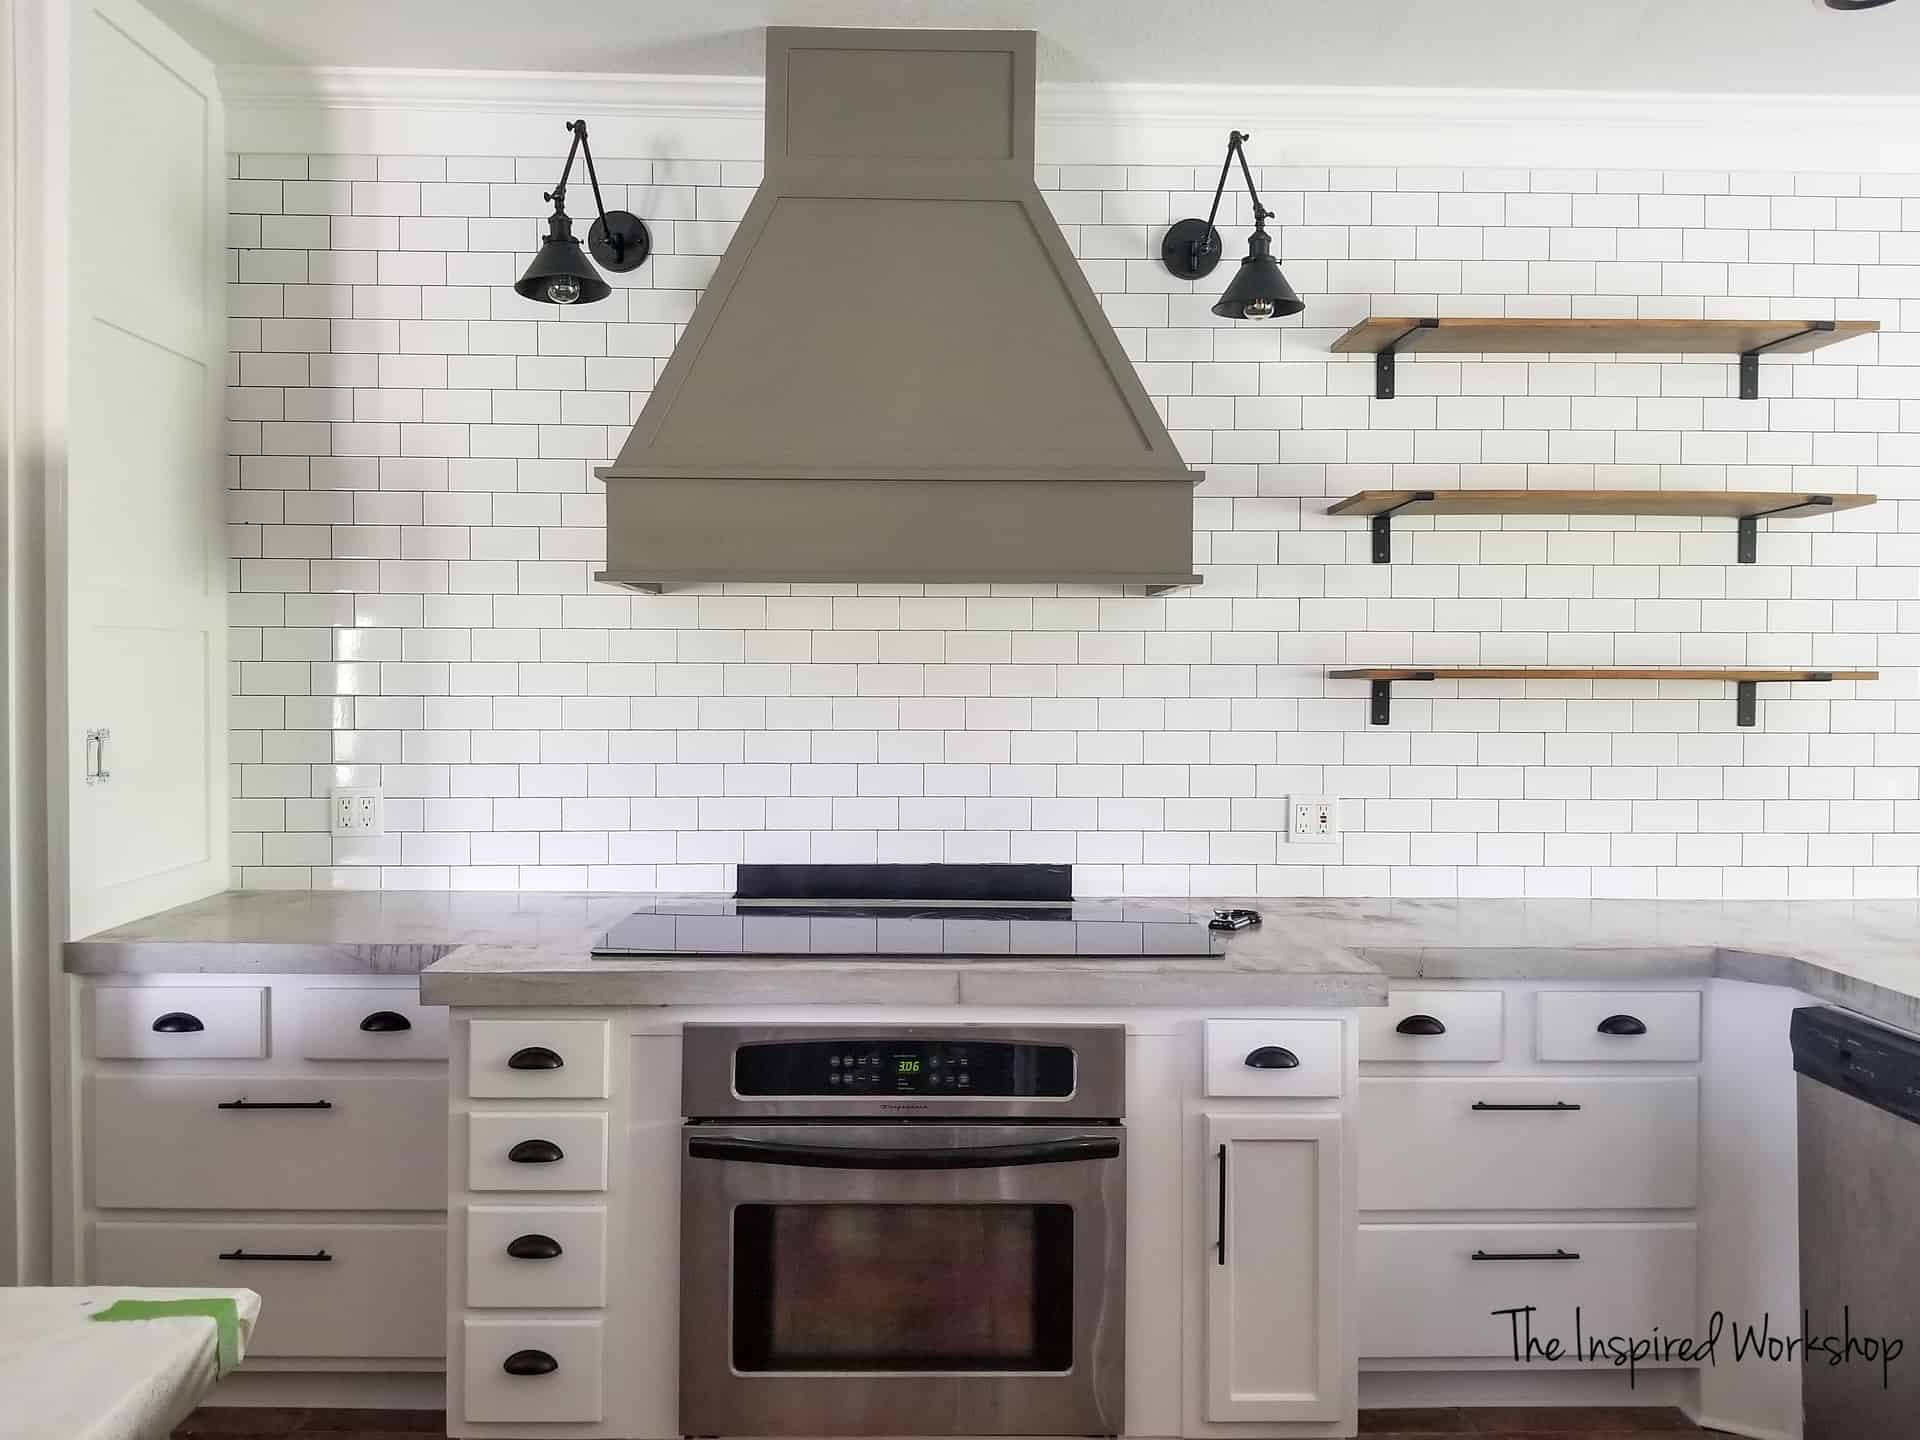
My wall was not bordered by two side walls, so very first I had to create a transition where the kitchen tile would end. I did this with the finished edge tiles in a vertical pattern going straight up the wall. Using my laser level, I just lined it up with where the counter ended and screwed my 1×2 into the wall as a guide to push the tiles against to keep them straight. I KNOW I took pictures of this process, but here again, when you go back a year or two later, they are not that easy to find! Lol! Here’s the best picture I have to show you the way I laid the side transition tiles.
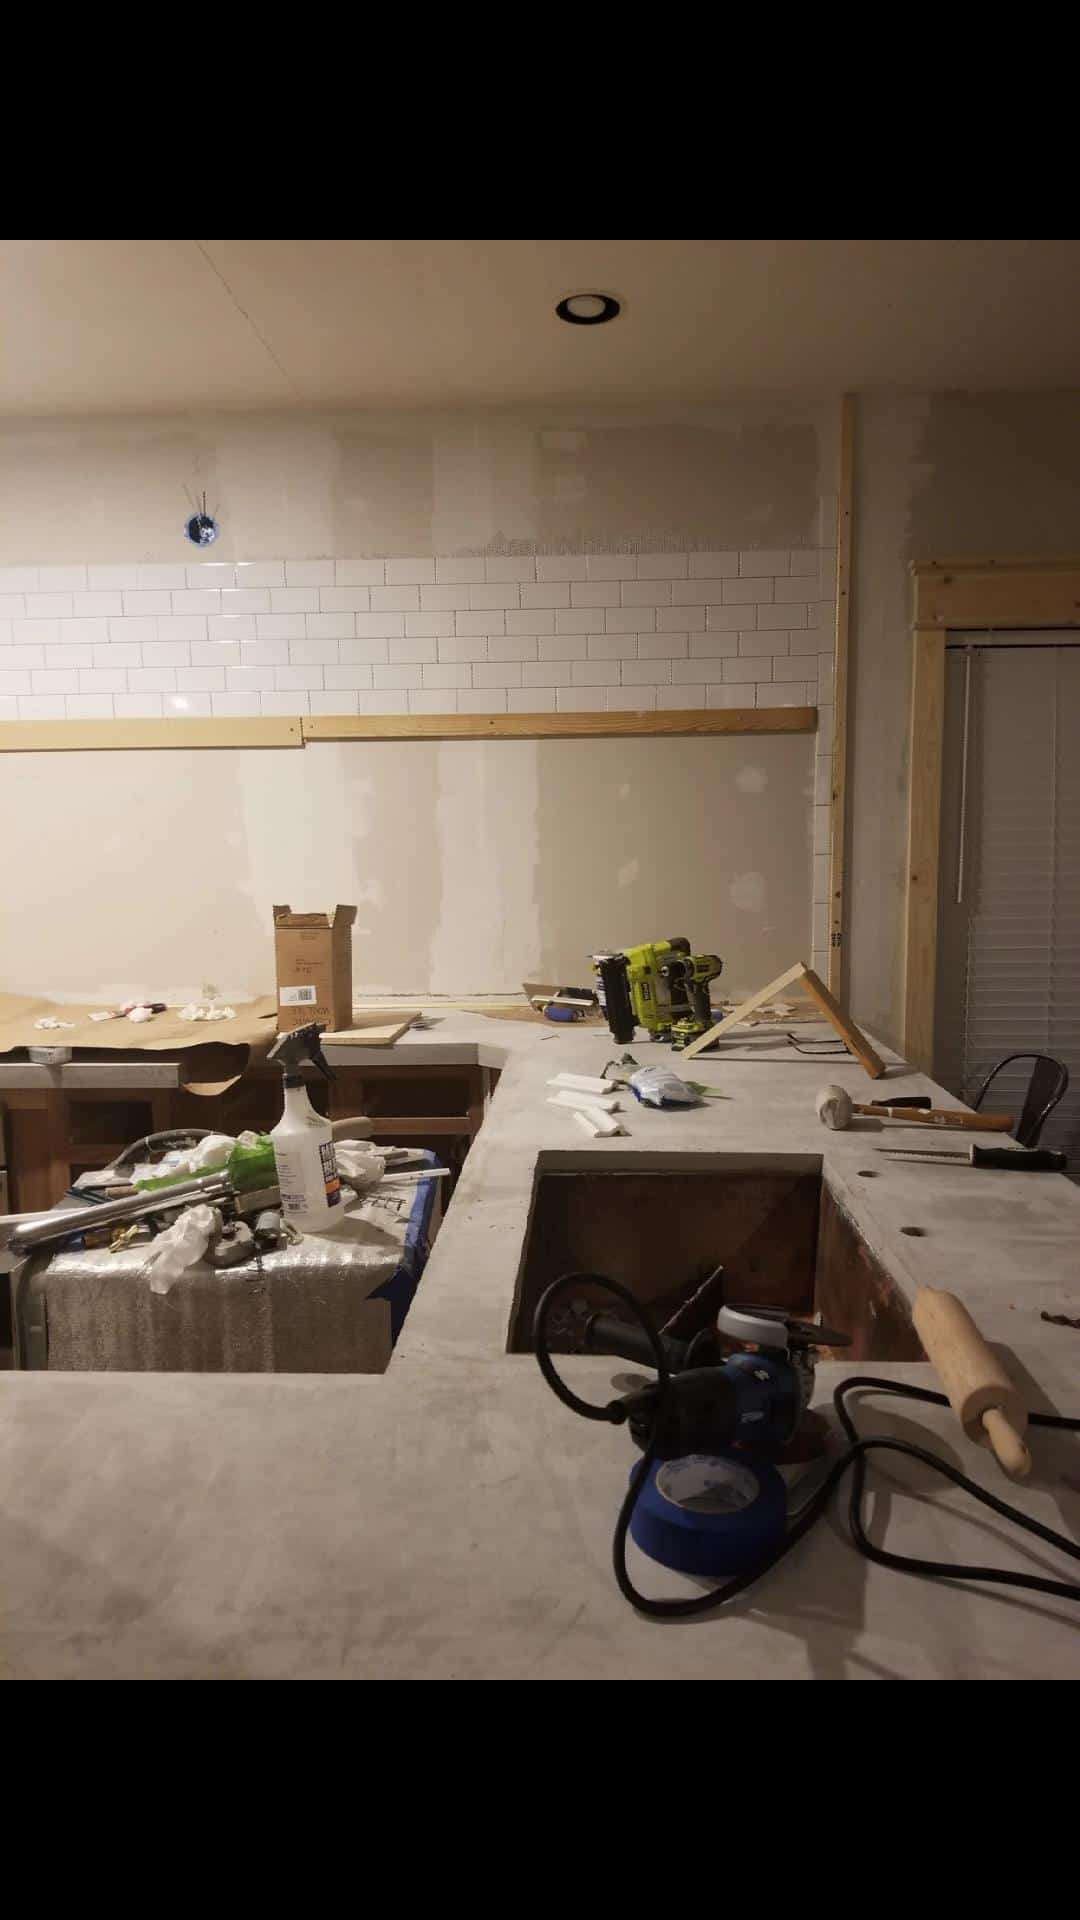
As I mentioned earlier, I watched a YouTube video showing to start tiling in the center of the wall if you are dealing with an uneven floor (which would be the countertop in my case) or ceiling…which I had both…so I thought, that makes sense…I will start in the middle! Bad idea, let me explain why.
So, I measured and found the center of my wall, and got the laser level set up so I could start my first row of tiles perfectly level and centered. Buttering the wall with thin-set took some getting used to, but it really is full proof as long as you are touching the wall with the v notches as you trowel. They say hold the trowel at an angle as you smooth the thin-set into perfect grooves, and that keeps it level, no big globs anywhere!
Here is me tiling for the first time! I way overthought the process but you know, it happens! Lol!
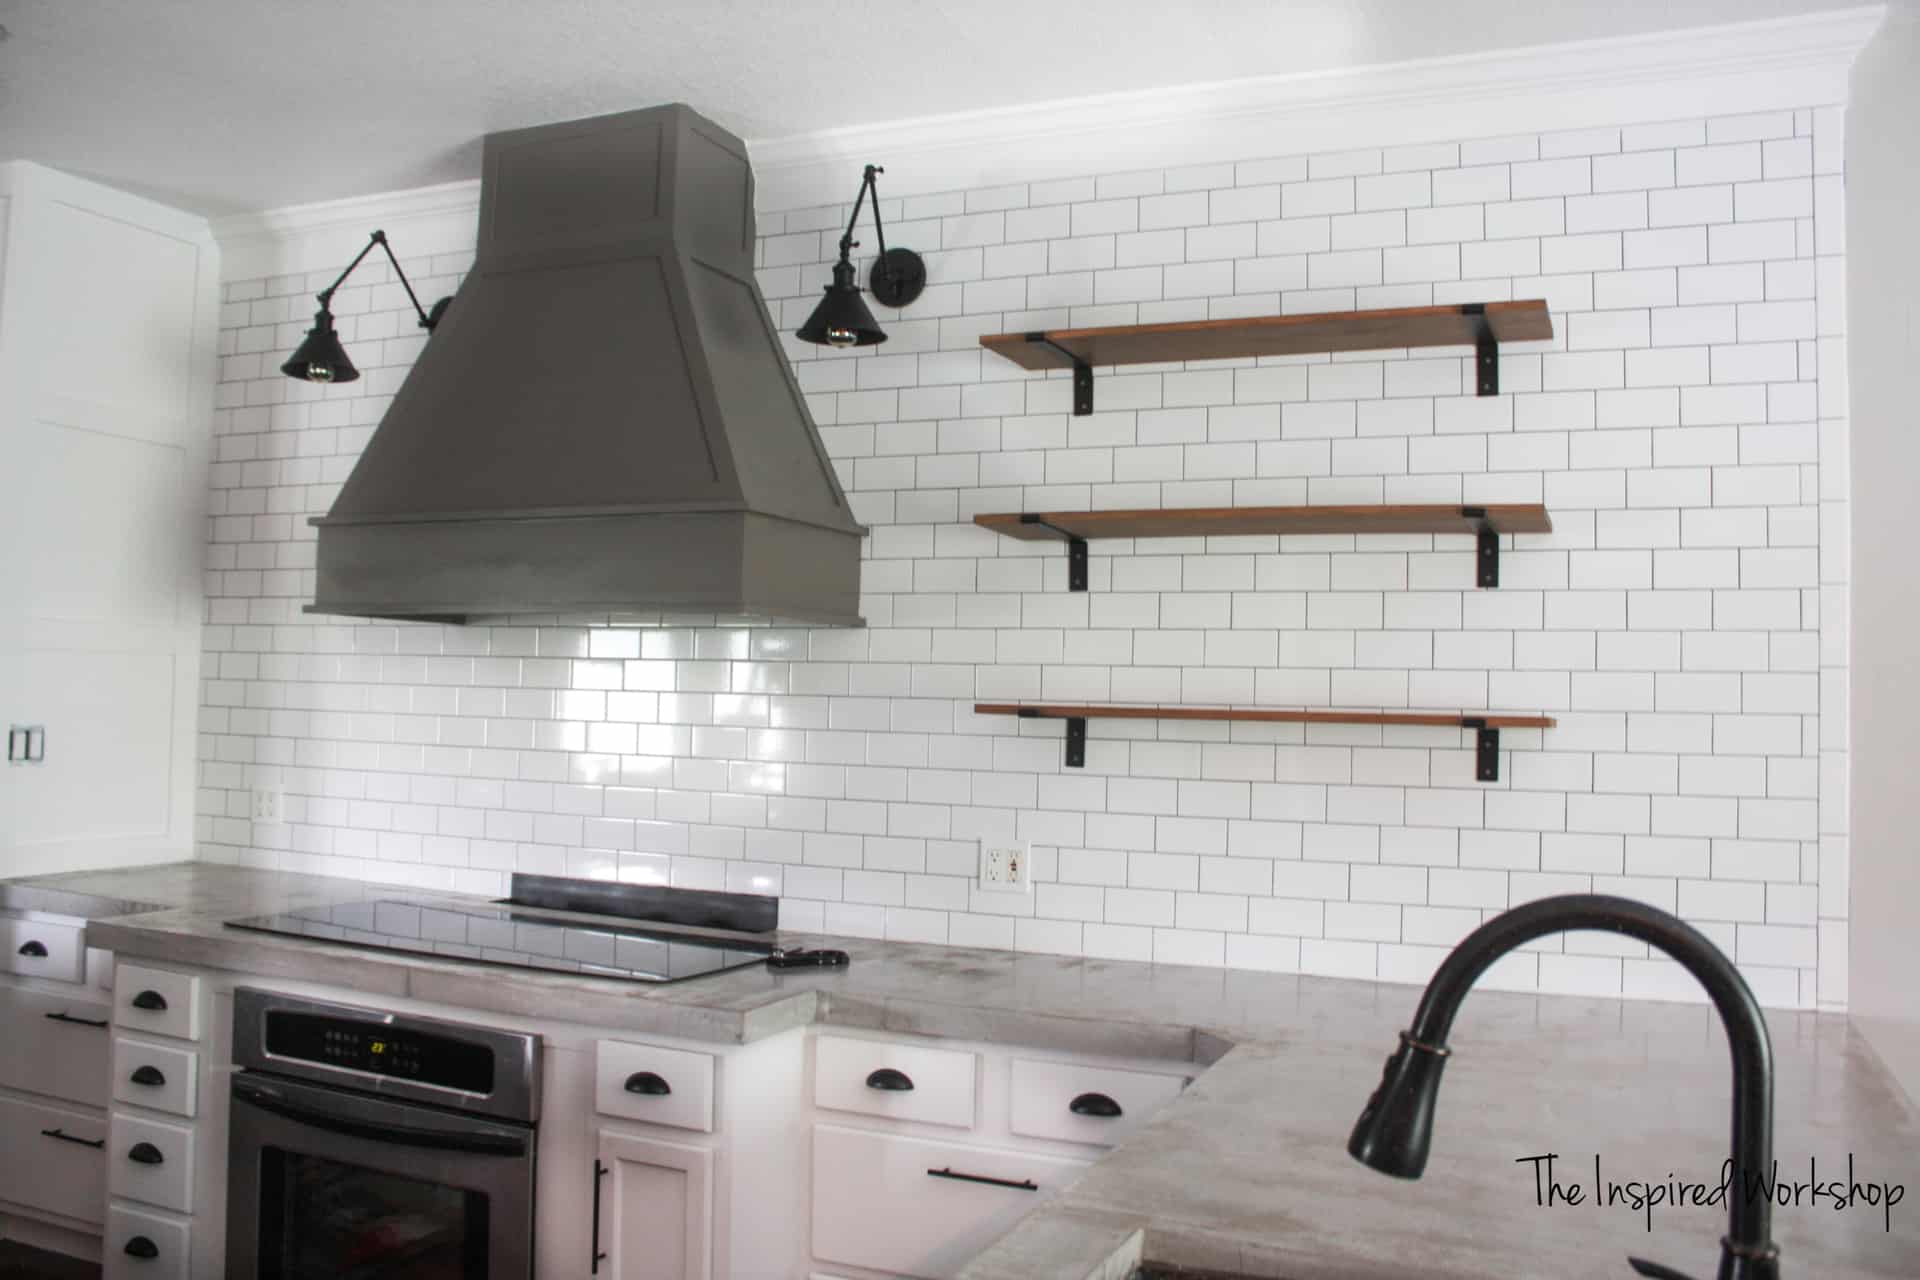
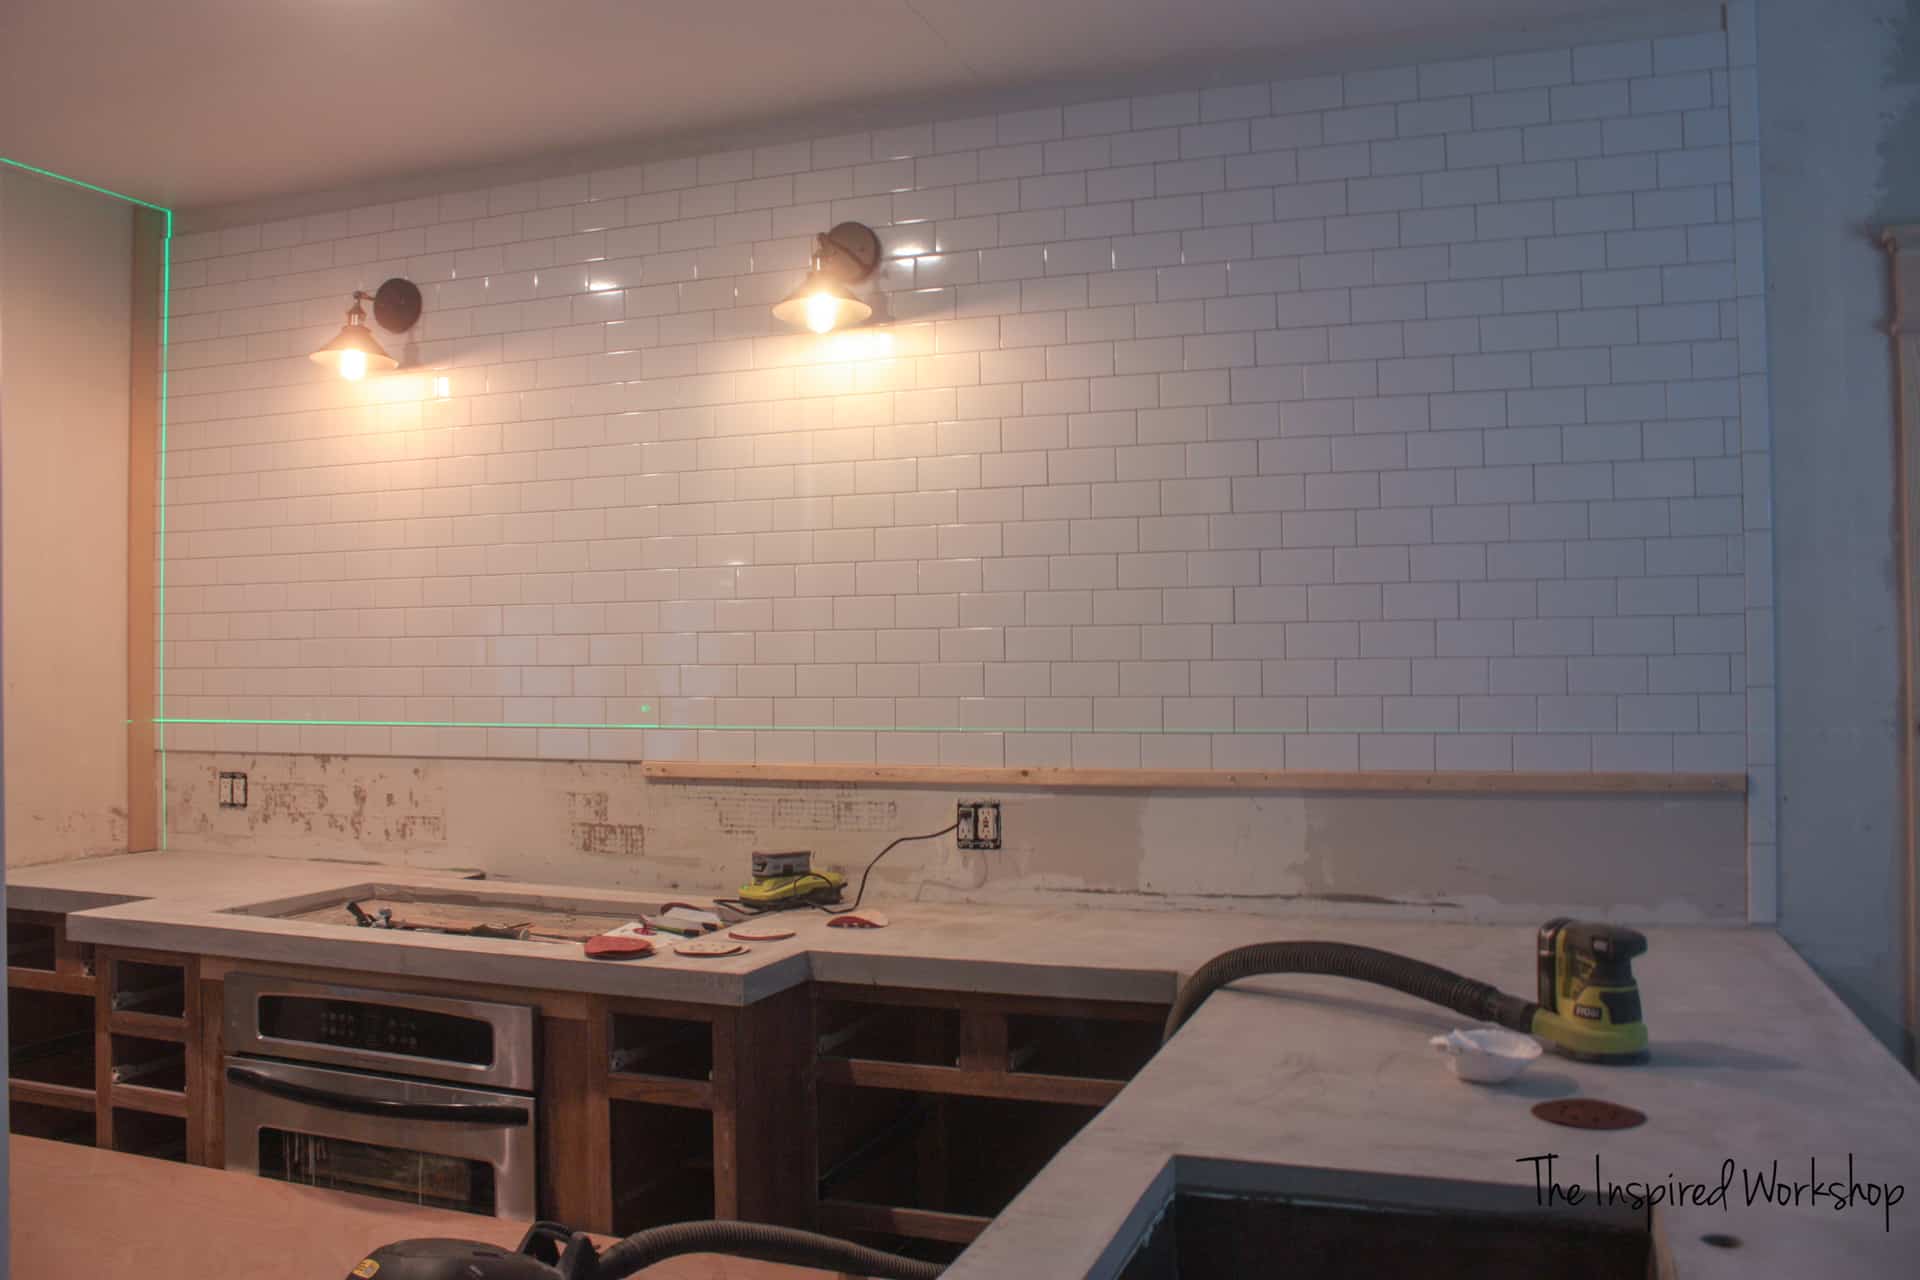
I used the three-row stagger pattern and tiled all the way to the ceiling, leaving a small space at the top that would need a cut tile…but since my ceiling was crooked, I was not placing tiles there. I knew better than to tile all the way up to the ceiling because it would drive me nuts to look at that uneven line every day! Lol!
This is where the laser level came in so handy when using the three-tile stagger pattern, you have to start each row 1/3 of the way into the last tile. I was able to just line the vertical laser level line up with the previous row that started at the same spot below to make sure they were dead on.
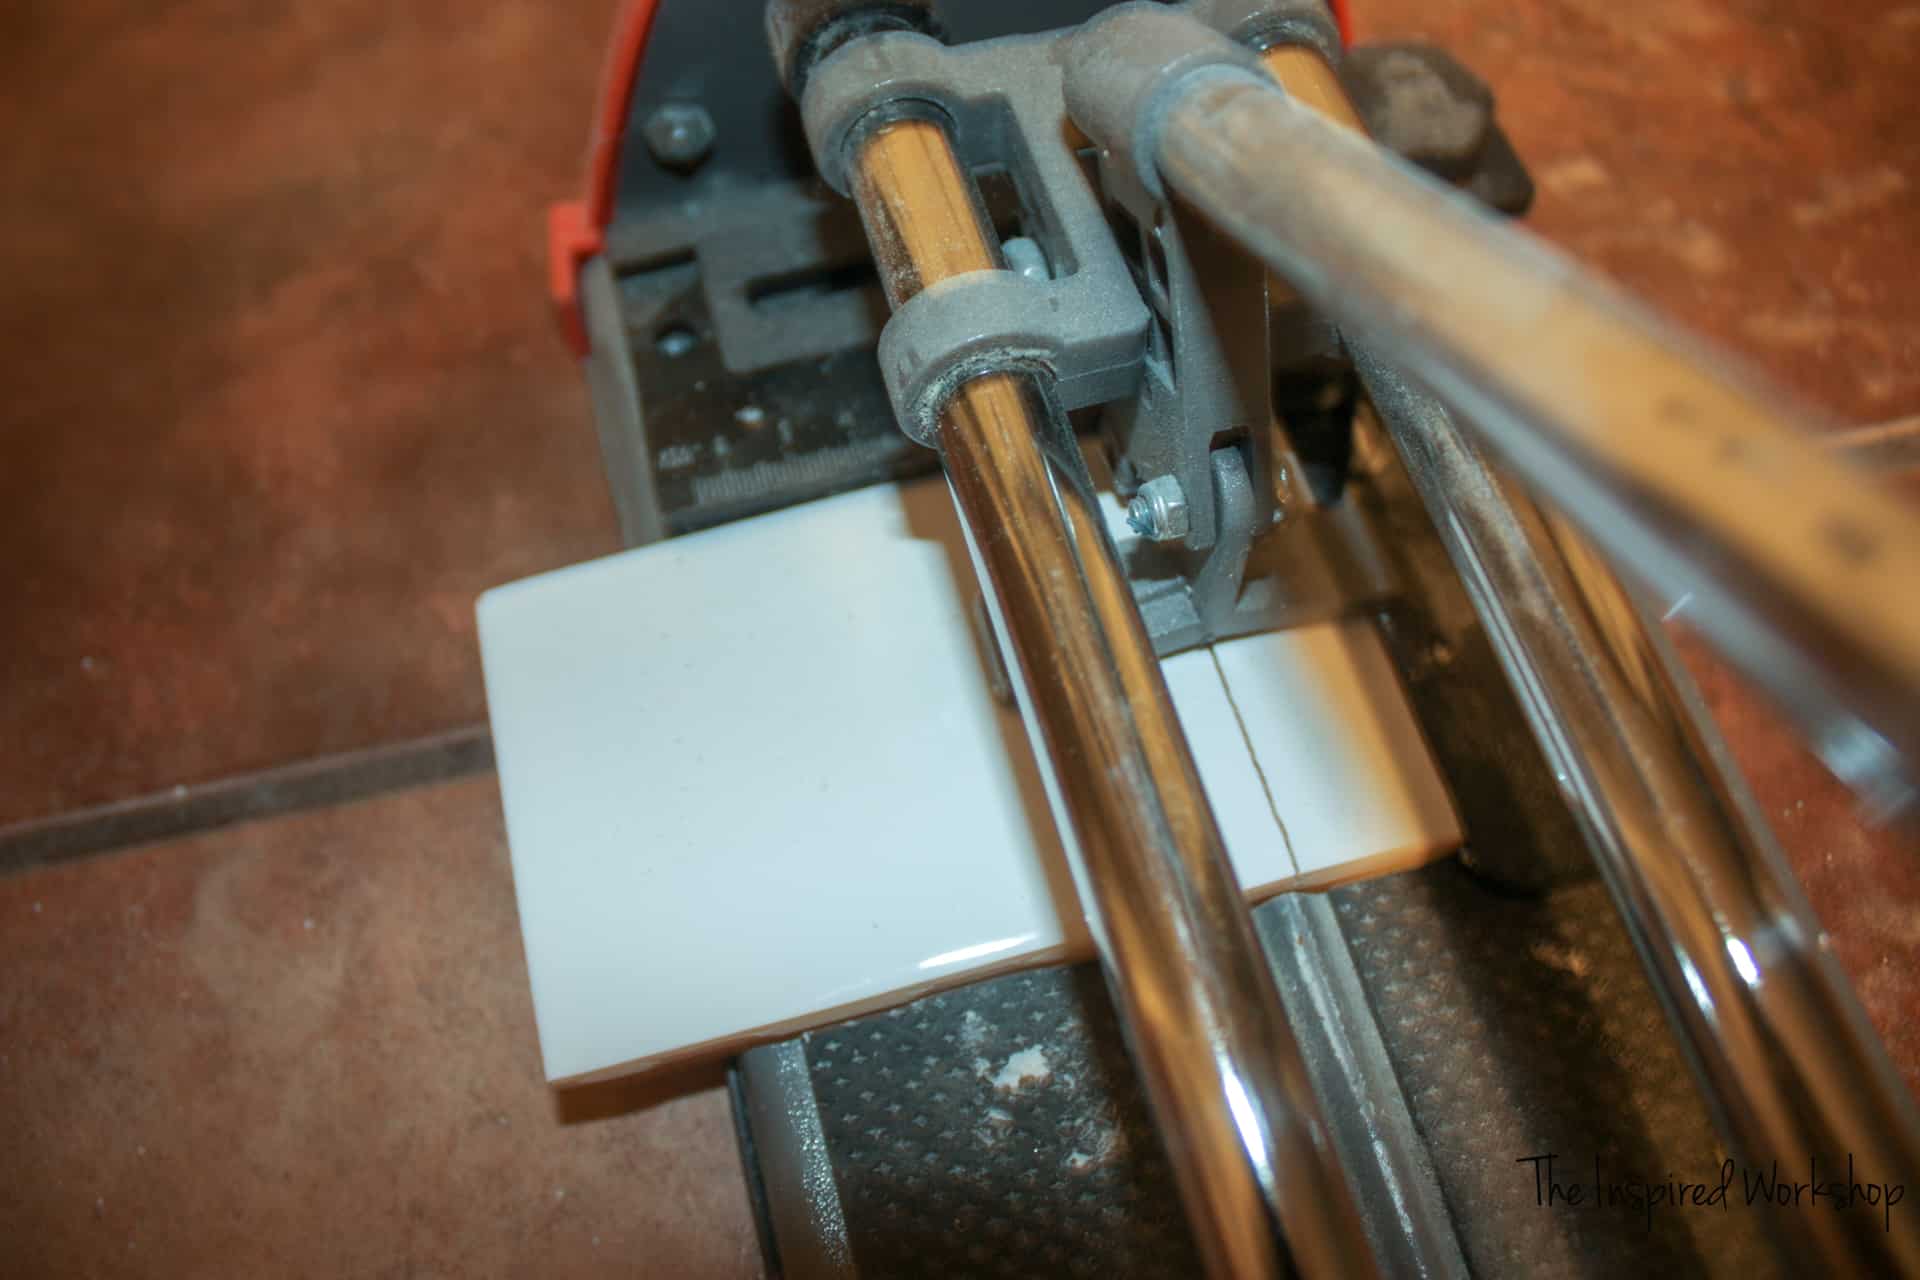
I cut the tile pieces at the beginning and end of the rows with a tile cutter. This was the best case scenario because it is small and compact without a lot of mess, vs the wet saw that needs a water hose and makes a huge mess! The small starting tiles are quickly cut inside by sliding the cutting wheel across the tile where you need it cut…it simply scores the tile.
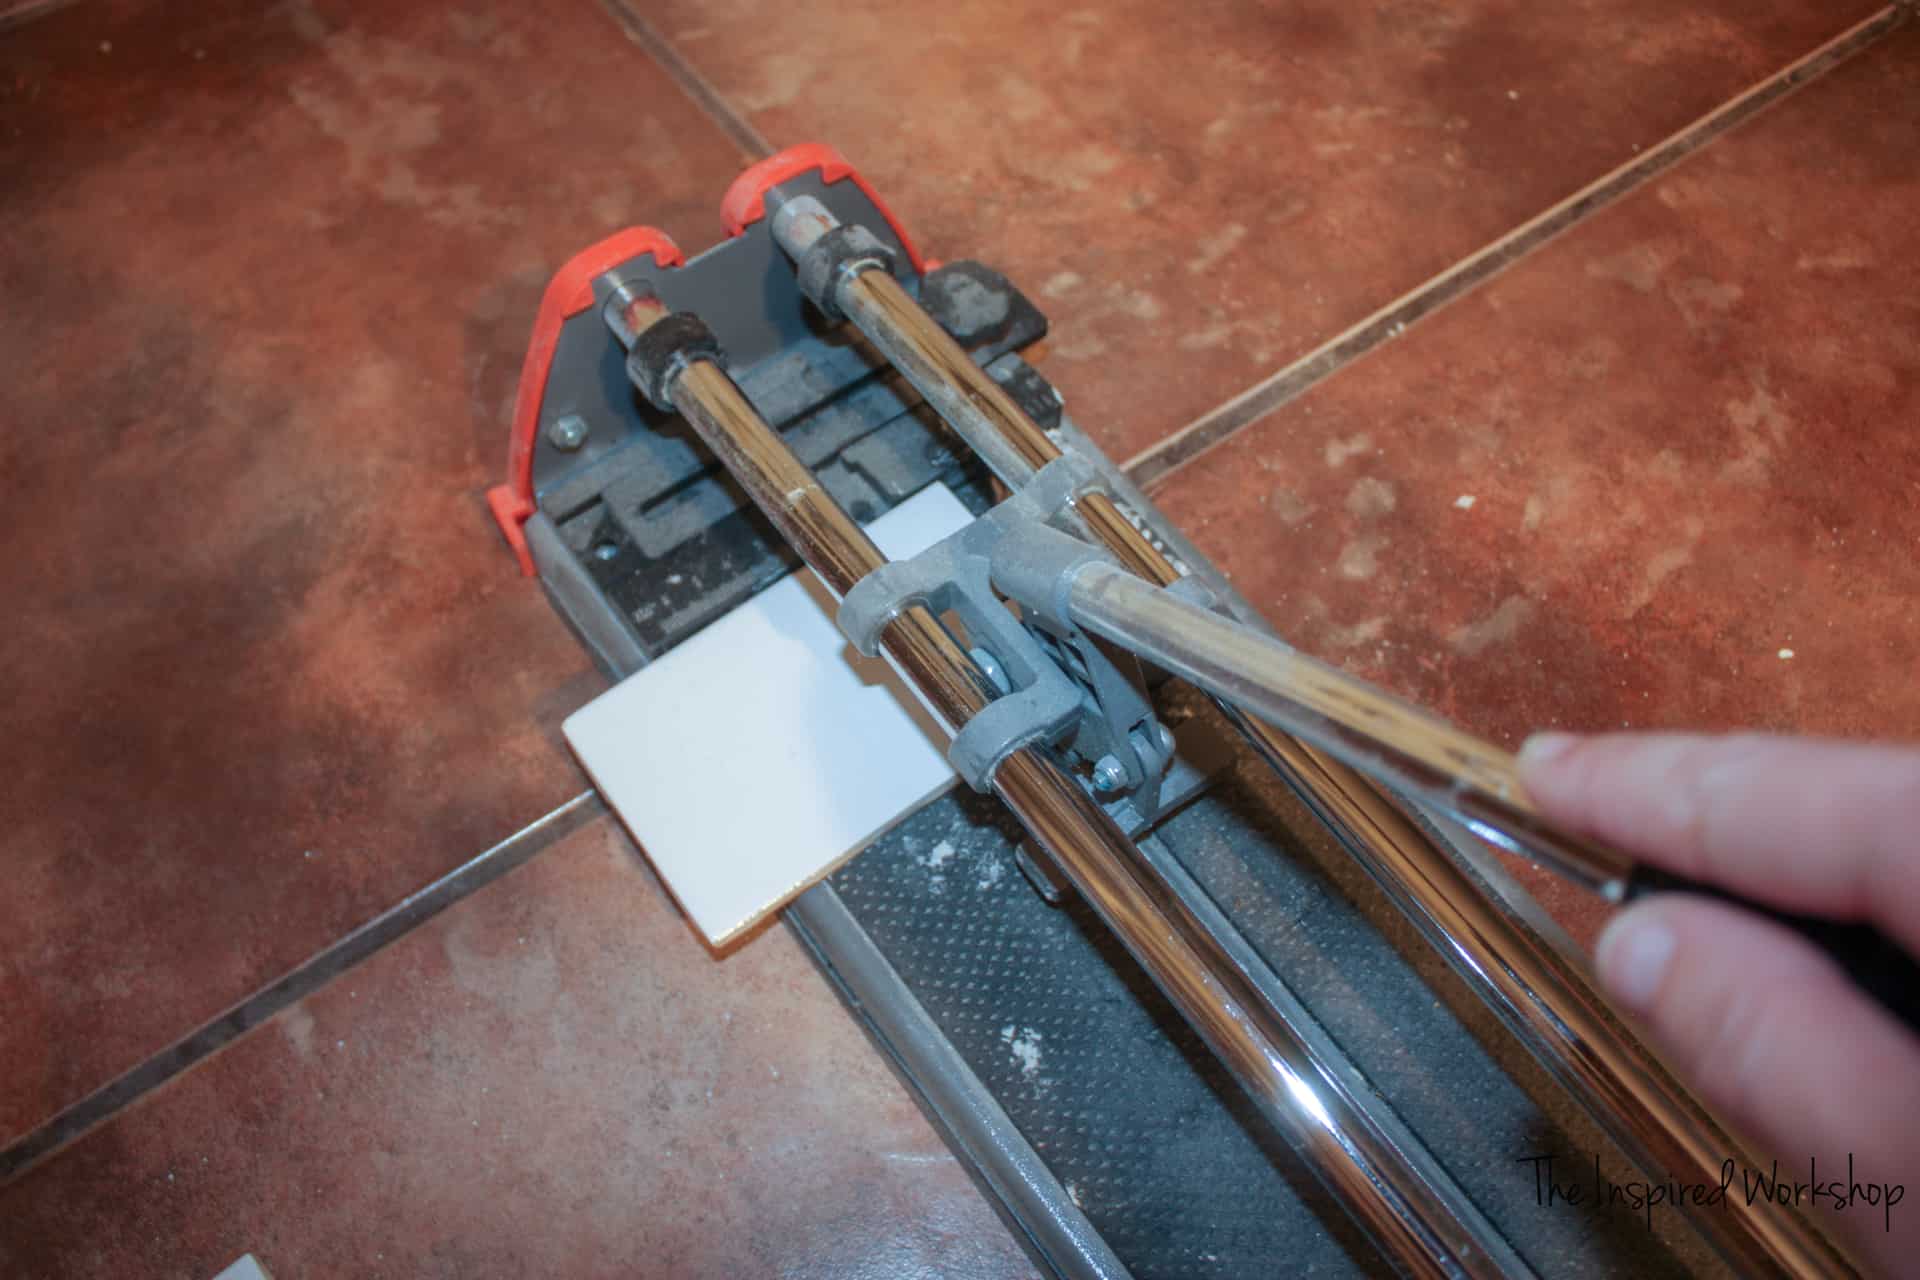
Then you lift the handle and the little foot swings forward to rest on the tile.
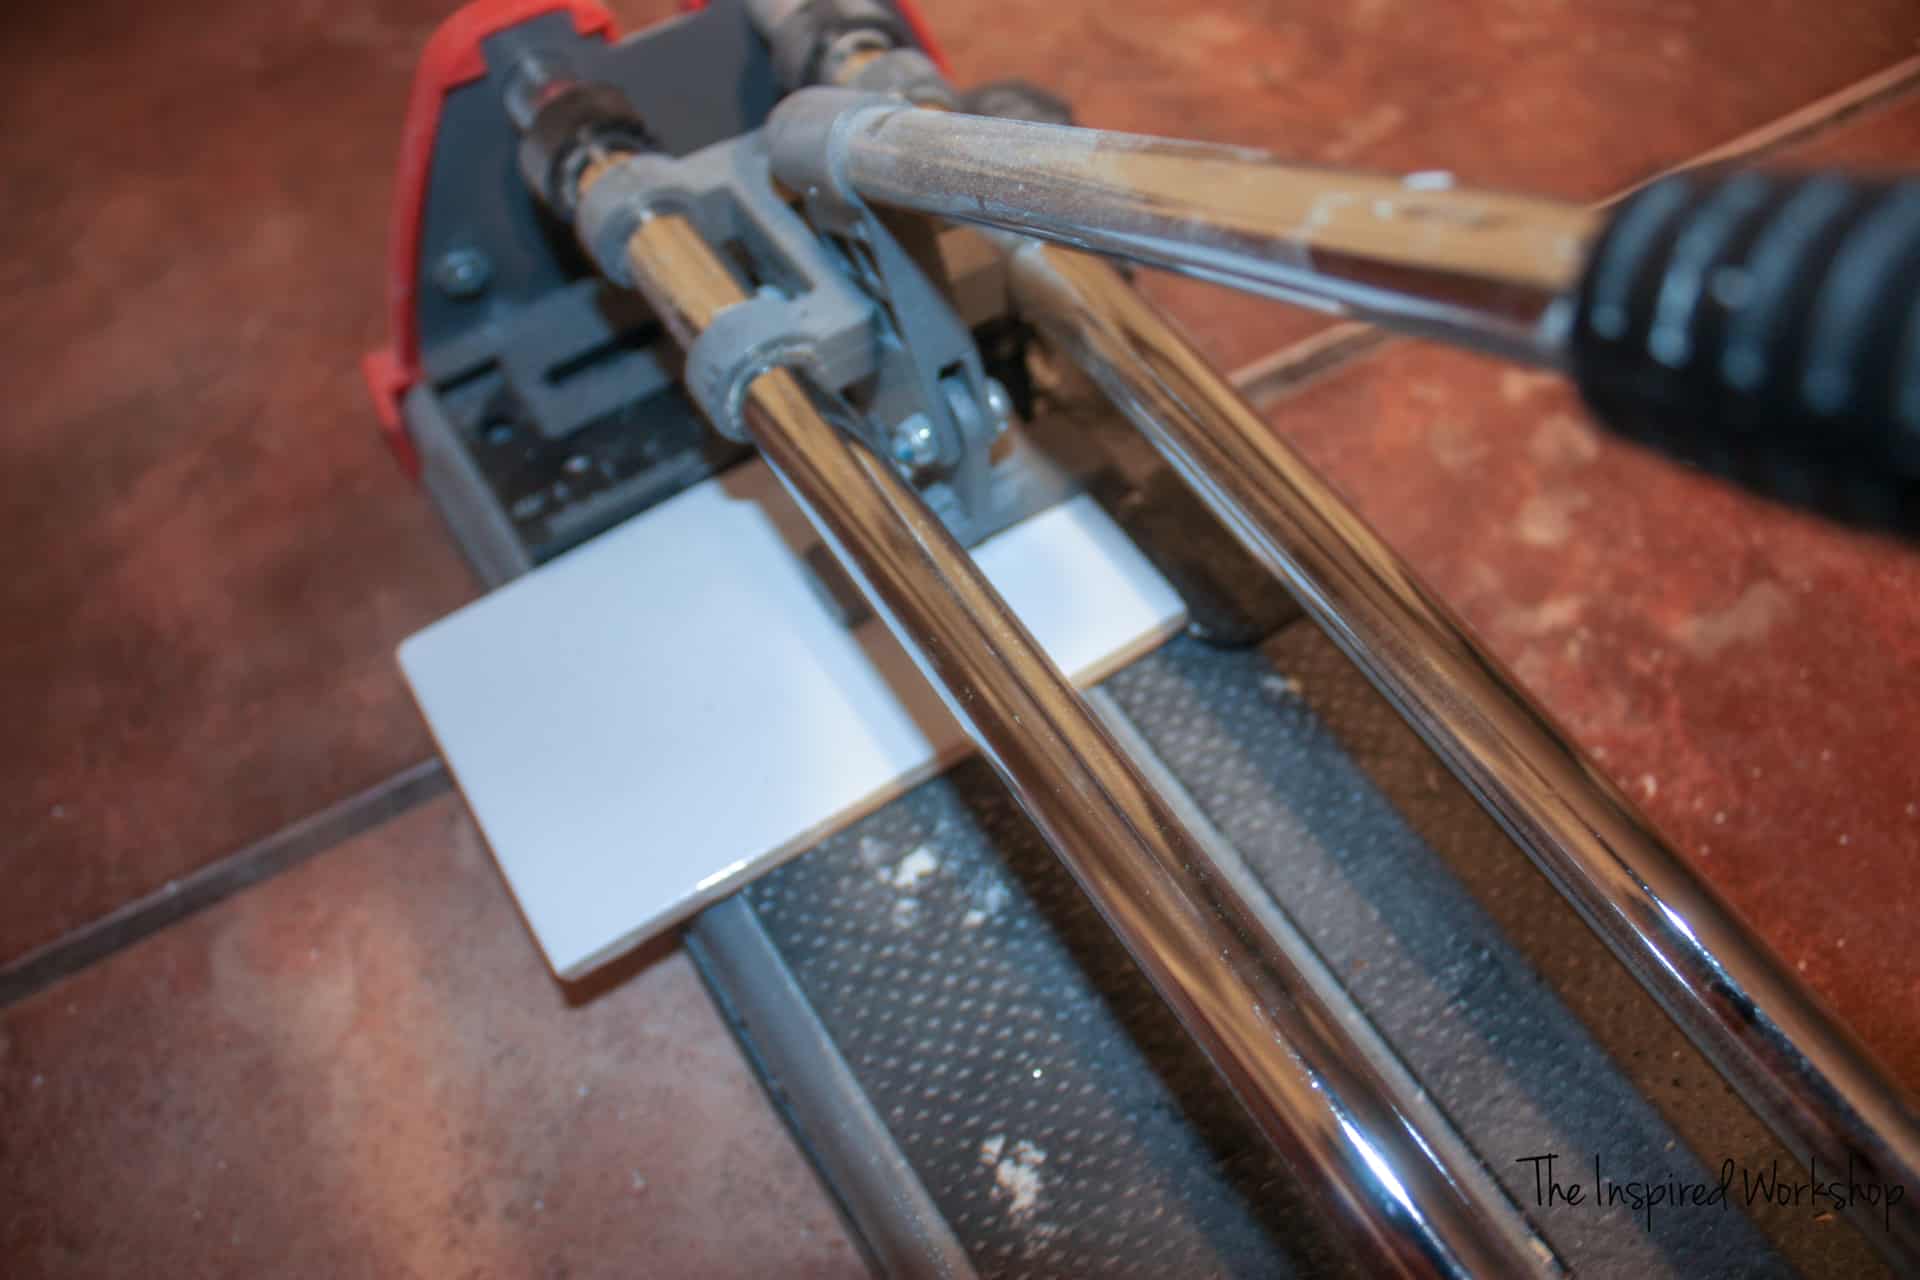
Then you press down on the handle and it breaks the tile across the score line!
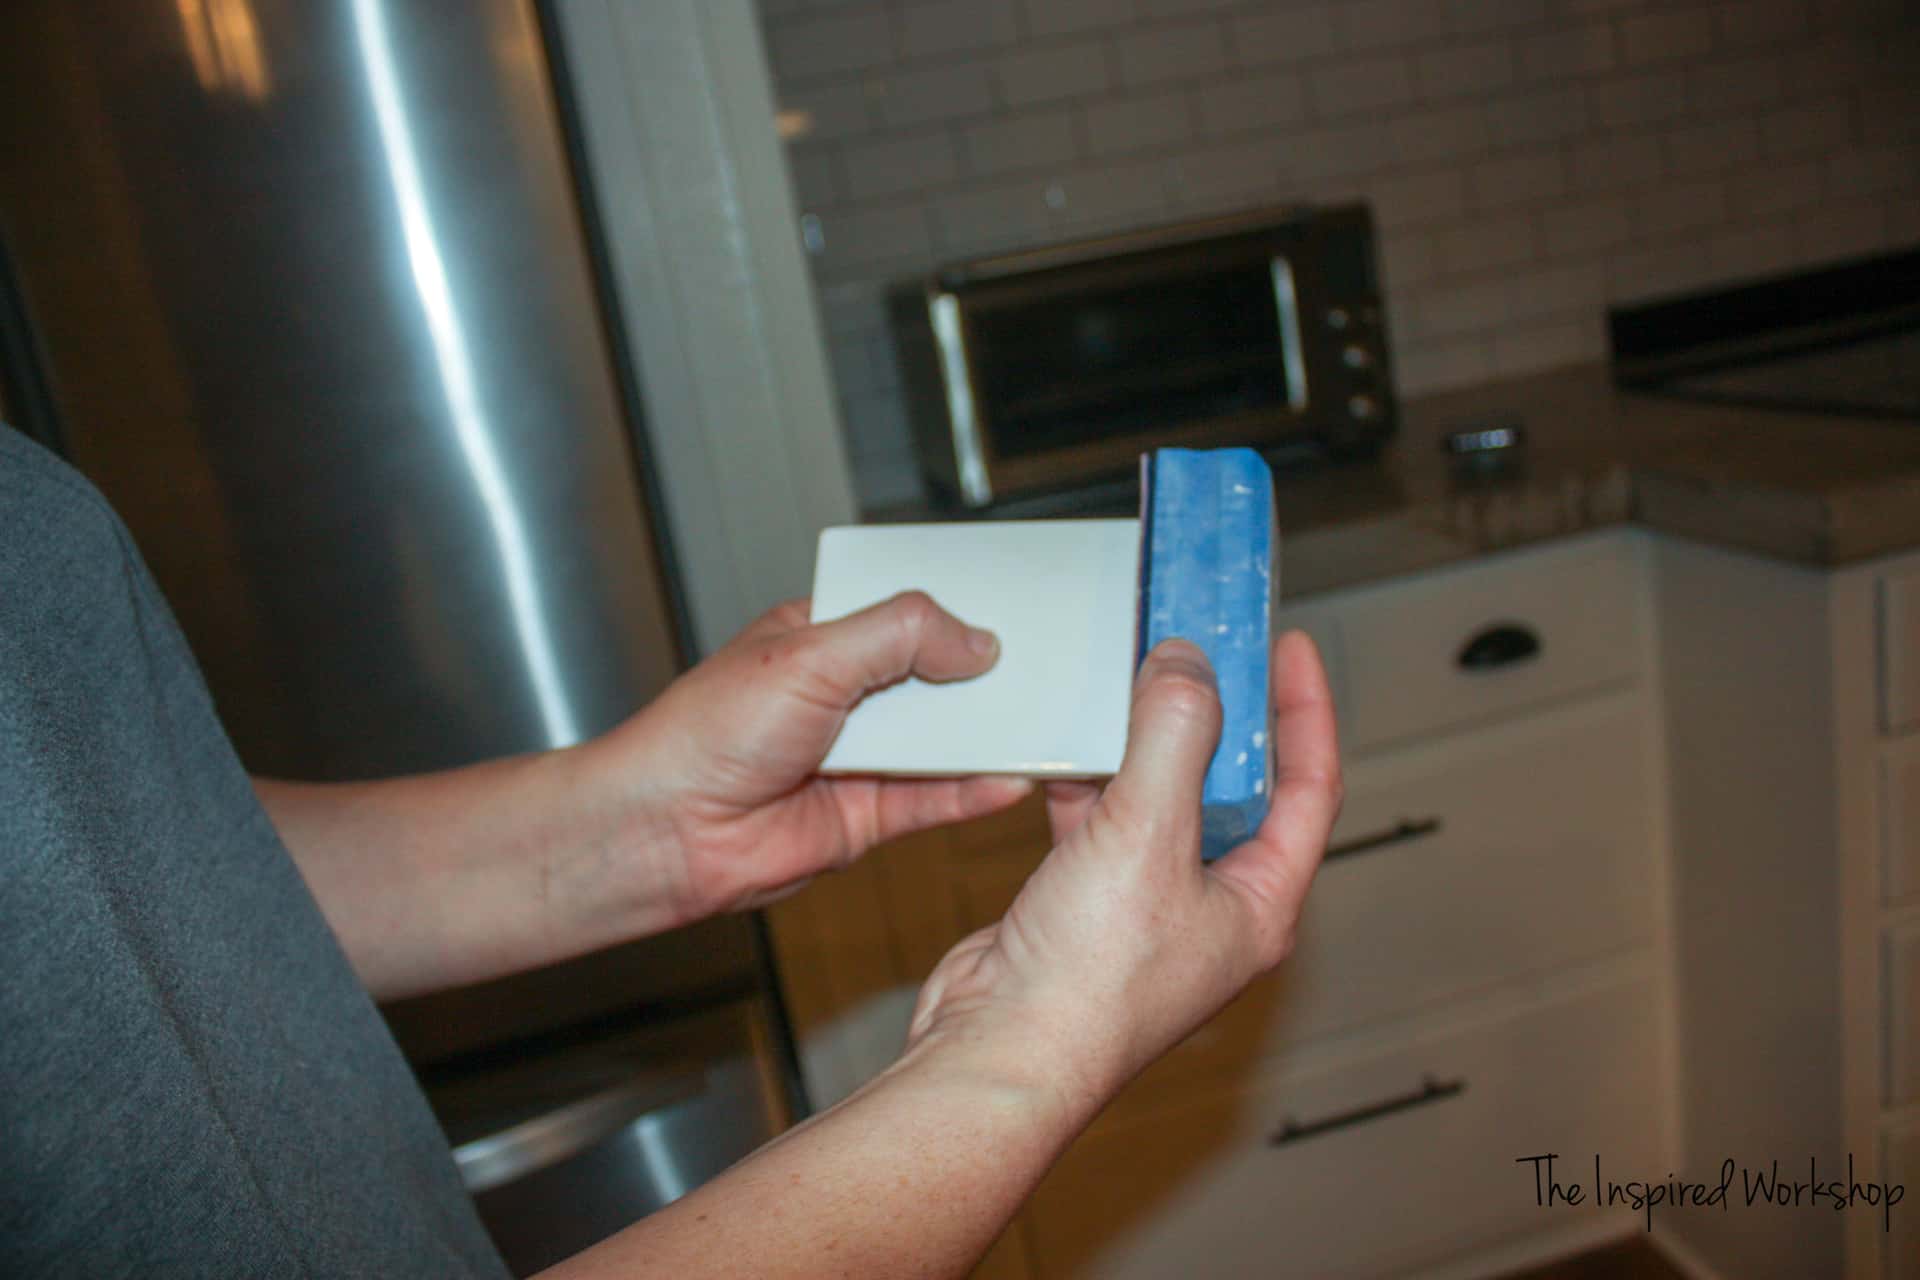
I then used the miraculous little diamond grit sanding block that I used on my concrete countertops to sand the edges of the tile!
I let the tiles dry overnight and the next day, I removed the 1×2 and tried to move it down on the way to start the next row of tiles, to meet up with my previously laid tiles…well guess what, here is where I realized what a mistake it was to start smack dab in the middle of the wall. I couldn’t for the life of me manage to set my 1×2 at the correct height to make the tiles meet up. It took me try after try…after try. I am talking measuring, then placing my 1×2, tiling a few rows, and then taking it all down to move the board and try again!
It was awful and I was ANGRY! Lol! I was so mad that I hadn’t thought about that happening…but after about 5 or 6 attempts and many hours later, I finally found the sweet spot and was able to finish tiling another section of the wall, leaving a small section to, then again, figure out the next day.
The better way to do this would have been to set the board up at the very bottom, at the height of one subway tile. On one end, of course, it would be smaller than a full subway tile since it was not level but it would have saved me this nightmare! Then after tiling 5 feet the first day I could have come back the second day and tiled the rest…boom, done! So much easier! Now I know for next time!
**Update: I have since tiled a huge shower that included four walls and tons of angles, and I set my ledger board up level at roundabout one tile high and it worked so flawlessly! You are welcome to read the post all about tiling a shower wall if you would like to get insight from my second time of tiling!
Depending on what size tiles you are using and the space you are tiling, in some cases if your countertops are level, then you can just start tiling with full tiles, straight from the countertop, and go up! You only have to complicate your life if you have uneven countertops….which shouldn’t be the case for most people. But I did talk to a contractor that said it actually happens more often than you would think! Yikes!
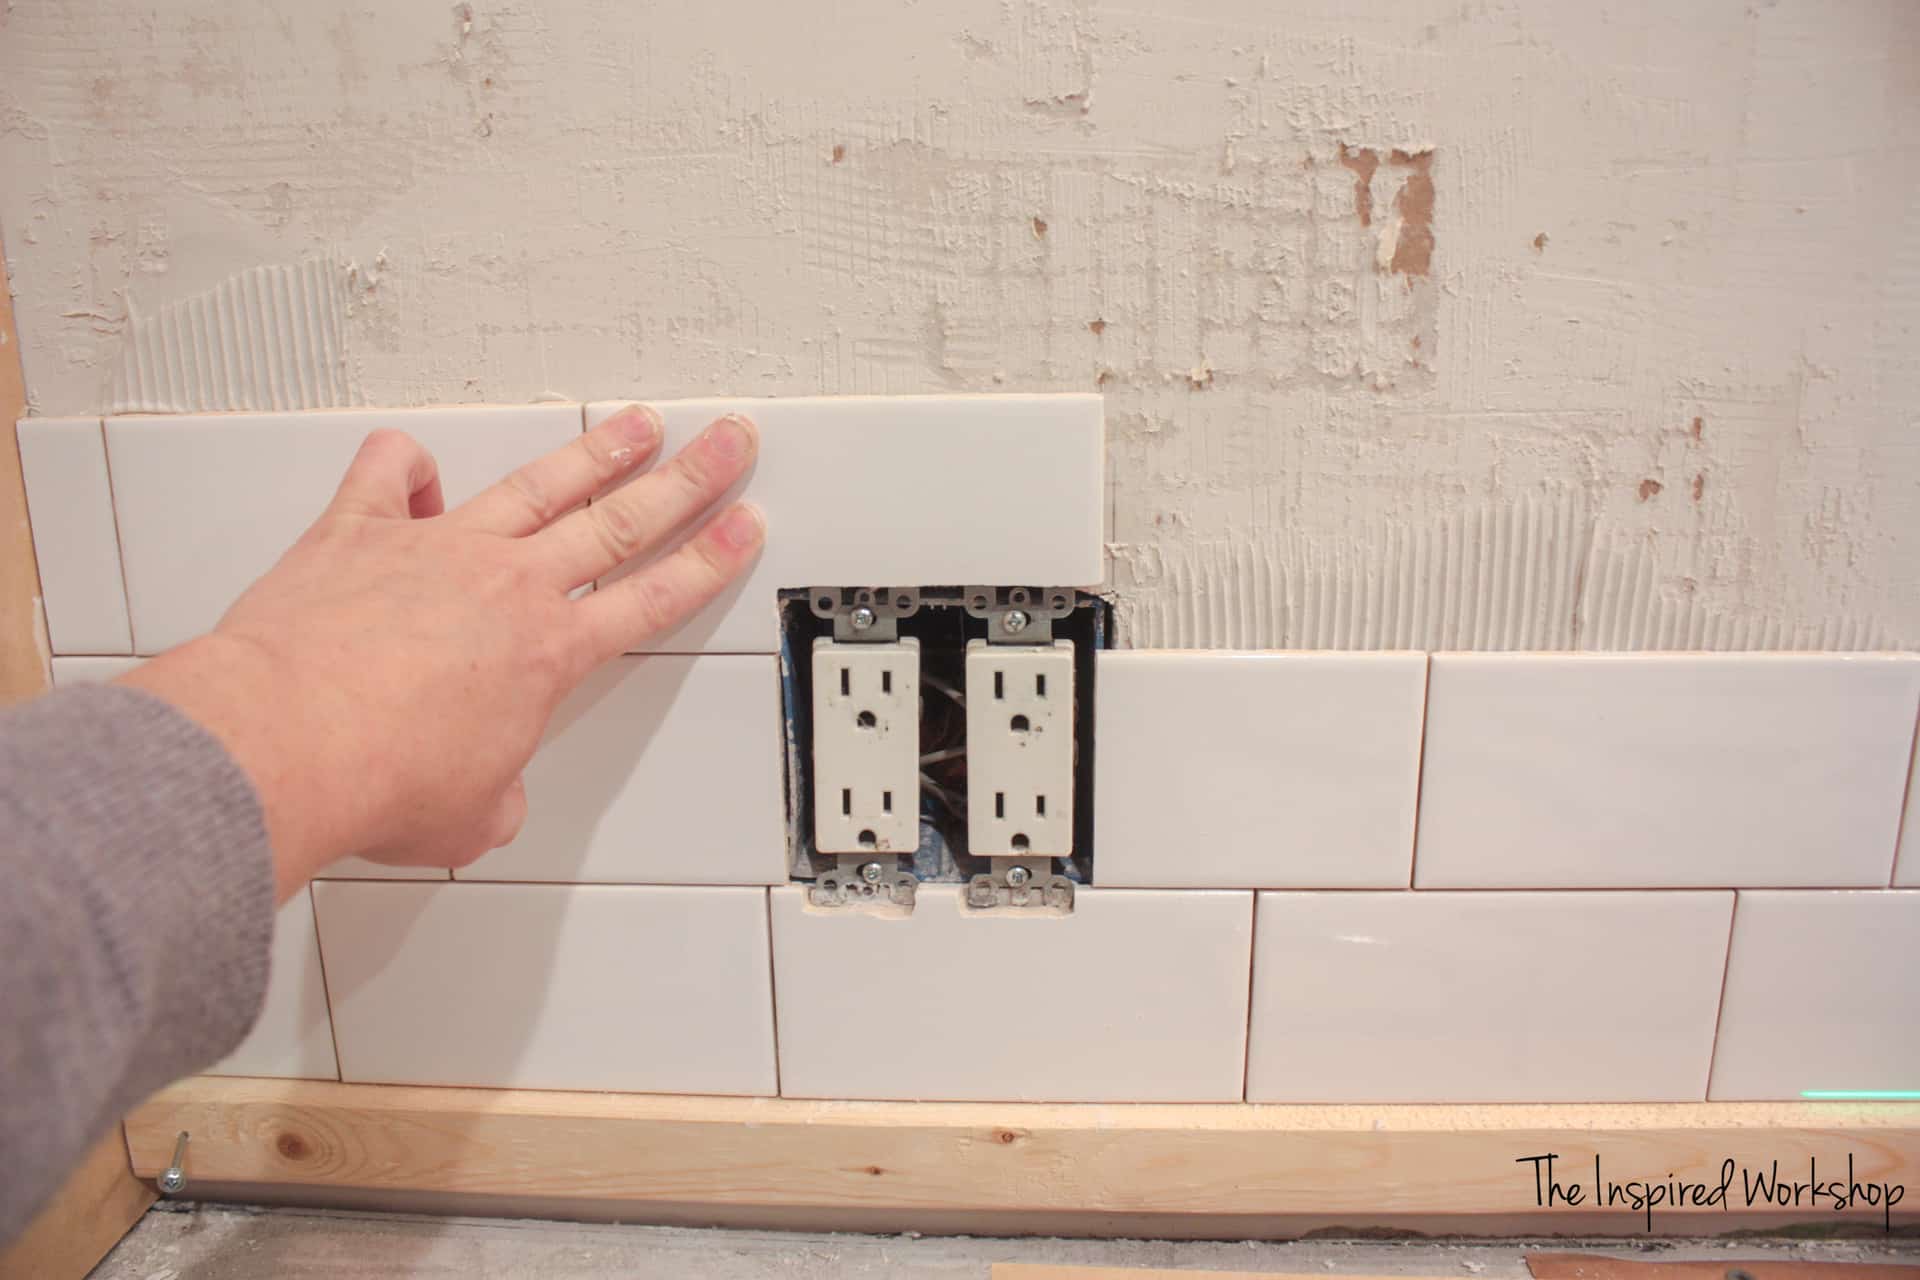
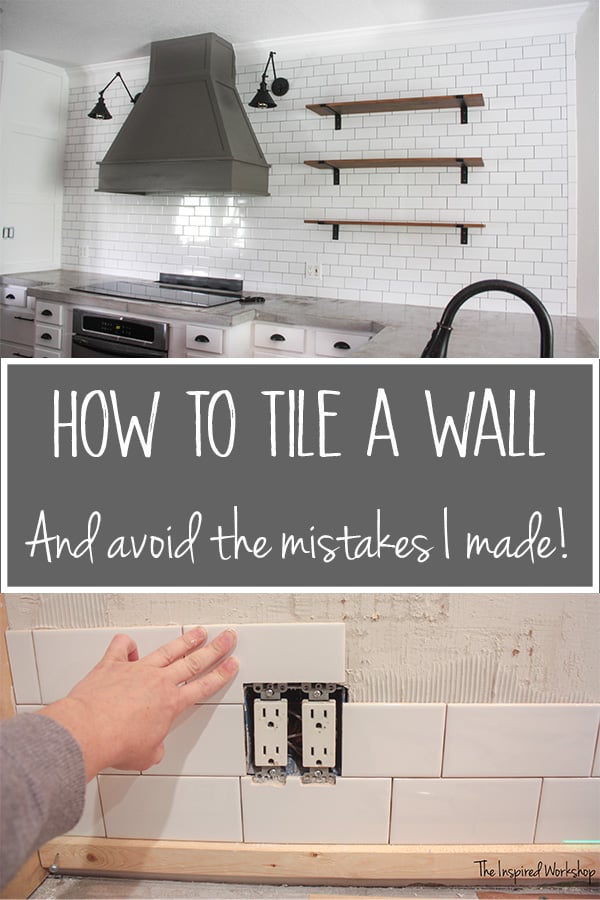
Anyway, the bottom portion included cuts around the outlets, I just used the angle grinder to make these cuts with a masonry cutting wheel.
I left the bottom row of tiles unfinished for quite some time trying to figure out the best option for the counters being unlevel. That would be dilemma #456 if you are keeping count! Lol!
I thought I had better pictures than that! Geez, I need to work on making sure I have thorough pictures!
Dilemma # 457: The uneven ceiling – When straight lines of subway tile, or any square or rectangle tile for that matter, meets up with crooked lines, it’s exceptionally obvious. I had two choices, I could use joint compound and build up (actually down) the end of the ceiling that was higher, or I could find a way to use molding to trick the eye into not noticing that it is not straight! After speaking with several professionals and other DIYers/bloggers that are much more experienced in this area, they convinced me that tricking the eye would be by far easier than feathering the joint compound out.
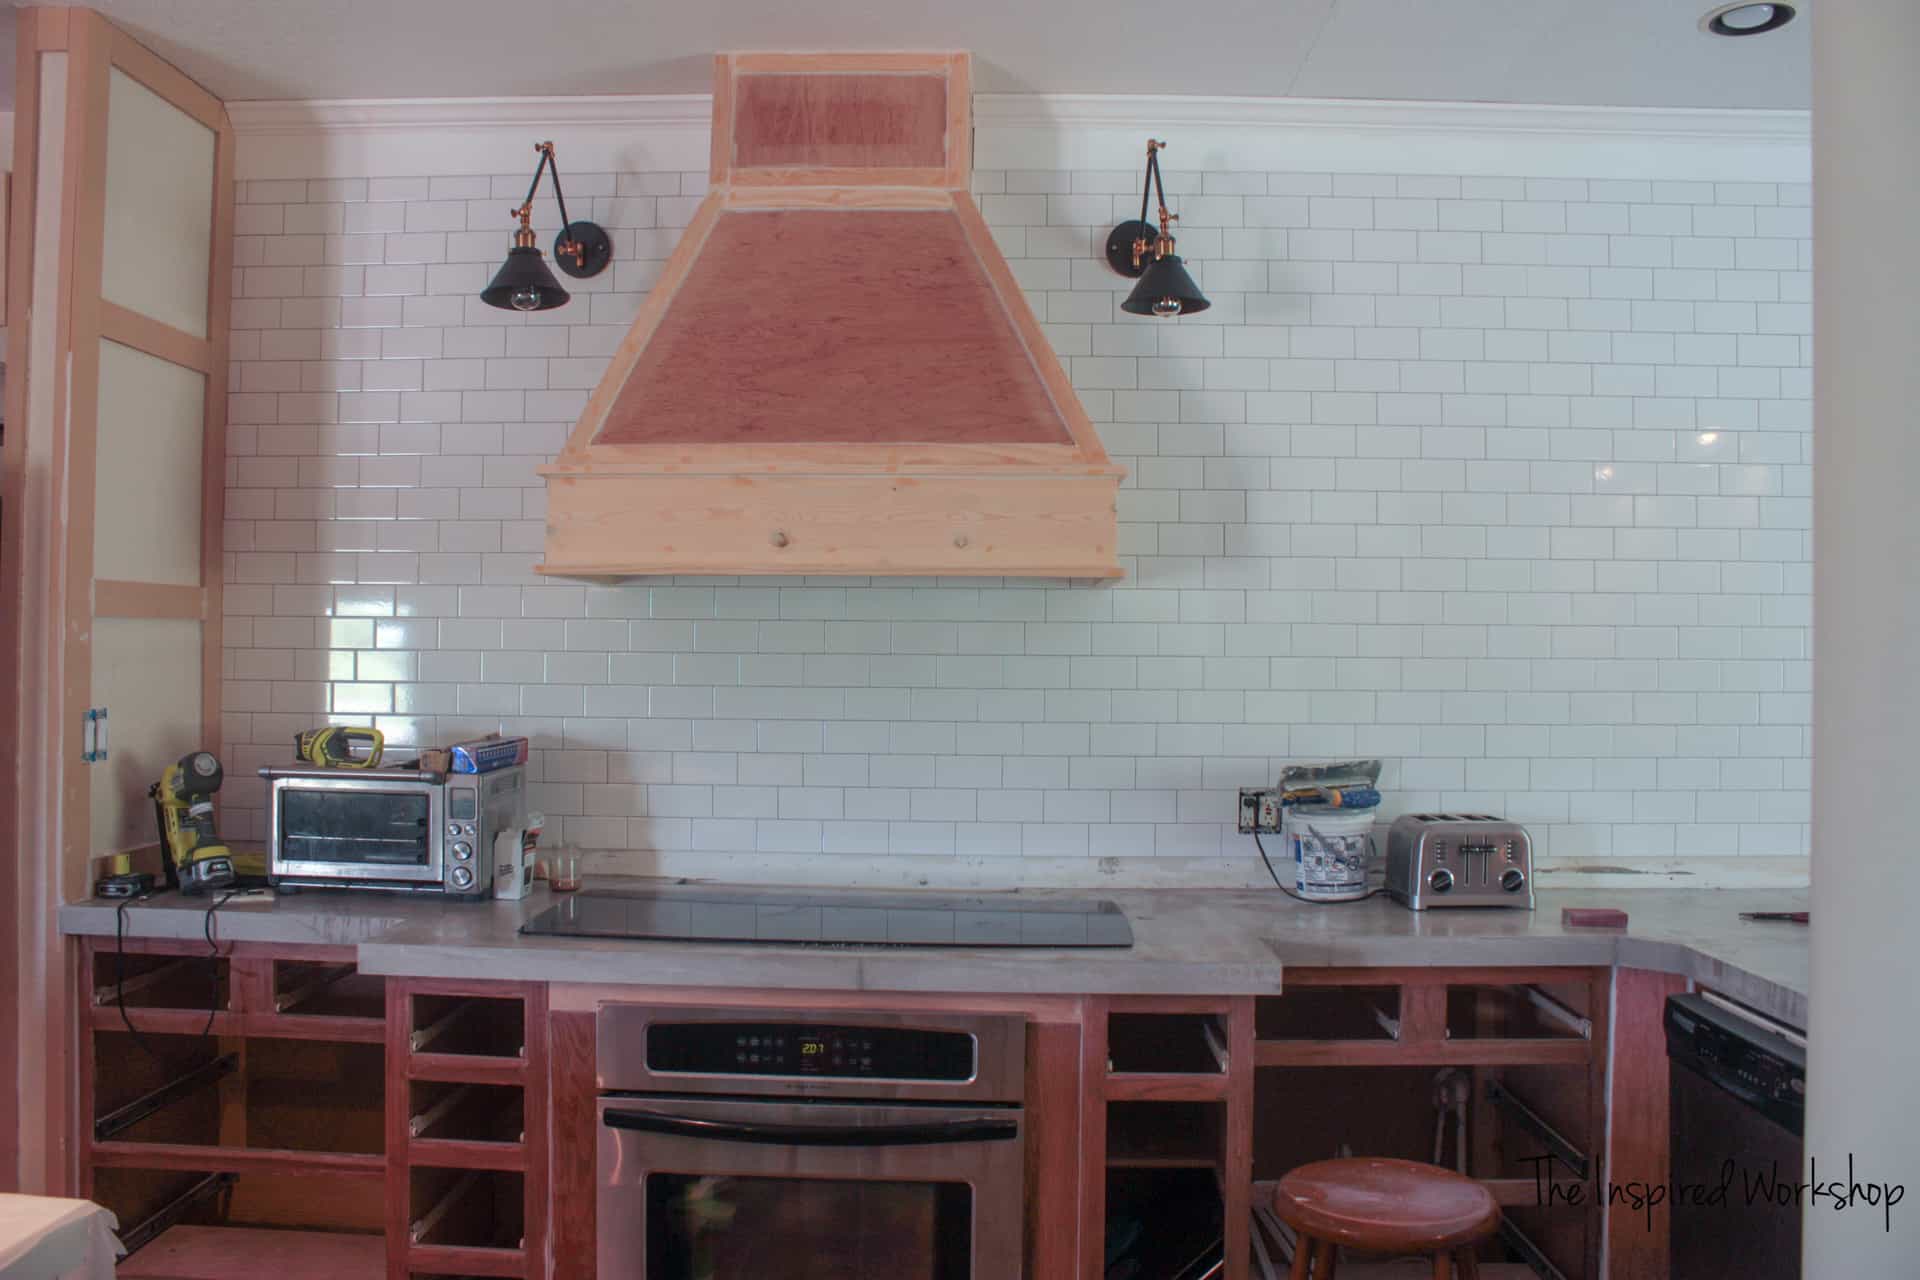
I opted to add molding, but a single piece of crown molding wouldn’t do the trick, it was still obvious. I added shims because they were perfect width at their largest end to meet up with the tile. That allowed me something to attach the 1×6 polypropylene board to and then place the crown molding over that.
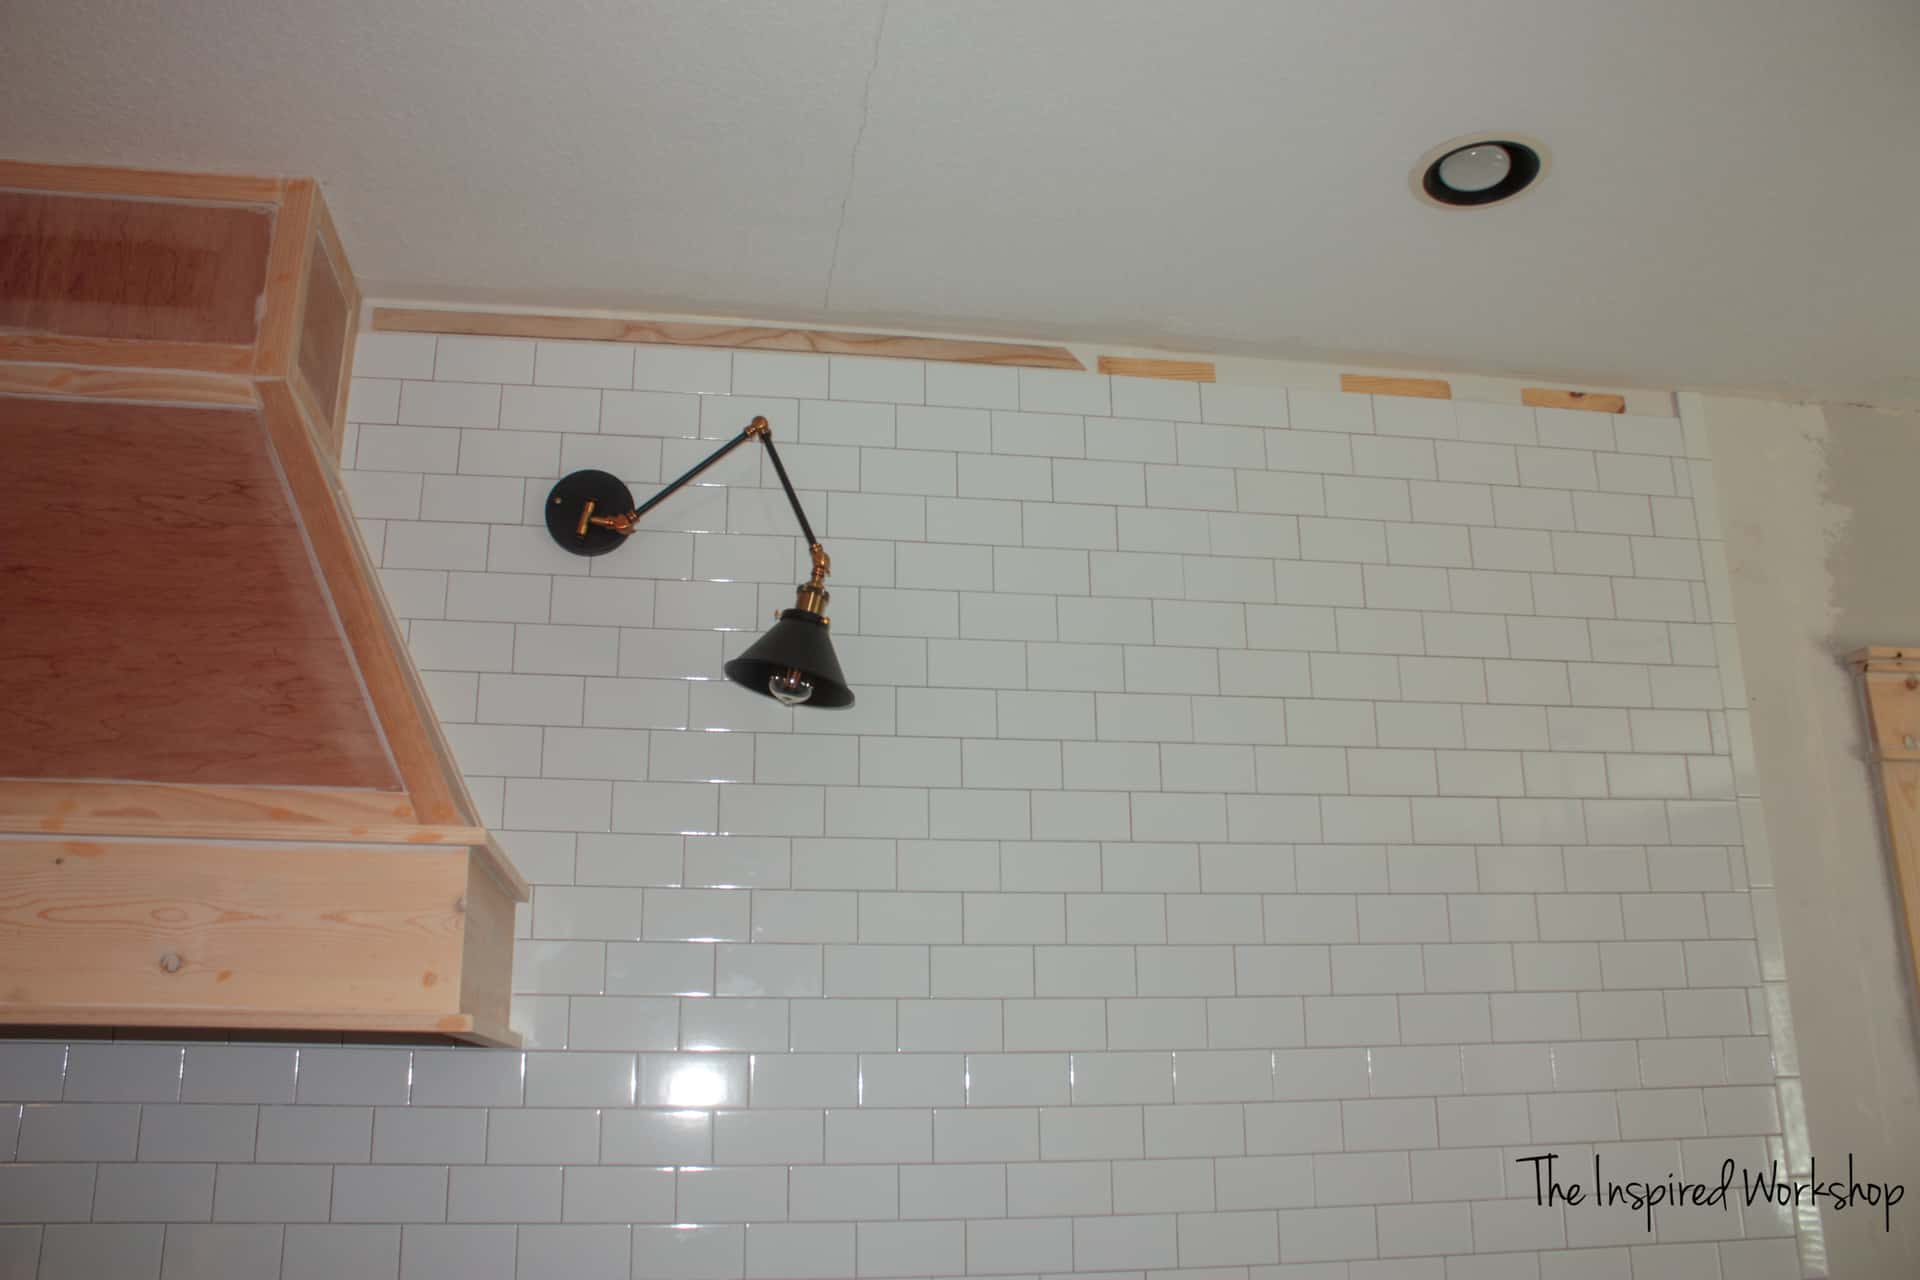
Back at it with the laser level to make sure the 1×6 was level, not flush with the ceiling! In doing that, the eye wasn’t zeroing in on two lines going in different directions! Then when the crown molding is added over the 1×6 the distraction will take place! Lol! It will be flush with the ceiling but there is no obvious line for the eye to follow so it doesn’t notice the uneven line! Now if you stare at it, of course, the eye will find it, but generally, no one is looking for that!
Viola tricked your eyes! I’m like a magician…you saw nothing!🤣
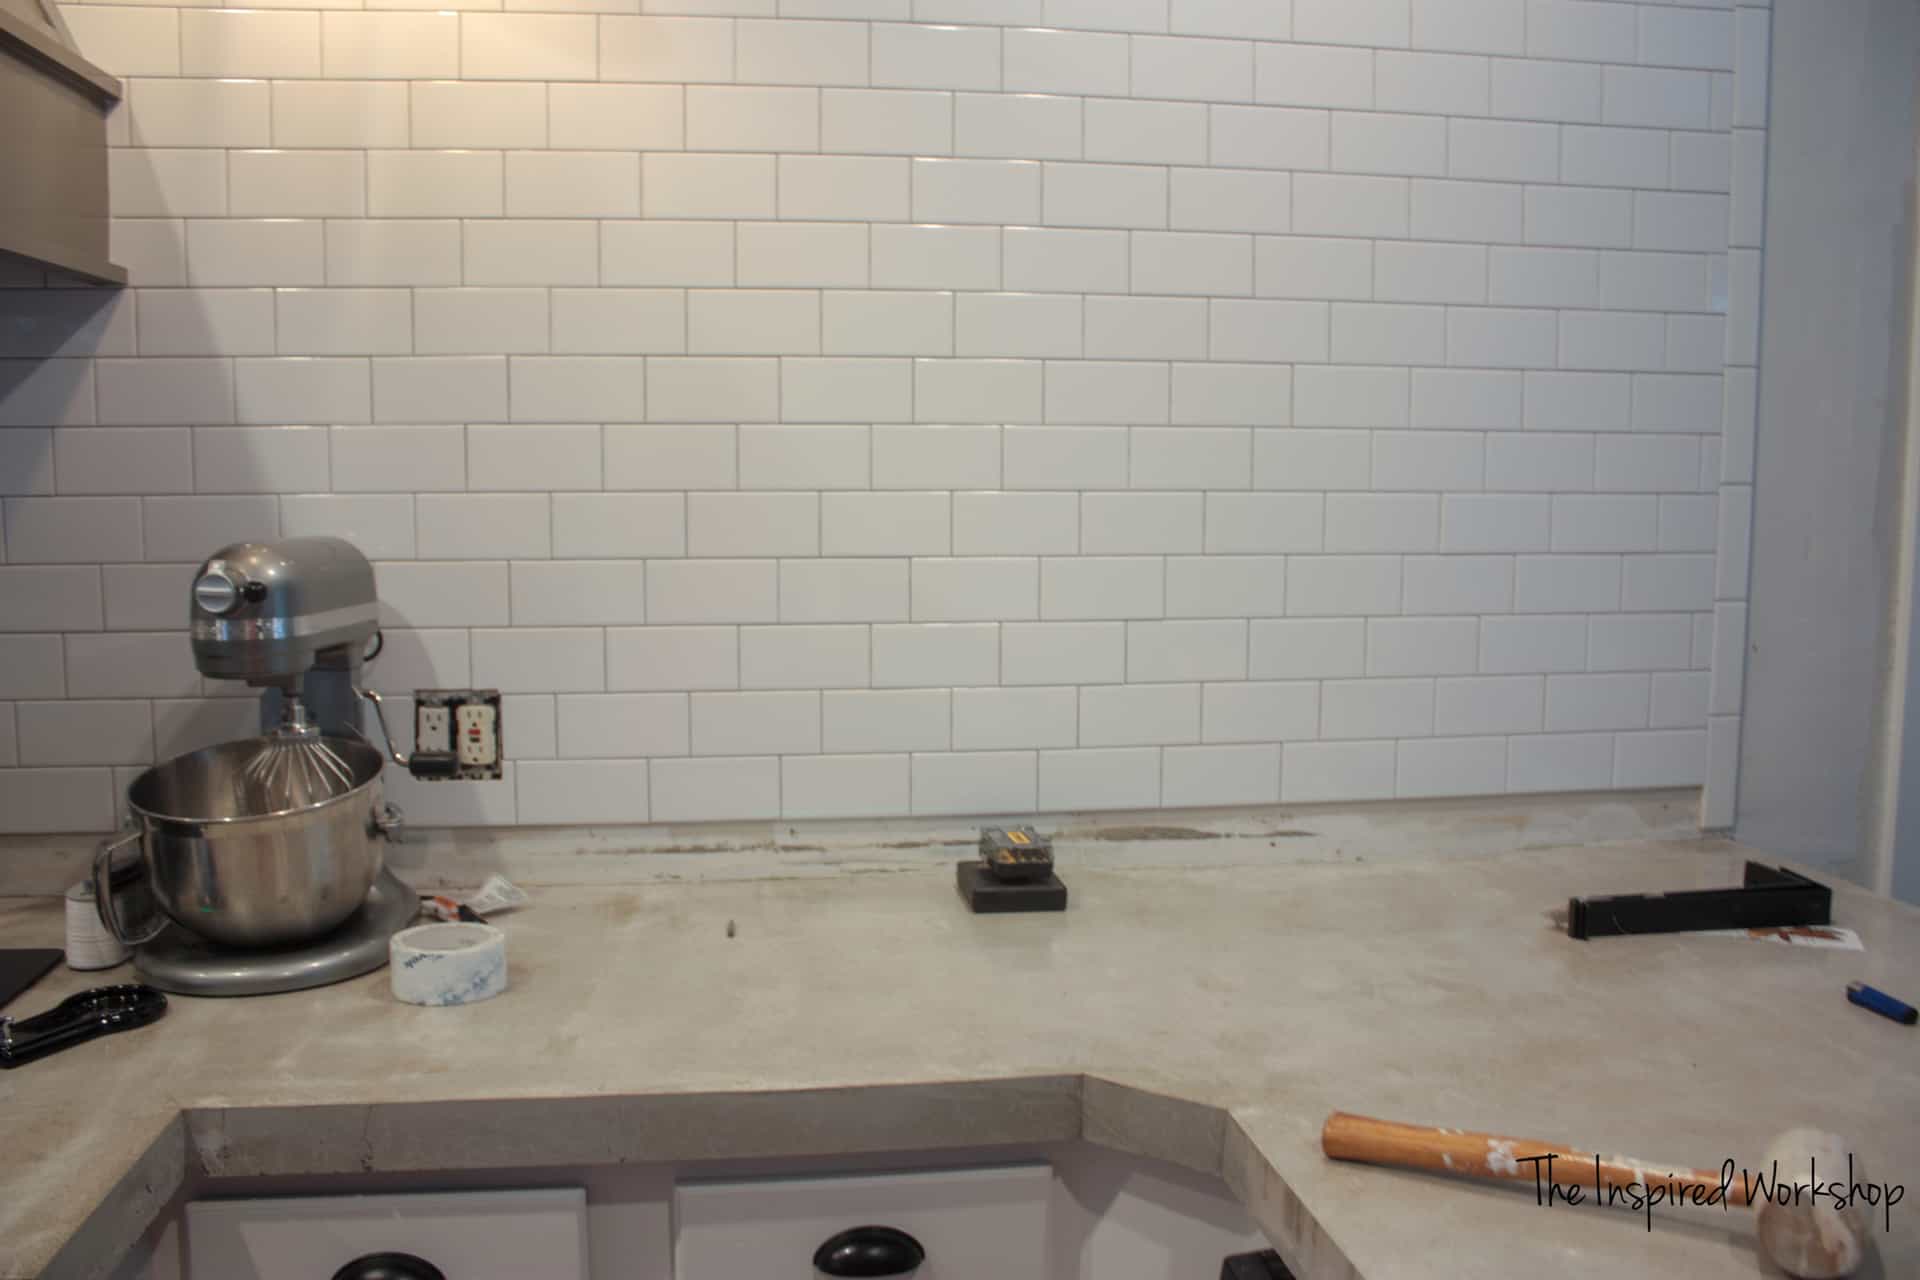
Now for the bottom row, it is what it is, there was no way to fix the concrete, so the tiles are different sizes, luckily I broke it up with the black of the vent hood that raises out of the counter and with stuff sitting on the counters it is not obvious.
I was able to pick up a Ryobi wet tile saw at Home Depot on clearance for 50 bucks…I bought a more expensive blade, and it worked great to cut that last row of tiles.
Now to grout this fine wall! First-time tiling means, first-time grouting!????
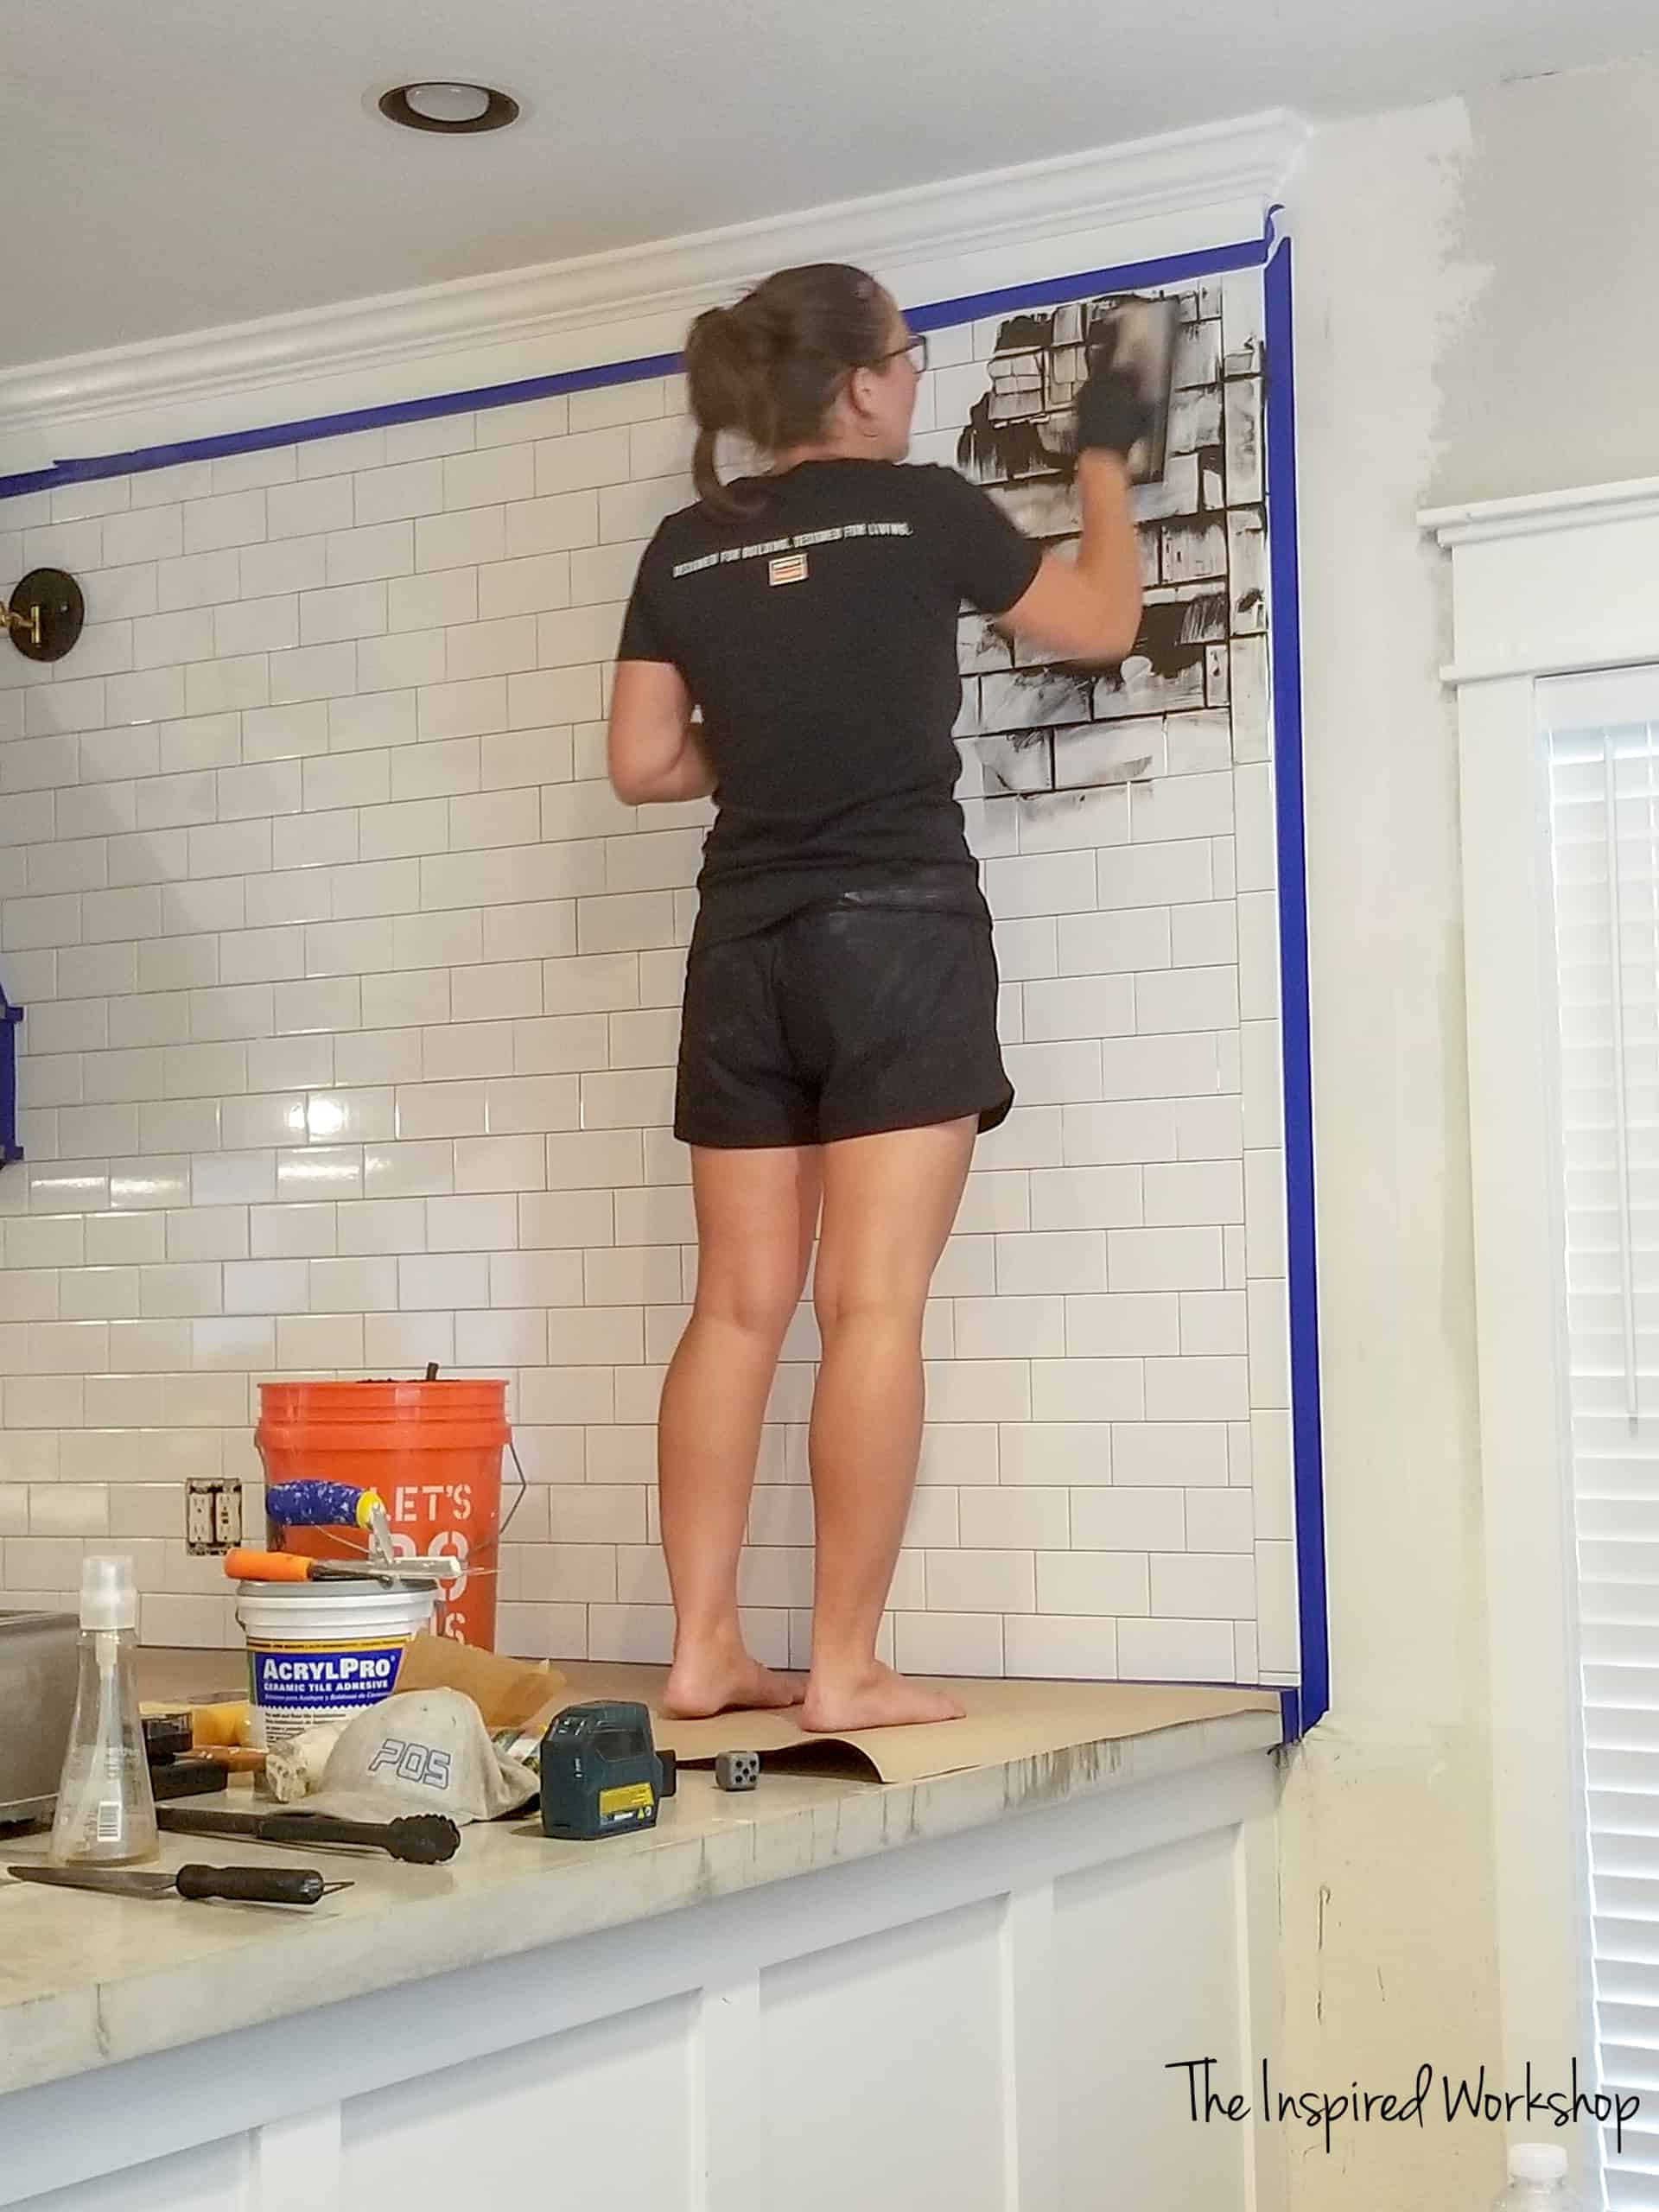
I just mixed up the grout as the package instructions stated and used the float to push it into the tile gaps. Using the wet sponge, I wiped and wiped and rinsed and rinsed!
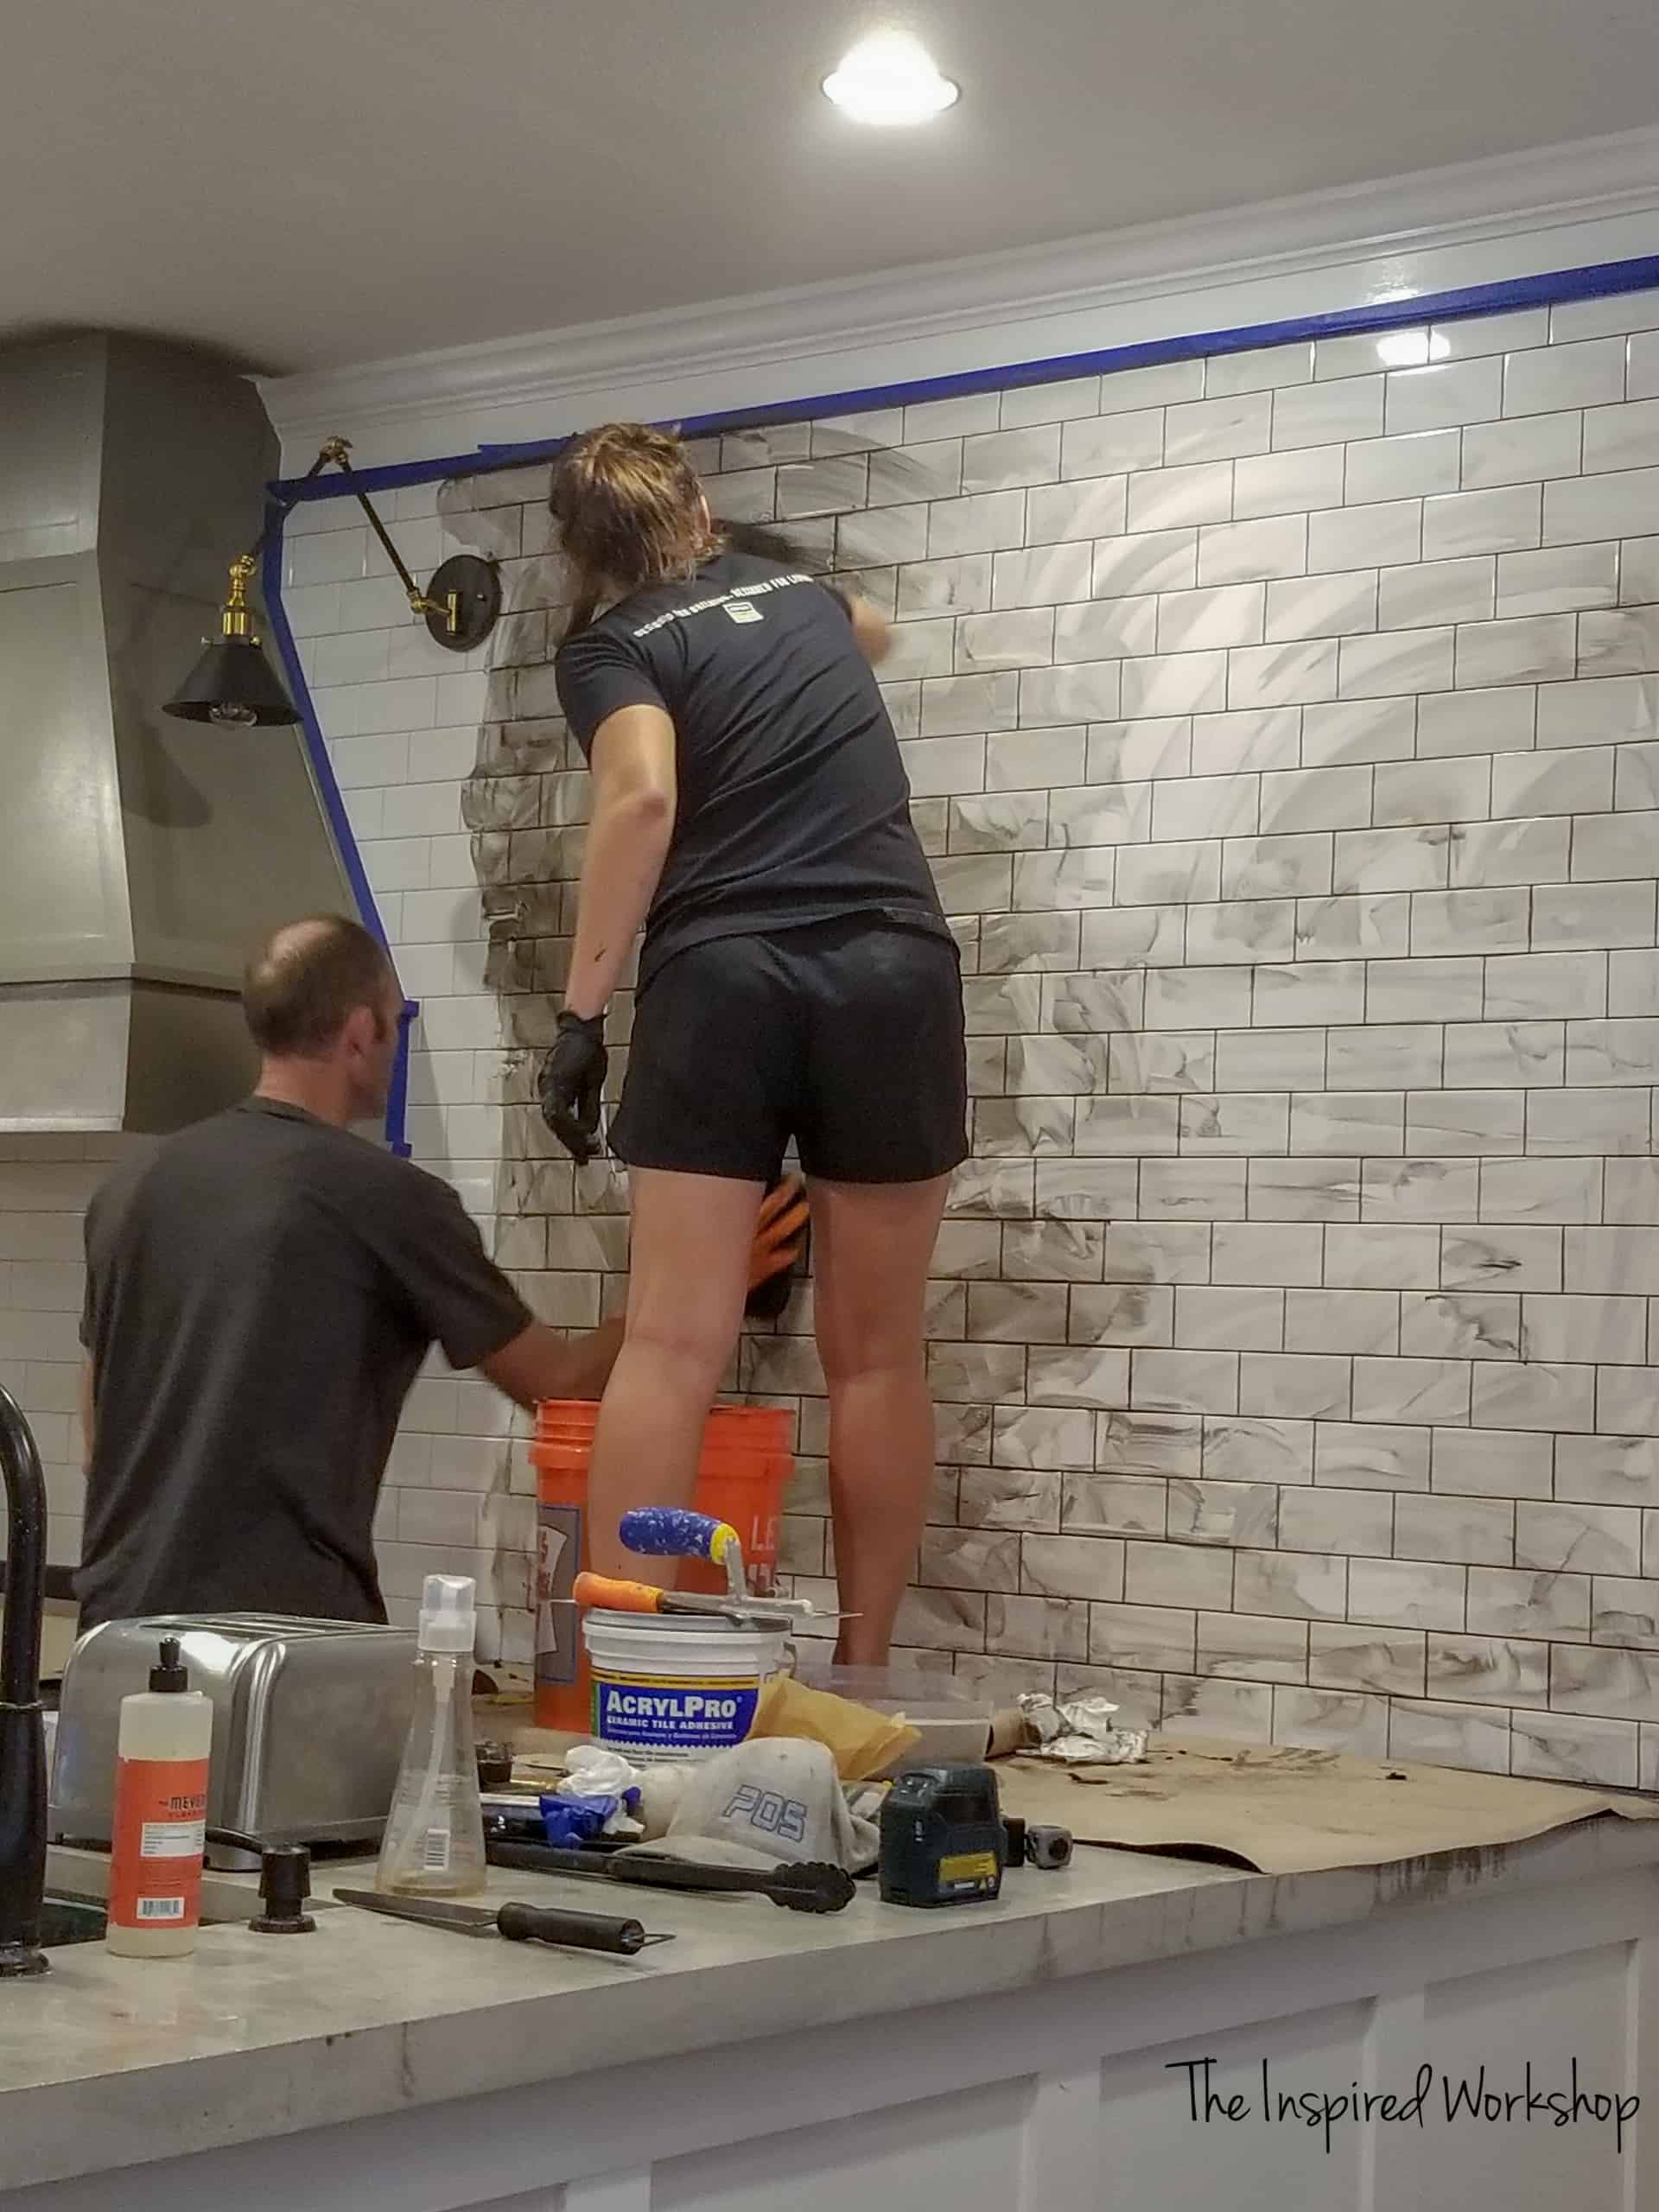
Brought in some backup when I thought there was no way it could be this hard! Lol! Then I realized if I took one swipe over it with the sponge, then let it slightly dry…I could easily wipe the tile down with a dry napkin and it acted almost like a dry erase board and came off pretty easily! It just wastes a lot of paper towels. I also made sure to rub the lines as well with the paper towel to make them straight and clean!
Boom, the wall is done! A new venture, complete! I can add tiling to my resume…I mean I won’t tell them how bad I was at it…just that I have done it! 😂
SOURCES
Swing Arm Lamps – They do not have the exact ones I purchased, but these are pretty darn close! I painted over the gold with black Rustoleum enamel paint
Shelf Brackets – From Hobby Lobby, make sure they are on sale 50% off (they will be half off every other week)
Shelves – 1×12 pine board cut to 42″ long and stained Old Barn Milk Paint in Weathered
Want the plans for the vent hood? Want to pour your own concrete countertops? Find all the kitchen renovation posts under Remodeling!
This was a big deal for me to try tiling for the first time! Have you tried any new ventures lately? Tell me all about it below!
Know anyone who would enjoy this post? SHARE IT with them!
[social_warfare]
Have a good one!

Want to save this post on How to Tile a Kitchen Wall for later? PIN it!
love it
Thank you so much!
Very good . thank you for sharing
Thank you so much!
Cara
So pretty! What did you do with the rest of the wall? I have a wall I want to tile, but never considered sectioning off part of it,
Hey Angela!
Thank you so much! The wall tile is edged with finished edge tiles (you can see the vertical row in the photos), and then the wall is just normal wall after that! Lol! I don’t know if that makes sense or not, but hopefully it does! I caulked the edge as well so it looks finished!
Hope that helps! Thanks for stopping by! Have a good one!
Cara