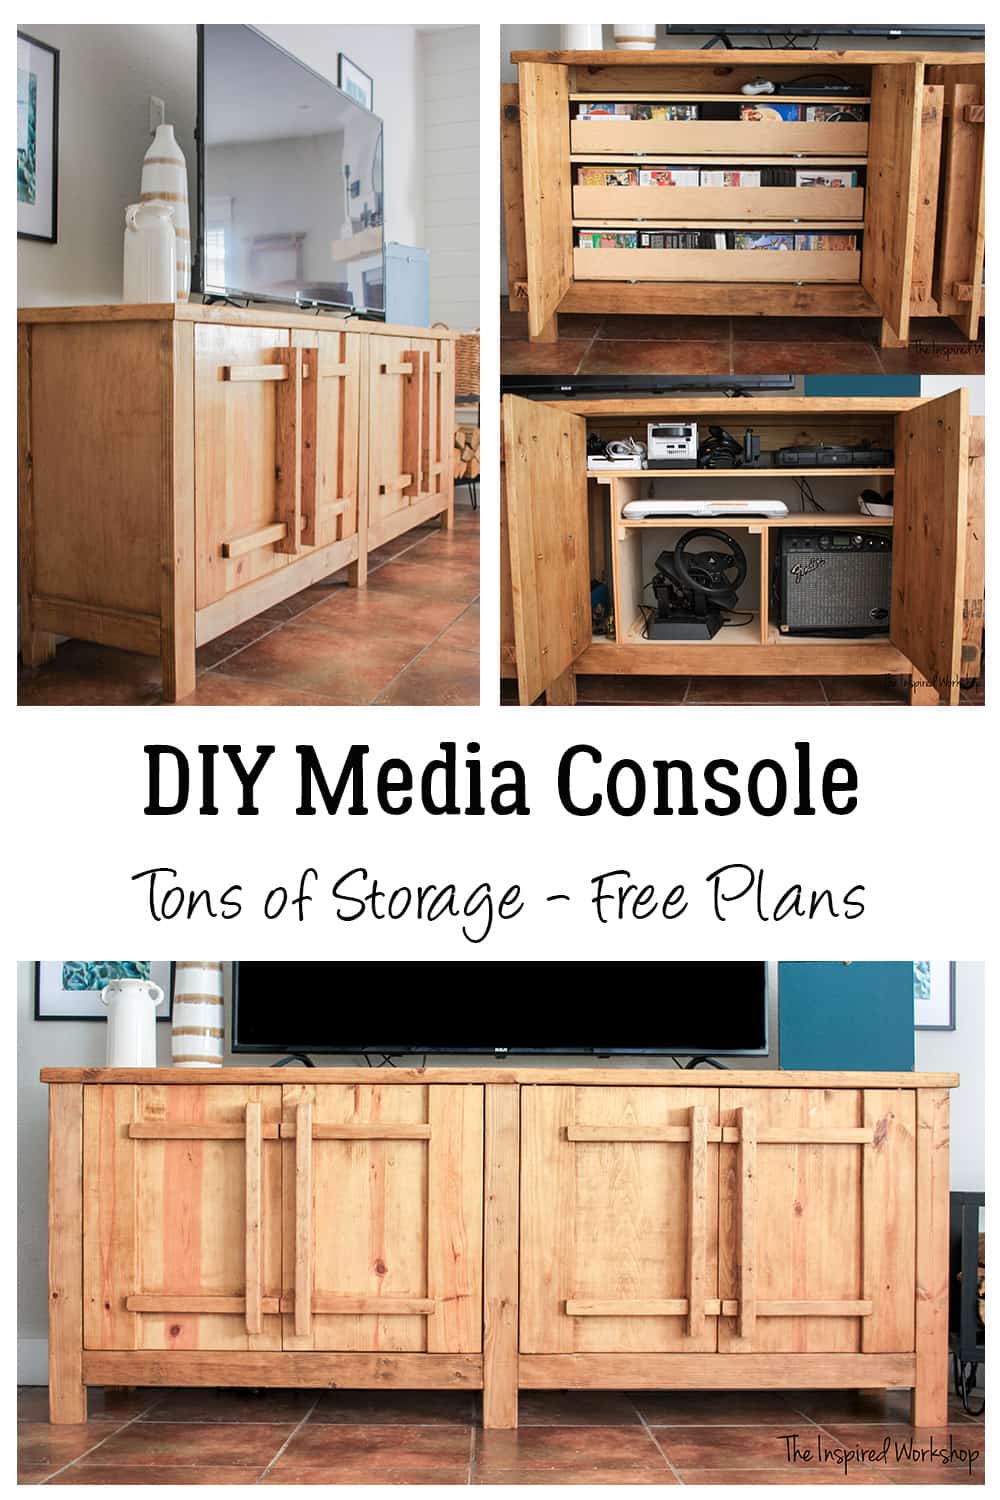
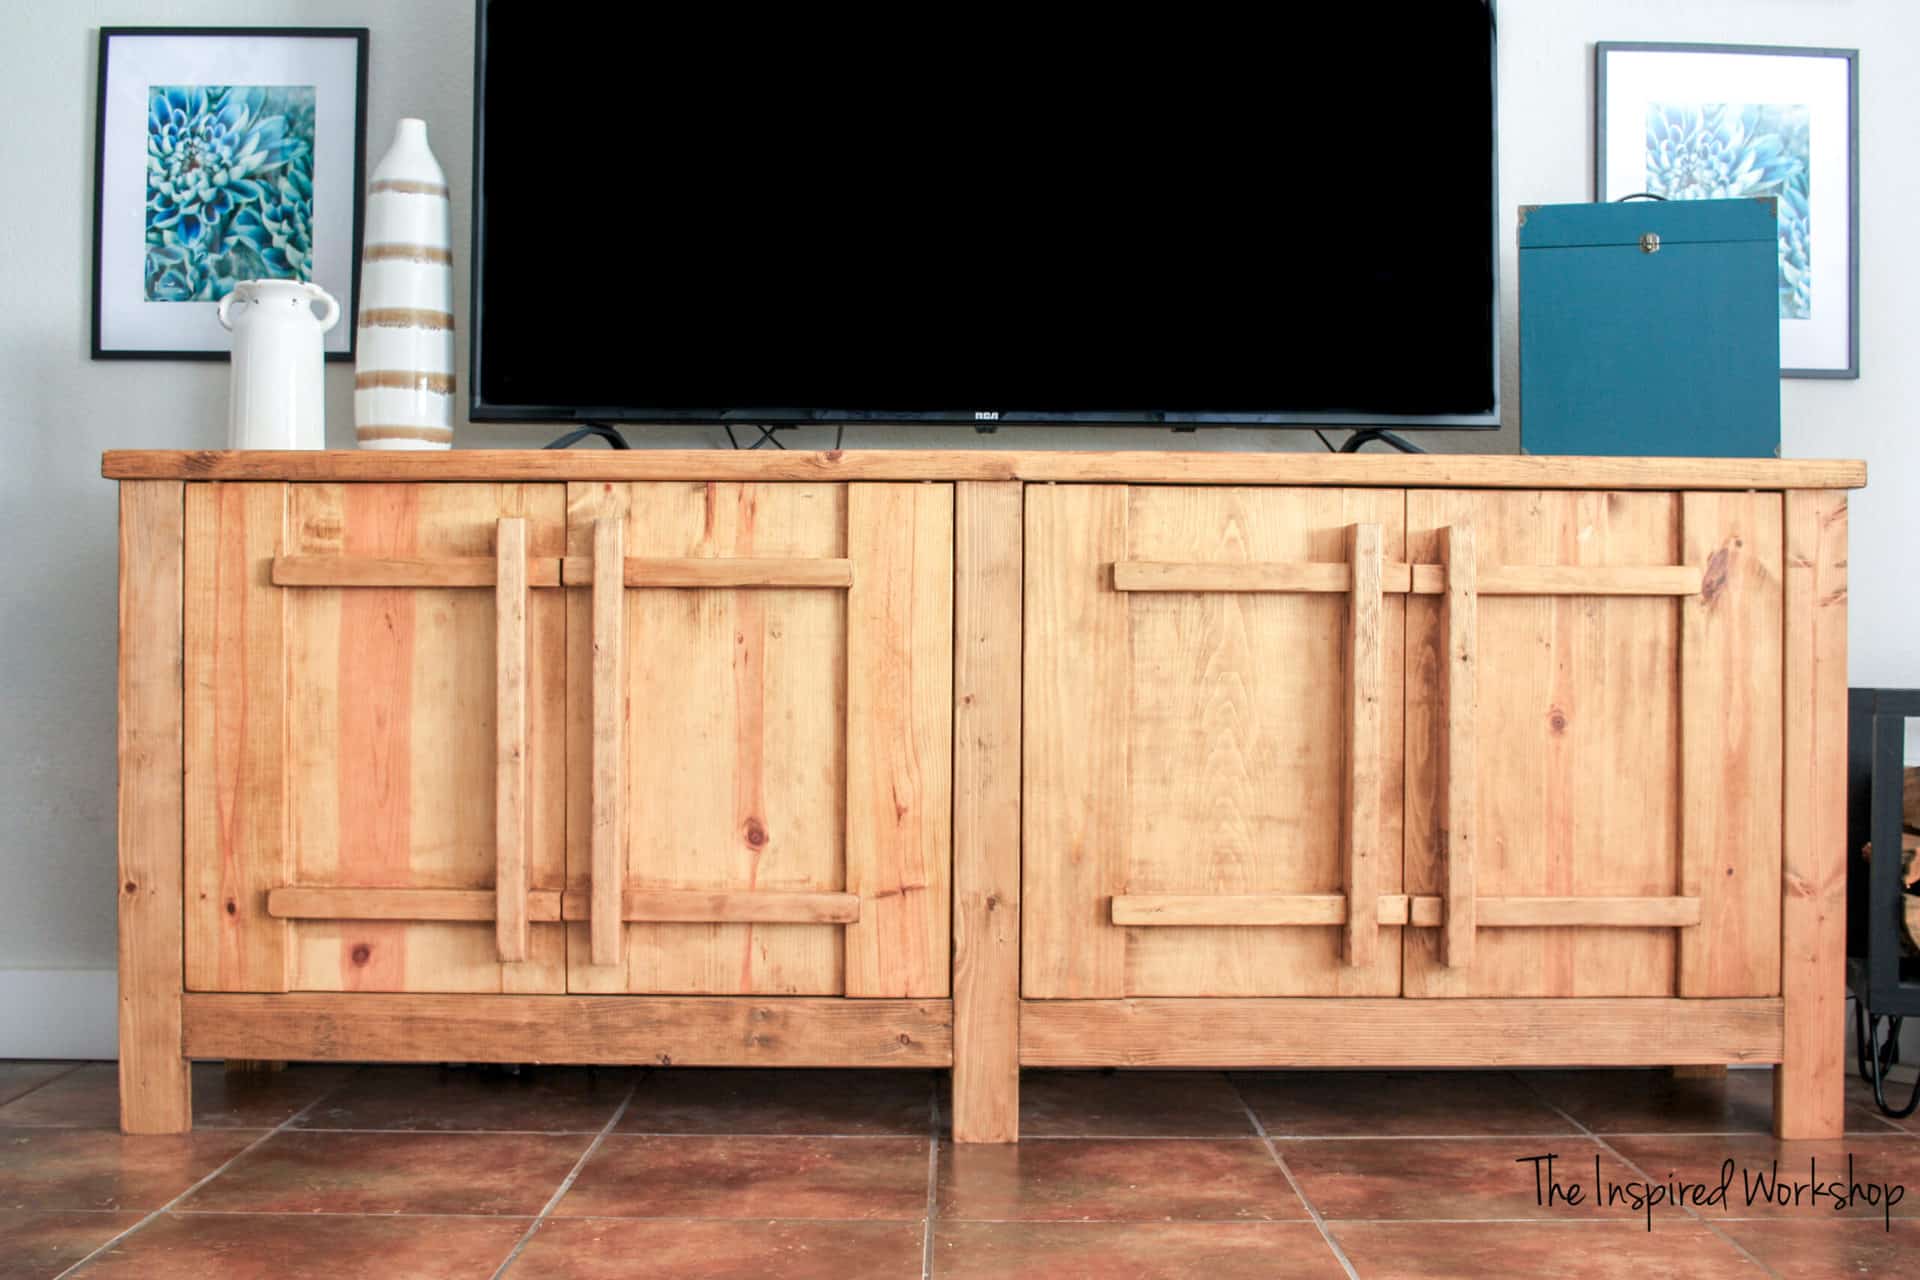
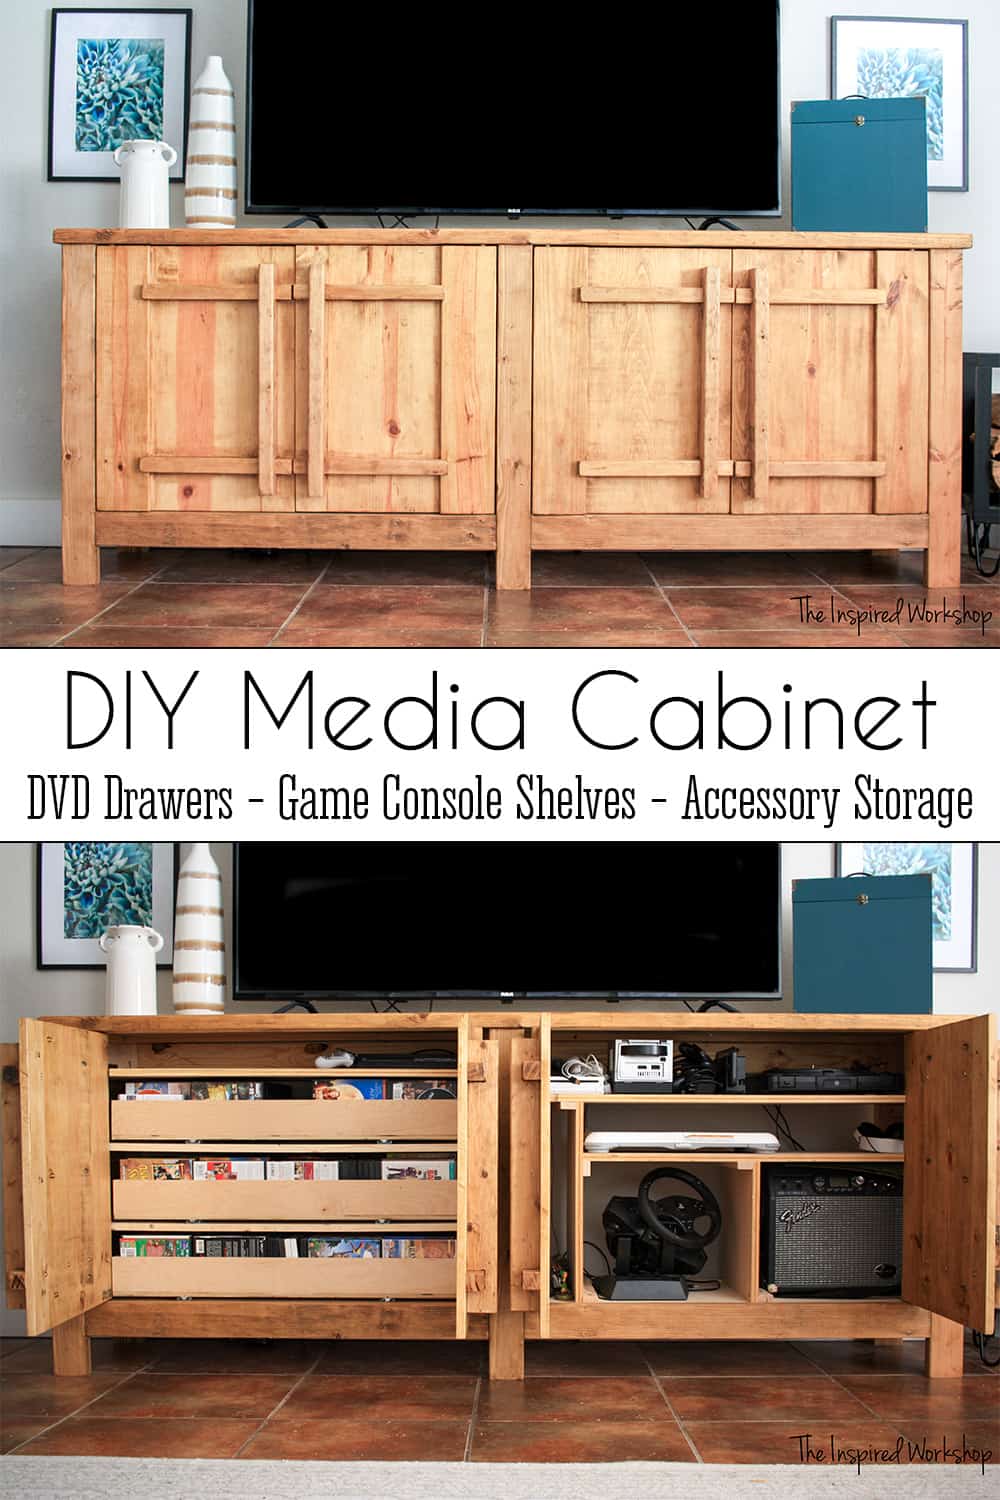
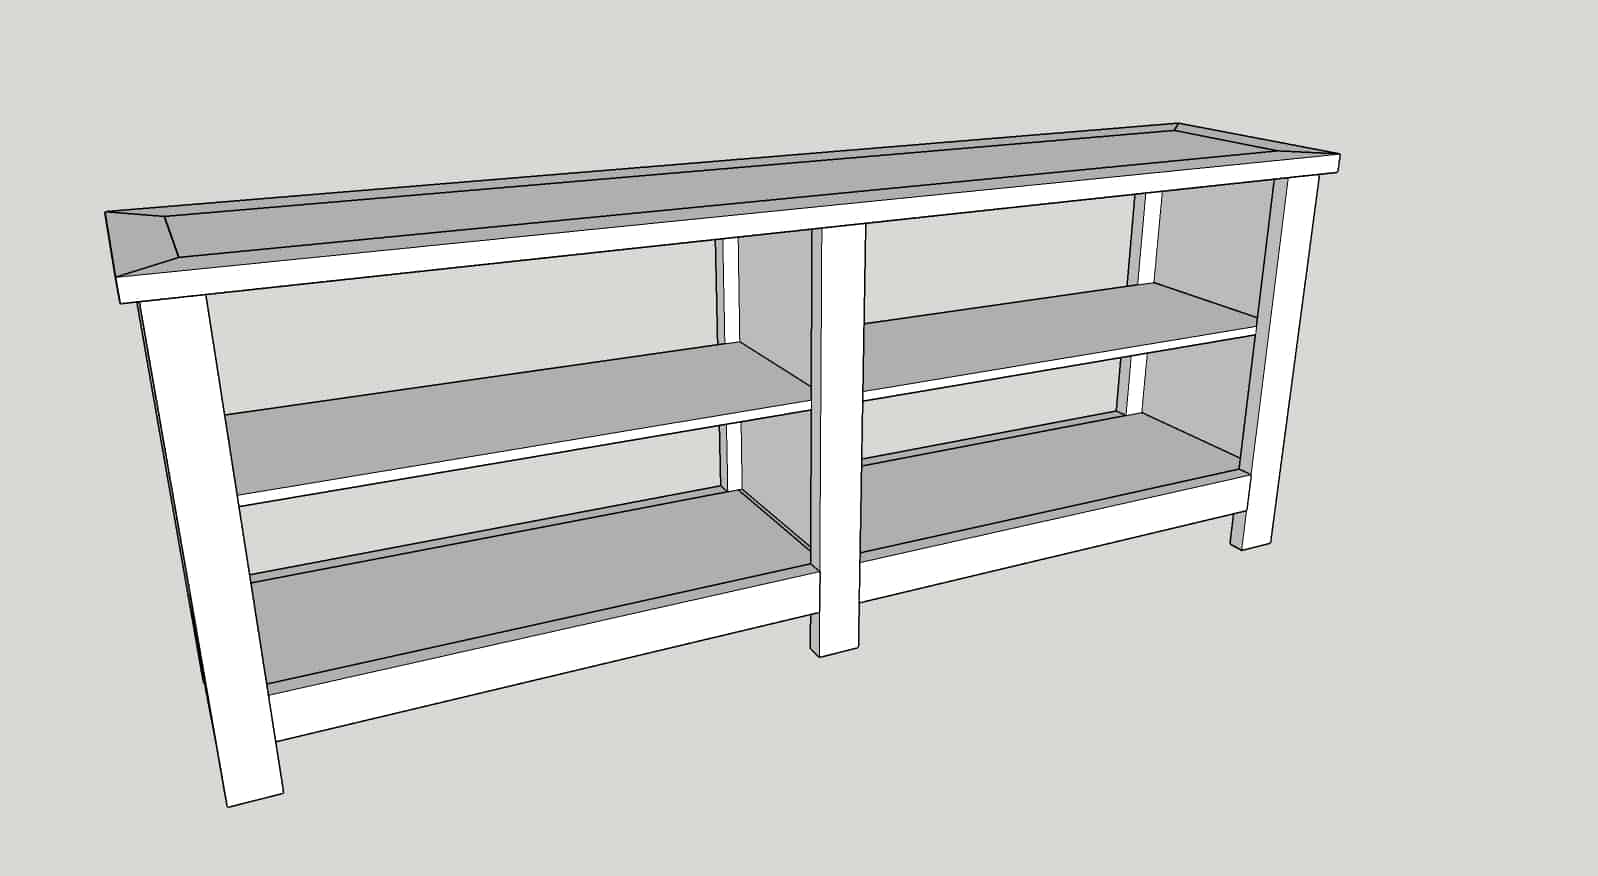
DIY TV Stand / Media Console
This DIY TV stand is the furniture dreams are made of! The exterior of this media cabinet is absolutely gorgeous, and the interior can house everything needed to watch TV, play video games, or watch movies! This media cabinet has so much storage that you can easily build yourself!
This is some funny shiz I tell you! This DIY TV Stand was supposed to be posted on the 4th of January! 😅 When I pulled the draft up, I had a GREAT LAUGH at what I felt coming into 2020…if only I would have known!!! OY!!!😂😆😂 This is what it said:
“Happy New Year! Can you believe another year has FLOWN by? I cannot…though I cannot say I am upset about 2019 being over either! Lol! I am excited to see what 2020 has in store and it is starting off pretty great since I was able to complete today’s beautiful DIY TV stand/media console!”
Bwahahaha!! I can’t believe I thought 2020 was going to be GREAT and I was happy 2019 was over…what I would do to have 2019 back now!!😂 I have had enough of you Corona, feel free to leave ANY DAY NOW! Lol!
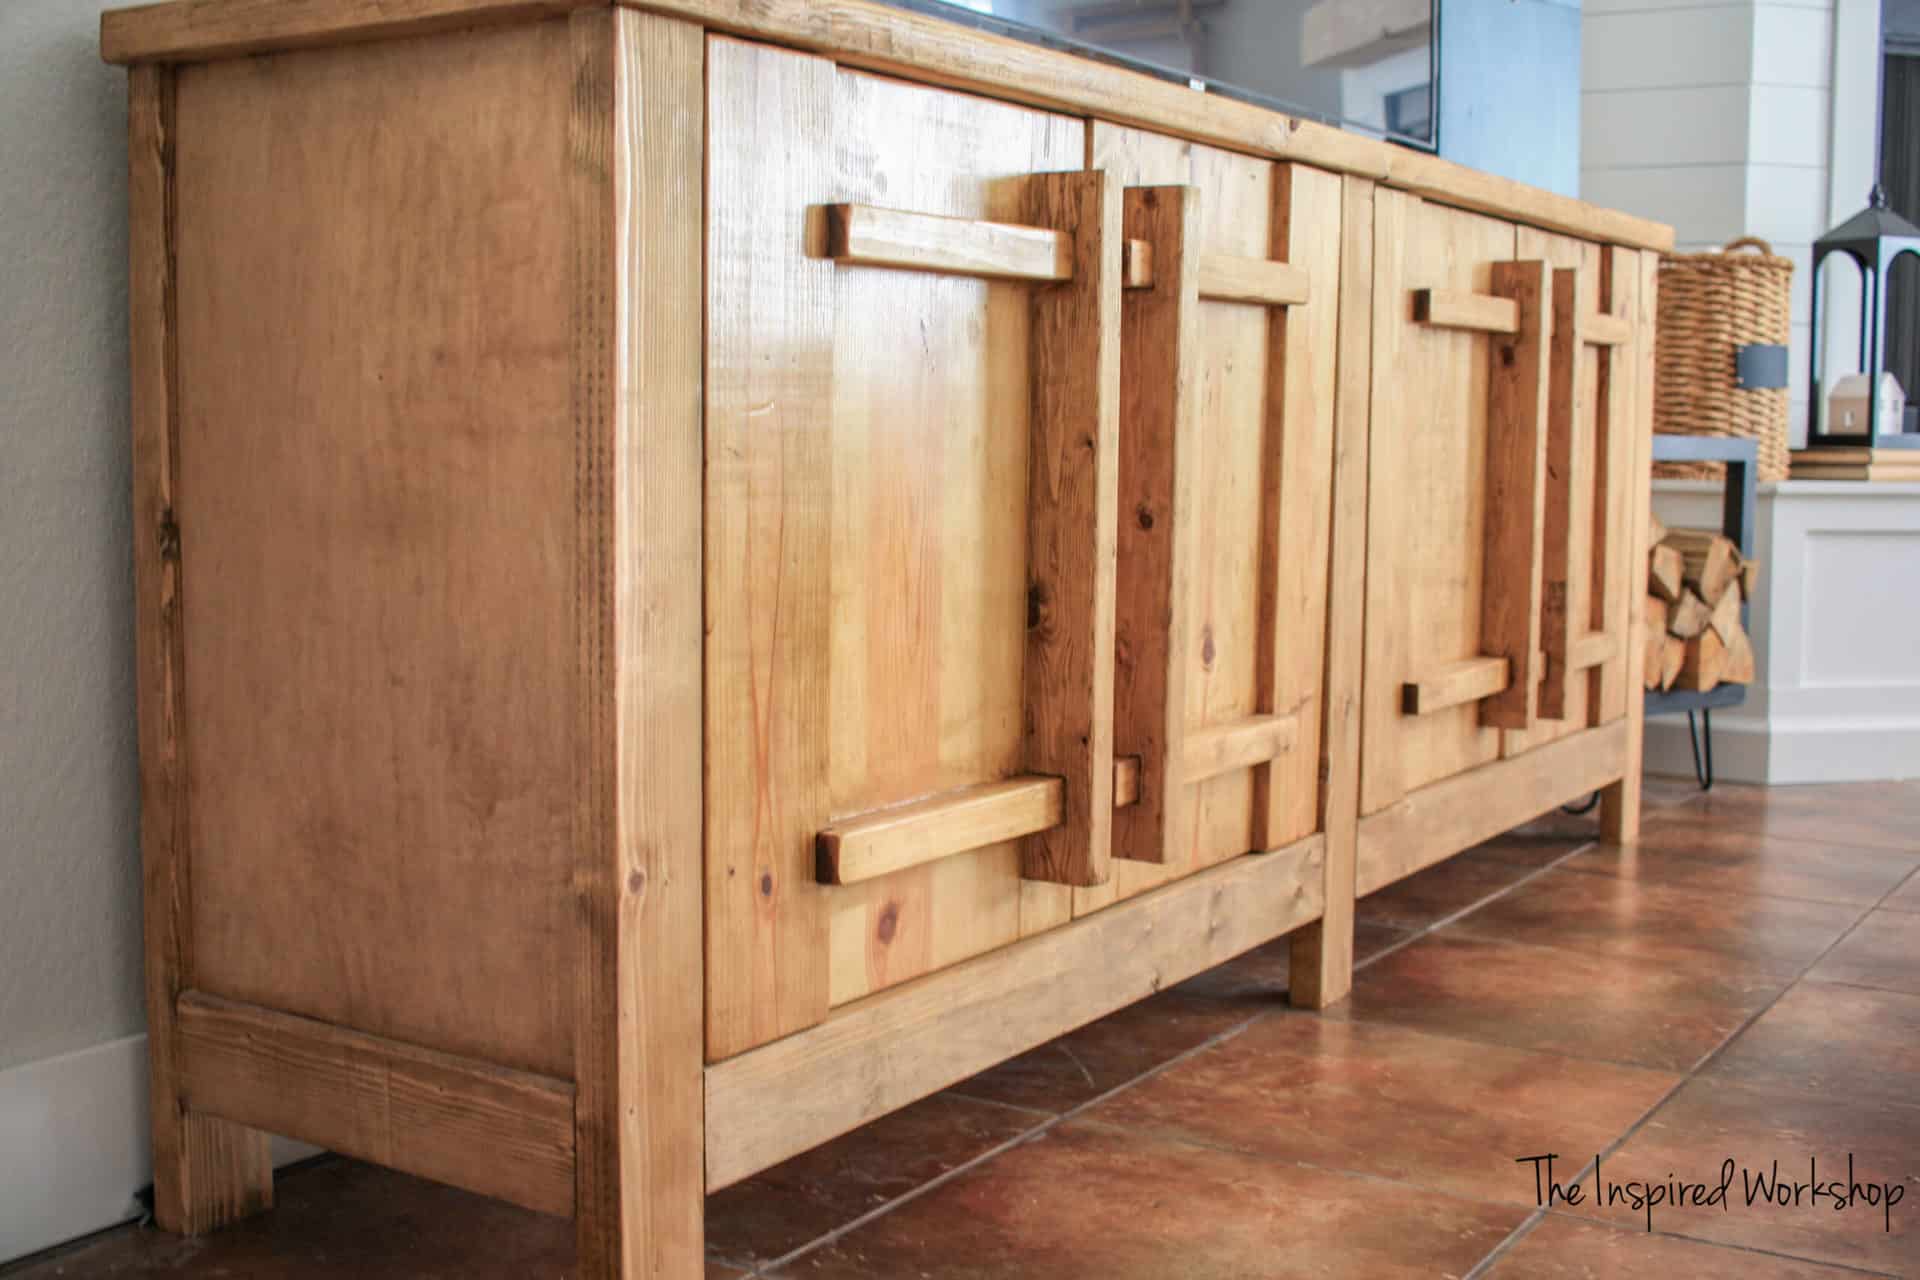
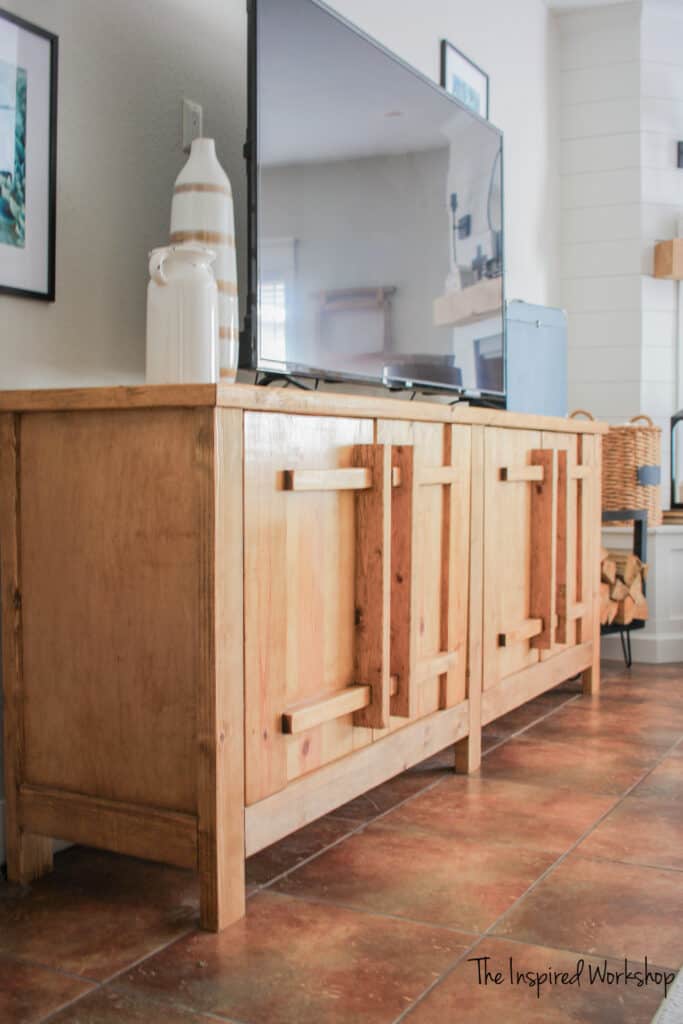
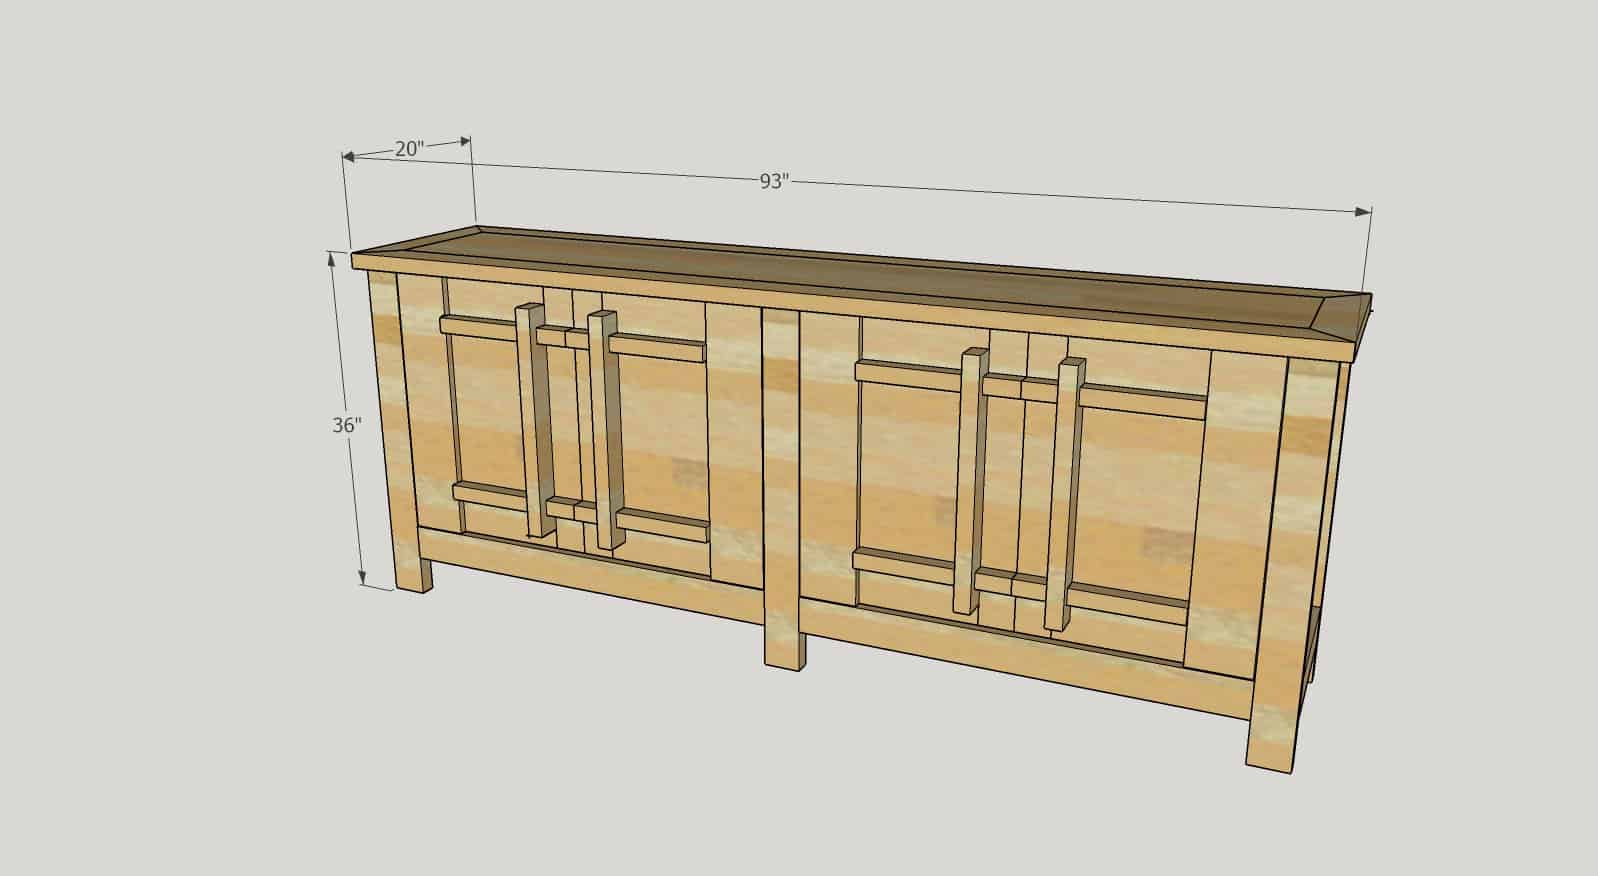
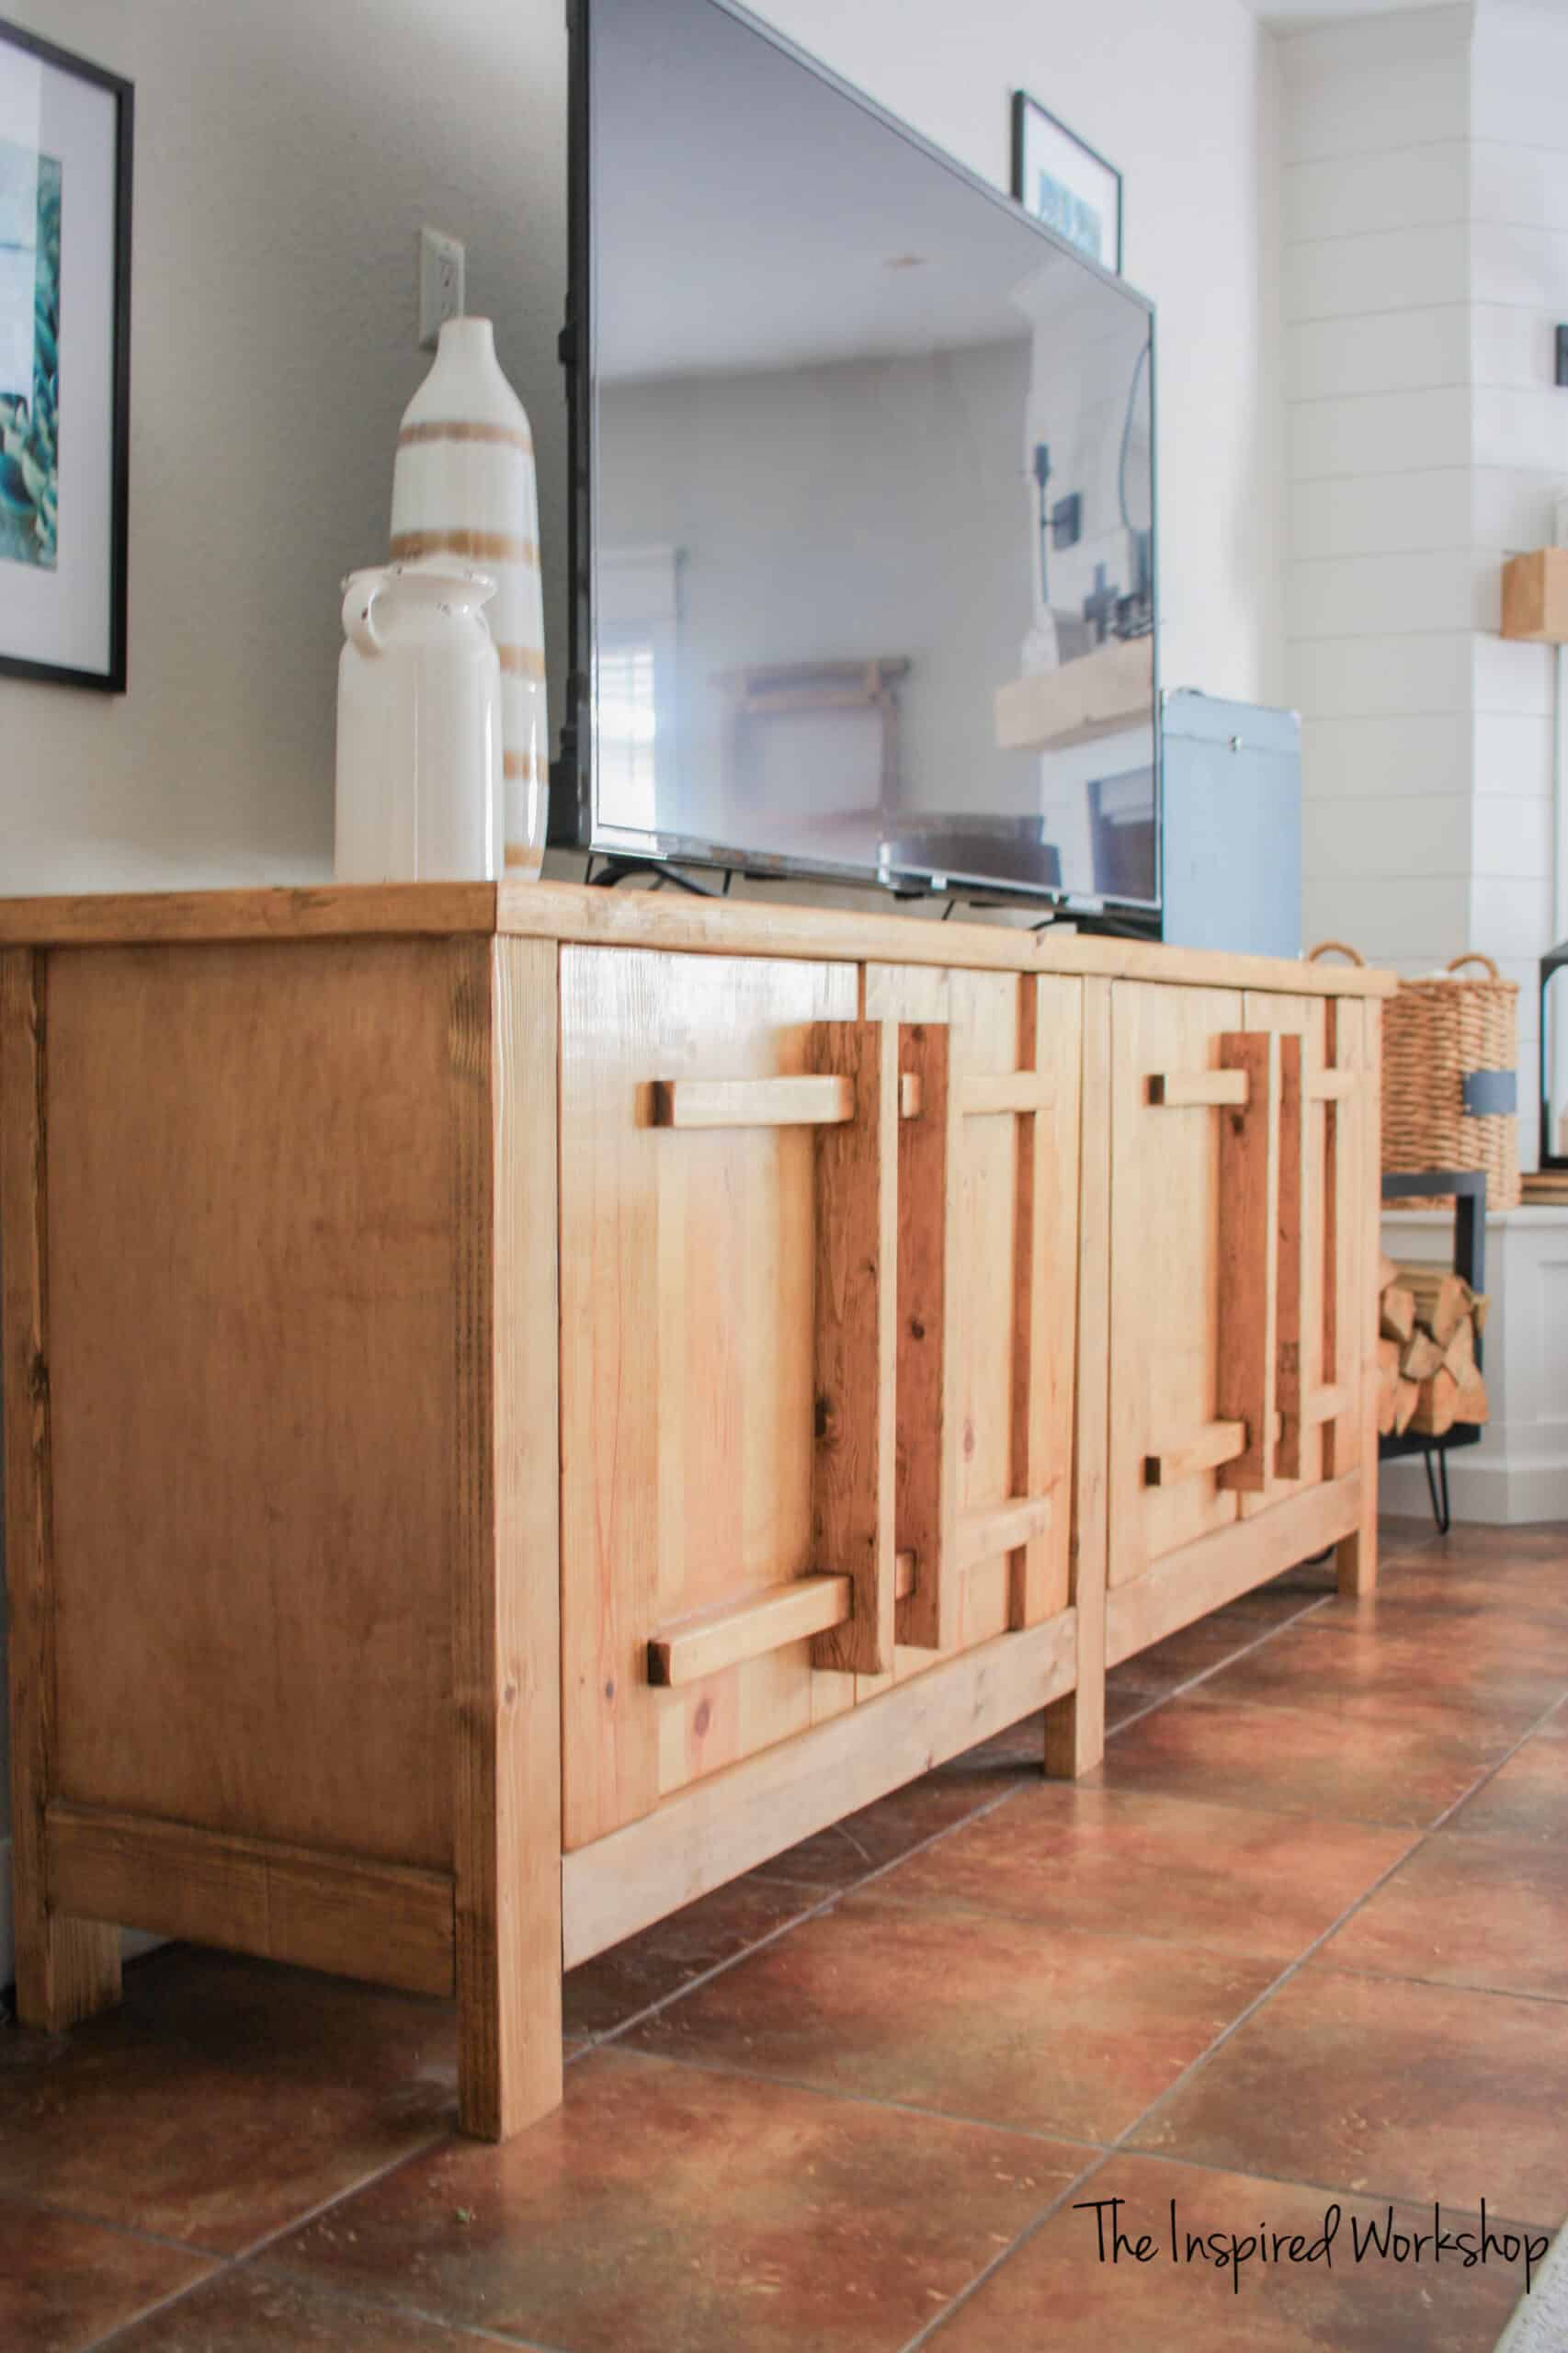
Anyway, enough about that…isn’t that the most beautiful, brawny thing you have ever seen? 😍 (Don’t worry, that strange pinkish stripe isn’t so obvious in real life! Lol!) I saw a media console just like this over at RH.com and I could not help but copy them and build it! I LOVE this thing and am so happy to not only have this LARGE version available but I will also have plans for a smaller one as well Friday!
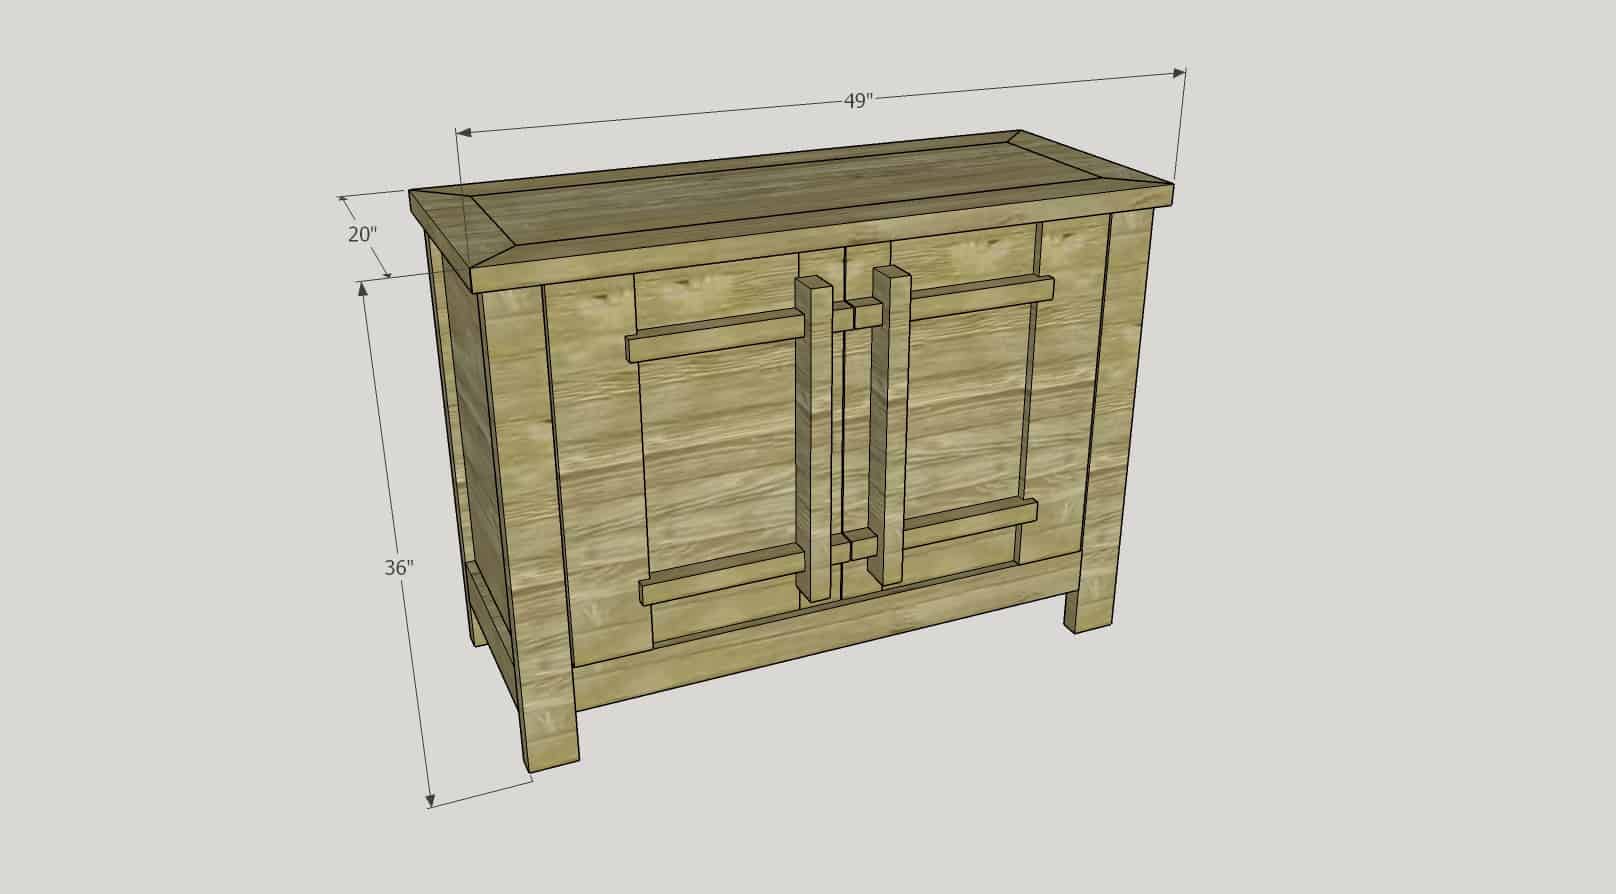
I know that not everyone has 93″ to spare on a living room wall for this DIY tv stand but the smaller version will only require 49″ of space! Woohoo!
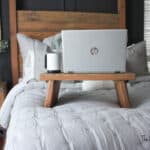
I also have a few other projects that you may want to take a look at if this DIY TV stand is too large for your space or if you’d just like something a little different! Check out this DIY Industrial Media Console if you like the wood and metal look without having to know how to weld! Or if you are looking for a slim option to hang your tv above because you are tight on space, this DIY Slim Truss Console Table would work great!
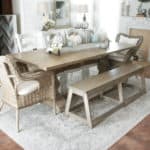
This herringbone door buffet could definitely be used as a media console if you wanted it as well!
I love that it looks a little rustic farmhouse, but at the same time has such a unique modern look! I am completely smitten with this piece of furniture! 🤩 First, it was gnomes throughout the holidays, now it is my DIY media console! Wow, it really doesn’t take a lot to steal my heart…my hubby better watch out!😂😜
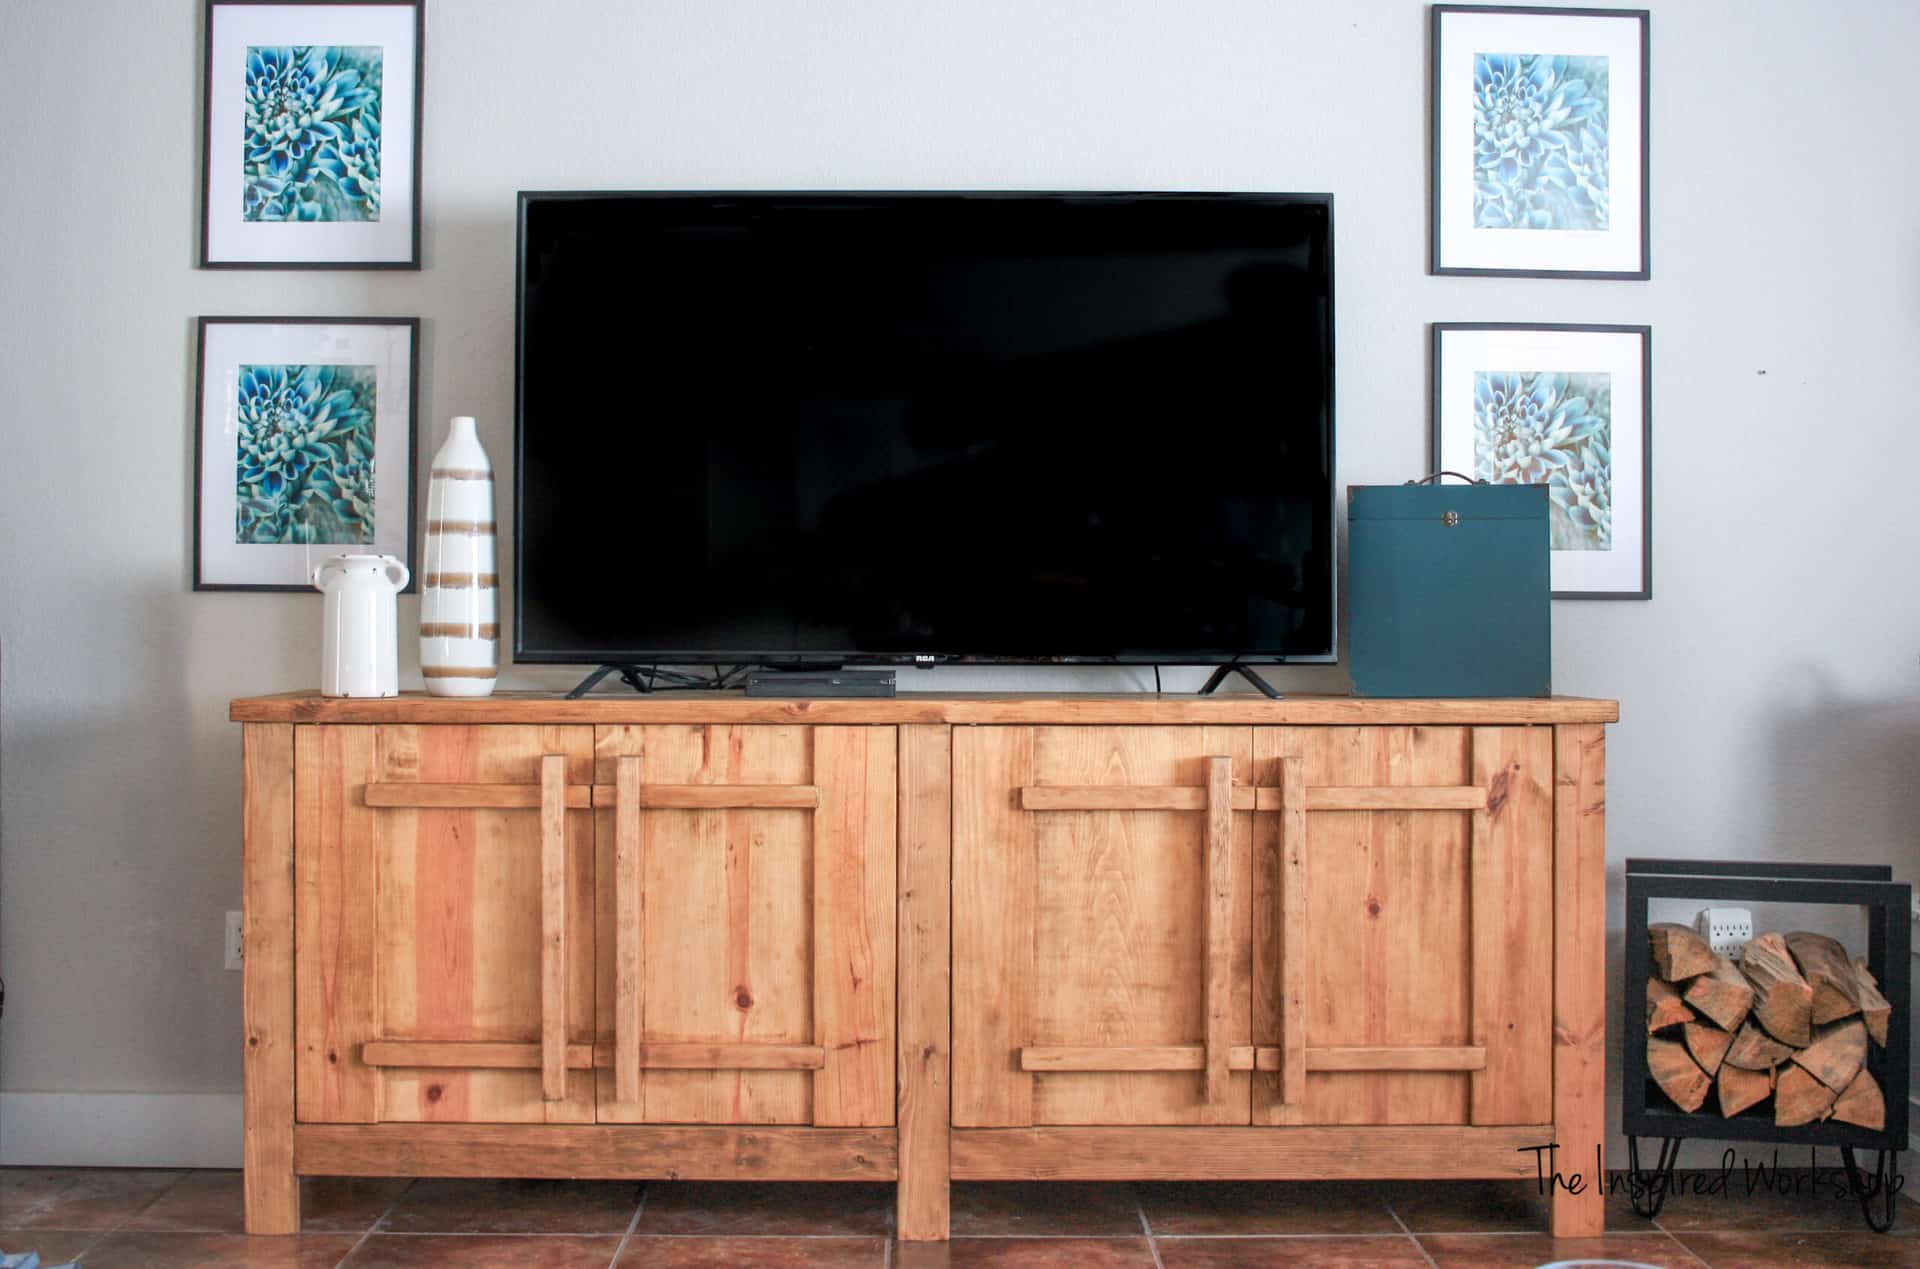
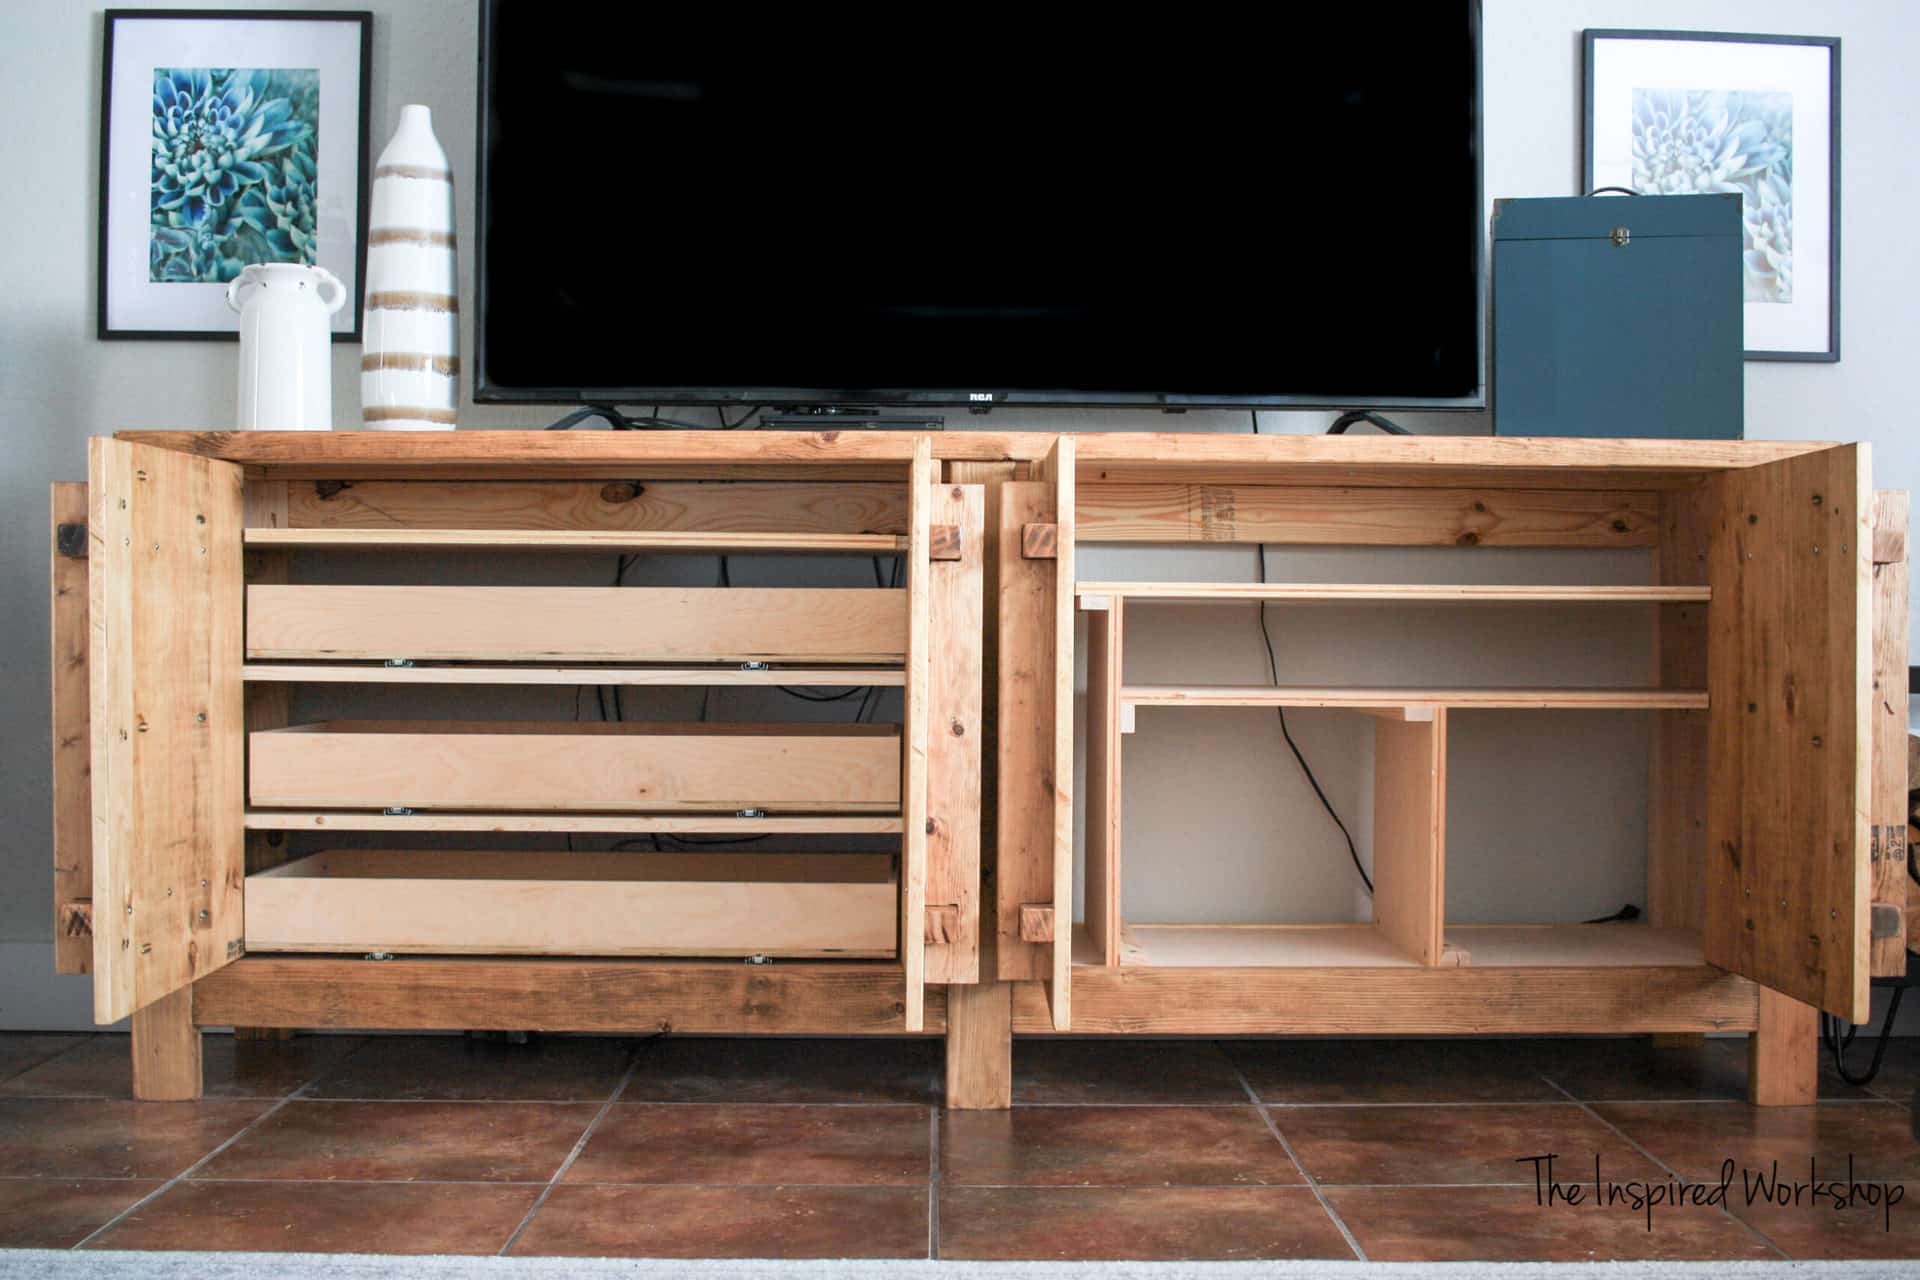
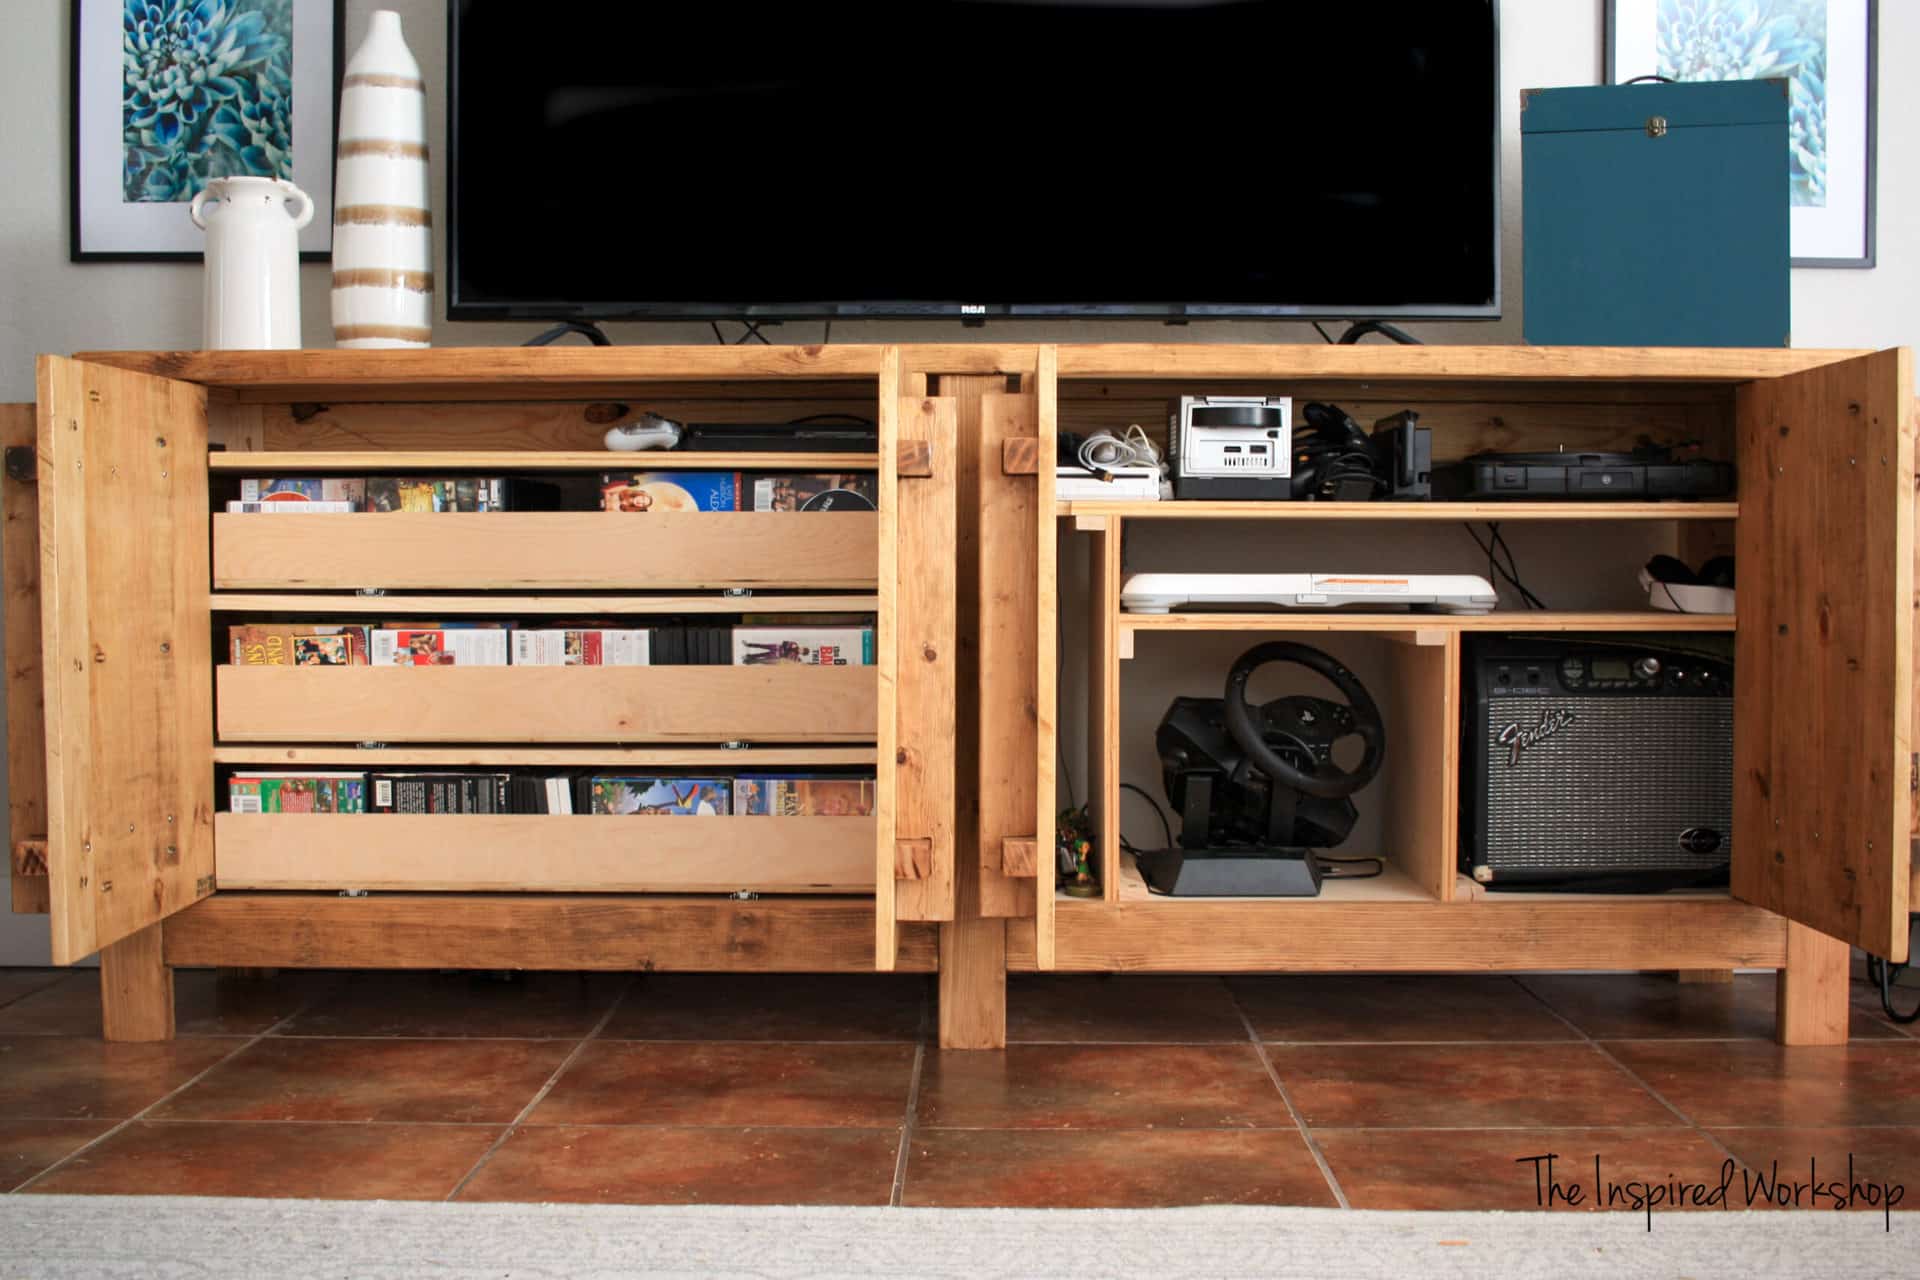
Not only is it beautiful on the outside, but it’s also beautiful on the inside as well…you know where it normally doesn’t count on a piece of furniture! Haha! It has all the media storage you need, DVD and game drawers, and shelves that hold all the accessories and consoles perfectly!
(Don’t mind that the back isn’t on yet! Lol! Or that I don’t have pictures in those frames either!😂🙈)
Enough about me and my love affairs…would you like to build one? I do, I do!
Here are the downloadable plans:
If you love this DIY tv stand/media console but you don’t have time to build it now, make sure and PIN IT so you can find it later!
Gathering Supplies to Build the DIY TV Stand
Building your own DIY media console as opposed to buying it from RH will save you a TON! Lol! The total cost of supplies at current lumber prices is right around $300! Now that is a steal compared to the 3200 they charge if you are not a member, plus shipping, but if you want to pay your membership fee of 150 bucks, you can get it for the low, low cost of 2400 plus shipping! Lol!
Materials for DIY TV Stand:
**Amazon links below are affiliate links! Any purchases made after clicking an affiliate will pay me a small percentage of your purchase amount at no extra cost to you! And I really appreciate it!😘 Other links are provided to help you but are not affiliate links!👍
- 2 – 3/4″ – 4×8 sheets of plywood
- 1 – 1/2″ 4×8 sheet of plywood
- 7 – 2x4x10
- 1 – 2x6x10
- 1 – 1x12x10
- 1 – 1x4x10
- 2 – 1x5x8
- 3 – 1x2x8
- 2 – 2x2x8
- 1 – 2x3x8
- 2 – 1/4″ 2×4 sheet of plywood
- Kreg Jig
- Wood glue
- 2 1/2″ pocket hole screws
- 1 1/4″ pocket hole screws
- 1″ pocket hole screws
- 2″ flat head screws – This is my FAVORITE brand of wood screw ever!
- saw
- drill
- jig saw or scroll saw
- 1/2″ oak dowels for the hinges
- 5/8″ pine dowel
- 1/2″ copper pipe for hinges
- epoxy
- pipe cutter
Cut List for DIY TV Stand:
- 2 – 2×4 @ 93″ mitered at 45 degrees off square, ends not parallel (front and back of the top frame)
- 2 – 2×4 @ 20″ mitered at 45 degrees off square, ends not parallel (side of the top frame)
- 6 – 2×4 @ 40 1/2″ (front and back rails)
- 6 – 2×4 @ 34 1/2″ (legs)
- 3 – 2×4 @ 16″ (side and middle rails)
- 4 – 2×6 @ 26 3/4″ (doors)
- 4 – 1×12 @ 26 3/4″ (doors)
- 4 – 1×4 @ 26 3/4″ (doors)
- 8 – 2×2 @ 15 1/2″ (doors)
- 4 – 2×3 @ 22 3/4″ (door handles)
- 1 – 3/4″ piece of plywood @ 13″ x 86″ (top)
- 3 – 3/4″ piece of plywood @ 16″ x 27″ (sides and middle)
- 1 – 3/4″ piece of plywood @ 16″ x 87″ (bottom)
- 2 – 1/4″ pieces of plywood @ 24″ x 43″ (back) you can route a space or just staple on
Optional Interior – Wood is accounted for in the Materials list
Interior left:
- 8 – 1×2 @ 15 3/4″ for undershelf braces
- 1 – 3/4″ piece of plywood @ 15 3/4″ x 43 5/8″ with notches cut on the front edge
- 3 – 1/2″ pieces of plywood @ 15 3/4″ x 36″ (drawer bottoms)
- 6 – 1/2″ pieces of plywood ripped down to 3 1/2″ wide x 36″ long (drawer fronts and backs)
- 6 – 1/2″ pieces of plywood ripped down to 3 1/2″ wide x 14 3/4″ long (drawer sides)
- 4 – 1×5 @ 43 5/8″
Interior Right:
- 8 – 1×2 @ 15 3/4″ undershelf braces
- 1 – 3/4″ piece of plywood @ 15 3/4″ x 43 5/8″ with notches cut on the front edge
- 1 – 3/4″ piece of plywood @ 15 3/4″ x 20″ (first vertical board)
- 1 – 3/4″ piece of plywood @ 15 3/4″ x 36 5/8″ with a notch cut in right front edge (second horizontal shelf)
- 1 – 3/4″ piece of plywood @ 15 3/4″ x 14″ (second vertical board)
Option 2: One shelf on each side
- 2 – 3/4″ pieces of plywood @ 15 3/4″ x 43 5/8″ with notches cut on front edges
If you want the free downloadable plans, click the link and enter your email, the plans will be sent straight to your inbox! DIY TV Stand Printable Plans
Building the DIY TV Stand
I used the Kreg Jig to build this DIY TV stand, so let me share a little info on how to use the Kreg Jig just in case you are new here!
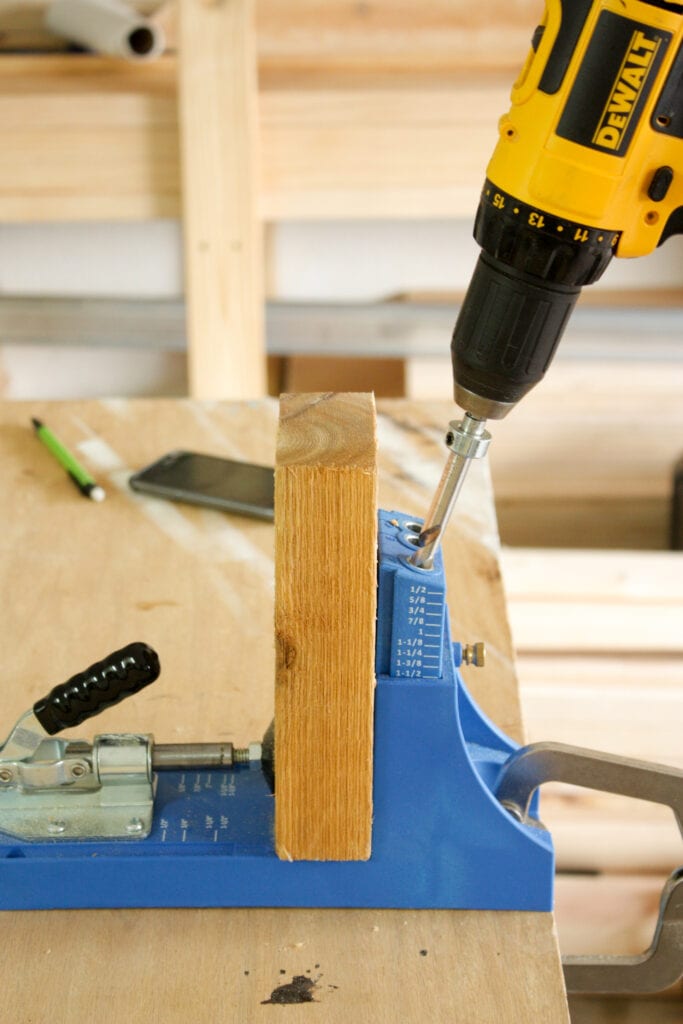
Since we are using 2x wood (2x4s) the actual width of the 2x4s is 1 1/2″, so we are going to set the Kreg Jig to 1 1/2″.
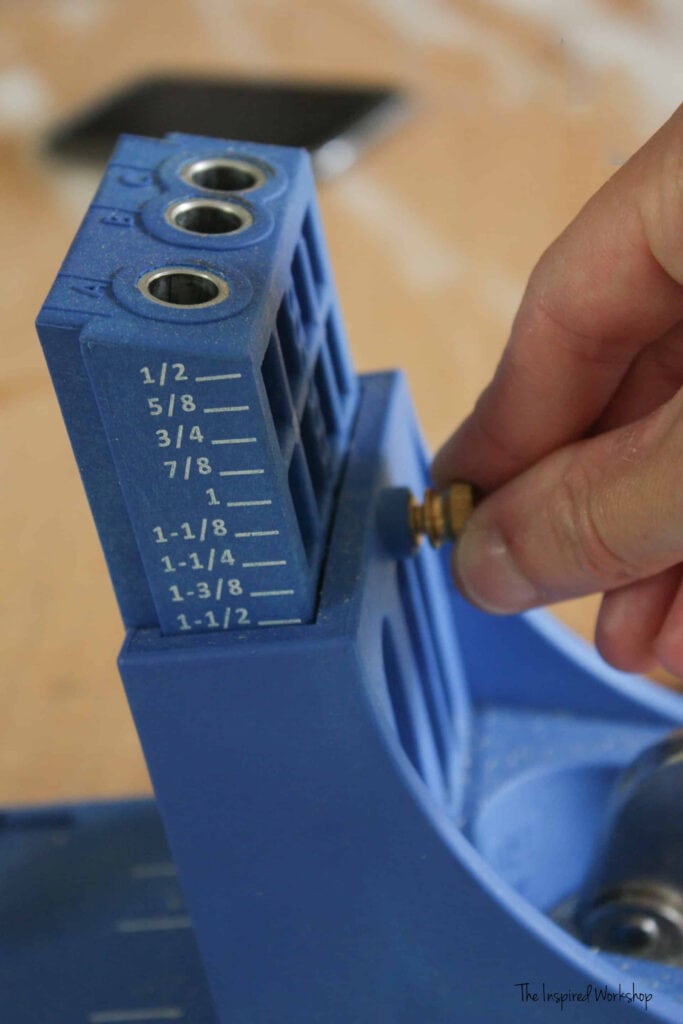
Then we will set the drill bit to the same depth of 1 1/2″.
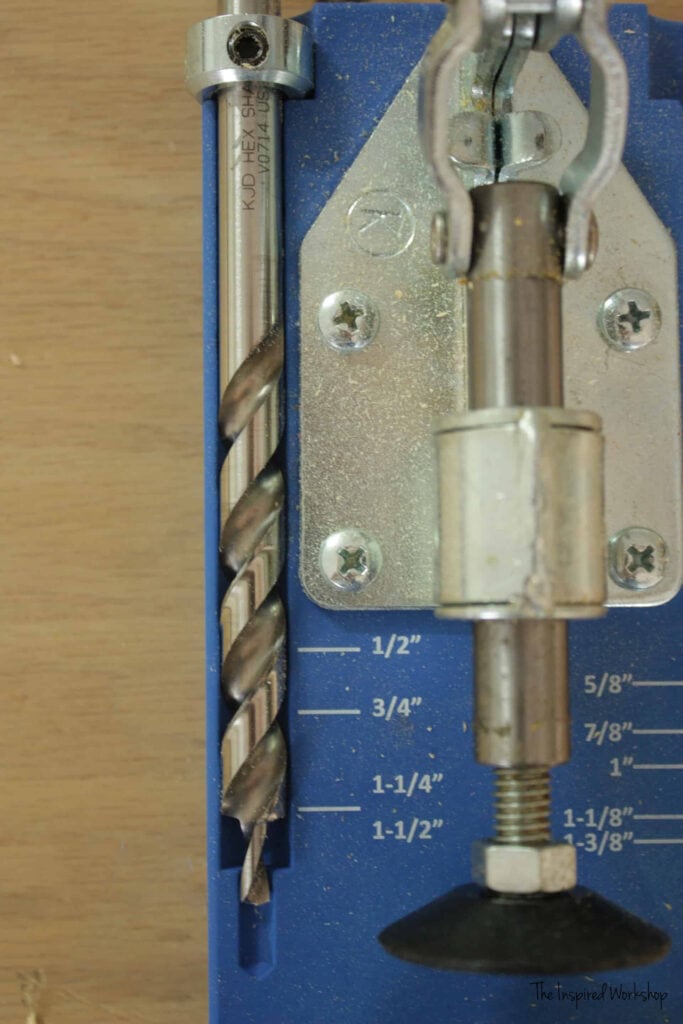
Now clamp your board, and drill your holes!
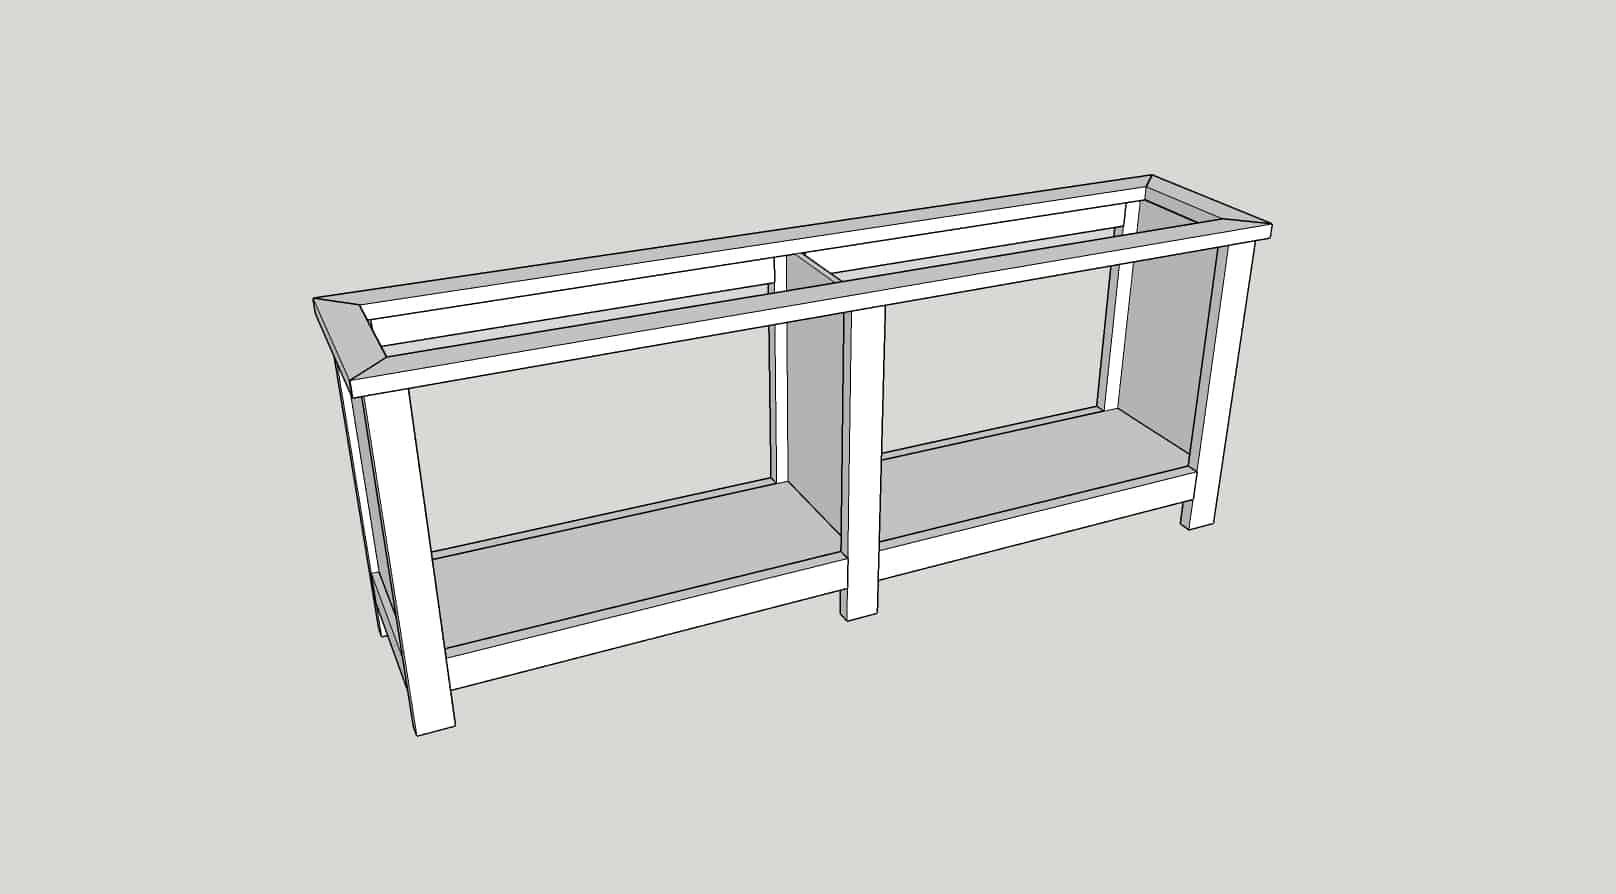
Building the back frame of the DIY TV Stand / Media Console
You can see in the photos below where you need to place the pocket holes.
You will want to use wood glue on ALL the joints during the build and any 2x wood, you will use 2 1/2″ pocket hole screws!
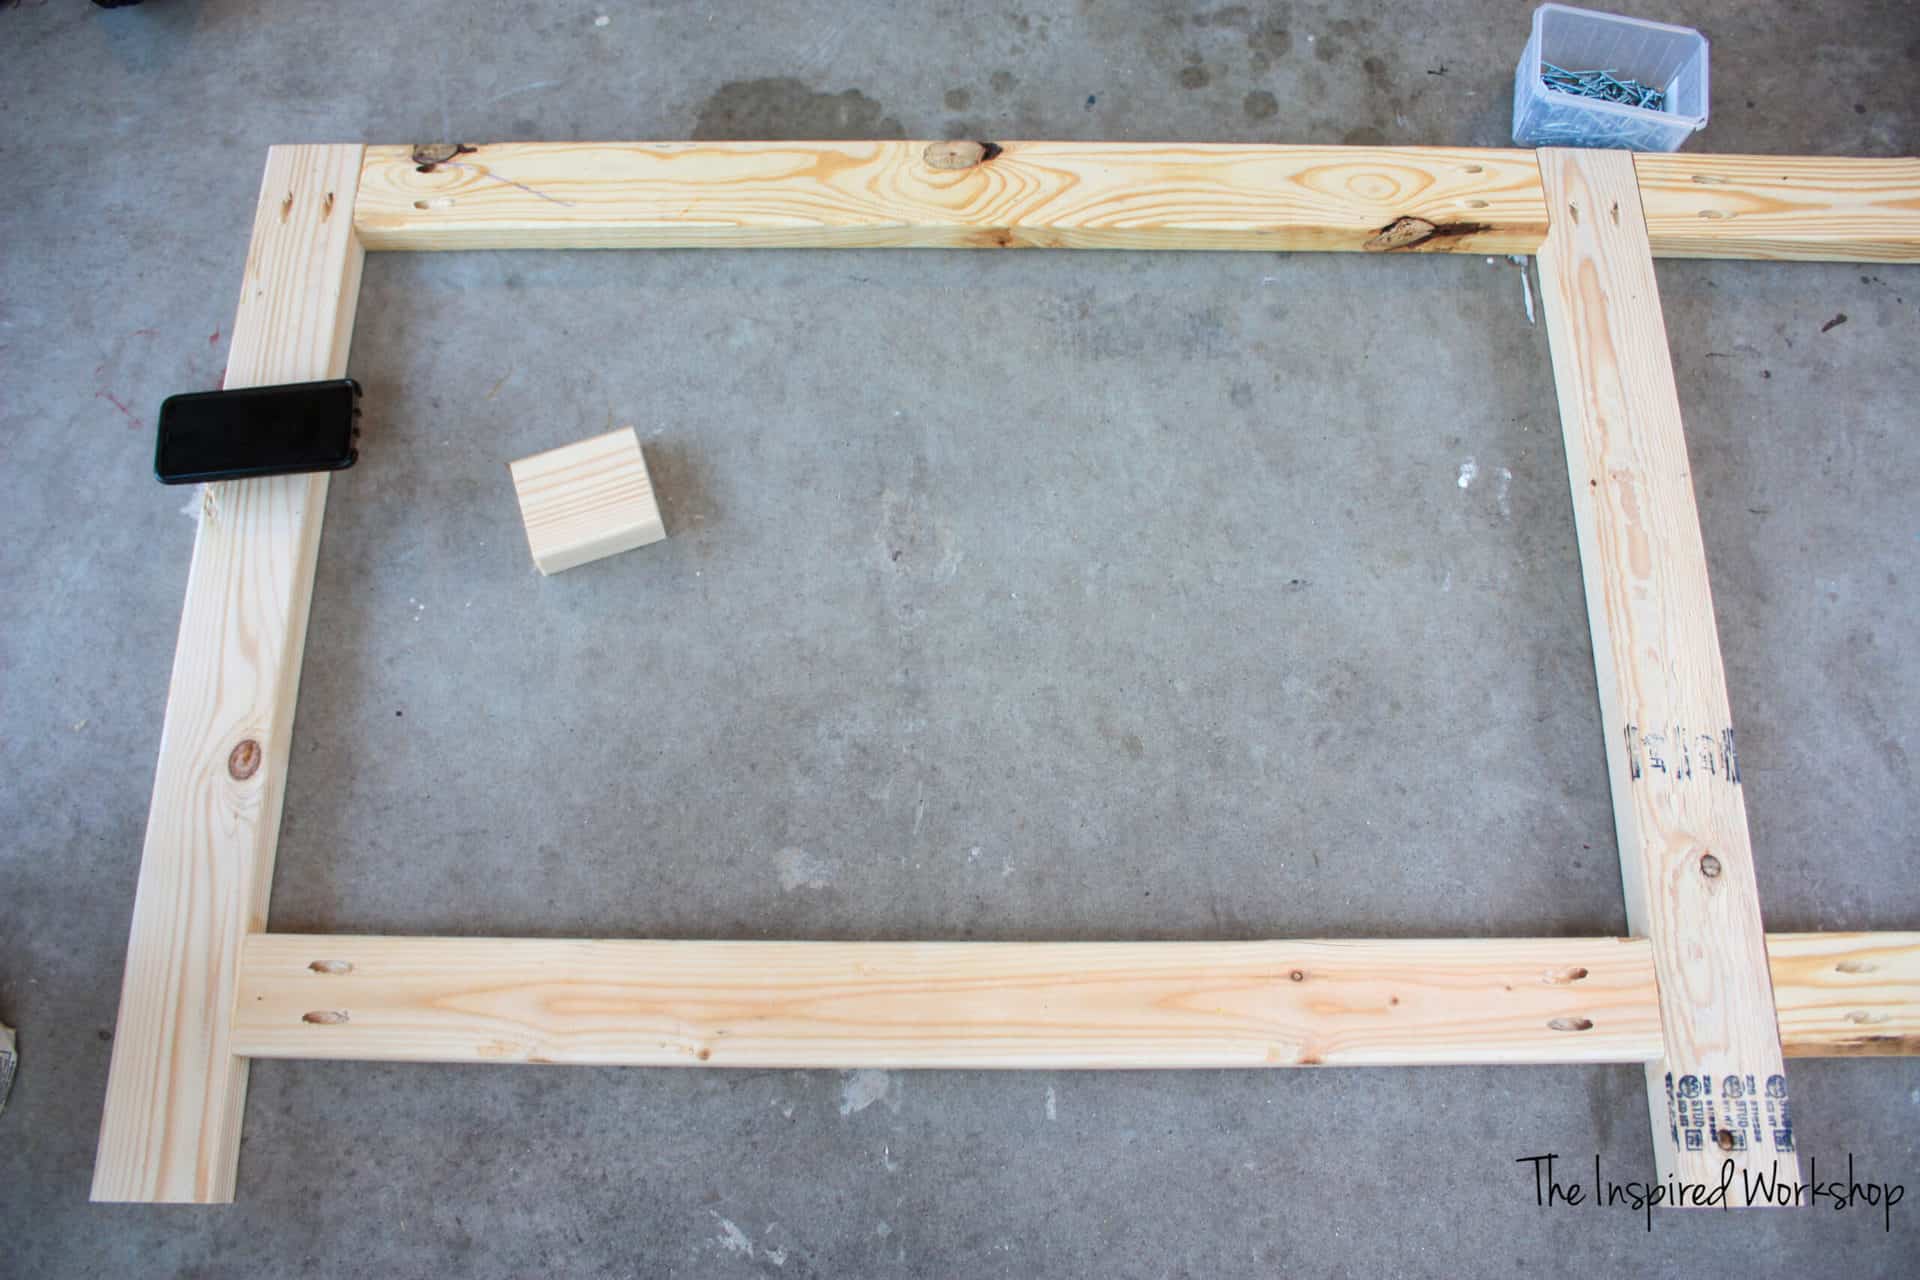
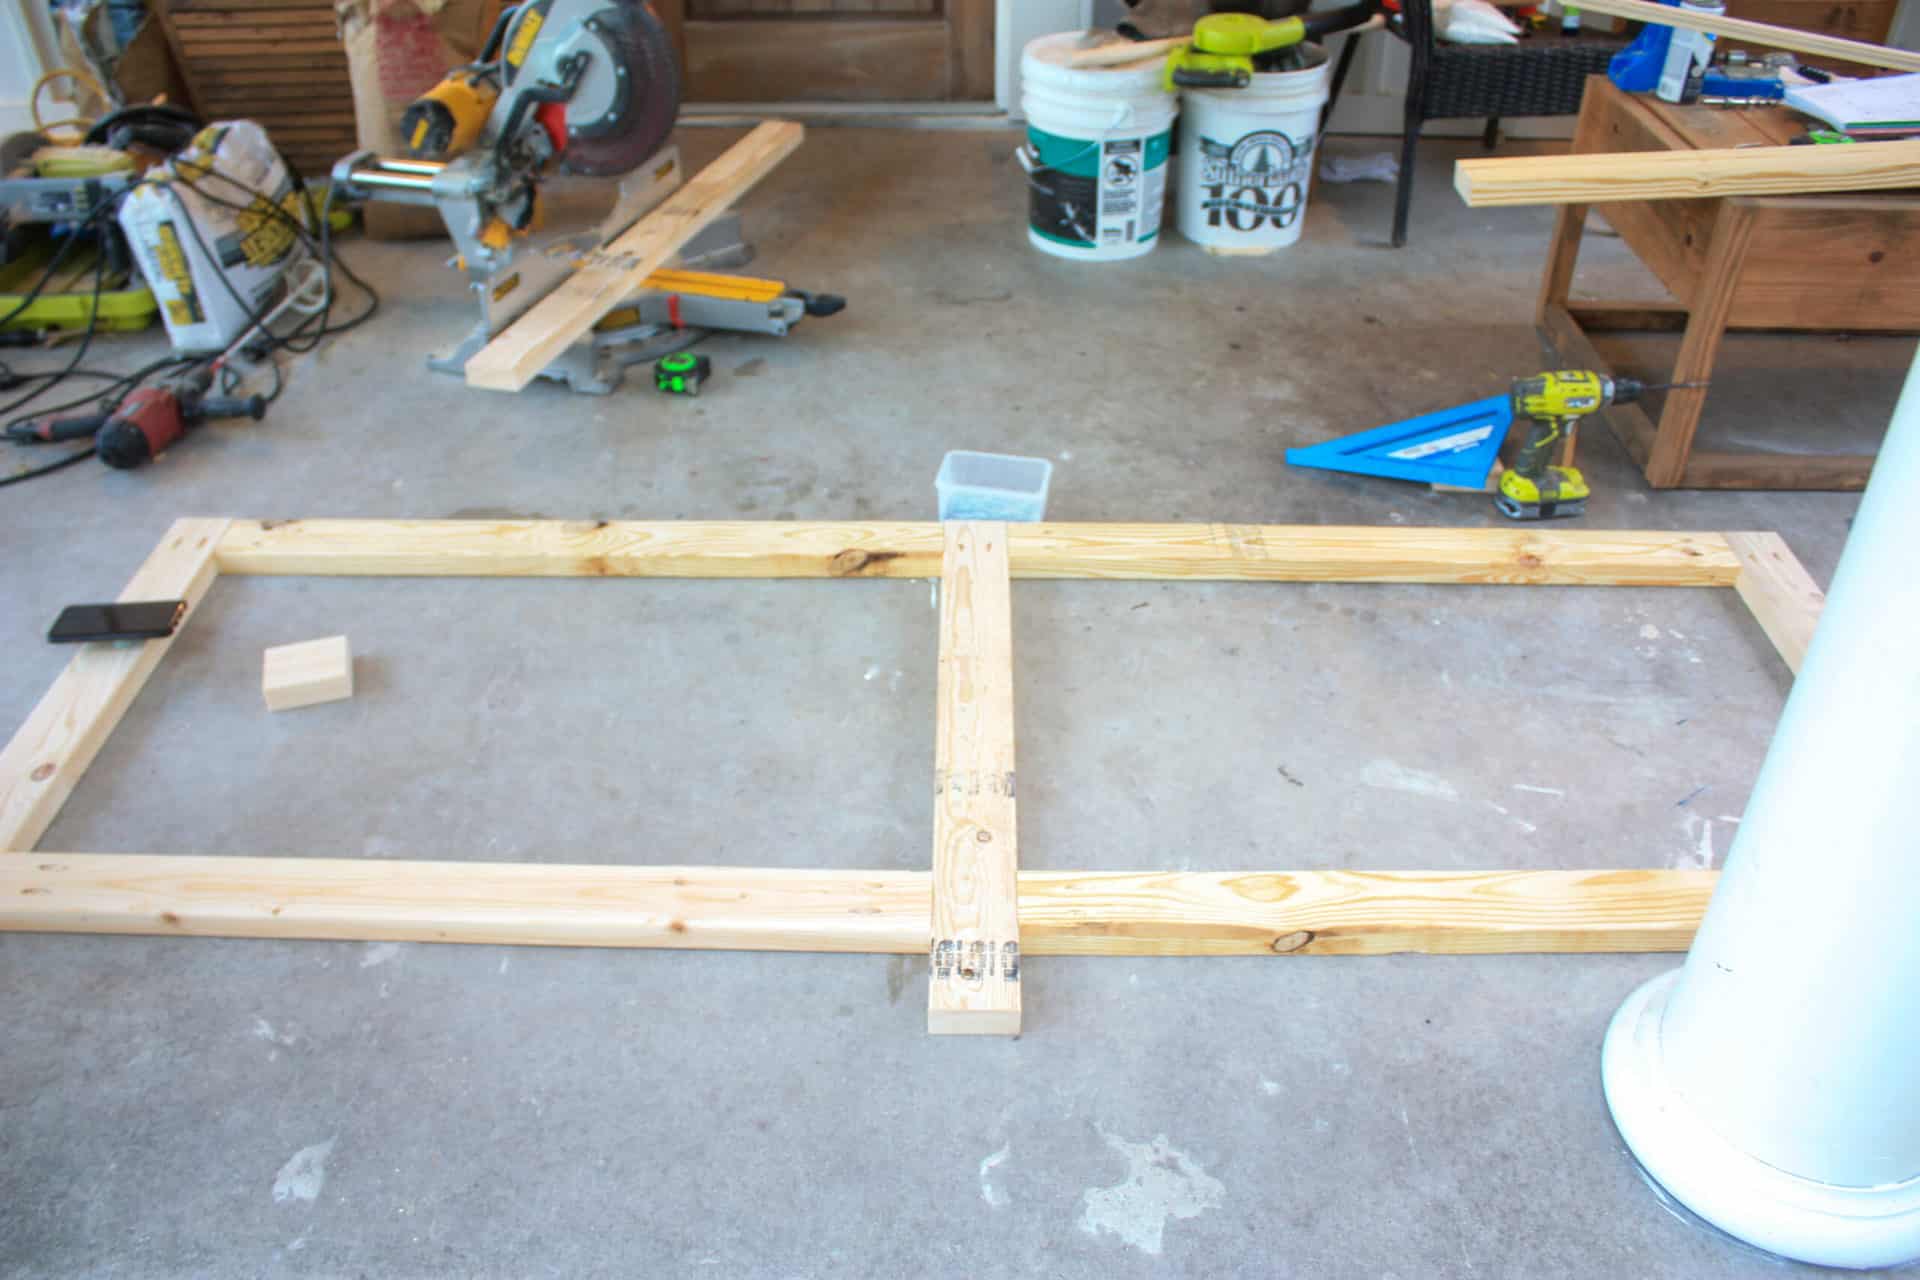
The back frame is done.
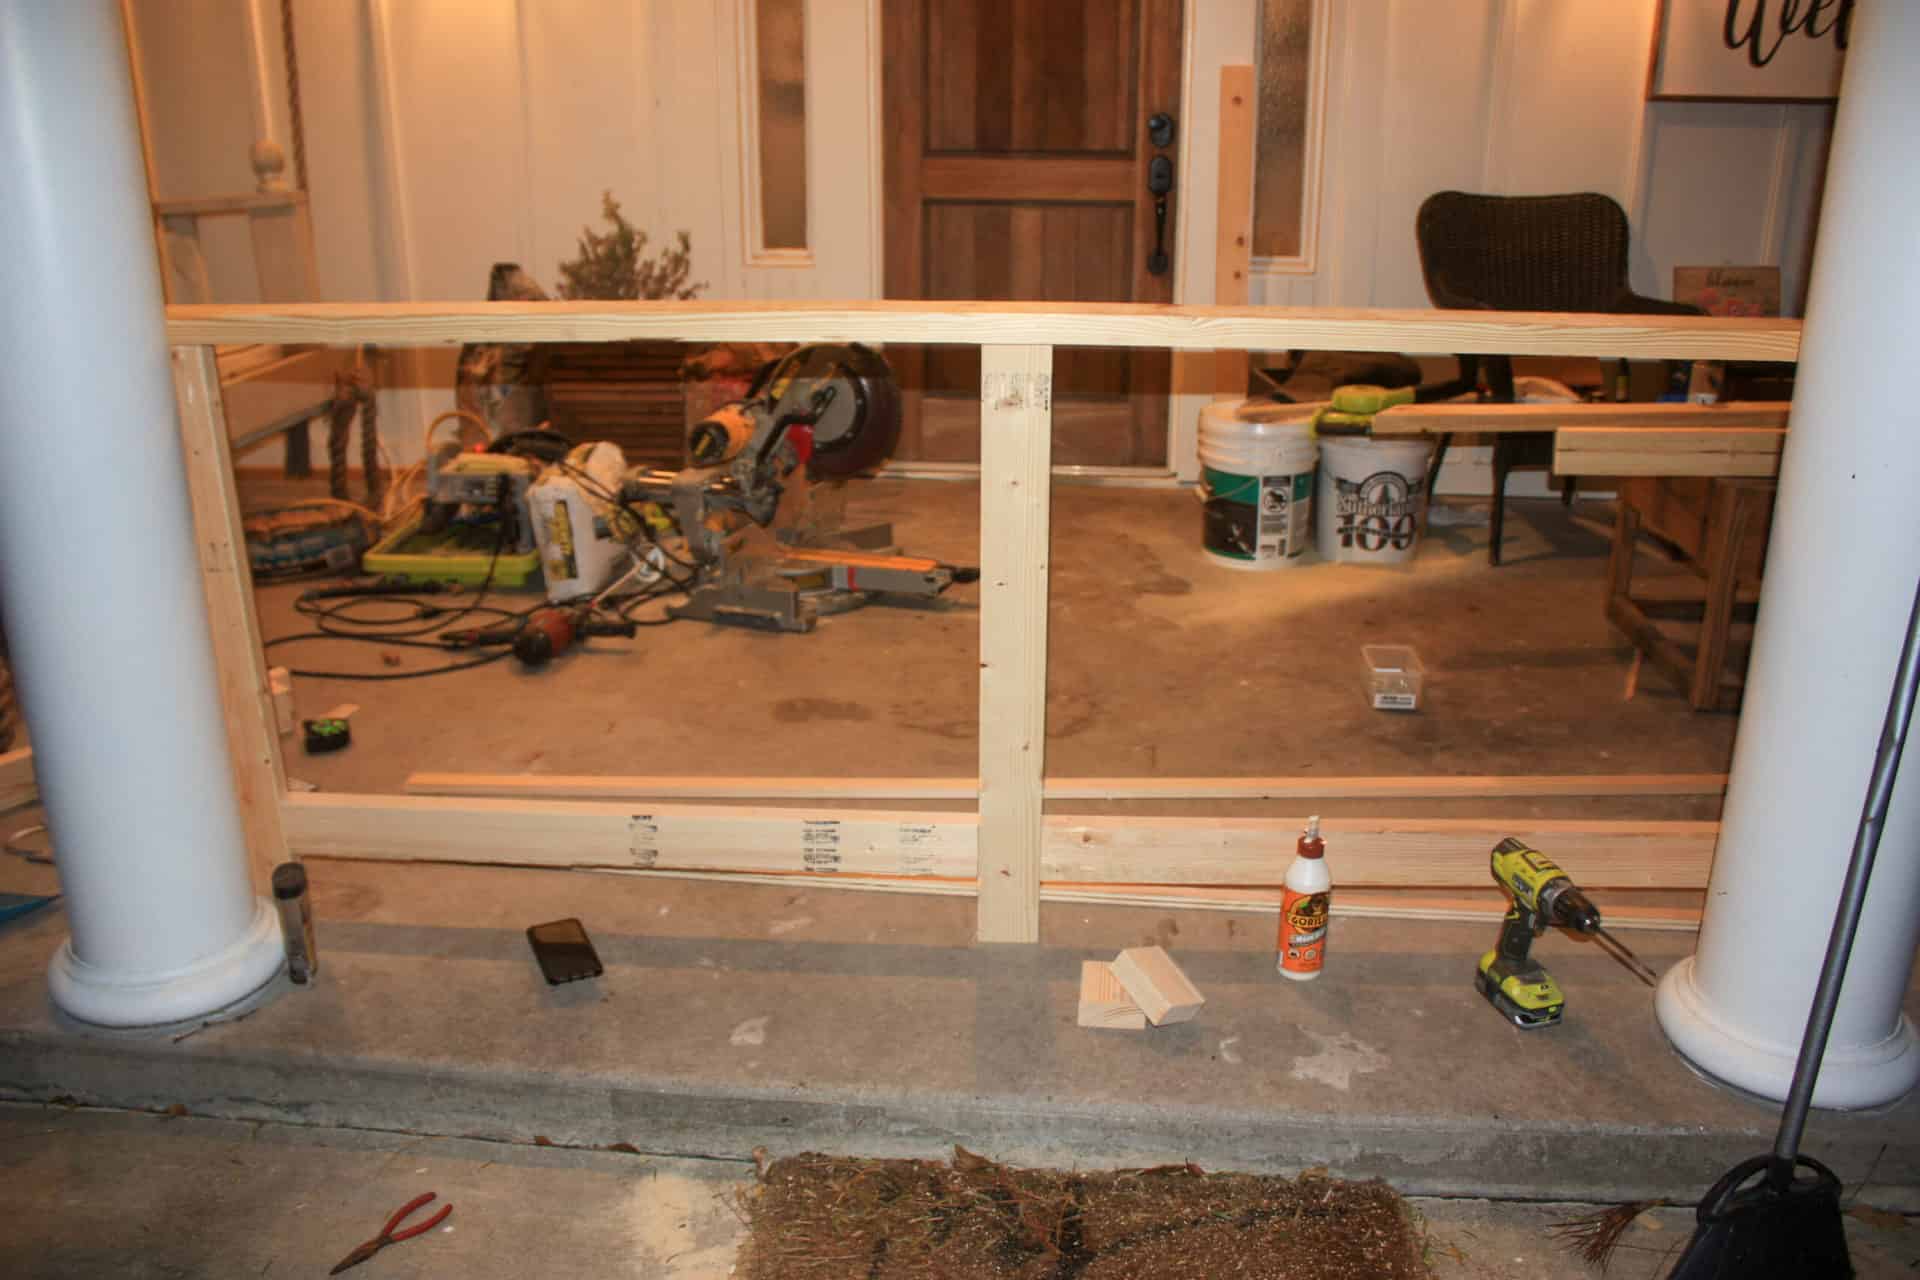
Building the front frame of the DIY TV Stand / Media Console
The front frame is almost the same as the back, except the 2x4s @ 40 1/2″ across the top are not there. You will just add the actual top board (2×4 @ 93″ 45 degrees off square, ends not parallel) to hold it all together. This same board will be placed on the back frame in later steps as well.
The top frame board is not flush with the front or back but centered on the two, which will make it a 1″ overhang on both sides. I used 1″ scrap pieces of wood under the other 2x4s to keep it in place and make sure it was attached correctly.
back
front
See how it is missing the top 2x4s? That’s how you want it to look! The front frame is done! See downloadable plans if you need extra help understanding the building of the front or back frame.
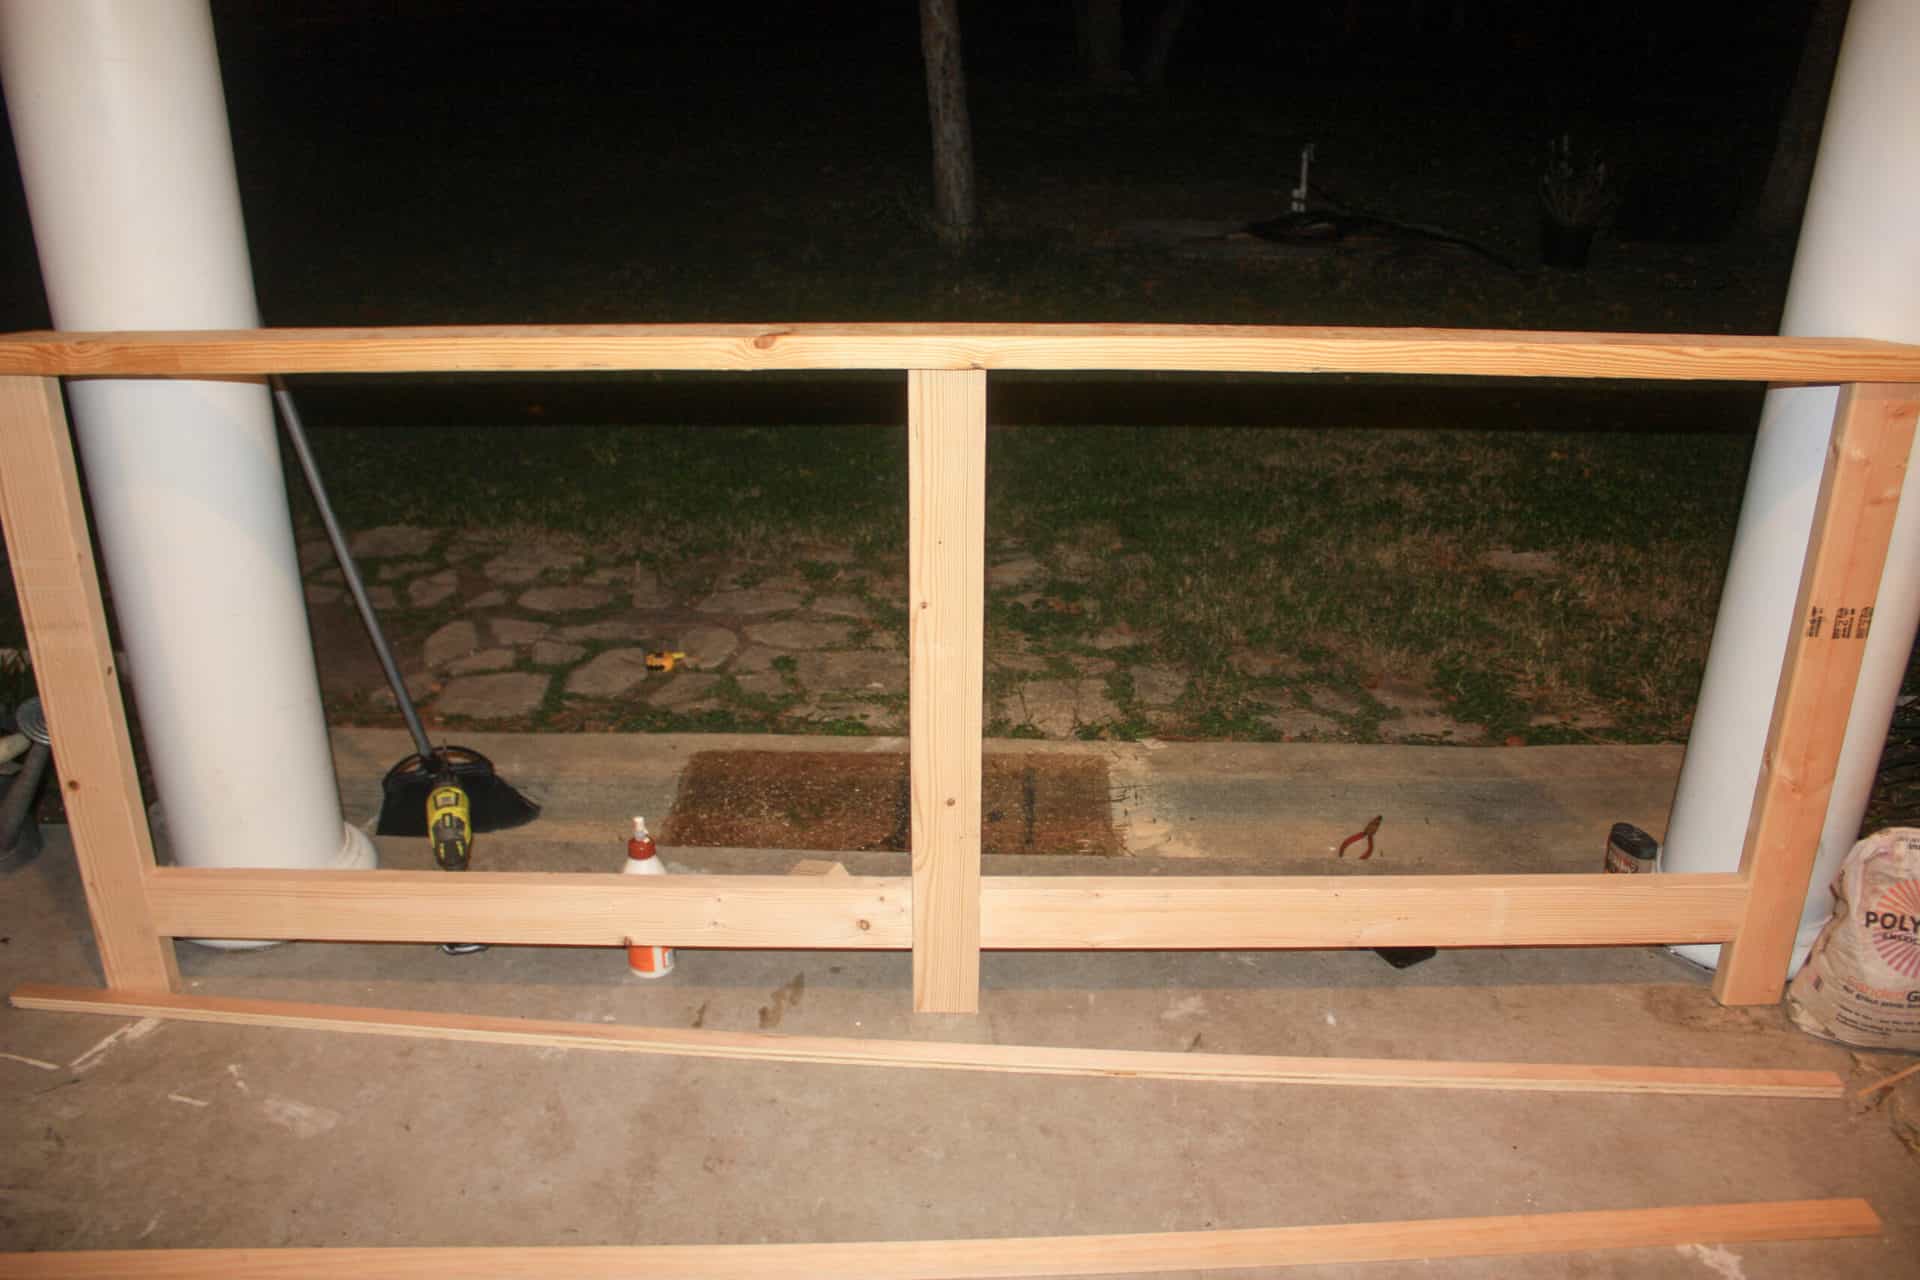
Attaching Front and Back Frames of the DIY TV stand
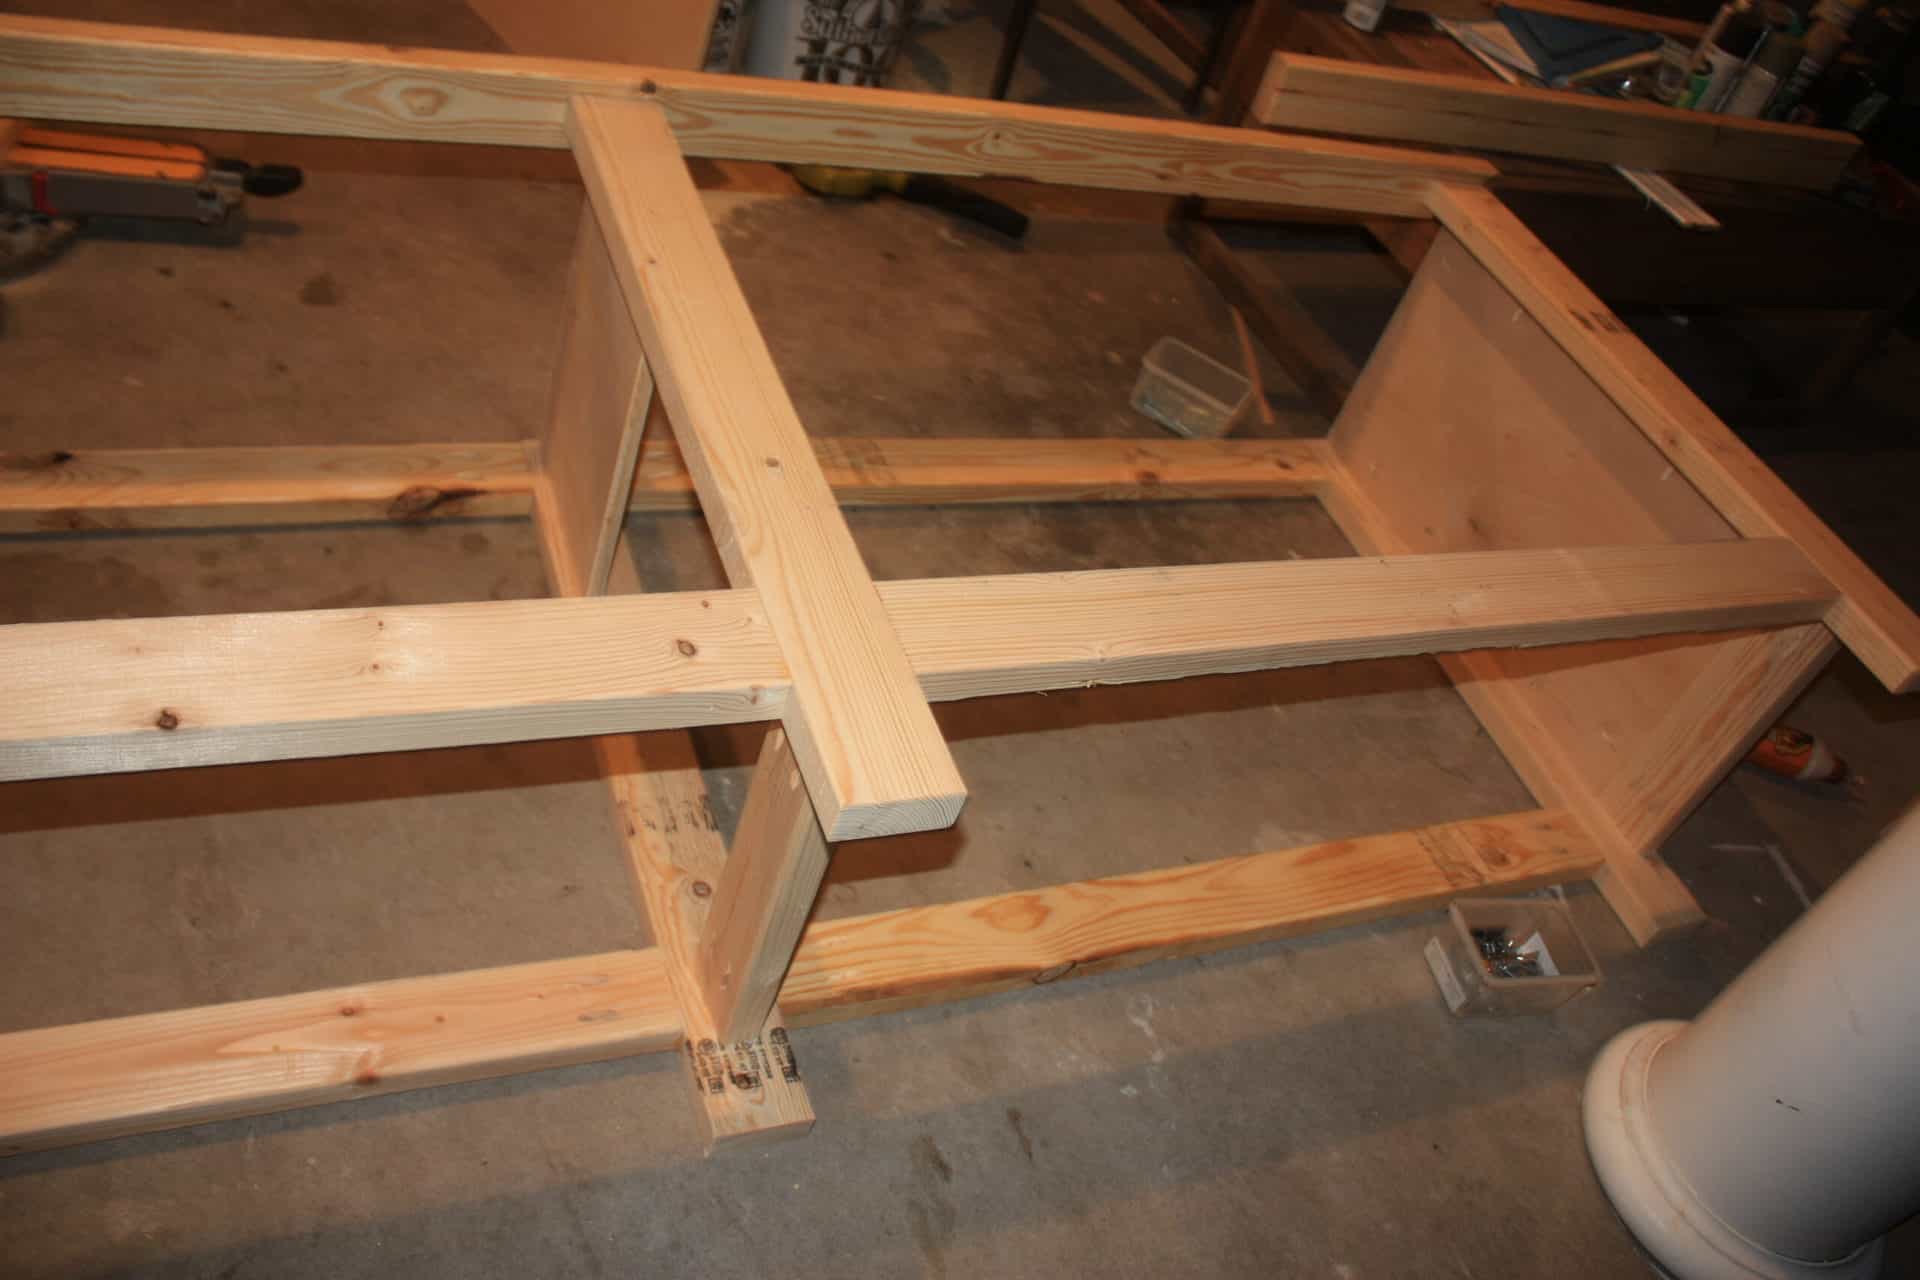
Attach the front and back frames together using the side and middle rail boards (3 – 2x4s @ 16″).
I added the side plywood at the same time as the bottom 2x4s to keep everything square and held in place. The plywood is only 3/4″ thick, actual measurement, so the Kreg Jig will need to be changed to 3/4″, and the drill bit will need to be changed to 3/4″ as well. You will use 1 1/4″ screws to attach!
Make sure and drill pocket holes on all four sides of the plywood, the holes drilled along the top of the plywood will be used later to attach the top.
I used a place holder because I used a solid bottom piece of plywood instead of two cut pieces. I placed the middle 2×4 @ 16″ down 3/4″ to accommodate the plywood going over it. If this doesn’t make sense, the printable plans will help!
Make sure and use wood glue on the plywood as well.
Now, go figure, it wouldn’t be a complete post if I didn’t forget to take pictures at a certain point or lose the pictures if I did take them! I swear if only I started and finished a project in a normal amount of time, maybe I wouldn’t have to say this pretty much EVERY STINKING POST! OY! As usual, I apologize and will use Sketchup pics where I didn’t take them!
Now, the next few steps are shown in the order that I did them, but you are more than welcome to change that up, I was not sure what I was doing for the shelves at first so I built the basic outside structure and then added the shelving, the doors, and last the drawers because they have to fit inside the doors!
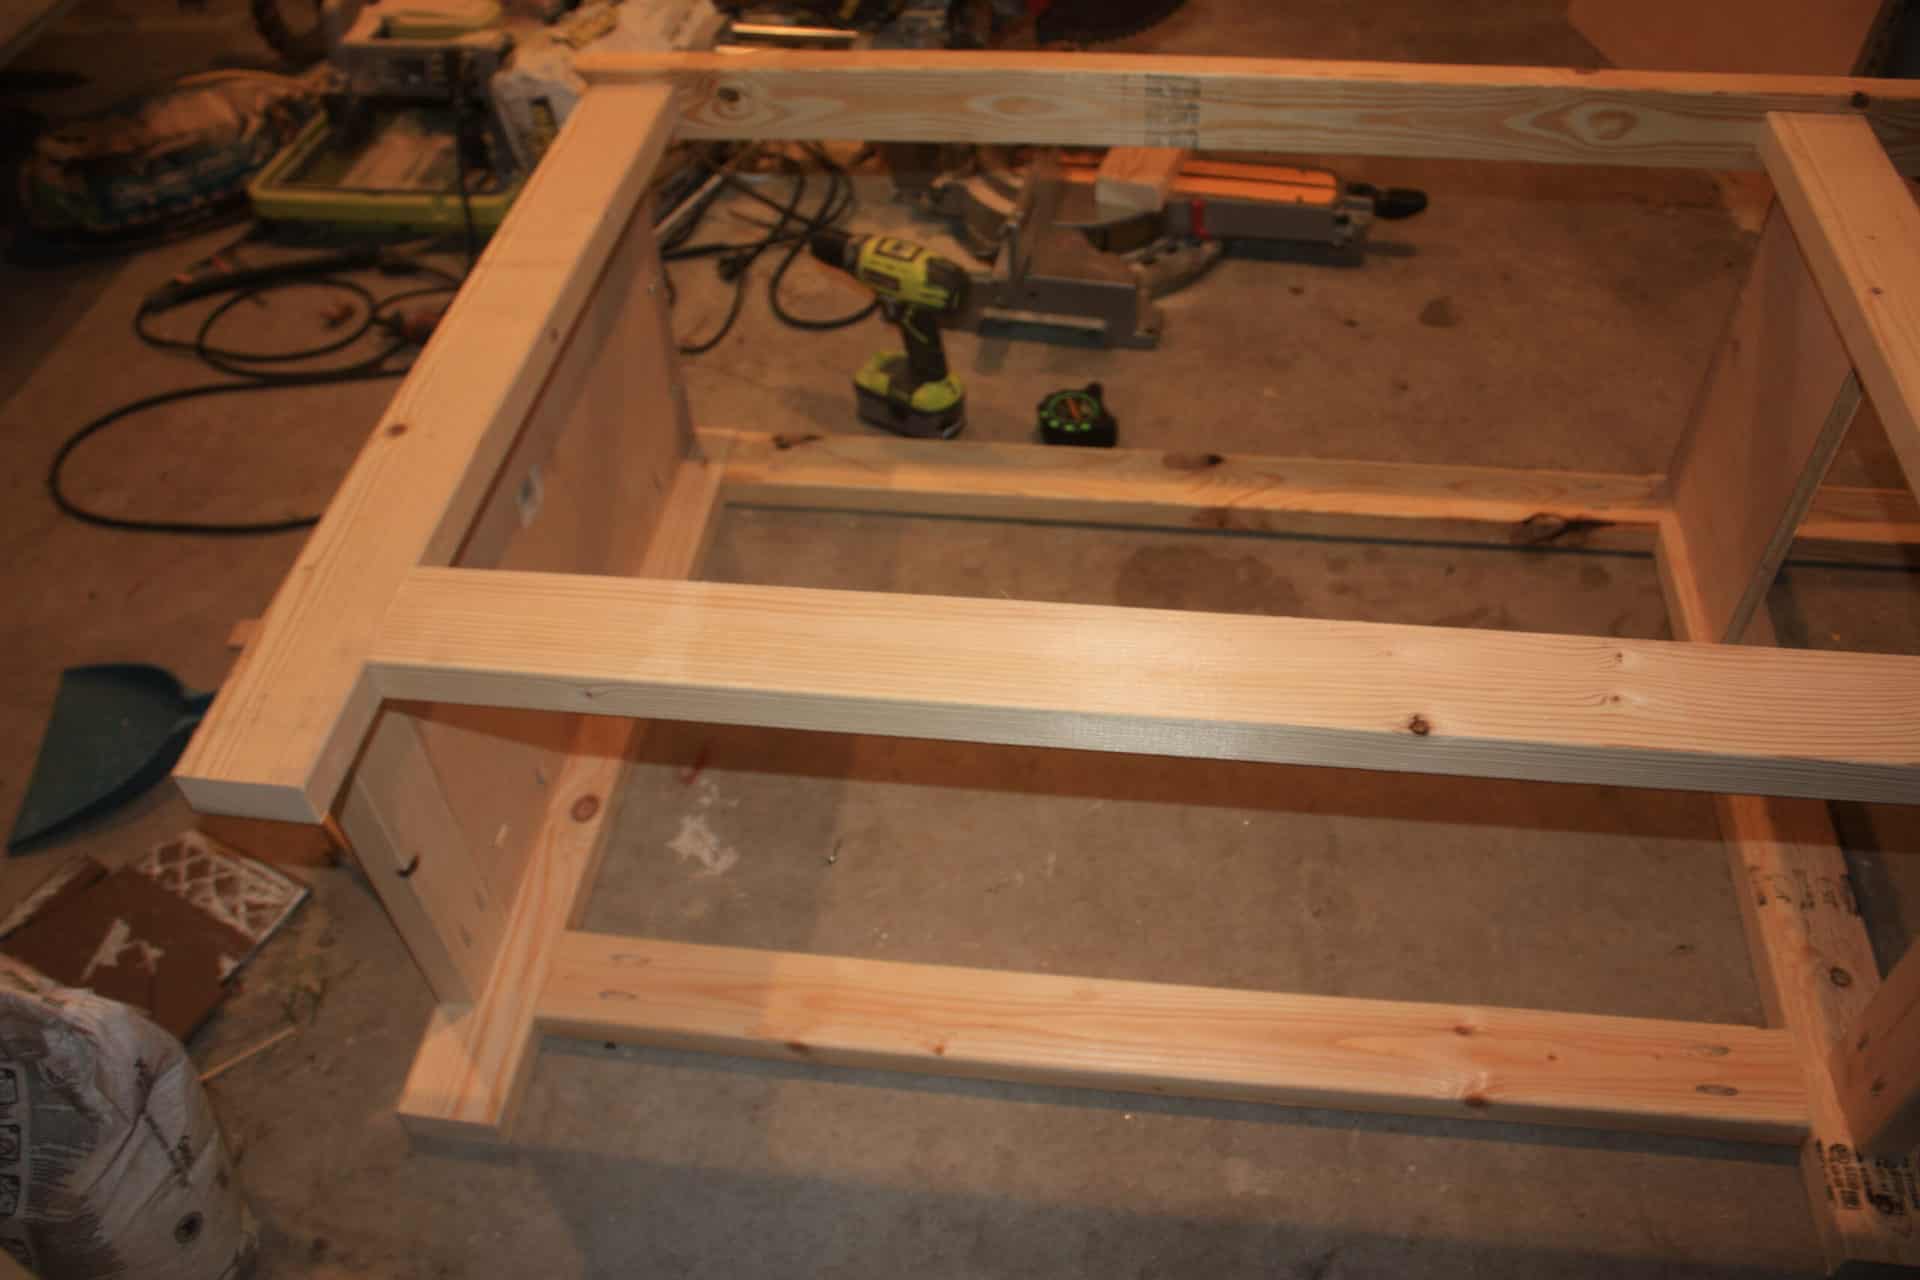
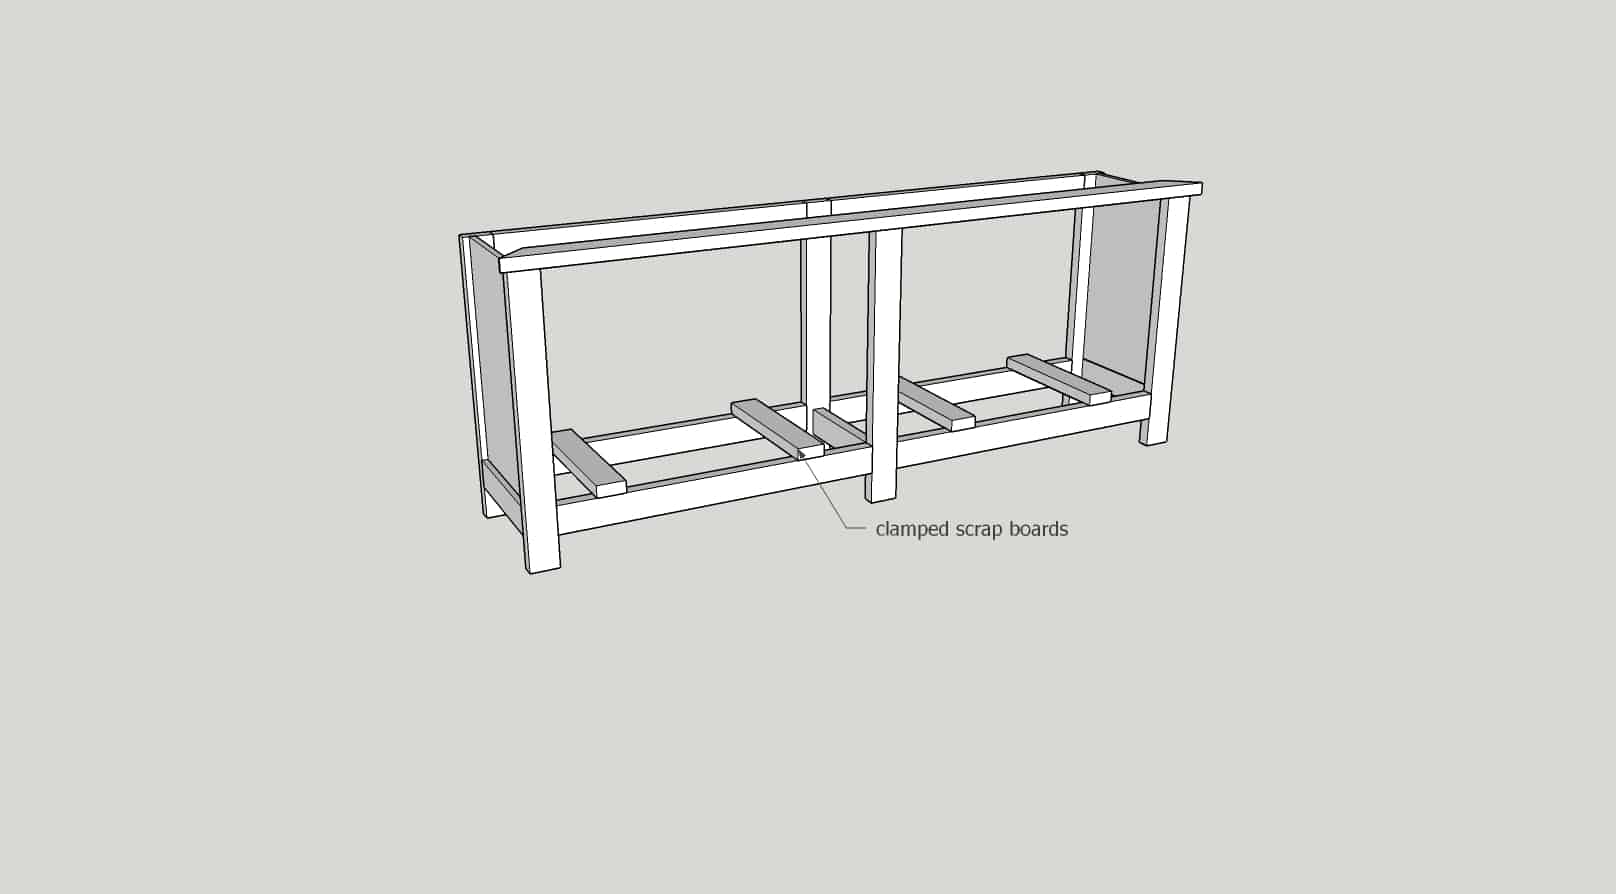
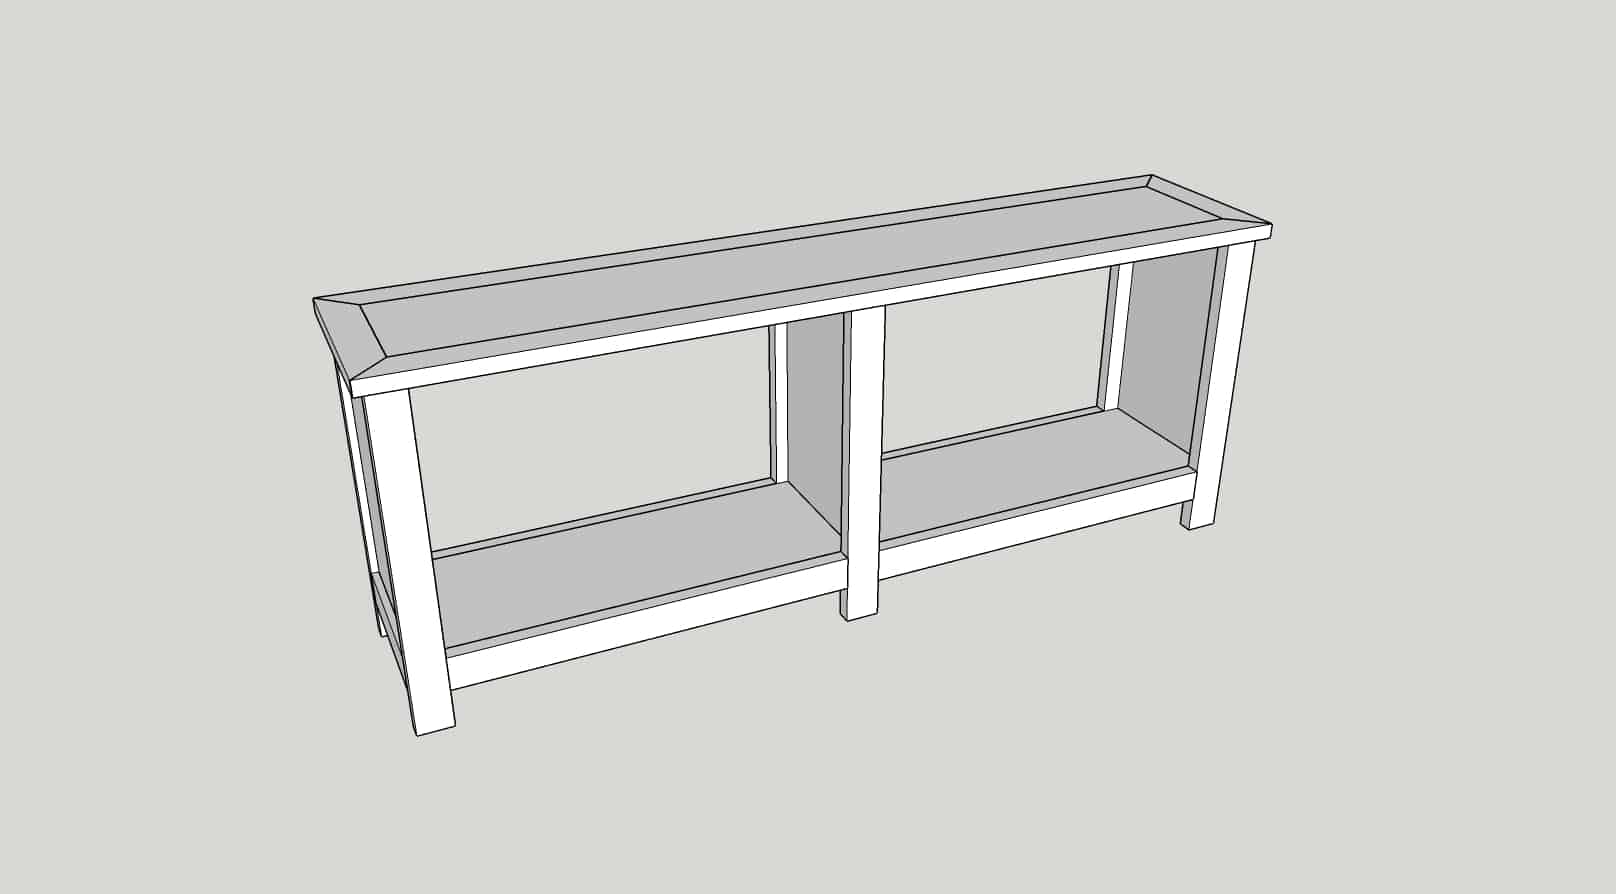
Adding the Bottom Plywood
I attached the bottom plywood at this point, I usually always flip a cabinet over and attach top first and work my way down (up) to the bottom, but I am not using pocket holes to attach my shelves so I did not add them first, but you can.
The easiest way to do this is to place your plywood across the bottom, and then clamp scrap boards across the bottom of the media cabinet along the 2x4s, then flip the cabinet over so you can lay your plywood on your scrap boards and it will be supported while you screw it into place! (Pretend the plywood is under those ‘clamped boards’…lol!)
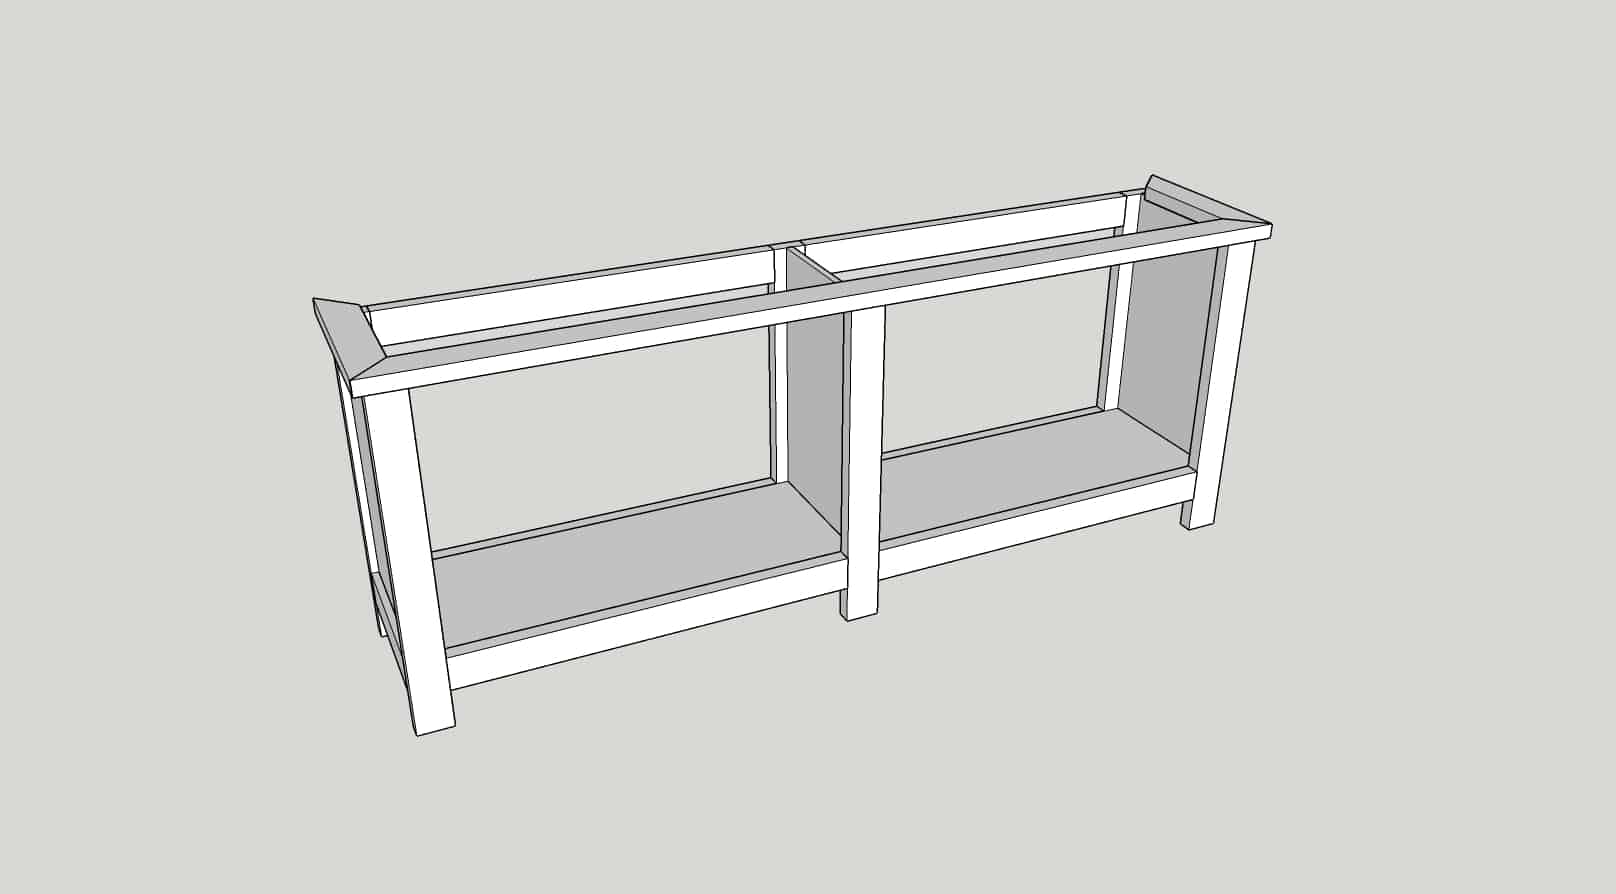
Add the Middle Partition
Choose whichever side you would like the pocket holes to face. Screw the partition into place!

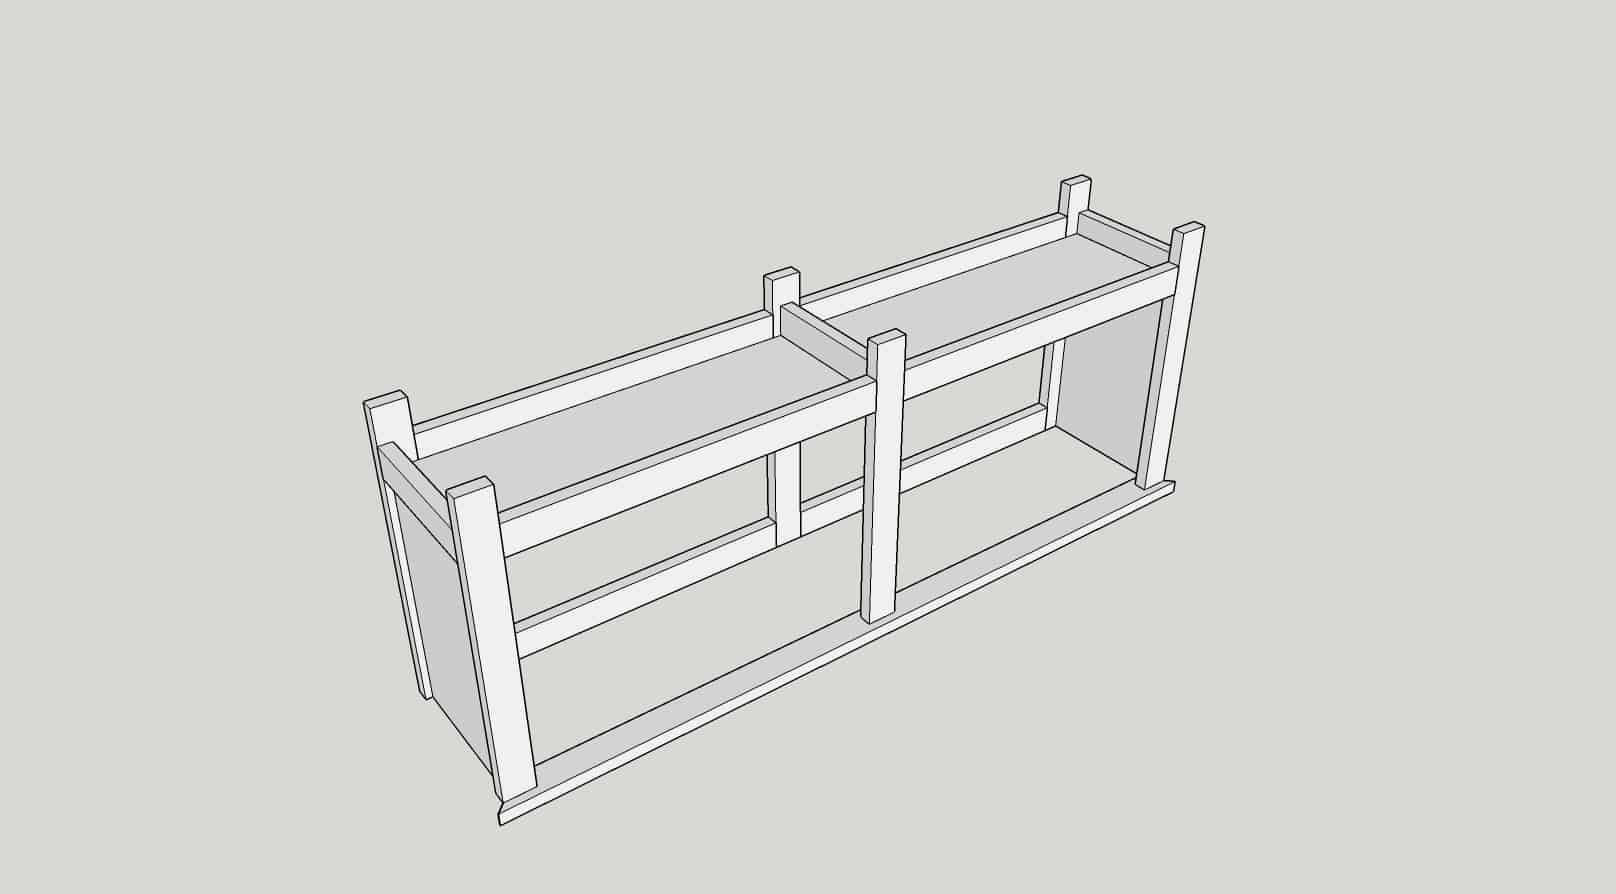
Building the Top of the DIY TV Stand
Now we can finish the top! Building the top of the media console consists of finishing the mitered frame as I will call it, and then attaching the plywood inside of the frame.
The front board of the top is already attached to the console, I suggest adding the sides next and then the back. All the top frame boards are mitered at 45 degrees off square, but you can still use pocket holes to attach them. Make sure when you are drilling your pocket holes that you can see where they will be drilled so you can make sure there will not be any unsightly holes on the edge of a board.
Drill 1 1/2″ pocket holes into the side boards only, on both ends. Attach these with pocket holes to the front board, and then add the back. Flipping it over helps see where the pocket holes are the easiest and will hold your plywood in place as you attach it as well.
Make sure after you have attached the new frame boards to each other that you use the previously drilled pocket holes to attach it all to the cabinet as well!
Building the Doors of the DIY TV Stand
Alright, the doors are the hardest part of the build. They are not actually hard per se, more so, they require a few jigsaw/scroll saw cuts which if you have been here any length of time, you know I am not great at the small tedious stuff that requires skill!! LOL!!
This was the part when I started putting it all off because the cuts had to be precise and I am not good at precise, don’t be like me, putting it off does not make you any more precise! 😅 Just get it over with, and worst-case scenario, the sooner you start, the sooner you can recut them if needed! (That was me talking to myself as well!🤓)
Start off by cutting all your door boards to the same length. This is important so you may want to set up a stop block to make sure they are all exact! Each door will consist of:
1 – 2×6 @ 26 3/4″
1 – 1×12 @26 3/4″
1 – 1×4 @ 26 3/4″
They will be attached in that order! I used pocket holes drilled along both sides of the 1×12 to attach. Again, a 1x has an actual measurement of 3/4″ so pocket holes will be drilled at a depth of 3/4″ and attached with 1 1/4″ screws and wood glue.
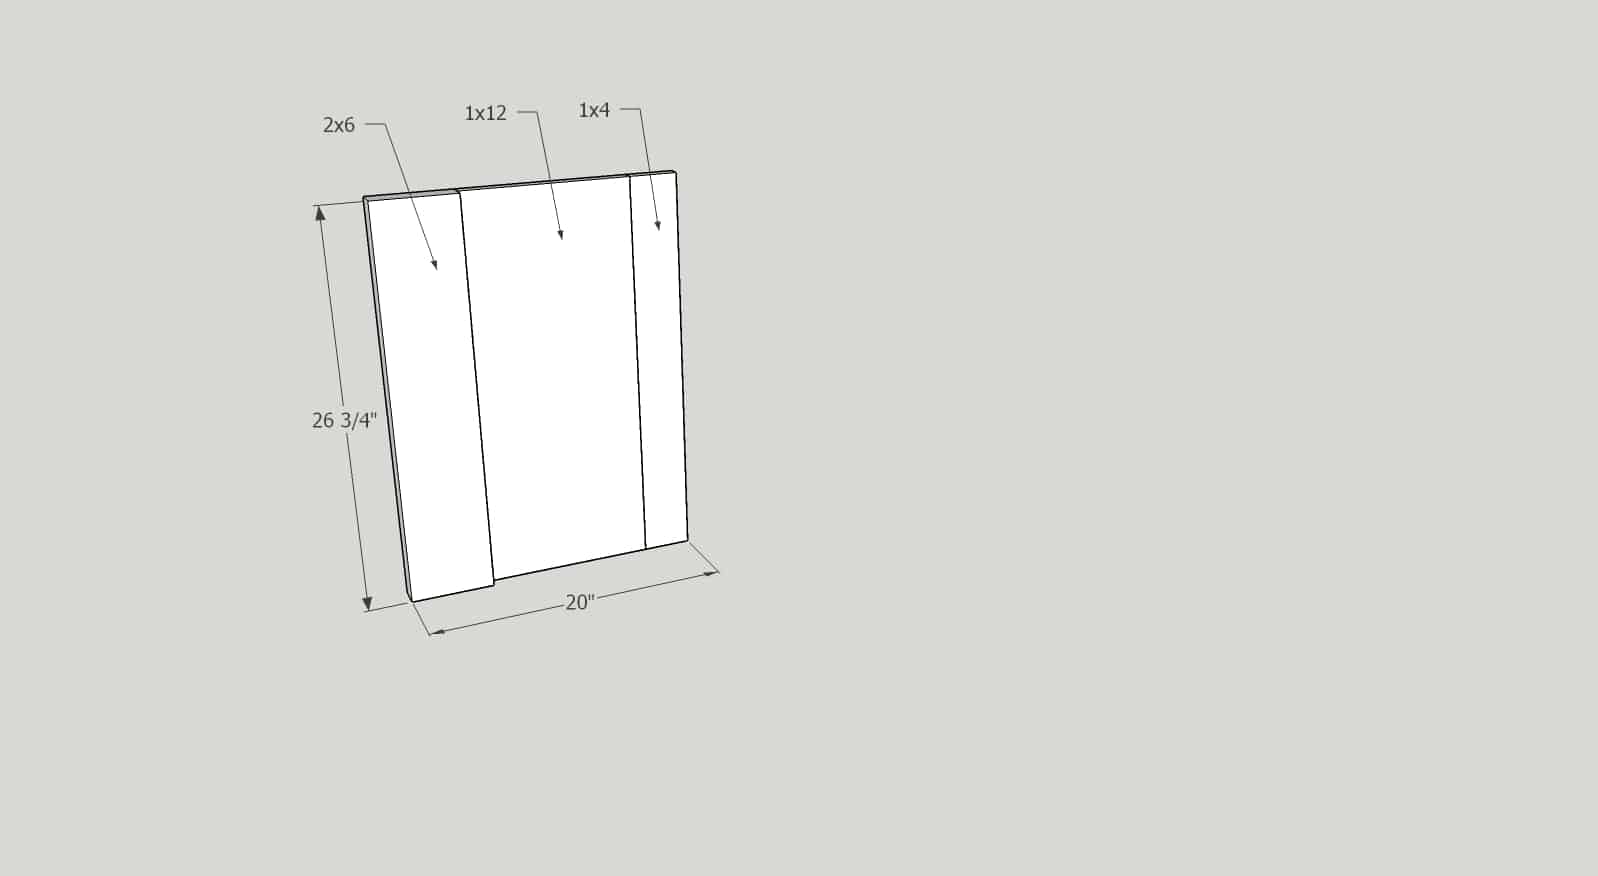
The 1×12 is flush with the back of the 2×6, creating dimension between the 2×6 and the 1×12 on the front of the door…if that makes sense.
I also had to rip a 1/4″ off of the 1x4s to make the door 20″ wide. A 2×6 has an actual width of 5 1/2″ + the actual width of a 1×12 is 11 1/4″ + the actual width of a 1×4 is 3 1/2″ so that equals 20 1/4″ and we need our doors to be 20″ total! I actually even ended up having to shave a little more off of each one after making my dowel hinges because they moved the doors over slightly more than 1/8″, so you may want to go slightly over 1/4″ or you can do as I did and run them through the table saw after you have the dowel holes drilled! Up to you!
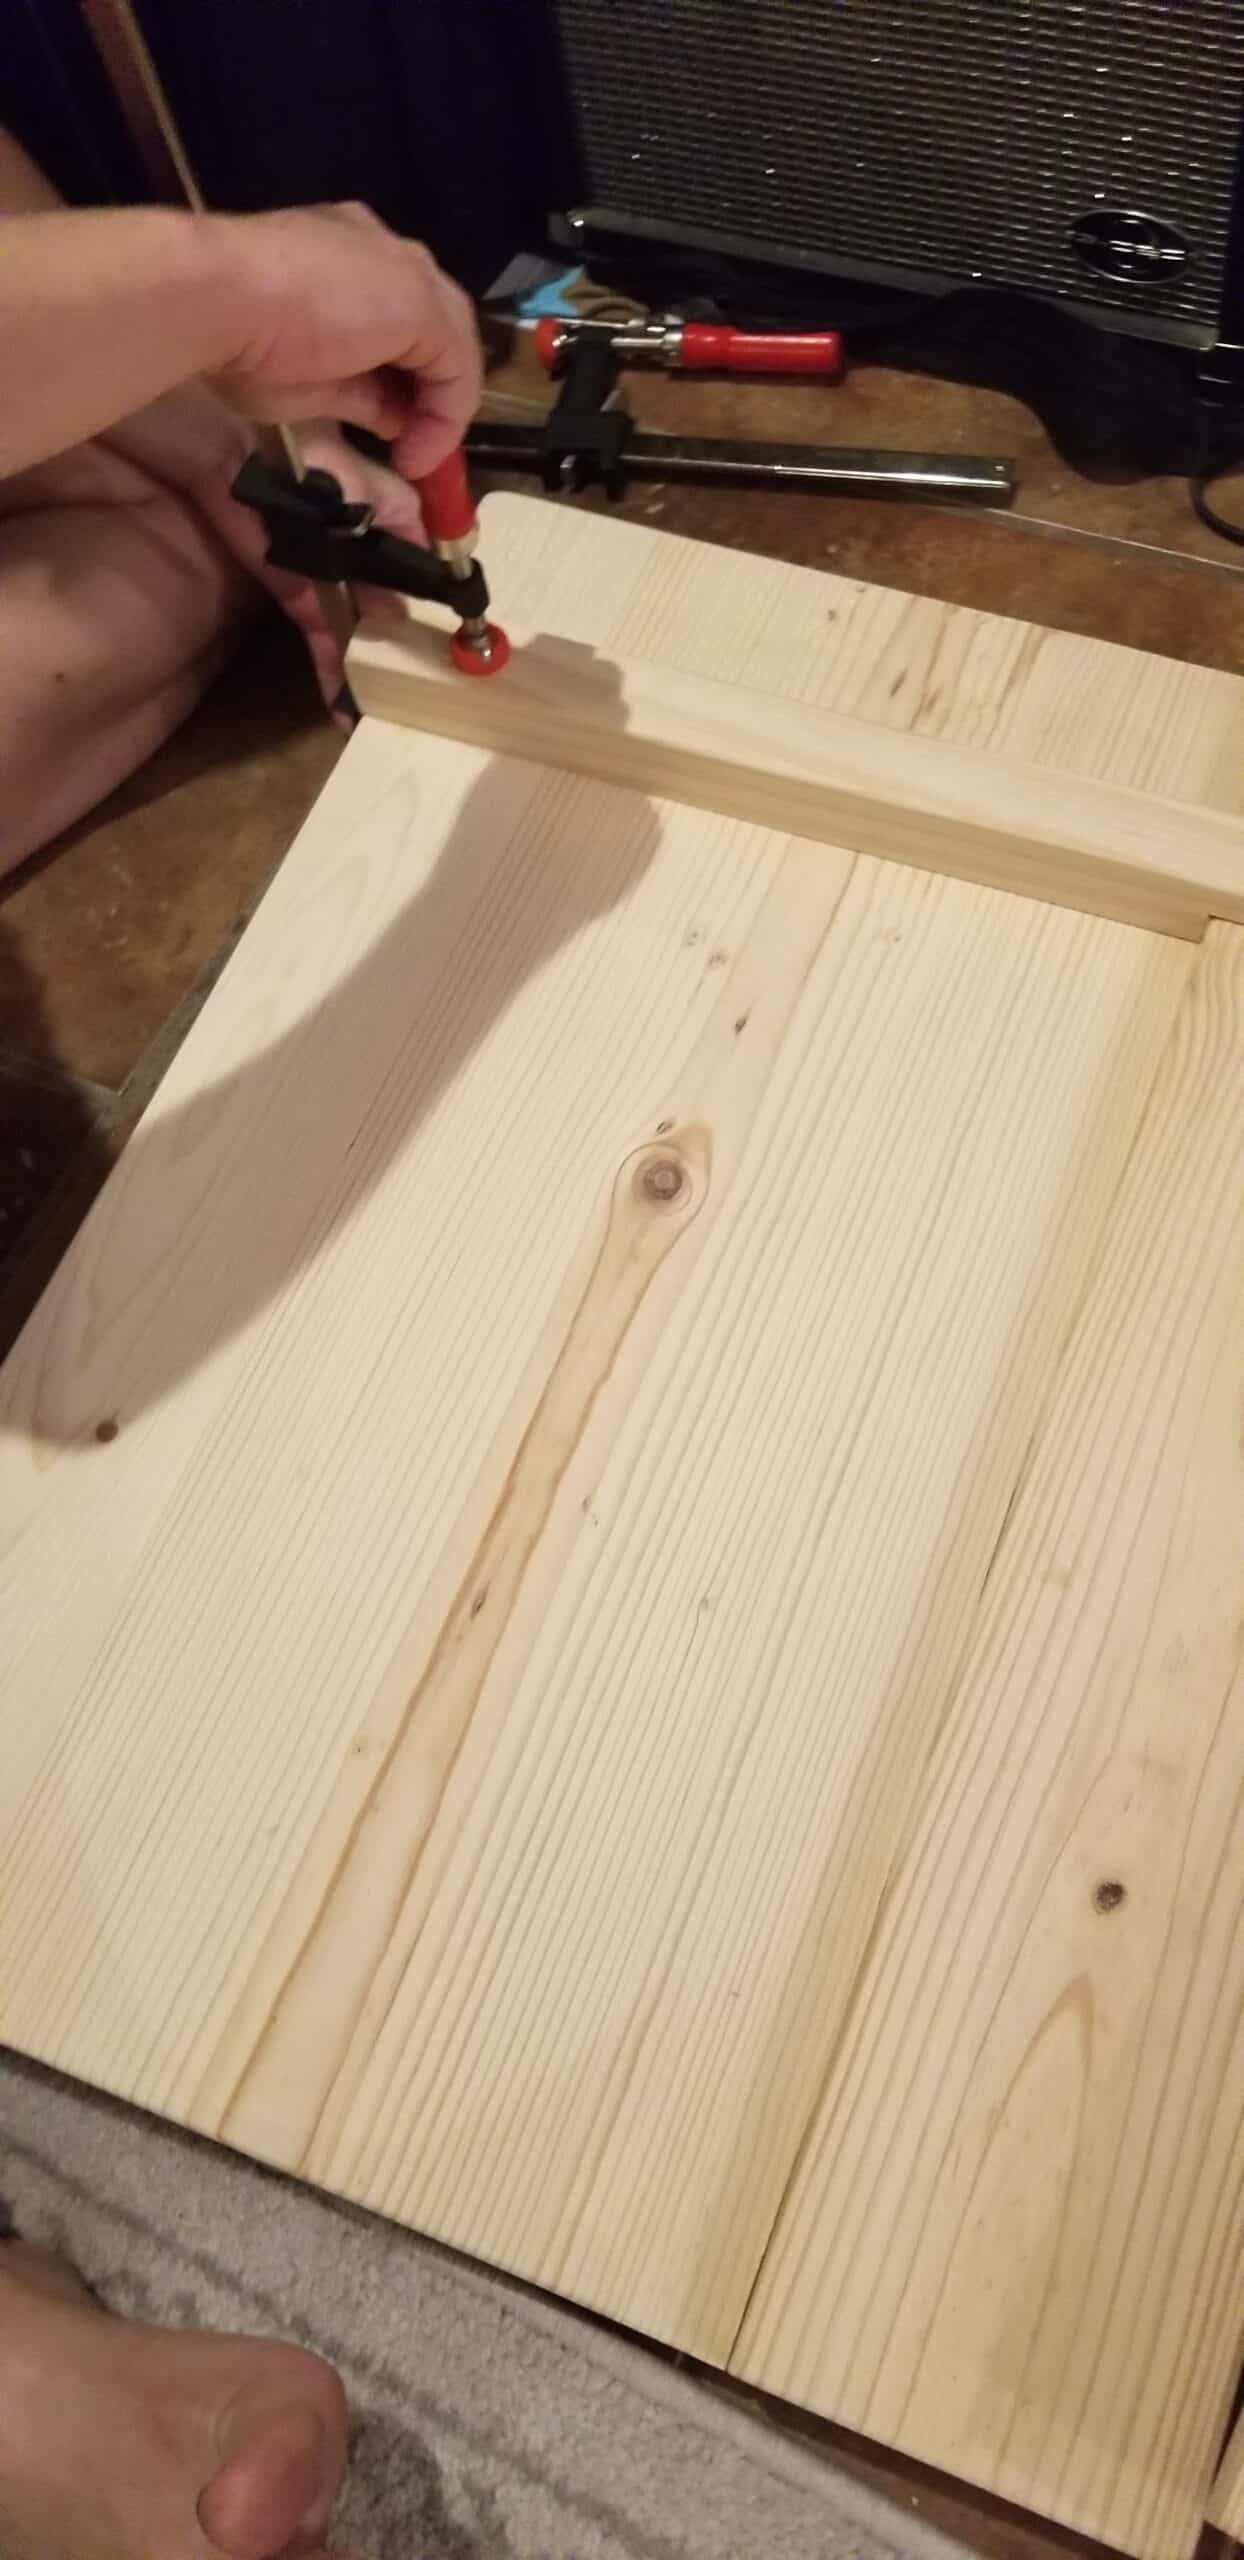
After assembling the boards for the door, it’s time to add the 2x2s to the front. These have small notches taken out on one end. The notches are cut at 3/4″ x 3/4″. This will fit over the edge of the 2×6. I notched them using the scroll saw but you can use a jigsaw if you don’t have a scroll saw.
This photo above was taken before I rounded all the edges of the 2x2s with a sander.
Measure down 4″ from the top and 4″ up from the bottom, that is where you will set your 2x2s, make sure they are flush with the edge of the door.

I measured on the back as well to make sure my screws go into the center of the 2×2.

I put ample wood glue on the 2x2s and clamped them in place where I wanted them, and picked up the door to screw them in from the back. Use flat-headed screws though, I used Kreg Screws and the rounded head was keeping the doors from closing all the way! LoL! It’s ALWAY something I learn along the way that I shouldn’t have done! 😆
Use 2″ screws to attach.

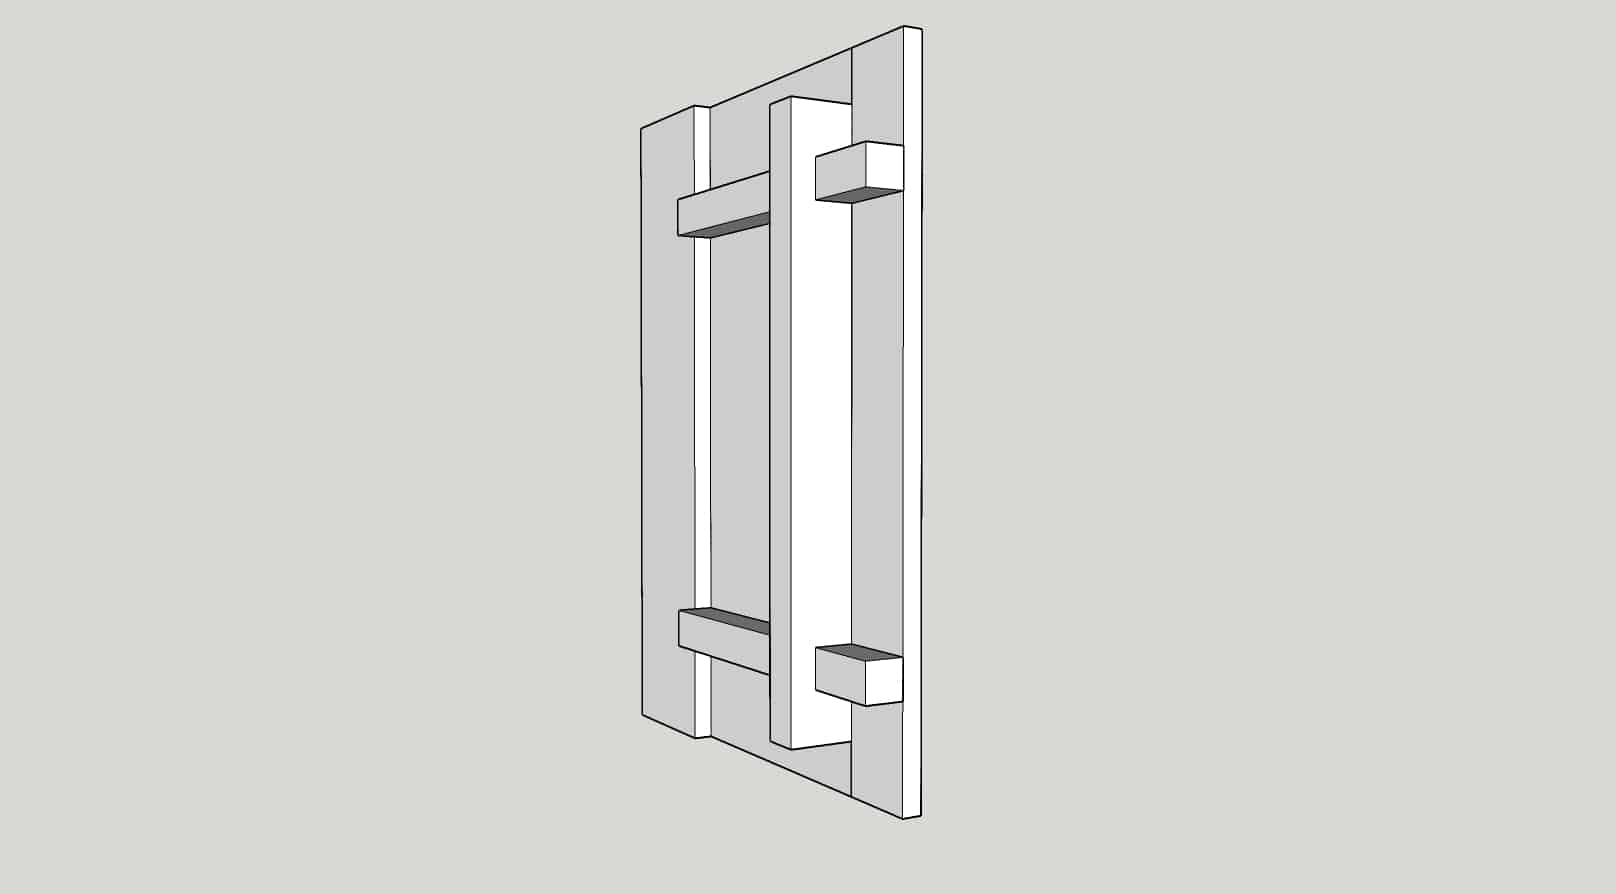
Making Handles for the DIY TV Stand
The last thing to do before the doors are finished is turning a 2×3 into a handle! This was the trickiest part since it has to fit perfectly over the 2x2s we attached in the last step.
2x3s are an off the shelf lumber in hardware stores around me, but I know that they may not be as common in some areas. If that is the case, you can rip a 2×4 down to 2 1/2″. I actually ran the 2×3 through my table saw just to take the rounded edge off so it sat completely flat against the door!
Once you have the 2x3s cut down to 22 3/4″ and the rounded edge removed, if you prefer, then just set them on top of the 2x2s and mark where they need to be cut.

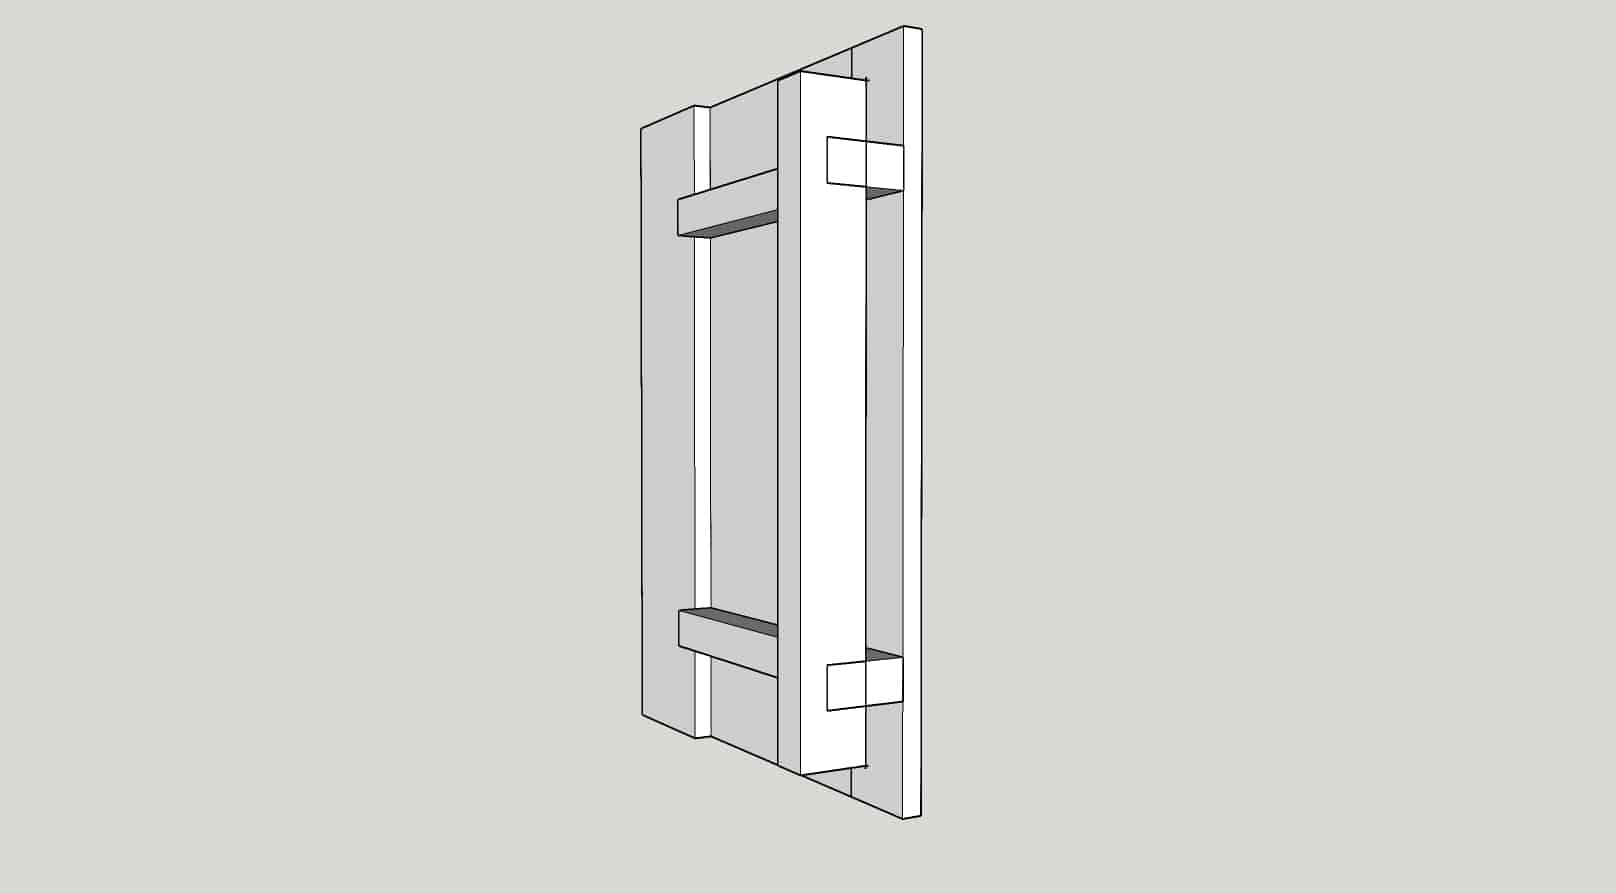
Cut them and glue and screw them from the back just as you did the 2x2s!
Dowel Hinges for DIY TV Stand
Now you need to attach the doors to the console, but I couldn’t find any store bought hinges that would work on a 2x board! 😬 Didn’t even think about that when I was planning the build of this TV stand! But luckily, I came up with an idea to make my own dowel and pipe hinges…and believe it or not, it worked! 😵 I made a separate post since it’s kind of a process and more than enough for a whole post of its own! See it here:
Building the Interior of the DIY TV Stand to Fit Your Needs
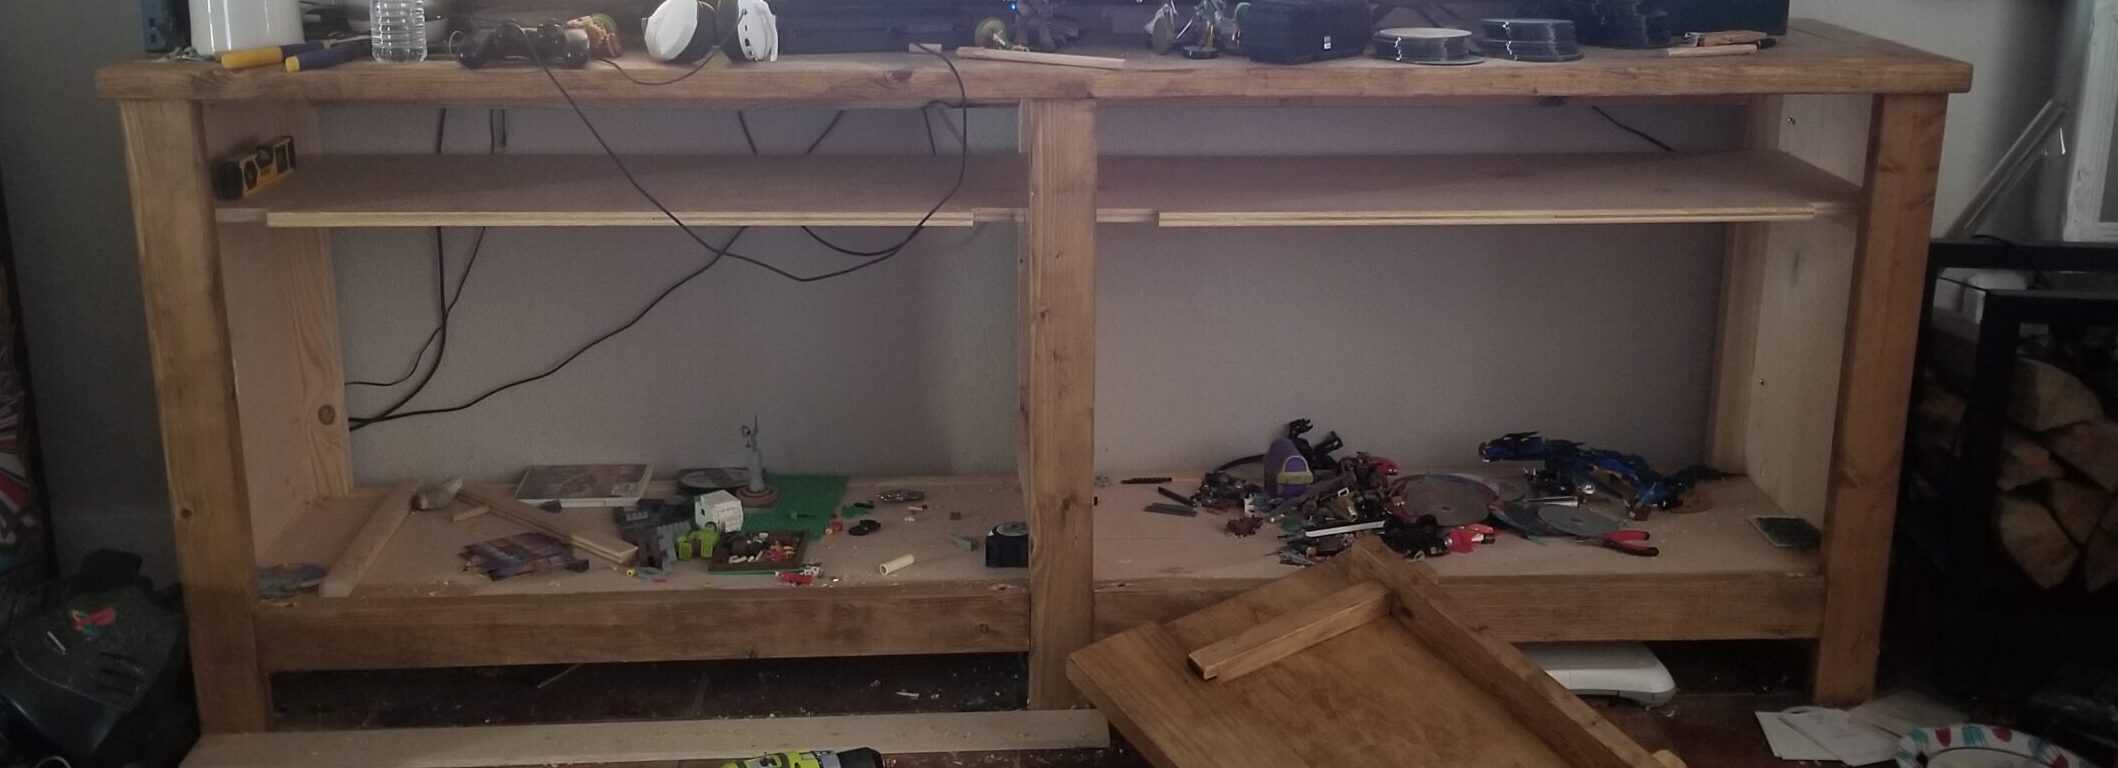
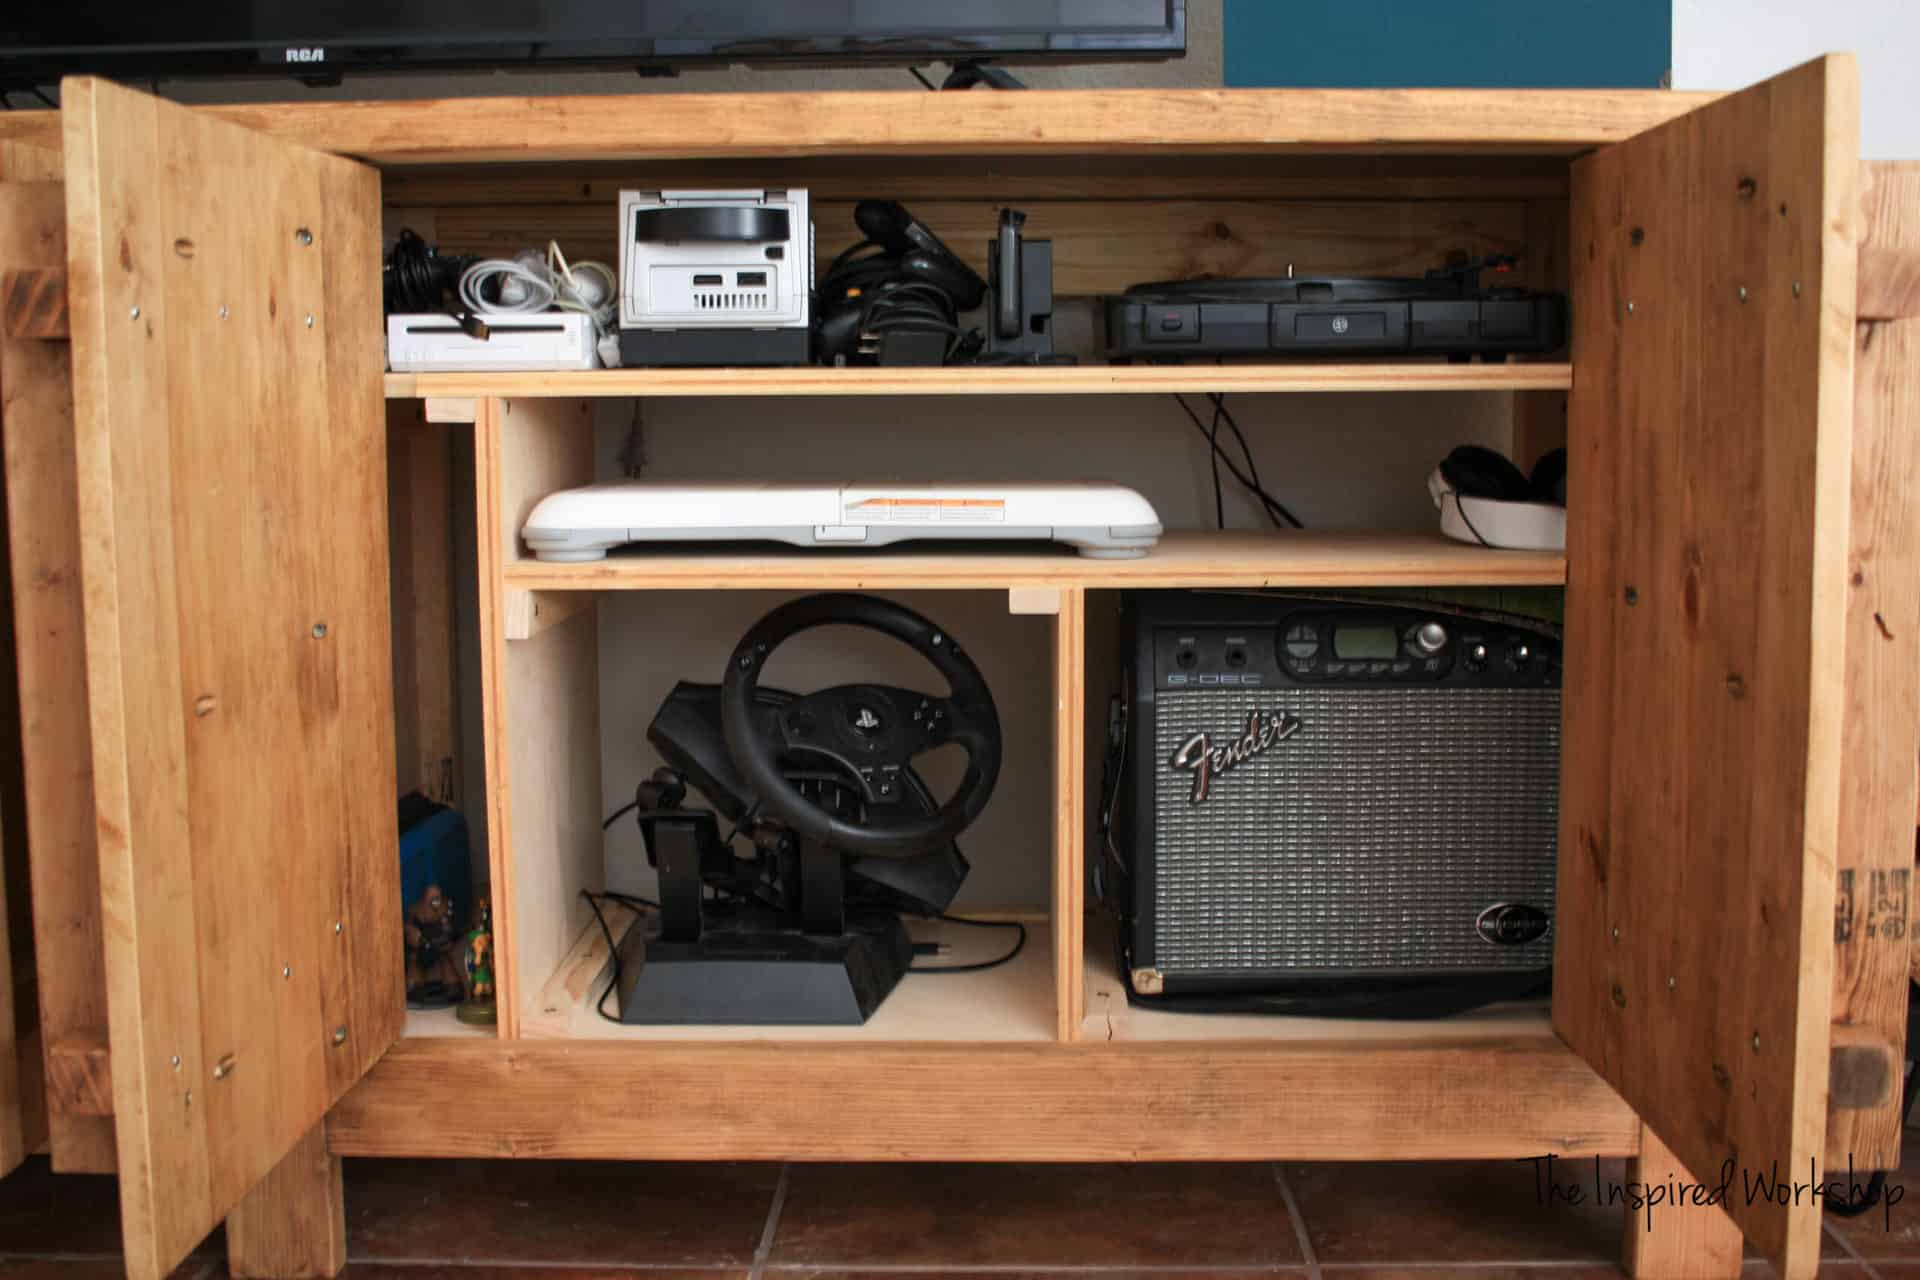
Lastly, you need to deck out the inside to fit your needs! Are you a gamer or have gamers in the house, you can easily make sure that all the gaming equipment fits perfectly into the console. Are you a movie lover and buy all the DVDs and Blu Rays of your favorite movies, if so you can build the drawers like I did to easily find the movie you are looking for! Or do you just want some basic simple shelves to store stuff inside, you can make that work as well!
This is the REASON I DIY! I LOVE to be able to build to suit my needs! We needed a little room to store odd-sized gaming equipment, a record player and amp… and a lot of DVDs… this is what worked perfectly! You can customize this part to fit exactly what you want! If you happen to want yours just like mine, continue reading on to see how I did all the interior parts of the TV stand!
If you want just one shelf midway in the cabinet, it will simply be 2 pieces of plywood cut at 43 5/8″ and either pocket holed into place, or you can use 1x2s as I did to brace the shelves so you can easily change them if need be!
Building Out the Left Side of the DIY TV Stand

Add the top shelf! Since it is the longest shelf you will need to add it to the media console before adding the doors or drawers!
The top shelf needs to be notched out of the front edges so that the doors can easily swing into this space when opening. They are notched 1″ inward and 4 1/2″ long.
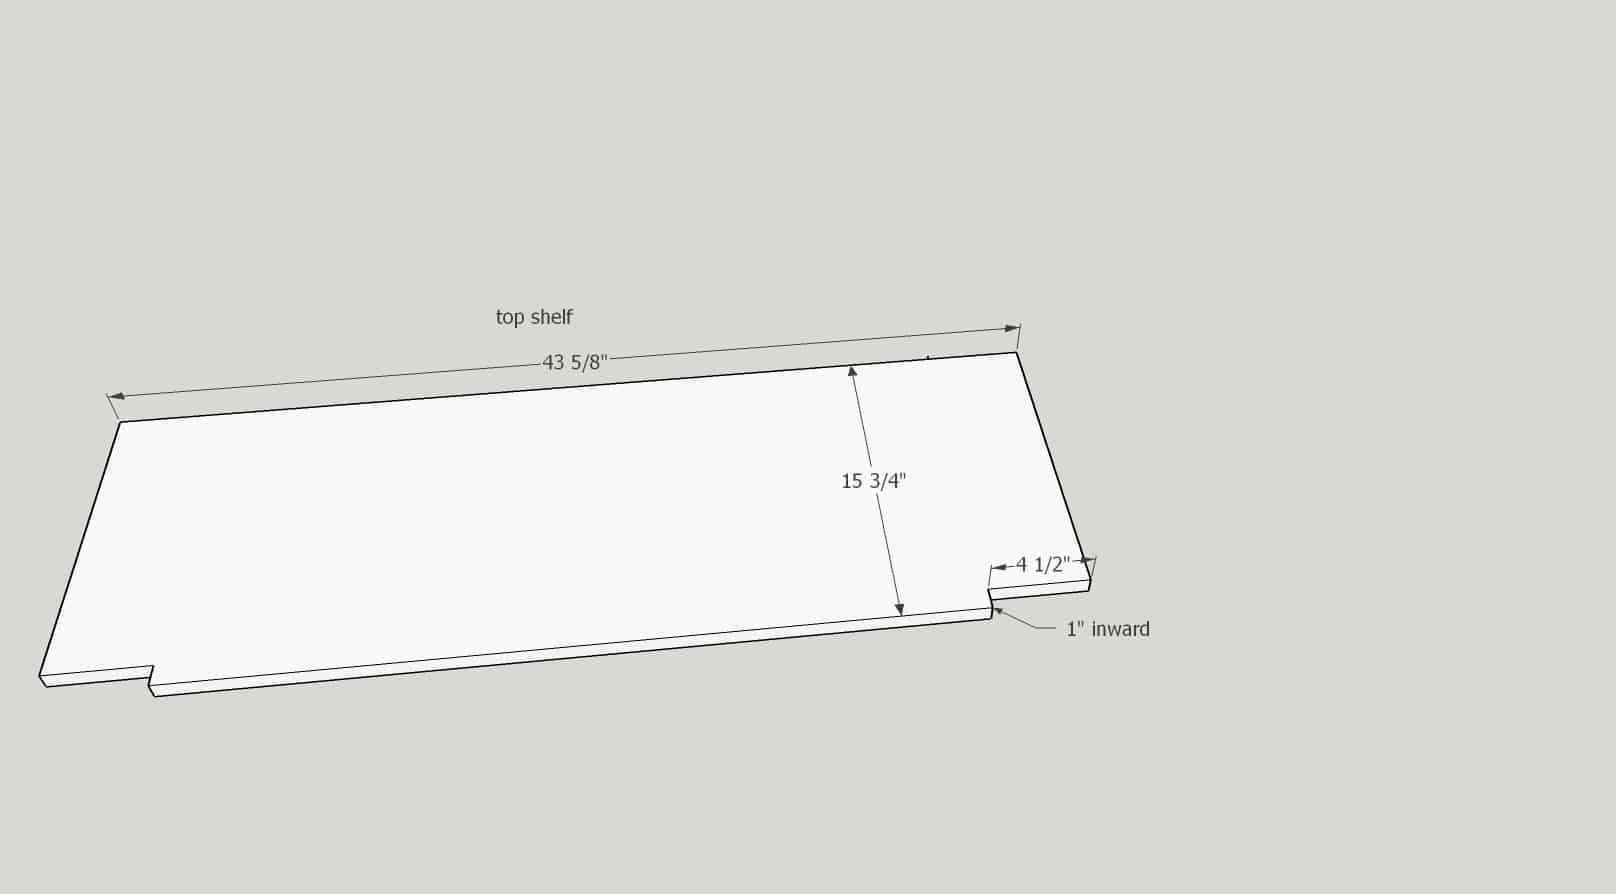
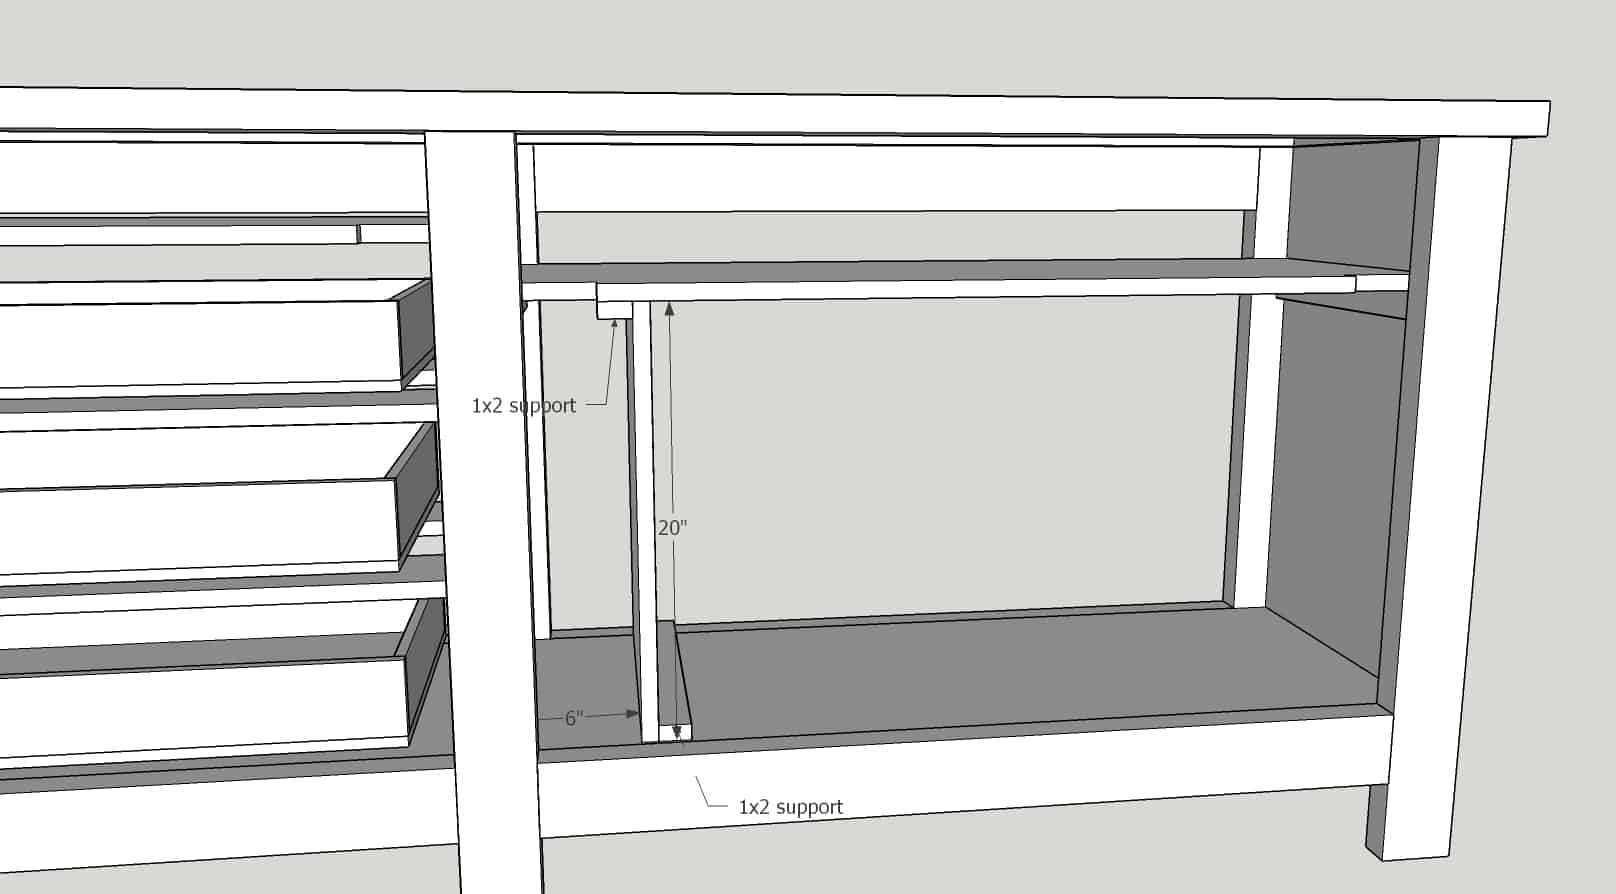
Using the 1x2s @ 15 3/4″ brace the shelf up on both sides with 1 1/4″ screws. You can glue the 1x2s if you would like, but I didn’t so I could move them if I ever wanted to change it up!
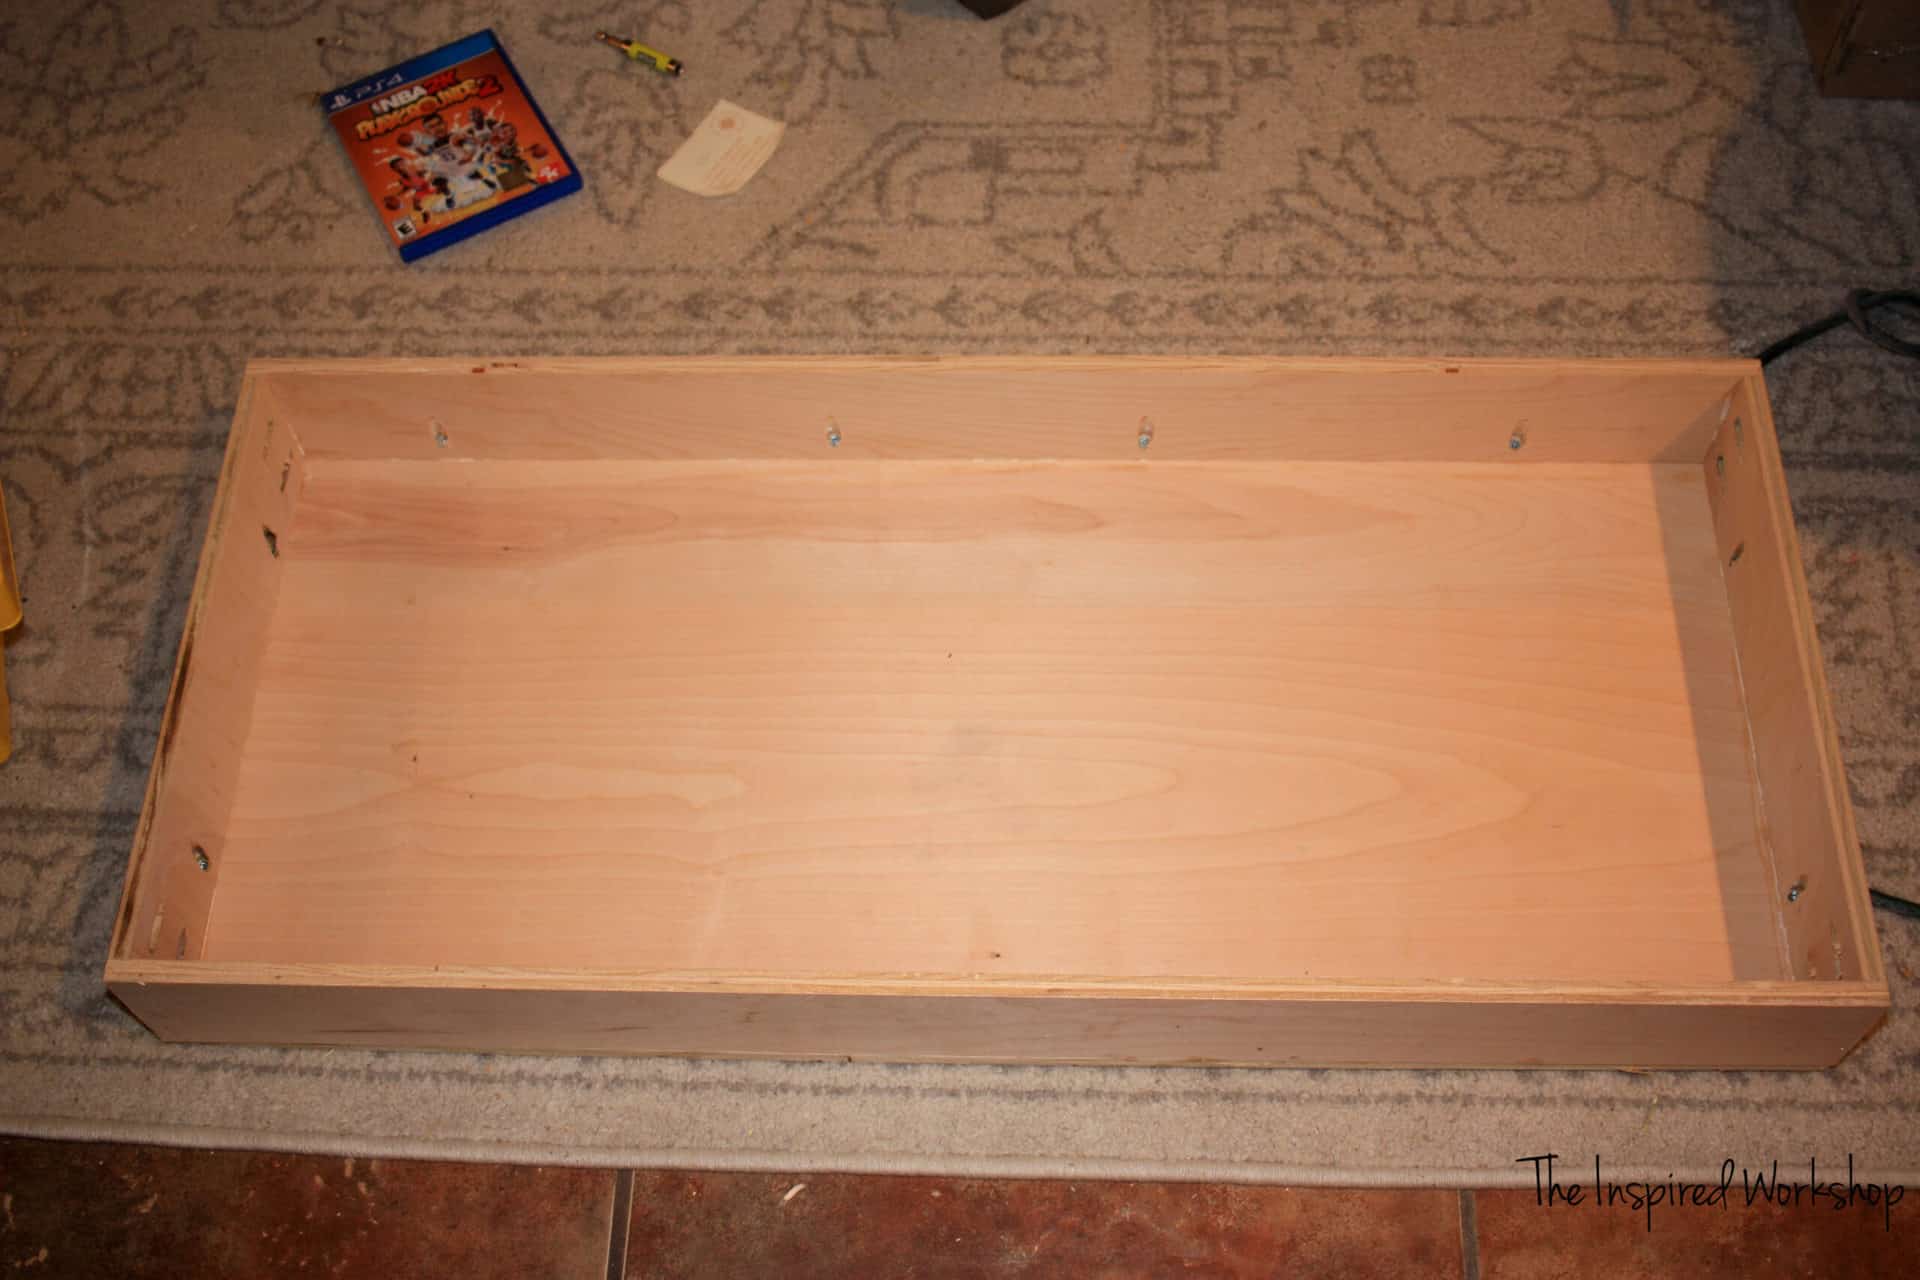
Next, you will build the drawer boxes! They are 36″ long by 15 3/4″ wide, they have to be this short to fit between the two open doors! And before you build yours, you will want to MAKE SURE AND MEASURE between your two open doors! Yes, that does mean that the doors should be in place, or at least holes drilled and tested to make sure of the space between them! Check top and bottom measurements as well, as one of my top dowels went in a little crooked and the bottom drawer had to be slightly smaller than 36″.
Take your piece of 1/2″x 36″x 15 3/4″ piece of plywood and attach 2 – 1/2″x 36″x 3 1/2″ and 2 – 1/2’x 14 3/4″x 3 1/2″ pieces to it with pocket holes drilled at 1/2″ depth and use 1″ screws! Make sure and USE WOOD GLUE or else your boxes can easily fall apart!
As you can see in the pic below, you will drill pocket holes along the edge of all the boards and on the two small (14 3/4″x 3 1/2″) will have holes drilled on both ends as well!
Drawer slides are attached to the bottom of the drawers since they are set too far in to be side slides. I attached the slides to the bottom of the drawer first. By the way, I bought these drawer slides from D. Lawless Hardware and they are a fraction of the cost of the ones from the big box stores, but JUST AS AMAZING!
I used side mount drawer slides even though they have bottom mount drawer slides! Lol!
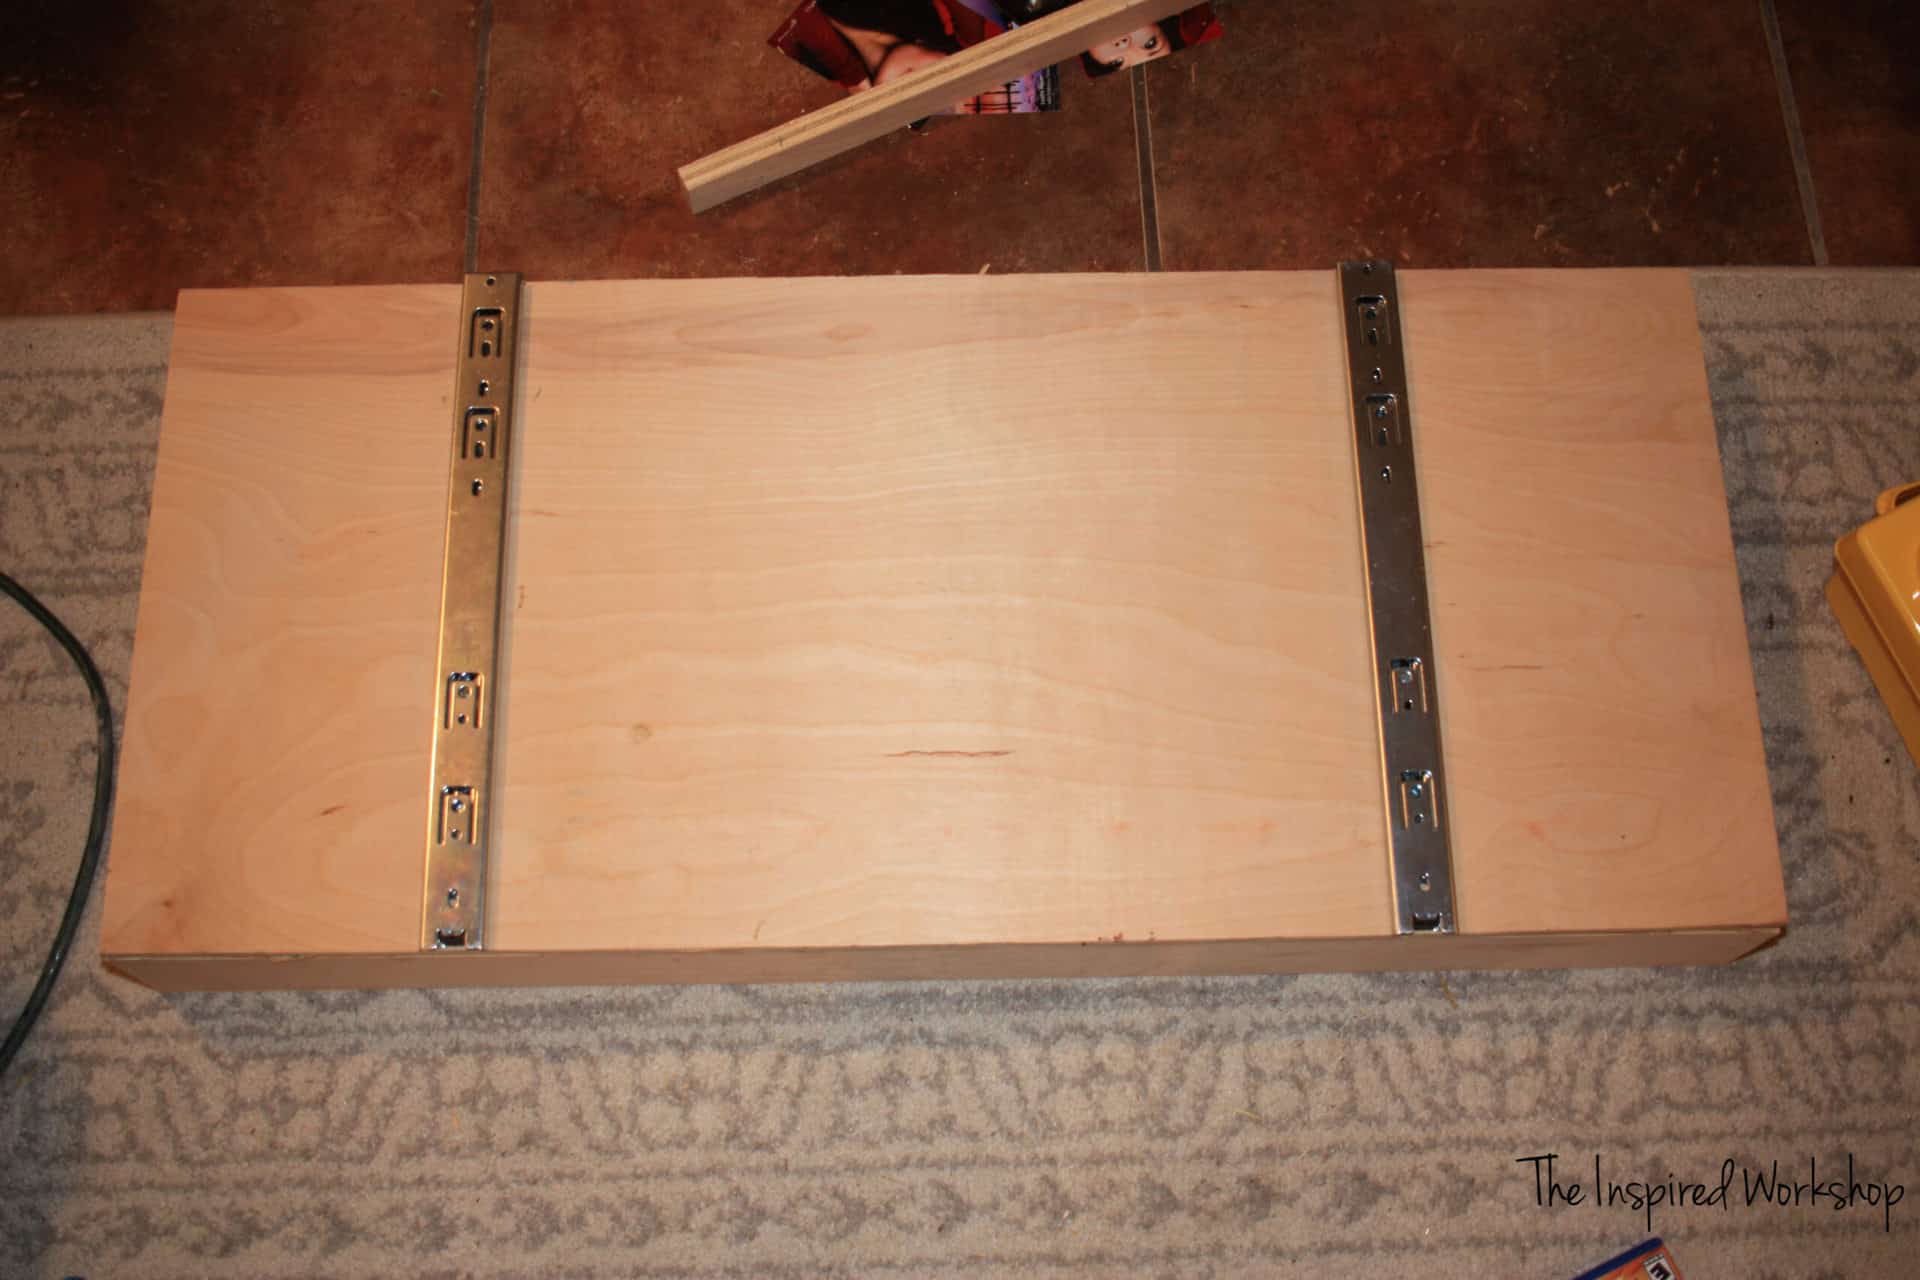
The bottom drawer is just going to have drawer slides affixed to the bottom plywood of the cabinet.
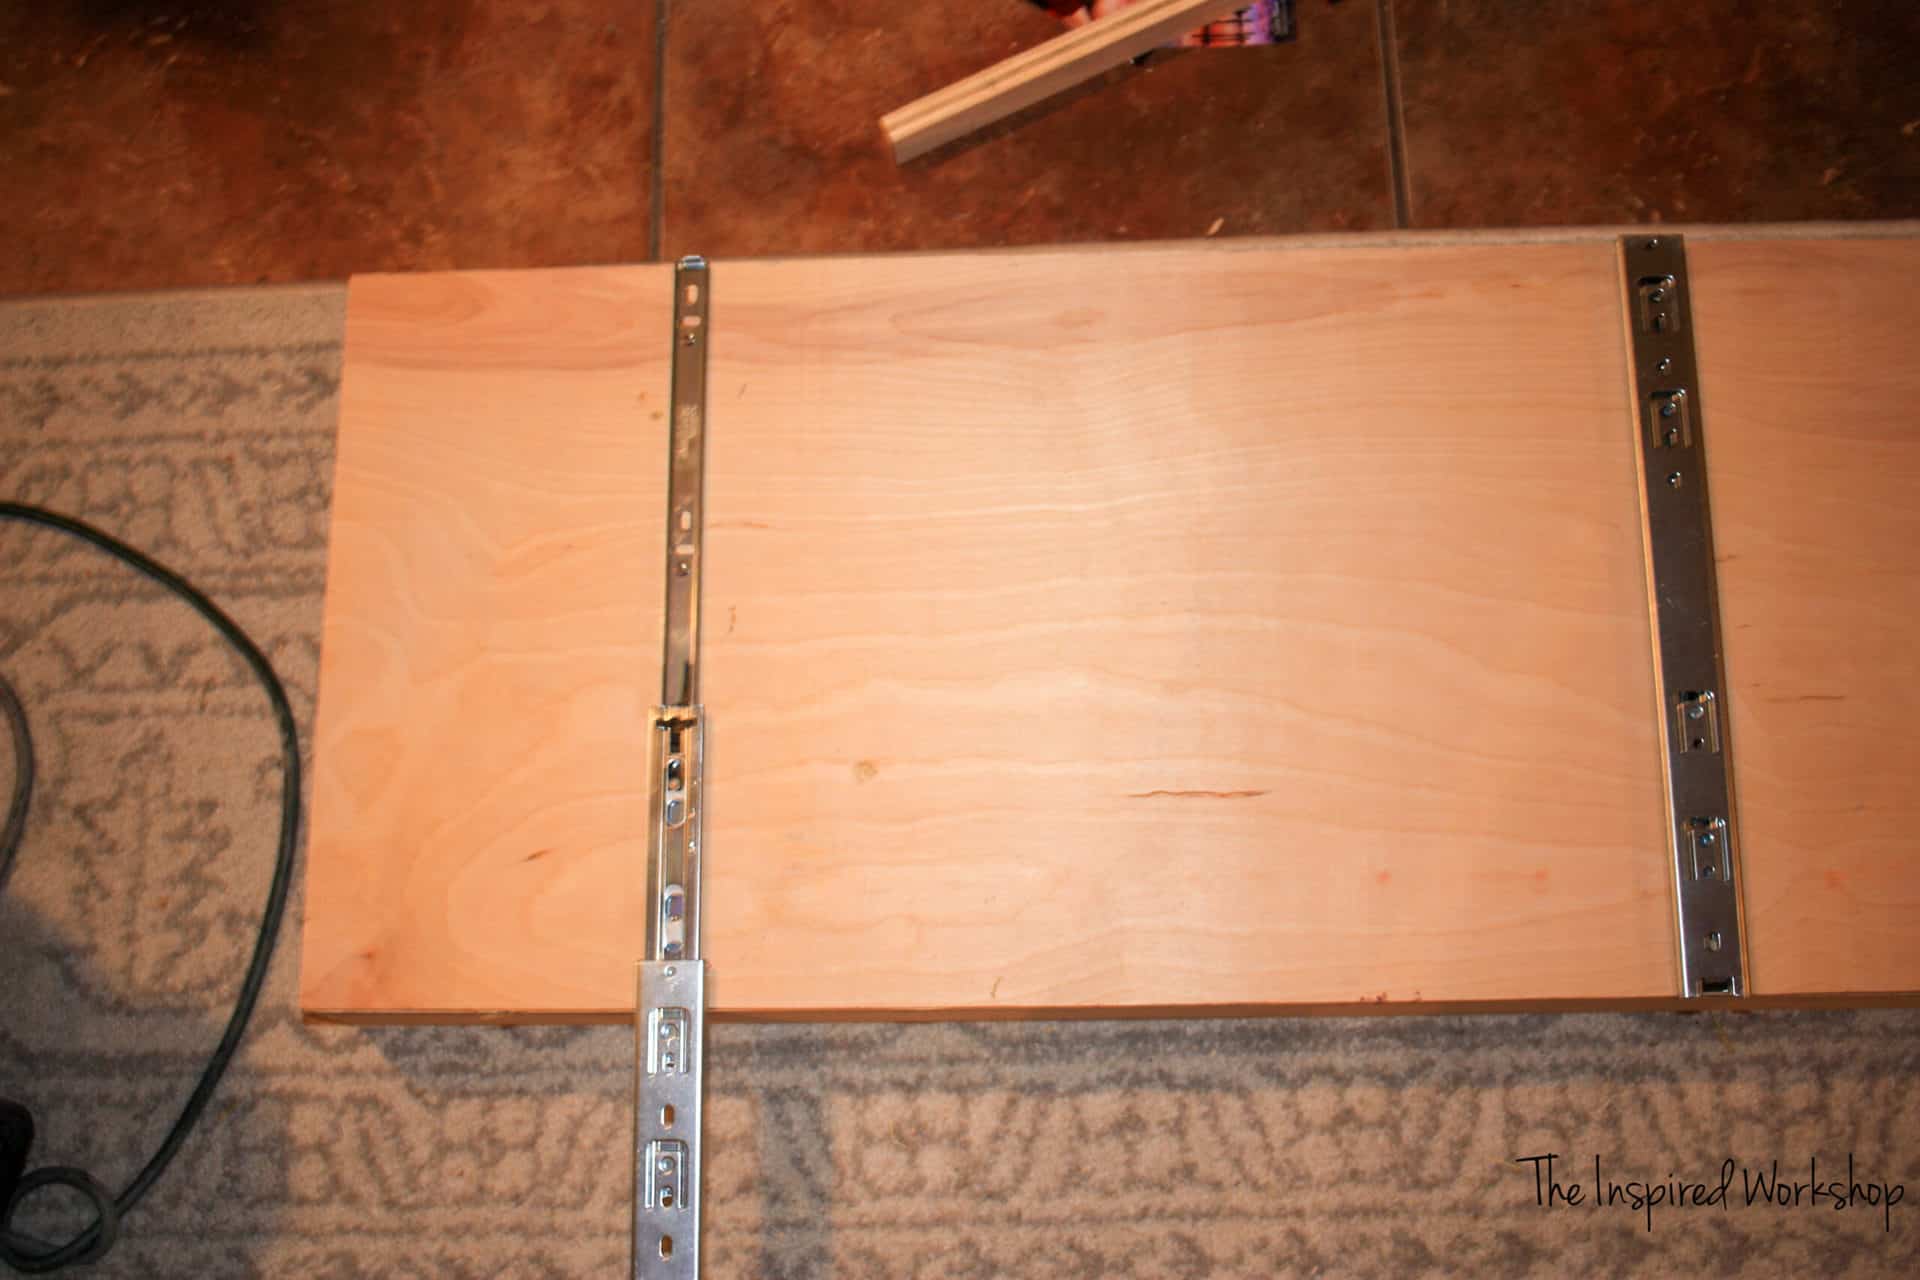
Set the drawer in place, and then push down on the inside of the drawer to slide the drawer out without moving the whole slide, only slide it out a small way and climb over the drawer to attach screws! Then pull the drawer out further to place other screws!


The first drawer is IN!!! Pop open a cold drink and celebrate!!😁

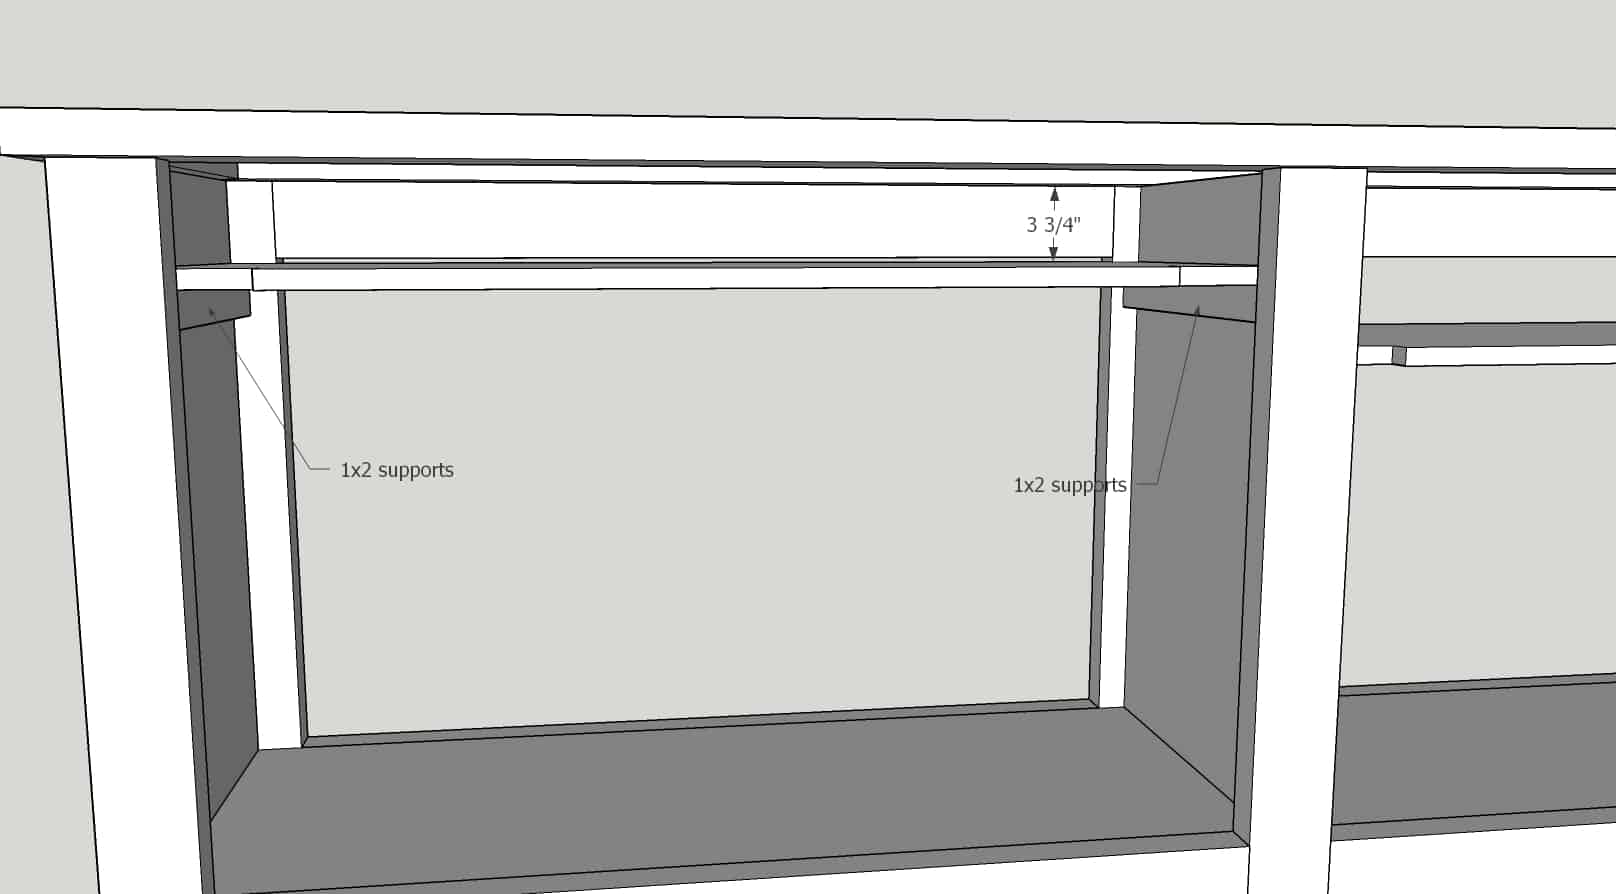
The next drawer needs support to attach the drawer slides to, so I added 2 – 1x5s to attach the slides to, you can use another size board if you can’t find 1x5s but I wouldn’t go with a smaller board, only larger. If you went with a smaller board, there wouldn’t be a place for more than 2 screws in the slides!
I attached the 1x5s the same way I did all the other shelves, just a 1×2 brace. I went ahead and put both of the sets of 1x5s in at this point because you can move them out of your way, but if you don’t put them in at this point you won’t have enough room to put them in!
The first set goes in at 7 1/4″ from the bottom of the cabinet, to the bottom of the 1×5. The second goes in at 15″ up from the bottom of the cabinet to the bottom of 1×5. (supports go below)
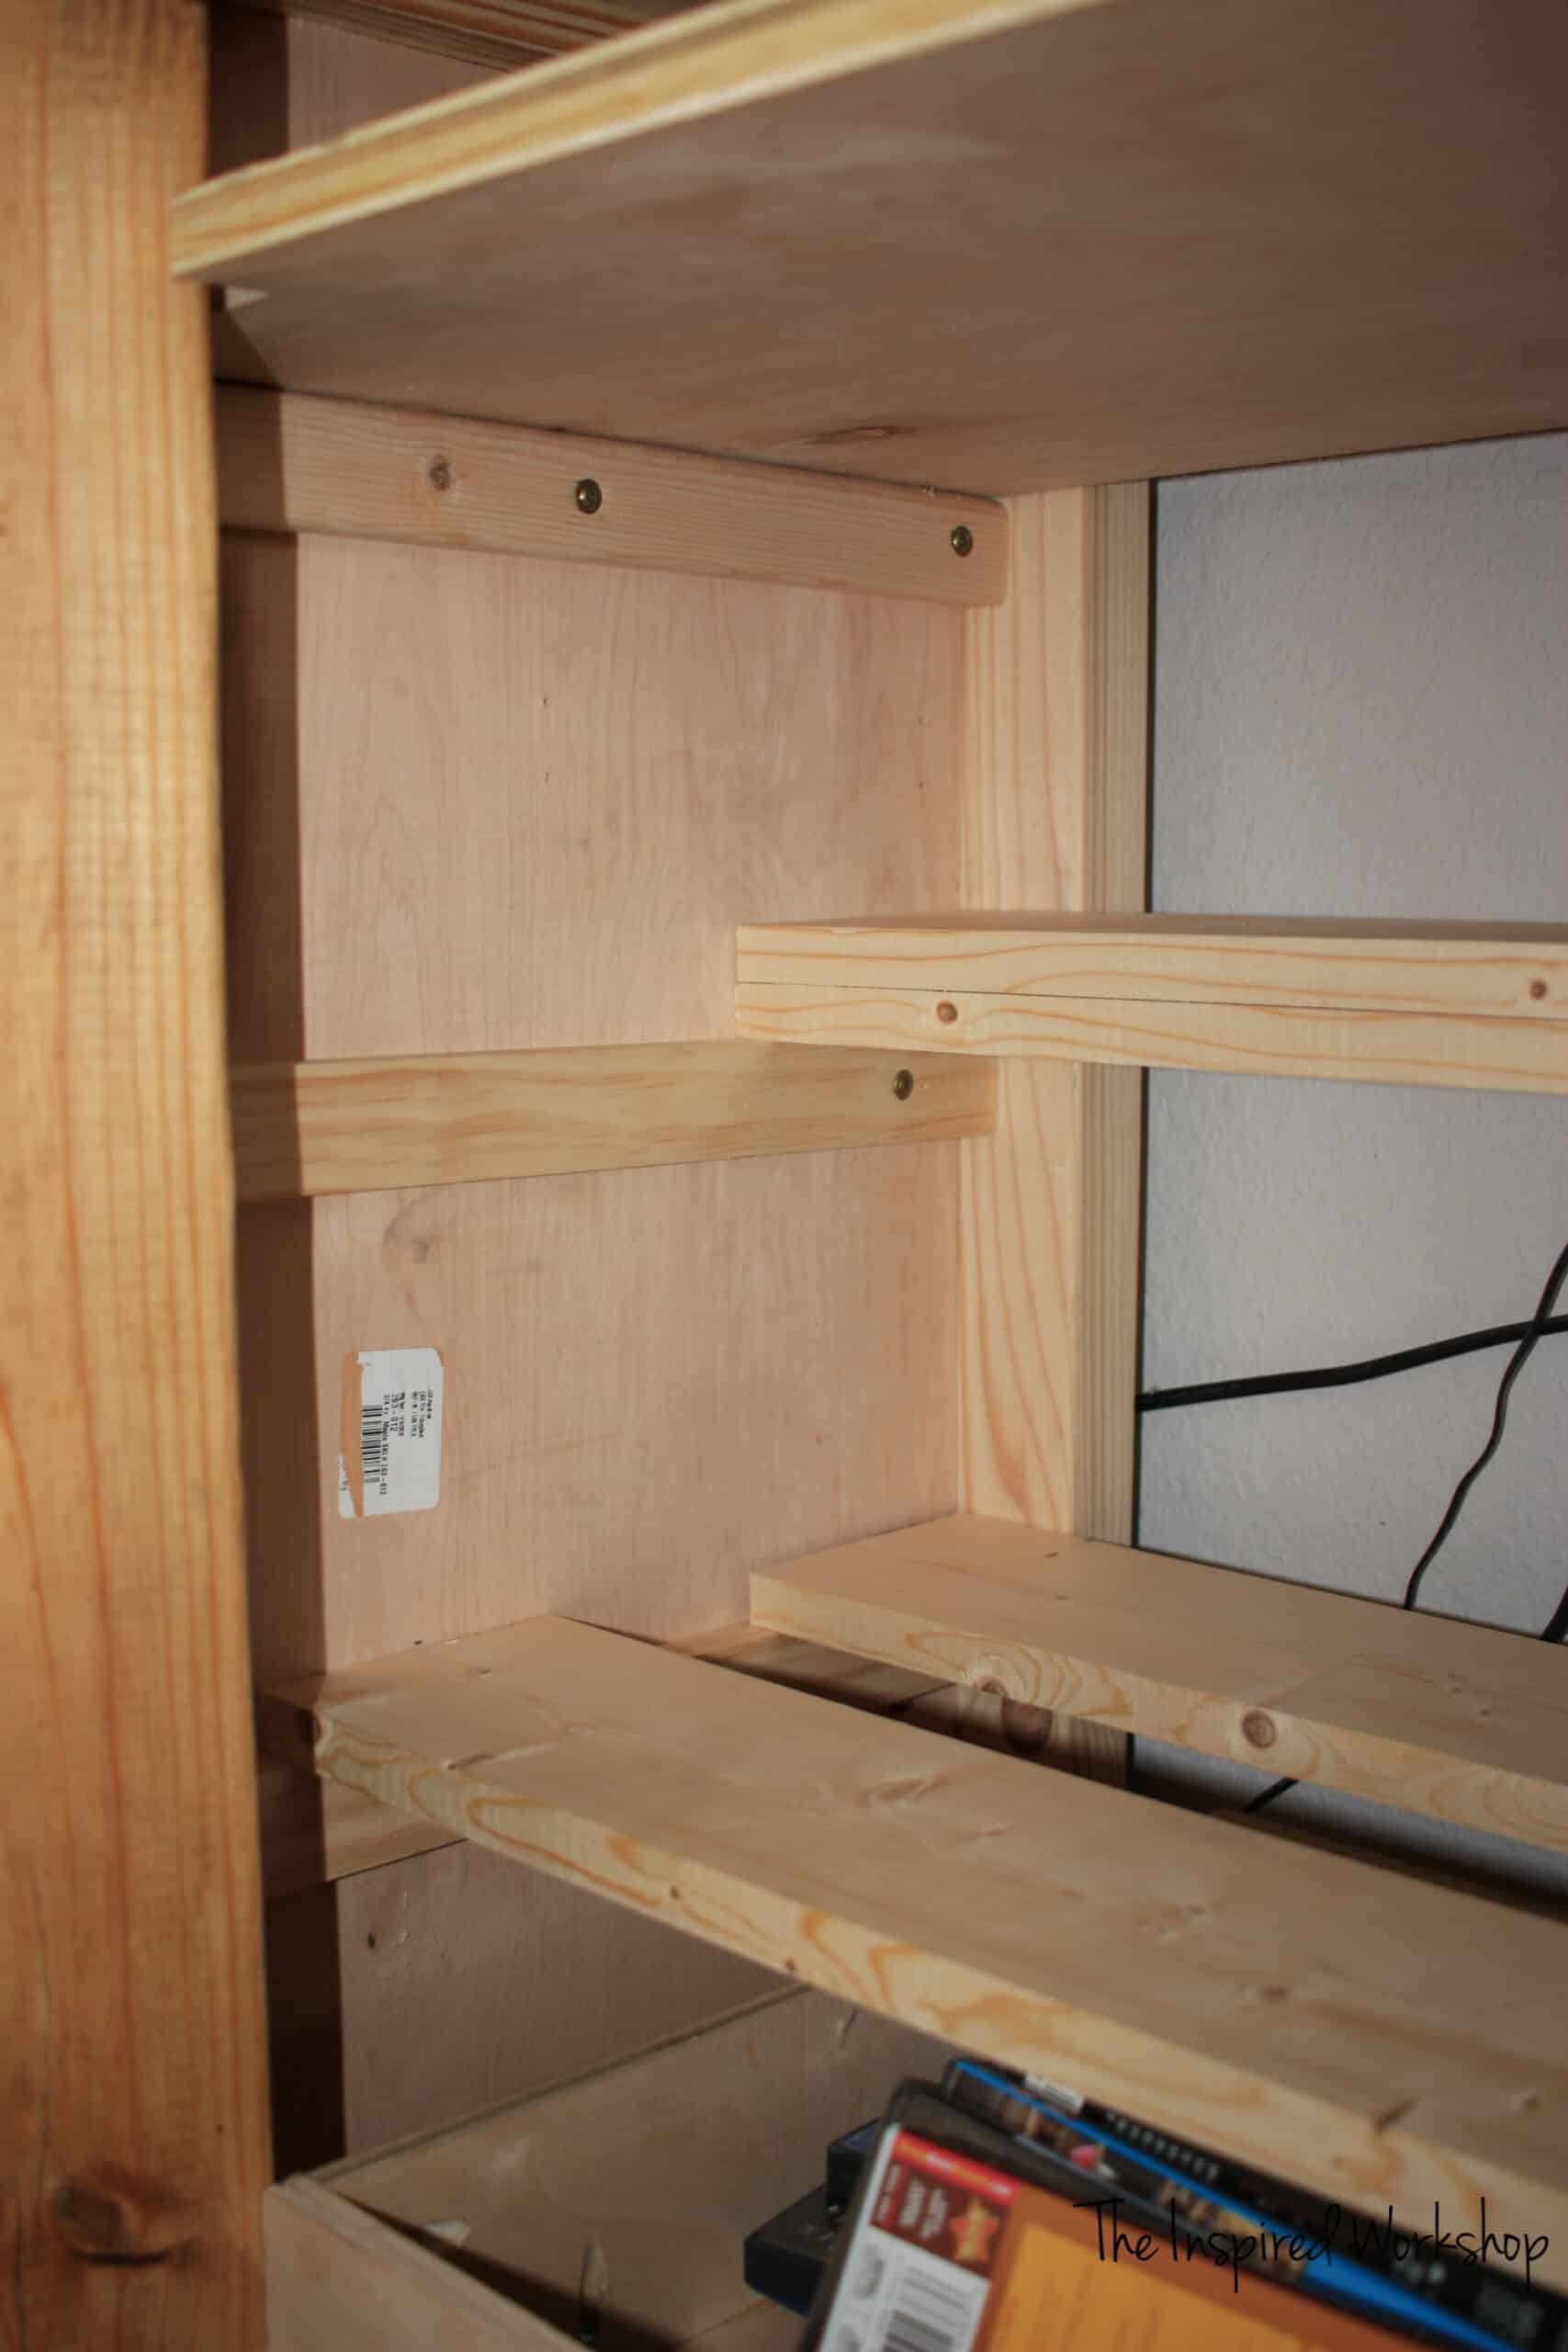
Now all you have to do is build the other 2 drawer boxes and put them in! Keeping the back of the cabinet open is the only way to get the top drawer slides in! After it is all in and finished, then you can add the back…or not as I have yet to do!😂🙈
Building Out the Right Side of the DIY TV Stand
On to the shelves! Woot, Woot!
Now, just an FYI, the shelves must be in BEFORE the doors go on!
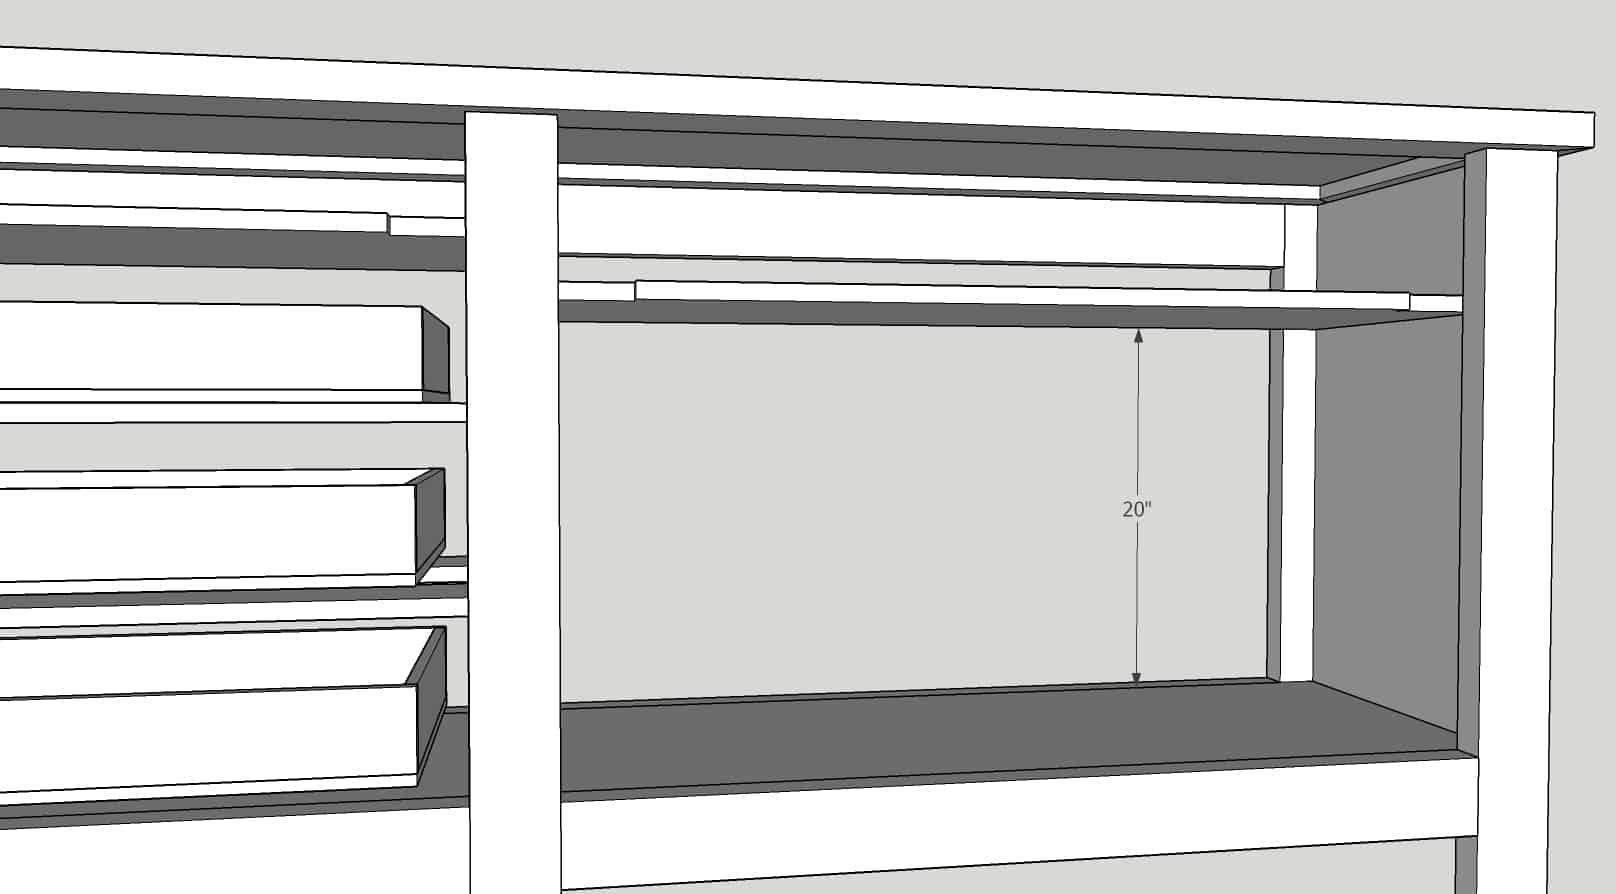
The top shelf is the exact same as on the left side. It is just set a little lower to allow for taller gaming consoles. It is set at 20″ up from the bottom of the cabinet.
On the right side, the same 1×2 @ 15 3/4″ support boards are used to support all shelves. You can choose whether or not you want to screw the shelf down to the support boards or not.
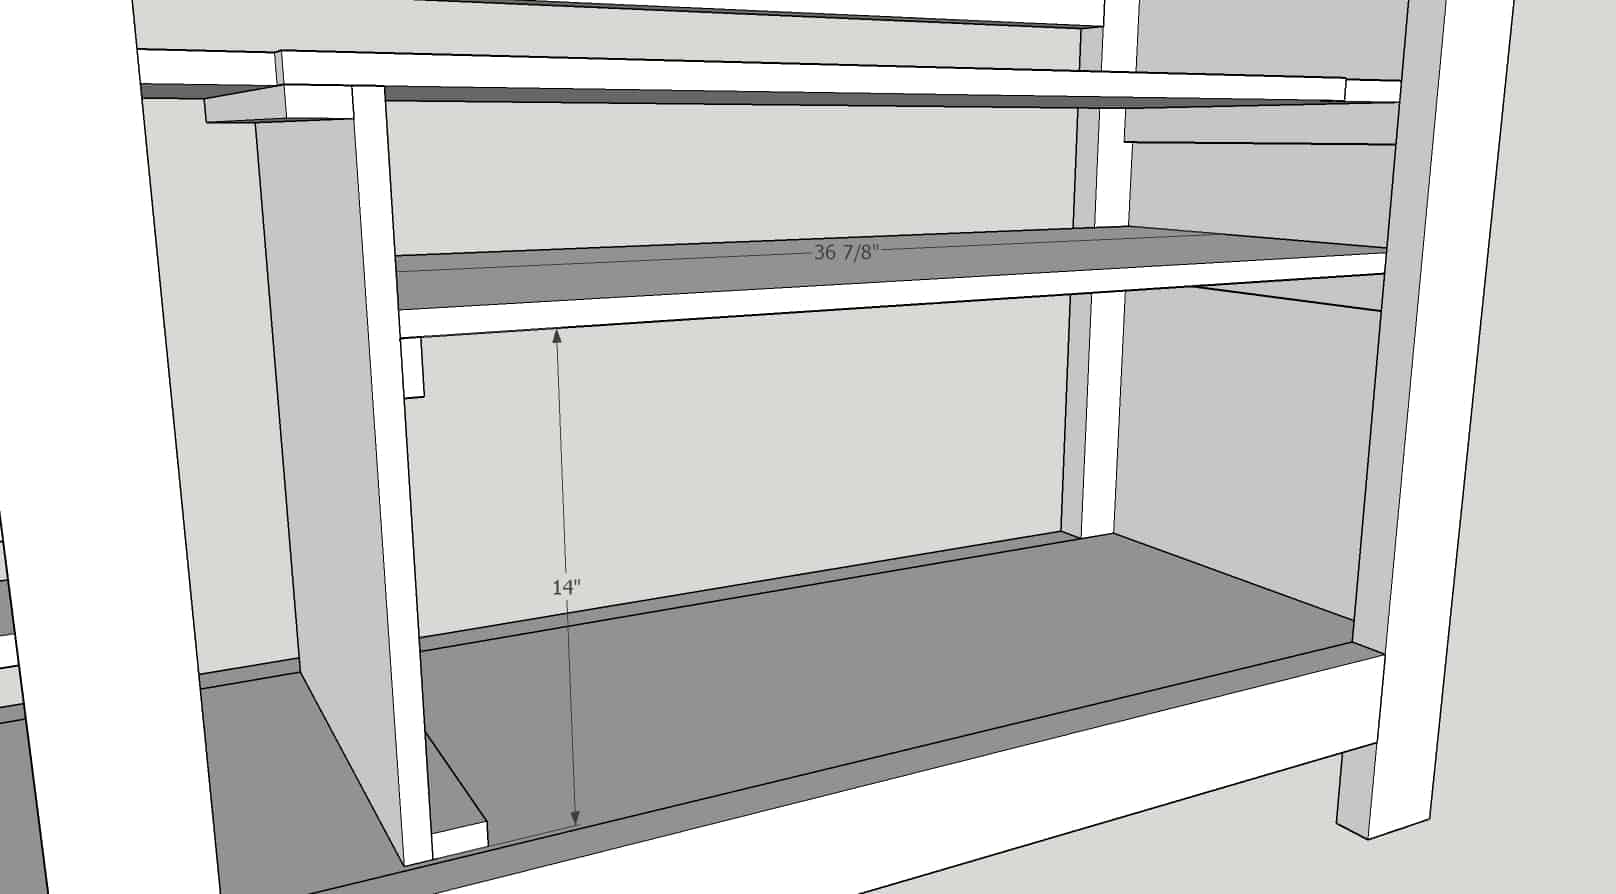
The next shelf is the verticle shelf to the left.
Then the second horizontal shelf.
In this pic below. it does not show the notch cut, but it does NEED TO BE NOTCHED only on the right side but just like the top shelf! The notch will be 1″ inward and 4 1/2″ long. The door will not open if it is not notched!
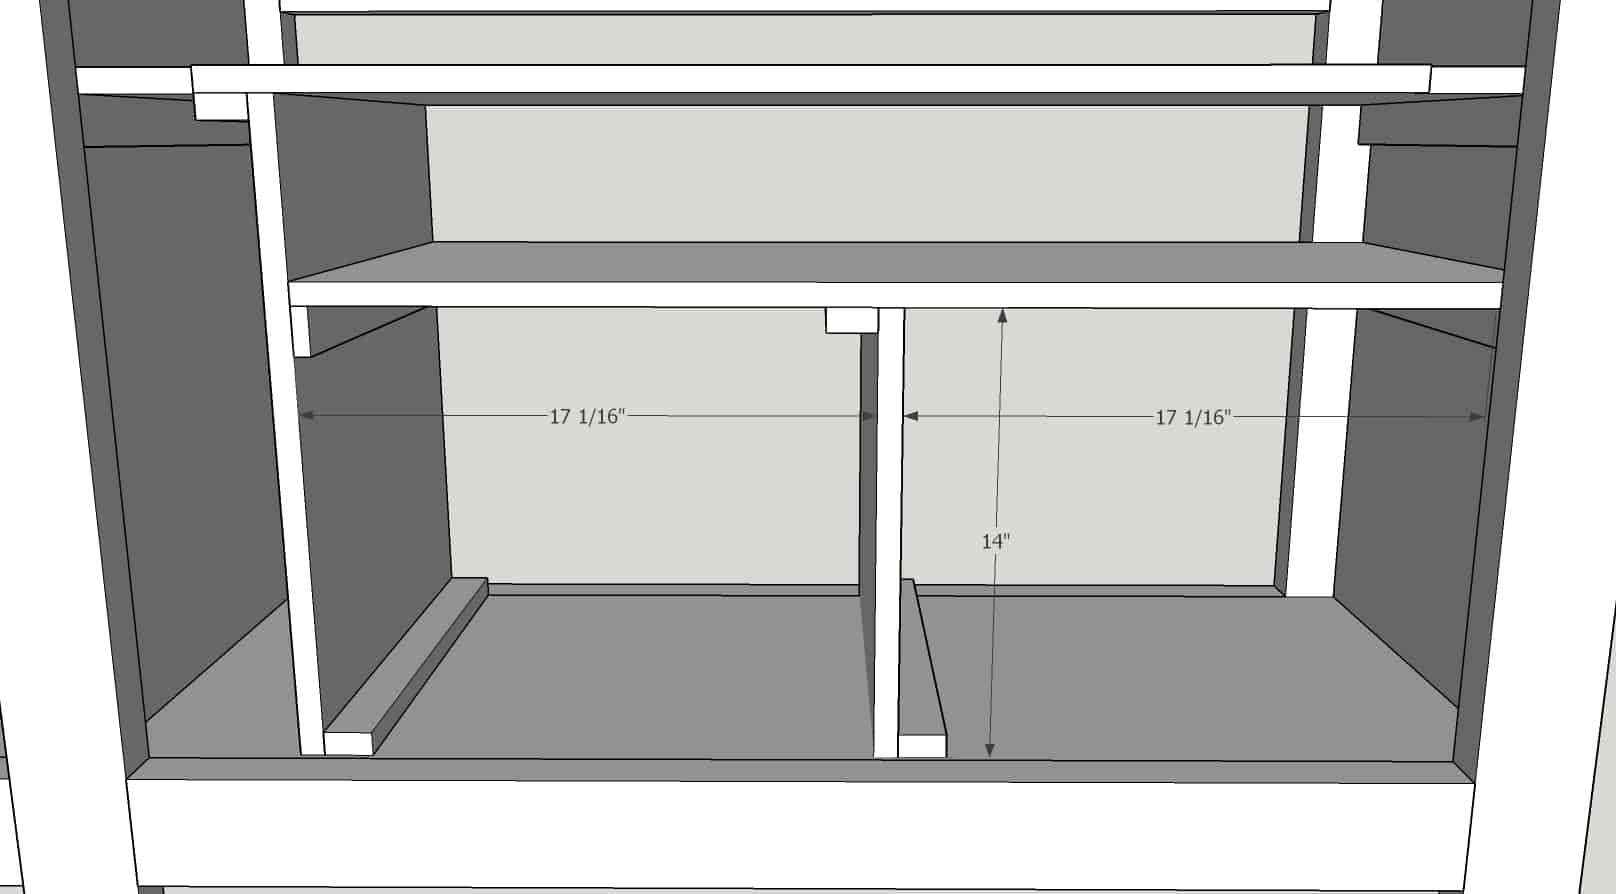
Last but not least is the vertical divider!
Boom! DONE! Fill it up with all the stuff that has been lying around for the last year…oh that’s just me?! My bad!😅😂
Now put doors on this side to COMPLETE your DIY media cabinet, gaming storage, tv stand, whatever you want to call it!! Or heck you can use it as a buffet, or any other table you need! Here’s the link to the DOWEL AND PIPE HINGES in case you missed it above!
And just like that, you made a beautiful piece of artwork that hides and organizes all of your tv watching and gaming needs!
I happen to LOVE it! It looks EVEN BETTER in real life if that’s even possible!😊
Well, I better get to work on all the fun fall projects I have planned over the next couple of weeks! See you soon!

LOVE this post and want to share it with others? Thank you!