DIY Modular Storage System
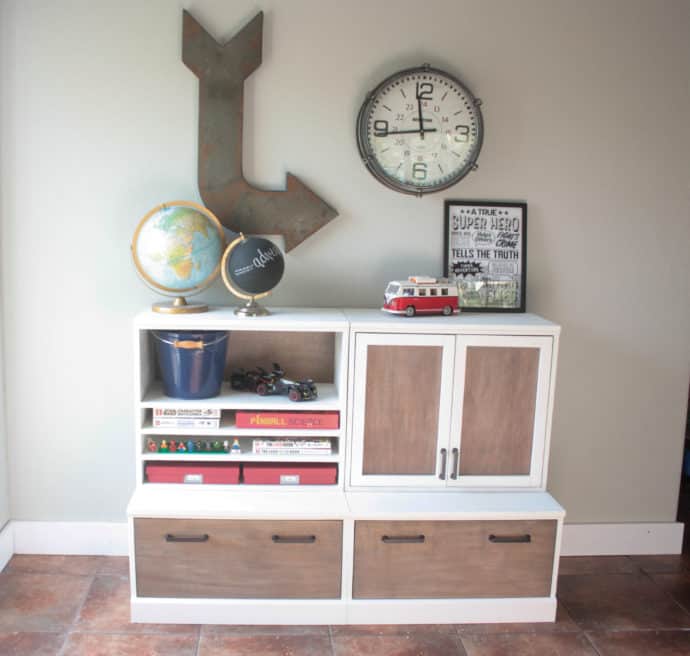
When it comes to kids they can have a lot of stuff from toys and art supplies to sports equipment and books which can quickly get out of hand and make quite the mess if you don’t have the proper storage for all of it! With this DIY modular storage system you can wrangle the mess no matter what your kids are into, the modular storage system can be built with as many or as few pieces as you need! So many options to organize all the kids stuff in their bedroom or playroom!
This post is sponsored by Kreg Tool!
Do you ever have a project that you start and literally so many things go wrong with it it seems almost insanely funny but so utterly frustrating that you really want to bash it to pieces?! Well, that was today’s project for me!! Lol!! I had so many things go wrong I don’t even know how I managed to make it even remotely presentable, but I have to say this DIY modular storage system looks pretty darn good for how bad she made me feel!! So I present to you, all the answers to your storage prayers!!
I have loved the Cameron Wall System from PBK for quite some time, but it runs around three hundred dollars per piece and by the time you pay taxes and shipping, it’s even more! What I created here is a four-piece system, so that would cost over $1400!! No thank you!! But there are so many options, you can get a multitude of looks with their system so you can’t help but love it and want to buy it! But then you remember, I can build that shizzle!! Lol!
Plus, when you DIY you can create solutions to problems that you may have, that the store designers just didn’t think of…like this cute little floor desk that is hidden away as a drawer! It is still a fully functioning drawer too!! My kids always tend to sit on the floor in the living room and use the coffee table to do their homework, and now they can have a cute little space of their own to sit and draw or do homework!

Check out that gorgeous PUREBOND Plywood too!! So beautiful, and better for your health and your home than other plywood!

The great thing about this system too is that they are all individual pieces, you can mix and match them, add to them, and separate them any time you need!!
That was the selling point I needed to get in gear and build them! I am not sure we are going to be in this house much longer, so anything that I can easily change up if need be is the perfect option for me! I may have a large wall in this house but not the next and I can break them up and still have all the storage! I happen to plan on adding two more cubbies to the top!! I didn’t realize it’s pretty short so I can utilize even more storage by building a couple more!! Yassss!!

You can get the FREE Plans for the pieces pictured here over at KregTool.com!
***NOTE: Make sure and attach all pieces to the wall to keep from having them fall on your children! My kids are old enough to know not to stand on a drawer, if yours are not, do not build this! I am NOT responsible for any accidents that may happen!***
So have you stopped in at Kreg Tool yet?! Did you know they have over 500 different build plans?! Isn’t that incredible?! Since Kreg Tool is Kreg’s site, every plan listed uses a Kreg Jig to complete it!! Pretty cool to offer 500 plans and no fancy expensive tools needed for any of them, just your handy dandy little Kreg Jig!! Make sure and head over there to see all the wonderful plans!!

Down below you can find the plans for the other parts of the DIY modular storage system that PBK offerd because I am planning on building other pieces but I will not make you wait until I do to post the plans! They are here for you today, just know that the ones below I have not actually built yet, the ones on Kreg Tool’s website are tested and built! I will be building the others soon from these same plans though!!
I can’t wait to fill them drawers up with goodies!! My boys already claimed them for their lego builds that they don’t want getting messed up!! Lol!! They sure are plenty big to house a couple of builds each!!
Gathering Supplies to Build the Modular Storage System
Want to make ripping your plywood for this build super easy? Have you seen Kreg’s new Accucut (affiliate link)? It is like my frugal pocketbook met a track saw and had a baby!! Yeah, it’s that amazing!! I was able to easily cut all my pieces…now don’t judge me on the fact that my blade was dulled immediately and was splintering up my board because I cut into the cinder block that was under my piece of plywood… and I was going to have to go to the hardware store to grab another…so I may have kept cutting with it!! And then I ended up having to go get another because it got out of hand with the splintering!!
You guys, one other thing, I just have to tell you!! I love my new paint sprayer by Home Right!! I am not paid by them to say anything, nor did I receive anything for free!! I just want to share this amazing tool with you because it saved my butt on this project!! I was able to quickly put two flawless coats on this in no time!! I have the older model and I’ve heard the newer one is even better but the cheaper older one works just fine for me!! Click the picture or link to get yourself one on Amazon! (affiliate link) Home Right Paint Sprayer

Now for the extra plans for cubbies, I haven’t built yet! I am going to break down each one with its own materials and cut list so hopefully, that will help keep it from getting confusing if you are building only certain ones!
Here are some ideas of all that you can do with the plans!


And so many more!
Bases:
- Media Base
- Drawer Base (find it at build something)
- Open Base (use the plans for Drawer Base and just raise the bottom up 3″)
- Market Bin Base
Cubbies and Cabinets:
- Cabinet w/ Doors (find it at build something)
- Cabinet w/ Chalkboard doors (use the same plans as cabinet w/ doors just paint door panel w/ chalkboard paint
- Market Bin Cubby
- Open Cubby
- Bookcase Cubby (use the same plans as the Art Cubby just don’t add the small shelves)
- Art Cubby (find the plans at build something)
Alright, I’ll just start with the bases and go from there into cubbies!
Base Options for Modular Storage System
Media Base for Modular Storage System

One thing I love about all the pieces in this collection is that they are all basic squares without any framing or special skills needed at all!! All you need is some 3/4″ plywood and your Kreg Jig and you are almost all set!! Lol!! I did use edge banding for this first time on this project and I said every cuss word in the book thanks to that stuff…and then I realized it was me!! Lol!! My last piece I did was not too bad at all!
Materials List:
- 1 – 3/4″ x 4′ x 8′ sheet of plywood
- 1 – 1x4x8
- 1 – 8′ stick of small molding, I got mine from Lowe’s!
- 1 – 1/4″ x 4′ x 8′ sheet of plywood if you want to put a back on it
Cut List
- 1 – 3/4″ x 21 1/2″ x 52″ – top
- 1 – 3/4″ x 21″ x 50 1/2″ – bottom
- 2 – 3/4″ x 21 x 14 1/2″ – sides
- 2 – 3/4″ x 21″ x 13 3/4″ – shelf dividers
- 1 – small molding piece cut @ 52″
- 1 – 1×4 @ 52″
- 3/4″ Edge banding-this one is such a good deal compared to what I paid at Lowe’s for 25′
- Kreg Jig
- Circular Saw or table saw
- drill
- 1 1/4″ pocket hole screws
- 1″ pocket hole screws
- Brad nailer
- 1 1/4″ brad nails
- wood glue
Let’s whip this little fella into shape!
Start by placing the top upside down, so if there’s a side that looks prettier than the other, place the pretty side down and pocket hole your two side pieces to it drilling 3/4″ pocket holes and using 1 1/4″ screws and wood glue to connect! The front will have the 1/2″ overhang!

Next, attach the bottom with the same, 3/4″ pocket holes and 1 1/4″ screws with wood glue! The bottom is set up 2 3/4″ from the ground!

Add a brace to make sure there isn’t any sagging in the middle, using the same pocket holes and screws with wood glue throughout the plan!! I won’t keep repeating myself so you just know, 3/4″ holes and 1 1/4″ screws with glue unless I state otherwise!

Next add your two shelves!

The pictures I am showing are of the back just as a reminder, the front has the 1/2″ overhang and so it makes it easier to add the shelves from the back where they are flush!
Last is just the finishing touches on the front, on the ones I built, I took my 1×4 and routed a slanted edge just to soften the top and make it look a little more like molding! I just brad nailed both pieces of molding with 1 1/4″ brad nails and of course some wood glue!


And that one is finished! Edge band it and finish it to your preference! You can also place a 1/4″ plywood back on it if you would like!
Market Base

Materials:
1 – 3/4″ 4′ x 4′ plywood
1 – 1x4x8
same tools as media base
Cut List:
2 – 3/4″ x 14 1/2″ x 21″ sides
1 – 3/4″ x 14″ x 29 1/2″ top
1 – 3/4″ x 14 1/2″ x 28″ back
1 – 3/4″ x 7 1/4″ x 28″ front
1 – 1×4 @ 29 1/2″
You will probably notice that they all have about the same plans, minus a few features that are a little off, but the basic steps are the same!
This time start by cutting the first boards to the shape!

Next attach the sides to the top! This plan will use 3/4″ pocket holes and 1 1/4″ screws with wood glue unless otherwise stated! So each time I say to attach , that is what I mean!

Attach the front piece flush with the front!

Attach the bottom flush with the side bottoms! Make sure and pocket hole bottom to the front as well!

Pocket hole the back flush with the sides!

Add your 1×4 to the front with 1 1/4″ brad nails and wood glue. I routed the edge of my 1x4s to look a little more like molding!

Add your edge banding and finish as you want!
Open Cubby

This cubby may be the simplest one to build of all of them!
Materials:
-3/4″ x 4′ x 8′ sheet of plywood
-1/4″ x 4′ x 4′ sheet of plywood
-small molding
-same tools as listed for media base
Cut List:
-2 – 3/4″ x 14″ x 23 3/4″ sides
-1 – 3/4″ x 14 1/2″ x 29 1/2″ top
-1 – 3/4″ x 14″ x 28″ bottom
-1 – 3/4″ x 14″ x 23″ vertical divider
-2 – 3/4″ x 14″ x 13 5/8″ shelves
Place the top down and pocket hole the two sides into the top, using 3/4″ pocket holes and 1 1/4″ screws along with wood glue ( this will be used throughout the plan unless stated otherwise!) The front will have a 1/2″ overhang on the top!

Attach the bottom flush with the ends of the sides!

Attach your vertical divider, flush to the back making sure that the overhang stays to the front! This is the back view and it is still upside down!

Next add your shelves!

Turn it around and right side up, to add the molding to the top! Just brad nail it in with 1 1/4″ brad nails and wood glue!

Add edge banding and finish with the finish of your choice!
Market Bin Cubby
Last one of the series!

Materials List:
-1 – 3/4″ x 4′ x 8′ sheet of plywood
-1 – 1/4″ x 4′ x 4′
-small molding
Cut List:
-2 – 3/4″ x 15 1/4″ x 23 3/4″ shaped side panel
-1 – 3/4″ x 14 1/2″ x 29 1/2″ top
-2 – 3/4″ x 13 1/4″ x 28″ bottom and shelf
-2 – 3/4″ x 4″ x 29 1/2″ front rails
-2 – 3/4″ x 13 1/4″ x vertical dividers
THis one gets a little bit trickier but it’s not hard!
First cut both of your shaped sides, I will clamp mine together and cut them at the same time when I build mine…just a little tip so they will be the same!

Now join your sides to your top, again you will use 3/4″ pocket holes, 1 1/4″ screws and wood glue for the plan unless otherwise noted!

Next, attach the front 4″ boards to the angled fronts! I would pocket hole from the inside into the boards!

Next add the bottom!

Then add the shelf, it will be level with the bottom of the second board!

Next add your vertical divider!

Last turn that baby around and add your small molding to the top!!

Add your edge banding and viola!! Finished!! Now you have all the plans you need to build the most awesome wall of storage or a small piece!! Finish as you please!
Now you have all the plans you need to build the biggest most awesome wall of storage or a small set, whatever you need!
If you have any questions feel free to ask below! I love reading your comments so leave me as many as you want below!! ????
Happy Building!
Cara

2 Comments