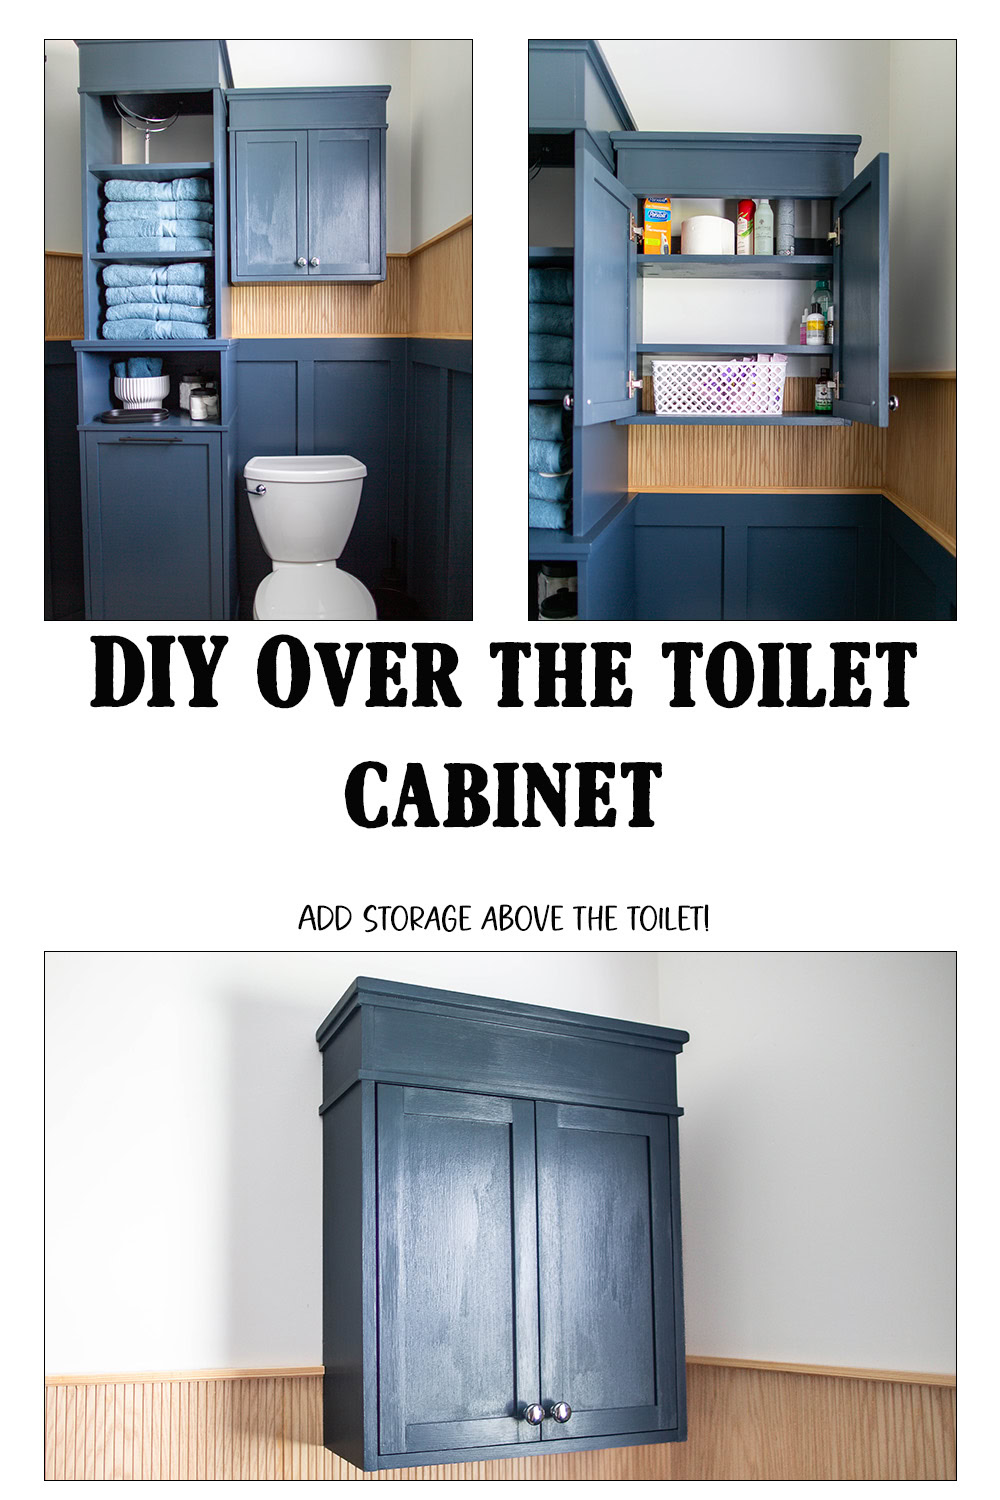
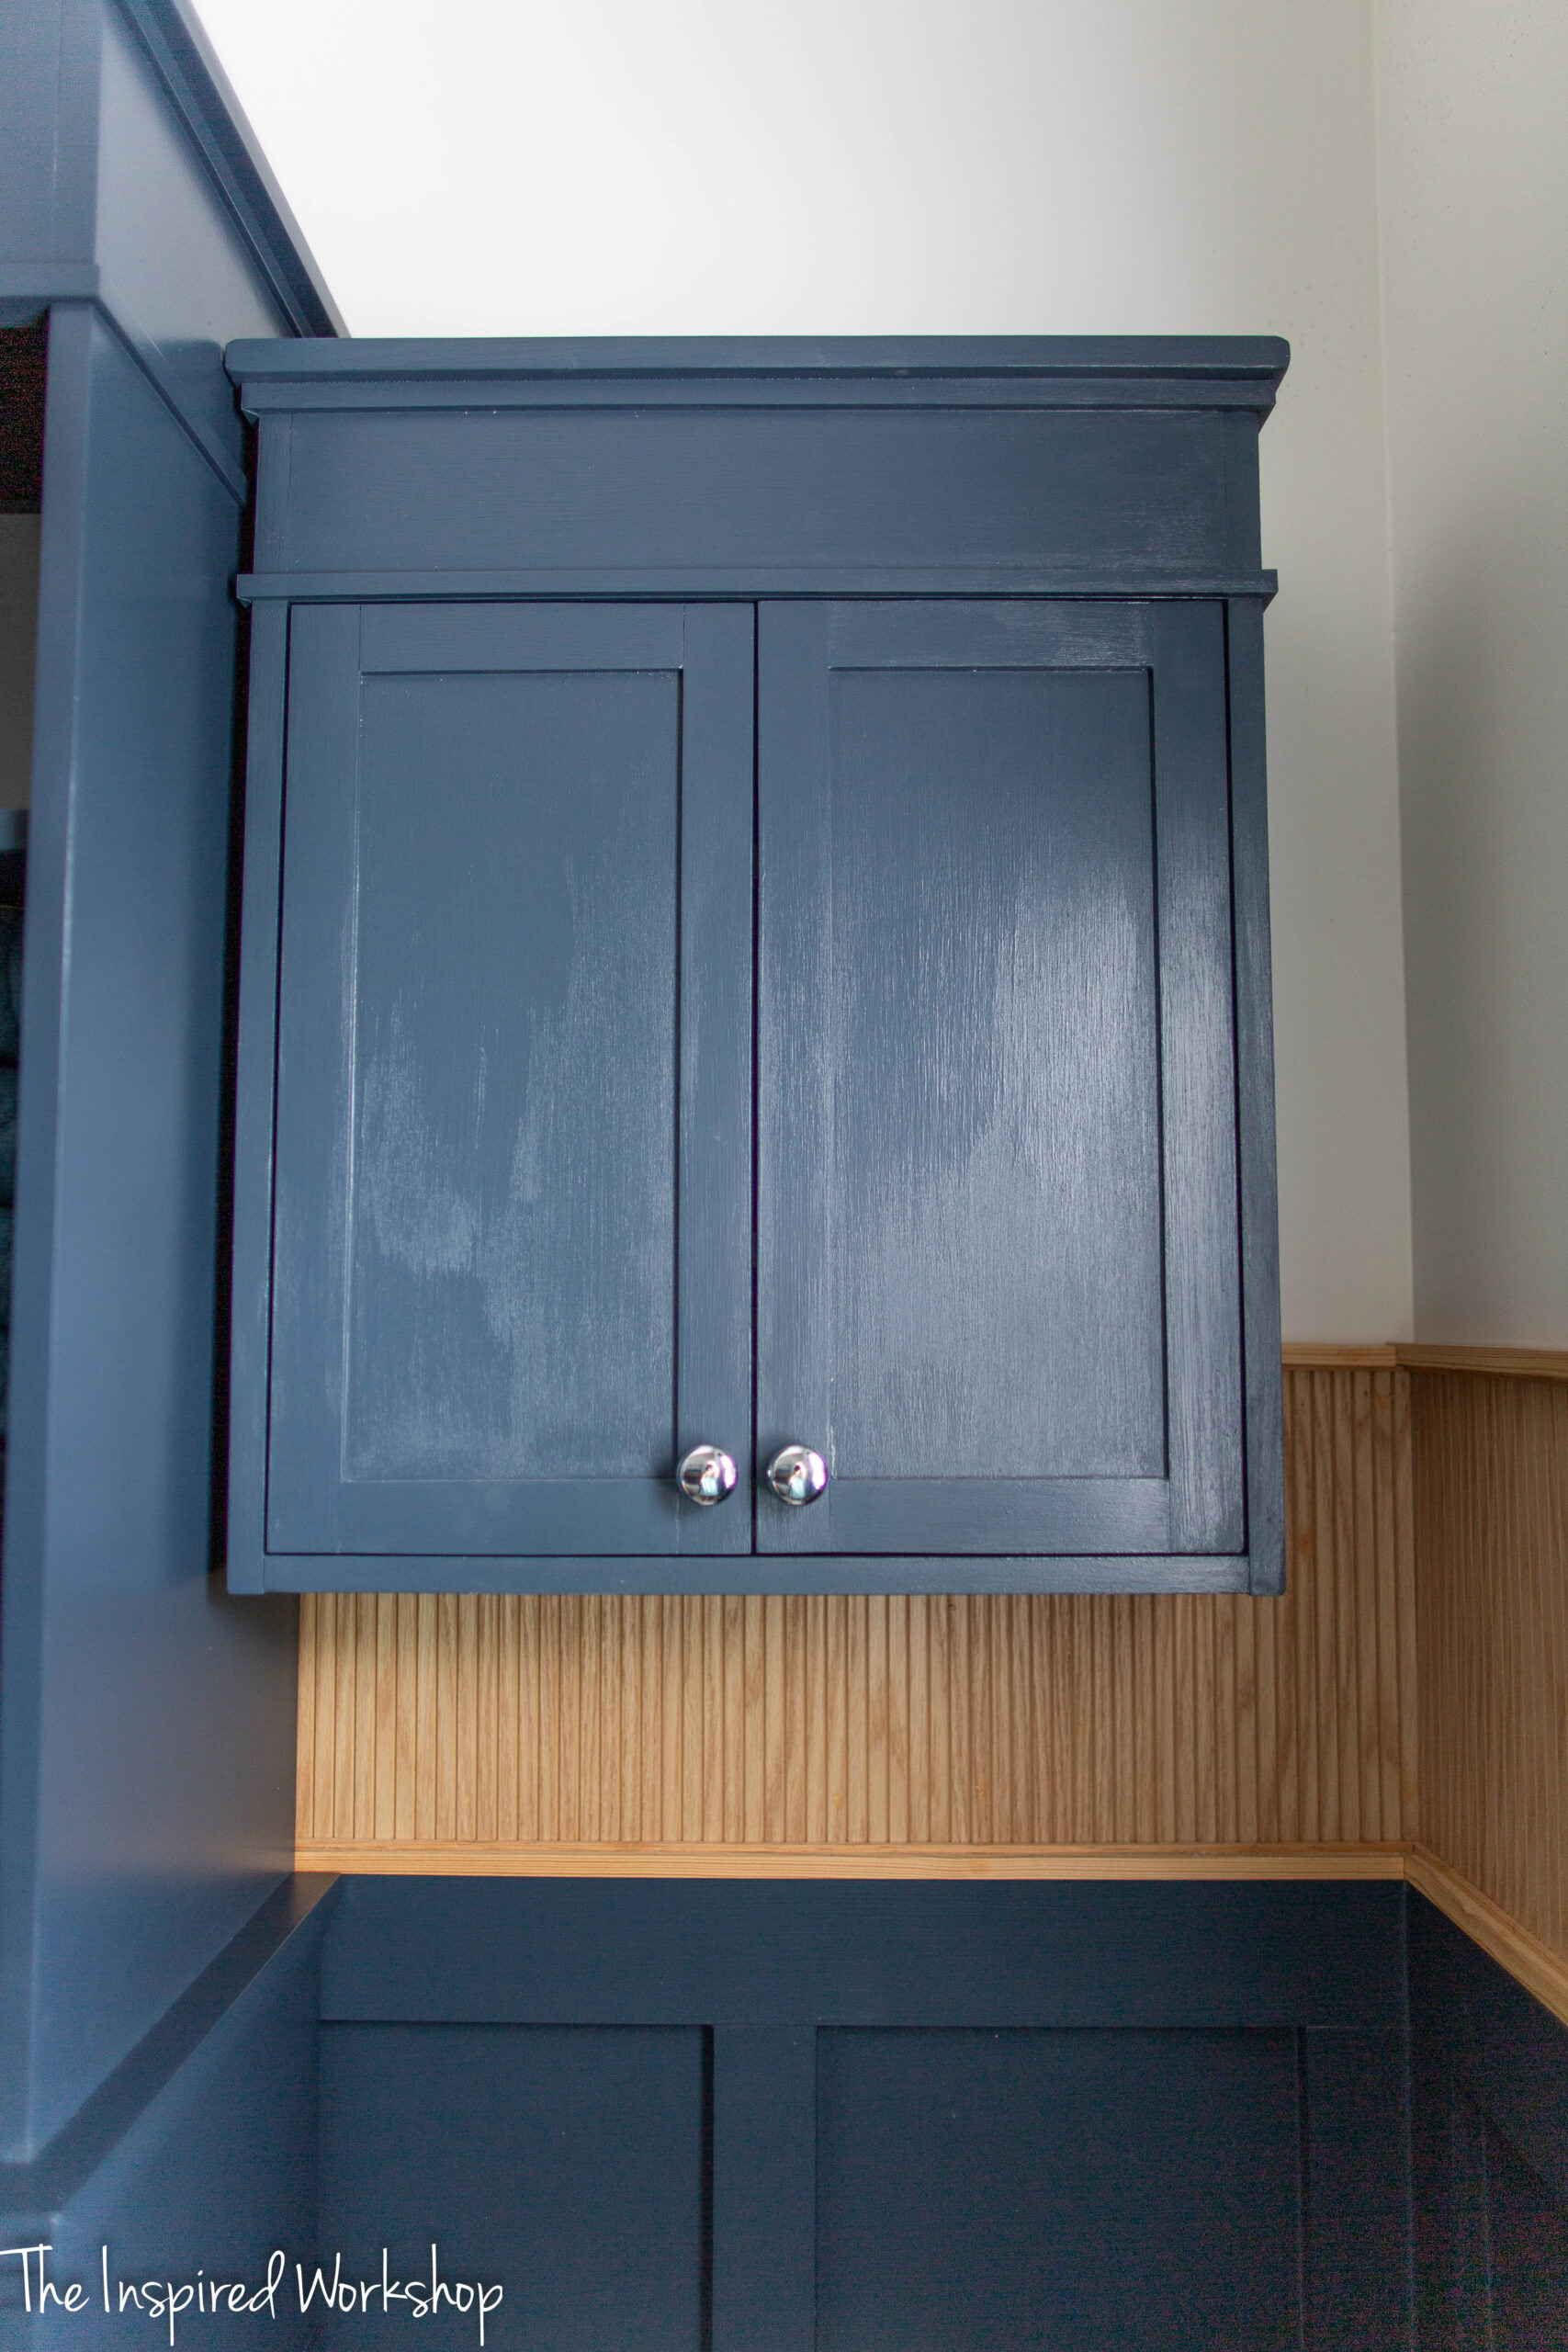
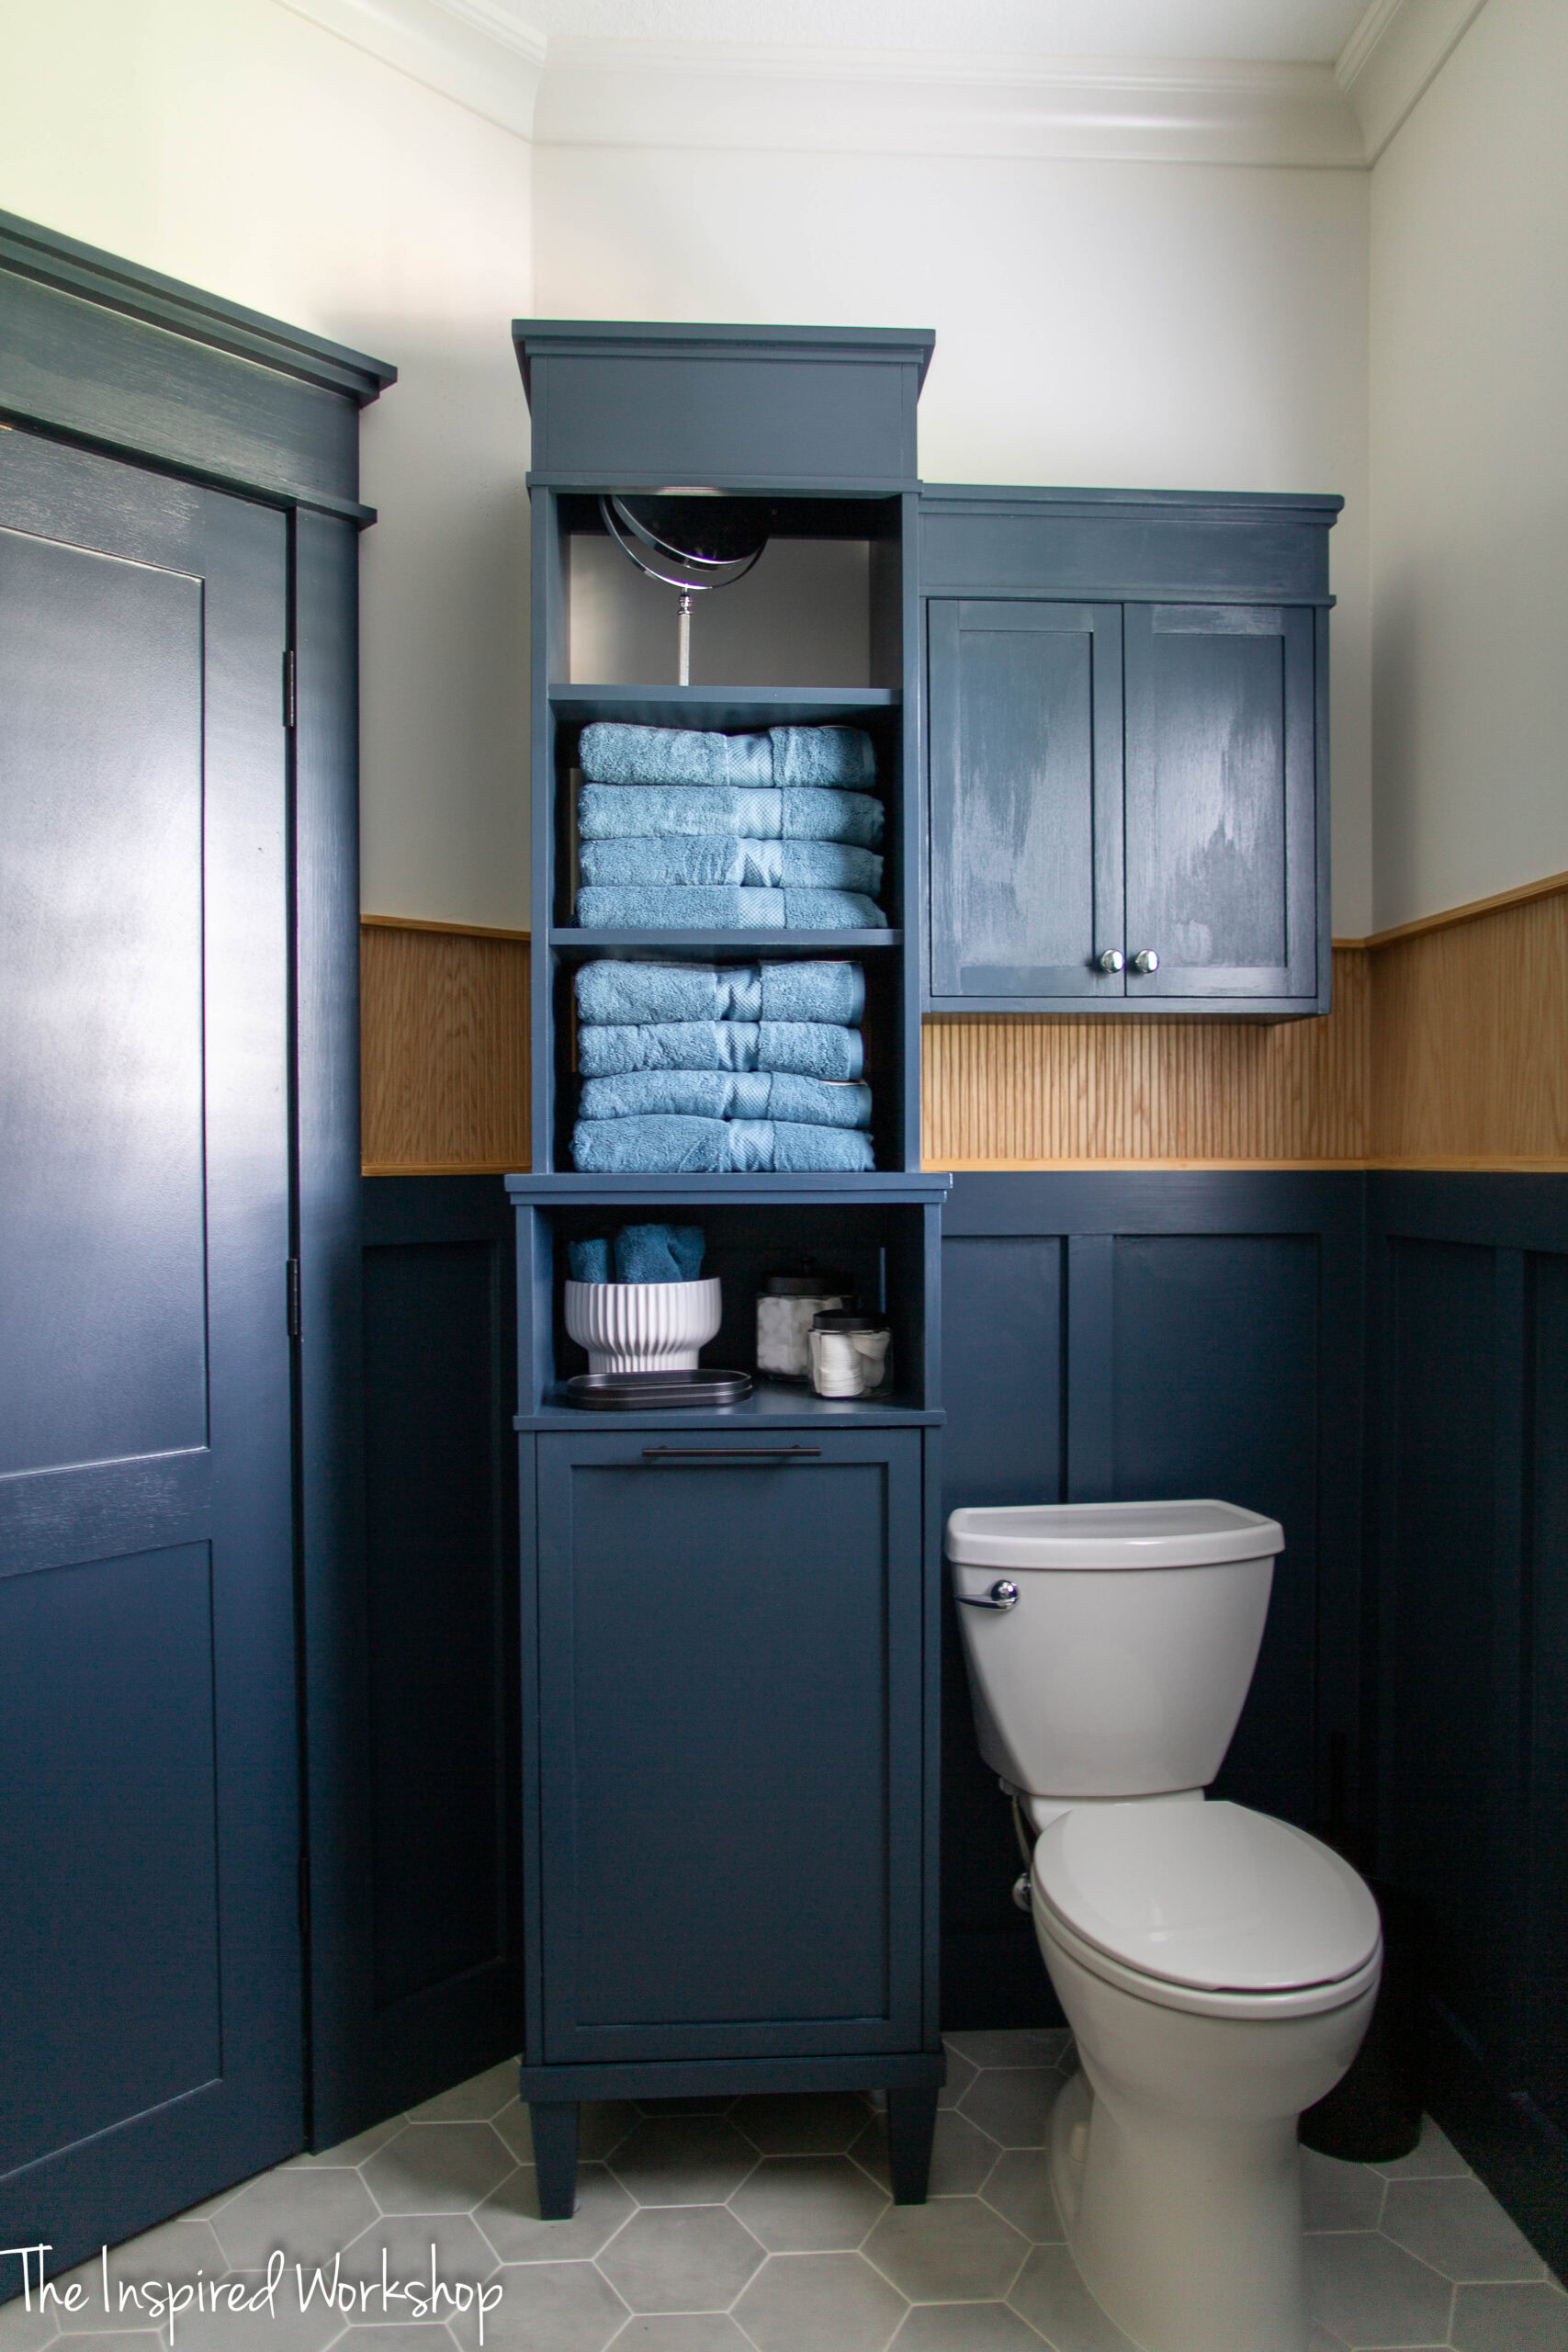
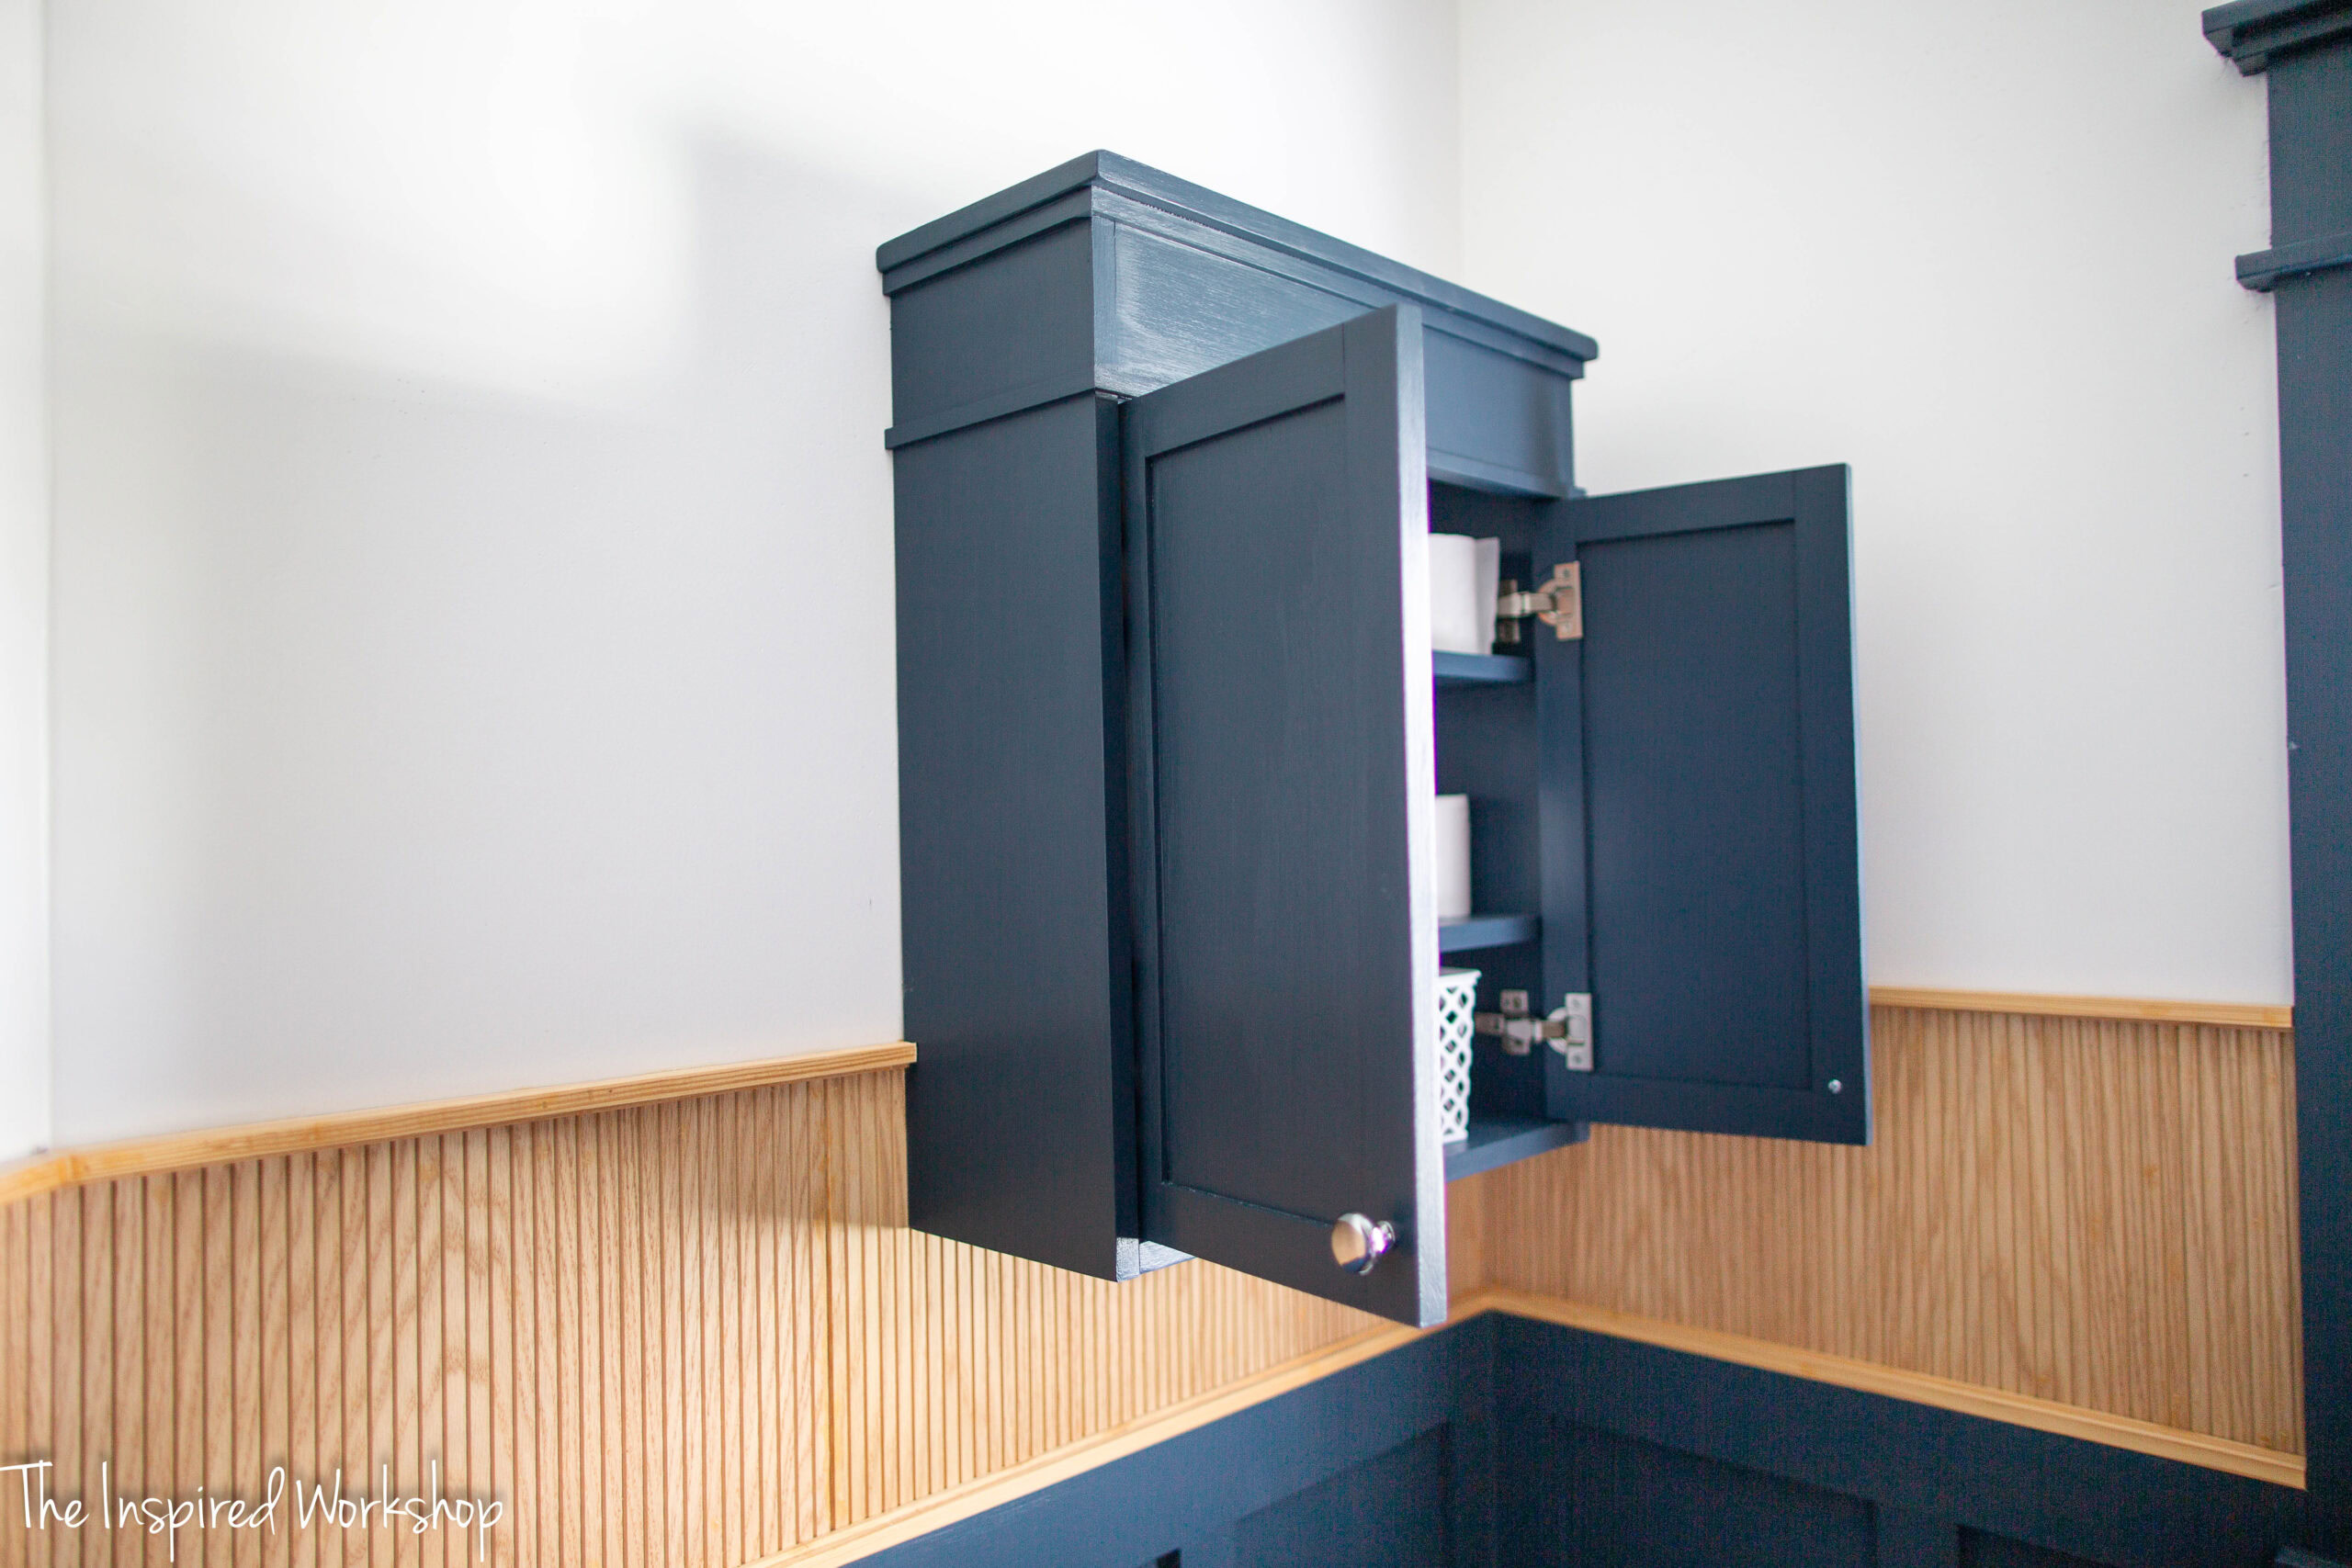
Over the Toilet Cabinet
Storage is so important in a bathroom, but sometimes it is hard to fit a lot of storage into the small space! This over the toilet cabinet will give you ample storage for smaller items without needing any extra space in your bathroom! You can build this bathroom storage cabinet with very little wood so the cost is minimal as well!
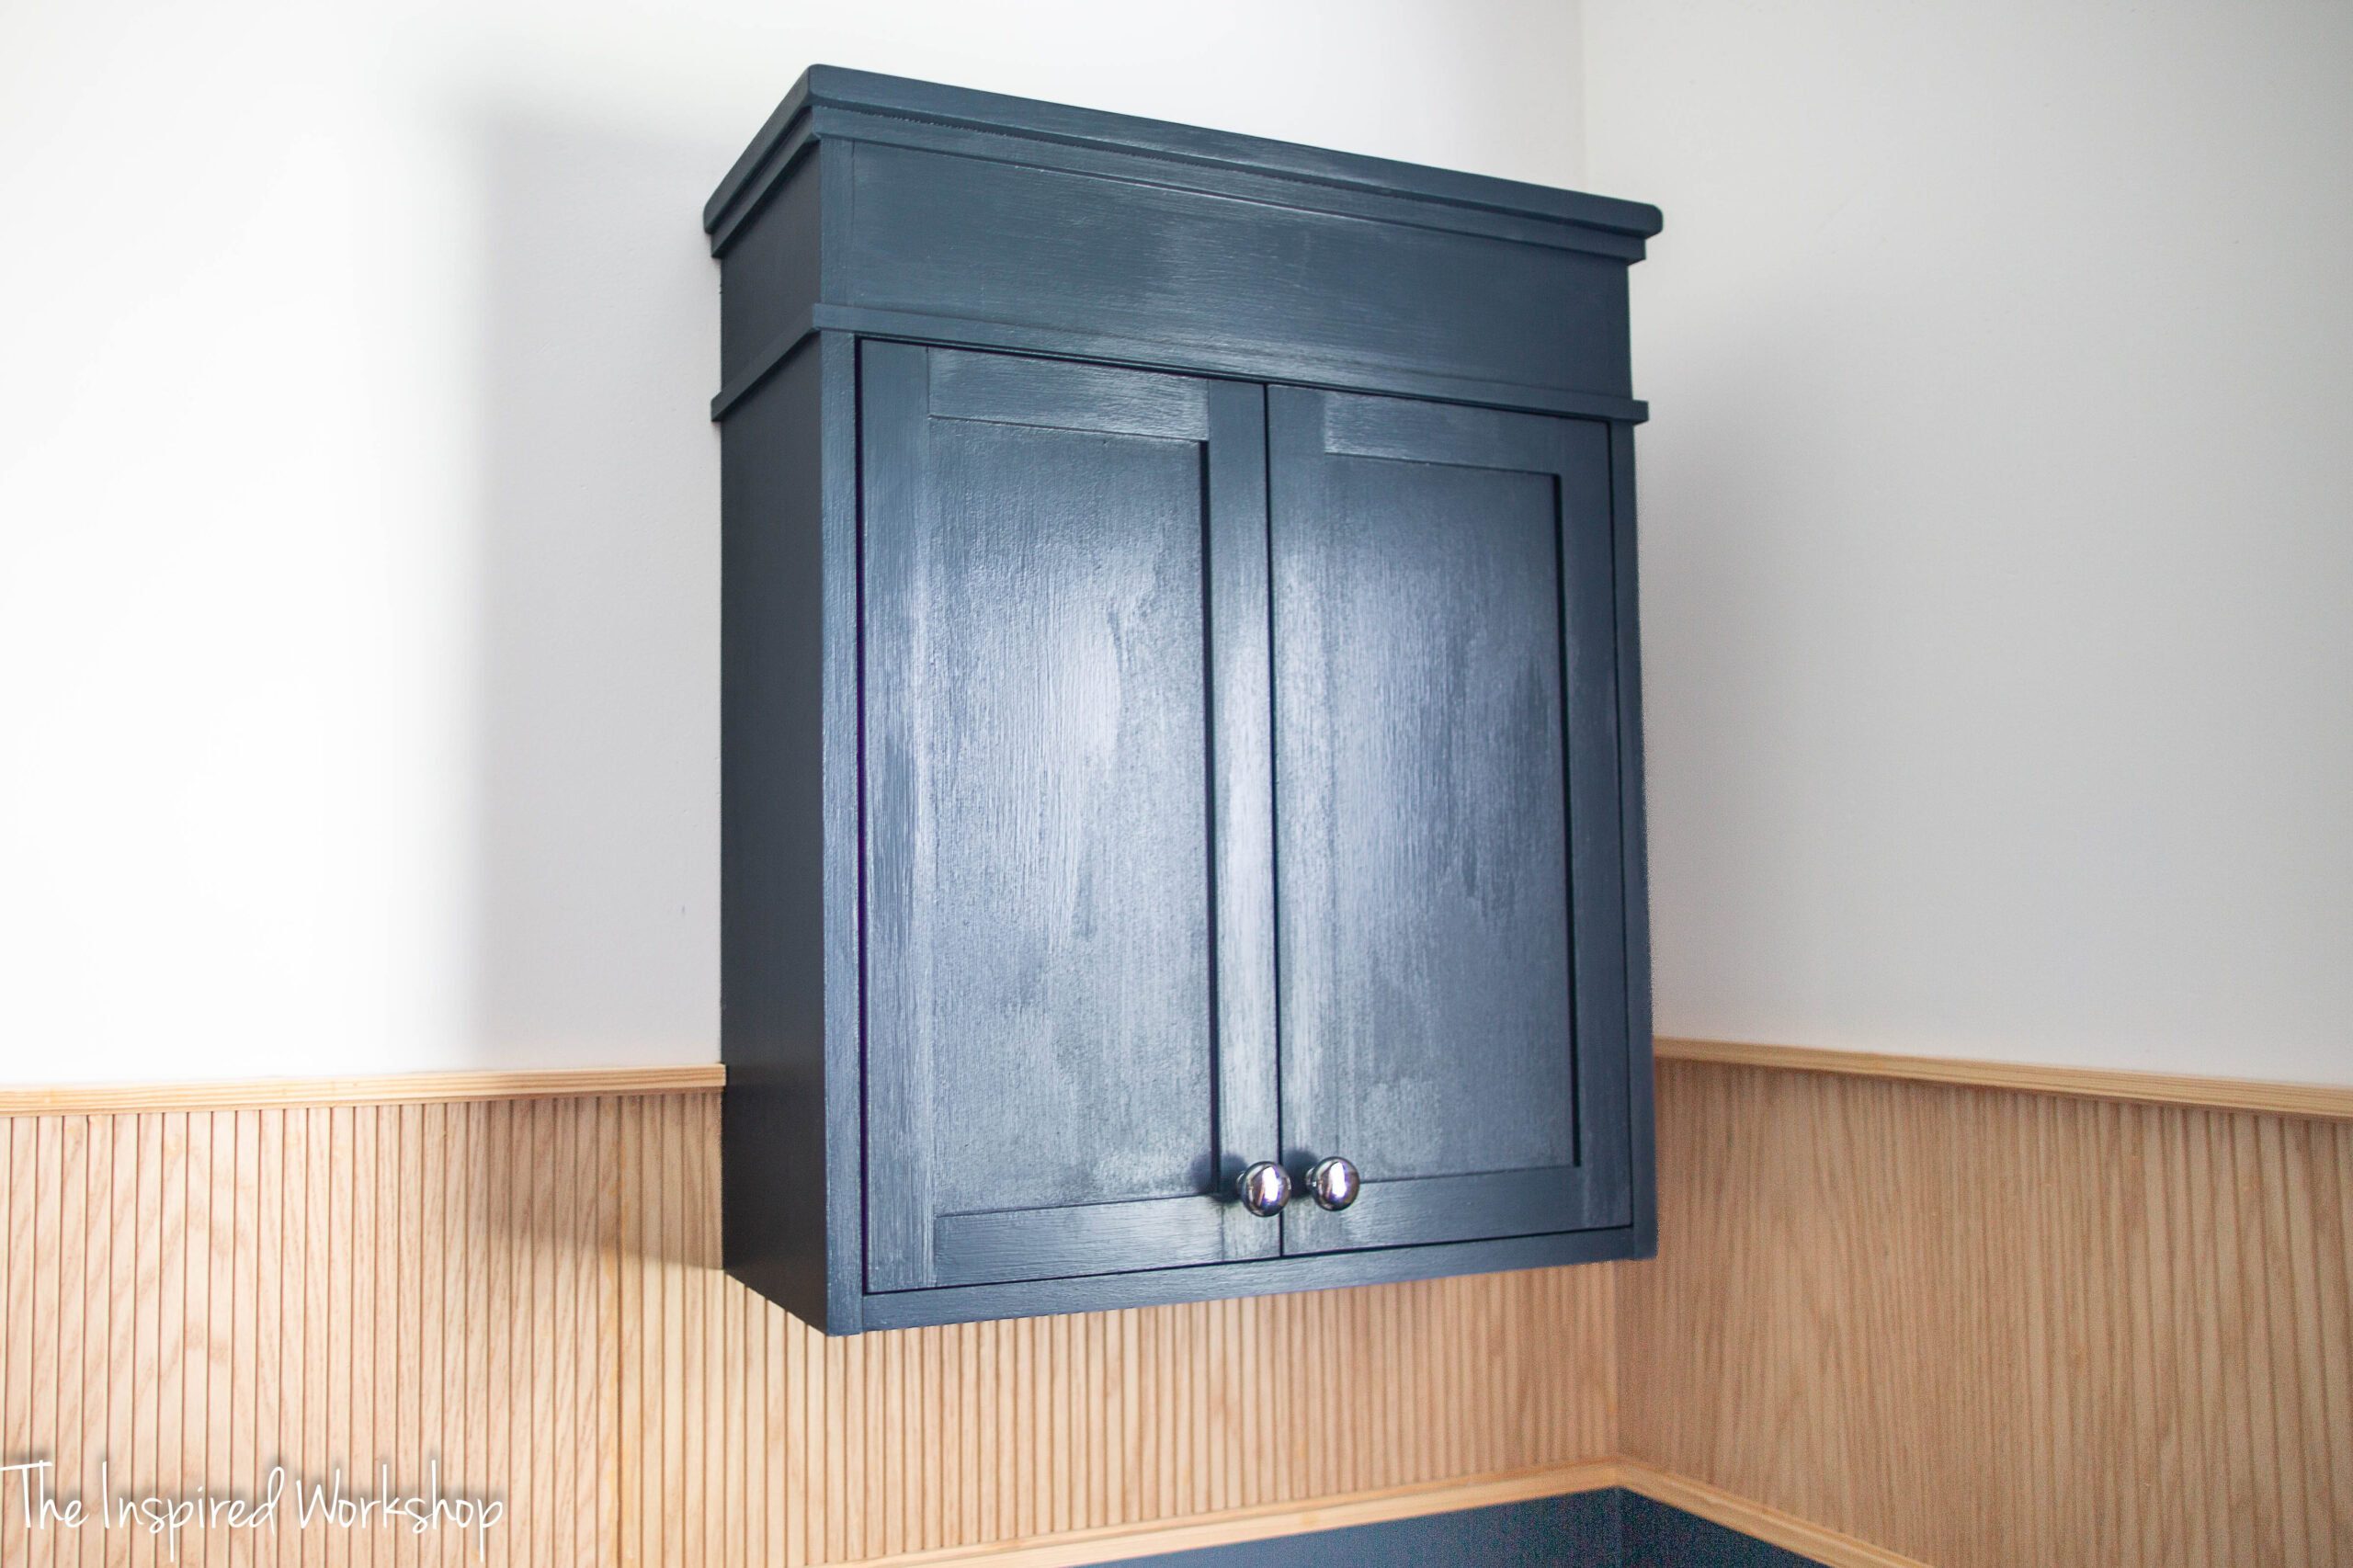
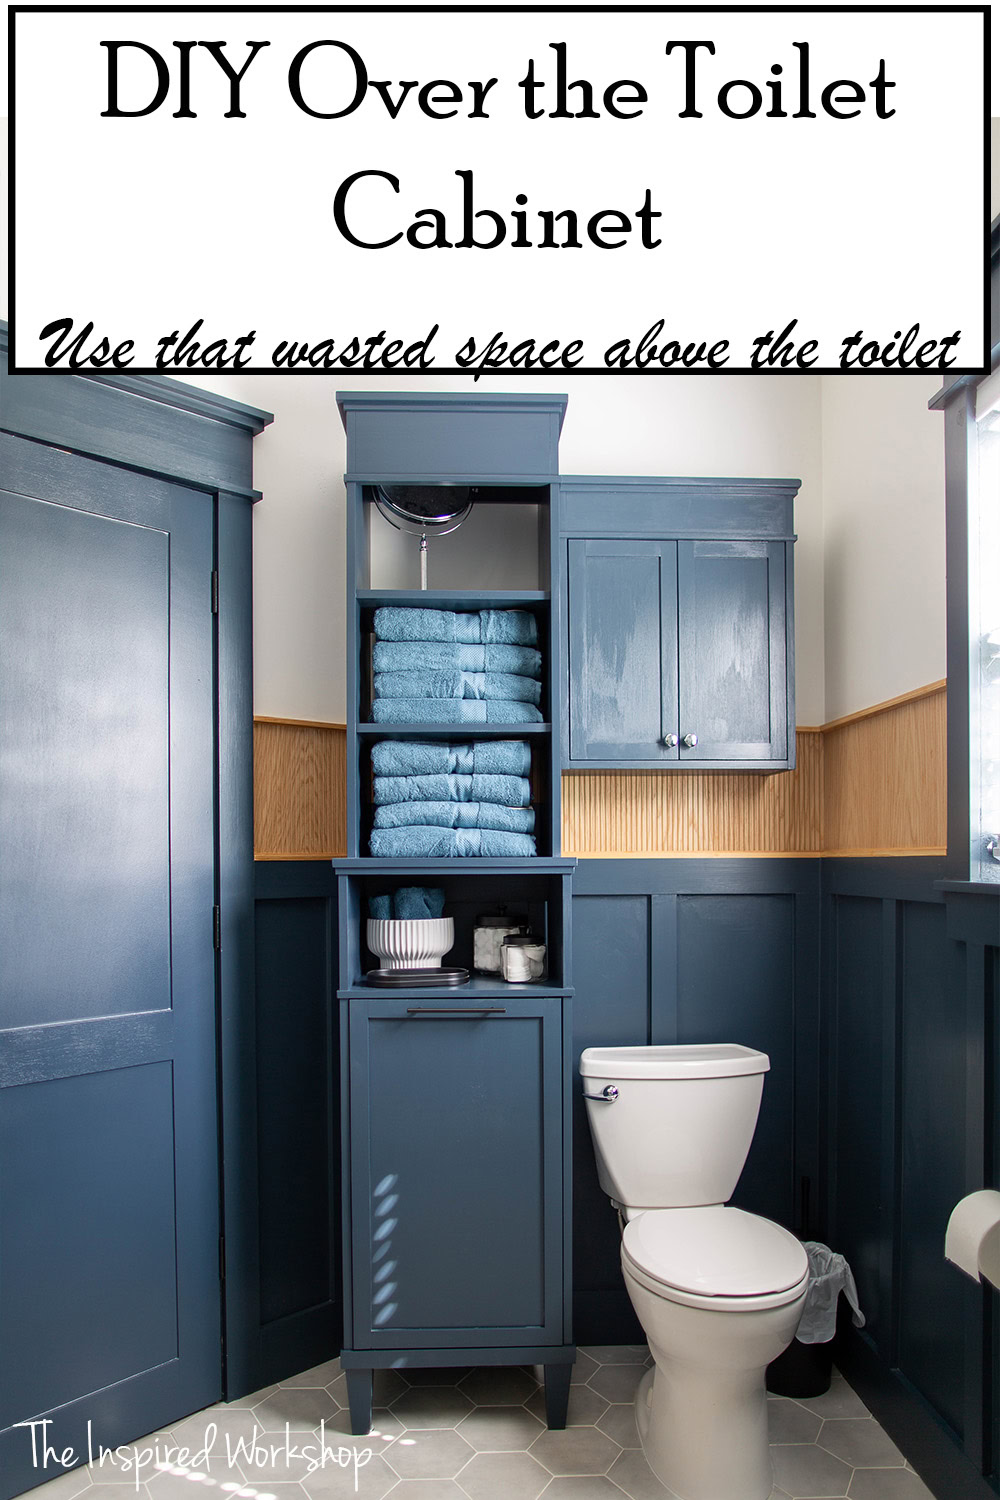
This over the toilet storage cabinet is such a nice touch in our recently remodeled boys bathroom. This bathroom has a wee bit of a funky layout so adding storage was really hard in here. Normally, I may not want a cabinet over the toilet but it was imperative that we get as much storage as possible and this was an easy way that did not cost very much as I used some scrap wood that I had on hand and it is small but actually has a lot of space.

When I was building the vanity for this bathroom, I incorrectly measured for the doors, and so I had to build this cabinet to fit those doors that wouldn’t fit the vanity as I am not into wasting wood with the prices as high as they are! Lol! Luckily it turned out even using the mistake doors, the cabinet turned out to be pretty much standard size anyway! It did slightly cramp the space between it and the linen cabinet, but it worked out!
You should go see the whole bathroom remodel, you guys I managed to remodel this entire bathroom for around 4500 bucks! I am not even kidding! And this isn’t a makeover, this bathroom was down to the concrete so we could move drain lines and build from the ground up! I think for the cost, it is so gorgeous, and fits our boys perfectly! All the plans, links to materials, and tips and tricks are available to help you!
Let’s build you some bathroom storage with your very own over the toilet cabinet!
Gathering Supplies for the Over the Toilet Cabinet
I mentioned before, I pretty much used scrap wood for the bulk of the cabinet, but I’ve given a materials list with the closest size boards to purchase! Since I already had the doors made, I was able to throw the cabinet together in two evenings of working in the garage, and it really only would have been one evening had I not been unsure of height and had to play around with different heights before finalizing the design and moving on to actually building it!
Total cost based on the materials listed below is right around about $65, this could be more or less depending on your area and availability of materials!
NOTE: Links below are AFFILIATE LINKS! Affiliate links are links that when you click the link and make a purchase, I make a small commission at no extra cost to you! I always appreciate it when you shop my links as it helps me keep bringing you free content!
Materials List:
- 1 – 1x10x8
- 1 – 1x6x6
- 1 – 1x2x10
- 1/4″ x 1 1/4″ x 4′ lattice trim
- 1/4″ 2×2 piece of plywood
- Table saw
- miter saw
- drill – I linked this set because it is on one heck of a deal right now for a drill and driver, I do use all Ryobi drills, I don’t have a driver though…definitely grabbing this!
- brad nailer
- Kreg Jig
- pocket hole screws 1 1/4″
- Kreg cabinet hinge jig
- inset cabinet hinges
- cabinet knobs – these are the knobs I used, they feel really solid in your hand, they are nice but very inexpensive!
- Paint/Stain of your choice – I used Midnight Navy by Behr
Cut List:
Main cabinet:
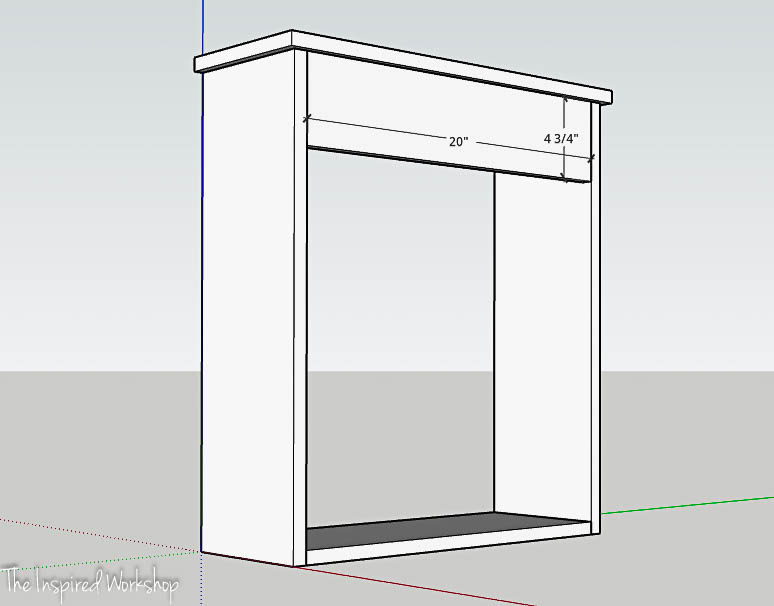
- 2 – 1×10* @ 25 3/4″ *ripped down to 8 3/4″ (sides)
- 1 – 1×10 @ 22 1/2″ (top)
- 1 – 1×10* @ 20″ *ripped down to 8 3/4″ (bottom)
- 2 – 1×10* @ 20″ *ripped down to 7 7/8″ (interior shelves)
- 1 – 1×6* @ 20″ * ripped down to 4 3/4″ (top front board)
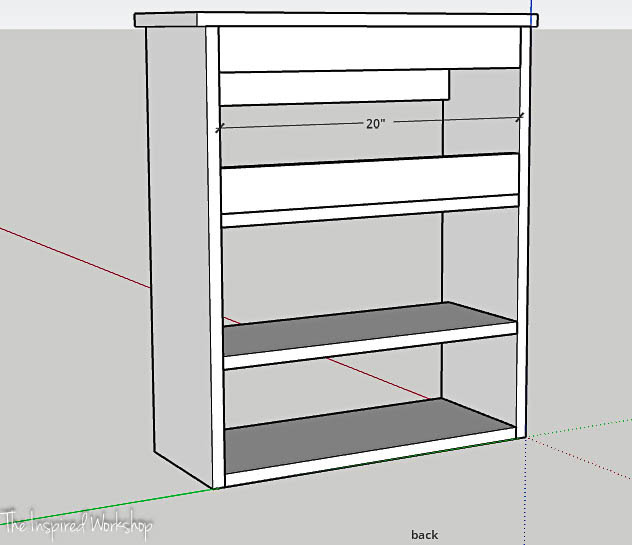
- 1 – 1×6* @ 20″ – ripped in half it can be both the top and middle back support or you can leave it at 5 1/2″ wide (which is the width of a 1×6 off the shelf) and just attach it above the top shelf, not all the way at the top of the cabinet though because you will want it lower so you hang the cabinet on the wall by this board.
Trim:
- 2 – 1/4″ pieces of trim ripped (from 1 1/4″) to 1/2″ and cut @ 22″ shortest end, beveled on both ends, ends not parallel (front trim)
- 4 – 1/4″ pieces of trim ripped (from 1 1/4″) to 1/2″ width and cut @ 9″ shortest end, beveled on one end (side trim)
Doors:
- 4 – 1×2 @ 20″
- 4 – 1×2 @ 7 5/16″
- 2 – 1/4″ plywood cut @ 17 3/8″ x 7 3/16″
Building the Over the Toilet Cabinet
First up on the building list is if you notice in the cut list, all the boards say “*ripped down to” and have a number. I had to do this to get the best size where it would be big enough, but not too big and stick out too far from the wall.
You can make yours wider than mine, which means you can leave your boards the width that they come if you like! This will only make the size 9 1/4″ wide instead of 8 3/4″. Not a big difference! You will need a larger board though for the top board as it is supposed to stick out from the rest of the cabinet.
Okay, so I ripped the boards down to the sizes I needed them to be and then cut them down to length! Once you have your 1x10s ripped and cut to size, we can start assembling the cabinet.
This is such a simple and easy build, the main cabinet is just a box with a few extra boards for the shelves, just remember my actual images may not follow the cut list for width because I was using scrap wood and tried to make it easiest for you to purchase the wood without wasting money! For this reason, I will use Sketchup images as well to help!
Building the Frame of the Cabinet
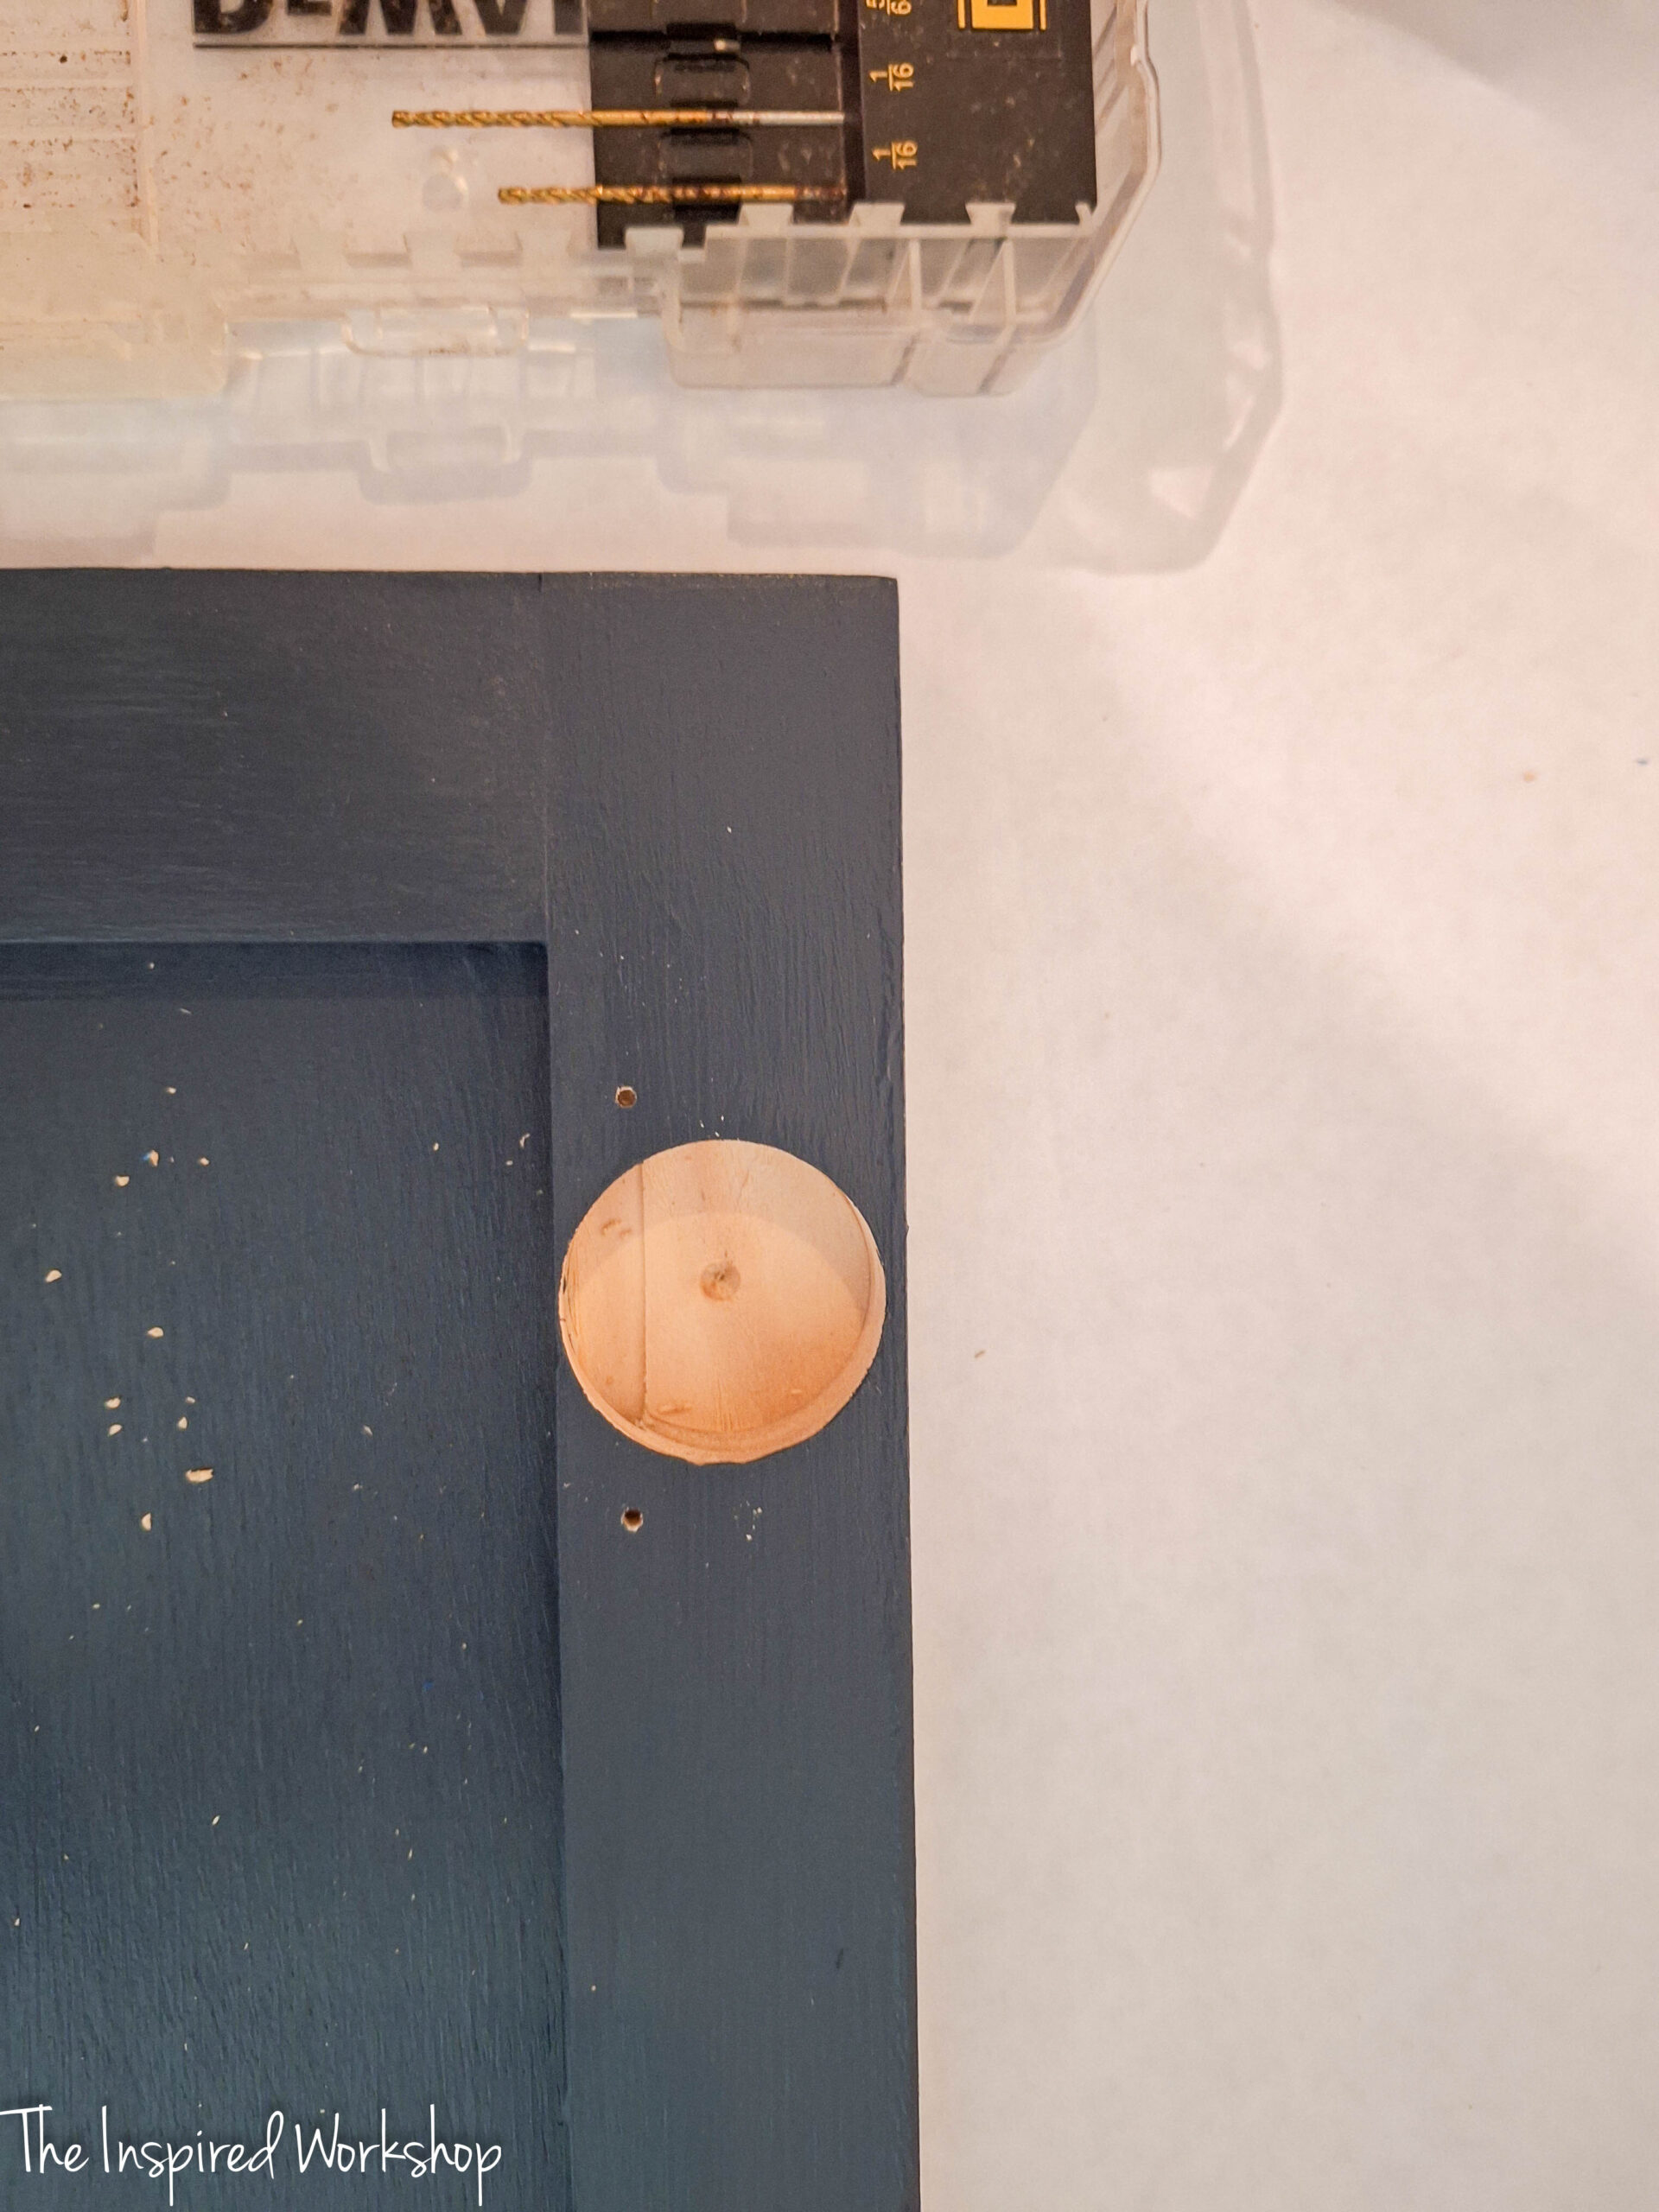
Take the boards labeled in the cut list as sides, top, and bottom. Using pocket holes drilled at 3/4″ depth into the top of the side boards to attach the top to the sides. The top will have an overhang on the sides and front, but should be flush to the back. Use 1 1/4″ screws and wood glue to attach.
Then drill 3/4″ pocket holes into the top or bottom of the bottom board to attach it to the sides. You can place them either place, if you place them on top of the board, make sure and fill them in and sand them now as it will be too tight to get the sander in there once the shelves are in place. Same with the side boards, go ahead and fill and sand them now.
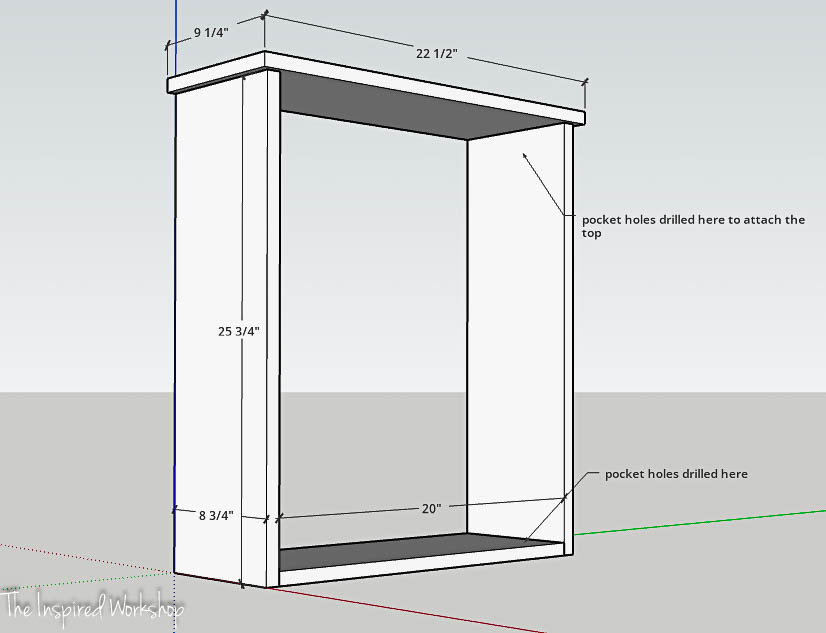
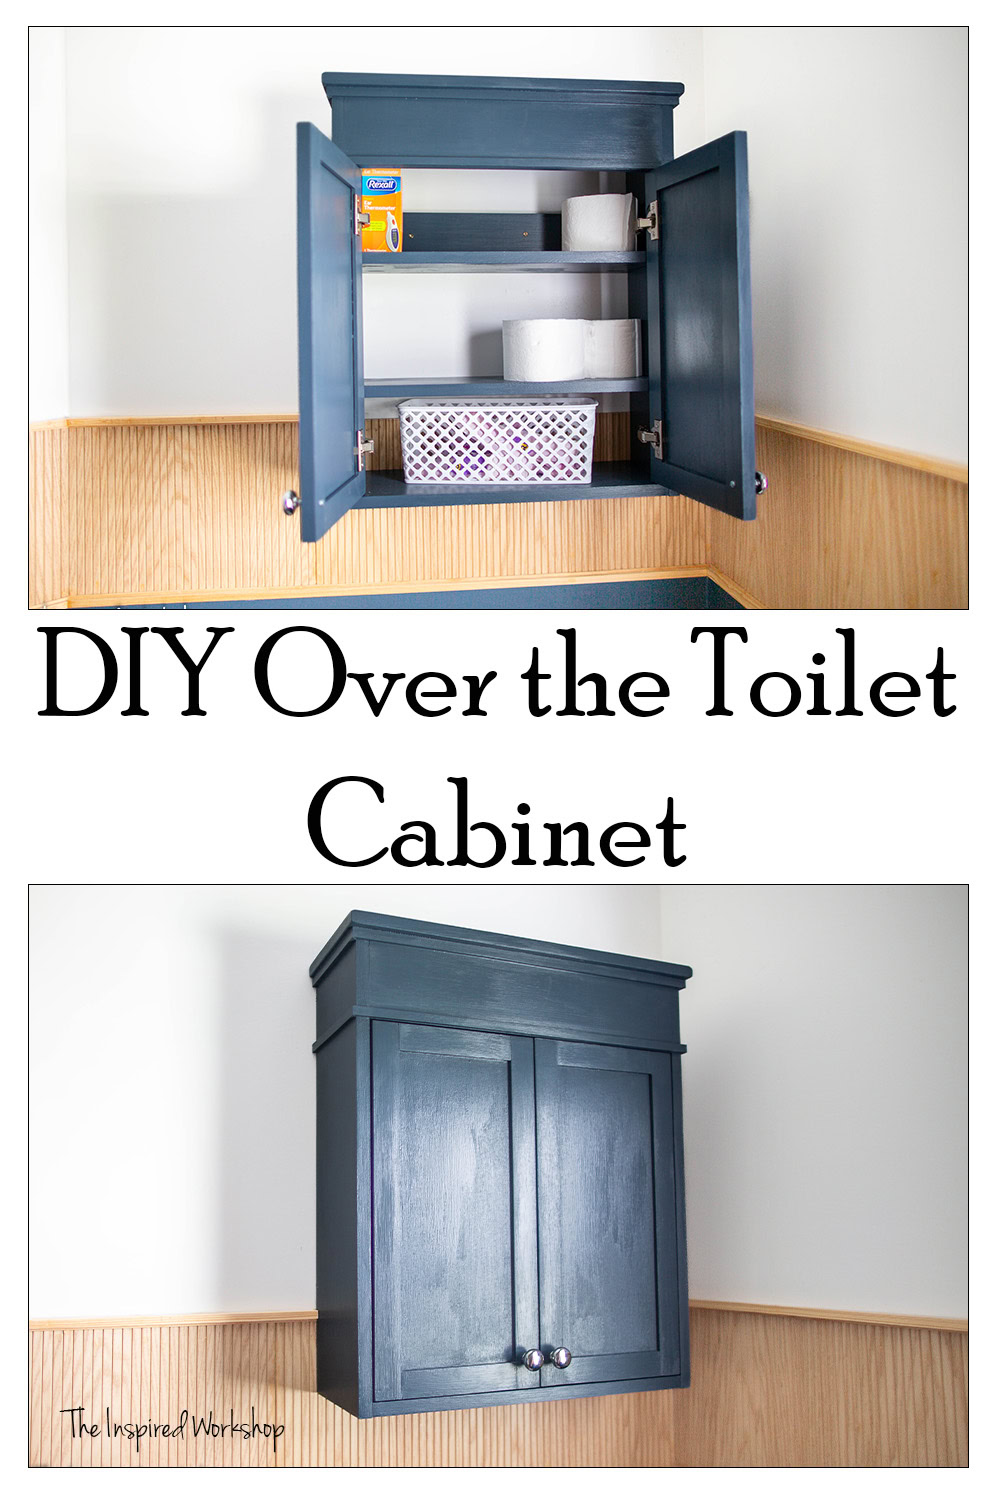
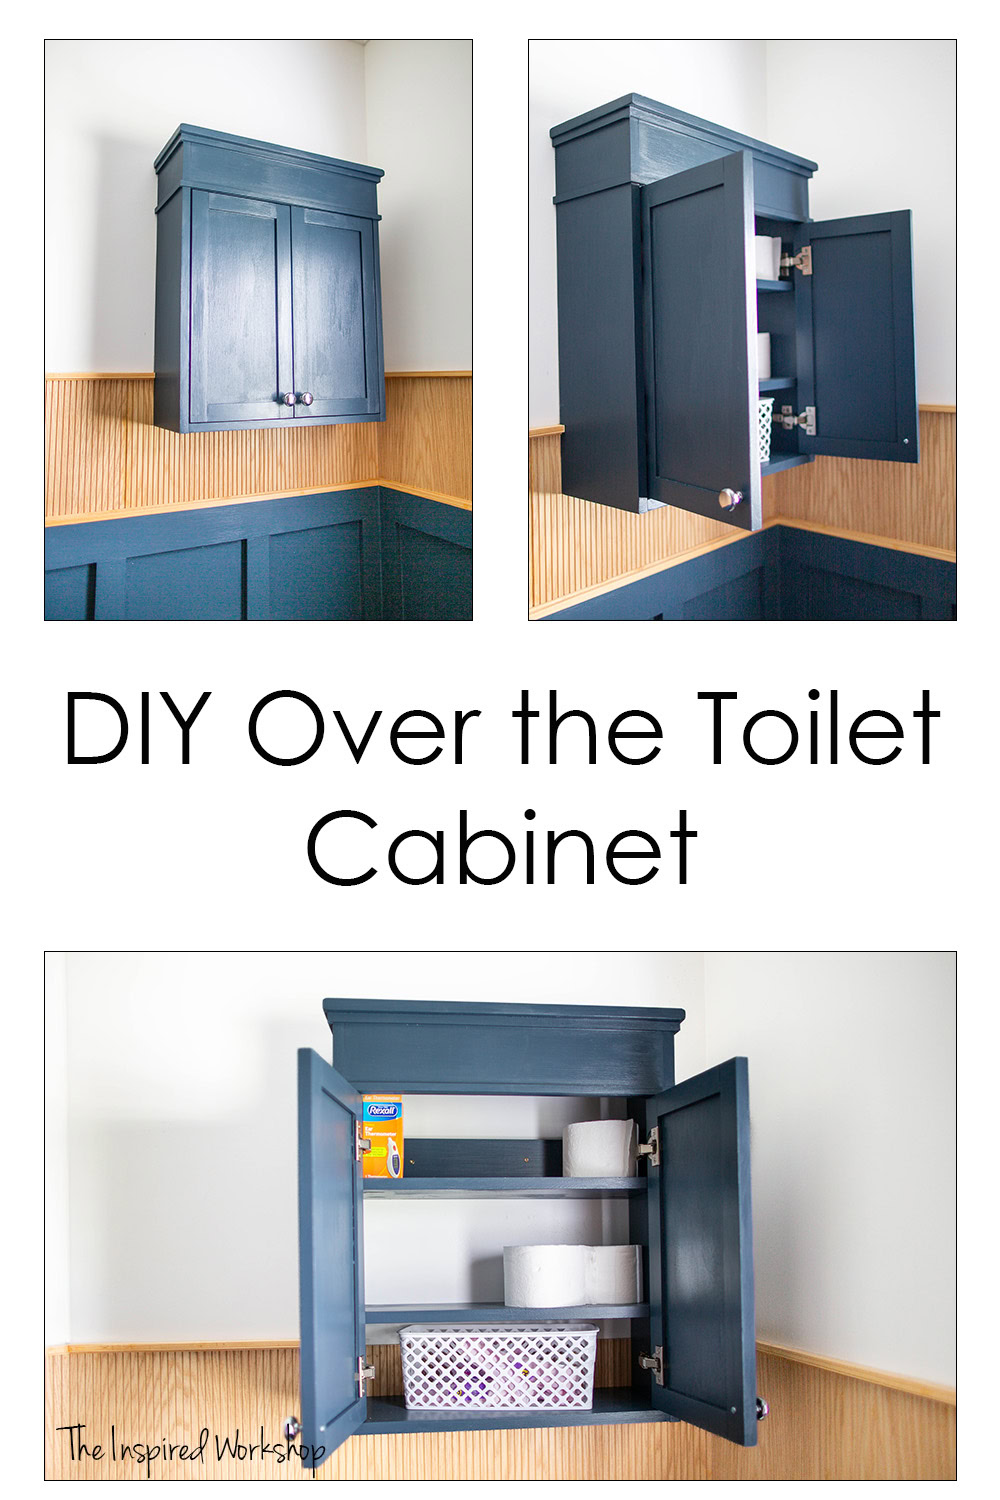
Once the frame of the cabinet is done, add the front board. This board will have 3 /4″ pocket holes on the back of it, so they will be concealed from view, use 1 1/4″ screws and wood glue to attach. Adding this board now keep the back support boards from making it hard to install this one!
Now you can add the shelves. I brad nailed these into place, along with wood glue because it would be too hard to cover and sand the pocket holes if I used them. Notice the shelves are 7/8″ more narrow than the sides, which the shelves should be flush to the back of the sides so the doors can fit inset.
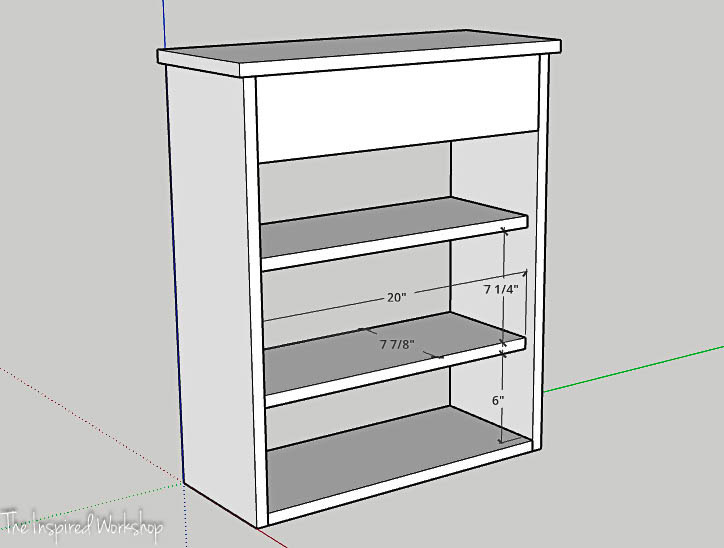
Once you have the shelves in place, you can add the back supports. They will have pocket holes drilled at 3/4″ depth on both ends, use wood glue and 1 1/4″ screws to attach. I did one at the top, to help keep it square, and one over the first shelf because I didn’t realize until after finishing the cabinet that I could not use the top board to hang the cabinet because the front board was too low and the back board was too high! Lol!
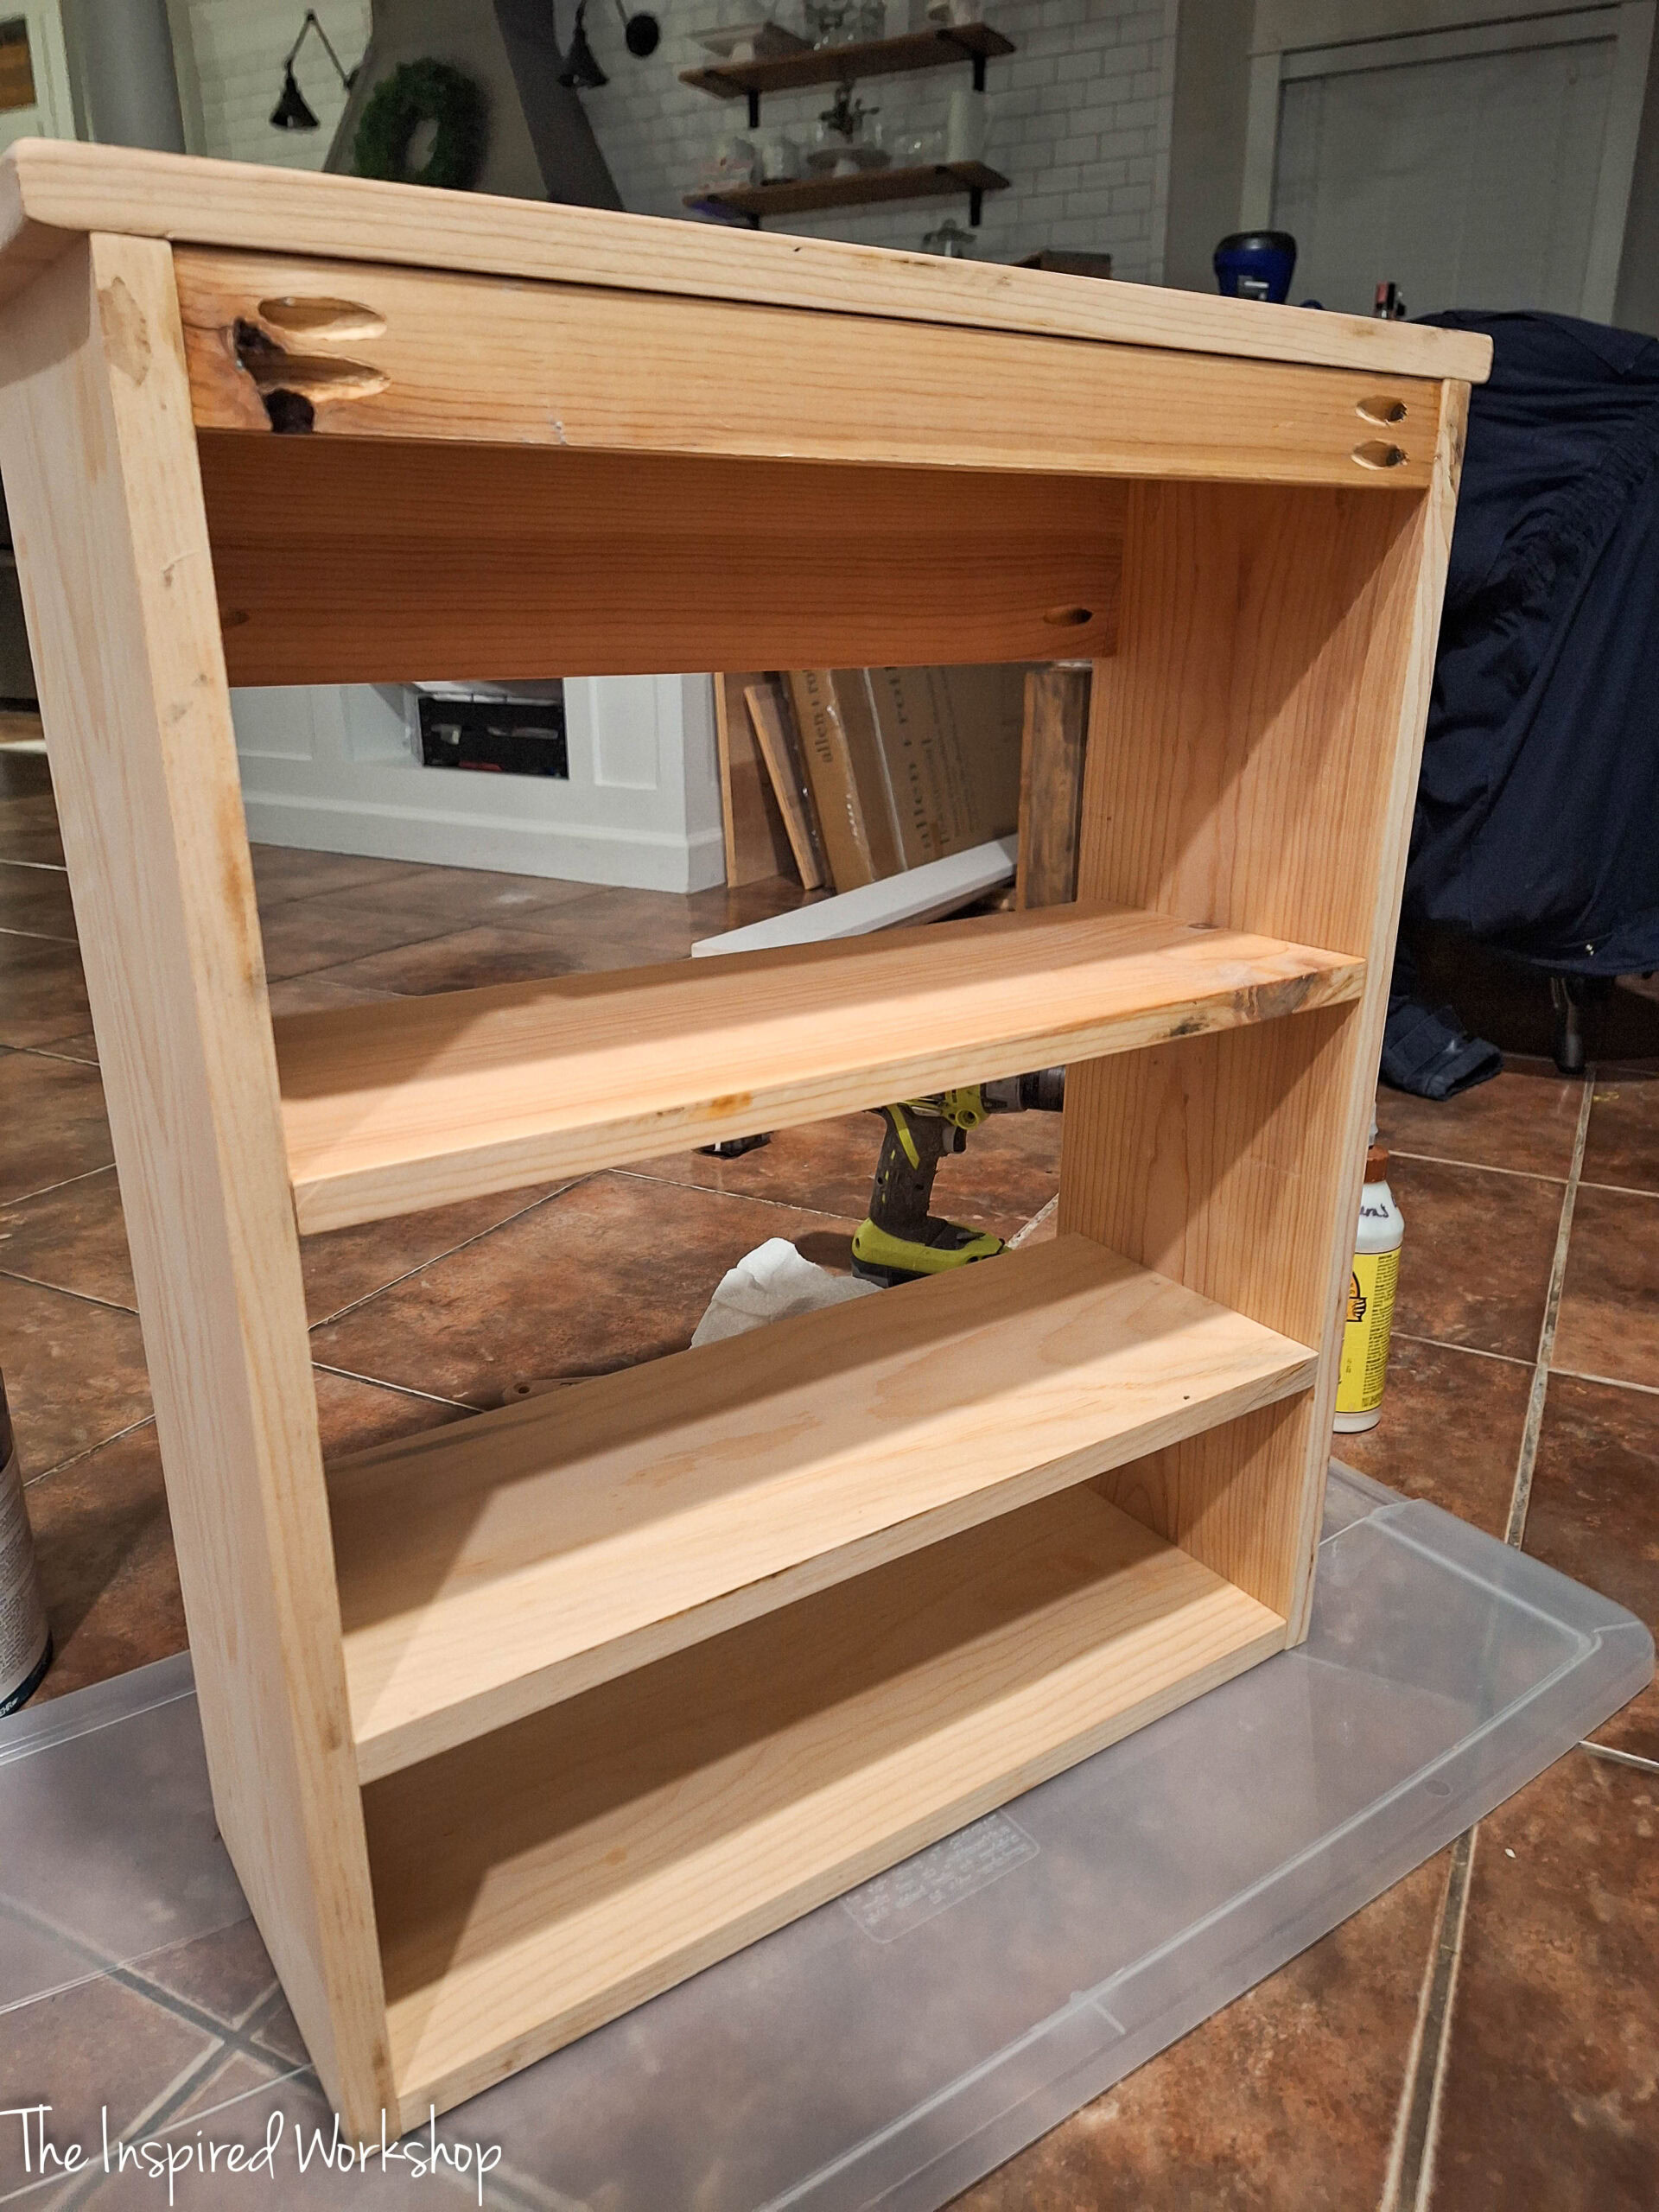
You can see the back support in this picture that I hung it by right by the toilet paper!
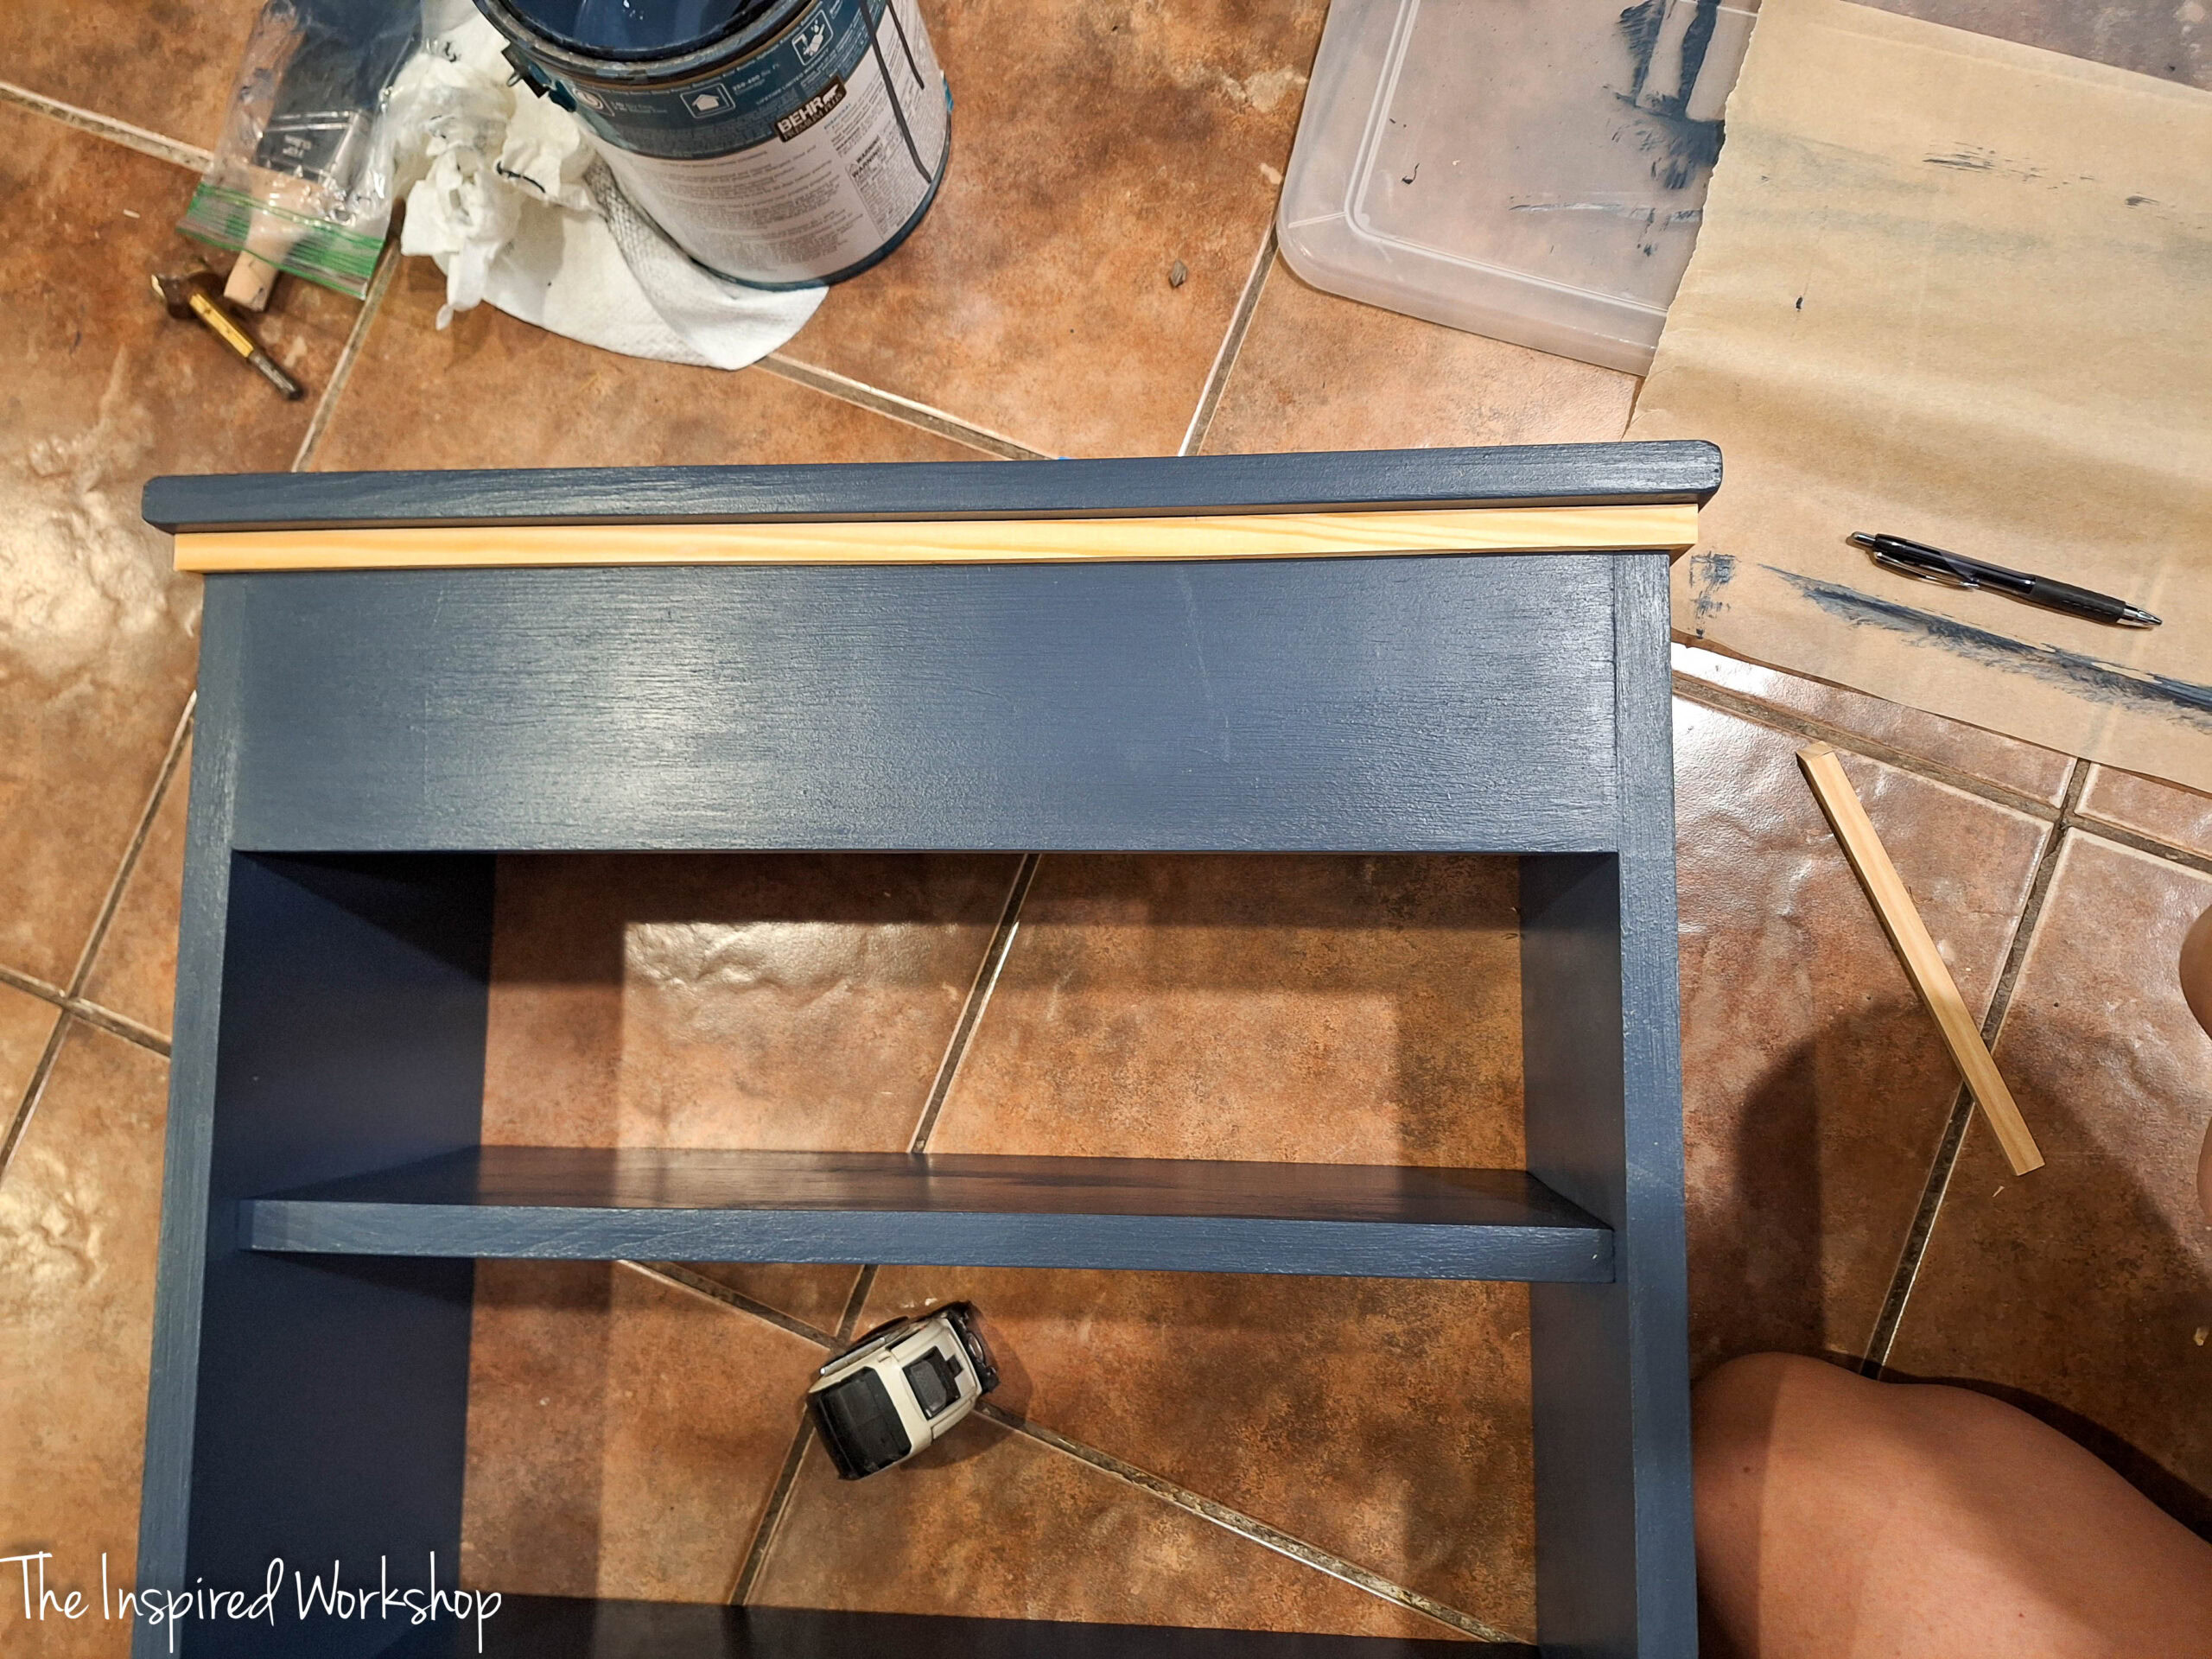
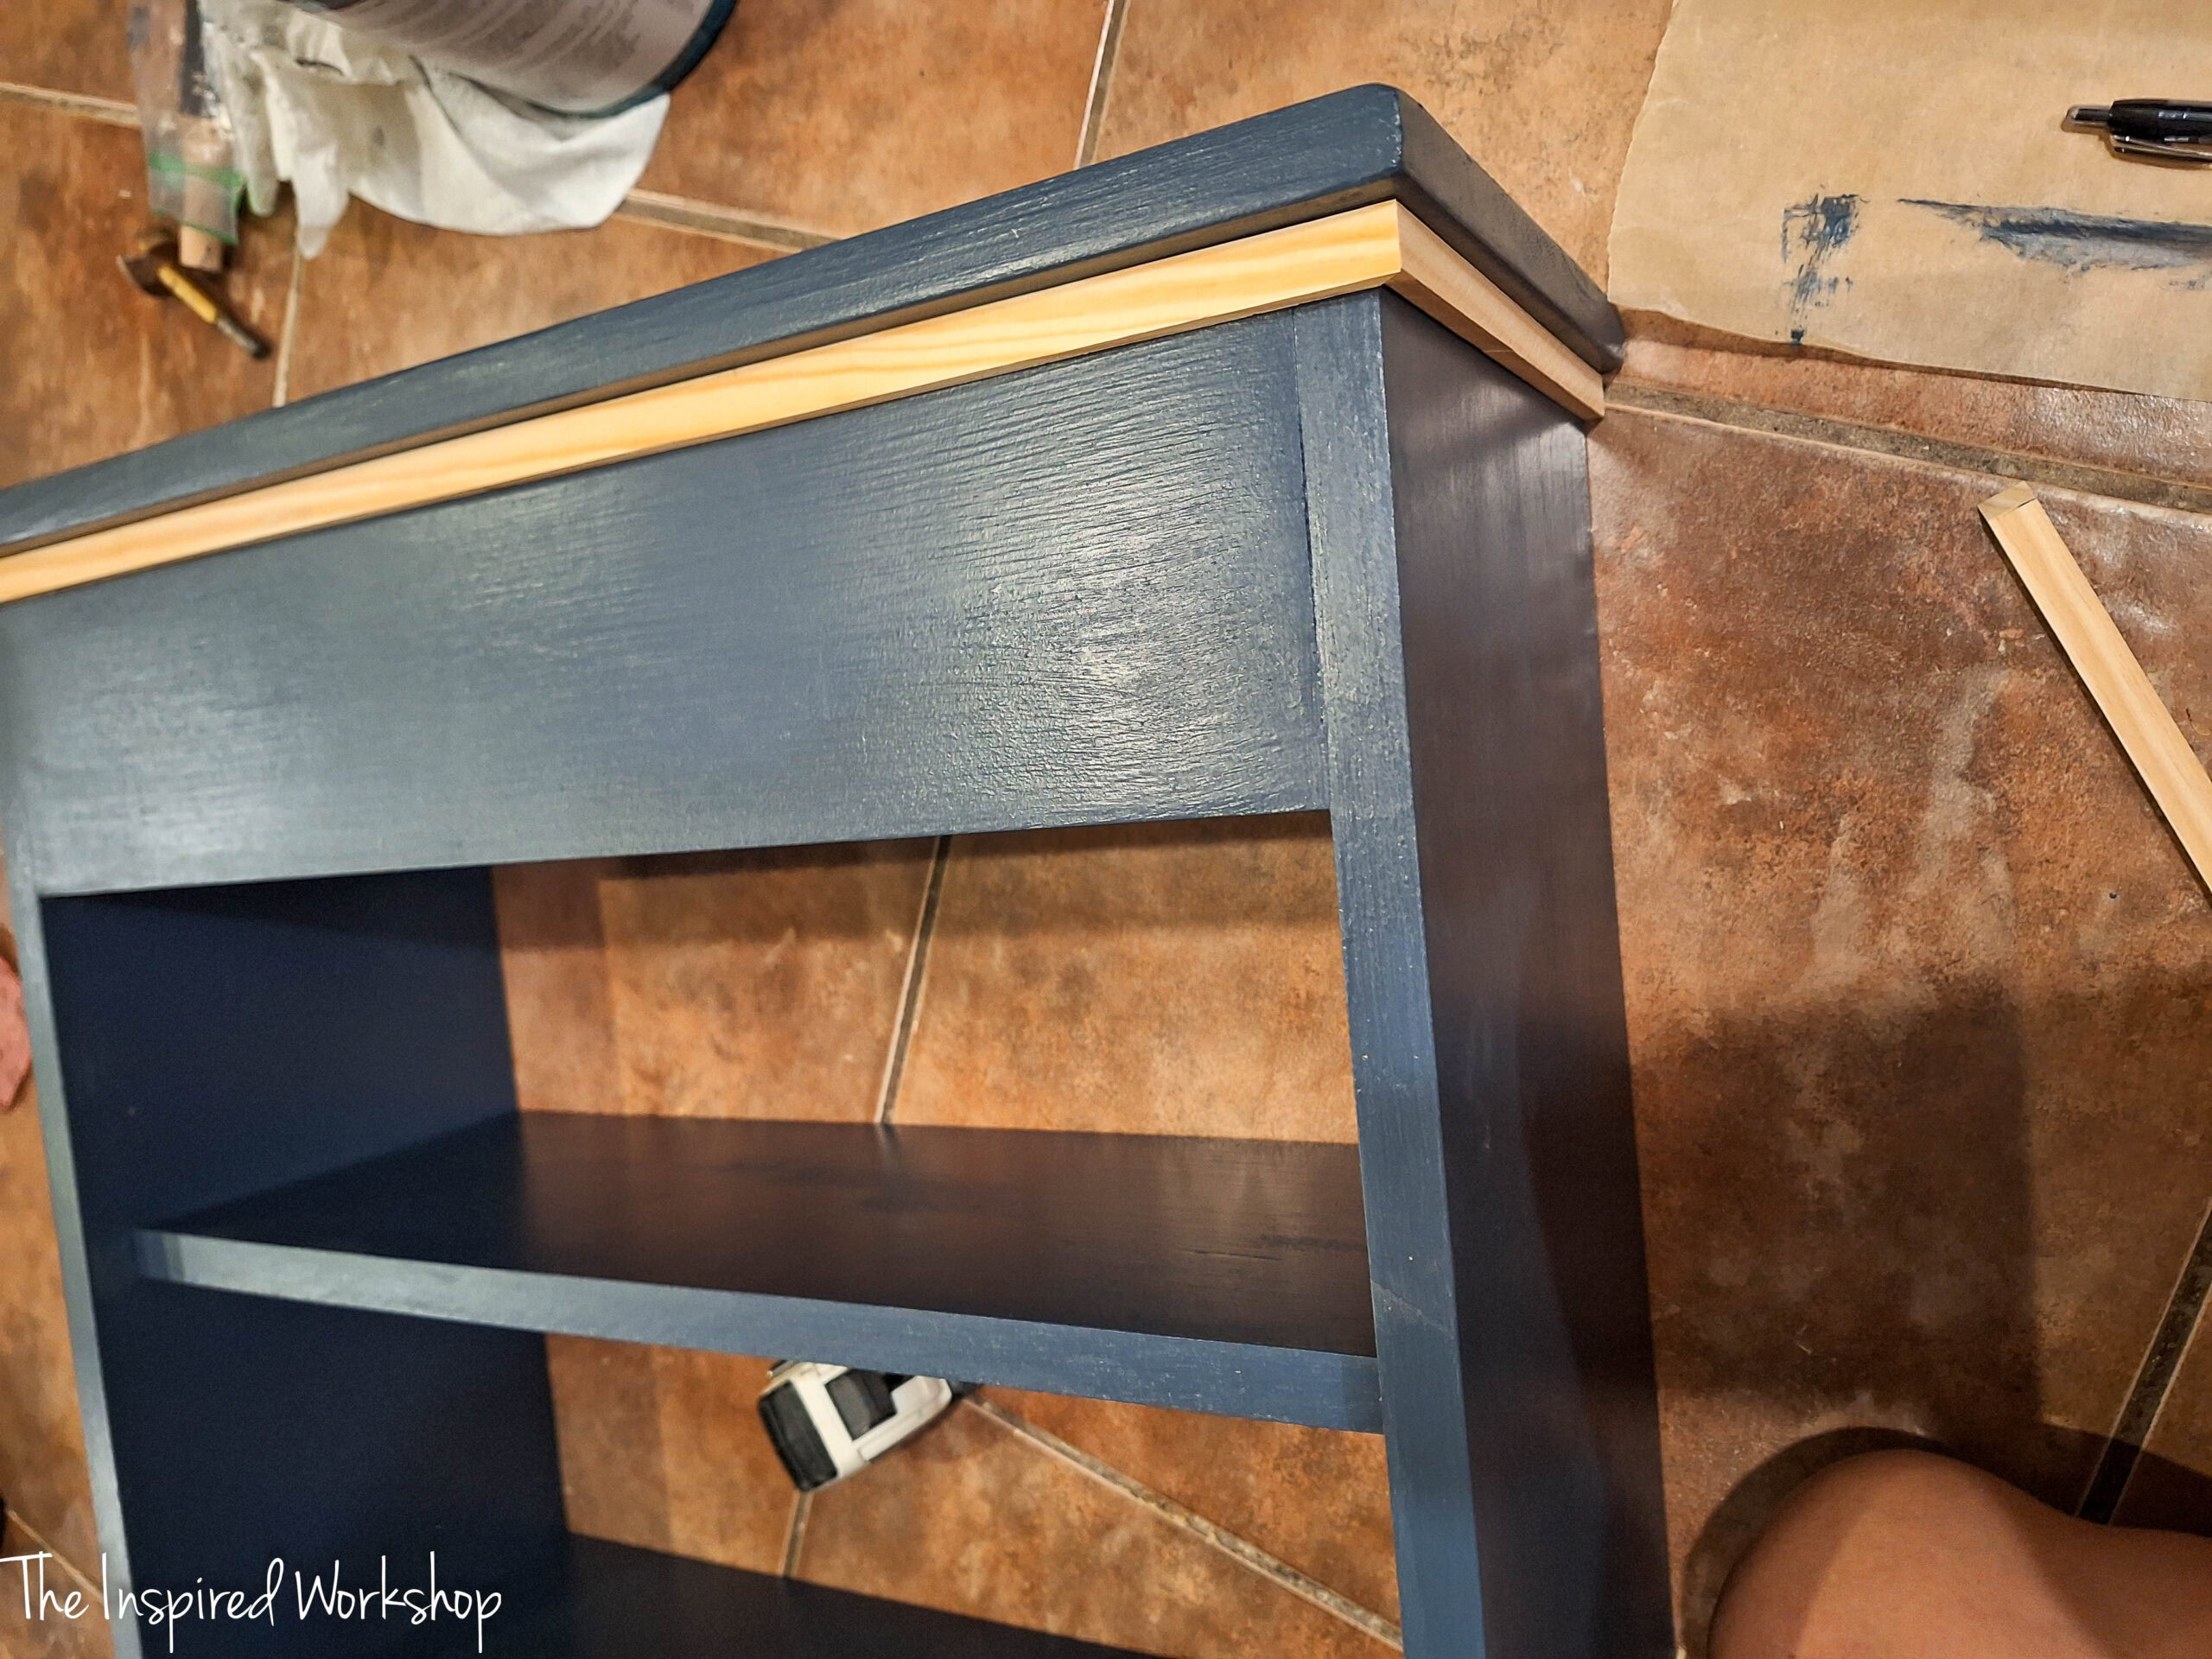
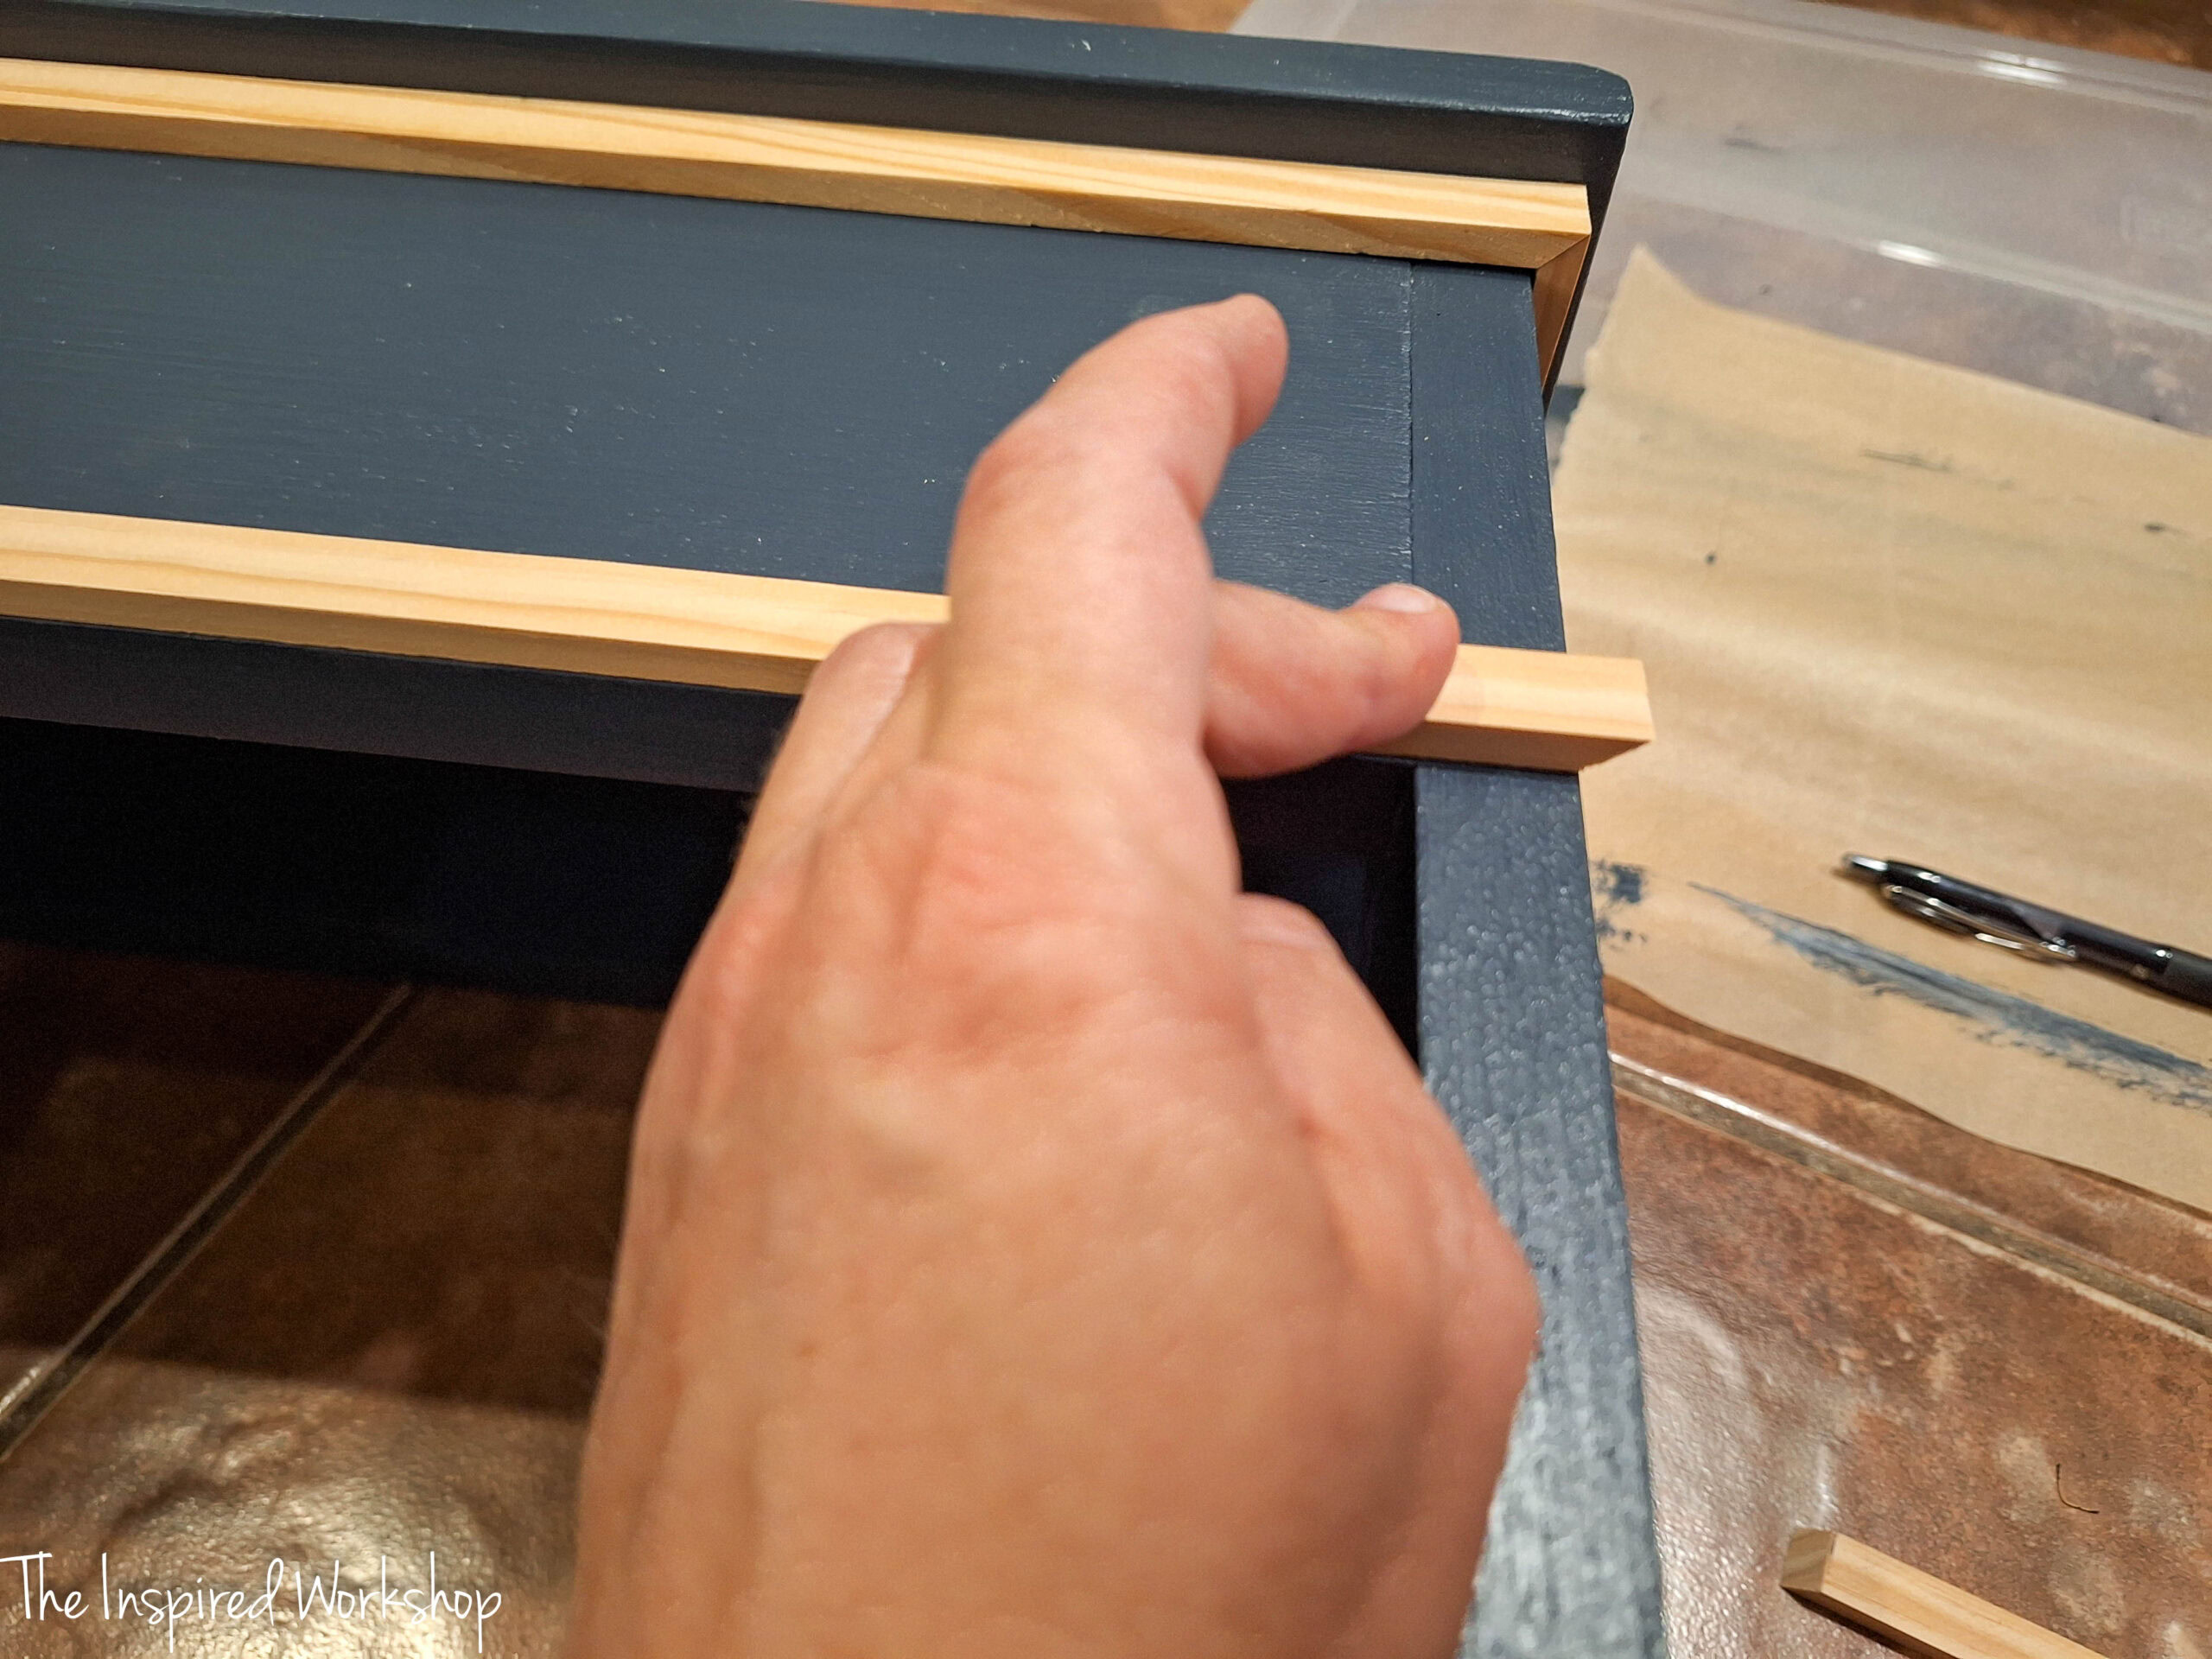
Next up adding the trim!
Adding Trim to the Cabinet
I had the cabinet fully painted before adding the trim! My paint sprayer was already set up in my yard with the color and everything ready to go, and we were about to get some storms for a couple of days, which meant mosquitos would be out in full force after that.
I didn’t have the trim on hand though, I had to make a trip to Home Depot to grab it, so I went ahead and painted the cabinet because it would be much easier to add the trim and paint the small pieces indoors by hand after the rest was already painted with my sprayer! All that just to explain why I am putting raw trim on a painted cabinet! 😅
The trim is beveled on the front corners at 45 degrees off square and I just super glued it into place, this is so much easier than trying to brad nail it and having to fill in holes after.
Alright, last thing, build the doors!
Building the Doors of the Cabinet
I built the doors the same way I built the vanity doors for the bathroom vanity actually the doors I used on this cabinet were the doors that were too small for the vanity and instead of wasting them, I built this cabinet around them! Lol!
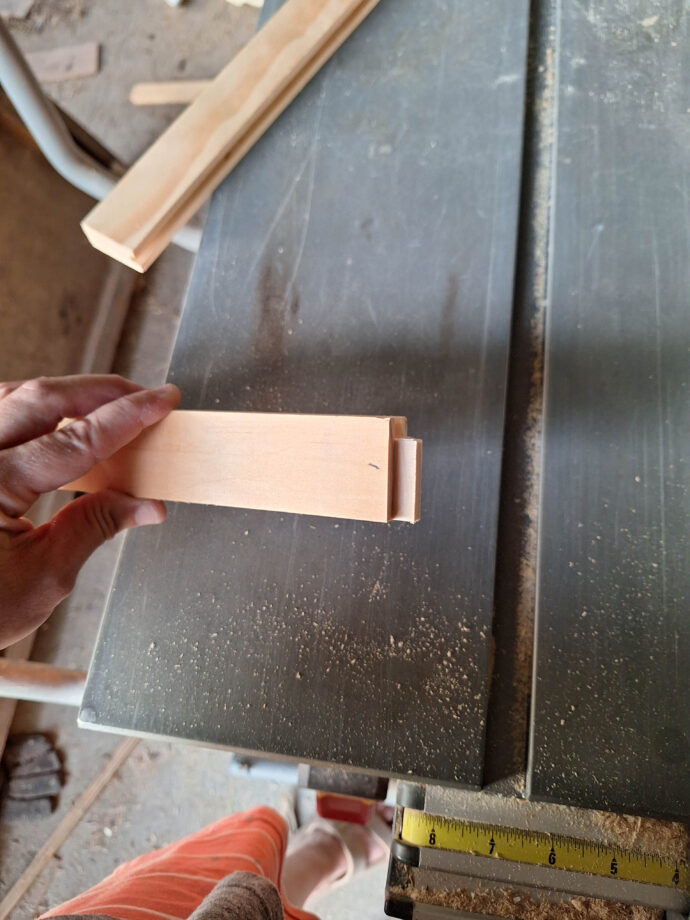
I used the tongue and groove method to create the doors, you do not have to do this, you can pocket hole them if you would prefer, but then you will need to route out a space in the back to fit the 1/4″ plywood. I love building doors with the tongue and groove method because they look legit, you see no exposed joinery, which I prefer!
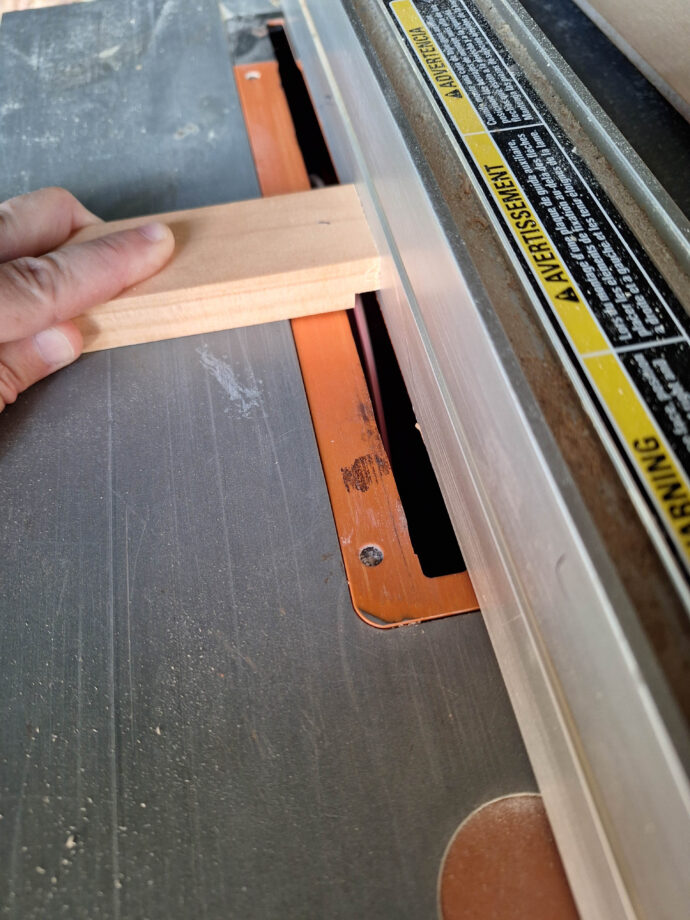
Cut your “door” boards to size but before putting them together, we need to run them through the table saw a couple of times to create the “groove”. The groove should be 1/4″ deep and set in the middle of the board, so 1/4″ over from each side, and 1/4″ wide! All that to say, you want it as close to the center as possible. Lol! You will run all the boards through each time before moving the fence.
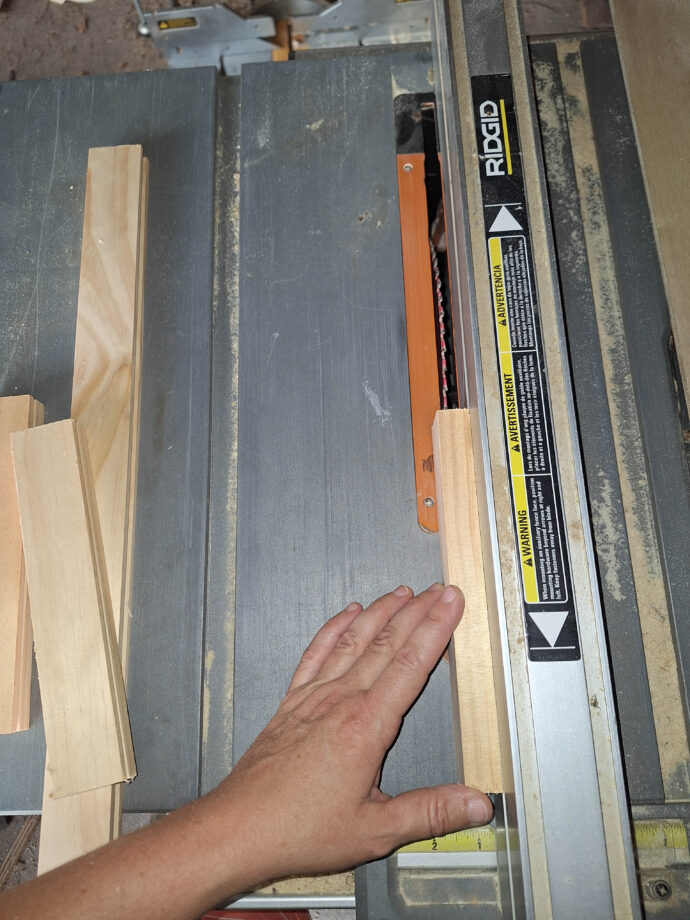
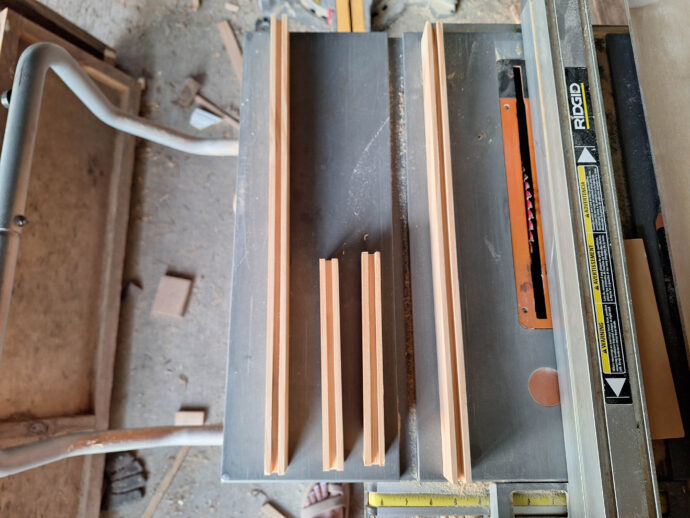
Once you have the grooves cut in all the door boards, you will cut the tongues on the center pieces of the doors, this will fit into the grooves you just made. Don’t raise or lower the blade at this point make sure it is the same level as the groove so the tongue fits properly!
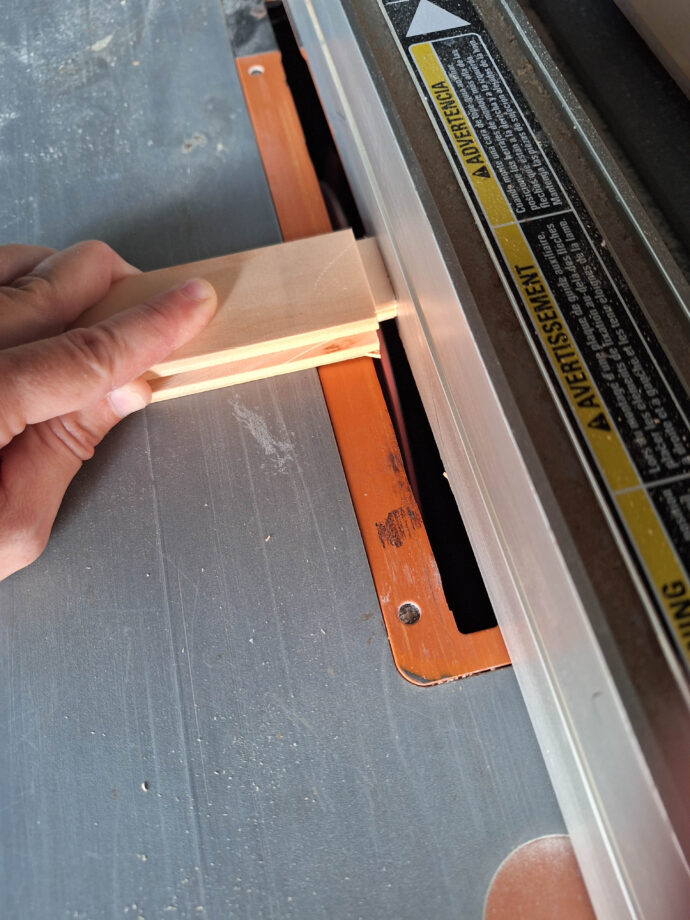
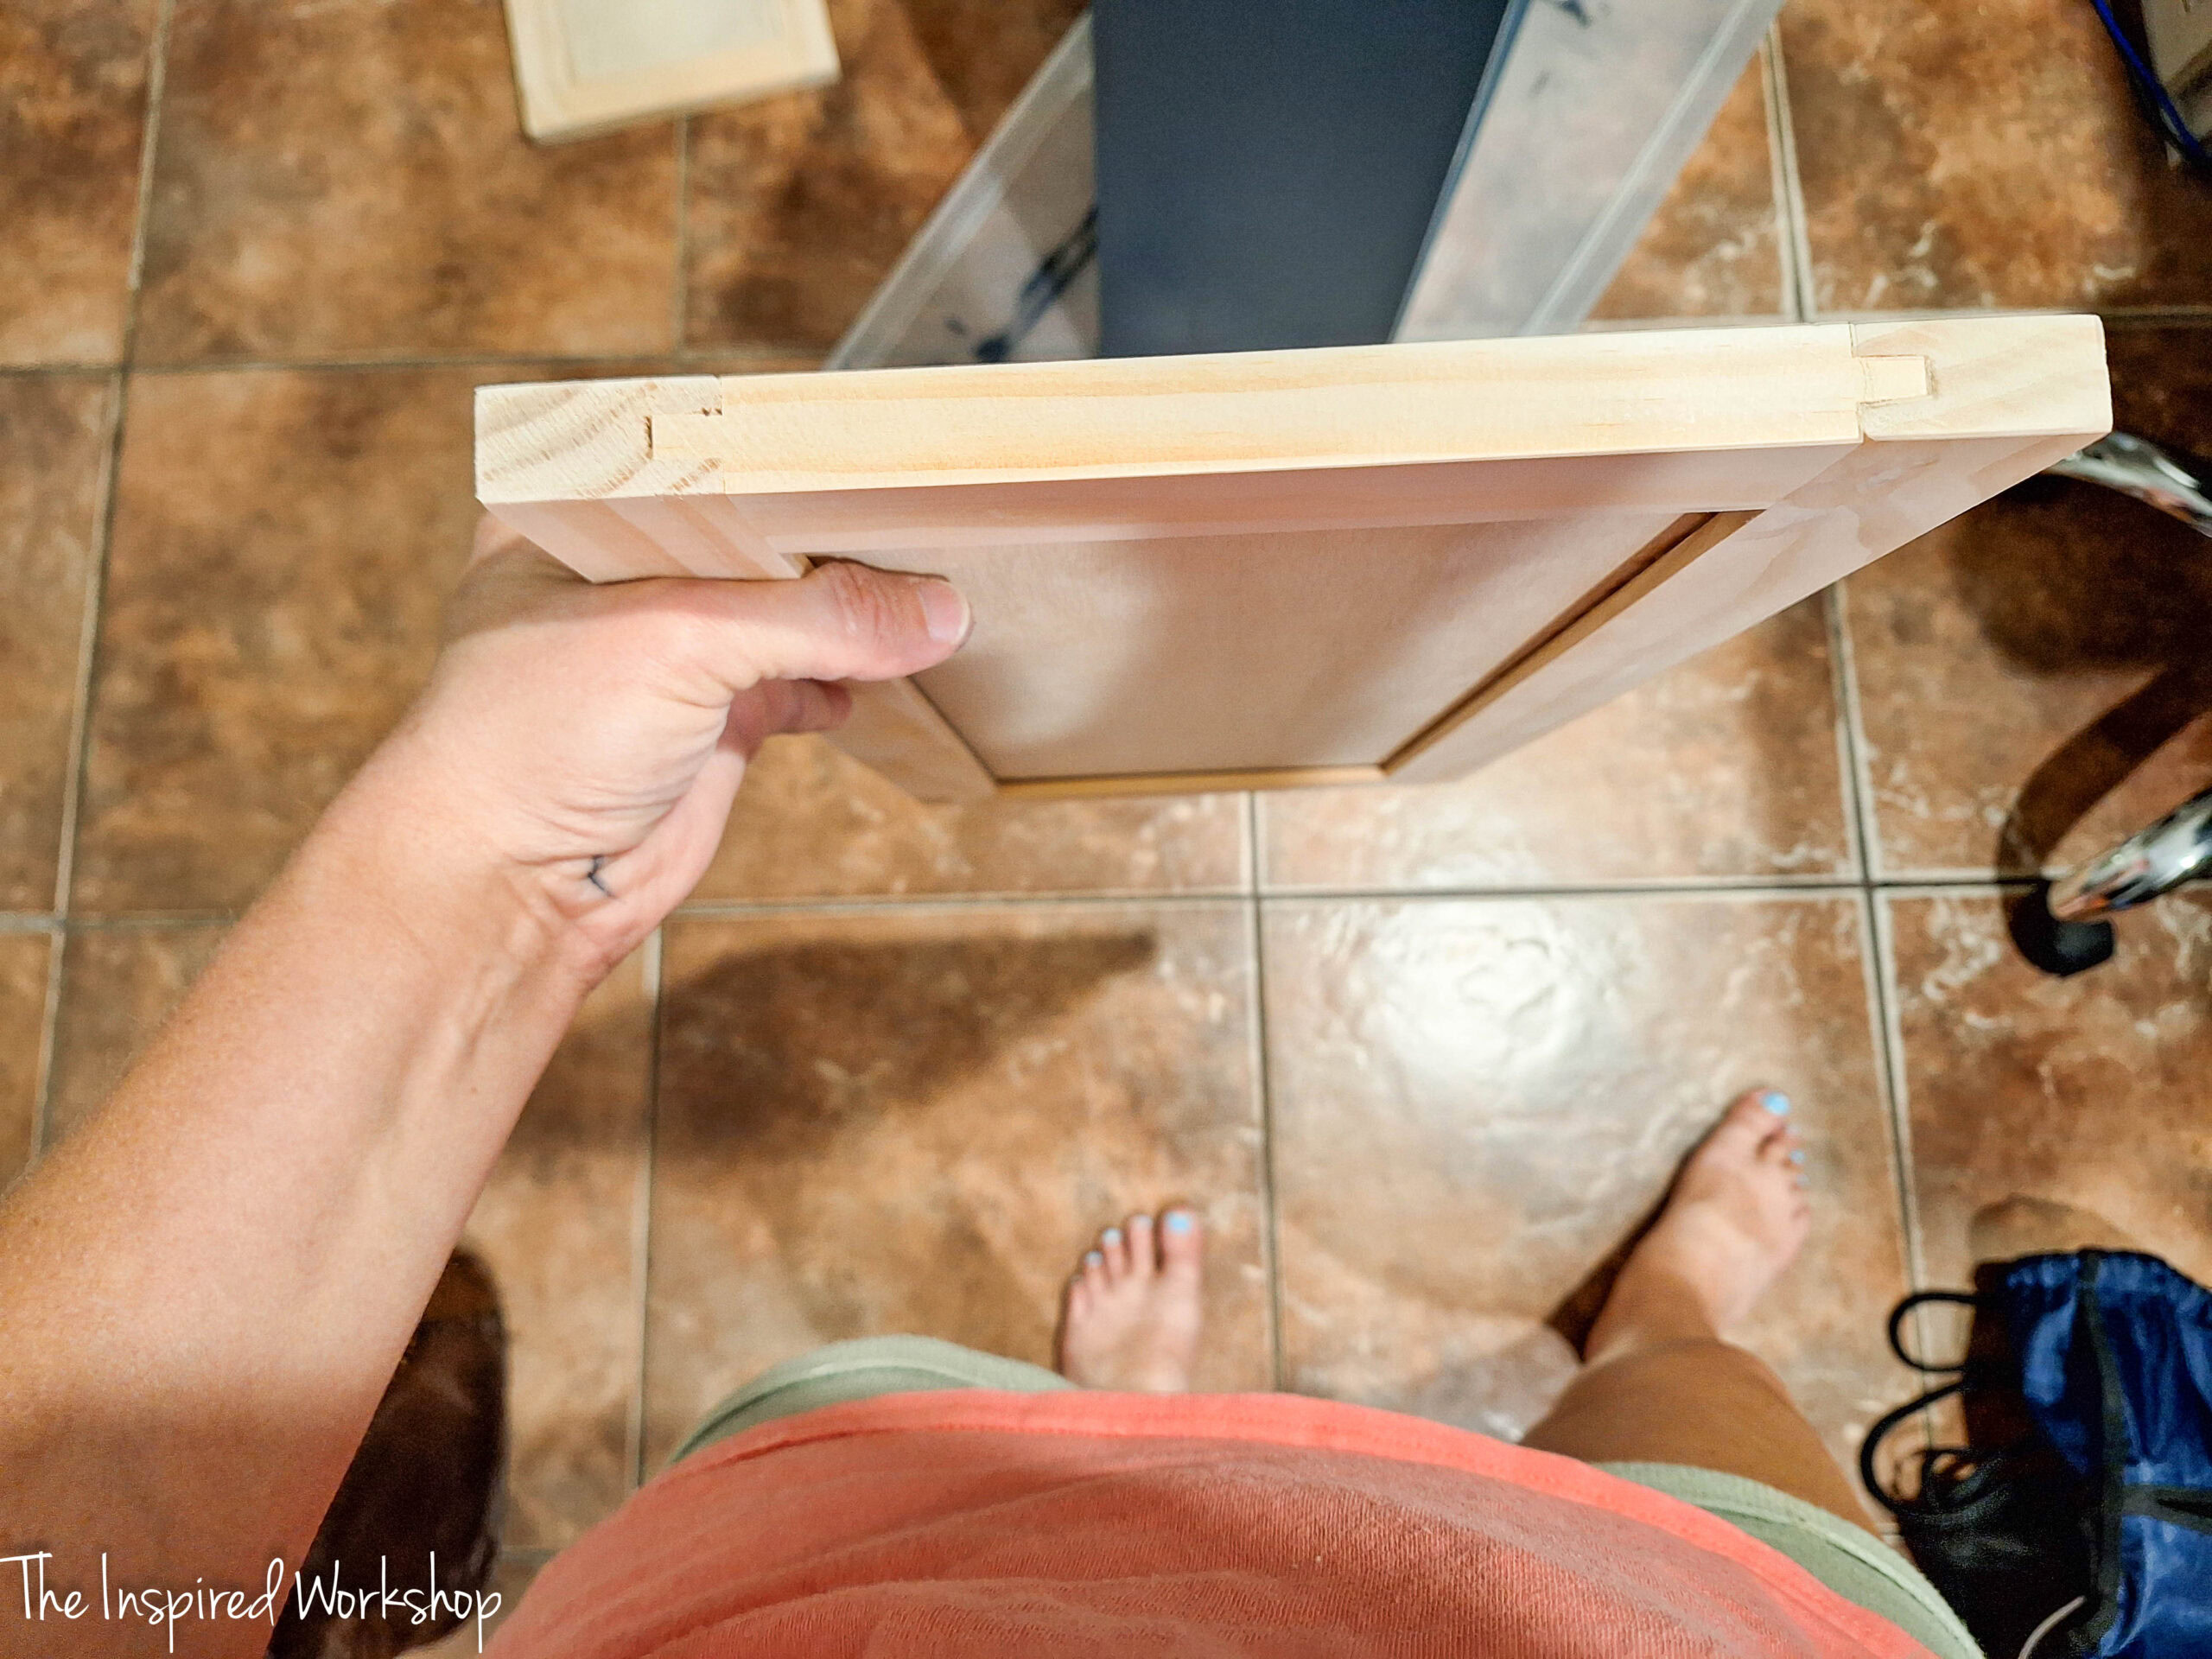
Now that you have your tongues and grooves cut, cut the 1/4″ plywood down to size, then use wood glue and clamps to put it all together! The plywood will have to slide into this groove before the frame is assembled! It will look like this! I know my door is not perfect, but after paint, it looks pretty dang good!
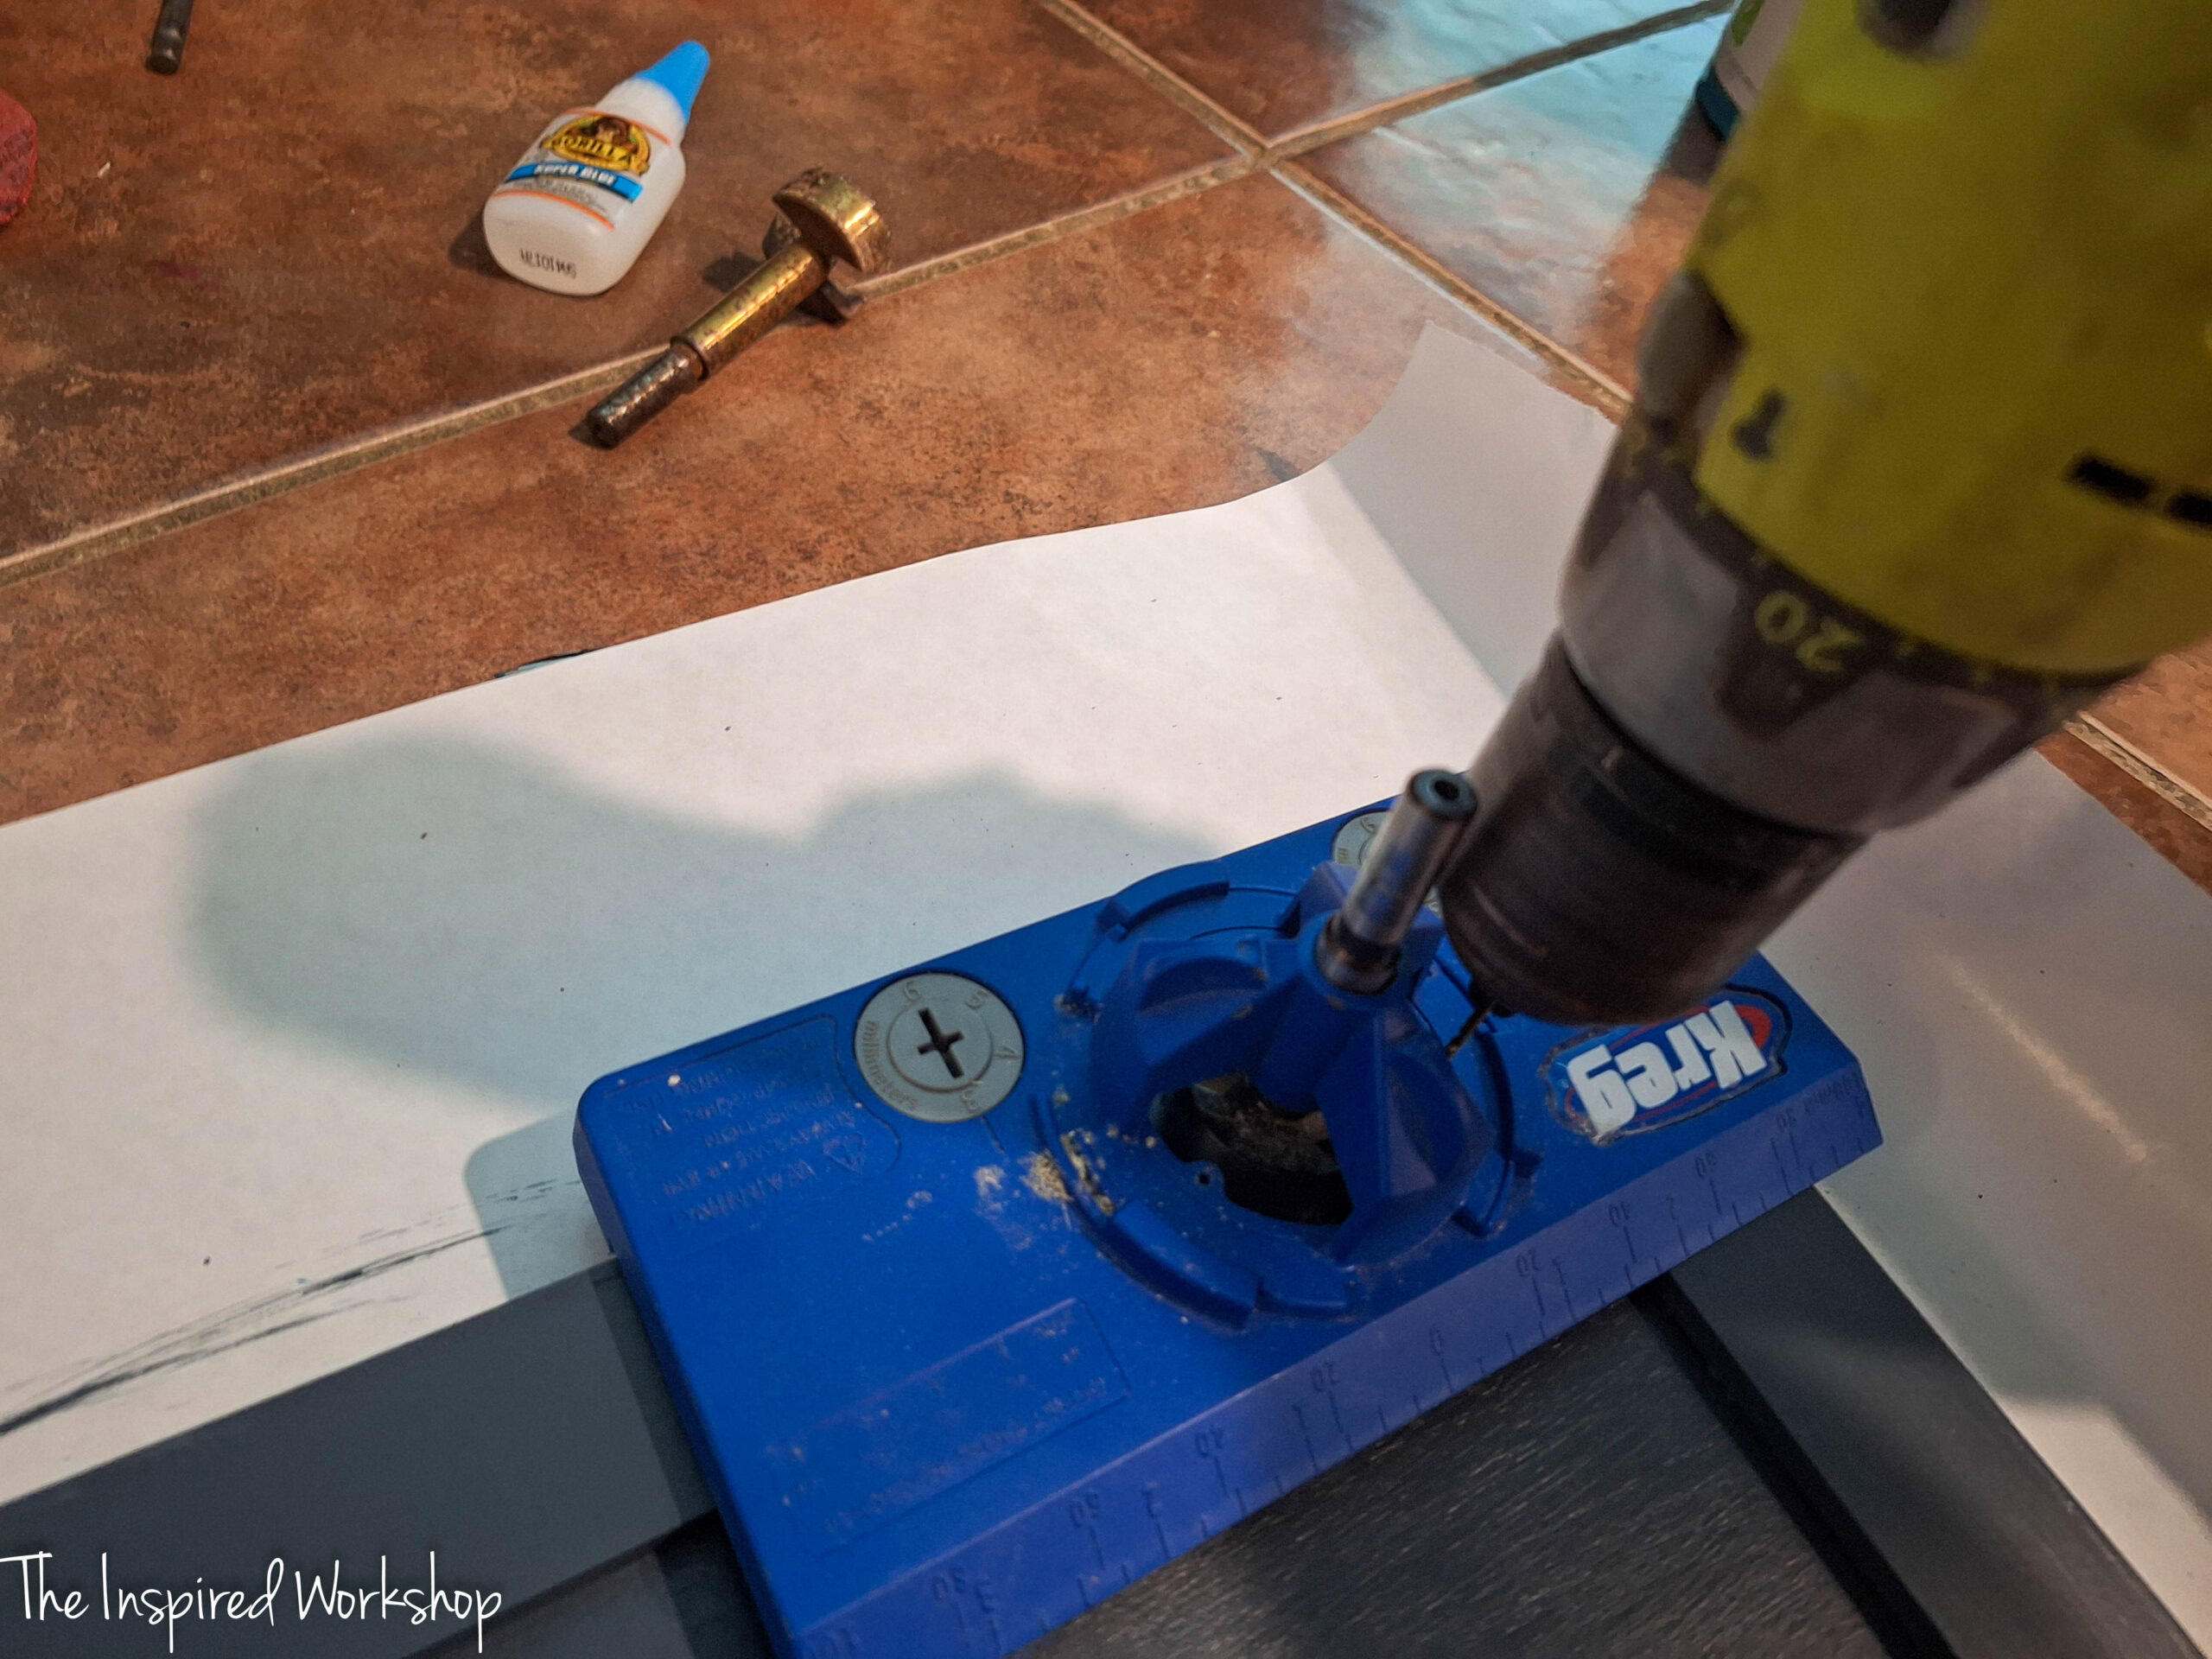
Once you get the doors glued up and they have dried, you can drill the cabinet hinge holes! I love the Kreg hinge jig, it is the EASIEST way to make these door look legit! The link is an affiliate link, but I bought the jig myself, it was not given to me! I drilled these holes after I had already painted the doors, but you can do it before to keep from scratching it up!
Hang them doors with the hinges and enjoy your cabinet!
Gosh I love this simple little cabinet, it holds a lot more than you would think and considering we don’t have a linen closet in this bathroom, we have a small vanity, and there’s not any usable floor space, this thing is worth its weight in GOLD!
Have you built something inexpensive and simple but you loved it because it really made life better? Tell me about it in the comments below!
Happy Building!

Want to save this post for later? Pin it!