DIY Bathroom Vanity Plans

Looking to upgrade your bathroom vanity or complete a bathroom remodel? This DIY bathroom vanity is the perfect solution for small spaces or build two to compliment each other in a master bathroom! Use the free DIY bathroom vanity plans to update your bathroom no matter how extensive the makeover!
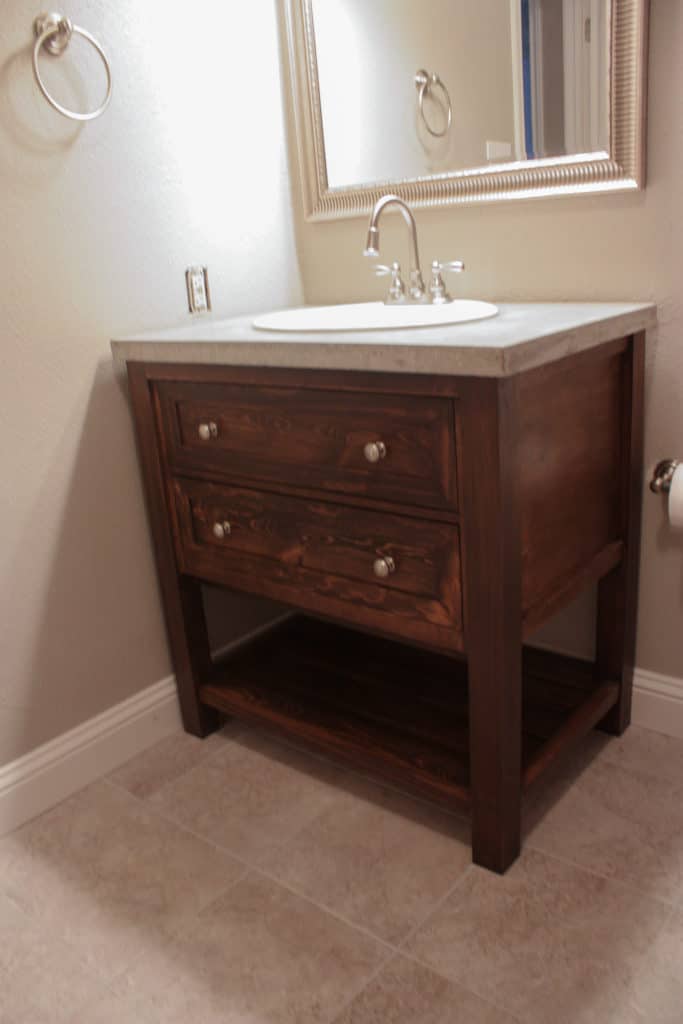
Are you following me on Instagram to keep up with all my latest projects and sneak peeks of projects I may currently be working on? If not, go follow along!! But, if you already are, you saw a few weeks back that I posted a picture of a bathroom vanity complete with a concrete countertop, and I am FINALLY here to share the DIY bathroom vanity plans with you all!! Don’t you just love a DIY project that looks this good?!

The pictures are not the greatest since I was trying to get out of this apartment as quickly as I could, the tenant was trying to set her bathroom up as I was trying to take photos! Lol!
This project was not hard but I managed to let it take me 6 months to complete because I was so worried about messing up on the concrete top that I just let it sit and sit…hmmm, sounds like you’ve heard that before!! Sounds like another of my projects, huh? Does, the DIY Emmerson dining table ring a bell?! Lol!! Well, I was super excited once I decided to just GET IT DONE!! It turned out great and then, of course, I was all like, “WHY do I do that, WHY?!” Some things I may NEVER know…and they may never change!! 🙂
So today I have the plans for the vanity and I will post a separate post for the concrete countertop, you can find it here, DIY Concrete Vanity Countertop, so you don’t have to skim through thousands of words and pics to get to the part you need!
Gathering Supplies for the DIY Bathroom Vanity
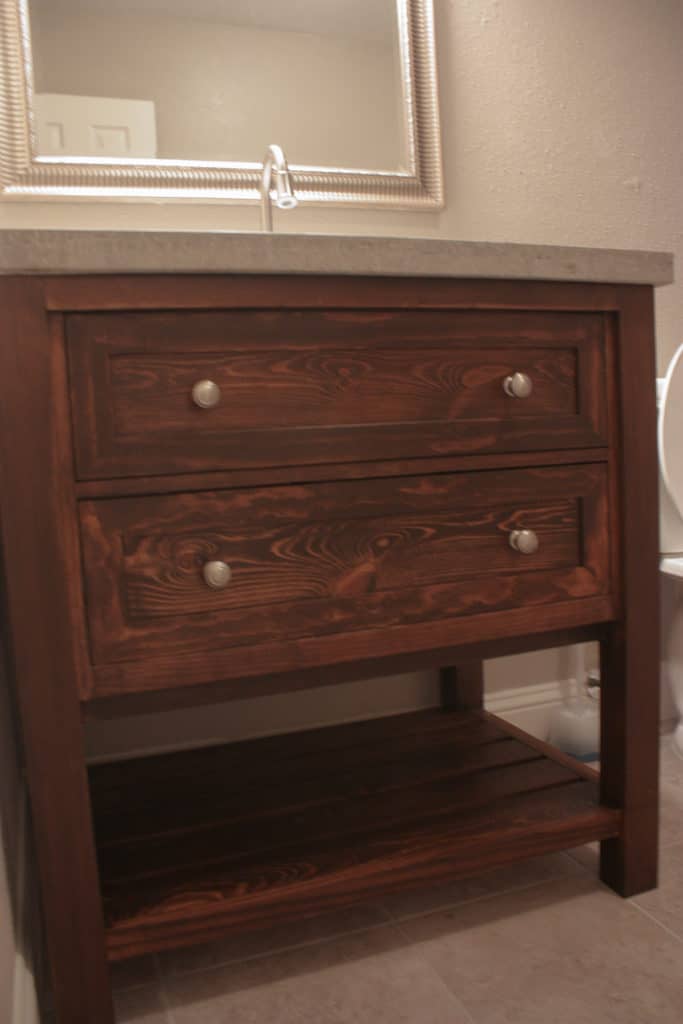
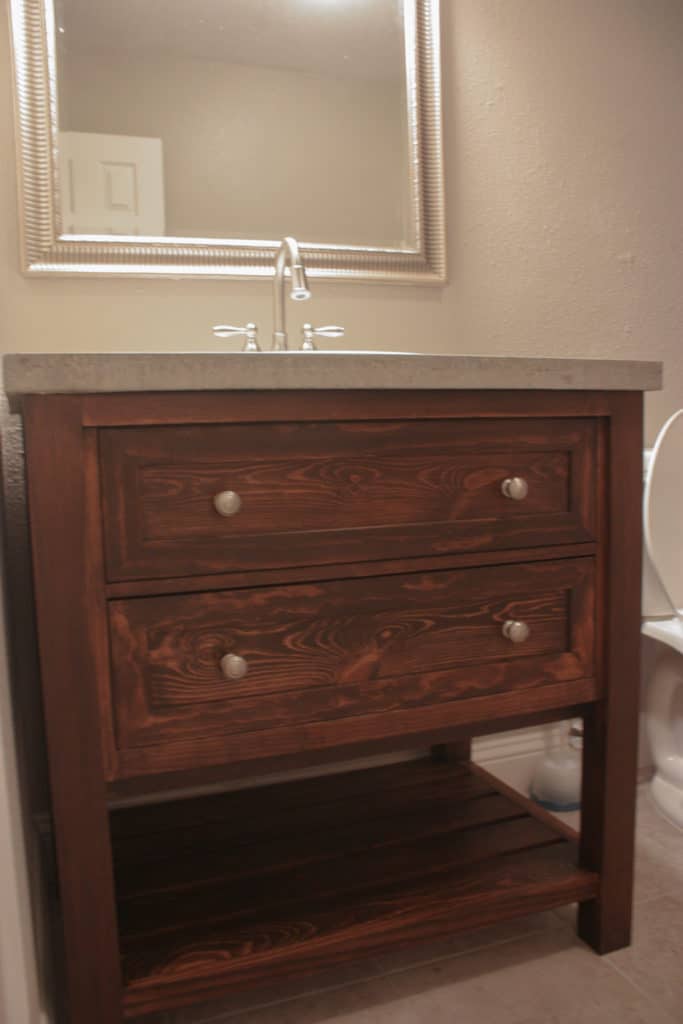
All in all, this DIY bathroom vanity cost me, for the wood, all concrete countertop supplies, the sink, AND the faucet, $240! Seeing as Pottery Barn sells this same vanity for $1200 without a faucet, I say it’s a total WIN!! Plus, after looking at even the cheap ones in Home Depot, you couldn’t get a vanity made out of particle board for this size and price!! The overall measurements of this vanity are 36″w x 36″h x 24″d.
As usual, you can get the download printable plans for the DIY Bathroom Vanity Plans! And down below I will give the step-by-step tutorial as well, along with the material and cut list!! And, of course, if you have any questions feel free to ask away in the comments below!!
Material List for DIY bathroom vanity:
**Note: Amazon links below are affilaite links! Affiliate links are links that pay me a small commission (at no extra cost to you) should you make a purchase after clicking a link!
- 4 – 3x3x36” poplar ‘legs’ (Lowe’s) **Note: The ‘legs’ were 15.00 each for a 36” piece…now having a table saw I would have saved the extra $40 and just bought 2 -4x4x96 and ripped them down to 2.5”x2.5”
- 1 – ¾” project panel 2’x4’
- 2 – 2x2x8 (I used furring strips for this to save big on the cost, just make sure and dig for straight ones!)
- 1 – 2x6x8
- 1 – 1x8x8
- 2 – 1x4x8
- 3 – 1x2x8
- 2 – ¼” x 1 ½” x 8’ (molding on drawer fronts)
- 2 inset hinges
- 2 magnetic clasps (I buy these in a 10-pack on Amazon and it saves me quite a bit over buying them individually!)
- 4 knobs
- miter saw
- kreg jig
- drill
- 1/2″ countersink drill bit
- wood glue
- 5/8″ brad nails
- brad nailer
Cut List for the DIY bathroom vanity:
- 4 – 3×3 @ 35”
- 2 – 2×2 @ 29”
- 1 – 2×2 @ 27 ½”
- 1 – 2×6 @ 29”
- 4 – 2×2 @ 18”
- 1 – 1×8 @ 27 ½”
- 1 – 1×8 @ 27 ¼”
- 2 – 3/4″ x 15 1/2” x 18” plywood pieces
- 2 – 1×2 @ 17”
- 3 – 1×2 @ 29”
- 1 – 1×2 @ 27 1/2″
- 4 – 1×2 @ 18”
- 2 – ¼” x 1 ½” @ 7” mitered at 45 degrees off square
- 4 – ¼” x 1 ½” @ 27 ¼” mitered at 45 degrees off square
- 2 – ¼” x 1 ½” @ 7 ¼” mitered at 45 degrees off square
Building the DIY Bathroom Vanity
Okay so first things first, cut all the legs and make sure they are all exactly 35″, hindsight I may have gone with 34” since the concrete countertop came out closer to 1 ½” inches, but the DIY bathroom vanity plans are based on the legs being 35”. Make sure and adjust accordingly if you go with 34”…Ok…Ok!!
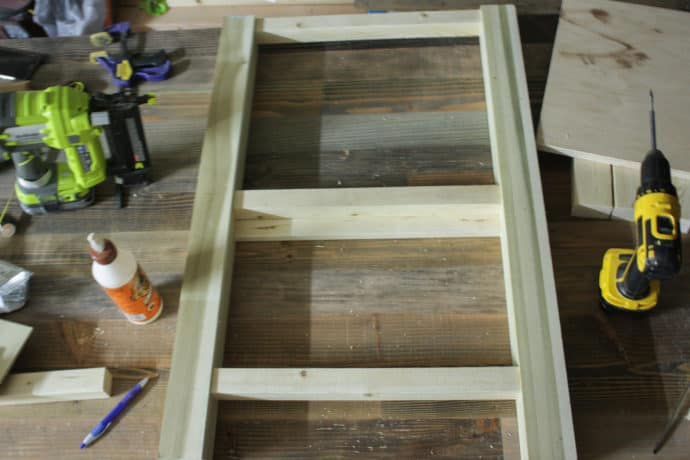
Next make the sides, cut 4 – 2x2s @ 18”, and drill 1 ½” pocket holes…If you haven’t used a Kreg Jig before, you can get the instructions for use in this post for the Kreg K4 or Kreg K5 DIY Dining Bench or the Kreg R3 DIY Console Table! That will explain how and why I say the things I say below if you are not familiar!
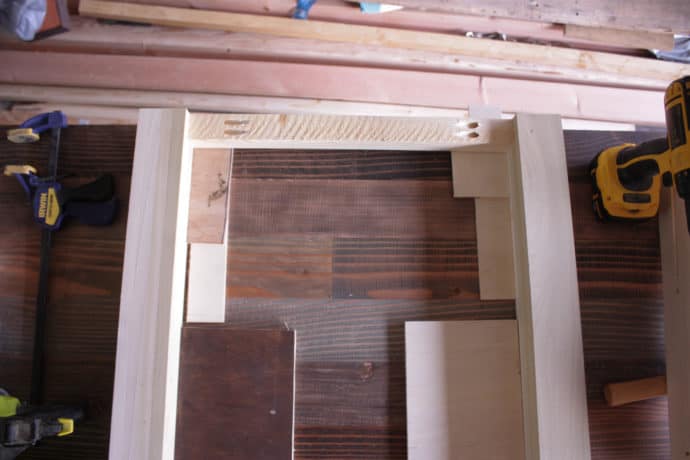
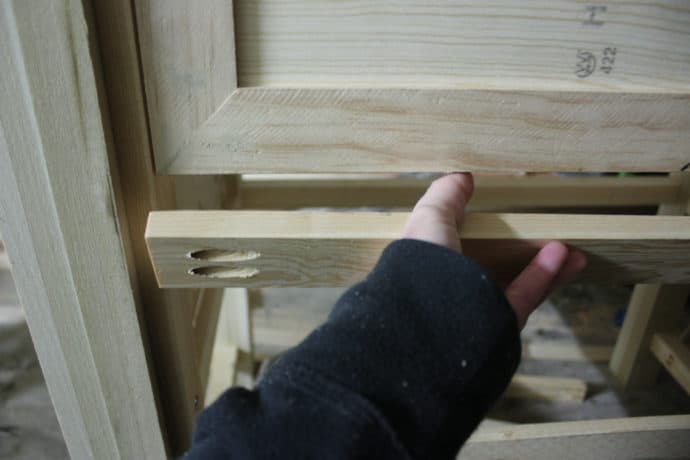
Once the 2x2s are cut and pocket holes drilled attach them to the 3x3s, the first one being flush with the top of the 3x3s, but set in a ½” (as you can see in the photo I used two pieces of scrap 1/4″ plywood to make 1/2″ so I didn’t have to worry about measuring) and the second one being 15 ½” down from the bottom of the first 2×2 and set in ½” (whichever side you choose to set in ½” will be the outside of the vanity so make sure your pocket holes are to the inside)! Use 2 ½” pocket hole screws and glue to attach!
Next cut the 1x2s @ 18” and use ¾” pocket holes and 1 ¼” screws, glue one right under the bottom 2×2 but flush with the inside…does that make sense? See the photo below! Then attach one four inches up from the bottom…the bottom of the 1×2 will be at four inches…the top will be at 5 ½”! This 1×2 will be set in ½” from the outside as well!! (See downloadable plans if it still doesn’t make sense or ask away in the comments below, or heck email me if you’d like at [email protected])!
Also, in the picture below I have a 2×2 at the bottom of the DIY bathroom vanity. I cut my 1×2 short and didn’t have any extra but I did have 2x2s laying around, if this happens to you feel free to do the same, your bottom 1x4s will just be slightly shorter!! 😉
Here’s what the DIY bathroom vanity looks like from the front!
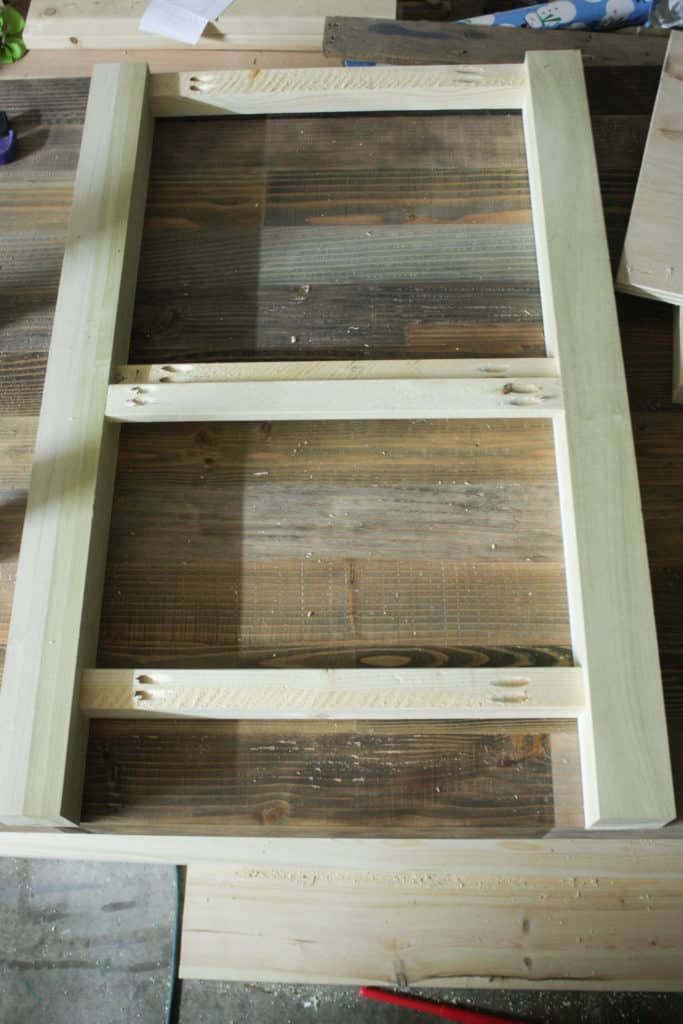
Next cut the ¾” plywood project panel down into the two pieces @ 15 ½” x 18” and drill ¾” pocket holes around the edge and glue and screw that sucker in there using 1 ¼” pocket hole screw! I was praising God the whole time because both actually fit perfectly!! The plywood is flush with the front of the 2x2s!
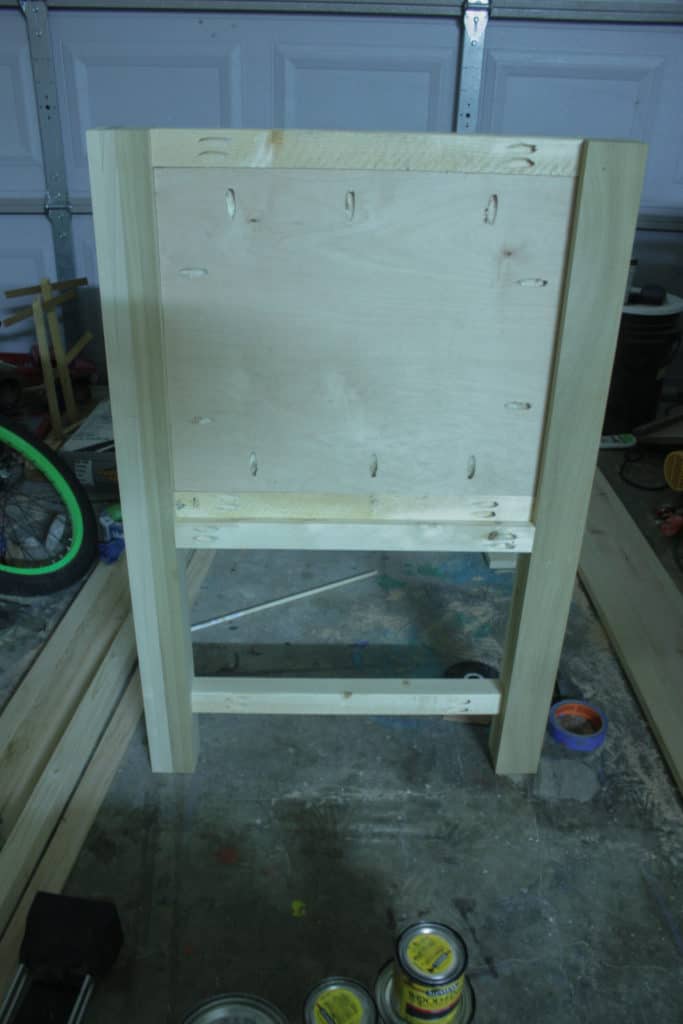
The sides are done!! Feel free to party down at this point, I mean I celebrate ALL the victories big or small! Lol!
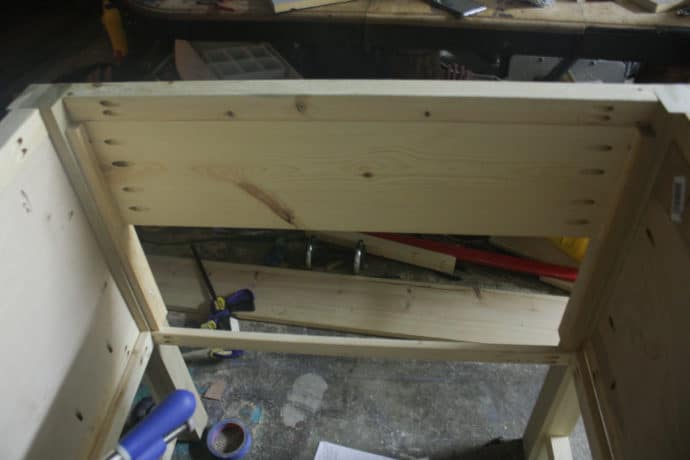
After that, cut the 2×2 that is going across the front of the vanity, it is cut at 29” and attached flush with the top, and flush with the front! Your pocket holes are drilled at 1 1/2″ and you will use 2 1/2″ screws and of course, make sure to use glue!! Go ahead and cut your 2×6 @ 29” and attach it flush with the top and flush to the back! Using the same 1 1/2″ pocket holes and 2 1/2″ screws and glue!
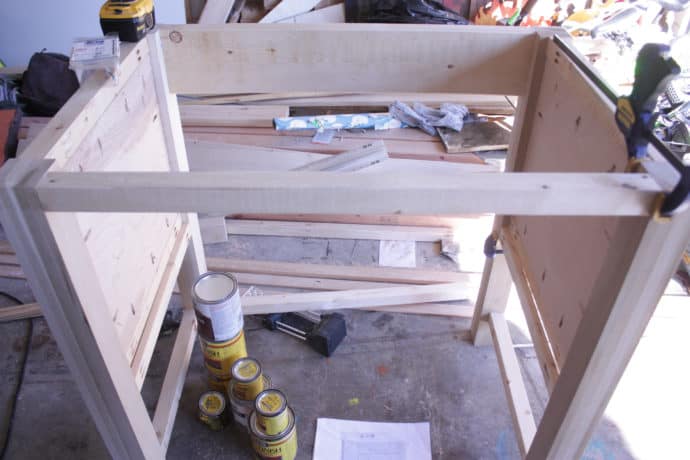
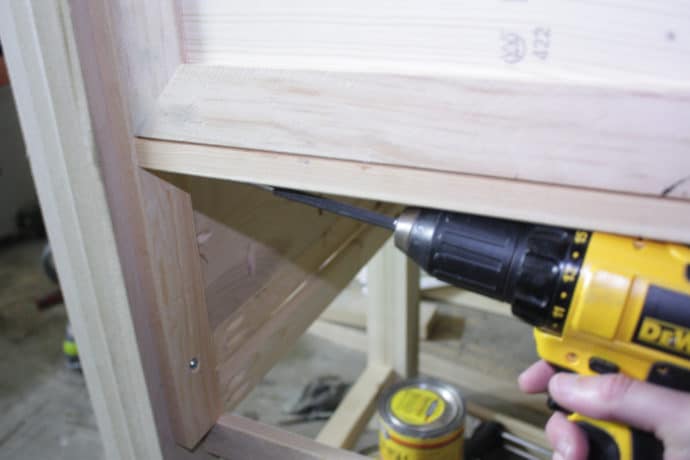
Next cut the sideboards that run parallel to the legs and attach to the legs, they are a 1×2 cut @ 17” they are not pocket holed they are simply countersunk screws. I did this by using a ½” countersink drill bit, drill the holes and then the head of the screw sits down inside a small hole so you can putty over them and no one will ever know there was a screw there!! Then you can attach the 1×2 @ 29″ flush with the inside of the legs as you can see at the bottom of the picture! Attach using 3/4″ pocket holes and 1 1/4″ screws and glue!
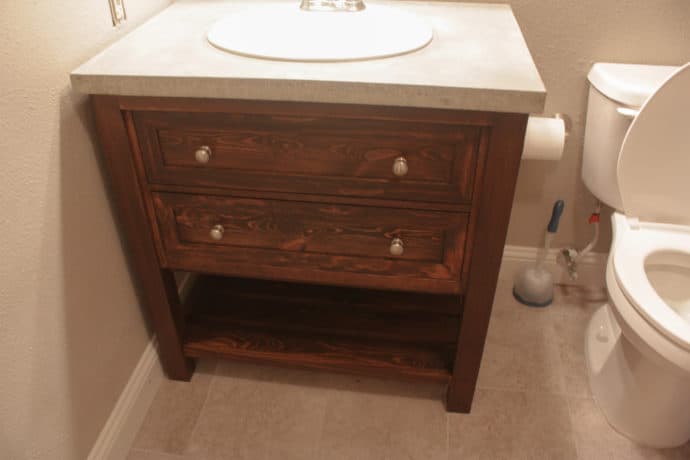
Then it’s on to making the ‘drawers’. They are not real drawers for the DIY bathroom vanity plans, they are totally fake! The bottom one does drop down like a door but there is no storage room because of the plumbing, if you needed storage here and didn’t care about easy access to the plumbing (meaning you are thin enough to fit down underneath, between the shelf and the bottom of the cabinet) then you could make a very small storage space here by closing it in behind the second ‘drawer’!
My sister’s apartment had a large linen closet in the bathroom and with baskets underneath we decided easy plumbing access was of greater value, so I built this with one completely fake drawer and wouldn’t be opposed to making them both fake without the dropdown at all!!
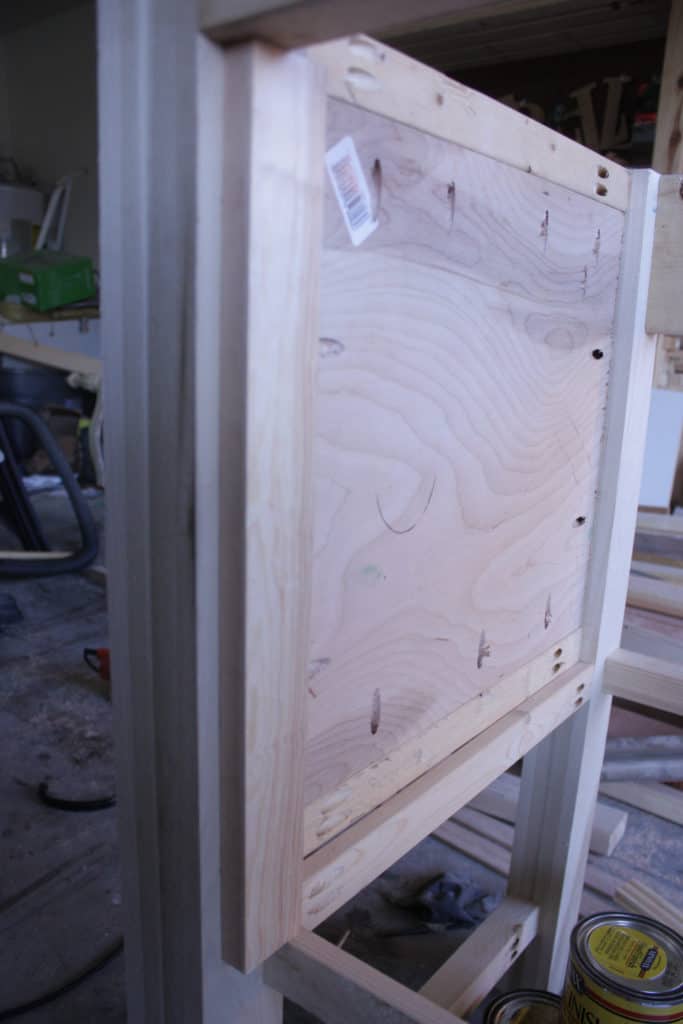
For the first drawer that is 100% fake, cut the 1×8 @ 27 ½” pocket hole on the back of the board (3/4” pocket holes and 1 ¼” pocket hole screws) and cut the trim molding (¼” x 1 ¼” flat molding) to just 1/8” smaller than the board itself all the way around with 45 degree mitered corners! This gives the illusion that it is a real drawer since you leave a 1/8” gap when installing a drawer! Glue and brad nail this to the drawer front using 5/8″ brad nails!
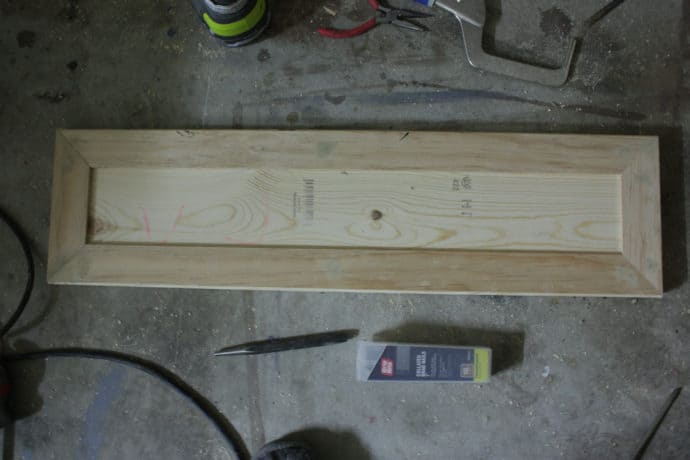
Here’s how the top drawer looks from the inside!
And outside!
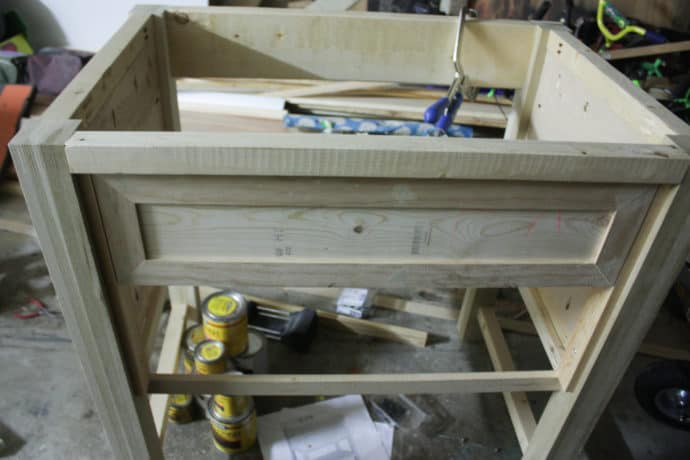
Make sure the front of the drawer is flush with the 1×2 that runs parallel to the legs as seen in the picture above! Once the top drawer is in place, the 1×2 @ 27 1/2″ is placed with the 3/4″ side as its face! 3/4″ pocket holes are facing down which is why you need to attach this at this point before moving on to the next drawer! Using 1 1/4″ screws and glue, attach!!
The second ‘drawer’ is cut a 1/8” smaller on each side(1/4” total) since it is really going to move…and the trim molding is placed all the way to the edge of this board! Glued and stapled just the same! I built the drawer front at this point but did not attach it until later on!
(NOTE**If you don’t want this door to move you can cut it exactly like the top one and attach it now! If you choose to do it this way make sure and cut the molding to fit all the way to the top and bottom but still in 1/8″ on each side as we have already left room for a real door here!)
At this point, we need the 2×2 @ 27 1/2″ placed at the very bottom of our 1×2 that runs parallel to the legs, using 1 1/2″ pocket holes, 2 1/2″ screws, and glue, attach it flush with the 1×2! I don’t have a picture of this step and I hope it’s not too confusing!
On to finishing up the bottom of the DIY bathroom vanity, in my original plans, I had solid 1x4s across the bottom, but time was running out on me extremely quickly, so I used one less 1×4 on the bottom than the plans call for and divided the extra space! It still looked great in the end and saved me the headache of the boards possibly not fitting on the first go around since I only had time for one go around!! LoL!!
The front and back boards have to have the corners cut out slightly with a jigsaw to make them fit around the legs! Last, drill 3/4″ pocket holes and screw them in with 1 1/4″ screws and glue them up, takes care of that!!
Here again, I was rushing and didn’t get a picture of that either, but in the finished photos, you can see how I did the bottom of the DIY bathroom vanity!
I sanded and stained this puppy before attaching the second drawer! I used Varathane Dark Walnut for the stain even though I REALLY wanted to paint it white, I couldn’t risk it not being perfect, and stain you really can’t mess up!! I also sealed it with three coats of my FAVORITE poly, Rust-oleum Ultimate Poly in Matte!


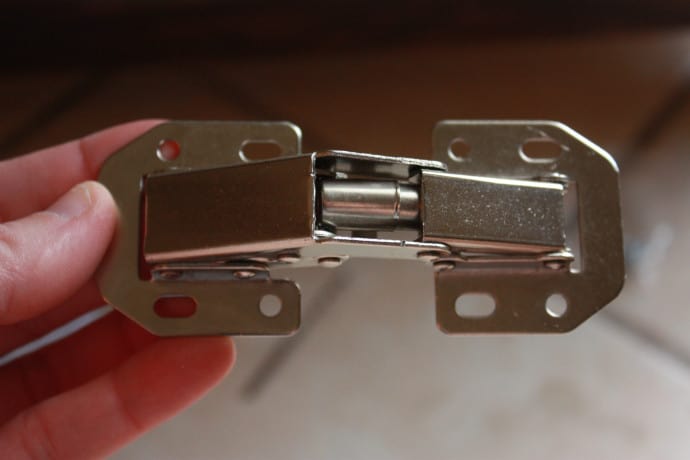
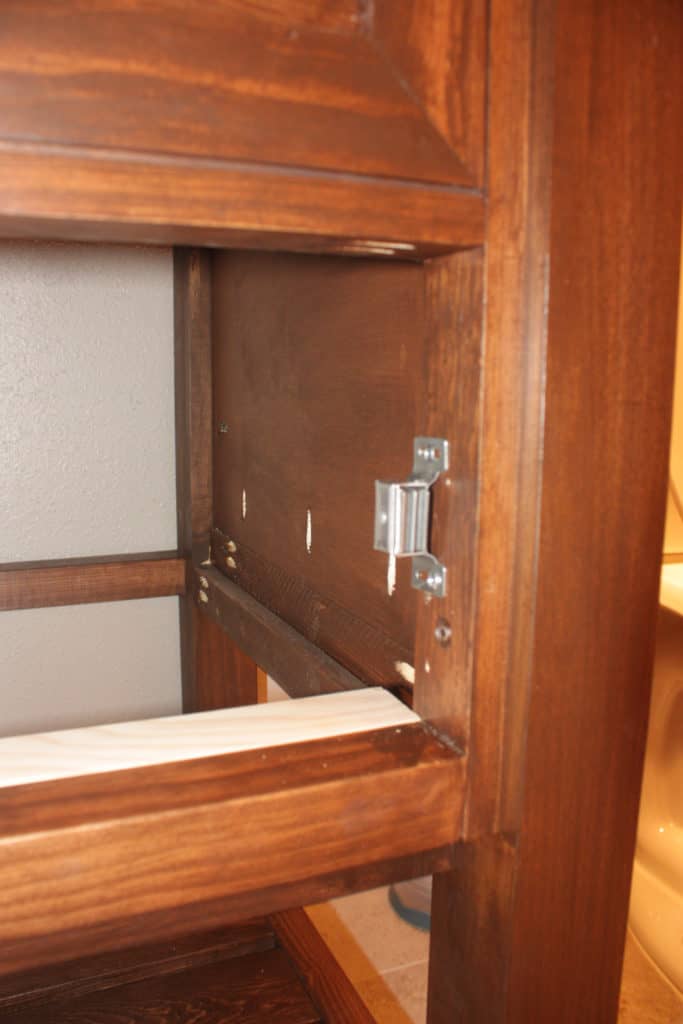
I used this inset hinge and magnetic clasps (affiliate link) on each side to hold it closed!
I also had to add a 2×2 behind the bottom 2×2 (the one below the second ‘drawer’ to have something to attach the hinges to…seeing as they are longer than 1 ½”! I just pocket-holed it into the other 2×2 so I didn’t have to make sure it was exact…mind you, I was putting the hinges on in the bathroom of the apartment as they were moving their belongings in…AWKWARD!!🥴 Actually, the rush was on because they asked to move in a day early and my sister said okay as long as they understood we would still be working in there finishing up loose ends!! Phew!!!
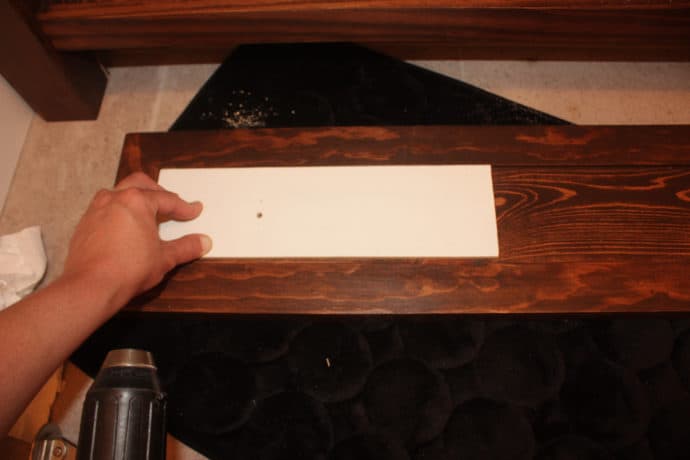
Also, before putting the hinges on, I drilled the holes for the knobs! I always make a template out of scrap 1/4″ plywood when I have more than one knob and they need to be lined up! It only takes a few extra minutes but saves a ton of time trying to line them up!
I love magnetic clasps and want to use them on everything!! Lol!! As a matter of fact, I have another project I just finished up that I am super excited about sharing with you all, and it has four magnetic clasps!!
Bata-bing Bata-boom!!! This beautiful DIY bathroom vanity is DONE!! But she is still a little naked on top! Click here to get the DIY concrete vanity countertop tutorial!
Make sure and tag your builds so I can see them!! #theinspiredworkshop And just remember that whatever you build or craft I hope you love every minute of it!!!

Want to save the DIY bathroom vanity plans for later? PIN it!
Thanks for the plans! My wife saw this and had me build two for our house. I modified it so it actually has functional drawers for more space. So far they work great!
https://uploads.disquscdn.com/images/0f3864f024939d85c8acaed7c38c5adab14f3a001b4680182c97a312ac7b31e0.jpg
Oh my gosh Roger!!! This is gorgeous!! I am so glad actual drawers worked on it!! Way to go man!! Do you mind if I share this picture via social media? Thanks for stopping by!! Have a great one!!
Thanks for the kind words! They are pretty awesome. We’ve been getting lots of compliments from everyone that sees them. Feel free to share the picture if you’d like.
Thank you Roger!! And to give you proper credit, what is your Instagram or Facebook user name if you have them so I can tag you?
Thanks for the plans! My wife saw this and had me build two for our house. I modified it so it actually has functional drawers for more space. So far they work great!
Beautiful!!! I would love to make this but, alas, I need storage!!!!! Probably more then the baskets would provide, but…….. It is tempting. Love your instruction and enthusiasm!!!! So fun. Can’t wait to read sink tutorial. I am dying to make something with concrete. I am so like u. I wait and wait and wait. Then finally do and say why did I wait?!!! Thanks again.
Thank you so much Sandy!!! I agree, if I were making a vanity for myself I would want lots of storage too!! The struggle is real…I do it EVERY time I am trying something new!! Lol!! Working with concrete was fun and I can’t wait to try something else with it!! I would LOVE to see whatever it is you make with concrete!! Thanks again for your sweet words, I appreciate them!!
You are so welcome. I was just looking at your concrete sink tutorial. Can’t wait for you to do a video on another project. I seem to learn better from videos!!! Thanks. Take care!!