DIY Feeder for Goats
Wasted hay is a widely discussed and important topic among goat owners, no one wants to throw money away if they can help it! Building your herd a couple of DIY feeder for goats will help solve this problem and allow for a place to feed not only hay but pellets, oats, and any other small feeds!
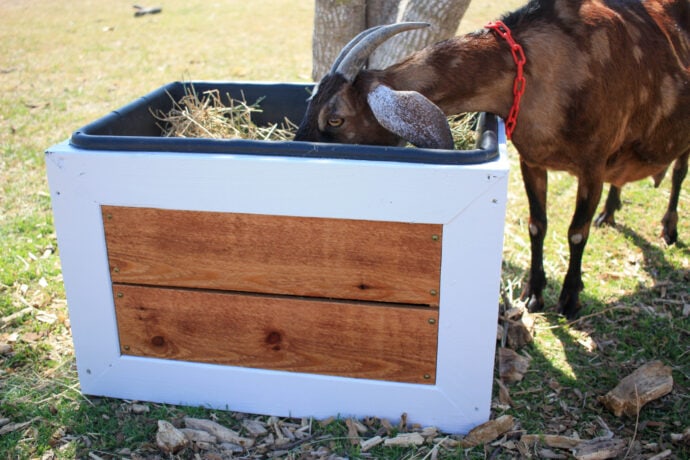
The goat hay feeder is small enough to easily dump out when needed and raises the feed and hay off the ground, and unlike typical hay feeders, there is no waste from hay falling through the wires! My girls are so picky, if their hay touches the ground, they will not touch it! If one pebble of poop gets into the feed bucket, they are done…which means money flying out the window!💸💸

The feeder for goats is built to where they are at a height that shouldn’t get pooped in, but still low enough they can eat everything placed in them!
I did build three different heights only because I have three pregnant mamas right now and so I will need the babies to be able to eat alongside the mamas, so we may have a few pebbles in the shorter ones! Lol!

Update: They are no longer pregnant mamas, they are mamas! We had 6 healthy little babies this last week, 3 boys and 3 girls! They are absolutely adorable! I’ll share photos soon!
Anyway, there is something about white and cedar that I just can’t get enough of! I absolutely love the color combination! I mean if you have been around here any length of time, you know that these DIY goat hay feeders match the goat house, the chicken coop, the small chicken coop, and even our well house… so it all looks somewhat like it’s meant to be in the yard! That is my ultimate goal but it’s not always easy to have function and beauty, I try but it doesn’t always work out! Lol!
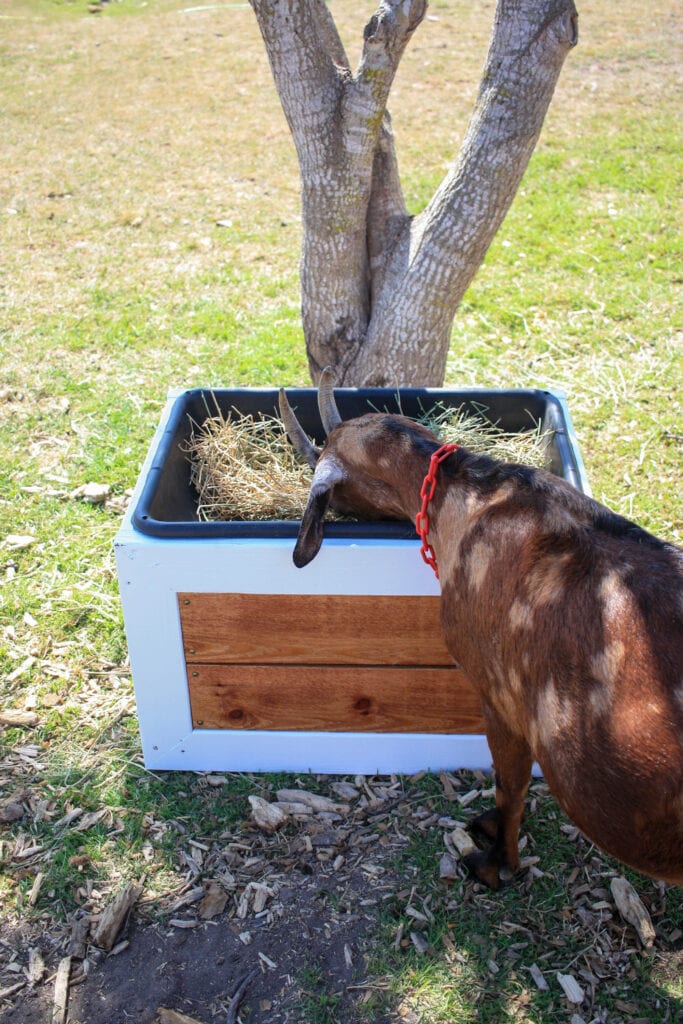
I guess the question is, do you want some functional, yet beautiful feeders for goats (or any other small livestock) that are cheap and easy to build? If you do, then keep on reading, I’ll hook you up!😉
Gathering Supplies for DIY Feeder for Goats
The great thing about the goat feeders is the cheap cost to build them! Even with ridiculous lumber prices…AGAIN…all three can be built for $150.00! You can’t even get ONE feed trough from Tractor Supply that cheap!
Download the printable plans to take to the garage and get building!
Materials Needed for Goat Feeder:
***NOTE: Amazon links below are AFFILIATE LINKS! Affiliate links are links that should you click one, and make a purchase, I make a small commission at no extra cost to you! It is a real win-win for us both when you so kindly make a purchase at one of my links, I make a wee bit of money to be able to keep bringing you free content! So thanks in advance!😊
Materials are for 1 feeder, if you want to build three as I did, you will need to triple the first 3 materials!
- 4 – 2x4x8
- 2 – 1x6x8 fence picket
- concrete mixing tub
- 3 1/8″ screws
- 1 1/4″ screws
- 1 1/2″ screws
- miter saw
- table saw
- wood glue
- paint/stain of your choice – I used white paint off the shelf, and sealed the cedar with Hellsman Spar Urethane in satin – it’s cheaper in store, I just linked it so you know what you are looking for!
Cut List for Goat Feeder:
All three feeders have the same dimensions, only the height changes. So the cut lists are almost the same but I still separated them!
Small Hay Feeder:
- 4 – 2×4 @ 28 1/2″ both ends mitered at 45 degrees off square, ends not parallel (top and bottom of long sides)
- 4 – 2×4 @ 16″ both ends mitered at 45 degrees off square, ends not parallel (sides of long sides)
- 4 – 2×4 @ 17 1/2″ (top and bottom of short sides)
- 8 – 1/2″ x 3/4″ (fence picket ripped down to 3/4″) @ 8 1/2″
- 3 – 1×6 @ 21 1/2″ fence pickets (one ripped in half) cedar long sides
- 3 – 1×6 @ 17 1/2″ fence pickets (one ripped in half) cedar short sides
Medium Hay Feeder:
- 4 – 2×4 @ 28 1/2″ both ends mitered at 45 degrees off square, ends not parallel (top and bottom of long sides)
- 4 – 2×4 @ 18″ both ends mitered at 45 degrees off square, ends not parallel (sides of long sides)
- 4 – 2×4 @ 17 1/2″ (top and bottom of short sides)
- 8 – 1/2″ x 3/4″ (fence picket ripped down to 3/4″) @ 10 1/2″
- 4 – 1×6 @ 21 1/2″ fence pickets (one ripped in half) cedar long sides
- 4 – 1×6 @ 17 1/2″ fence pickets (one ripped in half) cedar short sides
Large Hay Feeder:
- 4 – 2×4 @ 28 1/2″ both ends mitered at 45 degrees off square, ends not parallel (top and bottom of long sides)
- 4 – 2×4 @ 20″ both ends mitered at 45 degrees off square, ends not parallel (sides of long sides)
- 4 – 2×4 @ 17 1/2″ (top and bottom of short sides)
- 8 – 1/2″ x 3/4″ (fence picket ripped down to 3/4″) @ 12 1/2″
- 4 – 1×6 @ 21 1/2″ fence pickets (one ripped in half) cedar long sides
- 4 – 1×6 @ 17 1/2″ fence pickets (one ripped in half) cedar short sides
Building the Feeder for Goats
Quickly you can throw together the frame of the goat hay feeder. It is basically two mitered frames screwed together! Not hard at all!
First, make the two long side frames using 2 – 2×4 @ 28 1/2″ and 2 – 2×4 @ 16″, 18″, or 20″ depending on which size feeder you are building! Using wood glue and the 3 1/8″ screws attach the 2x4s on the miters. Screw at an angle from what will be the side into what will be the top/bottom.


Once you have the front and back frames made, the two frames need to be connected using the 2×4 @ 17 1/2″. You will want to use wood glue and screws straight through the front/back of the feeder into the side boards. Sorry about the quality of photos, I was building right at dark and they are awful quality! Lol!


Check the frame for size and make sure it fits!😏

That is the frame built, that is all that there is to it! I painted it at this point so that I wouldn’t need to tape off the cedar boards since I was keeping them natural! I just painted the hay feeders with exterior white paint straight off the shelf!
Then I added the small cedar strips (fence pickets ripped down to 3/4″) to the inside of the 2x4s. Since it is already painted, there really isn’t a need for wood glue as it isn’t made to adhere to painted surfaces! Just screw it into place. I used a scrap piece to make sure it was set back where it needed to be to make the cedar boards flush with the front!


I went ahead and drilled the 3/8″ holes to put ground anchors into at this point so my drill could easily get into the space, I flipped it upside down to drill them!

Flip it right side up!

Once that was done, I cut and sealed all my cedar boards to make sure I didn’t get spar urethane on my white painted frame! I then added them with wood glue and 1 1/4″ screws!

The spacing of these boards will change based on which size you are building! See the printable plans for more information!
Once all the cedar boards are attached, the goat hay feeder is ready to be placed where you want it, ground anchors attached, and goats fed!


I love them so much already and I can’t wait to keep bringing you so many more helpful plans for homesteading and gardening! Have you built anything lately for your garden or to help with homesteading? I would love to see it! I enjoy homesteading so much more than I ever thought I would!
So glad you stopped by, see you again soon!
Happy Building!

Want to save this DIY Feeder for Goats for Later? Pin It!

Related Posts





Curious how these have worked out for you? I think my girls would still waste hay by pulling out large clumps and letting it fall to the ground.
Hey Amy!
I have actually loved them! The girls do not really pull hay out of them, maybe every once in a while they will but it’s not typical! Granted, I am feeding alfalfa from square bales that fit perfectly in the troughs, they each only get one flake from the bale so they don’t stick up over the edges or anything, they have plenty of room still to move the hay around trying to get the leafy goodness!😉 The only problem I have had is one goat loves to lay in one and she has broke the concrete tub, I replaced it with a heavy duty feed trough (I think I mentioned it in the post that one of them is a feed trough and the others are cheaper concrete tubs, the feed trough is 20 bucks instead of like 6 bucks) and now I haven’t had any issues with it breaking! Lol! Hope that helps, let me know if you have any other questions! Thanks for stopping by!
Cara