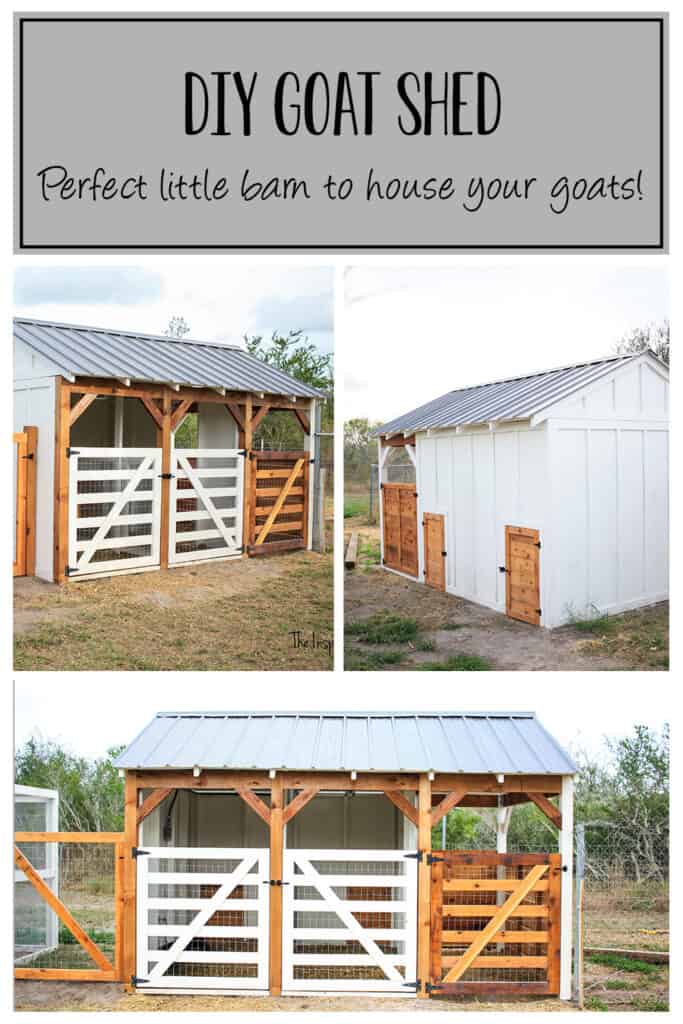
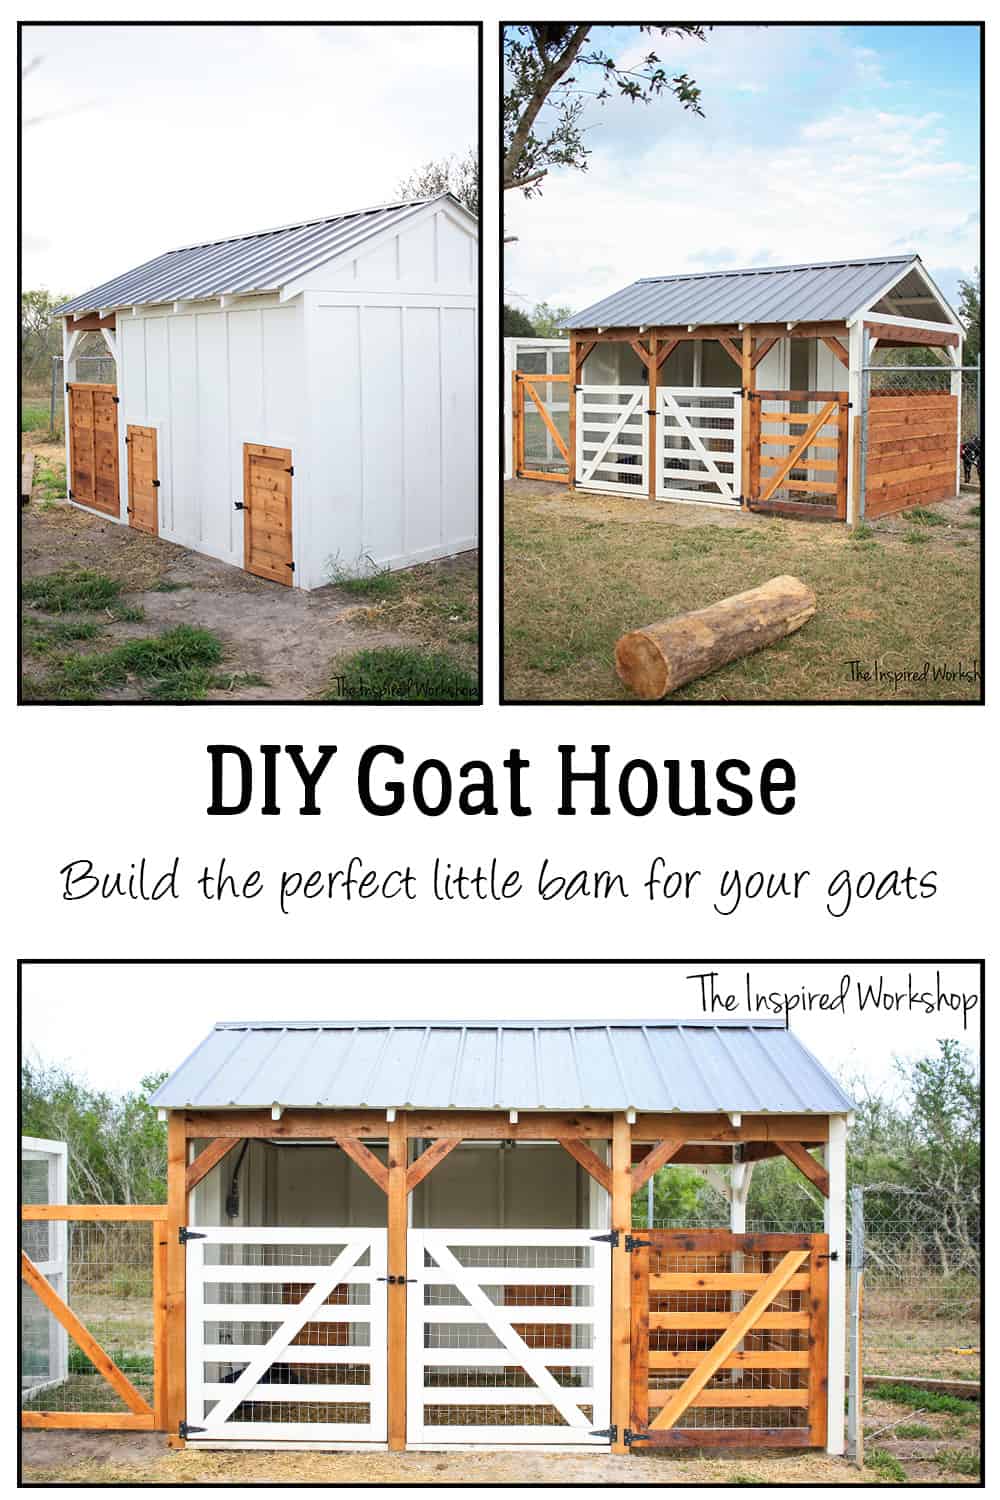
DIY Goat Shed
Homesteading has become more popular in recent times and after chickens, goats are the second most popular homesteading animal. Goats are small in size and you can raise them for meat or dairy! And with the DIY goat shed plans, you can build your homestead the perfect place for them to stay at night to be safe!

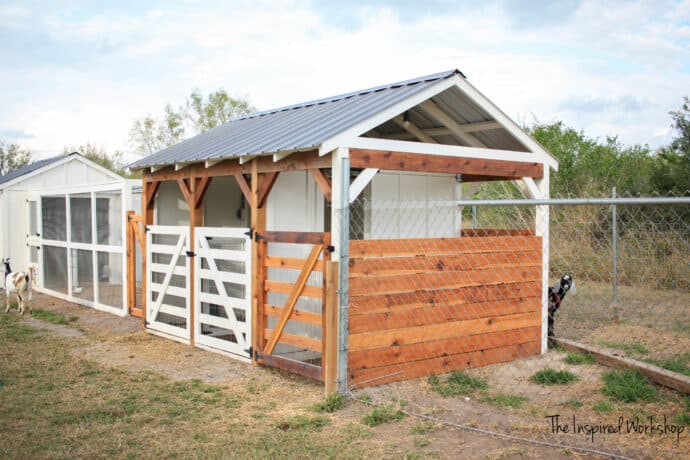
Yo, yo, yo!!! Y’all I have some exciting plans to share today! So you know how a while back I shared my Chicken Coop plans, and if you follow me on Instagram, I mentioned that I would have a bunch of homesteading type plans coming for you, like a DIY GOAT HOUSE with a milking area that you could turn into an extra stall!! Yes, I had to build my sweet little dairy goats a miniature goat barn, and you are going to want fresh milk after you see this!😜
Look at that adorable little DIY goat house that matches my chicken coop and just makes my heart melt when I see these sweet faces waiting for me in the mornings!

My girls are the BEST and I can’t wait to share EVERYTHING with you like milk stand plans, DIY hay feeders, see-saw plans, other playscape plans, and even how to keep them healthy without chemicals, as we raise them completely organic since we drink their milk raw!
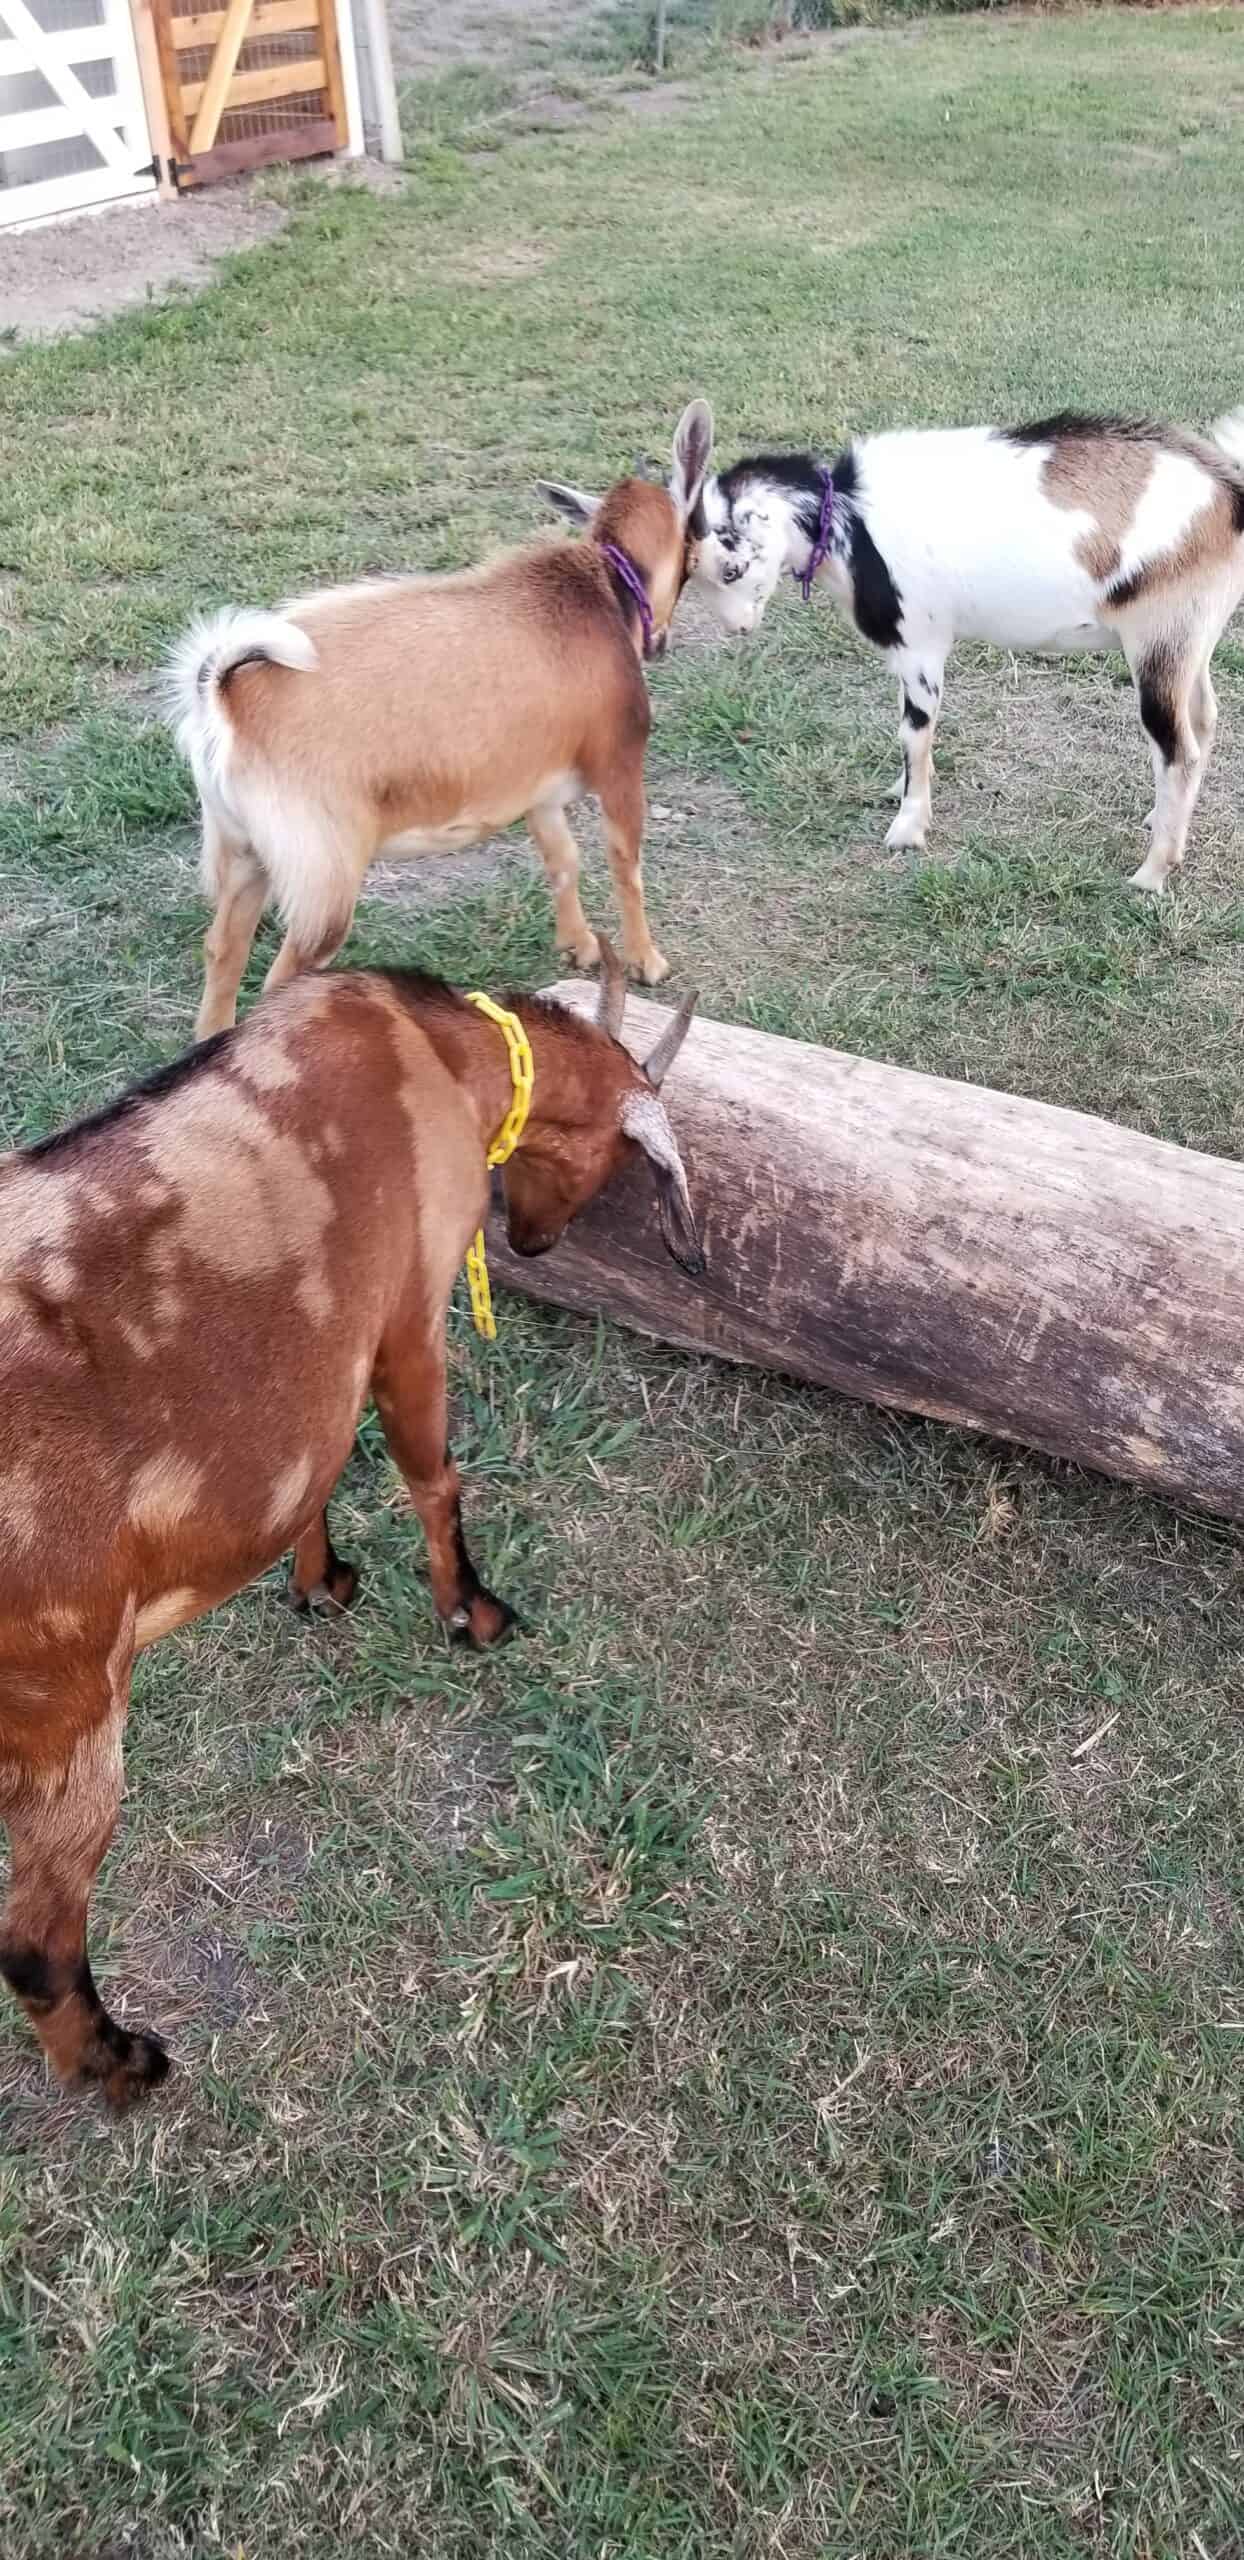
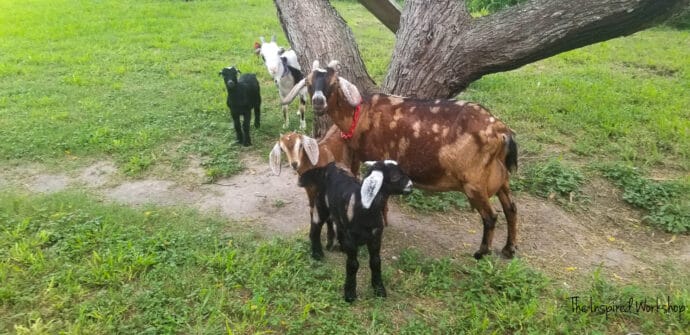
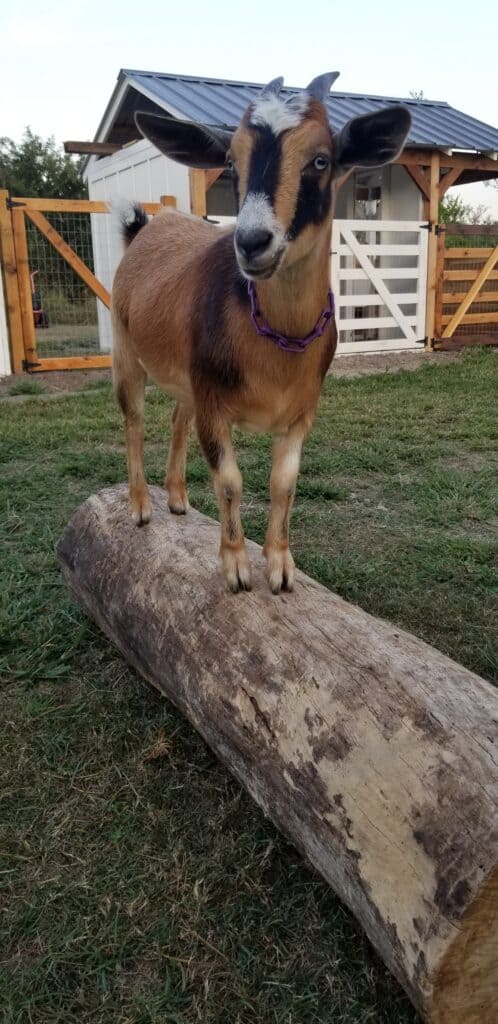
I can’t get good pictures of my girls for the life of me, but I tried! Lol! This is Daisy!

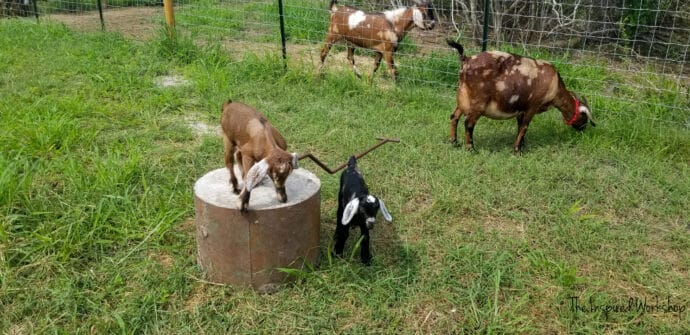
This is Daisy fighting her sister Bea! Lol! Faith is making an appearance rubbing her horns on the log!
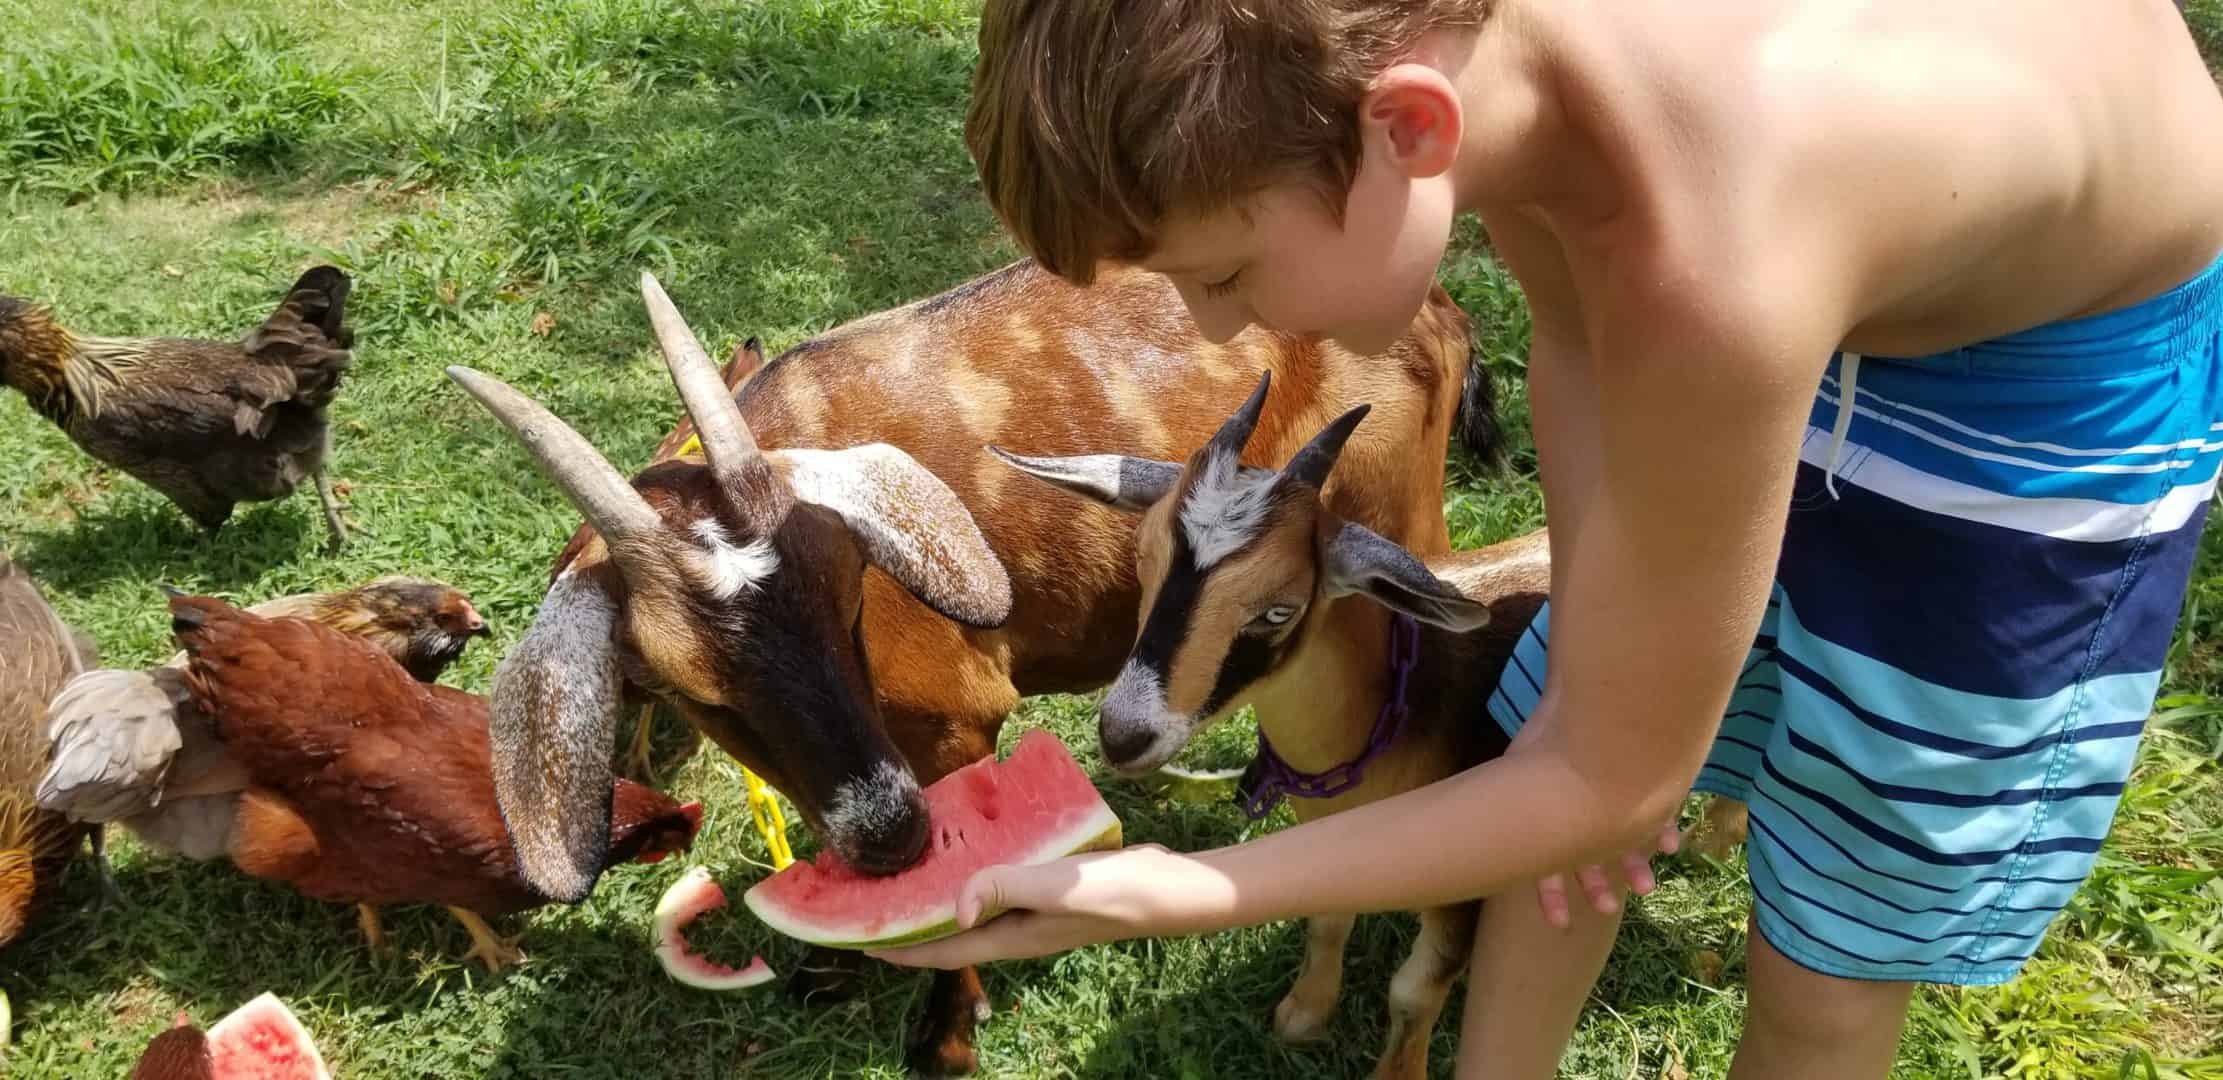
Oh, how they love watermelon!😍 Nom nom!
These ladies are just like my chickens, and I NEVER knew what I missing out on until I had them! Now I wonder how I ever lived without them! It’s one thing to have a pet(s) that you love, my dogs are my BABIES, but when you love them AND they produce FOOD for you and your family, it’s like a beautiful relationship that is crazy amazing! So basically, if you don’t already have goats and chickens…go getcha some!😉 You can thank me later!😜
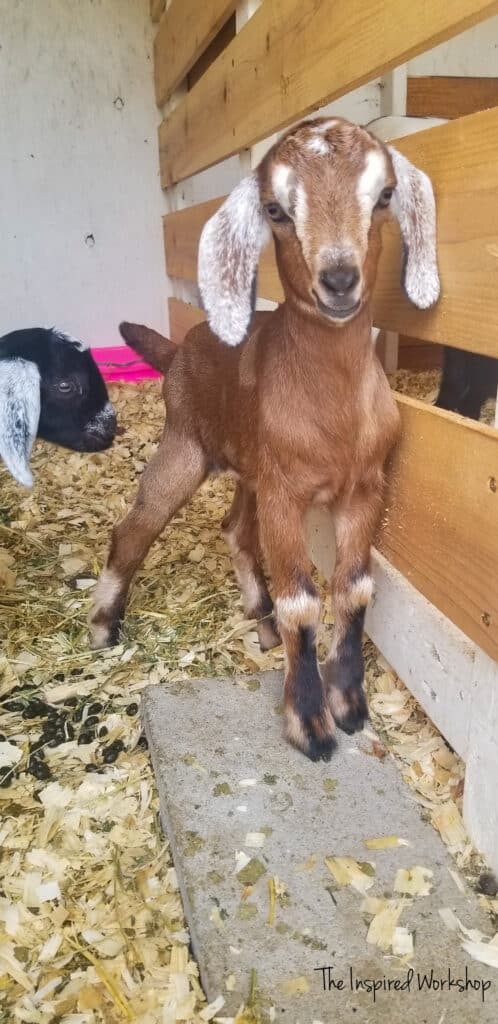
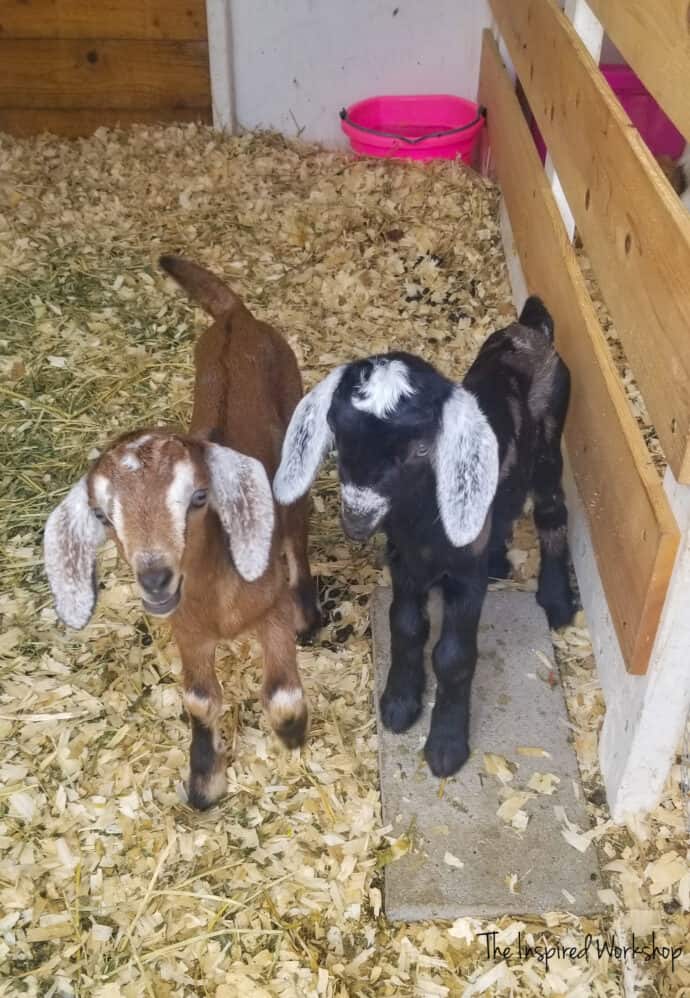
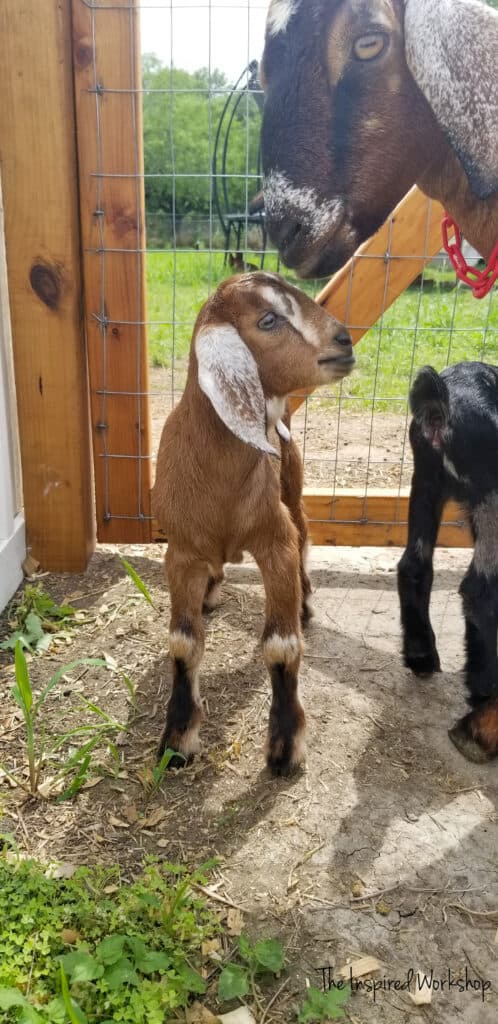
But you know what is even better than the ladies I bought last summer?! The babies they had this summer!! EEKKKK!! LOOK how CUTE they are!!!

Alright, back to the building of this fantastic little goat house! I mean, I am not sure what you would honestly call this, goat house…that’s what I call it, but others in my house say it’s a goat barn or goat shed, goat shelter… maybe even a small livestock shelter? I am not sure so I may randomly change what I call it throughout the post for search term purposes!🤓
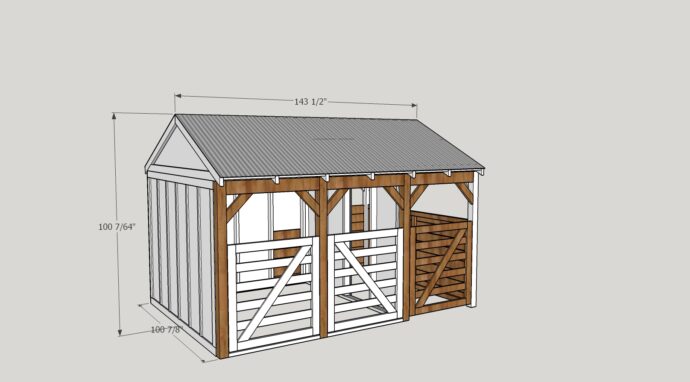
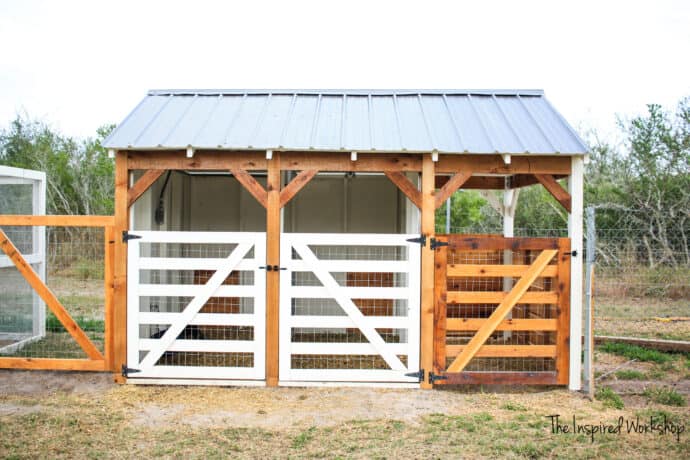
It is equipped with two 4’x8′ (total of 8’x8′ interior) stalls and a separate 4’x8′ milking area. There is access from both the front and back of the goat shed in case you have separate pastures or pens!
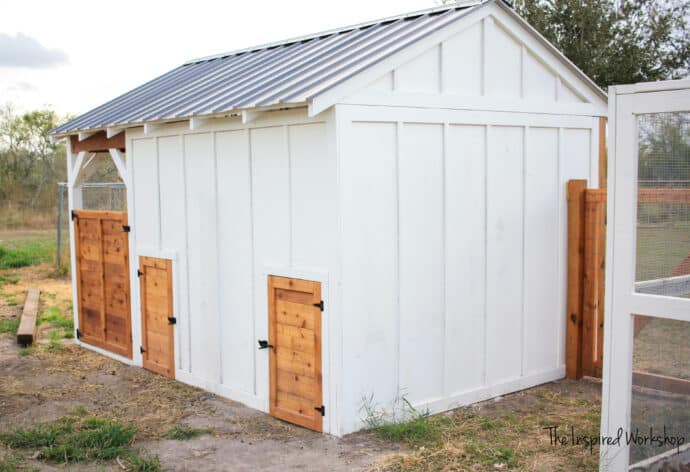
Sliding barn door to get from the stalls to the milking area without getting your girls wet if it’s raining!
I tried to make it as small and cost-effective as possible, but cover all the bases that I could! It is not an expensive build and can be thrown together in a few days, well, a few days if you don’t work as slow as I do!😅🙈 But having three ladies, I wish I would have made it slightly larger! I plan to build another goat shed flipped reverse of this one, to have a total of 2 large stalls (or 4 small stalls) and an 8×8 milking area…but I have a few other projects to pay for first! Lol!
The total cost for this small livestock shelter is about $1,200.00 if I built it today! Luckily, I built this before lumber went up and was able to build it for half of this cost, but for those of you trying to build it today, the price I paid doesn’t really matter, huh?! Ugh! Lumber prices are pretty frustrating that’s for sure!
UPDATE: Lumber prices have come back down…not plywood just yet, but framing lumber, so that’s exciting…you are looking at around $800 – $900 depending on prices in your area!! I’ll say that’s better than $1200 any day! Woohoo!
I cannot believe how expensive it has become, my building really has slowed down because of it, and my boy goats had to get a TINY goat house instead of a decent size one like this…which I will also have plans for soon! It still super looks cute, but extra space is always nice and it cost me the same to build it as it did this full-size one before the increase! Anyway, you will be able to see it here once it is completed! DIY SMALL GOAT SHELTER
This goat house is not only perfect for dairy goats, it can be used for any small 4H livestock, Boer goats, sheep, pigs, and after the Livestock show, pen your dogs up in it when you need to use the backyard without them! It looks so good I wouldn’t mind this in my yard even when I didn’t have livestock!
Alright, here are the links for the PRINTABLE GOAT HOUSE PLANS, I broke them up to keep them from overwhelming you while trying to build it and to keep it easy to find the certain part you are working on!
DOORS FOR GOAT SHED
GATES FOR GOAT SHED
STALL DIVIDERS FOR GOAT SHED
DIY MILK STAND
Now we can get started building this baby! I will apologize in advance for the lack of pictures showing me building my goat shed, but per the USUAL Cara, I had to pick up my goats and I didn’t have the goat shed even started!😳 The ladies I bought them from had already been SO KIND to let us go on vacation before picking them up, almost two weeks later than our original date! So I was not about to ask for more time to get the goat shed built, so it was all hands on deck and no time to take photos while working!😅🙈
Preparing to Build the DIY Goat Shed
Materials for DIY Goat House:
***NOTE: Links below are AFFILIATE LINKS! Affiliate links pay me a commission if you click a link and make a purchase! This commission is paid at no extra cost to you! I always appreciate it when you shop at my links so I can keep the content free on my site!😉
- 5 – 4x4x8 – 3 cedar and 2 pine if you are building just as I did, you will only need 4 cedar total if you are making it three stalls
- 6 – 2x6x8 – cedar
- 46 – 2x4x8 – 43 pine and 3 cedar
- 3 – 2x4x10 – pine
- 6 sheets of 1/2″ exterior plywood 4’x8′
- 12 – 1x4x8 furring strips – I would use treated boards for this instead since they touch the ground as I have realized the furring strips do rot way quicker than even regular untreated yellow pine 2x4s!
- 4 – 1x4x10
- 15 – 1x2x8 furring strips (these don’t touch the ground at all and I haven’t seen any rot in any of these but the cost isn’t much different for treated so you may want to just grab treated!)
- 12 – 1x6x8 cedar fence pickets
- 4 – 12 ft steel roof panels
- 2 – 10 ft steel roof ridges
- 1 pkg. 1 1/2″ steel roofing screws
- 1 pkg. 2 1/2″ steel roofing screws
- 1 box of 3 1/8″ screws
- 1 box of 1 1/2″ screws
- 20 – hurricane ties for roof
- 9 – 90 degree angle brackets for roof
- 8 – 5 in heavy duty t-hinges
- 2 sets of 3″ t-hinges
- 6 – medium gate latches
- barn door hardware – I created my own and you can do the same if you would like using this post!
Tools Needed!
- circular saw
- miter saw
- drill
- Kreg Jig
- Kreg rip cut will make it easier to rip your plywood down to 6′
If you want to spray paint your steel roof panels as I did, this is the spray paint I used…you will need 8 cans and some vinegar! I also purchased galvanized gate hinges and spray painted them black, you will want to clean them really well with vinegar, let them dry, then wipe everything down with water, then let fully dry again and they are ready to paint! I did this same process on the roof panels and I haven’t had any issues with paint chipping or flaking on the roof or hinges, they look as if I purchased them in the colors they are!
Cut List for the DIY Goat House:
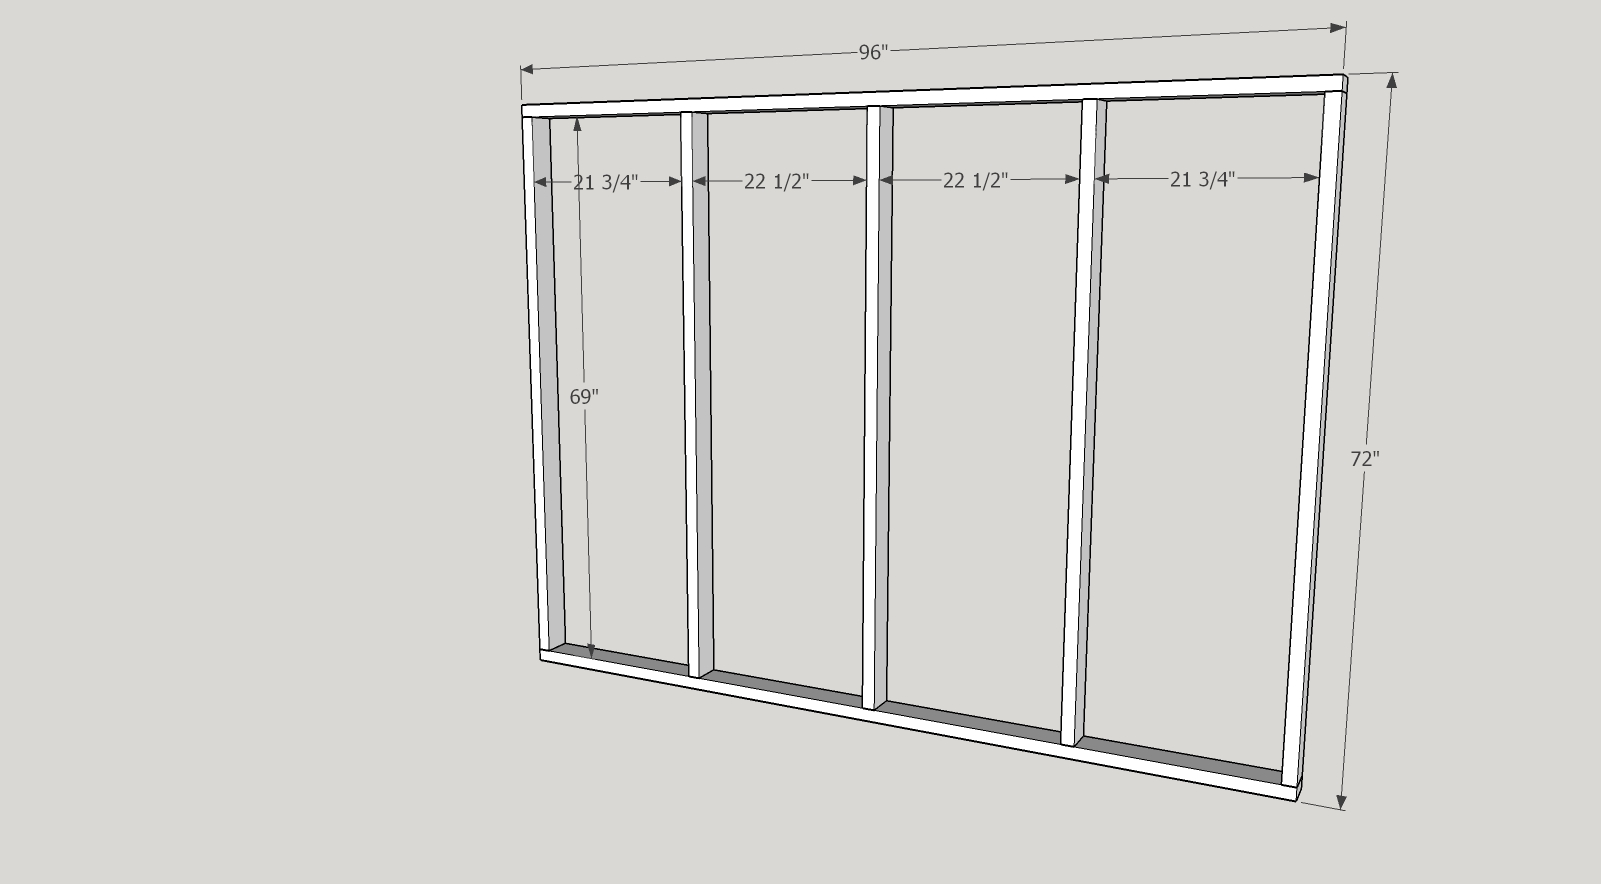
- 4 – 2×4 @ 96″ (side walls – top and bottom of frame)
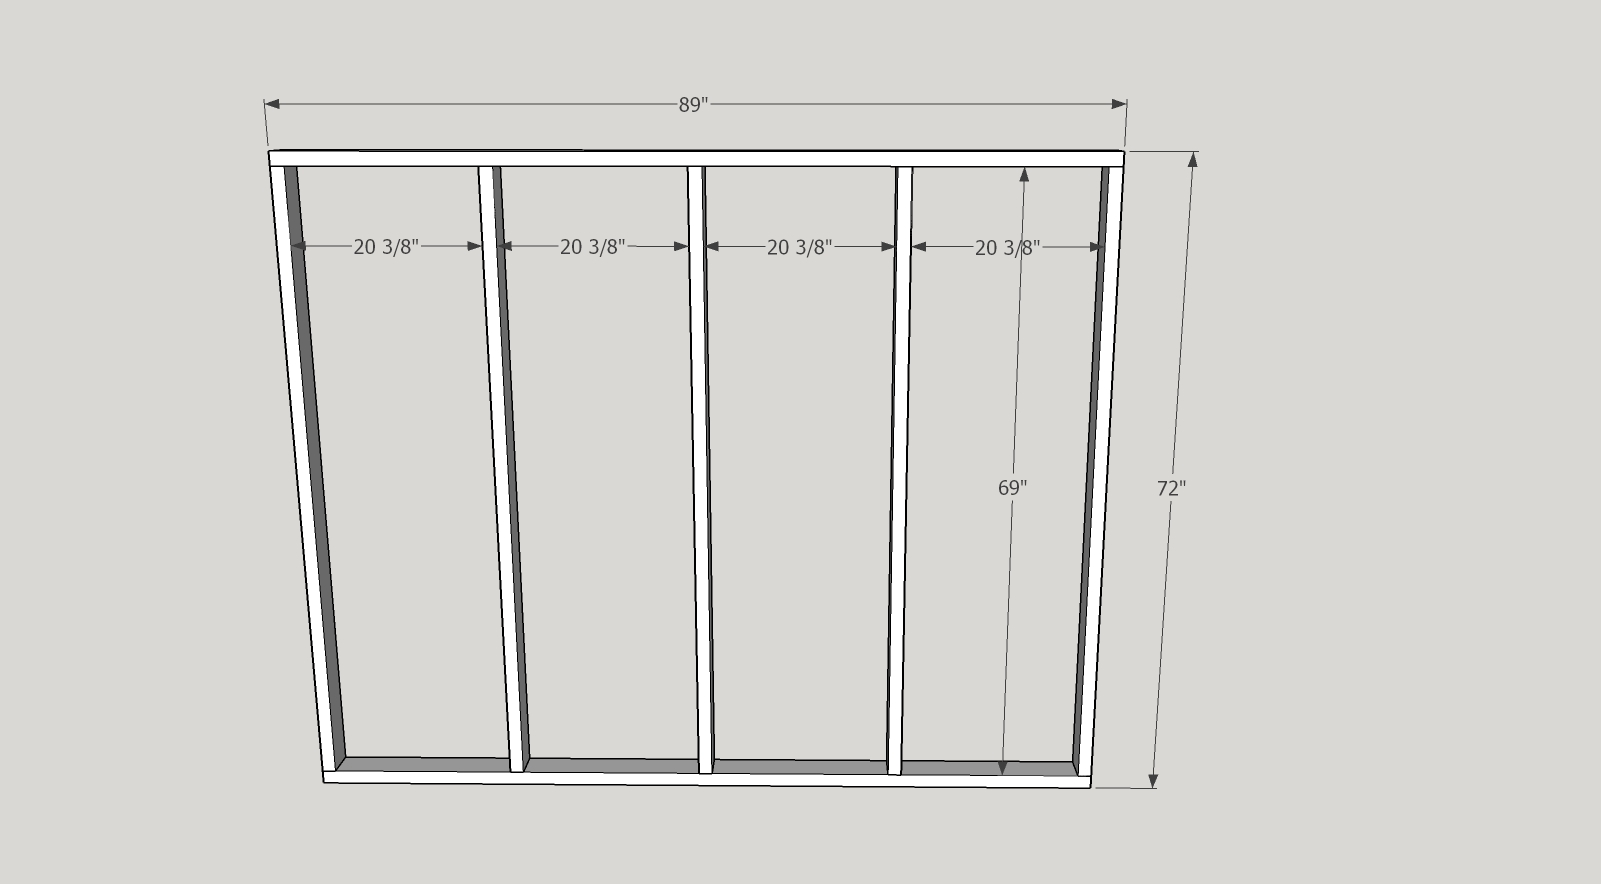
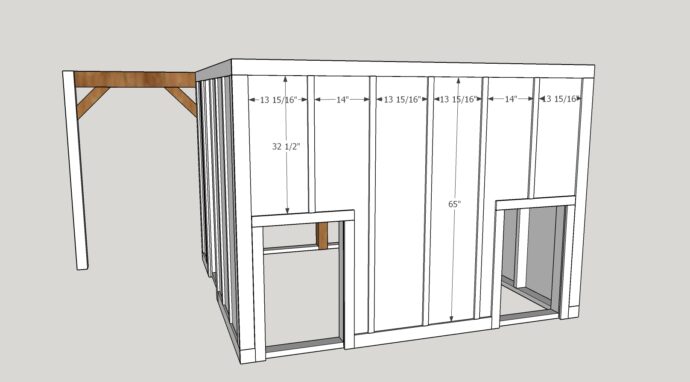
- 15 – 2×4 @ 69″ (wall supports on back and side walls)
- 2 – 2×4 @ 89″ (back wall – top and bottom of frame)
- 5 – 4×4 @ 72″ (front and side wall vertical supports)
- 2 – 2×6 @ 43 1/4″ (front wall – left and middle top boards)
- 1 – 2×6 @ 42″ (front wall – right top board)
- 1 – 2×6 @ 41 7/8″ (back wall – right top board)
- 10 – 2×4 @ 16 35/64″ mitered @ 45 degrees off square ends not parallel (front, side, and back wall angle braces) And lol, this is the measurement that Sketchup gave me, that is way more precise than I would ever be with measurements!😂 I cut mine at round about 16 1/2″)
- 2 – 24 @ 43 1/4″ (front wall bottom braces)
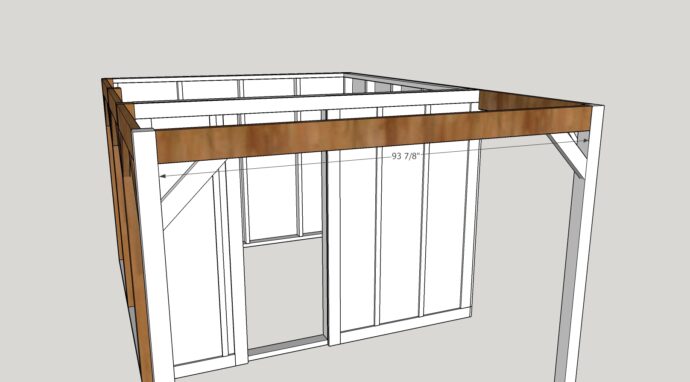
- 1 – 2×6 @ 93 7/8″ (side wall top board)
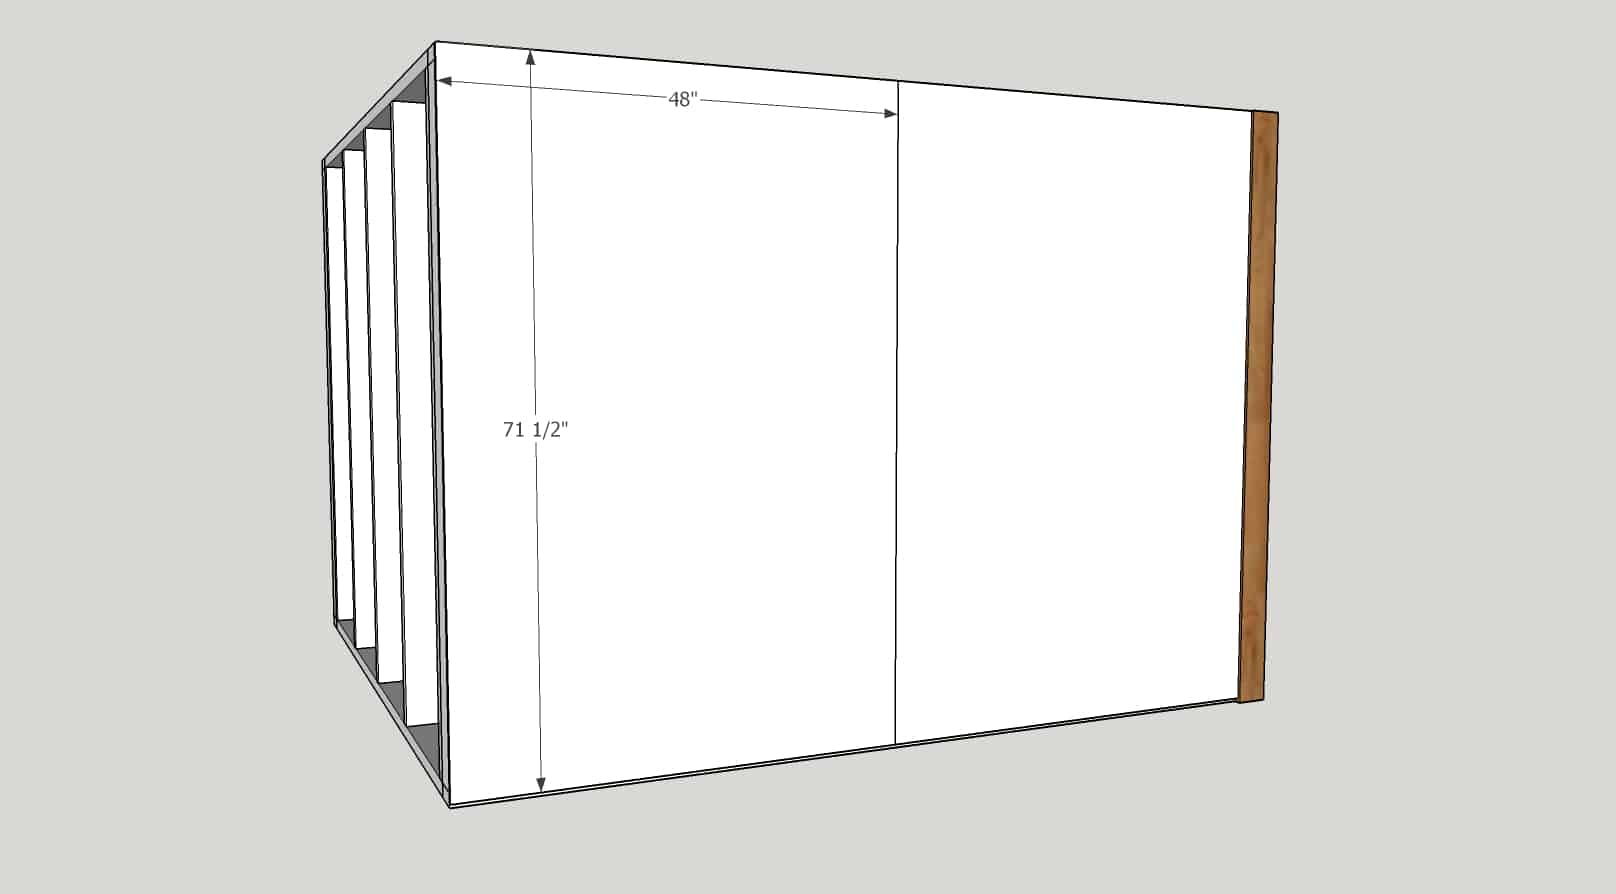
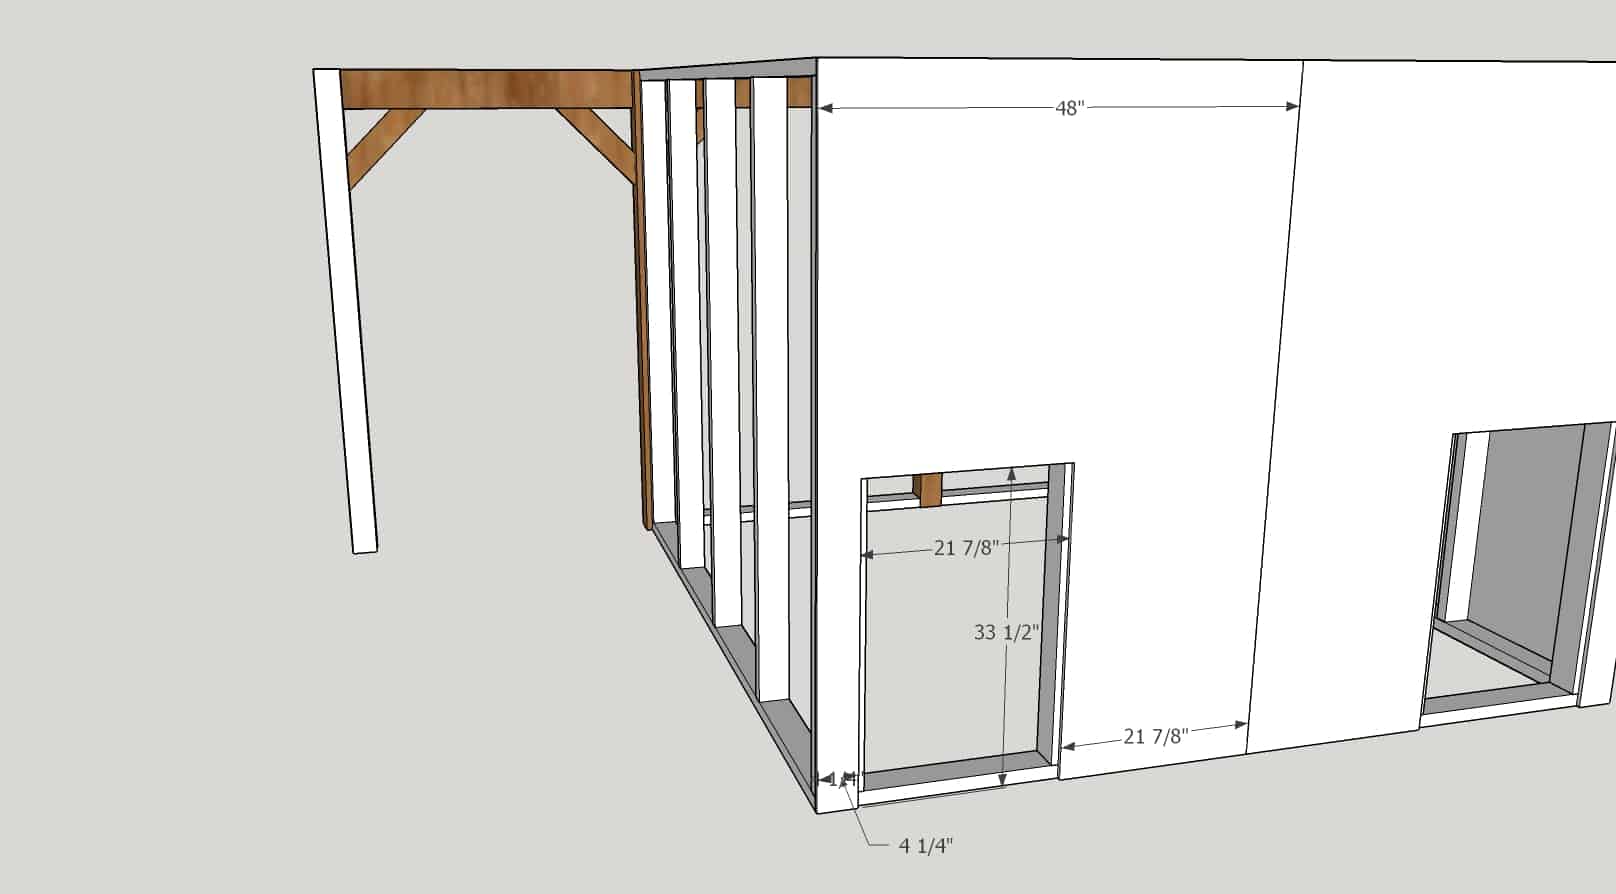
- 5 – 1/2″ plywood @ 48″ x 71 1/2″ (2 have cutouts for back doors as shown)
- 1 – 1/2″ plywood @ 24″ x 71 1/2″
- 1 – 1/2″ plywood cut to fit the rafter opening
Trim Boards for the Goat House:
Right Wall Trim: (looking at the goat barn from the front)
- 1 – 1×4 @ 96 1/2″ top
- 2 – 1×4 @ 68 1/2″ door frame
- 1 – 1×4 @ 20 1/2″ bottom left
- 1 – 1×4 @ 45″ bottom right
- 2 – 1×4 @ 65″ sides
- 3 – 1×2 @ 65″ battens
Back Wall Trim:
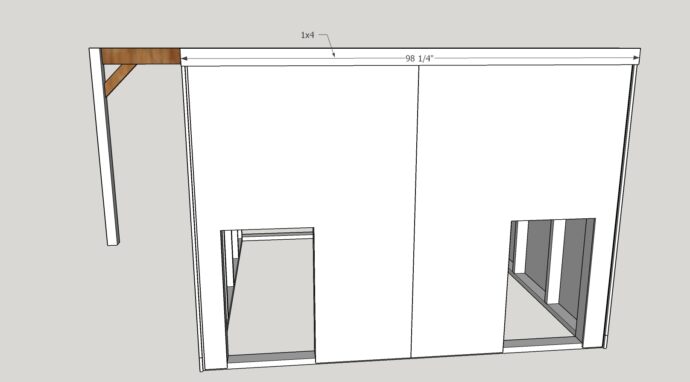
- 1 – 1×4 @ 98 1/4″ top
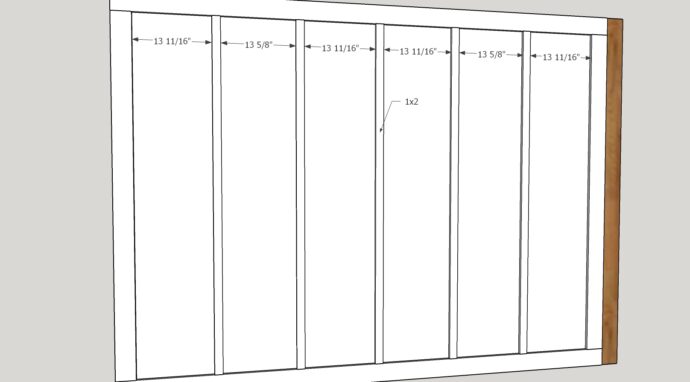
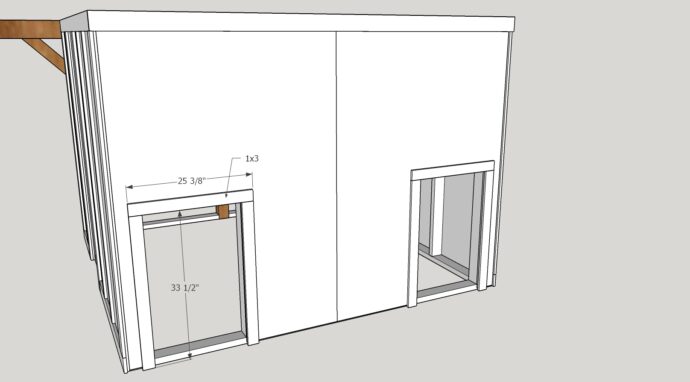
- 4 – 1×3 @ 33 1/2″ small door frames (vertical)
- 2 – 1×2 @ 25 3/8″ small door frames (top)
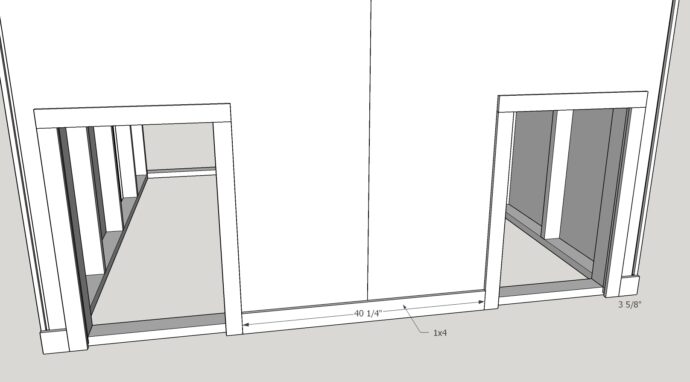
- 1 – 1×4 @ 40 1/4″ bottom middle
- 2 – 1×4 @ 3 5/8″ bottom outside
- 2 – 1×4 @ 65″ sides
- 3 – 1×2 @ 65″ battens
- 2 – 1×2 @ 32 1/2″ battens above doors
Left Wall Trim:
- 2 – 1×4 @ 96 1/2″ Top and bottom
- 2 – 1×4 @ 65″ sides (vertical)
- 5 – 1×2 @ 65″ battens
Building the DIY Goat Shed
Alright, we will jump straight in and get this goat house built as quickly as possible! Lol! This means for me, rain is coming if I am trying to build an outdoor structure! 😅 I swear, EVERY SINGLE TIME I try to build something outside, the rain will come…and I live in south Texas where we are in a drought pretty much all year long! Oh, maybe I should build outdoor projects all year long, and we will have rain all year long! 😂😏
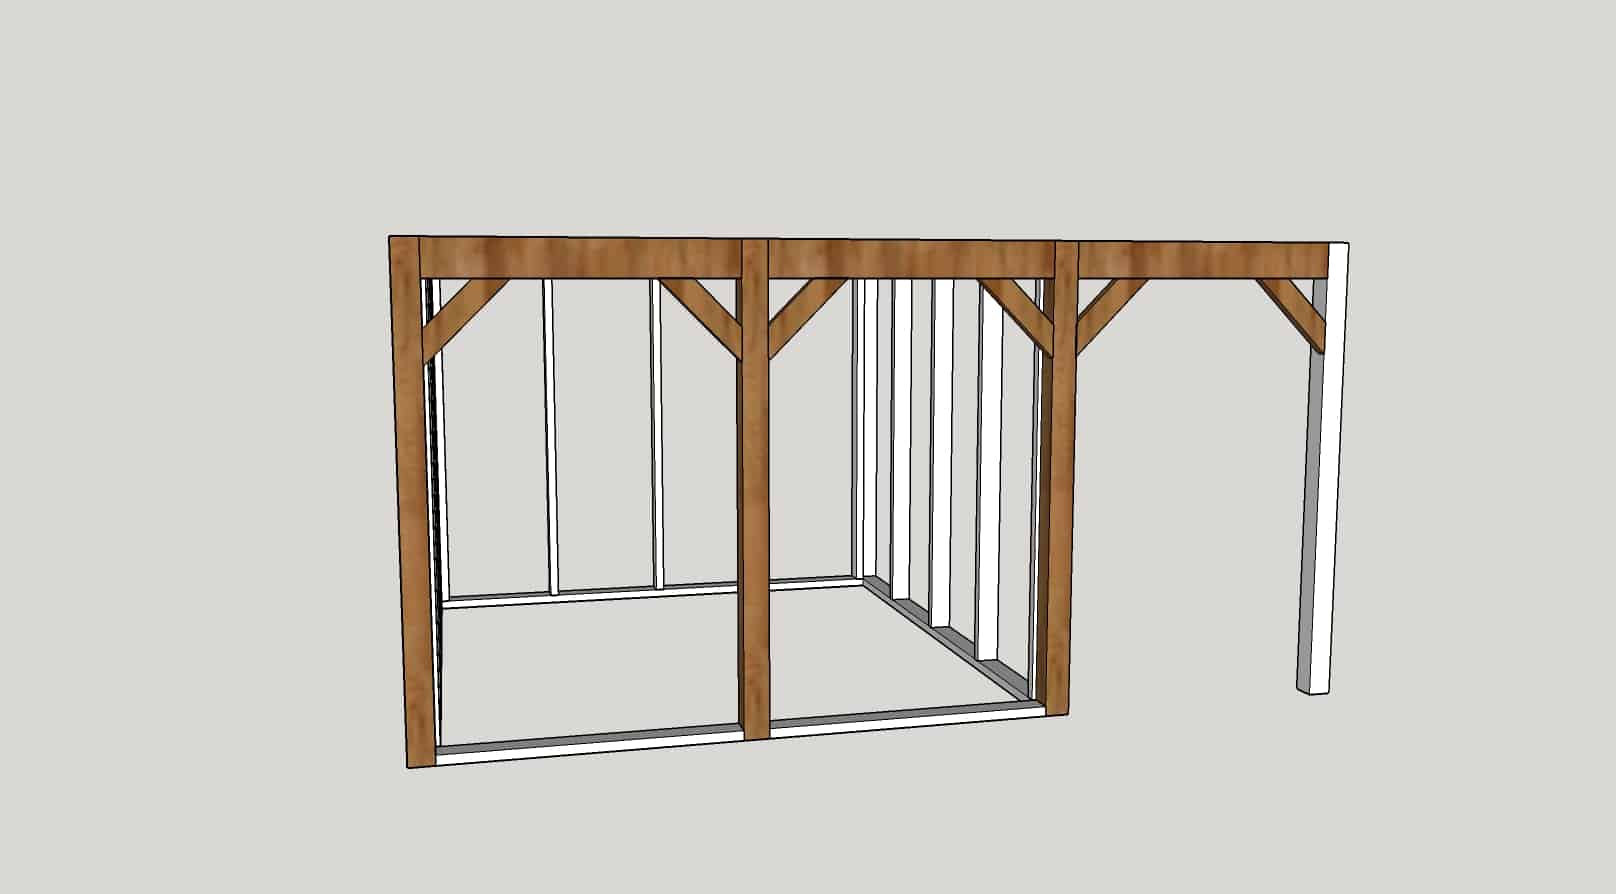
Anyway, back to building this DIY goat shelter! First things first, frame out the side walls! You will build one frame to be the left wall, which is the top picture, and the right wall is the second picture and only slightly different than the left wall.
To attach the boards, use 3 1/8″ screws from the top and bottom boards down through the vertical supports. Hope that makes sense! Now I realize in framing 101 they say only framing nails are to be used in framing a house…since this is as small as it is, screws will work just fine, but if you feel better following all the rules, feel free to use framing nails instead!
Also, to keep this build simple and more cost-efficient, I made sure not to frame out for any of the doors, instead, I made doors fit in the frame! I learned with the chicken coop that framing out for the windows and doors used quite a few extra 2x4s and a lot of extra time!
Build the back wall.
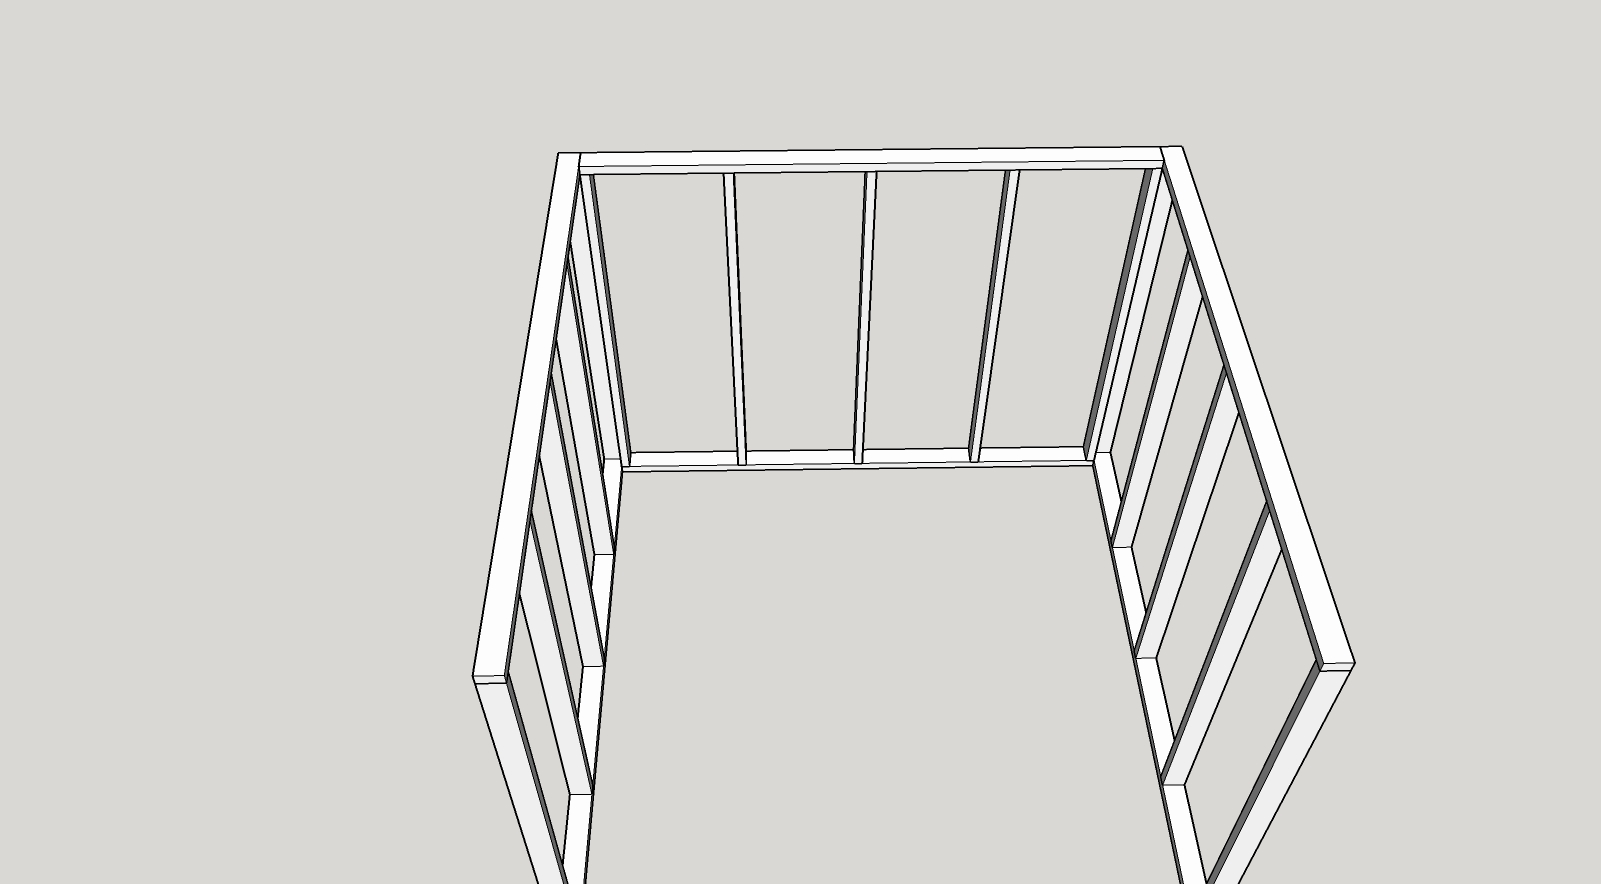
Set the three wall frames you have built. The back wall will fit INSIDE the side walls. Use the 3 1/8″ screws to attach the side walls to the back wall. Screw through the 2x4s of the back wall and into the side walls.
I am using the deep litter method here just as I am in my chicken coop, so there is not a floor, if you want a floor you can easily add one.
TIP: Make sure and slightly build the ground up…or at least slope the ground away from the goat house while leveling the area for the goat house to be built! I did a really great job of this with the chicken coop but didn’t do as well with this and we had water sitting inside with a really long and hard rain that we got…the chicken coop on the other hand was bone dry!
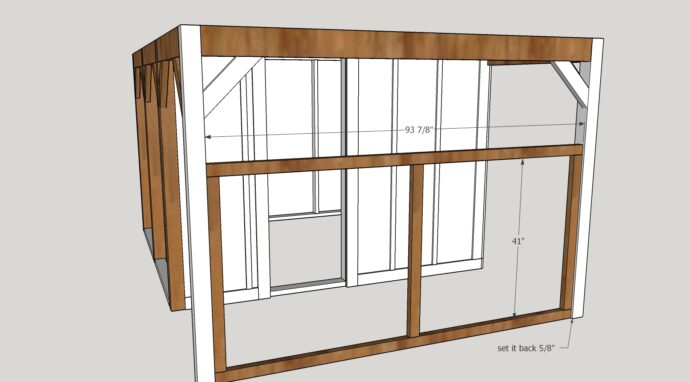
Next, build the front frame. If you are building the goat shed with three stalls as opposed to the milk stand area, you will of course change your back wall, or you can add a 4′ frame to the back wall if you’d prefer to stick to 8′ boards.
I am going to give instructions with the milk stand side open (as I built it) and you are welcome to email or comment with any questions you have on how to adjust the plans to create 3 stalls!
Build the front frame. Now, I changed the last post to pine and painted it white to save money and because I was originally leaving that side open without a gate. But then the other goats were bothering me while I was trying to milk and so I added another gate! If you are going to need to do the same, you may want to just use a cedar post here! Up to you!
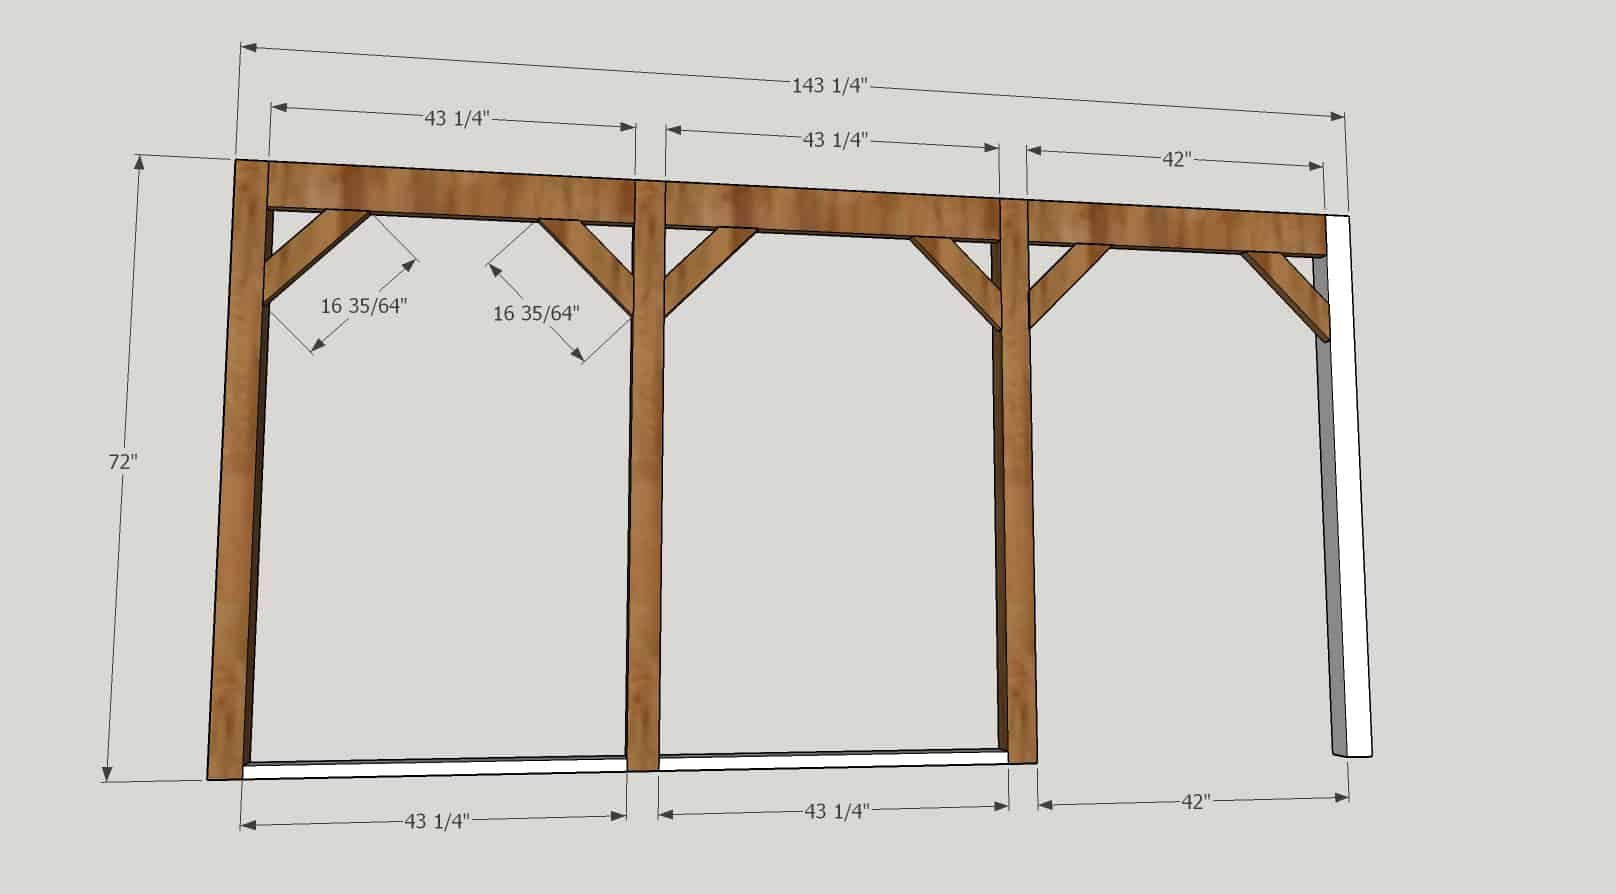
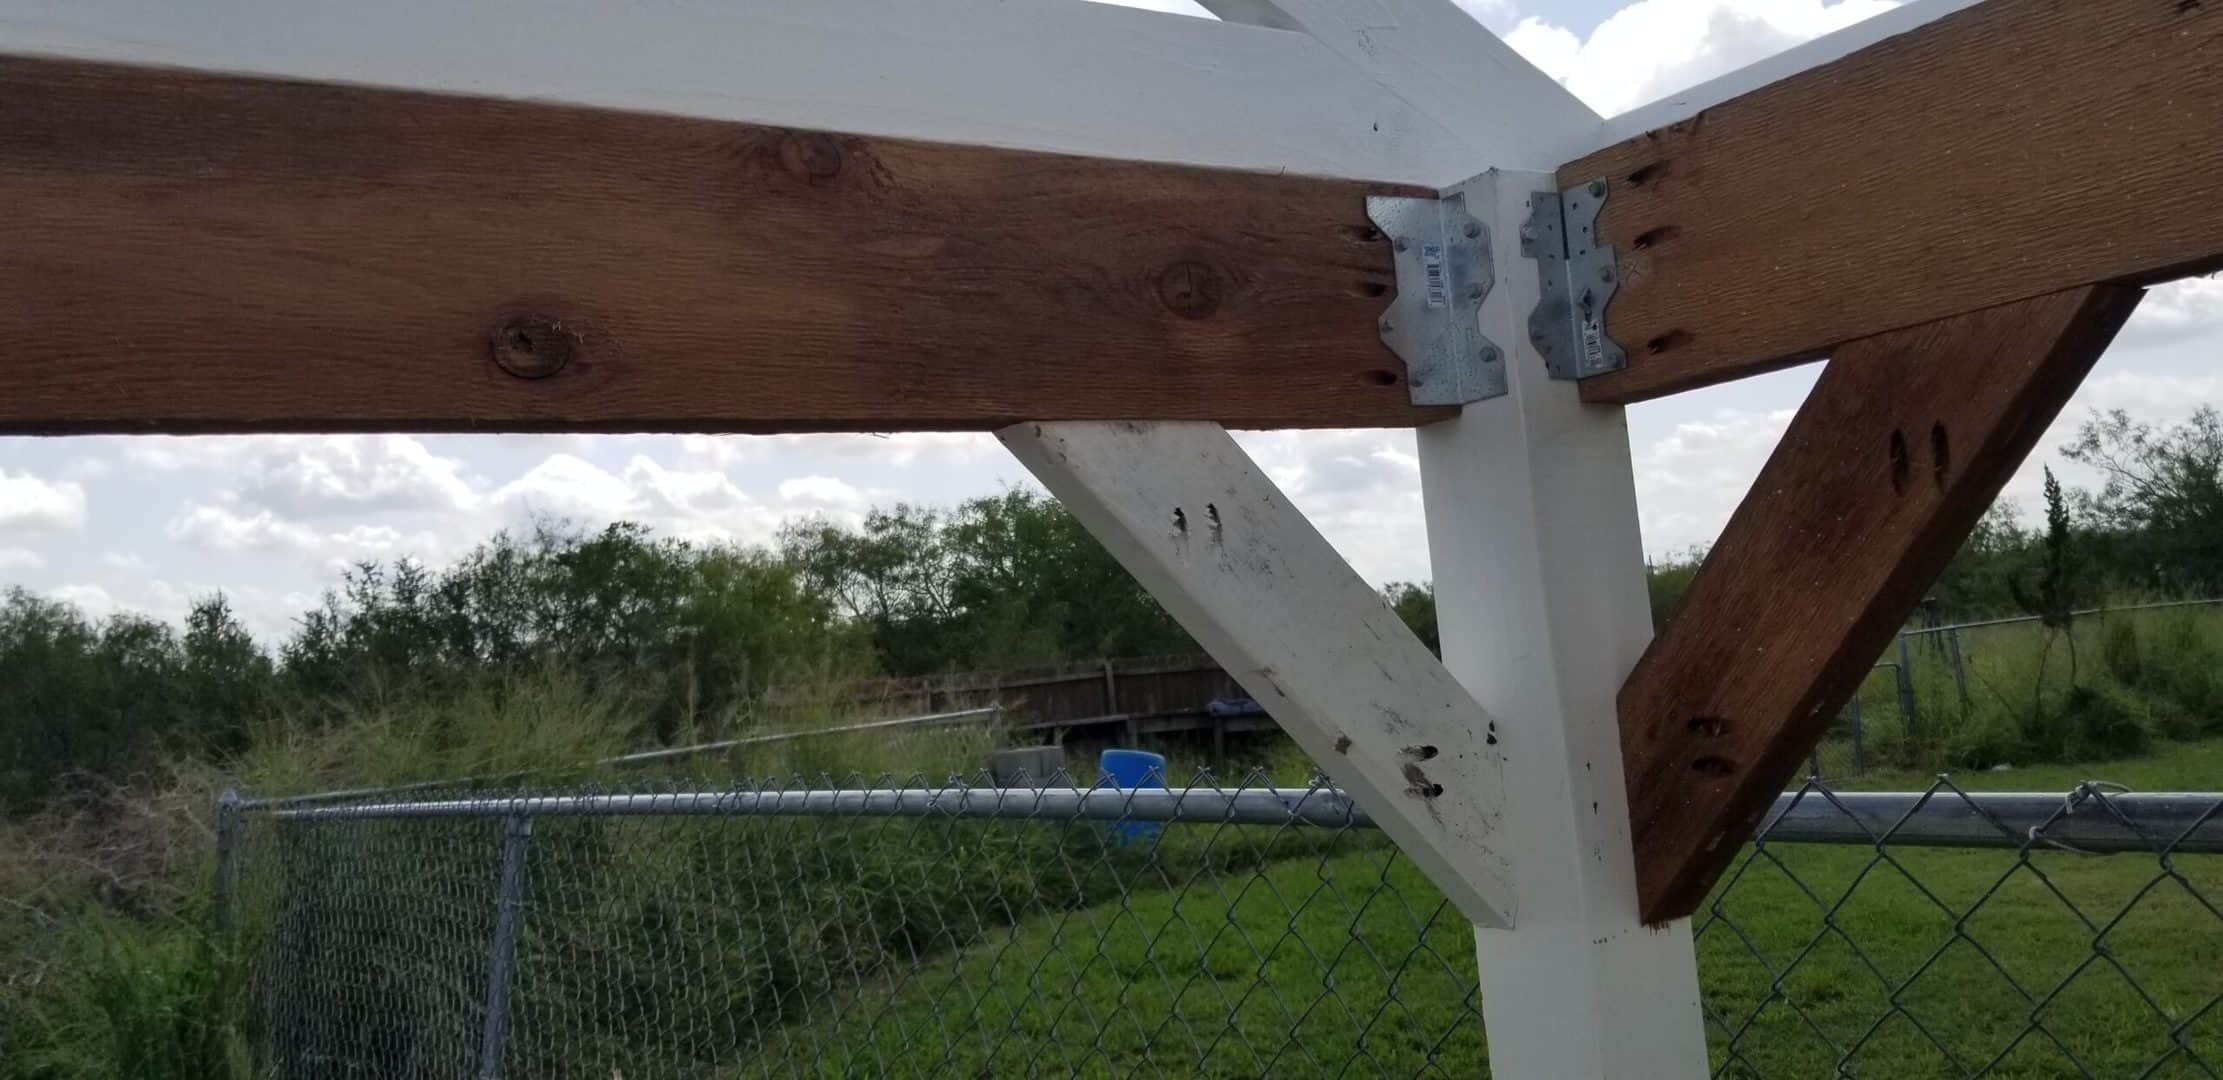
Use pocket holes drilled at 1 1/2″ depth and 2 1/2″ pocket hole screws to attach the 2x6s to the 4x4s. Make sure and use wood glue! I then used Simpson Strong-tie brackets as well on each section to reinforce the pocket holes! This is overkill for sure, one method of attachment is plenty! LOL! The brackets are faster and easier than drilling all those pocket holes, and sturdier in the long run, I feel!
This is the backside of the front frame. PH shows where the pocket holes are to be drilled if using pocket holes.
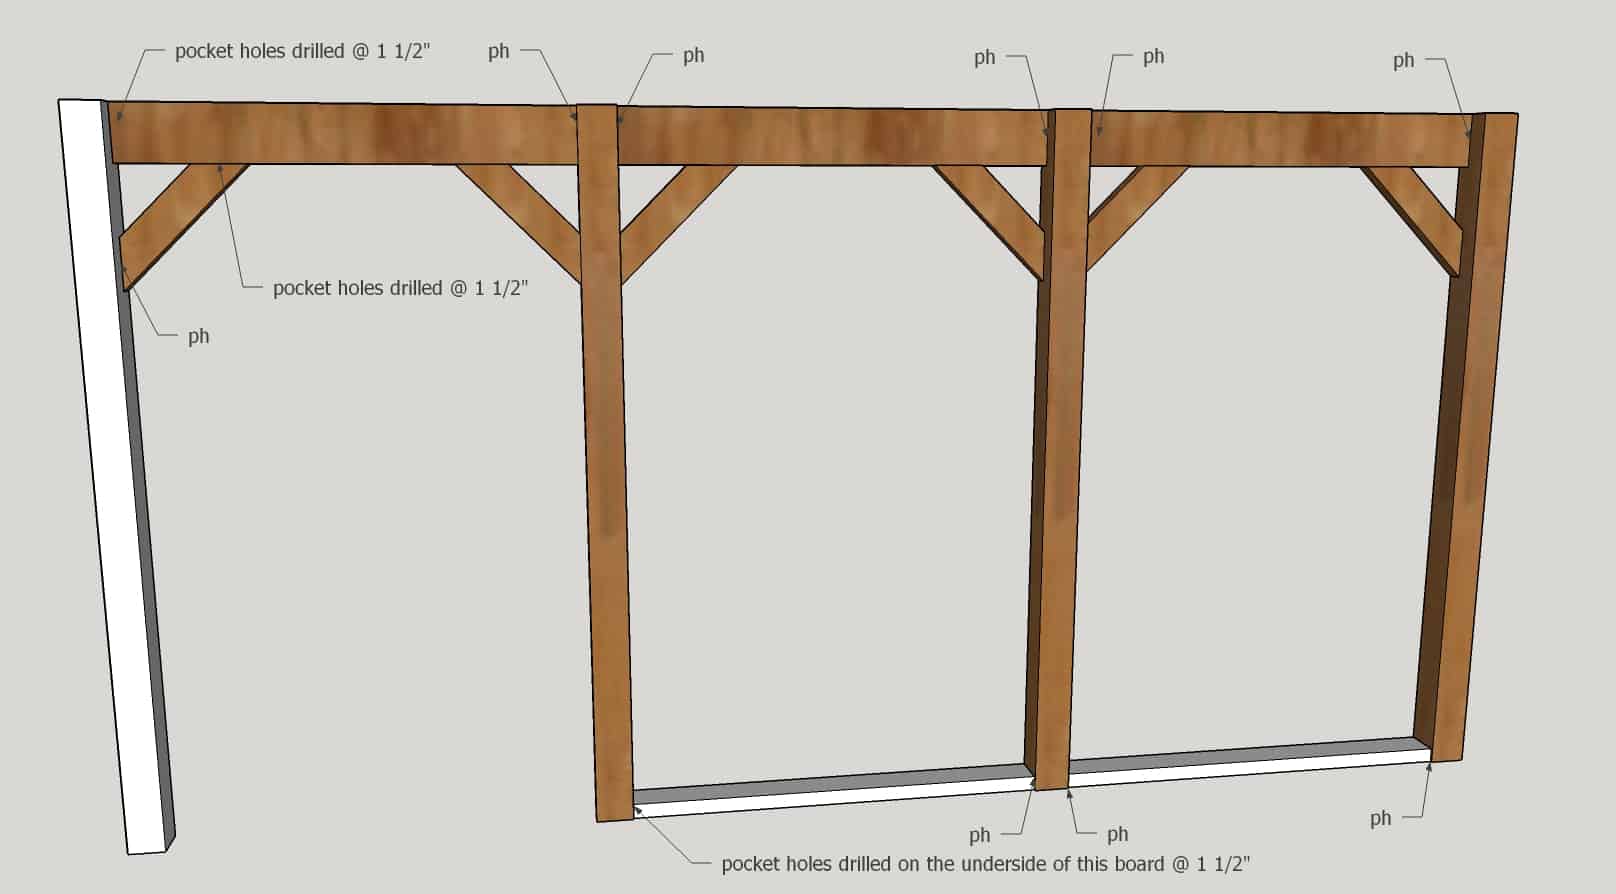
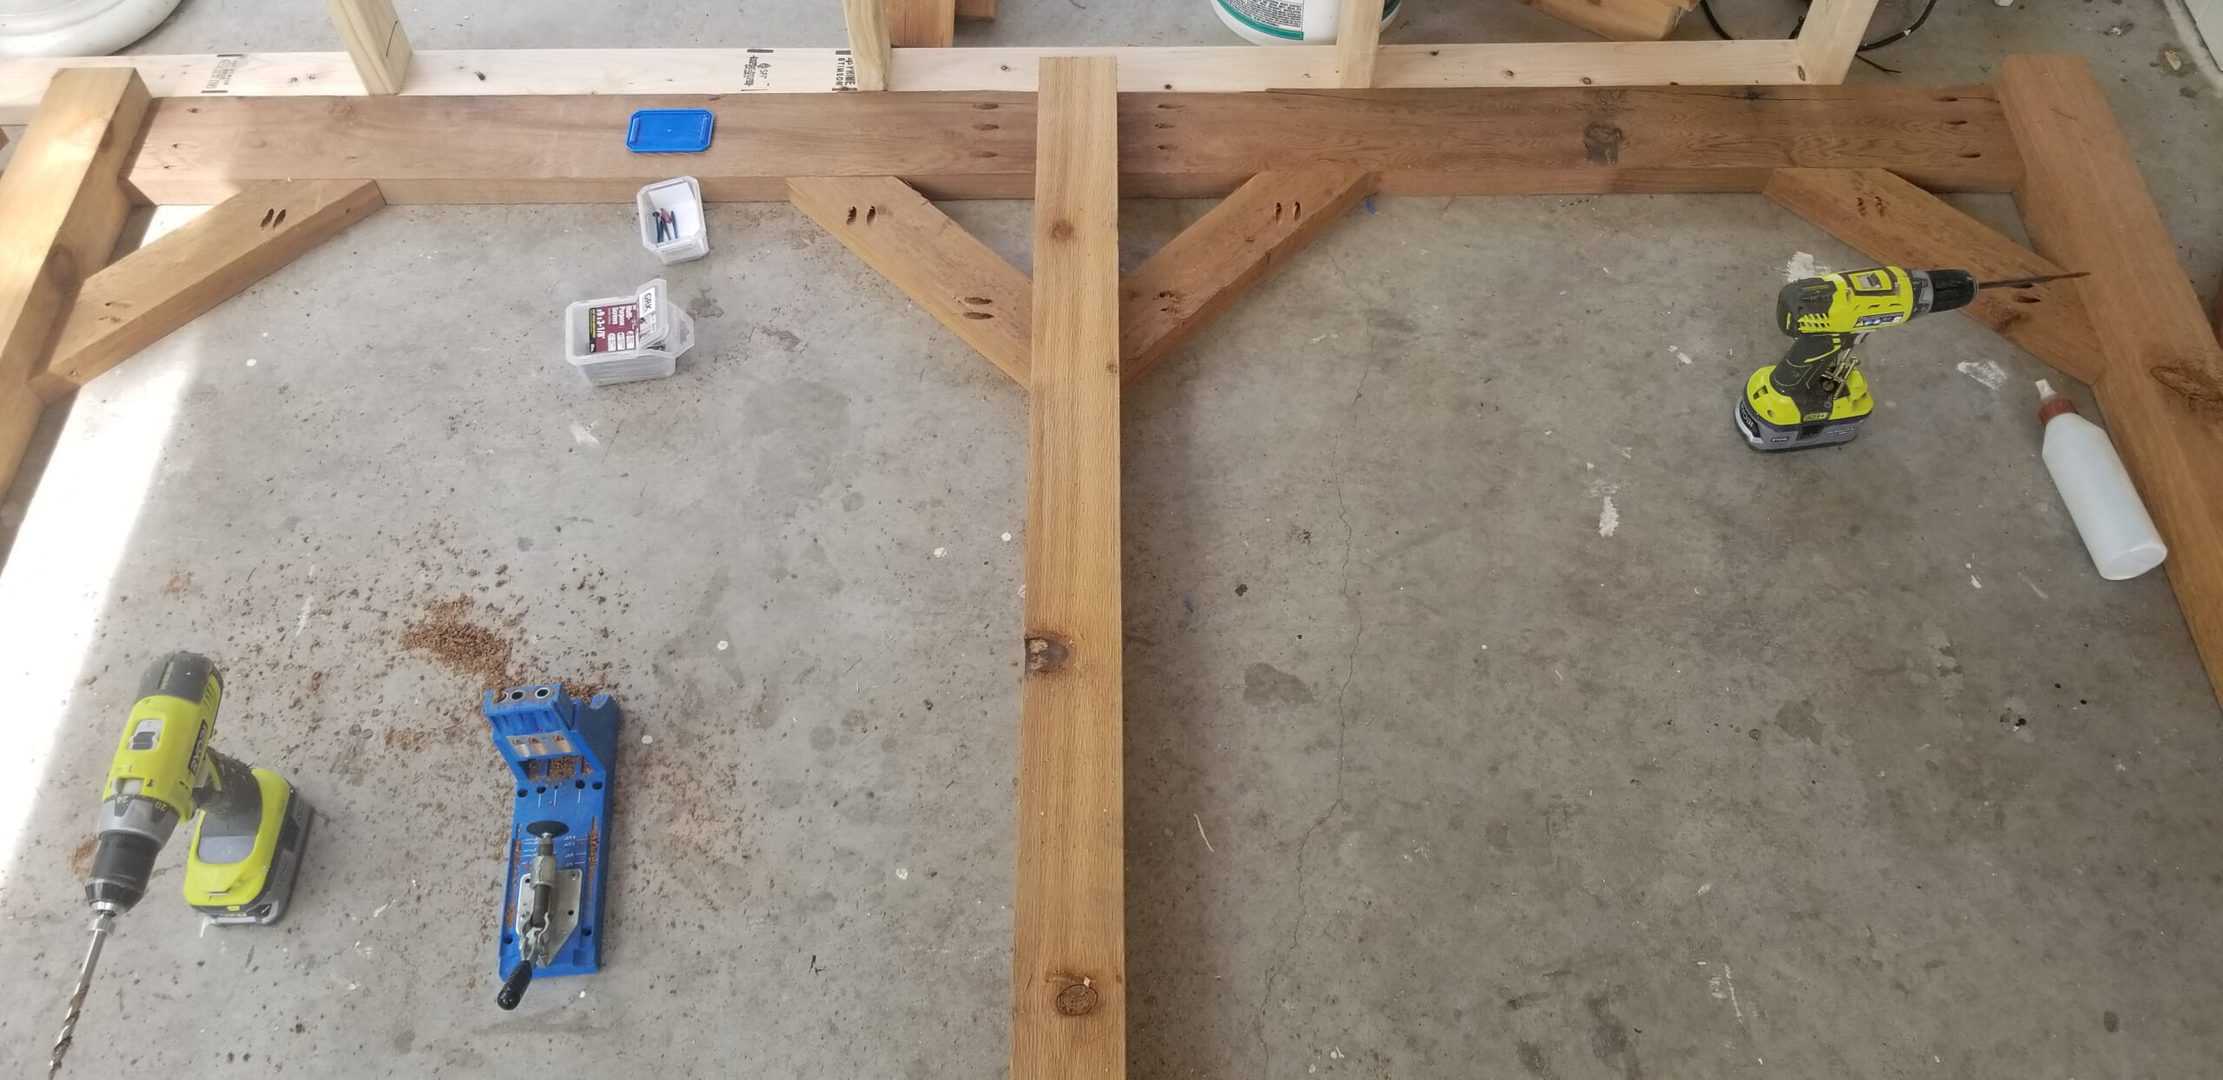
Here’s a picture with the brackets, just to show you, I used both kinds of brackets just because I had them on hand, I like the one on the left best, it is far sturdier than the right one! They are the 5″ L angle brackets and are available at any home improvement store near you!
Attach the front frame to the other three walls you already set. Screw through the sidewall 2x4s and into the 4x4s. The front left side should be set roughly an inch over the sidewall. This allows the front to be flush once you add the plywood and trim. The same 1″ hangover should be left on the third cedar post as well. If you are making three stalls, you can leave the hangover on the last post.
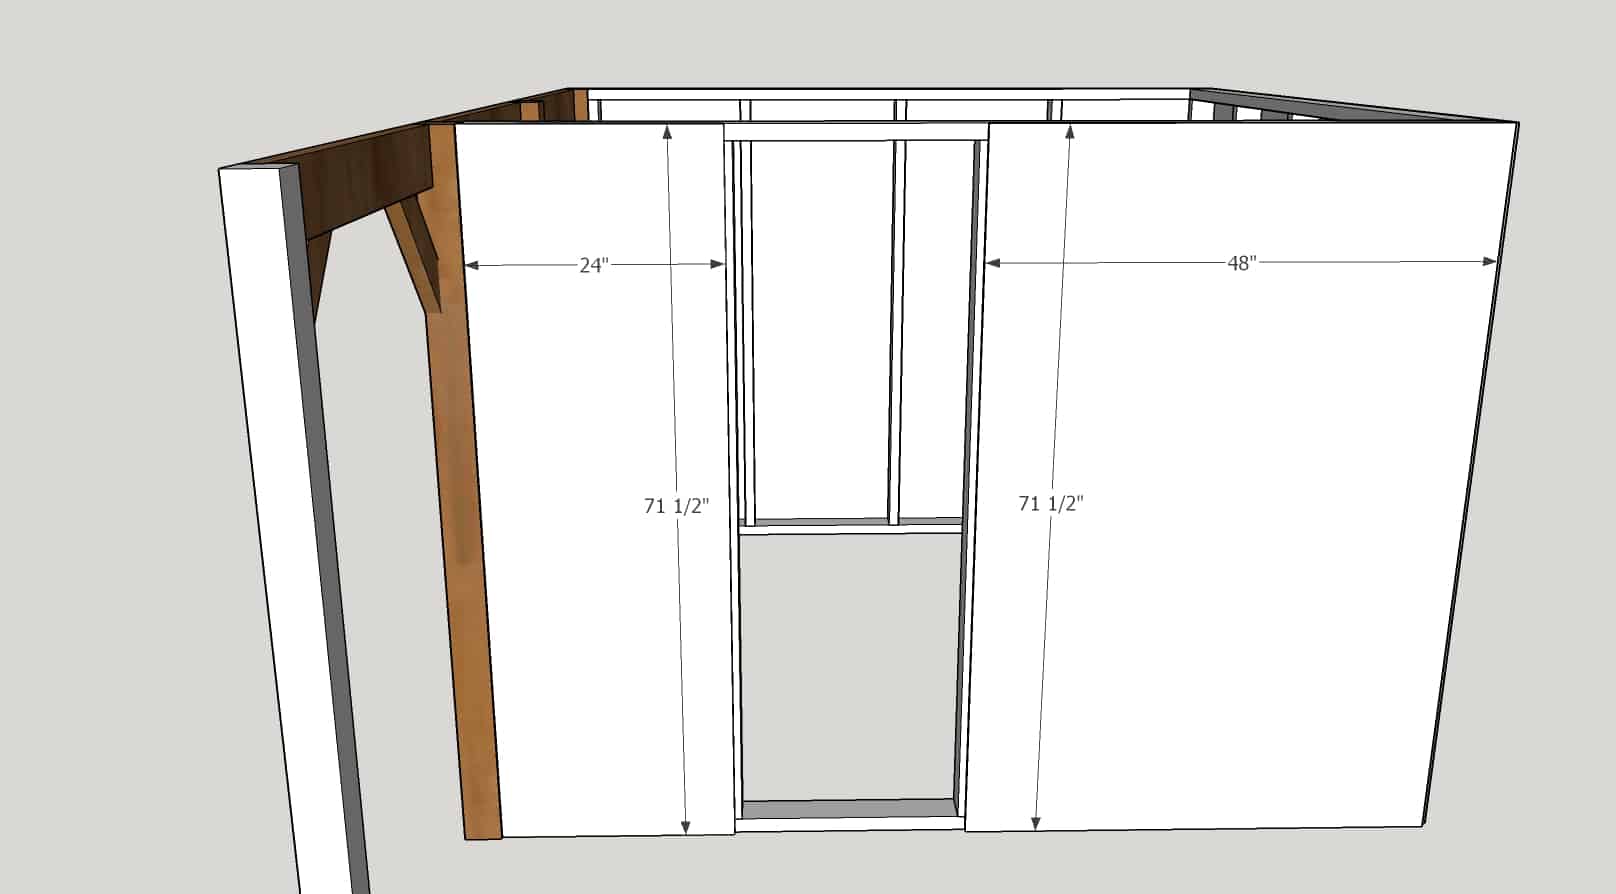
Once you have the front attached and everything is level, you can add the plywood!
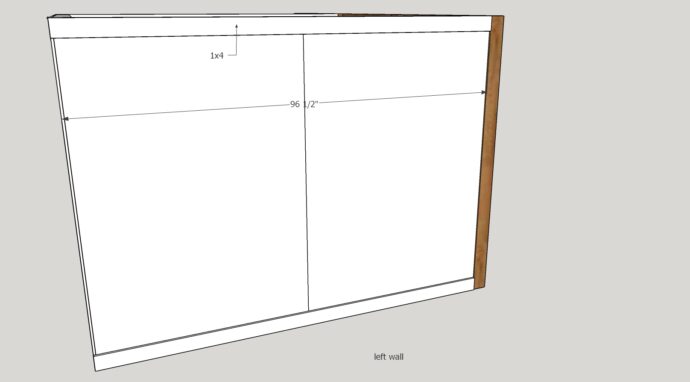
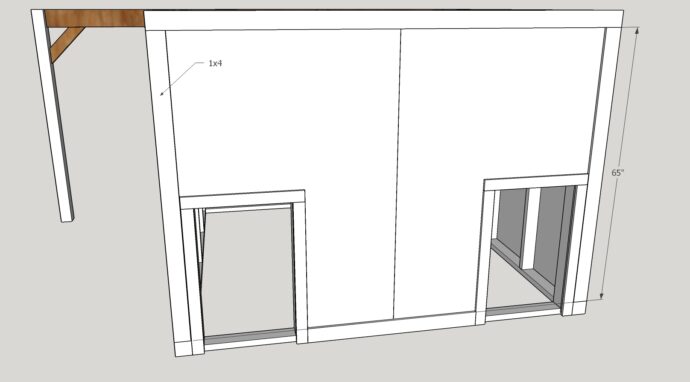
The left side wall is solid and just two sheets of plywood cut down to 71 1/2″. Again, as I did with the chicken coop, this solid wall is the north-facing wall to keep the cold north wind out of the shed.
I originally thought I was going to leave the rafters open on both ends of the goat shed for airflow, but after the first north wind came with rain, I decided it would be best to close it in as it was getting wet inside! Lol! You can see here how it was in this photo with the board sticking through…it was our ledge to stand on when attaching the roof! Lol!
Use 1 1/2″ screws to attach the plywood to the wall frames. Make sure and level the top of the plywood with the top of the frame…you want a 1/2″ gap along the bottom to keep water from reaching the plywood during rain!
**NOTE: as an extra precaution, you can always add this metal flashing under the plywood to keep from any chance of water making it to the plywood. If you live in a really wet area, you may want to do this! Use Liquid Nail and glue it along the base of the 2×4 and it will cover the edge of the plywood, and your trim covers the flashing!
Back wall plywood has small doors cut out of them. This enables us to let them into the pasture behind the goat shed, or we can use the front gates and let them into the backyard! After building the goat house, I will tell you, make these cuts slightly smaller than I did here in width…I am not sure why I thought they needed to be cut wider than the 2x4s!🤪🤔 They should be flush with the inside edge of the 2x4s. So that would make those cuts, 5″ from the edge, and 23 3/8″ wide, the height is fine!
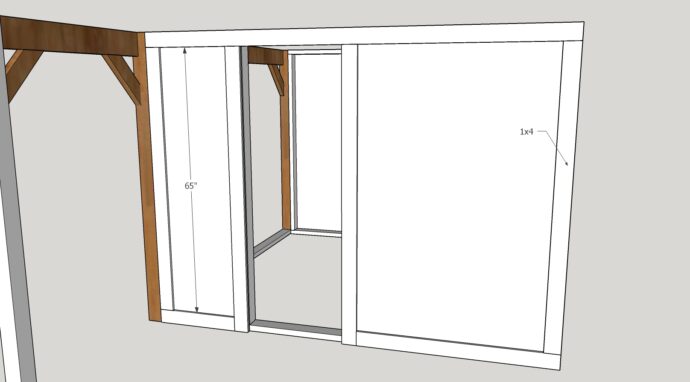
Side wall plywood on the right is one full sheet and one sheet ripped at 24″ to allow for the barn door opening. You can rip this piece slightly larger at 24 3/4″ to completely cover the 2×4 stud or leave it as I did as it will be covered with a trim board but you can see a gap from inside the doorway!
The basic structure is here, now we need to trim it out before we can finish the milk stand side so we can add the roof!
Trimming out the DIY Goat Shed
The trim looks great and adds the finishing touches that I love to the goat shed, but the trim also serves the purpose of covering exposed edges of the plywood to keep water from getting in them and making the plywood swell and ultimately rot!
Make sure and measure before cutting any of the trim boards as these are the sizes based on every board being cut to the EXACT length that it should be and we all know that SOMETIMES we don’t cut them to the correct size! Just to be safe, measure first!
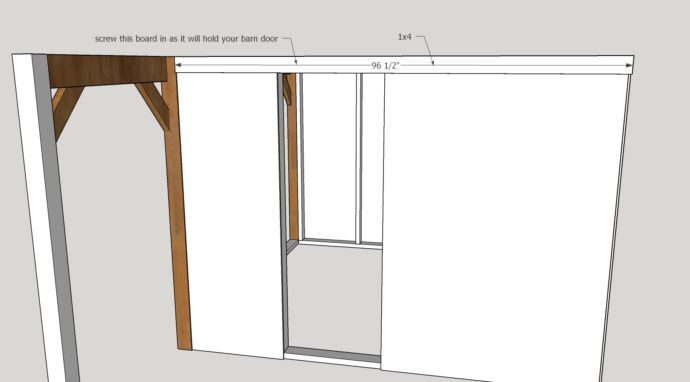
Add the side trim to the doorway! Make sure and seal the bottom ends of the board before attaching them to the goat house!
Now I am going to be honest, after using the goat house for a year and a half now, I’m not sure a sliding barn door is the best option here! Lol! I love the convenience and the look of it, but mine is screwed closed right now because…well GOATS!!! Lol!
My mamma goats are perfectly fine in here…but they had boy goats that were crazy and wild and kept escaping through the barn door! So for now, it is permanently shut, and it really hasn’t bothered me having to walk both of them around!
So if you want to save yourself the hassle, you can still build the barn door, but just screw it into the frame, don’t even bother with the hardware unless you have well-behaved goats…or you just want to try it out because like me, no one could have convinced me that they would do this!🤦♀️🤣
Add the baseboards, these can be brad nailed, they do not have to be screwed in! I used 2″ brad nails to attach them! Once you caulk all the trim, they aren’t going anywhere!
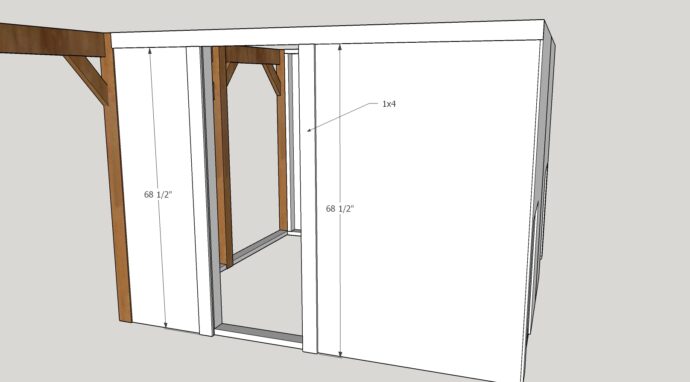
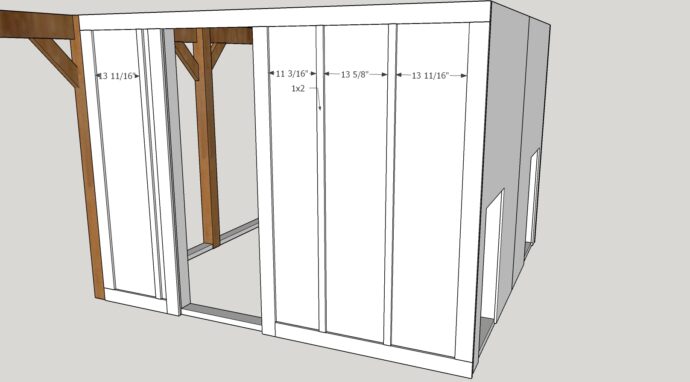
Add vertical trim.
Add battens to the side of the goat house, again no need to screw any of the trim in for the rest of the goat shed!
Add the top and bottom trim to the other side of the goat shed. It can be brad nailed as well as there is no real reason to waste screws!
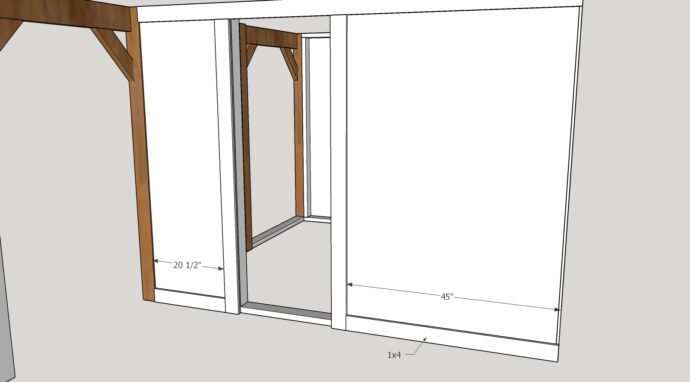
Add the vertical trim to the side of the goat shed!
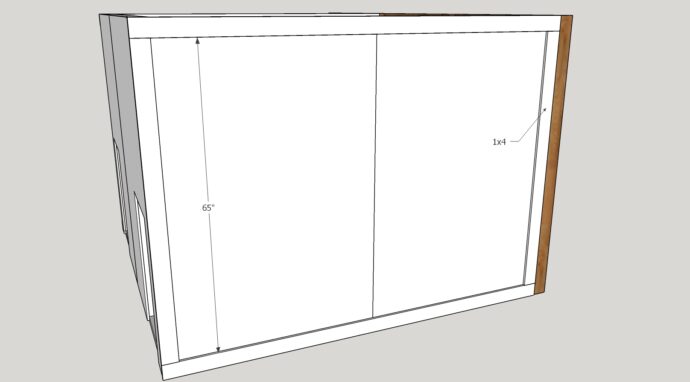
Add the battens to the side of the goat shed!
Add the top trim to the back! This trim board will extend out over the trim from the sides!
Add the trim to the back small doors! Again, make sure and seal the bottoms of the 1x3s that are going to be touching the ground.
Add the bottom trim to the goat shed.
Add the vertical trim to the back of the goat shed.
Add the battens to the back of the goat house!
Make sure and caulk all the areas water could get to the plywood! Focus on the baseboards and tops of the small doors, etc!
The basic shelter is already built, now it’s just about finishing out the milk stand side so we can add the roof! You will save a little money if you are just building the three stalls because you would just move the sidewall out and cover it with plywood, and boom…done!
Finishing Off the Milk Stand Side of the Goat Shed
Since I wanted this to be a separate area to milk my ladies, I adorned it with some cedar and couldn’t love it more! Plus, I can still use this area as a stall if needed, like during our crazy freeze that we had here this February, this worked perfectly to house my boys during the night to keep them warm!
Alright, next, add the top 2×6 @ 41 7/8″ across the side (back), this will attach to another vertical support (4×4) on the goat shed.
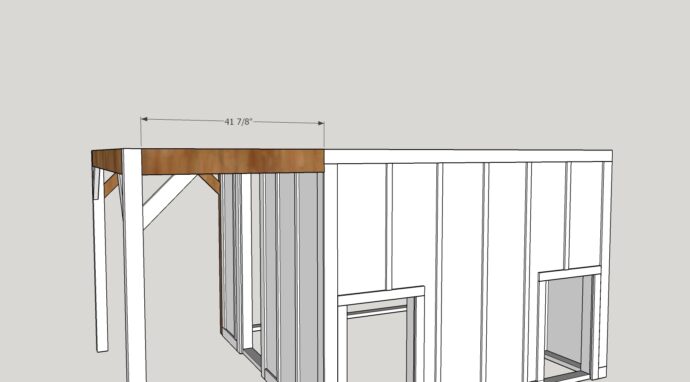
The photo above shows the long side board already in place but it will not be there yet! Next step you will add this board!
Build a frame with 2x3s to attach the cedar fence pickets to on this milk stand sidewall! I pocket holed the vertical boards into the top and bottom boards…using holes drilled at 1 1/2″ depth and 2 1/2″ screws with wood glue to attach. Make sure and face the pocket holes to the outside of the goat shed so that they will be covered by the fence pickets in the next step!
Attach the frame you build to the posts with 3 1/2″ screws and I did not use glue on this part because I was planning on opening it up if I add on later. You can use wood glue if you don’t have plans such as that! Lol!
Add the fence pickets to the frame! I used my favorite gold screws to attach the boards to this frame just screwing through the fronts of the boards!
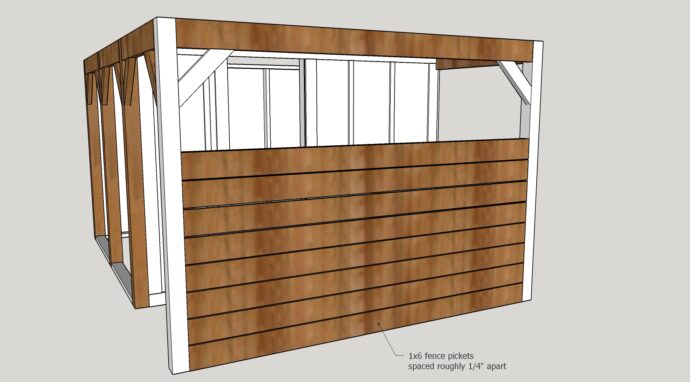
You do not have to enclose this side if you do not want to, originally I was leaving it open, hence why the front doesn’t all match! Lol! I ended up doing it because I do not want stuff blowing into my milk while I am milking and also my mama goats can get a little agitated that they have to get milked sometimes! Lol! So having them pinned in this little area is perfect for us, also, adding gates on both the front and back makes it easy to walk through but keeps any other goats from bothering us while milking!
Guess what?! We can now we can add the roof! This is when it all starts to take shape!!!
Adding the Roof to the Goat Shed
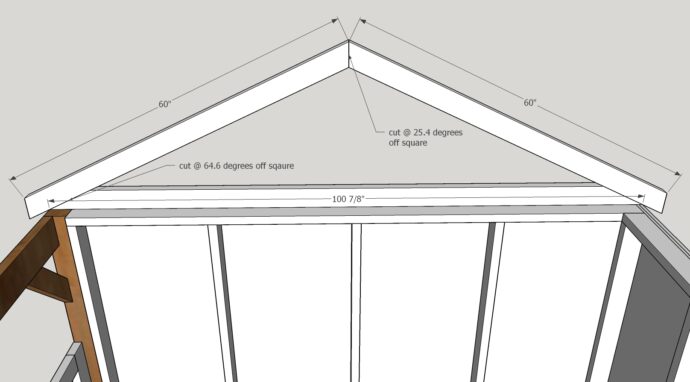
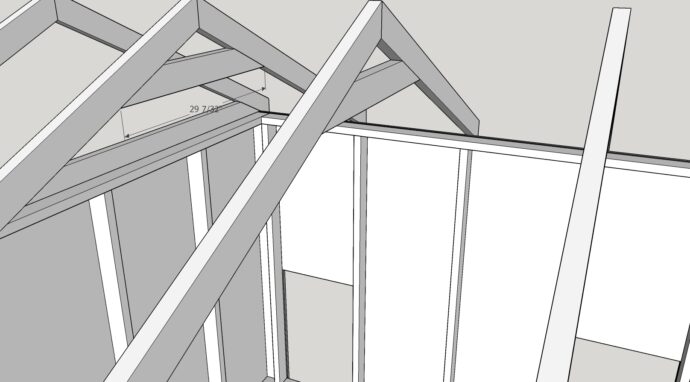
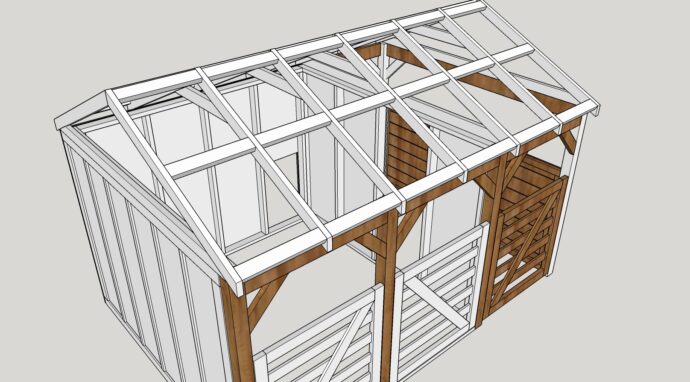
You will have to build a total of 7 rafters to complete the roof of the goat house.
Three of the rafters are built a little differently for the sides, they have a long bottom board that will rest on the walls. The other four will not have this bottom board so that the ceiling will be open inside the goat house so that you won’t hit your head if you are over 6ft tall! Lol!
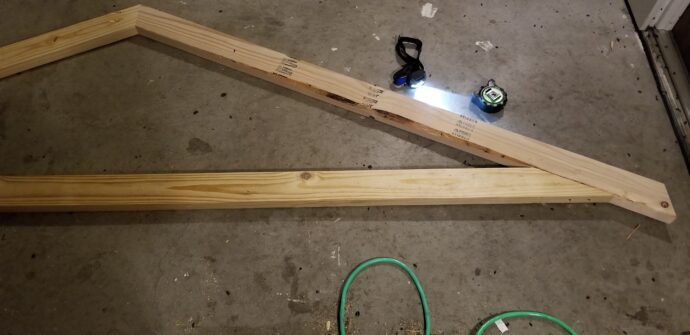
First, build the three rafters like the one below with the long bottom board. I used pocket holes (drilled at 1 1/2″ depth) at the top to attach the boards, and then I just screwed screws through the bottom of the bottom board, at an angle making sure to sink them!
If you look at the bottom of the rafter, you can see the two screw heads, and the pocket holes can be seen if you look really closely at the top! Lol!
Once I had all the rafters with the bottom boards assembled, I then assembled the other four rafters! I just used a small board near the top to keep the rafters from spreading too far! You do not have to cut it to fit inside perfectly, you can cut it longer, and screw it into the sides of the rafters as well!
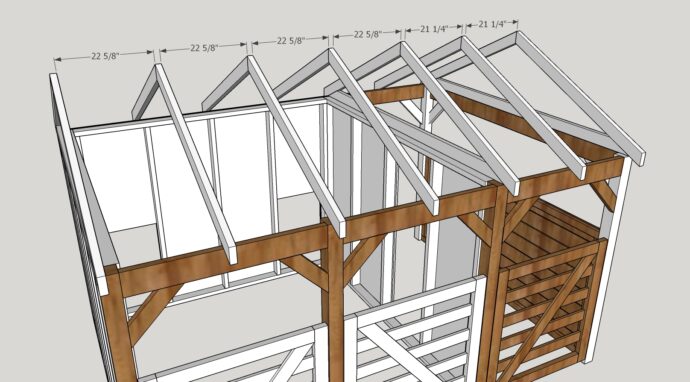
You’ll notice in the photo above, the milk stand side is slightly smaller than the other two stalls.
I attached the roof rafters to the goat shed with Simpson Strong-tie hurricane straps. The picture below is of the Chicken Coop we built but we did them the same way!
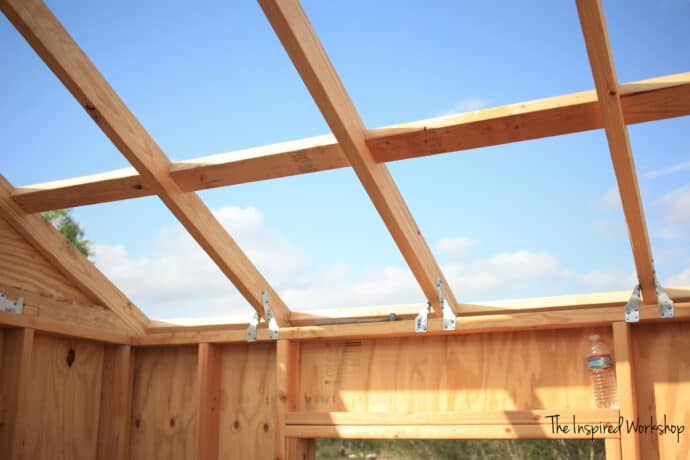
Add the middle boards to brace all the rafters and give you places to attach the steel panels! It is best to use these boards as spacers when you are attaching the rafters so you don’t accidentally attach them too far apart or too close!
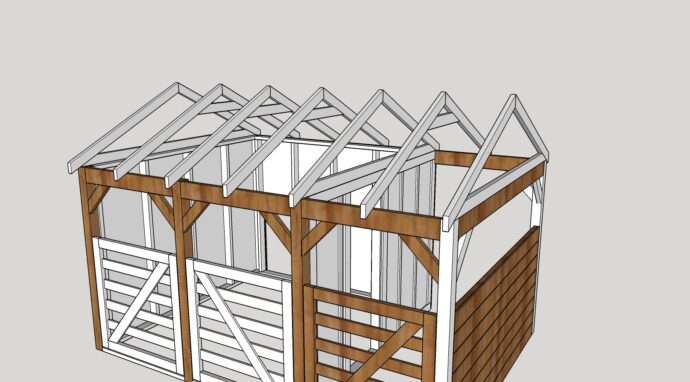
You are at the point you can add the roof panels!! Woohoo!!
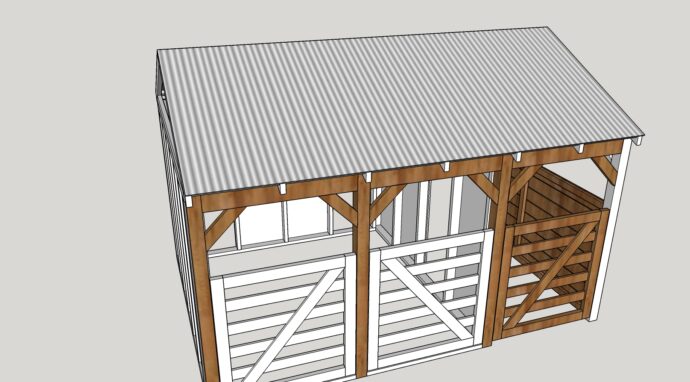
Add the ridge to the roof, and the roof is ready to go!
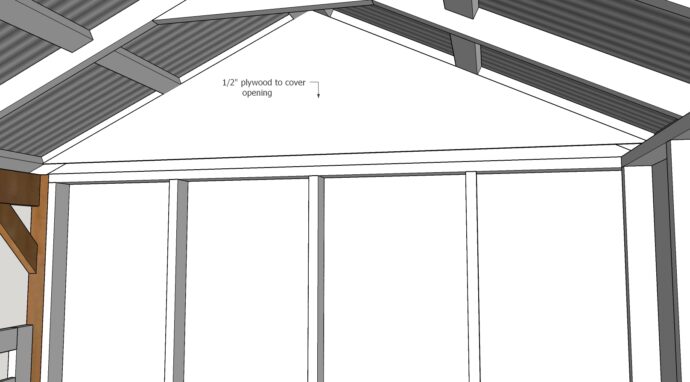
The last thing to do on the main structure is add this piece of plywood to cover the rafter opening! I just screwed it into place from the inside of the goat house and made sure to caulk really well along the outside where the plywood meets the rafter! Such an easy way to enclose this!
The place is ready for you to add gates and small doors! Here are the other posts for you to find the rest of the pieces to make your DIY Goat House just perfect!
I cannot even tell you how happy it makes me when I look into the backyard and see this adorable goat shed! It is way too cute!
If you build yourself a goat shed, you HAVE to share it with me! Nothing makes me happier than seeing your renditions of my build plans! Thank you so much for stopping by, make sure and grab the other plans so you can make the whole goat barn!
Happy Building!

Want to save this DIY Goat House for later? PIN IT!


love this! Can you email me the plan please? How many goats do you think could comfortable here? think 4 is too many ? Thank you!
Hey Rebekah!
Thank you so much! So, I have had four goats in here when the weather was really cold, we used the milk stand side as a stall and it was only overnight while the temperatures were in the teens, they were able to go outside during the day! If you have two goats that get along really well, it will work for short term, but if you want to leave them in the stalls, I wouldn’t do four! I would make it larger or leave it one open space without any dividers depending on whether they will be mamas with babies or just adult goats! I have had a mama and her babies (up to three babies while they were really young) in each stall and we even again used the milk stand side as a stall because all three of my girls had babies at the same time! It worked perfectly fine for this! Also it depends on what breed of goat you have, if they are full size Nubians, definitely, no! Lol! But Nigerian Dwarfs it would probably work okay, but Boer goats I would say, no! So it really will just depend on a few variables but ultimately if you were going to use it for adult goats and you wanted to keep the milk stand side open for milking, I would say 2 goats and 3 at most if you have two that like each other enough! Hope that helps!
Also, I emailed the plans to you so make sure and check your spam folder if you don’t see them!
Let me know if you have any other questions! Thanks so much for stopping by, have a wonderful evening!
Cara
Hello, I’m completely new to carpentry, and so I can’t seem to figure something out, and I was wondering if you’d be able to help me!
I like this design, but it was a little too small, and so I wanted to add 1 more stall to the entire thing (so 3 stalls and the milk stand side all together). I wasn’t sure how to figure out how much more total supplies I’ll need initially before the cuts are made, so I wanted to ask if you knew.
Basically I’ve gotten it down to increasing the back and front walls, I just don’t know how to figure out what boards I need more of or need to get bigger sizes of.
I hope you can help!
Hey Tylar!
I am so sorry it took me so long to get back to you on this, it is really hard to come up with everything you will need without completely drawing up new plans! I would love to be able to do this for you and if I get a chance within the next couple of days I will, I feel like lot of people could benefit from slightly larger plans! But for this moment, I would say the easiest way to change the size with one more stall would be exactly like you said with extending the front and back wall!
The back wall would just need to substitute 2x4x12s (top and bottom boards) instead of 2x4x8s, also add in 3 extra 2x4s for the studs and then on the front side, you will need one more 4×4 post, and for the top cedar, again you can grab a 2x6x12 instead of a 2x6x8 or you can just grab an extra 2x6x8, I’d compare prices to see which is best. Same with the 2×4 along the bottom, you can get a 2x4x12! You will need the materials for an extra gate and a couple of extra 2x4s for the roof rafters, looking at the plans you can get an idea of how many extra based on how many are over one stall (I think 2 extra rafters off the top of my head, which would be an extra 2 – 2x4x10 or 4 – 2x4x8) but double check that)! Then you will need one extra sheet of plywood, a few more trim boards, and two extra roof panels!
I hate that I can’t make the plans right now, I so wish I could, if my computer that I originally created the plans on hadn’t crashed, it wouldn’t take me nearly as long but I have to start from scratch which will take no less than 8-10 hours! Oy! Hopefully this will help though!
If you have any other questions, please feel free to reach out! Thanks so much for stopping by, have a wonderful evening!
Cara
May I get the plans and supplies/cut list? Thank you so much.
We just finished building our goat barn a d I’d love to share photos with you. We made some minor alterations to suit our needs but it’s perfect for our goats, thank you!
Hey Kierry!
Congrats on finishing your goat barn, that is so exciting! I would LOVE to see your pictures, you can send them to me at cara.theinspiredworkshop(at)gmail.com! I can’t wait to see them!
Thanks so much for stopping by, have a wonderful day!
Cara
I am getting ready to build the goat shed and while I was looking through the plans I cannot find the directions for the roof, they did not print with the original plans. Also, looking at the materials and cut list, I cannot figure out where the 3-2x4x10’s are used in the plans, can you clarify this please? Thank you!
Hey Kierry!
So, the roof rafters are not in the plans, I cannot figure it out except that I uploaded the wrong set of plans maybe, but problem is my computer that had all my plans on it crashed and none of them are able to be recovered! So, I now have to redraw up the plans and recreate the pdfs with steps! It is a long process and I can’t do it right this moment, unfortunately! The steps for the roof are in the post though so you can get it built it is just a little bit more time consuming, and I apologize for the inconvenience!
As far as the 3 – 2x4x10s, they are used on the bottom board of the roof rafters that sit on the walls, (which would be why you didn’t see a need for them in the plans…lol)! Hope that helps to clarify!
Let me know if you have any other questions! Thanks for stopping by! Have a wonderful evening!
Cara
Hi Cara! This looks terrific! I would love to make this and also make another in the same style that is big enough for my two horses. Did you use an app to create the plans and cut lists? I’m wondering how to upsize the plans?!
Hey Sheri!
Thank you so much! I used a program called Sketchup to design the plans, unfortunately there isn’t a super easy way to adjust them (that I have found anyway)! As far as the cut list goes, I have to create that myself! There is a new program MakebyMe (@Makebyme_diy on Instagram), a friend of mine posted about recently, she said is more beginner friendly than Sketchup and generates a cut list for you! I wish I had more time right now to sit down and create a customized set for you, but man I am crazy busy right now!🥴 If you aren’t trying to build it ASAP and have a little time, shoot me an email with the dimensions you would want and maybe in a couple weeks I could do it for you! cara.theinspiredworkshop (at) gmail.com! If not, give that MakebyMe a shot and let me know how you like it! Hope this helps!
Thanks for stopping by! Have a good one!
Cara
I love the idea of making this but where does it talk about the roof? I don’t see that part in any of the plans. Where am I missing it?
Hey MJ!
Okay, so something happened to the pictures in the post, I don’t even know what the error means! Lol! Hopefully my tech friend can help since the original pictures and plans are on my computer that crashed in January!😫 The printable plans should have the section on the roof BUT when I pulled it up, you are correct, it is not there! Now this begs the question, what have I done?!😬🫠 I will probably have to completely re-draw the plans! I will email the roof section to you as soon as I have it redone!
I apologize, I don’t know what has happened! I appreciate your kind words and will be in touch soon!
Have a good one!
Cara
Hello,
I am not seeing the roof plans in the email when I subscribed?
Could I receive those please. 😊
Hey Kellie!
I am sorry, I went and looked to see what you meant, and sure enough the roof is not included somehow! Lol! Unfortunately it will take me a little time to go back and recreate the plans as my computer that had all my plans, crashed and none of them were able to be recovered! OY! But in the meantime, you can use the post because it does have the roof steps in it! I apologize! I will email them to you as soon as I get them recreated! Hope that helps!
Thanks for stopping by! Have a good one!
Cara
This is beautiful! Can you email the plans to me, I can’t get the link to work. Thanks.
Hey Whitney!
Thank you so much for your kind words! The plans should be in your inbox! I apologize that I did not see this until just now!
Thanks for stopping by! Have a good one!
Cara
love this so much! Can I get the plans please?
Hey Kim!
Thank you so much for your kind words! The goat shed plans should be in your inbox, I apologize that it took so long to get them emailed!
Thanks for stopping by! Have a good one!
Cara
Can I get plans and supplies list for this
Hey Brit!
You sure can! Check your inbox! I apologize that I am so late seeing this though!😬
Thanks for stopping by! Have a good one!
Cara
Do you have plans for a pig pen?
Hey there! I am sorry, I don’t have any pig pen plans at this time! Thanks for stopping by, have a good one!
Cara
Hi, I really love this, we are just expanding our backyard farm. Is there someway you could send the plans?
Hey Tamour-Lin!
I emailed you the plans! Thank you so much for your kind words and for stopping by! Have a good one!
Cara
Could you email me the plans too? We are going to build this and eventually your chicken coop!
Hi Cara!! I absolutely love all of your work and plans on your site! Would you happen to have plans or a guide to how we can make this a 3 stall house instead of 2 ? Thank you so much !
We live in wisconsin in the woods, could never have an open goat shed, leaves them opened to the elements and predators, but your shed is very nice, thanks for sharing, we would also need an enclosure which would not be hard to add on!
Hey Cindy!
Thank you so much for the kind words about my goat shed! I totally understand the need for some extra reinforcements based on your area! Hope you build the perfect little goat shed for your goats! I’d love to see it if you do! Thanks for stopping by! Have a good one!
Cara
Looking for the divider instructions as well as the gate instructions please!
Hey Jess! I think I resolved the issues with the links not working! I have emailed all the plans to you, and the links should be working in the post as well! Let me know if you have any other issues! Thank you so much for stopping by! Have a great one!
Cara
Is there a way we can get the plans emailed?
Hey Sherri!
Check your email, the plans should be there!😊 Thanks for stopping by, have a good one!
Cara
I love this! But I can’t find the instructions for the smaller goat house. Help?
Hey Christina!
I have not managed to get them posted just yet, I am sorry about that, they are on the list… but dang the list is long! Lol! I can email them to the email you commented with as soon as I have them published if you would like! Thanks so much for stopping by! Have a good one!
Cara
Hi Cara, love your goat plans and we will be getting our first Nigerian Dwarfs this spring. Any chance you’ve gotten to the smaller/mini goat house yet? Even rough plans and/or a few pictures would be great for inspiration!
Thanks for what you do.
Hey Josh!
So I can re-draw up the plans for you based on the dimensions of the one I built (6ftx8ft) and show you how cute it looked when I built it, problem was, I never hammered the stakes into the ground like I was supposed to and goats will continuously push on anything that they feel a give in. So they beat it up and pushed it into the corner and rubbed their horns on the cedar to the point that it was like tooth picks! 😂 It was so neat that they could do that with their horns and so annoying that they would mess up the adorable home I built them! Lol! My computer crashed that had the step by step plans and the pretty photos from when it was first built! I will take some tomorrow just for laughs and email them to you with the plans when I draw them up again! I had forgot about it until I just read your comment and now, more than ever, I wish I had the original photos! The small one is just open in the front though without gates, just a shed for them to get out of the sun in the summer and wind in the winter! This spring we are moving their pens around and I am building a new small shelter which I have an idea for that I hope works better…well, hopefully I will do what I need to to secure it! Lol! Keep an eye on your email, hopefully I can get them drawn up within the week!
Thank you so much for your kind words and for stopping by! Have a wonderful New Year!
Cara
Hello, we are wanting to build a goat house and this looks great! However we live in ohio and with winters getting pretty cold what could be added or changed with this to help keep them warm
Hey Mark!
I live in Texas where the coldest we have seen was 17 degrees and rainy since we have had the goats in this goat house, so I may not be the best person to help you with fixing up your goat house to be warm since I can’t even begin to imagine your cold! Lol! But I will say, during that week of cold, we screwed a tarp across the front, we built it with a solid north wall, but the wind was still whipping around the front (that doesn’t normally happen with our regular cold fronts), so we hung the tarp to get us through. That got us discussing options to keep it handy and not have to run to the garage and find tarps in the nasty weather, and have to look at it with blue tarps screwed into it! Lol! The one thing we came up with was grabbing canvas tarps that are heavy-duty and rolling them up along the roof, inside the stalls above the gates where you really wouldn’t notice them unless you are inside the house looking out. We would have to add one one each stall since we have dividers in between, but then we would add hooks along the cedar posts on the inside that we could unroll the tarp and hook it to the posts so the wind can’t blow it open. I am not sure if that makes sense, if I get around to doing it, I will of course update the post! Also, we do have outlets inside the goat house so we could add heat lamps or mount a small heater on the ceiling, but they were plenty warm with the tarp so we didn’t use any extra heaters or lamps. I know y’alls winters are far colder though so you definitely could if you wanted to! I’m sorry that I am not more help seeing as I know hot weather really well, but not so much cold! Lol! Hope that somewhat helps though! Let me know if you have any other questions! Thanks for stopping by! Have a good one!
I adapted this to fit my needs & supplies on hand but the overall goat house is the same! I LOVE IT! Your plans were great. I have smaller goats so I even modified to add a hay loft inside! I can only fit about 6 bales but still worth it! I’m going to build your chicken coop next!