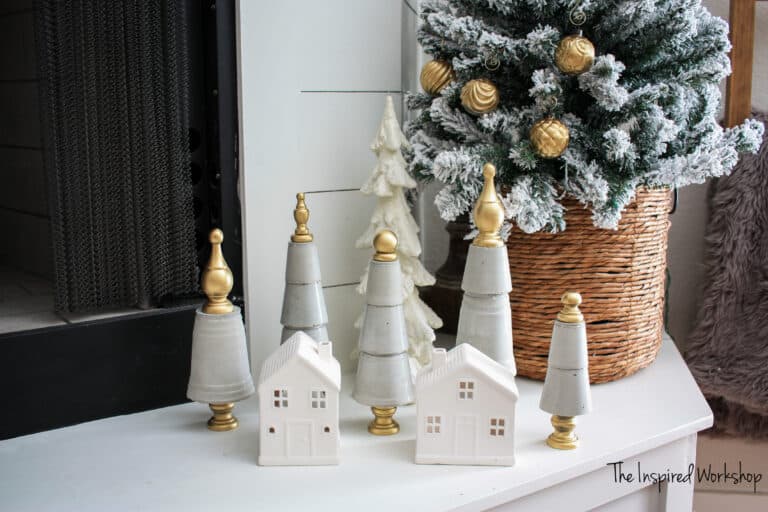
• Skip to secondary menu
  • Skip to main content
  • Skip to primary sidebar
  • Skip to footer
  • About
  • Blog
  • Contact Me

The Inspired Workshop

Inspiring you to Do-It-Yourself

  • Home
  • Furniture Plans
  • Remodeling
  • How To
  • Holiday
  • Crafts
  • Tools
  • Videos
You are here: Home / Search for "concrete"

Search Results for: concrete

DIY Concrete Countertops – Pour in Place

January 28, 2019 by Cara 2 Comments

This post is sponsored by Concrete Countertop Solutions. I was given some concrete products in exchange for my post, but ALL opinions are my OWN. I would also like to note that I purchased some of the supplies in this post from them as well with my own money!

Hey Everyone! Happy Monday!

Many months ago, ahem, maybe even a year ago, we poured concrete countertops in the kitchen during our kitchen renovation and I wanted to share all about the process, what we did well, what we would NOT do again, and answer some questions I received! Pour in place concrete countertops are absolutely a DIY solution to countertops if you are on a budget or just love the versatile look of concrete! I say after having poured them, as long as you can lift a full five-gallon bucket up to your head 15-20 times, you are good to go…or at least have someone handy who can! Lol!

Pour In Place Concrete Countertops

Don’t mind that fancy copper patina in the sink!๐Ÿ˜•

There are a few things you need to understand before picking concrete countertops as your new counters though, and that is one, they are not a uniform color, there are variances and the more you need to sand on them after pouring, the more they have variation because of the aggregate that shows through! Don’t think for one second that because you saw a far off picture of some concrete counters, or a semi blurred close up, that they are solid gray or white! I didn’t know this going in, and though I LOVE the look, I understand that not everyone wants that look. Since the only concrete projects I had done were flipped over, they had no aggregate showing through, they were more solid gray! If you are sold on concrete counters but want solid gray, maybe you will want to create forms and not pour them in place! I will go into more on this below!

And just in case you missed any of my previous posts on the kitchen renovation you can find them under Remodeling!

But first, I must show you more of the beauty shots! ???? And just to let you know, I did not edit these photos at all…they are exactly what the camera picks up, some spots are actually more exaggerated in the photos than in real life, but I wanted you to get a REAL clear picture of what concrete countertops look like!

Pour In Place Concrete Countertops

Pour In Place Concrete Countertops

Aren’t they gorgeous? ๐Ÿ˜ First off, my kitchen counter space could be a small bedroom, it came in around 80 square feet without the drink station. It makes for great space to cook, bake, and entertain…but it does not make for a budget-friendly renovation when you look at the prices on countertops! Lol! I priced out laminate and it was going to cost me more for this space than the concrete did…and by a long shot! It was over double the cost! Marble, granite…out of the question. But concrete, there was the solution to all my problems, I love the look of concrete, industrial yet sophisticated. And wait, you are telling me there is a way I can pour them in place with absolute ease because the edge forms do all the work? Sign. Me. Up. (This was my thinking, but clearly, you need to know trowel work and such which…I didn’t exactly…but it worked well enough!๐Ÿ˜…)

Enter Concrete Countertop Solutions, I found them while searching and researching all I could about pour in place concrete countertops. They had a system that made it so easy to DIY your concrete countertops, I practically begged them in an email to work with me on this post! Lol! I was using their white concrete and edge forms regardless of what their response was to my email, I was sold before contacting them that this was the ONLY way to do pour in place concrete countertops!

Now, let’s not forget, I had only worked with concrete a couple of times in the past, I made a few tabletops and benchtops, but they were created in forms and flipped over, so the top was essentially created by the form, not by my concrete work. This made me a little apprehensive about pouring the countertops in place, but if I didn’t even try, I would never know if I could or not! Lol! So I decided to give it a shot!

Pour In Place Concrete Countertops

While not ‘perfect’ of course, they are perfect for our kitchen! They are an option that I do not have to worry about the kids spilling anything on or hot pans melting! They work great for us and look great as well, in my opinion! Down below is the tutorial showing you how we did our pour in place concrete countertops, and what we learned in the process!

Materials Needed for Pour in Place Concrete Countertops

  • cement board cut to cabinet layout
  • heavy drop cloths to protect cabinets and floors…it gets pretty messy
  • White Countertop Mix  (from CCS if doing white counters)
  • Sand / Topping Mix (from the hardware store if doing gray counters)
  • Z Liqui-Crete (if doing gray counters)
  • counter edge forms
  • Fiber Mesh Reinforcement
  • Z Clips
  • Screed
  • Float
  • Sanding Pads – Z Gem Pads are the ones I purchased and I am still using them on a multitude of projects, not just my counters…worth every penny!
  • Sealer – This is the one I purchased from them (the owner recommended it for the white counters but it works great on all concrete)
  • miter saw
  • corded drill (you need one with low rpm – the link is to the cheap one I purchased and it worked great)
  • paddle mixer
  • duct tape
  • small 1/2″ screws
  • you will also need faucet knockouts and sink form if you have an under-mount sink
  • utility knife to cut cement board

Preparing the Kitchen for Countertops

NOTE: Before starting this tutorial, I would just like to make sure you understand that I am NOT a concrete professional of any sort, I am just sharing my journey of how we poured our concrete countertops!๐Ÿ˜‰

Before we could pour the counters we had to prep the cabinets, which in our case meant building them out in certain areas and adding support in other areas. Then we were ready to add the cement board to the tops of the cabinets to pour the concrete onto.

We had an abnormal situation because our cooktop was 49″ wide and left a span between cabinets that a 3×5 sheet of cement board couldn’t cover. We also have a vent that is inside the counter so you can’t put a support board across the back wall. This led us to have to find a larger 4×8 sheet of cement board. We could only find one brand, Perma Base at Lowe’s, and let me tell you…I would NOT use it again. I would special order the Durarock or Hardy brand! The Perma Base was the only one I could get in-store, and I regret it…it did not cut easily with a utility knife like the other brands, and it had the strangest Styrofoam balls in it, which made it so much weaker than the other brands! No lie, it was awful! So do not make that mistake, use the other brands…okay!

Once all your cement board is cut to size, attach it to the cabinets! Our kitchen looked a little silly at this point!

Prepping the kitchen for counters

After attaching the cement board, I was able to start attaching the edge forms! The edge forms were lifesavers for this project! I do not know what the outcome may have been without this special piece! Edge forms not only make the front…or should I say, the most important part of your counters look good, but the system is designed with edge forms that go up against the wall as well to give you two pieces to screed the concrete with to make sure they are level! That is worth every penny, trust me on this one! I still managed to make a mistake that I will show you later but it was due to the awful cement board, not the edge forms!

The edge forms are super easy to install. You cut them to the length of your counters, mitering the corners at 45 degree angles! You will need to duct tape the corners as well just to keep the concrete from seeping or opening the corners. Small screws are used to hold the forms in place! Concrete Countertop Solutions offers a vast selection of edge forms too, you don’t have to go with a straight square edge like I did, you can have a more fancy edge if you’d prefer! They even have a thinner square edge that I love…they didn’t offer that a year ago, but now they do! It is perfect!

This part did take me a full day to complete because I had a ton of corners to go around and concocting a way around the pillars wasn’t easy! Lol! I brought my miter saw inside because walking back and forth into the garage was wasting way too much time!

Prepping the cabinets for counters. Edge forms in place

Can we say MESS? ๐Ÿ˜ณ Wow, things can really get out of hand when I start projects!

Pour in Place Concrete Countertops

Pour in Place Concrete Countertops

At this point in the journey, I measured from the top of the edge form to the ceiling along the back wall, at both ends…they measured the same! I thought yes, great the cabinets are level! Muahahaha! Boy was I wrong! I sat a level along the back edge forms…showed it to be perfectly level! Yesss! Muahahaha! Boy was I wrong! One, it was a smaller level than I should have used…it was a 3 footer, should have been six! And, here’s where that Permabase board really bit me in the a**! It was sitting level but once the weight of the concrete was placed on top…it quickly sloped in the area where it wasn’t supported as well as we should have supported it. Now is that all the Permaboard’s fault, no. I have a fault as well in that I should have made sure it was super supported and not moved forward until we came up with a way to do that. But Hardy board or Durarock would have been so much stronger than this stuff so it would have helped as well! Lesson learned!

You know how I measured from the top of the form to the ceiling, yeah, and the measurement was the SAME on both ends…well guess what?! The countertop was sloped the opposite direction of the ceiling…neither one was level! Had I have had the laser level at that point in the journey I would have known that.๐Ÿ˜ฌ How does that manage to happen, I mean seriously…how?! So all the while I was WAY off, thinking I was golden! ๐Ÿ’ฉ Lesson learned…laser level for the win!๐Ÿ˜

Anyway, once the edge forms are in, AND THE COUNTERS ARE LEVEL, another part of the Concrete Countertop Solutions system, is the fiberglass mesh and little clips to hold it in place. This keeps the fiberglass mesh right in the center of the concrete so it doesn’t float to the top or stick out anywhere. And since the main goal of the mesh is to keep the concrete from crumbling and cracking, being held right in the center is best. There are also fiberglass fibers in their concrete mixture as well to help with this! I am telling you, this system is pretty awesome, and they have thought of everything!๐Ÿ‘Œ

Here’s the kitchen awaiting it’s pouring!

Pour in Place Concrete Countertops

Pour in Place Concrete Countertops

Pour in Place Concrete Countertops

Mixing and Pouring the Concrete for the Countertops

So, my husband was heading out of town for over a week, and remember I was trying to complete the kitchen in 6 weeks for the One Room Challenge…so I had no time to lose! He had 4 hours before he had to leave, and so we were going to do the island together and then I was going to try the rest by myself. Well, that plan didn’t quite work out the way we planned…our corded drill I bought, yeah, it wasn’t made for mixing concrete!  It burnt up after less than 5 minutes trying to mix that concrete!๐Ÿ˜ต My hubby finished mixing that batch by hand and we put in into the island form so it wouldn’t be wasted. But now I had to drive an hour to get to a store that sold a drill that was able to mix concrete! An hour there and an hour back…yeah my hubby was gone! On my own now, I had to mix the rest of the concrete and pour it myself! After that fiasco, I was a little worried!๐Ÿ˜ฐ

Luckily, the new drill, even though it was from Harbor Freight, worked great! I was able to mix the concrete and throw them in the form in minutes…only I about died having to lift the 5 gallon bucket of concrete over the counter all 8 times I had to! Lol! That’s why I wanted to make sure and state that in the first paragraph!

The instructions from CCS are great and well written on the packaging materials! For the white concrete, you just mix it with water in a 5 gallon bucket, water first, then slowly add concrete.

*Note: My video directors were not the best in the business,๐Ÿ˜‚ so they only caught parts of this and that…but I compiled the little footage that I did have to create snippets of video!

I decided after pouring the white concrete on the island that maybe it would be better to wait and not finish the kitchen on time, than mess up the whole main counter! Because once you get started, there really isn’t any stopping and the main counter is one solid, very large piece so if I started it, I had to finish it! Let me just say, a few extra hands are worth the wait! Yep, lesson #2 learned.๐Ÿ˜†

I purchased the island screed from CCS to make the island a breeze…ha ha ha…joke was on me, the island was larger than the screed! ๐Ÿ™ˆ I had to run into the garage and try to find the straightest board that I could. Talk about sweating! This is typical of DIY projects around here, the faster you learn to roll with the punches, the faster you learn to enjoy the challenge… I think! There is always something new, something you didn’t think of, and something you have to quickly think on your toes to improvise! I think I enjoy that!๐Ÿค”

Anyway, fast forward a week or so and my hubby returns home! Yay! Now we can do the BIG countertop! s Another problem, my grandma was in the hospital fighting for her life, if you have been following along for a while, here and there I have talked about her bout with liver cancer. This happened to be the last bout she faced, as it did take her life shortly thereafter. We poured our counters on the Wednesday before Thanksgiving, I rushed out and left my hubby to smooth them at the hour mark and went to see her in the hospital. She bravely hung on until she was able to eat her thanksgiving meal and passed away the Sunday after Thanksgiving. My countertops will forever remind me of her! She would have been so proud of them and my hard work in here, even though she wanted to see it finished and was never able to! I know she would have been! ๐Ÿ˜Š

Let me dry up my tears! Back to pouring these babies! So with help, someone mixing and someone pouring, it was so. much. better. It was still a lot of work don’t get me wrong…but oh so much easier than the pressure of doing it without any help! Lol!

We worked and poured, mixed, and poured some more.

Once they set for a couple of days, we sanded the edges of the edge forms and popped them off!

Viola, the edges looked like some kind of glass or marble, it was crazy how smooth they were. Since we smoothed the top, of course, it wasn’t quite as smooth as the edges! We just used our orbital sander to sand the tops and one thing to note, once you sand down you expose small aggregate…it’s tiny flecks and you can’t see them unless you are right on top of it, but it is what creates the overall tones of the concrete! The white mix, you had to sand down a lot farther to get to it. I think it’s because I mixed the white a lot thicker (drier) than the gray. So that is something to be leery of if you don’t want to see aggregate, they have to be perfectly done…and even then I’m not sure it’s possible! Lol!

So two things here…first, we didn’t have the trowel marks in the gray counters quite as bad as on the white counters…so I am thinking if you mixed the concrete a bit thinner than I did the white, but a hair thicker than we did the gray…they would be perfect! Wait, actually I think the white concrete with two people working it so that it doesn’t dry as fast would work the best! ๐Ÿ˜… Then you would not have the trowel marks…I think that’s an experiment I need to try! Hey, I have a bathroom counter that could use a makeover! Lol!

Anyway, I don’t mind the aggregate or trowel marks, I love the handmade, organic look of them! You know my favorite mug is from Magnolia Market and is hand made and not at all perfect…but I love it! Perfectionism is overrated! (Ahem, says the DIYer that can’t manage to do anything perfectly!๐Ÿ˜‚๐Ÿ˜) Here’s the imperfections best as I can capture them!

White Concrete countertops

Sealing Concrete Countertops

Once they are smoothed out to your liking, you seal them with the Aquapoxy! I love this stuff! It is so easy to apply, it is thin, not like I expected. I thought it was going to be thick and hard to apply, showing all imperfections, but nope, you roll it on with an epoxy roller and it dries beautifully! No talent needed here, thank goodness! ๐Ÿ˜Ž I thought I had pictures and a video of us applying the epoxy but I couldn’t find them anywhere! Sorry about that…but if you got this far, sealing is the easiest part!

Let it dry between coats and sit for three days I believe and they are DONE! Finished, ready to go, finito! The kitchen is back in working order! Yep!

Kitchen with white subway tile and concrete countertops

All in all, it was not a bad experience and I can’t wait to try concrete countertops somewhere else in the house! I’d love to know what you think, would concrete countertops be something you would consider? Let me know below!

Like what you read? Make sure and share it as that totally makes my day! Thanks for stopping by!

Wanna save this awesome project for later? Pin it!????

This beautiful DIY kitchen renovation includes pour in place concrete countertops that span a large island and peninsula. The tutorial shows you how to pour your own concrete countertops in place! The post covers the does, don'ts and so much more!

DIY Concrete Countertops


This DIY Kitchen Renovation includes a tutorial for DIY concrete countertops that were poured in place in both white concrete countertops and gray concrete countertops. Easy to follow how to tutorial.


Filed Under: Remodeling, How To Tagged With: concrete countertops, countertops, kitchen renovation, white concrete countertops

DIY Round Concrete Table Top

March 12, 2018 by Cara 1 Comment

Hello friends!

You guys…and gals!! I need help! How about we make a deal… I provide free project plans to you on here, and one of you (any one of you…I’m not picky really ????) call me each morning and give me a pep talk, and ask about the goals I met the day before! Oh, and get really mad at me if I didn’t complete them so that I quit letting time slip away from me!! Ugh! I swear I am going to wake up one morning at 80 years old and think I am only 33 because I am the world’s best time waster!! ???? So anyone want to do this for me?…Anyone?…Bueller? ????

Anyway, moving on from my plea for help…if you have been here before, I have done a couple of concrete table tops, just simple rectangle tops… but I tell you something that I had been eager to try, was a diy round concrete table top! But after coming up with the design of my most recent table base, I knew it had to sport a round top…and it had to be made out of concrete! I managed to figure it out as I went along and it turned out alright for being my first attempt!

DIY Round Concrete Table Top

[Read more…] about DIY Round Concrete Table Top

Filed Under: Furniture, Tips and Tricks Tagged With: concrete, round table, table top

X Base Outdoor Concrete Bench

June 11, 2017 by Cara 3 Comments

Hey, hey, hey!! Looks who’s back, and it hasn’t taken a month!! Lol!! I am back today to share the matching x base outdoor concrete bench plans to the table that I posted last Monday!! I mean you really can’t have one without the other, so I totally understand why everyone was wanting the plans asap!!


X Base Outdoor Concrete Bench

Don’t mind all the puddled water everywhere…it has been super rainy here!! I couldn’t be happier with this set that I built for the backyard and I cannot wait for the rain to end so I can get out there and try it out!!

[Read more…] about X Base Outdoor Concrete Bench

Filed Under: Furniture, Projects Tagged With: bench, concrete, farmhouse bench, outdoor furniture

X Base Outdoor Concrete Dining Table

June 5, 2017 by Cara 2 Comments

This post is sponsored by Build Something and Kreg!

Hey there!! Long time, no post…AGAIN!! Lol!! Well, life seems to try and get in the way of my blog all. the. darn. time!! Every dang time I decide to get serious about blogging…life throws me a curve ball!! I’m hoping one of these days life hurts it’s arm and can no longer pitch!!ย ???? But at least I am able to bring you some fantastic plans today for this amazing X base outdoor dining table complete with concrete top…and bench plans coming later today!! Yay!! You will be able to find the bench plans HERE!

I had to take pictures between the rain down pours, so the concrete is wet on one of the benches and the pics were taken literally in about five minutes, the weather refused to give me any more time than that!! ????But even with all the rain, they still look great!!

X Base Oudoor Dining TableX Base Oudoor Dining Table

X Base Outdoor Concrete Dining Table


I am so excited for summer picnics and evening meals out here…And I am excited to have teamed up with Kreg and Build Something to bring you the FREE plans for this table!! Get the plans HERE! Build Something is Kreg’s DIY website full of free plans for all kinds of builds!! You have to check out Wood Shop Diaries bench she just posted while you are over there…it’s my favorite bench ever!!! Now I may have to build one!! Lol!!

This table was such an easy build, and the concrete top is just icing on the cake! This was the largest concrete project I have done to date and I had a sore back after mixing 9 bags of concrete by hand for the benches and table, but once I sat it all up on the back patio…it was soooo worth it!!ย ????

X Base Outdoor Concrete Dining Table

And I love the rug I picked up at Home Depot…it was only 89 bucks!! It’s soaked with water and mud from the dogs, but I still couldn’t be happier with it!!

Head on over and get the FREE plans at BUILDSOMETHING.COM now!! Have a wonderful first week of summer!!!

Lots of LOVE,

Cara

Filed Under: Furniture, Projects

DIY Concrete Vanity Countertop

July 27, 2016 by Cara 2 Comments

Hey there!! Need a beautiful top to adorn your newly built vanity? Well, here is the tutorial for the DIY Concrete Vanity Countertop!

Do you follow me on Instagram and Pinterest? Make sure to do so, that way you donโ€™t miss the behind the scenes, in-betweens and shenanigans of The Inspired Workshop!!

Diy Concrete Vanity countertop

[Read more…] about DIY Concrete Vanity Countertop

Filed Under: Furniture, How To, Projects Tagged With: bathroom, concrete, concrete counter, countertop, vanity

How to Paint Kitchen Cabinets

September 22, 2020 by Cara Leave a Comment

Hey there! So I thought I had published all my kitchen renovation posts…and then I saw this little draft sitting all alone, ready to be published but not! Lol! Here it is, all about how to paint kitchen cabinets!

How to Paint Kitchen Cabinets

I am telling you, I was beyond skeptical about painting my kitchen cabinets…but ordering a whole new kitchen this large of cabinets was out of the question for my budget!

[Read more…] about How to Paint Kitchen Cabinets

Filed Under: How To, Remodeling, Tips and Tricks Tagged With: gray island, ktichen renovation, painting cabinets, painting kitchen cabinets, white kitchen

DIY Wine Dispenser

November 4, 2019 by Cara 1 Comment

Hey everyone! Happy Monday after daylight savings!๐Ÿ˜ฌโ˜• Am I the only one who is completely messed up by it even though in the fall when we ‘gain’ an hour? Good thing I built this DIY wine dispenser to help us make it through this tough time change! Lol! I teamed up with some friends of mine again this month to challenge ourselves to build something that we can give as a gift! Well, let me tell you a little secret…I’m not giving mine away…it’s for me! ๐Ÿ˜… But you could definitely build one as a gift and the recipient would be delighted to receive it I am sure! ๐Ÿ˜‰

DIY Wine Dispenser

Hello, is that not the best way to hide the fact that you are the classiest lady in the neighborhood and buy boxed wine?๐Ÿ˜œ I mean no one likes a show-off Karen! I must admit, I am not actually a big wine drinker, I know…gasp!๐Ÿ˜ฑ I may become one as of the building of this fancy wine dispenser, but for now, I will just sip my tequila out of the bottle and leave this on the counter for guests to enjoy! Who am I kidding, I’ll actually be drinking coffee trying to stay awake!๐Ÿ˜‚๐Ÿ˜‚ #partypooper

Look how quickly and easily you can use this wine dispenser!

Adding the bag of wine to the dispenser

Load it with your favorite wine, stand it up, place the lid on top! Ready to serve!

Dispensing Wine from the DIY Wine Dispenser

I really love it! Now I have SOOOOO many ideas swirling around about other designs that you could do with it! Apparently, I am all about dispensers, lol…did you see my DIY Cup Dispenser?

DIY Wine Dispenser

You have to check out the other really great projects from all my other friends as well! They brought their ‘A+ gifting game’ man! I love doing the challenges mainly just to see what all the other ladies build and create! It is so much fun! Scroll down to the bottom to click all the links and show them some love!

Now back to this here DIY wine dispenser, let me show you how to build your own!

Materials for the Wine Dispenser

Note: You can do this even cheaper out of 1/2″ MDF or 1/2″ plywood but I just purchased hobby boards from Home Depot that were made of poplar, they are 1/2″ and come in all kinds of smaller sizes! The total cost of wood was a little less than 20 dollars.

Amazon links below are affiliate links (all other links are not, they are just to help you find the items I used)! As you may have read before on my site, affiliate links may earn me a small commission if you click a link and make a purchase (you do not have to purchase the item that you clicked the link of, any item you buy after clicking the link will count), it is at no extra cost to you… and helps me keep all the plans free here on The Inspired Workshop! It’s really a win-win and I appreciate it!๐Ÿ˜Š

-1 – 1/2″x6″x48″ poplar hobby board

-1 – 1/2″x6″x24″

-1 – 1/4″x6″x48″

– brad nailer 

– 5/8″ brad nails

– saw

–1 1/8″ hole saw or Forstner bit

– knob or handle

– wood glue

– stain/paint

and some boxed WINE baby!

One of the things I enjoyed most about this DIY wine dispenser as a gift is that you can whip it up in a couple of hours, not days or weeks like a lot of my DIY ideas!

Cut List:

2 – 1/2″x6″ @ 14″ (sides)

1 – 1/2″x6″ @ 14″ ripped down to 5 1/4″ (back)

1 – 1/4″x6″ @ 14 1/8″ (front)

1 – 1/2″x6″ @ 6 1/4″ (lid)

1 – 1/4″x6″ @ 6 1/4″ (bottom)

1 – 1/4″x6″ @ whatever is left over after cutting the other two pieces! Mine was like 3″, and then I cut the 6″ side down to 5 1/4″. (this will be glued to the lid piece to hold it in place).

After cutting the above pieces, I used the remaining 1/2″x6″ and ripped it into 5/8″ strips to make the base.

4 – 1/2″x5/8″ @ 4″

2 – 1/2″x5/8″ @ 6 3/4″

2 – 1/2″x5/8″ @ 5 1/2″

2 – 1/2″x5/8″ @ 4 1/2″

1 – 1/2″x5/8″ @ 5 5/8″

Building the Wine Dispenser

This build is a pretty simple rectangular box, so I started out by cutting all my main pieces. Before assembling, make sure and cut your grooves for your front piece to slide into. I cut them on the table saw, with my blade raised about 1/8″ out of the table, I set my fence to about a 1/8″ as well. Run both of the boards through all the way through the saw, then move the fence over 1/8″ and run them again. You may need to run them one more time to make sure the front board fits in the grooves.

All the pieces to build the box of the wine dispenser

You cannot clearly see the grooves in this photo, but they are in the very bottom boards, and to the inside of the boards.

There are a couple of other ways you can cut the grooves for the door if you don’t have a table saw. You can use a router with a 1/4″ bit, or you can use a circular saw the same way you use the table saw. You can even use your miter saw if you place a stop on the arm.

Once you have the pieces cut, you can start assembling the box. I like to place my pieces on a raised surface when I am using the brad nailer so I can keep it level. This prevents the brad nails from shooting crooked and popping out in an unexpected area!

I also used painter’s tape to try to hold the pieces while I was brad nailing. Make sure and use ample wood glue to hold it together. The brad nails are only used to hold it together until the glue sets, not as the actual fastener!

Brad nailing the box together

I did slide the front piece into the box to hold the boards in place while I brad nailed it, just make sure that no glue gets on it!

I brad nailed the bottom as well, again with plenty of wood glue, none along the front!

DIY wine dispenser

I just left the top piece alone, for now, it will just be a lid so there really isn’t anything to do with it just yet!

Next, I let that sit to make sure not to stress the glue joints while it dries. I started on the base. I built the top square of the base using 2 of the 1/2″x5/8″ @ 6 3/4″ and 2 of the 1/2″x5/8″ @ 4 1/2″

Base of the wine dispenser

Once that is glued and brad nailed, you can add the ‘legs’ (4- 1/2″x5/8″ @ 4″).

Building the base

Flip it over to make it easy to attach the rest of the legs!

Attach the 2 – 1/2″x5/8″ @ 5 1/2″ to the shorter sides, and the 1/2″x5/8″ @ 5 5/8″ to the center of those boards once attached.

Completed Base for the wine dispenser

Once the base was complete, I let it sit for a couple of hours as well to make sure the glue had time to set since it is only brad nails holding it together!

Next, I added glue along the top of the base and sat the box on it, but you can’t actually brad nail it, so I just placed heavy items on top to act as a clamp until the glue dried.

Glueing the base to the box

While that was drying, I went ahead and stained the lid so I could add the knob. I also glued the little leftover piece of 1/4″x6″ to the underside of the lid. I made sure that it was glued to the back of the lid to where I could place the lid on top and slide it back into the perfect place. I hope that makes sense!

I then placed a piece of painter’s tape to keep the wood from splintering and then drilled a hole.

Drilling a hole in the lid

Add the knob!

Added the knob to the lid

I stained this with my FAVORITE stain Old Barn Stain in Weathered, but on this poplar, it looked green still through the stain so I then went over it with Golden Oak by Rustoleum. Then it was the perfect warm grayish color!

Back to the box, I made a complete ROOKIE mistake! I decided in a rash decision to drill the spout hole while it was in the grooves so that I wouldn’t drill into the floor with my expensive Forstner bit. DUMB, DUMB idea Cara! I knew that it was only 1/4″ wood but I thought maybe it would be okay because it wasn’t a large span in between the boards! NOPE, it broke in half…the whole board as the bit broke through the board!๐Ÿ˜ฏ

drilling the spout holeSo then I had to glue the board up and hope for the best because my Home Depot didn’t have another board, I bought the last one they had! Lol!

Gluing the damaged board

Luckily, it worked pretty well! You can see the line sometimes but it isn’t obvious!

I then placed painter’s tape on the front board where I drilled the spout hole because I had to cut the hole in half.

I also made ANOTHER rookie mistake here, I forgot that I was cutting this board and didn’t allow for the extra 1/8″ when it was cut. Mine has a small gap, a blade width size gap at the top because of it! Oy!๐Ÿ™ˆ I adjusted the cut list though so that it won’t happen to you!๐Ÿ˜†

I glued the small bottom piece into the grooves and left the large piece free to move up and down.

DIY Boxed wine dispenser

DIY Bag wine holder

Place the lid on top, stand that baby up, and pour you a glass of wine! Don’t mind if I do!

Dispensing Wine from the DIY Wine Dispenser

I have an adorable idea to easily change out a label so that you can show what kind of wine is in the dispenser but Amazon still has not delivered my package, so I will update the post once I make them!

DIY Wine Dispenser

Ooh, la la! I love it!

Here are the links for the other ladies that participated in the challenge! Check them out, and let me know if you make a DIY gift this year for someone special, I would LOVE to see it!

Katie – Addicted 2 DIY

Cristina – RemodelaCasa

Jaime – Jamie Costiglio

Sarah – Created Home

Anika – Anika’s DIY Life

Sam – DIY Huntress

Beth – Reality Daydream

Mindi – My Love 2 Create

Gail – My Repurposed Life

Sarah – Ugly Duckling House

Shelly – 100 Things to Do

Angie – House Becoming Home

Have a wonderful week!

Enjoy this post and want to save it for later? Pin it!

DIY Wine Dispenser

DIY Wine Dispenser

Filed Under: Crafts, Furniture, Gift Ideas, Holidays Tagged With: gift ideas, hostess, wine

  • Go to page 1
  • Go to page 2
  • Go to page 3
  • Go to Next Page »

Primary Sidebar

Connect with me!

  • Email
  • Facebook
  • Instagram
  • Pinterest
  • Twitter
  • YouTube

Search

Welcome

Hey there! Welcome to the place I share all my diy adventures in hopes of inspiring you to pick up a hammer or drill and get to work building, crafting or renovating your dreams! I will show you step by step instructions on every project to help you see how easy it can be! I’m so glad to have you here! Look around, hopefully you will enjoy what you see!

New Posts Sent Straight to Your Inbox!

Sign up to receive new posts directly in your inbox! Don't miss a single post or FREE plans!

Please wait...

Thank you for signing up! Can't wait to keep in touch!

Recent Posts

  • DIY Gold Hexagon Napkin Rings
  • DIY Marble Epoxy Pumpkin Chargers
  • DIY Hinges Made From Dowel and Pipe
  • DIY TV Stand / Media Console
  • DIY Neutral Fall Wreath

Latest Pins

  • DIY TV Stand - Media ConsoleThis DIY Media Cabinet is not only beautiful, it's even more functional! With drawers to store video games and DVDs and shelves to accommodate all gaming consoles, gaming accessories and more! Tons of storage to keep all your tv watching and gaming equipment organized! Don't need all that storage for gaming and TV, build it to hold dishes and serving ware and use it as a DIY buffet! Use it as a show stopper in your entryway! Options are endless with DIY furniture!
  • This diy outdoor planter can be built out of your scrap wood laying around the shop! An inexpensive way to get a beautiful high end look on your front porch, back patio or out by the pool! It bodes well with traditional decor, modern decor or even eclectic vintage decor! It is so versatile! Build yourself a DIY wooden outdoor planter today! #frontporchdecor #diyoutdoorplanter #diyplanter #diyscrapwoodproject via @theinspiredworkshop
  • DIY Hinges - Make your own hinges from a dowel rod and pipe to complete this media console or any other piece of furniture that you want to have hidden hinges on! DIY hinges can be easily made and allow you to use thicker materials than standard hinges.
  • How to make your own barn door hardware - Full tutorial to show you how to diy barn door hardware! Looks just like what you would pay 100s of dollars for but yet it only costs a little over 20 bucks! #diybarndoor #diyhardware #diymeatalworking
Follow Me on Pinterest

I have been featured at

Archives

Copyright

It makes me happy when we all share… but please keep in mind that all images & text on this site are property of The Inspired Workshop. I love seeing my photos on other websites, just as long as there are no more than two per post, and they are linked back to my site! Please do not remove any watermarks, crop or edit any photos, or copy text off of this site without obtaining written permission from me first! Pinning is always welcome and appreciated! Thanks!

SiteLock

Popular Posts

DIY Scrap Wood Outdoor PlanterDIY Scrap Wood Outdoor Planter
DIY Ring Toss GameDIY Ring Toss Game
DIY Concrete Countertops – Pour in PlaceDIY Concrete Countertops – Pour in Place
DIY Dog Bed – Pottery Barn KnockoffDIY Dog Bed – Pottery Barn Knockoff
DIY Vent Hood Plans and Kitchen UpdateDIY Vent Hood Plans and Kitchen Update

Footer

Privacy Policy

Rest assured that The Inspired Workshop will never sell or distribute your name or email address! Please be aware though that we do offer advertisements and in order to place relevant ads for your viewing, tracking cookies are used. Tracking cookies are small text files that are stored on your computer, which are only used to analyze your viewing preferences while on this site! You do not have to allow tracking cookies to enjoy this site and you may disable them in your web browser! Thanks!

Disclosure

Although I am sometimes given free product to review or am paid to help promote certain products/websites, all opinions on this website are 100% my OWN!! I only work with brands that I truly use and LOVE, and I have no problem turning down offers from brands that I do not feel are great quality, or would not use!! I promote many brands without incentive as well, I just enjoy sharing anything and everything I have found in hopes of make building/crafting simple enough everyone can do it!! You can be certain that if I am promoting it, I truly LOVE it!!

Tags

barn door bathroom bench chevron Christmas Decor concrete console table countertops dining bench dining table distressed finish diy fall decor farmhouse bench fireplace gift ideas holiday decor Home Depot industrial kitchen reno kitchen renovation knockoff makeover mantle media cabinet one room challenge outdoor furniture painting cabinets pallet wood playroom pottery barn Restoration Hardware review rope storage table table settings vanity wall art wall decor wall hanging wardrobe west elm winter decor wreath

Copyright © 2021 ยท Lifestyle Pro on Genesis Framework ยท WordPress ยท Log in

We use cookies to ensure that we give you the best experience on our website. If you continue to use this site we will assume that you are happy with it.OkNo